
一、前言
用官网的介绍来说,这其实是专为Nuxt开发人员设计的一款强大的基于文件系统的CMS 系统。官方文档地址:content.nuxt.com/, 这是一个比较新的版本,我暂时没有找到比较好的中文翻译站点,我建议大家直接看官网原文档,避免因为版本不同而踩坑。
二、页面布局设计
这里我参考了一些博客站点的设计,我希望左边是一个合集的展示,点击专栏,右侧显示出具体的文章列表,点击文章后进入详细内容查看页面。大概得示意图如下。

三、整合 NuxtContent
1. 安装模块
bash
npx nuxt module add content不出意外的话,你应该会碰到以下报错
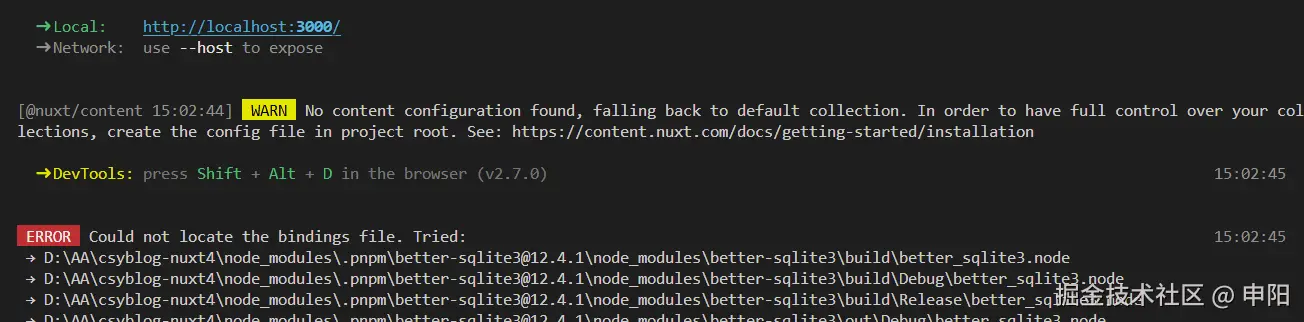
不要慌,首先我是完全按照官方文档进行操作的,如果有问题,肯定会有人反馈,所以第一时间我就去
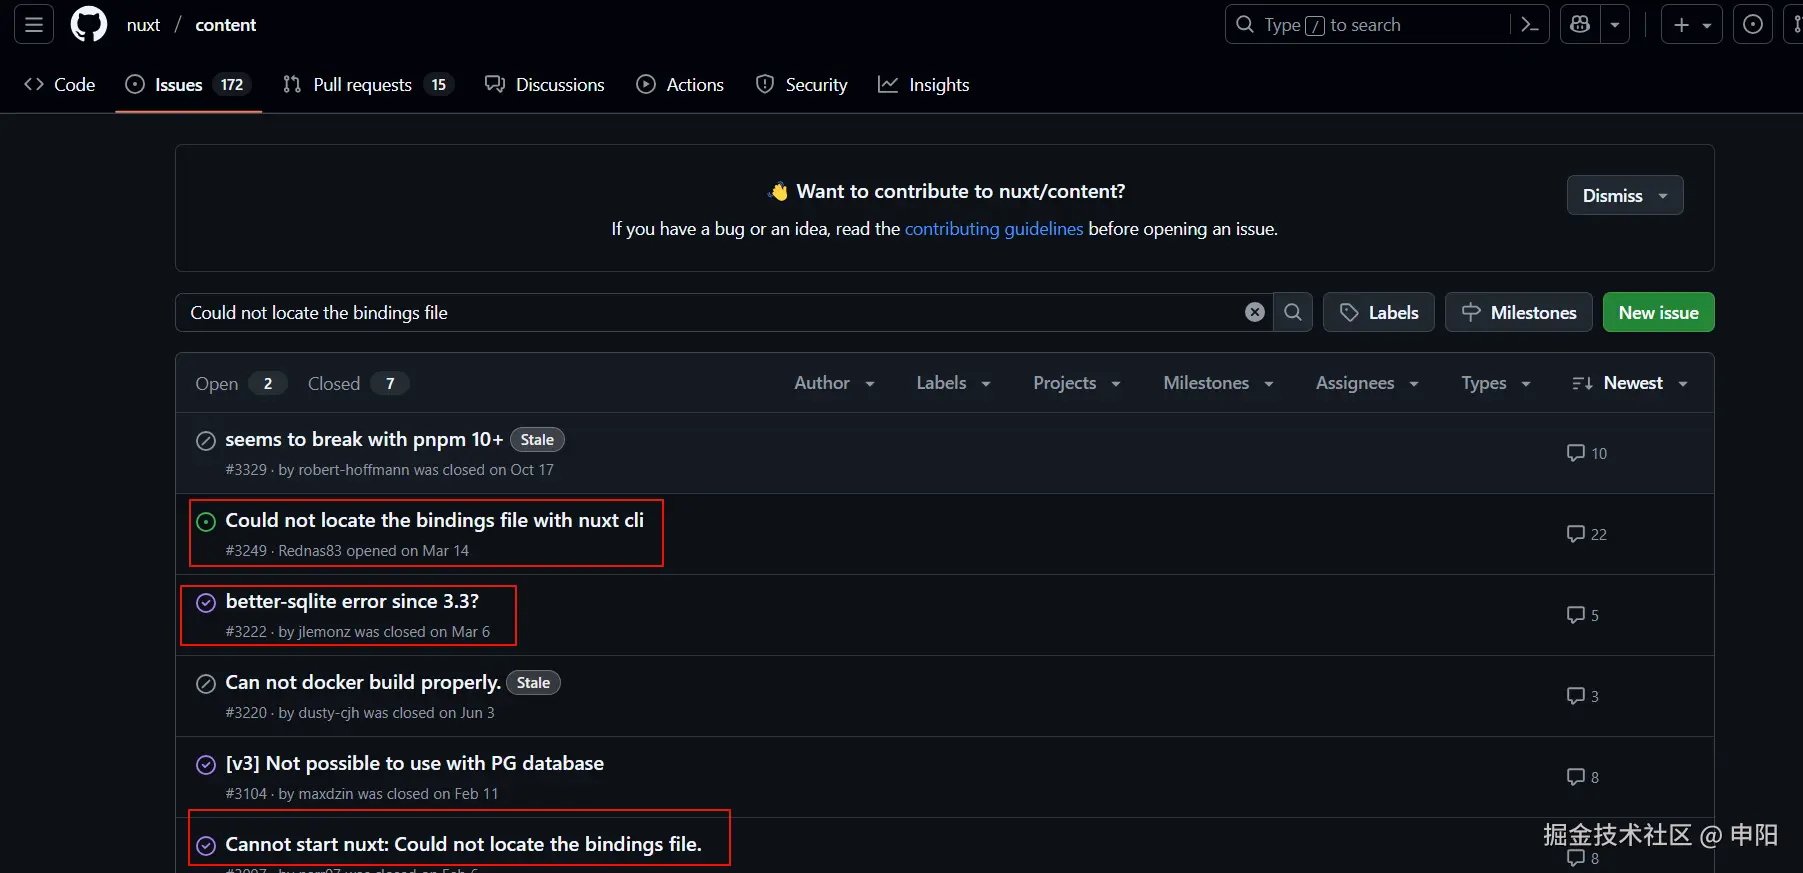
github的issues里翻了一下,果不其然,有很多人都反馈了这个问题,感兴趣的自己去了解一下。这里我给出直达链接:github.com/nuxt/conten...node版本过高,在pnpm@10之后有一些破坏性的更新。
重新安装一下一来
pnpm i,我发现了这个
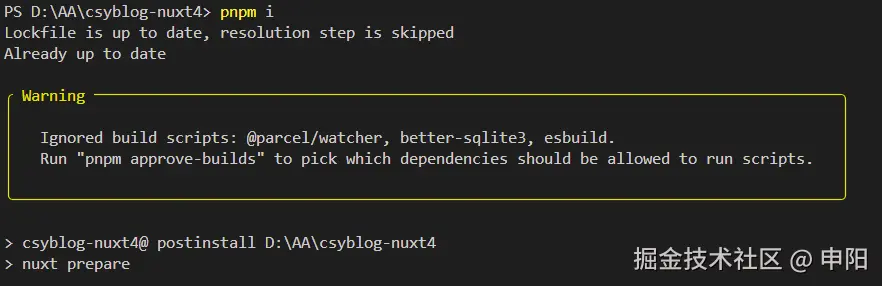
根据提示,我尝试了一下执行pnpm approve-builds, 并且勾选上以下依赖

报错,安装不成功

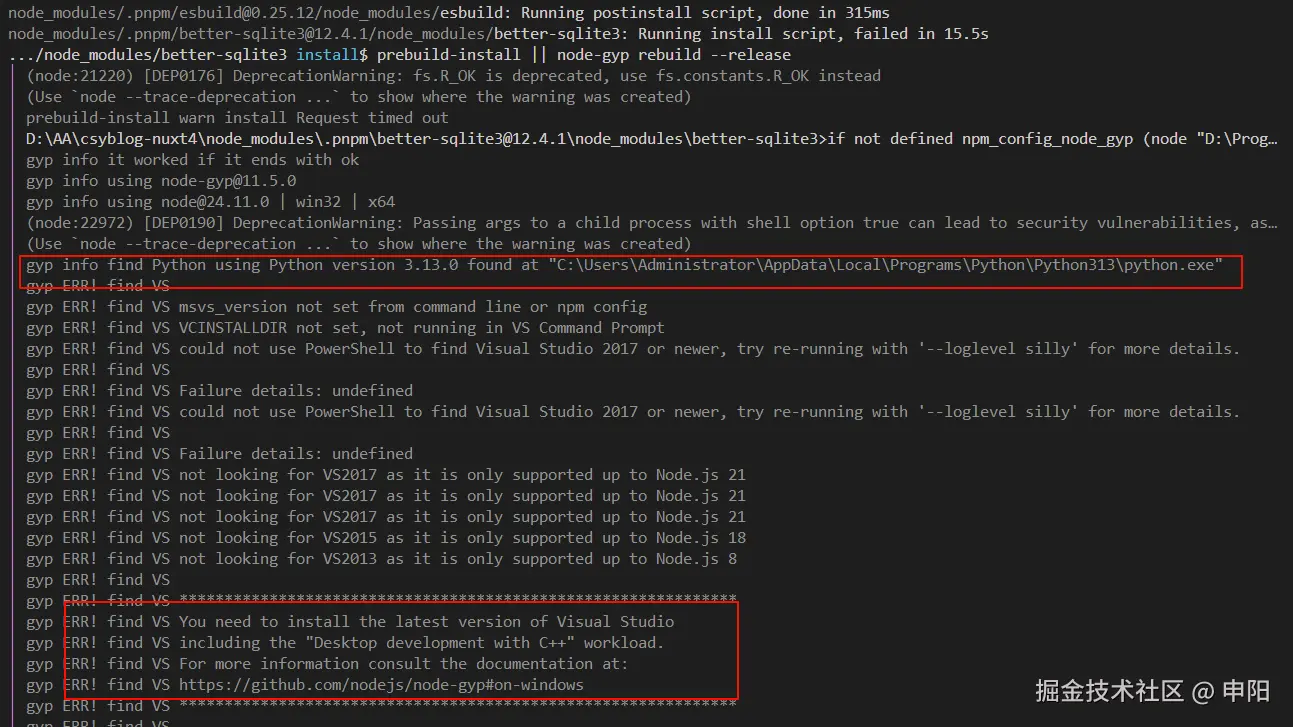 大致意思是说,它需要依赖我本地的
 Visual Studio 来进行编译,还和 c++有点关系,说巧不巧,我前几天刚把这玩意卸载了,之前学习c#的时候装过。我肯定不会再装回去了,这有点反直觉了,难道我用这个还得为你装个本地的编译器嘛。我都懒得去试这个解决方案,我觉得很不合理。
我又去官网扫了一遍 , 搜了一下关键词
better-sqlite3
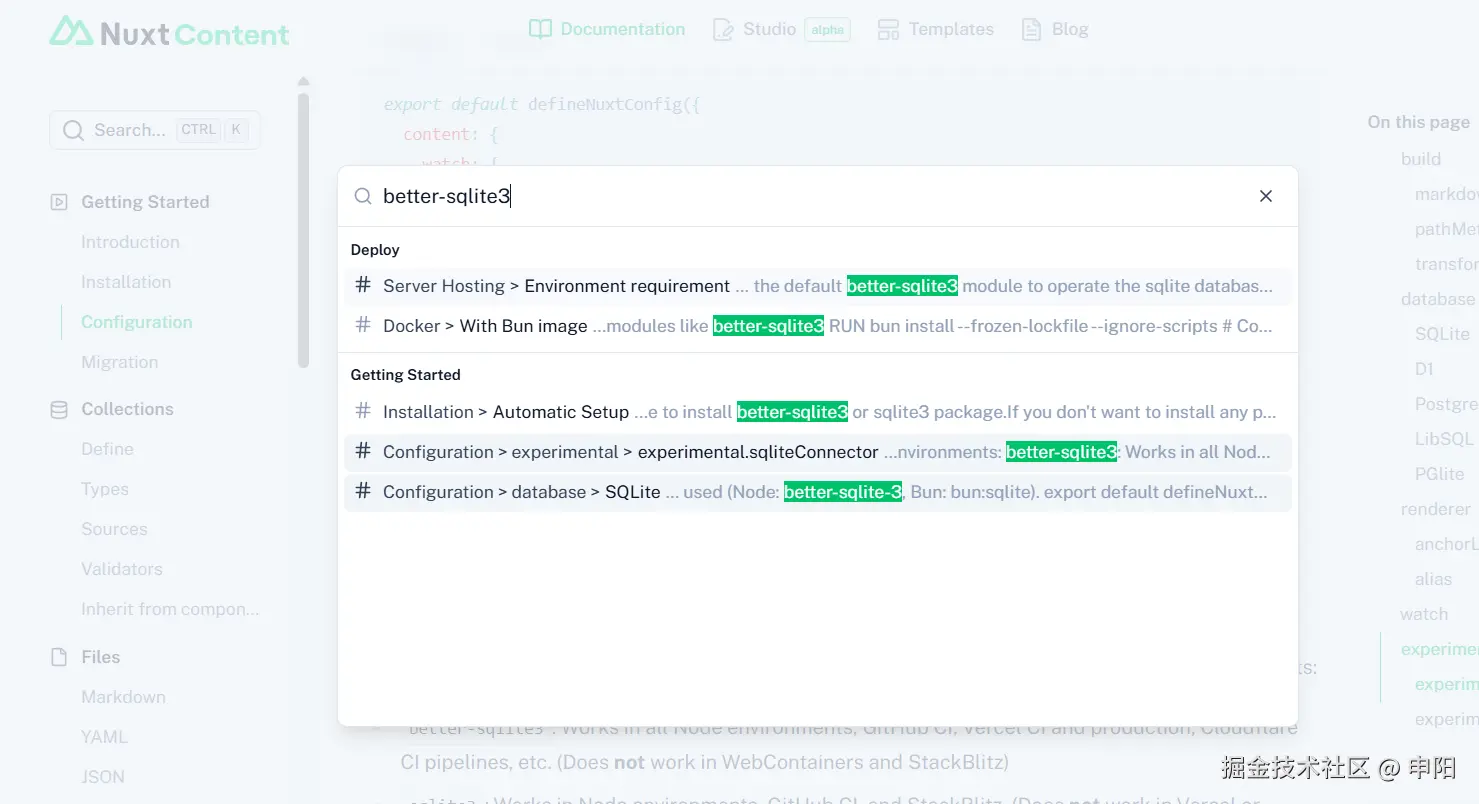
非常好,install 的时候官方这里有提示
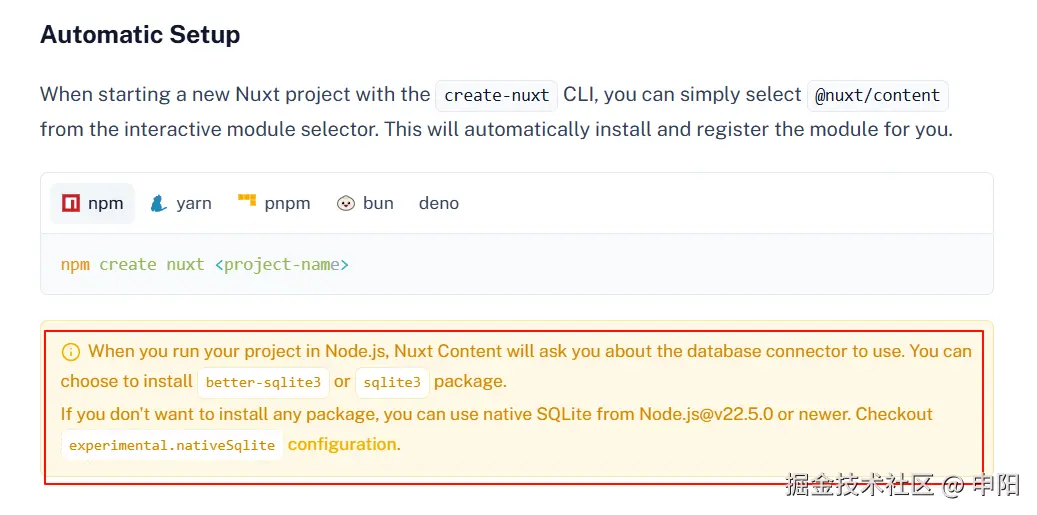
修改配置
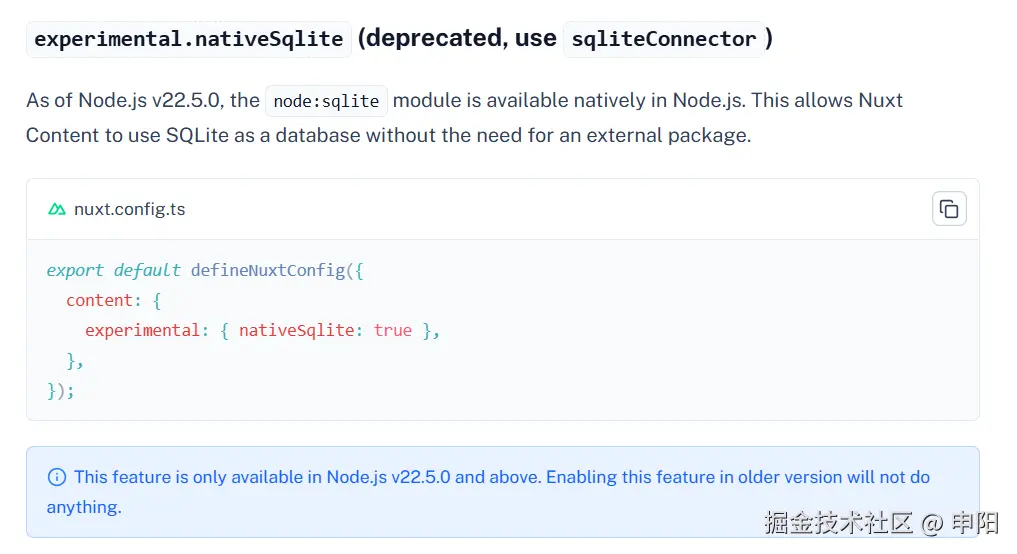
重新启动项目,运行成功。
问题解决。
将刚刚执行 pnpm approve-builds 造成的影响还原
- 删除生成的
pnpm-workspace.yaml文件 - 卸载
sqlite3相关依赖
反省,看文档还是不够仔细啊! 耽误了一些时间,不过我觉得这个排查步骤还是比较有意义的,所以花了大量篇幅记录下来了,希望对看我博客的你能有所帮助。
2. 组织我们的文件结构
1. 页面结构
ini
pages
├─ blog
│  ├─ index.vue      # 默认加载页面
│  └─ [...slug].vue  # 动态详情页
├─ about.vue
├─ index.vue
└─ tools.vue
2. 文档结构 (没有 content 目录自己新建一个)
css
content
└─ blog
   └─ v2h
      ├─ day1.md
      └─ day2.md
这里简单解释一下,
blog是一个合集,表示这里存放的是所有博客文章,v2h意思是value 2 hours每天两小时这个专栏的意思,day1.md则表示专栏下的文章。
3. 读取文件内容
接下来就是将我们的博客文章,读取到页面中。
首先我们需要定义一个配置文件,告知blog目录,作为合集配置
1. 新建 content.config.ts
typescript
import { defineCollection, defineContentConfig } from '@nuxt/content'

export default defineContentConfig({
    collections: {
        blog: defineCollection({
            type: 'page',
            source: 'blog/**/*.md',

        })
    }
})
2. 测试一下api
新建一些文档,目录结构如下
bash
content
└─ blog
   ├─ miniapp      # 小程序专栏
   │  └─ aaa.md
   └─ v2h         # 每天两小时专栏合集
      ├─ day1.md
      └─ day2.md
在 blog/index.vue中读取文件导航信息。
html
<script setup lang="ts">
const { data } = await useAsyncData('navigation', () => {
  return queryCollectionNavigation('blog')
})
</script>
<template>
  <div>博客</div>
  <!-- <div>{{ allPosts }}</div> -->
  <div>{{ data }}</div>
</template>
<style scoped lang="scss"></style>
查看输出内容
json
[
    {
        "title": "Blog",
        "path": "/blog",
        "stem": "blog",
        "children": [
            {
                "title": "Miniapp",
                "path": "/blog/miniapp",
                "stem": "blog/miniapp",
                "children": [
                    {
                        "title": "Aaa",
                        "path": "/blog/miniapp/aaa",
                        "stem": "blog/miniapp/aaa"
                    }
                ],
                "page": false
            },
            {
                "title": "V2h",
                "path": "/blog/v2h",
                "stem": "blog/v2h",
                "children": [
                    {
                        "title": "Day1",
                        "path": "/blog/v2h/day1",
                        "stem": "blog/v2h/day1"
                    },
                    {
                        "title": "Day2",
                        "path": "/blog/v2h/day2",
                        "stem": "blog/v2h/day2"
                    }
                ],
                "page": false
            }
        ],
        "page": false
    }
]
返回了整个文档结构。有了这个我么就可以轻松的组织好左侧的目录结构了。

html
<script setup lang="ts">
const { data } = await useAsyncData('navigation', () => {
  return queryCollectionNavigation('blog')
})
</script>
<template>
  <div class="full-height-container grid grid-cols-5 gap-6 p-6">
    <!-- 左侧导航栏 -->
    <div class="col-span-1 bg-white rounded-xl shadow-lg overflow-hidden flex flex-col">
      <div class="p-4 border-b border-gray-100">
        <h2 class="text-lg font-semibold text-gray-800">博客专栏</h2>
      </div>
      <ul class="menu menu-lg rounded-box w-full h-full">
        <li v-for="columns in data![0]!.children">
          <details open>
            <summary>{{ columns.title }}</summary>
            <ul>
              <li v-for="article in columns.children">
                <a>{{ article.title }}</a>
              </li>
            </ul>
          </details>
        </li>
      </ul>
    </div>

    <!-- 右侧内容区 -->
    <div class="col-span-4 bg-white rounded-xl shadow-lg flex flex-col overflow-hidden">{{ data }}</div>
  </div>
</template>
完善两点,基本上就成型了。
- 点击一级菜单的时候右侧分页展示专栏下所有文章列表
- 点击子集菜单,直接进入文章详情
四、最终成果展示
示例代码:
blog/index.vue
html
<script setup lang="ts">
import type { ContentNavigationItem } from '@nuxt/content'

const currentPage = ref<ContentNavigationItem[]>([])
const router = useRouter()
const { data } = await useAsyncData('navigation', () => {
  return queryCollectionNavigation('blog', ['description'])
})

const handleColumnsClick = async (title: string) => {
  if (!data.value?.[0]?.children) {
    console.warn('No navigation data found')
    return
  }
  // 过滤匹配的项
  const filteredItems = data.value[0].children.filter((item) => item.title === title)
  if (!filteredItems?.[0]?.children) {
    console.warn('No Content data found')
    return
  }
  currentPage.value = filteredItems[0]?.children
}

const handleArticleClick = async (path: string) => {
  await navigateTo(path)
}
</script>
<template>
  <div class="full-height-container grid grid-cols-5 p-6">
    <!-- 左侧导航栏 -->
    <div class="col-span-1 bg-white rounded-xl shadow-lg overflow-hidden flex flex-col">
      <div class="p-4 border-b border-gray-100">
        <h2 class="text-lg font-semibold text-gray-800">博客专栏</h2>
      </div>
      <ul class="menu menu-lg rounded-box w-full h-full">
        <li v-for="columns in data![0]!.children">
          <details open>
            <summary @click="handleColumnsClick(columns.title)">{{ columns.title }}</summary>
            <ul class="before:w-px">
              <li v-for="article in columns.children">
                <a @click="handleArticleClick(article.path)">{{ article.title }}</a>
              </li>
            </ul>
          </details>
        </li>
      </ul>
    </div>

    <!-- 右侧内容区 -->
    <div class="col-span-4 flex flex-col gap-4 px-20">
      <template v-for="item in currentPage" :key="item.path">
        <NuxtLink :to="item.path">
          <div class="card card-side bg-base-100 shadow-sm px-2">
            <figure>
              <img class="w-40 h-20" src="/images/image-20251031133400797.png" alt=" " />
            </figure>

            <div class="card-body">
              <h2 class="card-title">{{ item.title }}</h2>
              <p>{{ item.description }}</p>
            </div>
          </div>
        </NuxtLink>
      </template>
    </div>
  </div>
</template>
blog/[...slug].vue
vue
<script setup lang="ts">
const route = useRoute()
const { data: post } = await useAsyncData(route.path, () => {
  return queryCollection('blog').path(route.path).first()
})
</script>
<template>
  <div class="h-screen"><ContentRenderer v-if="post" :value="post" /></div>
</template>
<style scoped lang="scss"></style>
五、总结
到这里基本结构算是定下来了,后续就是内容的填充,以及观感上的优化了。
当然这并不是我们最终的目标,最终会集成后台管理系统,完成一套真正的 CMS 发布系统。所以如果你觉得麻烦,或者对于 NuxtContent并不感兴趣,完全可以忽略这一节内容。
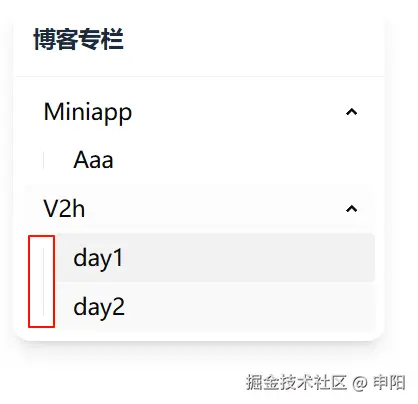
在进行样式调整的时候,我发现了一个
bug,inspira-ui 和 daisyui 的样式表变量存在命名冲突。比如:inspira-ui 定义
--border: oklch(0.922 0 0);是颜色属性,而 daisyui 定义的是宽度属性--border: 1px;导致属性值覆盖,这肯定不是个例,暂时记录一下,后续再考虑怎么解决。
目前会导致 daisyui 的菜单左边没有竖线
我目前的解决方案是直接在标签覆盖回去
<ul class="before:w-px">
千里之行,始于足下。你的"个人公司"从这第一个2小时开始。欢迎在评论区分享你的进展或遇到的卡点,我会逐一查看,尽可能的帮助解决。我们下一篇文章见!