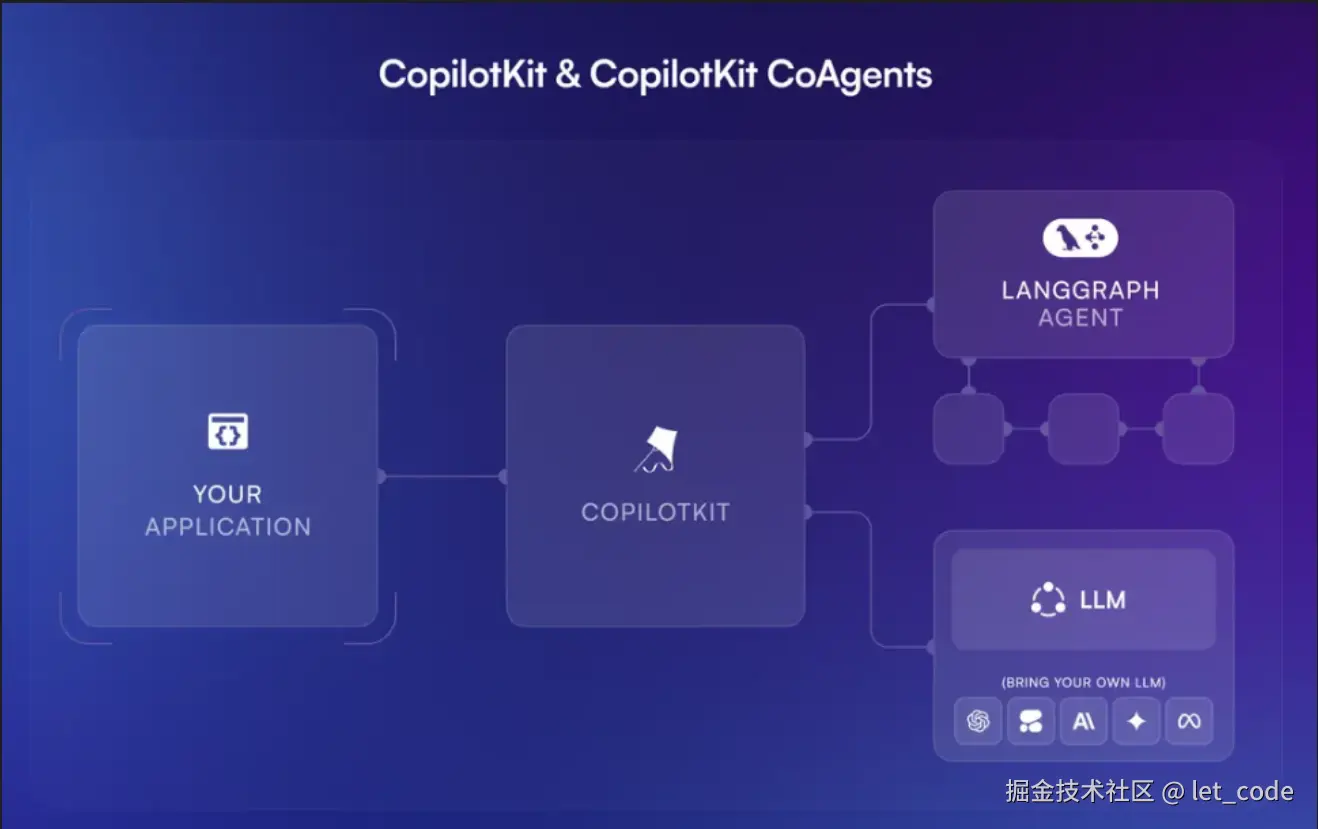
CopilotKit是什么
CopilotKit 将应用的逻辑、状态和用户上下文连接到 AI 代理。提供了构建、部署和监控 AI 辅助功能的工具,这些功能感觉直观、有用且深度集成。
CopilotKit特点
Generative UI(生成式 UI):使用自定义 UI 组件实时呈现agent的状态、进度、输出和工具调用。Human in the Loop(人机协同):用户可以在关键点指导agent。实现更可靠的输出。Shared State(共享状态):agent和应用状态保持同步。agent可以查看应用中的所有状态,应用可以实时响应agent。
CopilotKit和LangGraph的关系
聊天组件
前三个组件由@copilotkit/react-ui提供。
-
CopilotChat:灵活的聊天界面组件。 -
CopilotSidebar:可折叠和扩展的侧边栏聊天组件。 -
CopilotPopup: 可以打开和关闭的浮动聊天组件。 -
HeadLess UI: 支持自定义组件。tsximport { useCopilotChat } from "@copilotkit/react-core"; import { Role, TextMessage } from "@copilotkit/runtime-client-gql"; export function CustomChatInterface() { const { visibleMessages, appendMessage, setMessages, deleteMessage, reloadMessages, stopGeneration, isLoading, } = useCopilotChat(); const sendMessage = (content: string) => { appendMessage(new TextMessage({ content, role: Role.User })); }; return ( <div> {/* Implement your custom chat UI here */} </div> ); }
设置聊天组件的样式
- 样式:主要思路是通过样式覆盖的方式进行组件样式的设定。支持通过css变量、css类的方式进行组件样式和字体的定义。
- 图标:通过组件的
icons属性进行定义。 - 标签:通过组件的
labels属性进行自定义。
具体类名、变量名、icons属性、labels属性参考这里
自定义子组件
支持通过组件的props将自定义的子组件传递进去,从而实现子组件的自定义。
js
import { type AssistantMessageProps } from "@copilotkit/react-ui";
import { useChatContext } from "@copilotkit/react-ui";
import { Markdown } from "@copilotkit/react-ui";
import { SparklesIcon } from "@heroicons/react/24/outline";

import { CopilotKit } from "@copilotkit/react-core";
import { CopilotSidebar } from "@copilotkit/react-ui";
import "@copilotkit/react-ui/styles.css";

const CustomAssistantMessage = (props: AssistantMessageProps) => {
  const { icons } = useChatContext();
  const { message, isLoading, subComponent } = props;

  const avatarStyles = "bg-zinc-400 border-zinc-500 shadow-lg min-h-10 min-w-10 rounded-full text-white flex items-center justify-center";
  const messageStyles = "px-4 rounded-xl pt-2";

  const avatar = <div className={avatarStyles}><SparklesIcon className="h-6 w-6" /></div>

  return (
    <div className="py-2">
      <div className="flex items-start">
        {!subComponent && avatar}
        <div className={messageStyles}>
          {message && <Markdown content={message.content || ""} /> }
          {isLoading && icons.spinnerIcon}
        </div>
      </div>
      <div className="my-2">{subComponent}</div>
    </div>
  );
};


<CopilotKit>
  <CopilotSidebar AssistantMessage={CustomAssistantMessage} />
</CopilotKit>
子组件包括:

除此之外,markdown的渲染默认使用react-markdown。支持通过markdownTagRenderers属性来自定义markdown渲染组件。
Actions
允许 LLM 与应用程序的功能交互。当 LLM 调用 Action 时,可以提供自定义组件来可视化其执行和结果。
js
"use client" // only necessary if you are using Next.js with the App Router.
import { useCopilotAction } from "@copilotkit/react-core";

// Your custom components (examples - implement these in your app)
import { LoadingView } from "./loading-view"; // Your loading component
import { CalendarMeetingCardComponent, type CalendarMeetingCardProps } from "./calendar-meeting-card"; // Your meeting card component

export function YourComponent() {
  useCopilotAction({
    name: "showCalendarMeeting",
    description: "Displays calendar meeting information",
    parameters: [
      {
        name: "date",
        type: "string",
        description: "Meeting date (YYYY-MM-DD)",
        required: true
      },
      {
        name: "time",
        type: "string",
        description: "Meeting time (HH:mm)",
        required: true
      },
      {
        name: "meetingName",
        type: "string",
        description: "Name of the meeting",
        required: false
      }
    ],
    render: ({ status, args }) => {
      const { date, time, meetingName } = args;

      if (status === 'inProgress') {
        return <LoadingView />; // Your own component for loading state
      } else {
        const meetingProps: CalendarMeetingCardProps = {
          date: date,
          time,
          meetingName
        };
        return <CalendarMeetingCardComponent {...meetingProps} />;
      }
    },
  });

  return (
    <>...</>
  );
}
Agent State
Agent State组件允许可视化 CoAgents 的内部状态和进度。使用 CoAgents 时,可以提供自定义组件来呈现代理的状态。
js
"use client"; // only necessary if you are using Next.js with the App Router.

import { useCoAgentStateRender } from "@copilotkit/react-core";
import { Progress } from "./progress";

type AgentState = {
  logs: string[];
}

useCoAgentStateRender<AgentState>({
  name: "basic_agent",
  render: ({ state, nodeName, status }) => {
    if (!state.logs || state.logs.length === 0) {
      return null;
    }

    // Progress is a component we are omitting from this example for brevity.
    return <Progress logs={state.logs} />;
  },
});
前端工具
前端工具指的是前端定义的函数可以被 agent 调用。当函数被 agent 调用时,函数在客户端执行,使agent可以直接访问前端环境,从而实现agent对UI的控制和人机交互。
前端工具可以轻松实现:
- 读取或修改 React 组件状态
- 访问浏览器 API,如 localStorage、sessionStorage 或 cookie
- 触发 UI 更新或动画
- 与第三方前端库交互
- 执行需要用户即时浏览上下文的操作
实现
1.创建前端工具
需要使用 useFrontendTool 钩子创建一个前端工具。
js
//page.tsx
import { useFrontendTool } from "@copilotkit/react-core"

export function Page() {
  // ...

  useFrontendTool({
    name: "sayHello",
    description: "Say hello to the user",
    parameters: [
      {
        name: "name",
        type: "string",
        description: "The name of the user to say hello to",
        required: true,
      },
    ],
    handler: async ({ name }) => {
      alert(`Hello, ${name}!`);
    },
  });

  // ...
}
2.修改代理
安装 CopilotKit SDK npm install @copilotkit/sdk-js。
要访问 CopilotKit 提供的前端工具,可以在代理的状态定义中继承 CopilotKitState :
ts
import { Annotation } from "@langchain/langgraph";
import { CopilotKitStateAnnotation } from "@copilotkit/sdk-js/langgraph";

export const YourAgentStateAnnotation = Annotation.Root({
    yourAdditionalProperty: Annotation<string>,
    ...CopilotKitStateAnnotation.spec,
});
export type YourAgentState = typeof YourAgentStateAnnotation.State;
之后,代理的状态将包括 copilotkit 属性,其中包含可以访问和调用的前端工具。
agent调用前端工具:
ts
async function agentNode(state: YourAgentState, config: RunnableConfig): Promise<YourAgentState> {
    // Access the tools from the copilotkit property

    const tools = state.copilotkit?.actions;
    const model = ChatOpenAI({ model: 'gpt-4o' }).bindTools(tools);

    // ...
}
Generative UI
用自定义 UI 组件实时呈现 agent 的状态、进度、输出和工具调用。
主要有三种方式使用生成式UI:
- 后端工具:通过生成式UI组件渲染工具的调用
- 前端工具:为agent提供前端工具来显示自定义组件并且驱动UI
- agent 状态:用自定义组件来显示agent的状态、进度和输出
后端工具
工具是 LLM 调用预定义的(通常是确定性函数)的一种方式。CopilotKit 允许在 UI 中将这些工具呈现为自定义组件,我们称之为生成式 UI。
简而言之就是允许我们向用户展示agent正在执行的操作,尤其是当我们调用工具时,允许完全自定义工具在聊天中的呈现方式。
jsx
//agent.ts
import { ChatOpenAI } from "@langchain/openai";
import { tool } from "@langchain/core/tools";
import { z } from "zod";

const get_weather = tool(
  (args) => {
    return `The weather for ${args.location} is 70 degrees.`;
  },
  {
    name: "get_weather",
    description: "Get the weather for a given location.",
    schema: z.object({
      location: z.string().describe("The location to get weather for"),
    }),
  }
);

async function chat_node(state: AgentState, config: RunnableConfig) {
  const model = new ChatOpenAI({ temperature: 0, model: "gpt-4o" });
  const modelWithTools = model.bindTools([get_weather]);

  const response = await modelWithTools.invoke([
    new SystemMessage("You are a helpful assistant."),
    ...state.messages,
  ], config);

  // ...
}前端通过useCopilotAction钩子在UI中呈现:
jsx
//page.tsx
import { useRenderToolCall } from "@copilotkit/react-core";
// ...

const YourMainContent = () => {
  // ...
  useRenderToolCall({
    name: "get_weather",// 注意name保持一致
    render: ({status, args}) => {
      return (
        <p className="text-gray-500 mt-2">
          {status !== "complete" && "Calling weather API..."}
          {status === "complete" && `Called the weather API for ${args.location}.`}
        </p>
      );
    },
  });
  // ...
}
useDefaultTool 捕获所有没有专用渲染器的工具。
jsx
//page.tsx
import { useDefaultTool } from "@copilotkit/react-core";
// ...

const YourMainContent = () => {
  // ...
  useDefaultTool({
    render: ({ name, args, status, result }) => {
      return (
        <div style={{ color: "black" }}>
          <span>
            {status === "complete" ? "✓" : "⏳"}
            {name}
          </span>
          {status === "complete" && result && (
            <pre>{JSON.stringify(result, null, 2)}</pre>
          )}
        </div>
      );
    },
  });
  // ...
}
前端工具
定义 LangGraph agent 可以调用的客户端函数,执行完全在用户的浏览器中进行。当agent调用前端工具时,逻辑会在客户端运行,使agent可以直接访问前端环境。一般在agent需要和客户端交互时使用。
使用 useFrontendTool 钩子创建一个前端工具:
tsx
// page.tsx
import { useFrontendTool } from "@copilotkit/react-core"

export function Page() {
  // ...

  useFrontendTool({
    name: "sayHello",
    description: "Say hello to the user",
    parameters: [
      {
        name: "name",
        type: "string",
        description: "The name of the user to say hello to",
        required: true,
      },
    ],
    handler({ name }) {
      // Handler returns the result of the tool call
      return { currentURLPath: window.location.href, userName: name };
    },
    render: ({ args }) => {
      // Renders UI based on the data of the tool call
      return (
        <div>
          <h1>Hello, {args.name}!</h1>
          <h1>You're currently on {window.location.href}</h1>
        </div>
      );
    },
  });

  // ...
}
agent 访问前端工具:
tsx
//agent.ts
import { Annotation } from "@langchain/langgraph";
import { CopilotKitStateAnnotation } from "@copilotkit/sdk-js/langgraph";

export const YourAgentStateAnnotation = Annotation.Root({
    yourAdditionalProperty: Annotation<string>,
    ...CopilotKitStateAnnotation.spec,
});
export type YourAgentState = typeof YourAgentStateAnnotation.State;

//现在,agent的状态将包括 copilotkit 属性,其中包含可以访问和调用的前端工具。
async function agentNode(state: YourAgentState, config: RunnableConfig): Promise<YourAgentState> {
    // Access the tools from the copilotkit property

    const tools = state.copilotkit?.actions;
    const model = ChatOpenAI({ model: 'gpt-4o' }).bindTools(tools);

    // ...
}
agent 状态
所有 LangGraph agent 都是状态化的。这意味着当 agent 通过节点时,一个状态对象会在它们之间传递,以保持会话的整体状态。CopilotKit 允许使用自定义 UI 组件(生成式 UI)在应用程序中呈现此状态。
ts
// agent.ts
import { RunnableConfig } from "@langchain/core/runnables";
import { ChatOpenAI } from "@langchain/openai";
import { Annotation } from "@langchain/langgraph";
import { SystemMessage } from "@langchain/core/messages";
import { copilotkitEmitState, CopilotKitStateAnnotation } from "@copilotkit/sdk-js/langgraph";

type Search = {
  query: string;
  done: boolean;
}

export const AgentStateAnnotation = Annotation.Root({
  searches: Annotation<Search[]>,
  ...CopilotKitStateAnnotation.spec,
});

async function chat_node(state: AgentState, config: RunnableConfig) {
  state.searches = [
    { query: "Initial research", done: false },
    { query: "Retrieving sources", done: false },
    { query: "Forming an answer", done: false },
  ];

  // We can call copilotkit_emit_state to emit updated state
  // before a node finishes
  await copilotkitEmitState(config, state);

  // Simulate state updates
  for (const search of state.searches) {
    await new Promise(resolve => setTimeout(resolve, 1000));
    search.done = true;

    // We can also emit updates in a loop to simulate progress
    await copilotkitEmitState(config, state);
  }

  const response = await new ChatOpenAI({ model: "gpt-4o" }).invoke([
    new SystemMessage({ content: "You are a helpful assistant."}),
    ...state.messages,
  ], config);
前端通过 useCoAgentStateRender 在聊天中呈现agent的状态:
tsx
//page.tsx
import { useCoAgentStateRender } from "@copilotkit/react-core";

// For type safety, redefine the state of the agent. If you're using
// using LangGraph JS you can import the type here and share it.
type AgentState = {
  searches: {
    query: string;
    done: boolean;
  }[];
};

function YourMainContent() {
  // ...

  // styles omitted for brevity
  useCoAgentStateRender<AgentState>({
    name: "sample_agent", // the name the agent is served as
    render: ({ state }) => (
      <div>
        {state.searches?.map((search, index) => (
          <div key={index}>
            {search.done ? "✅" : "❌"} {search.query}{search.done ? "" : "..."}
          </div>
        ))}
      </div>
    ),
  });

  // ...

  return <div>...</div>;
}
除此之外还允许在聊天之外呈现agent的状态:
tsx
//page.tsx
import { useCoAgent } from "@copilotkit/react-core";
// ...

// Define the state of the agent, should match the state of the agent in your LangGraph.
type AgentState = {
  searches: {
    query: string;
    done: boolean;
  }[];
};

function YourMainContent() {
  // ...

  const { state } = useCoAgent<AgentState>({
    name: "sample_agent", // the name the agent is served as
  })

  // ...

  return (
    <div>
      {/* ... */}
      <div className="flex flex-col gap-2 mt-4">
        {state.searches?.map((search, index) => (
          <div key={index} className="flex flex-row">
            {search.done ? "✅" : "❌"} {search.query}
          </div>
        ))}
      </div>
    </div>
  )
}
Human in the Loop (HITL)
用户与 agent 协作处理复杂任务。
主要有三种方式实现人机交互:
- 基于中断
- 基于前端工具
- 基于节点
基于中断
基础
需要一个状态属性来存储名称:
ts
//agent.ts
// ...
import { Annotation } from "@langchain/langgraph";
import { CopilotKitStateAnnotation } from "@copilotkit/sdk-js/langgraph";
// ...

// This is the state of the agent.
// It inherits from the CopilotKitState properties from CopilotKit.
export const AgentStateAnnotation = Annotation.Root({
  agentName: Annotation<string>,
  ...CopilotKitStateAnnotation.spec,
});
export type AgentState = typeof AgentStateAnnotation.State;
在LangGraph 代理中调用 interrupt:
ts
//agent.ts
import { interrupt } from "@langchain/langgraph";
import { SystemMessage } from "@langchain/core/messages";
import { ChatOpenAI } from "@langchain/openai";

// add the agent state definition from the previous step
export const AgentStateAnnotation = Annotation.Root({
    agentName: Annotation<string>,
    ...CopilotKitStateAnnotation.spec,
});
export type AgentState = typeof AgentStateAnnotation.State;

async function chat_node(state: AgentState, config: RunnableConfig) {
    const agentName = state.agentName
    ?? interrupt("Before we start, what would you like to call me?");

    // Tell the agent its name
    const systemMessage = new SystemMessage({
        content: `You are a helpful assistant named ${agentName}...`,
    });

    const response = await new ChatOpenAI({ model: "gpt-4o" }).invoke(
        [systemMessage, ...state.messages],
        config
    );

    return {
        ...state,
        agentName,
        messages: response,
    };
}
前端使用 useLangGraphInterrupt 钩子,为终中断提供一个要渲染的组件,然后使用用户的响应调用 resolve。
tsx
//page.tsx
import { useLangGraphInterrupt } from "@copilotkit/react-core";
// ...

const YourMainContent = () => {
// ...
// styles omitted for brevity
useLangGraphInterrupt({
    render: ({ event, resolve }) => (
        <div>
            <p>{event.value}</p>
            <form onSubmit={(e) => {
                e.preventDefault();
                resolve((e.target as HTMLFormElement).response.value);
            }}>
                <input type="text" name="response" placeholder="Enter your response" />
                <button type="submit">Submit</button>
            </form>
        </div>
    )
});
// ...

return <div>{/* ... */}</div>
}
高级
在代理中呈现多个中断事件时,UI 中的多个 useLangGraphInterrupt 钩子调用之间可能会发生冲突。出于这个原因,钩子可以接受一个 enabled 参数,该参数将有条件地应用它:
定义两个不同的中断,通过type进行区分:
ts
//agent.ts
import { interrupt } from "@langchain/langgraph";
import { SystemMessage } from "@langchain/core/messages";
import { ChatOpenAI } from "@langchain/openai";

// ... your full state definition

async function chat_node(state: AgentState, config: RunnableConfig) {
  state.approval = await interrupt({ type: "approval", content: "please approve" });

  if (!state.agentName) {
    state.agentName = await interrupt({ type: "ask", content: "Before we start, what would you like to call me?" });
  }

  // Tell the agent its name
  const systemMessage = new SystemMessage({
    content: `You are a helpful assistant...`,
  });

  const response = await new ChatOpenAI({ model: "gpt-4o" }).invoke(
    [systemMessage, ...state.messages],
    config
  );

  return {
    ...state,
    messages: response,
  };
}
前端定义多个处理程序:
tsx
//page.tsx
import { useLangGraphInterrupt } from "@copilotkit/react-core";
// ...

const ApproveComponent = ({ content, onAnswer }: { content: string; onAnswer: (approved: boolean) => void }) => (
    // styles omitted for brevity
    <div>
        <h1>Do you approve?</h1>
        <button onClick={() => onAnswer(true)}>Approve</button>
        <button onClick={() => onAnswer(false)}>Reject</button>
    </div>
)

const AskComponent = ({ question, onAnswer }: { question: string; onAnswer: (answer: string) => void }) => (
// styles omitted for brevity
    <div>
        <p>{question}</p>
        <form onSubmit={(e) => {
            e.preventDefault();
            onAnswer((e.target as HTMLFormElement).response.value);
        }}>
            <input type="text" name="response" placeholder="Enter your response" />
            <button type="submit">Submit</button>
        </form>
    </div>
)

const YourMainContent = () => {
    // ...
    useLangGraphInterrupt({
        enabled: ({ eventValue }) => eventValue.type === 'ask',
        render: ({ event, resolve }) => (
            <AskComponent question={event.value.content} onAnswer={answer => resolve(answer)} />
        )
    });

    useLangGraphInterrupt({
        enabled: ({ eventValue }) => eventValue.type === 'approval',
        render: ({ event, resolve }) => (
            <ApproveComponent content={event.value.content} onAnswer={answer => resolve(answer)} />
        )
    });

    // ...
}
选择自定义聊天 UI 时,某些情况可能需要预处理中断事件的传入值,甚至需要完全解析它而不显示其 UI。这可以使用 handeer 属性来实现,该属性不需要返回一个 React 组件。 处理程序的返回值将作为结果参数传递给 render 方法。
tsx
//page.tsx
// We will assume an interrupt event in the following shape
type Department = 'finance' | 'engineering' | 'admin'
interface AuthorizationInterruptEvent {
    type: 'auth',
    accessDepartment: Department,
}

import { useLangGraphInterrupt } from "@copilotkit/react-core";

const YourMainContent = () => {
    const [userEmail, setUserEmail] = useState({ email: 'example@user.com' })
    function getUserByEmail(email: string): { id: string; department: Department } {
        // ... an implementation of user fetching
    }

    // ...
    // styles omitted for brevity
    useLangGraphInterrupt({
        handler: async ({ result, event, resolve }) => {
            const { department } = await getUserByEmail(userEmail)
            if (event.value.accessDepartment === department || department === 'admin') {
                // Following the resolution of the event, we will not proceed to the render method
                resolve({ code: 'AUTH_BY_DEPARTMENT' })
                return;
            }

            return { department, userId }
        },
        render: ({ result, event, resolve }) => (
            <div>
                <h1>Request for {event.value.type}</h1>
                <p>Members from {result.department} department cannot access this information</p>
                <p>You can request access from an administrator to continue.</p>
                <button
                    onClick={() => resolve({ code: 'REQUEST_AUTH', data: { department: result.department, userId: result.userId } })}
                >
                    Request Access
                </button>
                <button
                    onClick={() => resolve({ code: 'CANCEL' })}
                >
                    Cancel
                </button>
            </div>
        )
    });
    // ...

    return <div>{/* ... */}</div>
}
基于前端工具
前端工具可以用在多种方式上。其中一种方式是有人工介入的流程,工具的响应由用户的决定来控制。
在这个例子中,我们将模拟一个用于执行命令的"批准"流程。首先,使用useHumanInTheLoop钩子来创建一个提示用户批准的工具。
要访问由 CopilotKit 提供的前端工具,您可以在agent的状态定义中继承自 CopilotKitState:
ts
//agent.ts
import { Annotation } from "@langchain/langgraph";
import { CopilotKitStateAnnotation } from "@copilotkit/sdk-js/langgraph";

export const YourAgentStateAnnotation = Annotation.Root({
    yourAdditionalProperty: Annotation<string>,
    ...CopilotKitStateAnnotation.spec,
});
export type YourAgentState = typeof YourAgentStateAnnotation.State;
经上述操作,agent的状态将包括 copilotkit 属性,其中包含可以访问和调用的前端工具。接下来就可以调用前端工具方法:
ts
//agent.tsx
async function agentNode(state: YourAgentState, config: RunnableConfig): Promise<YourAgentState> {
    // Access the tools from the copilotkit property

    const tools = state.copilotkit?.actions;
    const model = ChatOpenAI({ model: 'gpt-4o' }).bindTools(tools);

    // ...
}
基于节点
LangGraph 和 CopilotKit 现在都不鼓励使用基于节点的中断。从 LangGraph 0.2.57 开始,推荐的设置断点的方法是使用 interrupt 函数 ,因为它简化了人机交互模式。
想要了解可以参考这里
状态共享
在 UI 和 LangGraph agent 状态之间创建双向连接。
读取agent状态
不仅可以在聊天界面中使用实时代理状态,还可以在原生应用程序中使用。
LangGraph 是有状态的。在节点之间转换时,该状态将更新并传递到下一个节点。假设agent状态如下所示:
ts
//agent.ts
import { Annotation } from "@langchain/langgraph";
import { CopilotKitStateAnnotation } from "@copilotkit/sdk-js/langgraph";

export const AgentStateAnnotation = Annotation.Root({
    language: Annotation<"english" | "spanish">,
    ...CopilotKitStateAnnotation.spec,
});
export type AgentState = typeof AgentStateAnnotation.State;

async function chat_node(state: AgentState, config: RunnableConfig) {
  // If language is not defined, use a default value.
  const language = state.language ?? 'spanish'

  // ... add the rest of the node implementation and use the language variable

  return {
    // ... add the rest of state to return
    // return the language to make it available for the next nodes & frontend to read
    language
  }
}
前端调用 useCoAgent 钩子,传递agent的名称,并选择性地提供初始状态:
tsx
//pages.tsx
import { useCoAgent } from "@copilotkit/react-core";

// Define the agent state type, should match the actual state of your agent
type AgentState = {
  language: "english" | "spanish";
}

function YourMainContent() {
  const { state } = useCoAgent<AgentState>({
    name: "sample_agent",
    initialState: { language: "spanish" }  // optionally provide an initial state
  });

  // ...

  return (
    // style excluded for brevity
    <div>
      <h1>Your main content</h1>
      <p>Language: {state.language}</p> // [!code highlight]
    </div>
  );
}
useCoAgent 中的状态是响应式的,当代理的状态发生变化时会自动更新
在聊天中渲染 agent 状态
可以使用 useCoAgentStateRender 钩子。
tsx
//page.tsx
import { useCoAgentStateRender } from "@copilotkit/react-core";

// Define the agent state type, should match the actual state of your agent
type AgentState = {
  language: "english" | "spanish";
}

function YourMainContent() {
  // ...
  useCoAgentStateRender({
    name: "sample_agent",
    render: ({ state }) => {
      if (!state.language) return null;
      return <div>Language: {state.language}</div>;
    },
  });
  // ...
}
useCoAgentStateRender 中的状态是响应式的,当代理的状态发生变化时会自动更新。
写入agent状态
假设 agent 状态:
ts
//agebt.ts
import { Annotation } from "@langchain/langgraph";
import { CopilotKitStateAnnotation } from "@copilotkit/sdk-js/langgraph";

export const AgentStateAnnotation = Annotation.Root({
    language: Annotation<"english" | "spanish">,
    ...CopilotKitStateAnnotation.spec,
});
export type AgentState = typeof AgentStateAnnotation.State;
useCoAgent 返回一个 setState 函数,您可以使用该函数来更新代理状态。调用这个将更新代理状态并触发依赖于代理状态的任何内容的重新渲染。
tsx
//page.tsx
import { useCoAgent } from "@copilotkit/react-core";

// Define the agent state type, should match the actual state of your agent
type AgentState = {
  language: "english" | "spanish";
}

// Example usage in a pseudo React component
function YourMainContent() {
  const { state, setState } = useCoAgent<AgentState>({
    name: "sample_agent",
    initialState: { language: "spanish" }  // optionally provide an initial state
  });

  // ...

  const toggleLanguage = () => {
    setState({ language: state.language === "english" ? "spanish" : "english" });
  };

  // ...

  return (
    // style excluded for brevity
    <div>
      <h1>Your main content</h1>
      <p>Language: {state.language}</p>
      <button onClick={toggleLanguage}>Toggle Language</button>
    </div>
  );
}
高级用法
重新运行agent,并提示更改内容
新的 agent 状态将在下次 agent 运行时使用。如果您想手动重新运行它,请在useCoAgent钩子上使用run参数。 agent将重新运行,它不仅会获得最新的更新状态,还会获得可能取决于以前状态和当前状态之间的数据增量的提示 。
tsx
//page.tsx
import { useCoAgent } from "@copilotkit/react-core";
import { TextMessage, MessageRole } from "@copilotkit/runtime-client-gql";

// ...

function YourMainContent() {
  const { state, setState, run } = useCoAgent<AgentState>({
    name: "sample_agent",
    initialState: { language: "spanish" }  // optionally provide an initial state
  });

  // setup to be called when some event in the app occurs
  const toggleLanguage = () => {
    const newLanguage = state.language === "english" ? "spanish" : "english";
    setState({ language: newLanguage });

    // re-run the agent and provide a hint about what's changed
    run(({ previousState, currentState }) => {
      return new TextMessage({
        role: MessageRole.User,
        content: `the language has been updated to ${currentState.language}`,
      });
    });
  };

  return (
    // ...
  );
}
agent状态输入和输出
有些属性是内部处理的,而另一些则是 UI 传递用户输入的方式。此外,有些状态属性包含大量信息。在agent和 UI 之间来回同步它们可能成本高昂,而且可能没有实际好处。
假设状态如下:
tsx
//agent.ts
import { Annotation } from "@langchain/langgraph";
import { CopilotKitStateAnnotation } from "@copilotkit/sdk-js/langgraph";

const AgentState = Annotation.Root({
  ...CopilotKitStateAnnotation.spec,
  question: Annotation<string>, //期望LLM回答的问题
  answer: Annotation<string>,//LLM回应的答案
  resources: Annotation<string[]>,//用于LLM回答问题,不应向用户同步
})
agent定义输入输出:
ts
//agent.ts
  import { Annotation } from "@langchain/langgraph";
  import { CopilotKitStateAnnotation } from "@copilotkit/sdk-js/langgraph";

  // Divide the state to 3 parts

  // An input schema for inputs you are willing to accept from the frontend
  const InputAnnotation = Annotation.Root({
    ...CopilotKitStateAnnotation.spec,
    question: Annotation<string>,
  });

  // Output schema for output you are willing to pass to the frontend
  const OutputAnnotation = Annotation.Root({
    ...CopilotKitStateAnnotation.spec,
    answer: Annotation<string>,
  });

  // The full schema, including the inputs, outputs and internal state ("resources" in our case)
  export const AgentStateAnnotation = Annotation.Root({
    ...CopilotKitStateAnnotation.spec,
    ...OutputAnnotation.spec,
    ...InputAnnotation.spec,
    resources: Annotation<string[]>,
  });

  // Define a typed state that supports the entire
  export type AgentState = typeof AgentStateAnnotation.State;

  async function answerNode(state: AgentState, config: RunnableConfig) {
    const model = new ChatOpenAI()

    const systemMessage = new SystemMessage({
      content: `You are a helpful assistant. Answer the question: ${state.question}.`,
    });

    const response = await modelWithTools.invoke(
      [systemMessage, ...state.messages],
      config
    );

    // ...add the rest of the agent implementation
    // extract the answer, which will be assigned to the state soon
    const answer = response.content

    return {
      messages: response,
      // include the answer in the returned state
      answer,
    }
  }

  // finally, before compiling the graph, we define the 3 state components
  const workflow = new StateGraph({
    input: InputAnnotation,
    output: OutputAnnotation,
    // @ts-expect-error -- LangGraph does not expect a "full schema with internal properties".
    stateSchema: AgentStateAnnotation,
  })
    .addNode("answer_node", answerNode) // add all the different nodes and edges and compile the graph
    .addEdge(START, "answer_node")
    .addEdge("answer_node", END)
  export const graph = workflow.compile()
预测状态更新
一个LangGraph agent的状态更新是不连续的;仅在图中的节点转换之间进行。但是,图中单个节点运行往往需要许多秒,并且包含用户感兴趣的子步骤。
预测状态更新帮助我们向用户尽可能连续的反应 agent 正在执行的操作。
当你的LangGraph中的节点执行完毕时,其返回的状态成为唯一的真实来源。虽然中间状态更新对于实时反馈很有帮助,但任何你想持久化的更改都必须明确地包含在节点的最终返回状态中。否则,它们将在节点完成时被覆盖。
在状态中定义一个 observed_steps 字段,该字段将在agent编写报告的不同部分时更新。
ts
//agent.ts
import { Annotation } from "@langchain/langgraph";
import { CopilotKitStateAnnotation } from "@copilotkit/sdk-js/langgraph";

export const AgentStateAnnotation = Annotation.Root({
    observed_steps: Annotation<string[]>,  // Array of completed steps
    ...CopilotKitStateAnnotation.spec,
});
export type AgentState = typeof AgentStateAnnotation.State;
有两种发出状态更新的方式:手动预测和基于工具的预测。
手动预测状态更新
对于长时间运行的任务,可以逐步发出状态更新,作为最终状态的预测。在这个例子中,我们通过执行一系列带有每次更新之间一秒延迟的步骤来模拟一个长时间运行的任务。
ts
//agent.ts
import { copilotkitEmitState } from "@copilotkit/sdk-js/langgraph";
// ...
async function chat_node(state: AgentState, config: RunnableConfig) {
    // ...

    // Simulate executing steps one by one
    const steps = [
        "Analyzing input data...",
        "Identifying key patterns...",
        "Generating recommendations...",
        "Formatting final output..."
    ];

    for (const step of steps) {
        state.observed_steps = [...(state.observed_steps ?? []), step];
        copilotkitEmitState(config, state);
        await new Promise(resolve => setTimeout(resolve, 1000));
    }
}
这些预测将在代理运行时发出,允许您在确定最终状态之前跟踪其进度:
tsx
//page.tsx
import { useCoAgent, useCoAgentStateRender } from '@copilotkit/react-core';

// ...
type AgentState = {
    observed_steps: string[];
};

const YourMainContent = () => {
    // Get access to both predicted and final states
    const { state } = useCoAgent<AgentState>({ name: "sample_agent" });

    // Add a state renderer to observe predictions
    useCoAgentStateRender({
        name: "sample_agent",
        render: ({ state }) => {
            if (!state.observed_steps?.length) return null;
            return (
                <div>
                    <h3>Current Progress:</h3>
                    <ul>
                        {state.observed_steps.map((step, i) => (
                            <li key={i}>{step}</li>
                        ))}
                    </ul>
                </div>
            );
        },
    });

    return (
        <div>
            <h1>Agent Progress</h1>
            {state.observed_steps?.length > 0 && (
                <div>
                    <h3>Final Steps:</h3>
                    <ul>
                        {state.observed_steps.map((step, i) => (
                            <li key={i}>{step}</li>
                        ))}
                    </ul>
                </div>
            )}
        </div>
    )
}
基于工具预测状态更新
对于长时间运行的任务,您可以配置 CopilotKit 在执行特定工具调用时自动预测状态更新。在这个示例中,我们将配置 CopilotKit 在 LLM 调用步骤进度工具时预测状态更新。
ts
//agent.ts
import { copilotkitCustomizeConfig } from '@copilotkit/sdk-js/langgraph';

async function frontendActionsNode(state: AgentState, config: RunnableConfig): Promise<AgentState> {
    const modifiedConfig = copilotkitCustomizeConfig(config, {
        emitIntermediateState: [
        {
            stateKey: "observed_steps",
            tool: "StepProgressTool",
            toolArgument: "steps",
        },
        ],
    });

    const stepProgress = tool(
        async (args) => args,
        {
            name: "StepProgressTool",
            description: "Records progress by updating the steps array",
            schema: z.object({
                steps: z.array(z.string()),
            }),
        }
    );

    const model = new ChatOpenAI({
        model: "gpt-4o",
    }).bindTools([stepProgress]);

    const system_message = new SystemMessage("You are a task performer. Pretend doing tasks you are given, report the steps using StepProgressTool.")
    const response = await model.invoke([system_message, ...state.messages], modifiedConfig);


    if (response.tool_calls?.length) {
        return {
            messages: response;
            observed_steps: response.tool_calls[0].args.steps,
        }

    return { messages: response };
}
这些预测将在代理运行时发出,允许您在确定最终状态之前跟踪其进度:
tsx
//page.tsx
import { useCoAgent, useCoAgentStateRender } from '@copilotkit/react-core';

// ...
type AgentState = {
    observed_steps: string[];
};

const YourMainContent = () => {
    // Get access to both predicted and final states
    const { state } = useCoAgent<AgentState>({ name: "sample_agent" });

    // Add a state renderer to observe predictions
    useCoAgentStateRender({
        name: "sample_agent",
        render: ({ state }) => {
            if (!state.observed_steps?.length) return null;
            return (
                <div>
                    <h3>Current Progress:</h3>
                    <ul>
                        {state.observed_steps.map((step, i) => (
                            <li key={i}>{step}</li>
                        ))}
                    </ul>
                </div>
            );
        },
    });

    return (
        <div>
            <h1>Agent Progress</h1>
            {state.observed_steps?.length > 0 && (
                <div>
                    <h3>Final Steps:</h3>
                    <ul>
                        {state.observed_steps.map((step, i) => (
                            <li key={i}>{step}</li>
                        ))}
                    </ul>
                </div>
            )}
        </div>
    )
}
子图
一个子图简单地是作为另一个图中的节点使用的图。把它看作是LangGraph的封装:每个子图是一个自包含的单元,可以组合起来构建更大、更复杂的系统。
使用此功能不需要在agent端执行额外步骤。您需要做的就是在 useCoAgent 钩子中启用子图流:
tsx
  const { state, nodeName } = useCoAgent<AgentState>({
    name: "sample_agent",
    initialState: INITIAL_STATE,
    config: {
      streamSubgraphs: true,
    }
  });
子图节点将照常流式传输,你将能够使用 nodeName 变量查看哪个子图正在流式传输。您也可以直接从子图使用 interrupt()。