一、整体流程
|-------|--------|----------------------------------------|-------------------------|
| 步骤 | 类比 | 具体动作 | 对应文件 |
| ① 打地基 | 数据库 | 建库建表 | *.sql |
| ② 架钢筋 | 整合骨架 | 导包 + 3 份 XML 配置 | pom.xml + spring-*.xml |
| ③ 分楼层 | 分层代码 | entity → mapper → service → controller | *.java |
| ④ 接水电 | web 接入 | web.xml 配 DispatcherServlet + 编码过滤器 | web.xml |
| ⑤ 试运行 | 一键启动 | mvn tomcat7:run | 浏览器访问 |
|------------|-----|-------|-----------------------------|-------------|
| 层 | 英文名 | 比喻 | 职责 | 禁止做的事 |
| Controller | 控制层 | 前台接待员 | 收请求 → 调 Service → 返回页面/JSON | 不写 SQL/不做业务 |
| Service | 业务层 | 业务部门 | 组合 DAO 实现业务规则 + 事务控制 | 不直接连数据库 |
| Mapper | 持久层 | 仓库管理员 | 只负责 CRUD(SQL 或注解) | 不写业务逻辑 |
| domain | 模型层 | 货物本身 | 纯 Java Bean 封装数据 | 无业务方法 |
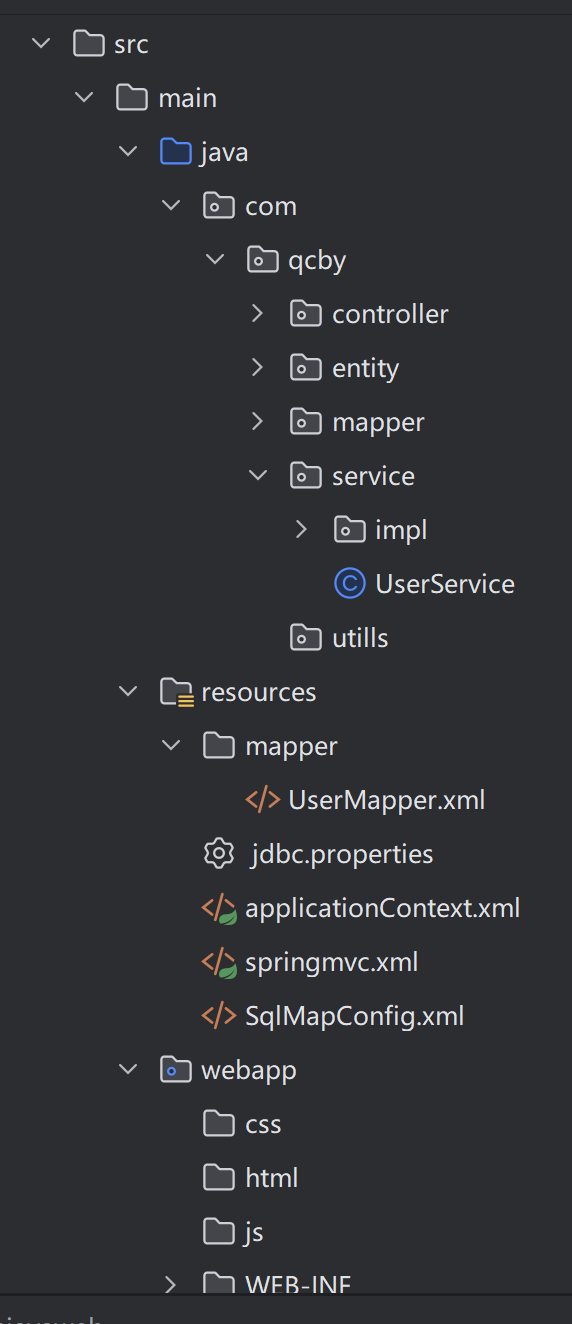
1.先创建数据库
2.创建实体类domain、mapper、service代码
3.写web层controller代码
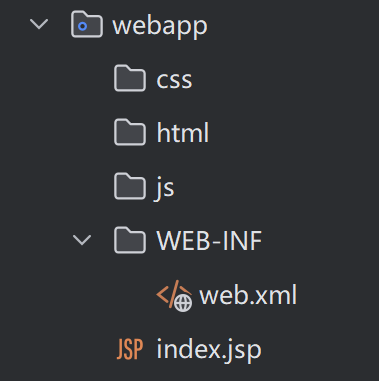
4.webapp层
web.xml(spring控制器):
<!-- 1. Spring 监听器:启动 Spring 容器 -->
<!-- 2. SpringMVC 前端控制器 -->
<!-- 3. 乱码过滤器 -->
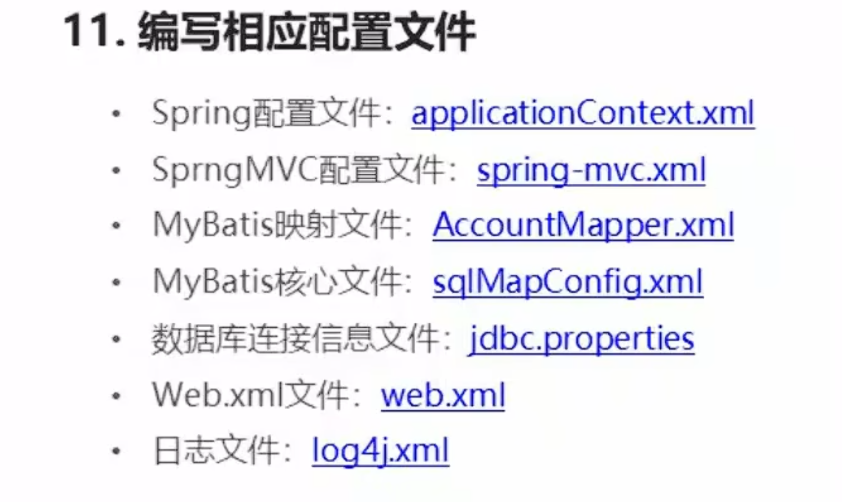
5.resource配置文件
二、mybatis层
|----------------|-----------------------------------------|------------------|
| 文件 | 作用 | 典型文件名 |
| MyBatis 核心配置文件 | 告诉 MyBatis 全局运行参数 (数据源、别名、插件、加载哪些映射文件等) | sqlMapConfig.xml |
| MyBatis 映射文件 | 写 SQL 语句 和 结果映射 (一个表/模块一套) | XxxMapper.xml |
AccountMapper.xml
XML
<?xml version="1.0" encoding="UTF-8" ?>
<!DOCTYPE mapper PUBLIC "-//mybatis.org//DTD Mapper 3.0//EN" "http://mybatis.org/dtd/mybatis-3-mapper.dtd" >
<mapper namespace="cn.tx.dao.AccountDao" >
<!--查询所有-->
<select id="findAll" resultType="cn.tx.domain.Account">
select * from account
</select>
</mapper>SqlMapConfig.xml
XML
<?xml version="1.0" encoding="UTF-8"?>
<!DOCTYPE configuration
PUBLIC "-//mybatis.org//DTD Config 3.0//EN"
"http://mybatis.org/dtd/mybatis-3-config.dtd">
<configuration>
<!-- 配置环境 -->
<environments default="mysql">
<environment id="mysql">
<transactionManager type="JDBC"/>
<dataSource type="POOLED">
<property name="driver" value="com.mysql.jdbc.Driver"/>
<property name="url" value="jdbc:mysql:///ssm"/>
<property name="username" value="root"/>
<property name="password" value="root"/>
</dataSource>
</environment>
</environments>
<!--加载映射配置文件-->
<mappers>
<mapper resource="mappers/AccountDao.xml" />
</mappers>
</configuration>三、spring和springmvc配置文件
1.spring配置文件applicationContext.xml
XML
<?xml version="1.0" encoding="UTF-8"?>
<beans xmlns="http://www.springframework.org/schema/beans"
xmlns:xsi="http://www.w3.org/2001/XMLSchema-instance"
xmlns:context="http://www.springframework.org/schema/context"
xmlns:aop="http://www.springframework.org/schema/aop"
xmlns:tx="http://www.springframework.org/schema/tx"
xsi:schemaLocation="http://www.springframework.org/schema/beans
http://www.springframework.org/schema/beans/spring-beans.xsd
http://www.springframework.org/schema/context
http://www.springframework.org/schema/context/spring-context.xsd
http://www.springframework.org/schema/aop
http://www.springframework.org/schema/aop/spring-aop.xsd
http://www.springframework.org/schema/tx
http://www.springframework.org/schema/tx/spring-tx.xsd">
<!-- 开启注解扫描,要扫描的是service -->
<context:component-scan base-package="cn.tx.service"></context:component-scan>
</beans>
web.xml
XML
 <!--配置前端控制器-->
  <servlet>
    <servlet-name>dispatcherServlet</servlet-name>
    <servlet-class>org.springframework.web.servlet.DispatcherServlet</servlet-class>
    <!--加载springmvc.xml配置文件-->
    <init-param>
      <param-name>contextConfigLocation</param-name>
      <param-value>classpath:springmvc.xml</param-value>
    </init-param>
    <!--启动加载-->
    <load-on-startup>1</load-on-startup>
  </servlet>
  <servlet-mapping>
    <servlet-name>dispatcherServlet</servlet-name>
    <url-pattern>*.do</url-pattern>
  </servlet-mapping>

  <!--解决post请求中文乱码的过滤器-->
  <filter>
    <filter-name>characterEncodingFilter</filter-name>
    <filter-class>org.springframework.web.filter.CharacterEncodingFilter</filter-class>
    <init-param>
      <param-name>encoding</param-name>
      <param-value>UTF-8</param-value>
    </init-param>
  </filter>
  <filter-mapping>
    <filter-name>characterEncodingFilter</filter-name>
    <url-pattern>/*</url-pattern>
  </filter-mapping>
2.springmvc配置文件
创建springmvc.xml的配置文件,编写配置文件
XML
<?xml version="1.0" encoding="UTF-8"?>
<beans xmlns="http://www.springframework.org/schema/beans"
xmlns:mvc="http://www.springframework.org/schema/mvc" xmlns:context="http://www.springframework.org/schema/context"
xmlns:xsi="http://www.w3.org/2001/XMLSchema-instance"
xsi:schemaLocation="
http://www.springframework.org/schema/beans
http://www.springframework.org/schema/beans/spring-beans.xsd
http://www.springframework.org/schema/mvc
http://www.springframework.org/schema/mvc/spring-mvc.xsd
http://www.springframework.org/schema/context
http://www.springframework.org/schema/context/spring-context.xsd">
<!-- 扫描controller的注解,别的不扫描 -->
<context:component-scan base-package="cn.tx.controller"></context:component-scan>
<!-- 配置视图解析器 -->
<bean id="viewResolver" class="org.springframework.web.servlet.view.InternalResourceViewResolver">
<!-- JSP文件所在的目录 -->
<property name="prefix" value="/pages/" />
<!-- 文件的后缀名 -->
<property name="suffix" value=".jsp" />
</bean>
<!-- 设置静态资源不过滤
<mvc:resources location="/css/" mapping="/css/**" />
<mvc:resources location="/images/" mapping="/images/**" />
<mvc:resources location="/js/" mapping="/js/**" />
-->
<!-- 开启对SpringMVC注解的支持 -->
<mvc:annotation-driven />
</beans>四、业务层controller
创建AccountController类,编写方法,进行测试
java
package cn.tx.controller;
import org.springframework.stereotype.Controller;
import org.springframework.web.bind.annotation.RequestMapping;
import org.springframework.web.servlet.ModelAndView;
@Controller
@RequestMapping("/account")
public class AccountController {
/**
* 查询所有
* @return
*/
@RequestMapping("/findAll.do")
public ModelAndView findAll(){
System.out.println("表现层:查询所有的账号...");
ModelAndView mv = new ModelAndView();
mv.setViewName("suc");
return mv;
}
}
五、总
数据库→实体类domain层(User.java)→Mapper(UserMapper.xml)写sql语言→
服务层(UserService.java)调用Mapper获取用户信息→
控制器层(UserController.java)调用服务层获取用户信息