最近菜鸟公司准备做一个纯前端项目,需求是:
用户输入一些东西,然后选择本地的文件夹路径,等选好后会点击提交,提交就是将用户填写的东西传参给该电脑上的脚本,让其跑出一些文件。
这个需求,一开始描述的时候,同事说的服务器,菜鸟就以为是做一个网页,给用户访问,那问题就来了:怎么去获得服务器上的文件路径?纯前端做不到啊!
当时给菜鸟整懵逼了,后面交流才发现,是将服务器和脚本一起给用户或者理解为用户用向日葵远程服务器!
然后大佬就说了,这种情况,可以用Electron,因为有node在里面,所以可以获取路径,正好也可以搞成一个桌面软件!
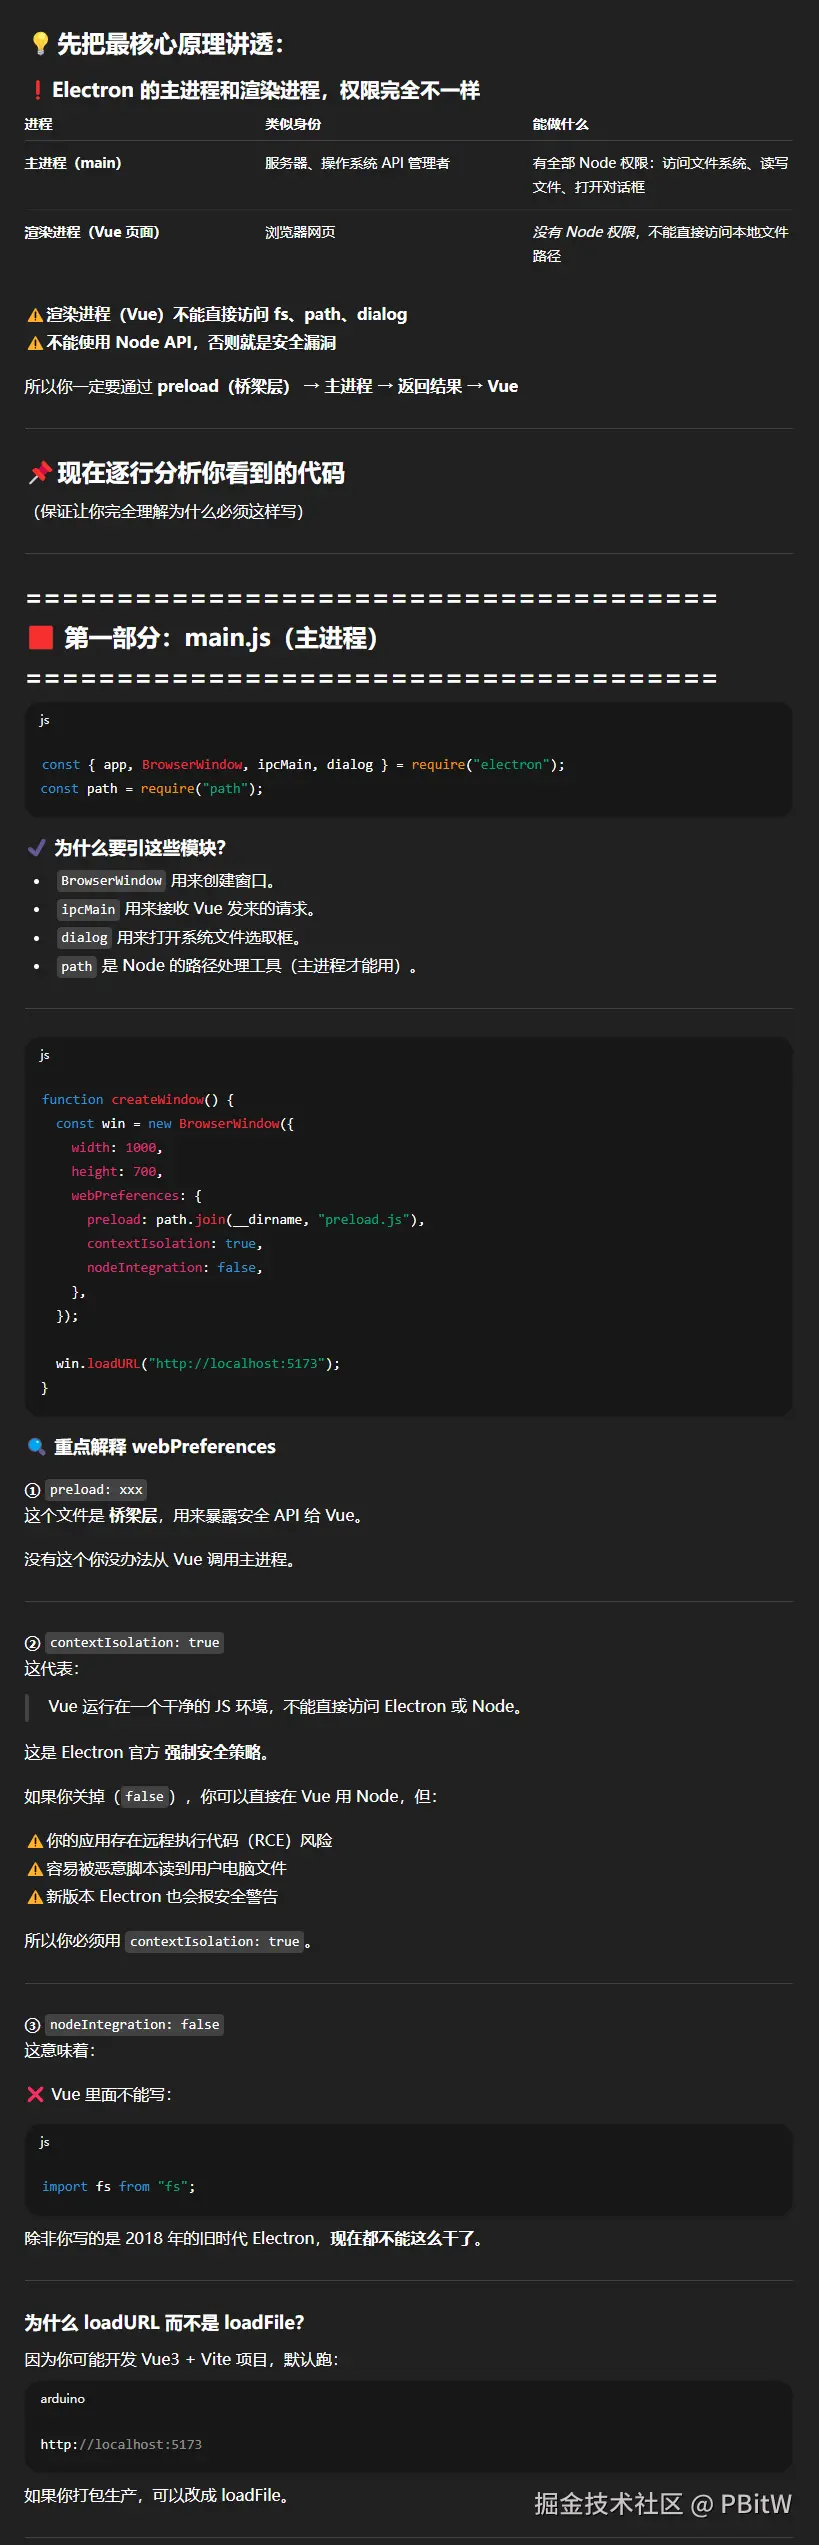
初识 Electron
这个菜鸟是直接看官网:electron.nodejs.cn/docs/latest...
按照官网的来,是那种从零搭建的,不是和vue一样,搭建起来就有很多内置的东西!
坑点
这里一步一步照着来就行,没啥大问题,最大的问题就是Electron可能下载不完全!
菜鸟一开始想用pnpm下载的,下载速度确实快,但是差东西也是真的差,反正运行就报错:
barcodeformedicinal@1.0.0 dev
electron .
F:\proGitLab\BarcodeForMedicinal\node_modules.pnpm\electron@30.5.1\node_modules\electron\index.js:17
throw new Error('Electron failed to install correctly, please delete node_modules/electron and try installing again');
Error: Electron failed to install correctly, please delete node_modules/electron and try installing again
菜鸟一开始问Trae,说可能是最新版本的Electron国内没有稳定镜像,需要换成28~32之间的版本,所以把package.json改成
json
{
  "name": "barcodeformedicinal",
  "version": "1.0.0",
  "main": "main.js",
  "scripts": {
    "dev": "electron .",
    "test": "echo \"Error: no test specified\" && exit 1"
  },
  "author": "",
  "license": "ISC",
  "description": "",
  "devDependencies": {
    "electron": "30.x"
  }
}
pnpm install electron --save-dev下载之后,就会自动变成一个30比较稳定的版本了。
但还没有用,继续报错,菜鸟就尝试设置pnpm为国内镜像
pnpm config set registry registry.npmmirror.com
还是没有用,所以只能还是用npm设置镜像为国内
npm config set registry registry.npmmirror.com
并新建一个.npmrc文件,内容如下
electron_mirror=npmmirror.com/mirrors/ele...
然后执行
npm i
可能会卡在这一步
npm warn deprecated boolean@3.2.0: Package no longer supported. Contact Support at www.npmjs.com/support for more info.
这里建议重启电脑,重新开翻墙 ,菜鸟昨天晚上一直卡这里,第二天电脑自己关机了,再重新运行一下直接就成功了,还是npm最牛皮,虽然有点幽灵依赖问题,但是稳!
vite + Electron
菜鸟按上面的搞完,发现这个是按照原生去开发的,而不是用vue,想用vue应该先创建vue项目,再来接入Electron。
创建vue项目可以去看我的 ------ vue3+vite+eslint|prettier+elementplus+国际化+axios封装+pinia
这里参考了别人的文章 ------ 用electron+vite+vue3搭建桌面端项目,electron基础配置一
创建vue项目完毕后,还需要下载几个包:
npm
npm install -D electron-builder
npm install -D electron-devtools-installer
npm install -D vite-plugin-electron
这里先解释一下这几个包,其中最重要的是 vite-plugin-electron!
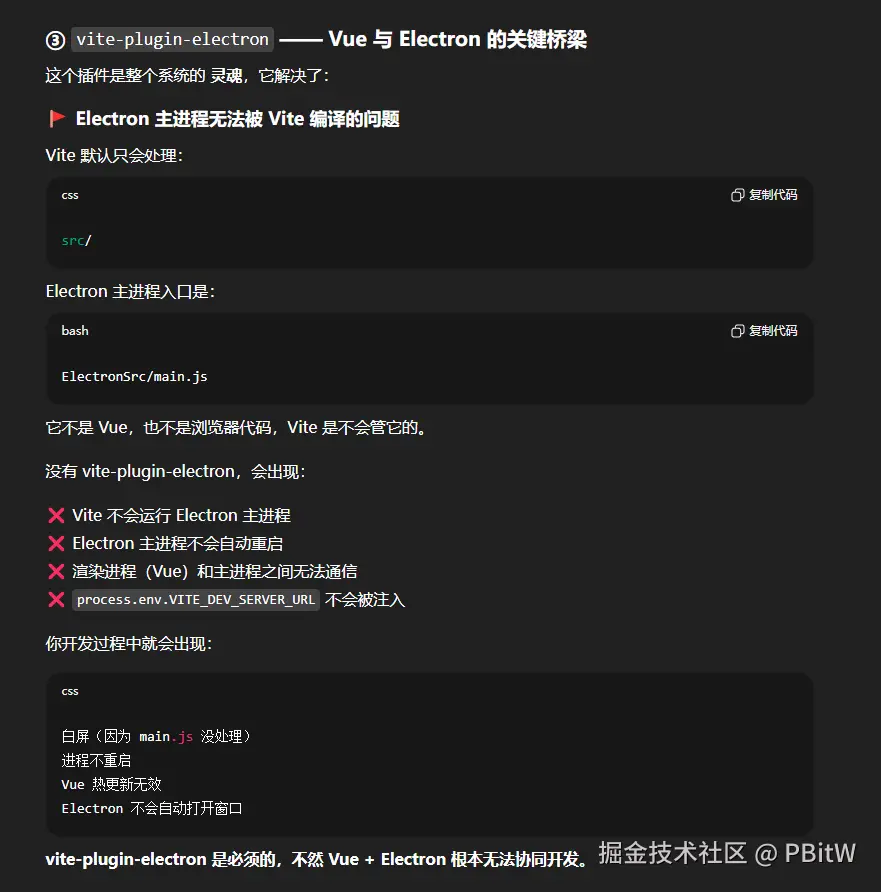
其次就是 electron-builder,这个是你 electron 打包成安装包必须要下载的!
electron-devtools-installer 是辅助开发,可以在 electron 控制台的 Chrome DevTools 里自动安装 Vue3 Devtools 方便调试vue代码!
electron/main.js 默认模板
electron引入成功了,可以开始写electron的相关代码了,新建一个ElectronSrc 文件用来写electron的代码,在它下面创建一个main.js文件用来写主进程代码
js
const { app, BrowserWindow } = require('electron')
const { join } = require('path')

// 屏蔽安全警告 - 只在开发或你确认安全的场景使用,生产环境最好不要屏蔽安全警告
// ectron Security Warning (Insecure Content-Security-Policy)
process.env['ELECTRON_DISABLE_SECURITY_WARNINGS'] = 'true'

// 创建浏览器窗口时,调用这个函数。
const createWindow = () => {
    const win = new BrowserWindow({
        width: 800,
        height: 600,
    })

    // development模式
    if(process.env.VITE_DEV_SERVER_URL) {
        win.loadURL(process.env.VITE_DEV_SERVER_URL)
        // 开启调试台
        win.webContents.openDevTools()
    }else {
        win.loadFile(join(__dirname, '../dist/index.html'))
    }
}

// Electron 会在初始化后并准备
app.whenReady().then(() => {
    createWindow()
    app.on('activate', () => {
        if (BrowserWindow.getAllWindows().length === 0) createWindow()
    })
})

app.on('window-all-closed', () => {
    if (process.platform !== 'darwin') app.quit()
})
这基本就是每个项目都要写的最简单的一点内容,所以可以搞成默认模板!
全屏
js
  const win = new BrowserWindow({
    frame: true, // 保留窗口框(默认 true)
    fullscreen: false, // 按F11的效果,所以不要开启
    autoHideMenuBar: true, // Windows/Linux 下隐藏菜单栏(按 Alt 会显示)
    webPreferences: {
      preload: path.join(__dirname, "preload.js"),
      contextIsolation: true,
      nodeIntegration: false
    }
  });

  // 启动时最大化
  win.maximize();
配置
在 vite.config.js 中配置 vite-plugin-electron 插件入口
js
import { fileURLToPath, URL } from 'node:url'

import { defineConfig } from 'vite'
import vue from '@vitejs/plugin-vue'
import vueDevTools from 'vite-plugin-vue-devtools'
import electron from 'vite-plugin-electron'

// https://vite.dev/config/
export default defineConfig({
  plugins: [
    vue(),
    vueDevTools(),
    electron({
      // 主进程入口文件
      entry: './ElectronSrc/main.js' // 你自己创建的为准
    })
  ],
  resolve: {
    alias: {
      '@': fileURLToPath(new URL('./src', import.meta.url))
    },
  },
})
在 package.json 把 "type": "module", 删除掉并且配置main字段
json
{
  "name": "barcodeformedicinal",
  "version": "0.0.0",
  "private": true,
  "main": "ElectronSrc/main.js", // 你自己创建的为准
  "engines": {
    "node": "^20.19.0 || >=22.12.0"
  },
  "scripts": {
    "dev": "vite",
    "build": "vite build",
    "preview": "vite preview",
    "lint": "eslint . --fix --cache",
    "format": "prettier --write src/"
  },
  "dependencies": {
    "pinia": "^3.0.3",
    "vue": "^3.5.22",
    "vue-router": "^4.6.3"
  },
  "devDependencies": {
    "@eslint/js": "^9.37.0",
    "@vitejs/plugin-vue": "^6.0.1",
    "@vue/eslint-config-prettier": "^10.2.0",
    "electron": "^30.5.1",
    "electron-builder": "^26.0.12",
    "electron-devtools-installer": "^4.0.0",
    "eslint": "^9.37.0",
    "eslint-plugin-vue": "~10.5.0",
    "globals": "^16.4.0",
    "prettier": "3.6.2",
    "vite": "^7.1.11",
    "vite-plugin-electron": "^0.29.0",
    "vite-plugin-vue-devtools": "^8.0.3"
  }
}
解释

注意
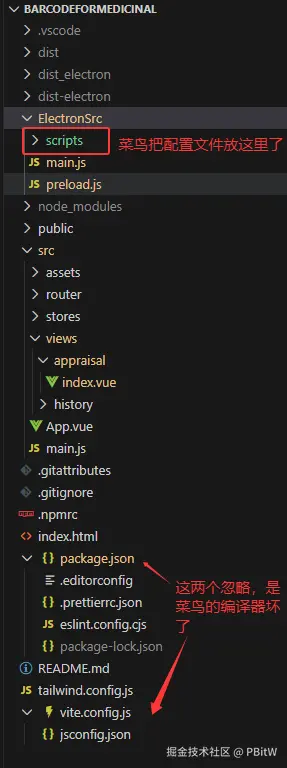
菜鸟是第一次开发,所以这里目录结构其实不是很规范,如果大家按照大型项目那样的目录结构的话,下面有些package.json文件的配置,就要先cd,然后运行build。
Trae建议目录结构

优化开发体验
这里直接用之前项目的eslint会不生效,排查了半天,发现是之前搞了一个自动引入的json文件,这个新建的项目没有,所以导致的报错!
这种情况自己排查很难排查,直接调用这两个命令更加方便
npm
# 运行 ESLint 检查并自动修复
npm run lint

# 运行 Prettier 格式化
npm run format
tailwind 导入
这里菜鸟用的是官网提供的最新的导入方式
这里不导入base的方式可以看我之前的文章:工作两年,最后从css转向tailwind了!
搭建界面
这里开发界面其实就是用vue开发,这里菜鸟选用了Naive UI,大佬说这个更加好用,比element plus要清晰!
实际开发发现,这个Naive UI更加适合jsx使用很强的人使用,菜鸟不是很会!
这里把两个界面的代码直接放过来了
html
<script setup>
import { useMessage, NForm, NFormItem, NInput, NButton, NDataTable } from "naive-ui";
import { ref, h } from "vue";

const formRef = ref(null);
const message = useMessage();

const modelRef = ref({
  path: "",
  sampleData: [
    {
      Barcode: "",
      sampleName: ""
    }
  ]
});
const rules = {
  sampleData: [
    {
      required: true,
      validator(rule, value) {
        console.log("Validating sampleData:", value);
        for (let i of value) {
          if (!i.Barcode || !i.sampleName) {
            return Promise.reject(new Error("样本信息需要完善!"));
          }
        }
        return true;
      },
      trigger: ["input", "blur"]
    }
  ],
  path: [
    {
      required: true,
      message: "请输入芯片路径"
    }
  ]
};
function createColumns() {
  return [
    {
      title: "Barcode",
      key: "Barcode",
      render(row, index) {
        return h(NInput, {
          placeholder: "请输入Barcode",
          value: row.Barcode,
          onUpdateValue(v) {
            modelRef.value.sampleData[index].Barcode = v;
          }
        });
      }
    },
    {
      title: "样本名称",
      key: "sampleName",
      render(row, index) {
        return h(NInput, {
          placeholder: "请输入样本名称",
          value: row.sampleName,
          onUpdateValue(v) {
            modelRef.value.sampleData[index].sampleName = v;
          }
        });
      }
    },
    {
      title: "操作",
      key: "operation",
      width: 80,
      render(row, index) {
        return h(
          "p",
          {
            class: "text-red-500 cursor-pointer",
            onClick: () => {
              modelRef.value.sampleData.splice(index, 1);
              message.success("删除成功");
            }
          },
          { default: () => "删除" }
        );
      }
    }
  ];
}
const columns = createColumns();

function addRow() {
  modelRef.value.sampleData.push({ Barcode: "", sampleName: "" });
}

function submitForm() {
  formRef.value
    .validate()
    .then(() => {
      // TODO:调用脚本
      message.success("鉴定成功");
    })
    .catch(() => {
      message.error("请完善样本信息");
    });
}
</script>

<template>
  <n-form ref="formRef" :model="modelRef" :rules="rules">
    <n-form-item path="sampleData" label="样本信息">
      <div class="w-full">
        <div class="mb-4 flex justify-end">
          <n-button class="ml-auto" size="small" @click="addRow">添加一行</n-button>
        </div>
        <n-data-table :columns="columns" :data="modelRef.sampleData" />
      </div>
    </n-form-item>
    <n-form-item path="path" label="芯片路径">
      <n-input v-model:value="modelRef.path" @keydown.enter.prevent />
    </n-form-item>
    <n-form-item>
      <div class="flex w-full justify-center">
        <n-button type="primary" @click="submitForm">开始鉴定</n-button>
      </div>
    </n-form-item>
  </n-form>
</template>
html
<script setup>
import { NButton, NDataTable } from "naive-ui";
import { h } from "vue";

const data = [
  {
    appraisalId: "123456",
    appraisalStatus: "已鉴定",
    createTime: "2023-08-01 10:00:00",
    path: "/path/to/chip"
  }
];
function createColumns() {
  return [
    {
      title: "鉴定编号",
      key: "appraisalId"
    },
    {
      title: "鉴定状态",
      key: "appraisalStatus"
    },
    {
      title: "创建时间",
      key: "createTime"
    },
    {
      title: "芯片路径",
      key: "path"
    },
    {
      title: "操作",
      key: "operation",
      width: 200,
      render(row, index) {
        return h(
          "div",
          {
            class: "flex justify-evenly"
          },
          {
            default: () => [
              h(NButton, { type: "primary", size: "small" }, { default: () => "查看详情" }),
              h(NButton, { type: "primary", size: "small" }, { default: () => "查看报告" })
            ]
          }
        );
      }
    }
  ];
}
const columns = createColumns();
</script>

<template>
  <div>
    <n-data-table :columns="columns" :data="data" />
  </div>
</template>

<style lang="scss" scoped></style>
访问路径搭建
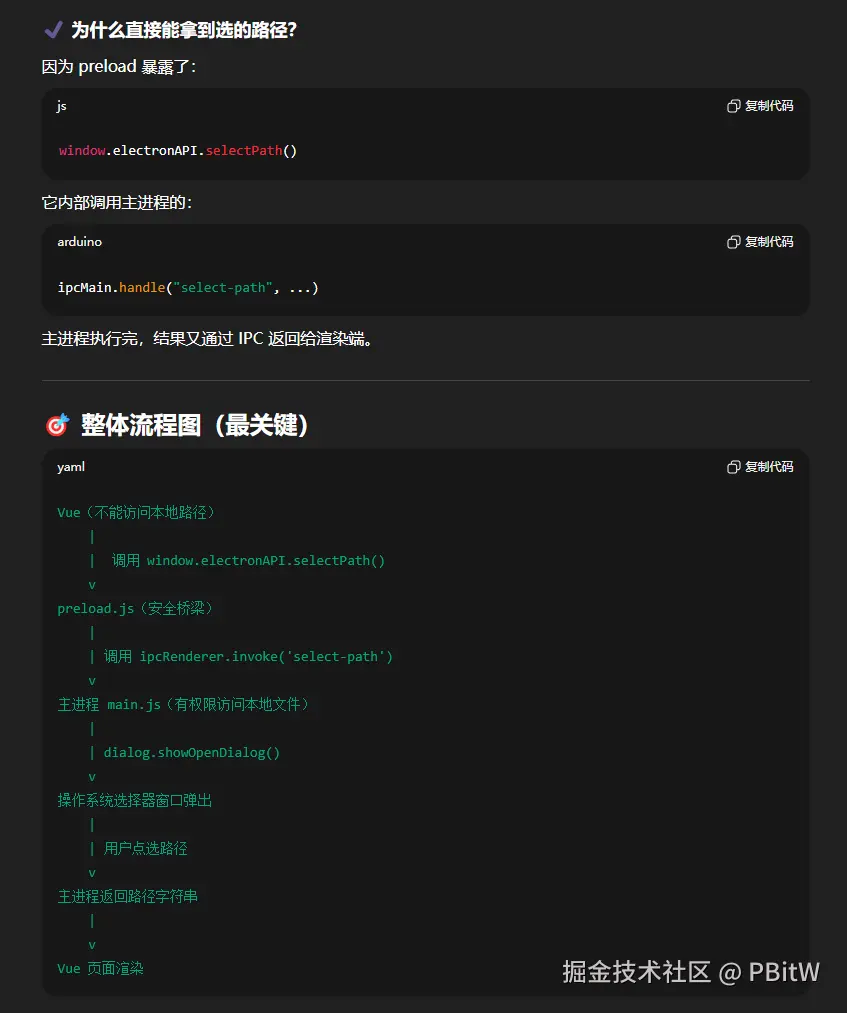
前面只是前端部分,所以很简单,但是难的就是菜鸟这里要搞:访问路径、调用脚本、自己把数据存起来并展示到历史记录这些功能,接下来一个一个搞!
这里先写访问路径的搭建,现在的AI是真的很强
这里菜鸟直接用了,还真可以,所以找AI要了解释

搭建调用脚本
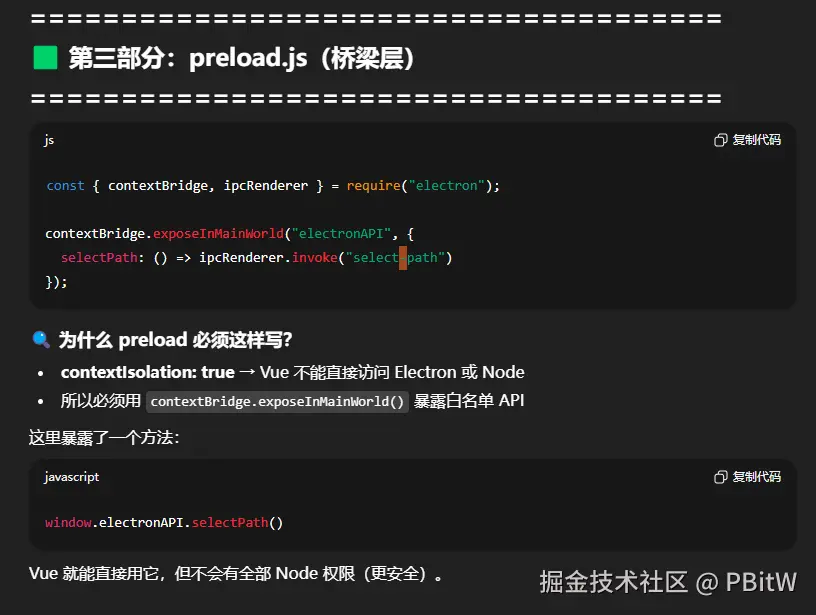
这个的vue和preload.js还是一样比较好写,就是preload.js暴露,然后vue调用electron暴露出来的方法即可
js
const { contextBridge, ipcRenderer } = require("electron");

contextBridge.exposeInMainWorld("electronAPI", {
  selectPath: () => ipcRenderer.invoke("select-path"),
  runScript: (args) => ipcRenderer.invoke("runScript", args)
});
js
function submitForm() {
  formRef.value
    .validate()
    .then(async () => {
      // 运行本地脚本
      const args = {
        path: modelRef.value.path, // 参数1,芯片路径
        sampleData: JSON.stringify(modelRef.value.sampleData) // 参数2,样本数据
      };

      try {
        const result = await window.electronAPI.runScript(args);
        message.success("脚本执行成功:" + result);
      } catch (err) {
        message.error("脚本执行失败:" + err);
      }
    })
    .catch(() => {
      message.error("请完善样本信息");
    });
}难点在于electron怎么去调用脚本?
这里调用脚本可以有两个选择:exec 和 execfile,这里菜鸟更推荐前面的!
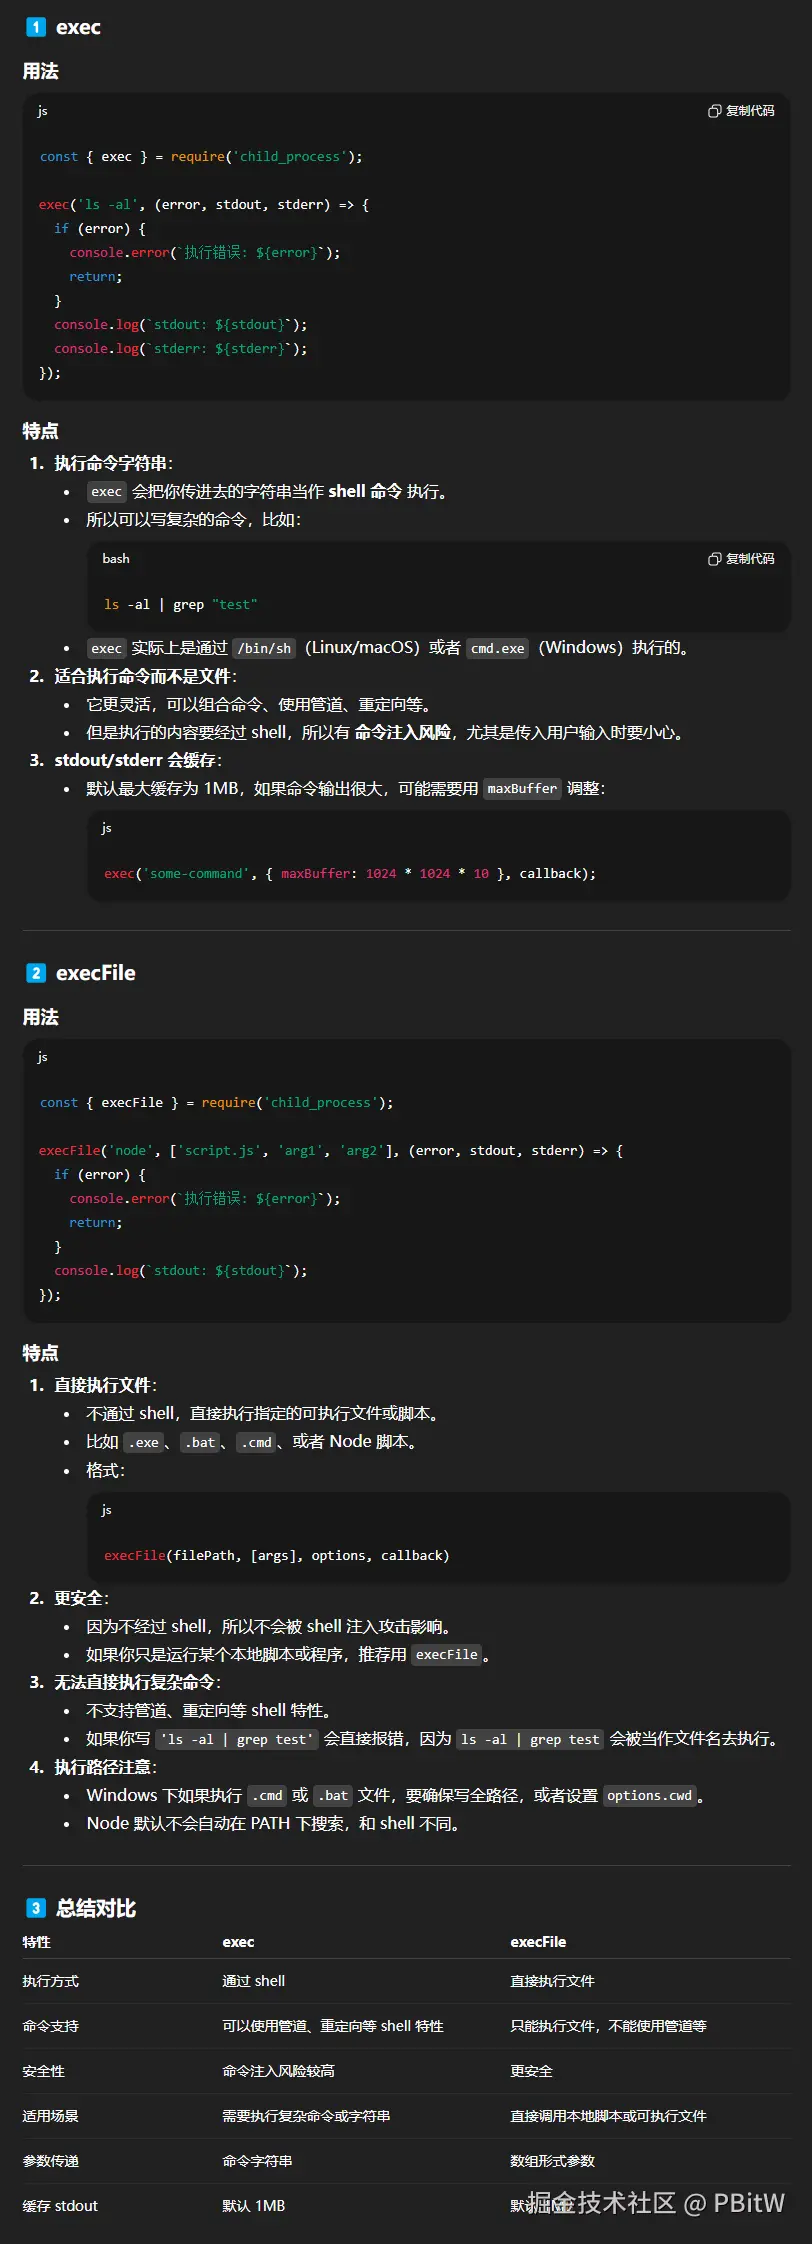
菜鸟一开始用excefile总是报错
Error occurred in handler for 'runScript': Error: spawn EINVAL
一直解决不了,然后大佬建议我用exec,结果就可以了,具体原因如下
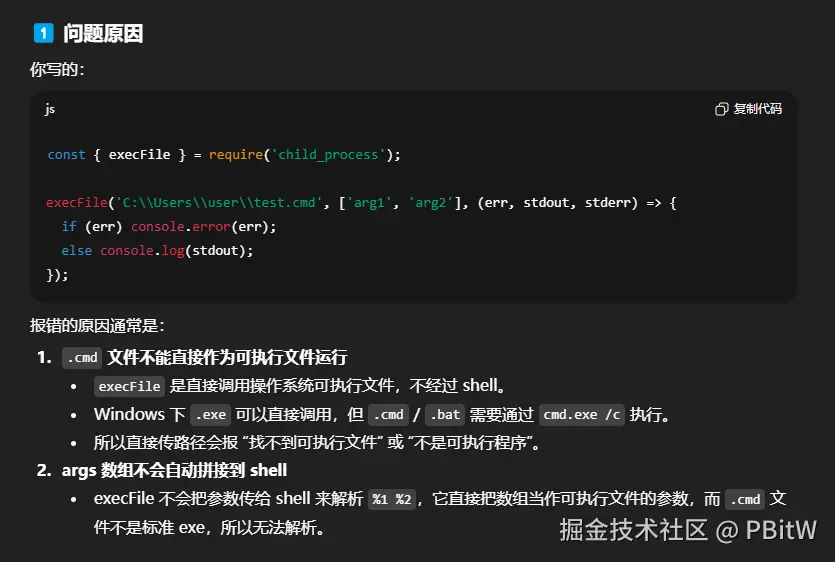
正确的写法比较复杂(第二个没试,因为菜鸟已经选用了exce所以就没有换了,所以就没有深究了!)
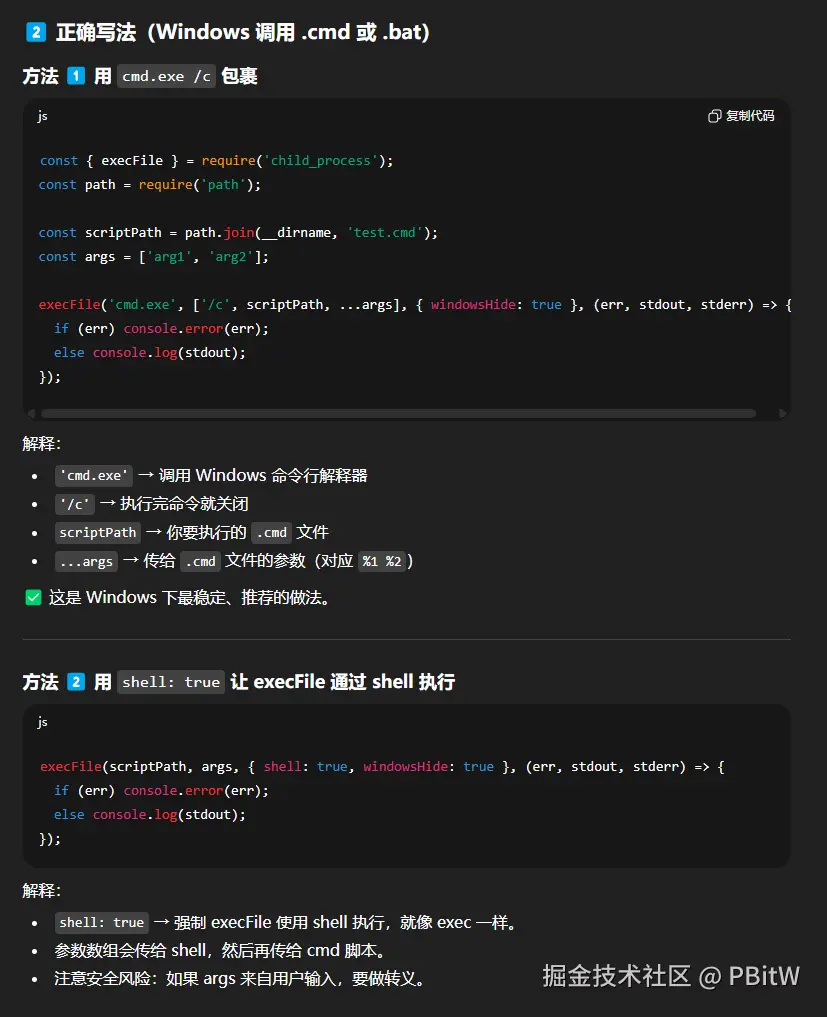
有兴趣的读者可以自己尝试一下第二种,和exec感觉差不多!
调用固定位置脚本
然后这个是菜鸟一开的代码
js
const { exec } = require("child_process");

// 运行脚本
ipcMain.handle("runScript", async (event, data) => {
  return new Promise((resolve, reject) => {
    console.log("准备运行脚本,传入参数:", data);

    const scriptPath = path.join(__dirname, "scripts", "test.cmd");

    // 拼接命令(自动交由 shell 解析)
    const command = `"${scriptPath}" "${data.path}" '${JSON.stringify(data.sampleData)}'`;

    // 关键:shell 由系统决定
    exec(command, { shell: true }, (error, stdout, stderr) => {
      if (error) {
        console.error("脚本执行失败:", error);
        reject(stderr || stdout || "脚本运行异常");
        return;
      }
      resolve(stdout);
    });
  });
});
菜鸟这里是直接运行的自己写在

下的一个脚本文件,这里脚本可以随便写点什么,能证明调用了就行
cmd
@echo off
echo 这是一个测试脚本
echo 你传进来的路径是:%1
echo 你传进来的样本数据是:%2
根据配置运行脚本
但是菜鸟一想,这脚本还要我们公司的其他部门给我,然后还要一起打包进去,那这不就很奇怪,应该是根据配置文件,去某个文件夹下寻找脚本,并运行才对!
所以菜鸟建了一个配置文件 config.json

json
{
  "scriptDir": "F:\\myPro",
  "name": "test.cmd"
}
如何把配置文件移动到你需要的地方(菜鸟这里是存在了用户目录下),代码呈现
js
const fs = require("fs");

// 保存配置
const userDataPath = app.getPath("userData");
console.log(userDataPath);

const scriptDir = path.join(userDataPath, "scripts"); // 目标文件夹
const defaultScriptDir = path.join(__dirname, "scripts"); // 源文件夹
// 如果目标文件夹不存在,先创建
if (!fs.existsSync(scriptDir)) {
  fs.mkdirSync(scriptDir, { recursive: true }); // 递归创建目录
  console.log("scripts 文件夹已创建");
}
// 读取默认目录下的文件列表,逐个拷贝
fs.readdirSync(defaultScriptDir).forEach((file) => {
  const srcFile = path.join(defaultScriptDir, file);
  const destFile = path.join(scriptDir, file);
  // 只拷贝文件
  if (fs.lstatSync(srcFile).isFile()) {
    fs.copyFileSync(srcFile, destFile);
    console.log(`${file} 已拷贝到 scripts`);
  }
});
现在要做的就是怎么读取到配置文件了!

运行脚本的时候,去获取配置文件
js
// 运行脚本 -- 同步
ipcMain.handle("runScript", async (event, data) => {
  return new Promise((resolve, reject) => {
    console.log("准备运行脚本,传入参数:", data);
    try {
      const userDataPath = app.getPath("userData");
      const configPath = path.join(userDataPath, "scripts", "config.json");
      // 读取 config.json
      if (!fs.existsSync(configPath)) {
        throw new Error("config.json 不存在,请先初始化 scripts 文件夹");
      }
      const configContent = fs.readFileSync(configPath, "utf-8");
      const config = JSON.parse(configContent);
      // 获取脚本路径
      const scriptPath = path.join(config.scriptDir, config.name);
      if (!fs.existsSync(scriptPath)) {
        throw new Error(`脚本文件不存在: ${scriptPath}`);
      }
      // 拼接命令(自动交由 shell 解析)
      const command = `"${scriptPath}" "${data.path}" '${JSON.stringify(data.sampleData)}'`;
      // 关键:shell 由系统决定
      exec(command, { shell: true }, (error, stdout, stderr) => {
        if (error) {
          console.error("脚本执行失败:", error);
          reject(stderr || stdout || "脚本运行异常");
          return;
        }
        resolve(stdout);
      });
    } catch (err) {
      console.error("脚本运行异常:", err);
      reject(err.message);
    }
  });
});
但是又一想,万一别人给的脚本不能及时返回怎么办?
那就只能用一个进程调用一下脚本就行,不用管其是否成功,所以加了一个方法(加入方法后一定要npm run dev一下项目,不然会报错找不到)!
js
const { spawn } = require("child_process");

// 运行脚本 -- 不等待结果
ipcMain.handle("runScriptNoWait", async (event, data) => {
  return new Promise((resolve, reject) => {
    console.log("准备运行脚本,传入参数:", data);
    try {
      const userDataPath = app.getPath("userData");
      const configPath = path.join(userDataPath, "scripts", "config.json");
      // 读取 config.json
      if (!fs.existsSync(configPath)) {
        throw new Error("config.json 不存在,请先初始化 scripts 文件夹");
      }
      const configContent = fs.readFileSync(configPath, "utf-8");
      const config = JSON.parse(configContent);
      // 获取脚本路径
      const scriptPath = path.join(config.scriptDir, config.name);
      if (!fs.existsSync(scriptPath)) {
        throw new Error(`脚本文件不存在: ${scriptPath}`);
      }

      // 参数转换
      const args = [data.path, JSON.stringify(data.sampleData)];
      // spawn 后台执行
      const child = spawn(scriptPath, args, {
        shell: true, // 让系统选择 cmd/bash
        detached: true, // 让脚本成为独立进程
        stdio: "ignore" // 不接收任何输出
      });

      // 断开 Electron 与脚本的关系
      child.unref();

      // ***关键:不等待脚本执行结果***
      resolve("脚本已成功启动"); // 不等待 stdout,也不等待脚本结束
    } catch (err) {
      console.error("脚本运行异常:", err);
      reject(err.message);
    }
  });
});
这样,运行脚本的功能也算是完结了!
把数据存起来并展示到历史记录
这里菜鸟想到的是,直接存在data.json中
js
[]内容就是一个数组,然后就是读取和存入的逻辑
js
// 保存数据到data.json
ipcMain.handle("saveRecord", async (event, record) => {
  return new Promise((resolve, reject) => {
    console.log(record);
    try {
      const userDataPath = app.getPath("userData");
      const dataPath = path.join(userDataPath, "scripts", "data.json");
      // 读取 data.json
      if (!fs.existsSync(dataPath)) {
        throw new Error("data.json 不存在,请先初始化 scripts 文件夹");
      }
      const dataContent = fs.readFileSync(dataPath, "utf-8");
      const data = JSON.parse(dataContent);
      // 追加记录
      data.push(record);
      // 写入 data.json
      fs.writeFileSync(dataPath, JSON.stringify(data, null, 2));
      resolve("记录已成功保存");
    } catch (err) {
      console.error("保存记录异常:", err);
      reject(err.message);
    }
  });
});

// 读取data.json数据
ipcMain.handle("readRecords", async (event) => {
  return new Promise((resolve, reject) => {
    try {
      const userDataPath = app.getPath("userData");
      const dataPath = path.join(userDataPath, "scripts", "data.json");
      // 读取 data.json
      if (!fs.existsSync(dataPath)) {
        throw new Error("data.json 不存在,请先初始化 scripts 文件夹");
      }
      const dataContent = fs.readFileSync(dataPath, "utf-8");
      const data = JSON.parse(dataContent);
      resolve(data);
    } catch (err) {
      console.error("读取记录异常:", err);
      reject(err.message);
    }
  });
});
vue 界面的调用就不展示代码了,大致逻辑就是:点击鉴定的时候调用脚本并存入数据,点击历史记录就读取。
和之前写法一样,就不粘贴代码出来了!
打包
完成了上面,感觉大功即将大成,但是要想看看有没有用,还是得看打包后的文件能不能再Linux上运行!
但是这个时候执行npm run build只会打包vue项目,并不会变成electron项目!
这里打包想要修改package.json
package.json
{
"name": "barcodeformedicinal",
"version": "0.0.0",
"private": true,
"main": "ElectronSrc/main.js",
"engines": {
"node": "^20.19.0 || >=22.12.0"
},
"scripts": {
"dev": "vite",
"build:vue": "vite build",
"build:electron": "electron-builder",
"build": "npm run build:vue && npm run build:electron", // 要同时打包两个
"preview": "vite preview",
"lint": "eslint . --fix --cache",
"format": "prettier --write src/"
},
// 配置electron打包
"build": {
"appId": "com.example.barcodeformedicinal",
"productName": "中药材条形码鉴定",
"asar": true,
"directories": {
"output": "dist_electron"
},
"files": [
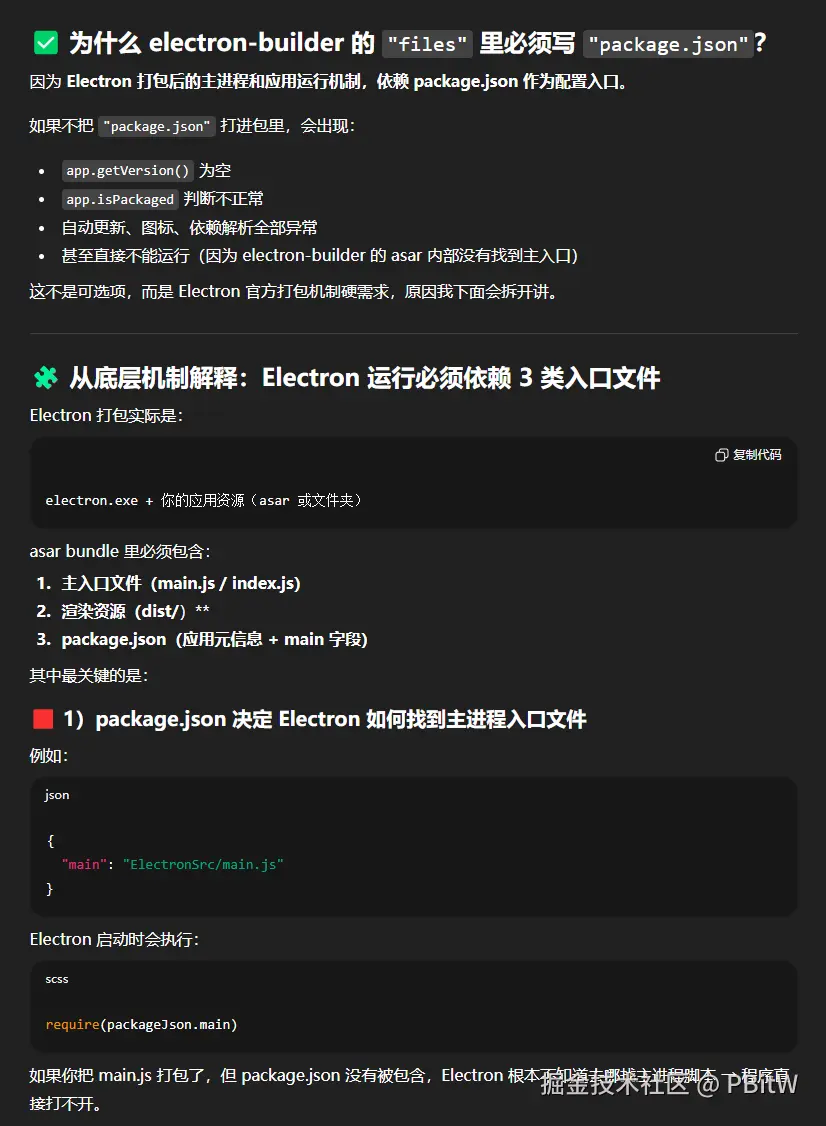
// 把dist和electron一起打包,要package.json是因为需要main
"dist/**",
"ElectronSrc/**",
"package.json"
],
"win": {
"target": "nsis"
}
},
"dependencies": {
"pinia": "^3.0.3",
"vue": "^3.5.22",
"vue-router": "^4.6.3"
},
"devDependencies": {
......
}
}
为什么files里面需要加上package.json
注意
window 打包可能会报错,但点击是可以运行的,菜鸟暂时没有管。
菜鸟准备复现,结果又好了,所以建议大家多试试,很可能是和网络有关!
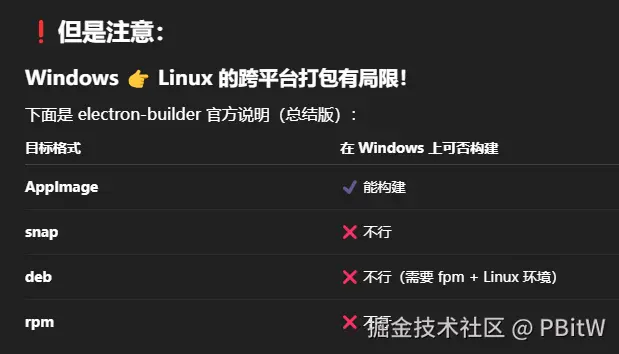
打包为Linux可以运行
打包成Linux运行的,需要加上 -- --linux,不然默认是打包window上的exe!
package.json
{
"name": "barcodeformedicinal",
"version": "0.0.0",
"private": true,
"main": "ElectronSrc/main.js",
"engines": {
"node": "^20.19.0 || >=22.12.0"
},
"scripts": {
"dev": "vite",
"build:vue": "vite build",
"build:electron": "electron-builder",
"build": "npm run build:vue && npm run build:electron -- --linux", // 这里加上-- --linux
"preview": "vite preview",
"lint": "eslint . --fix --cache",
"format": "prettier --write src/"
},
"build": {
"appId": "com.example.barcodeformedicinal",
"productName": "中药材条形码鉴定",
"asar": true,
"directories": {
"output": "dist_electron"
},
"files": [
"dist/**",
"ElectronSrc/**",
"package.json"
],
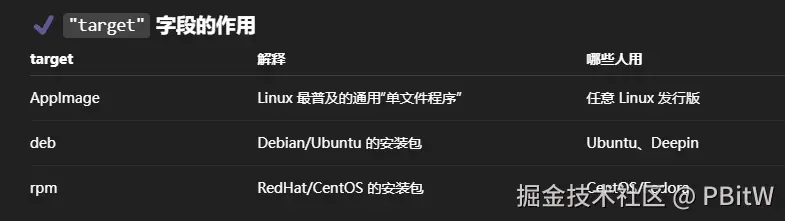
"linux": {
"target": [
"AppImage",
"deb",
"rpm"
],
"category": "Utility"
}
},
"dependencies": {
......
},
"devDependencies": {
......
}
}