文章目录
- [1. 搭建环境](#1. 搭建环境)
- [2. 配置公共类](#2. 配置公共类)
- [3. 自动化代码-PO模式](#3. 自动化代码-PO模式)
-
- [3.1 页面元素类-获取页面元素](#3.1 页面元素类-获取页面元素)
- [3.2 页面操作类-封装页面操作过程](#3.2 页面操作类-封装页面操作过程)
- [3.3 测试流程类-测试过程的真正执行](#3.3 测试流程类-测试过程的真正执行)
- 总结
✨✨✨学习的道路很枯燥,希望我们能并肩走下来!
编程真是一件很奇妙的东西。你只是浅尝辄止,那么只会觉得枯燥乏味,像对待任务似的应付它。但你如果深入探索,就会发现其中的奇妙,了解许多所不知道的原理。知识的力量让你沉醉,甘愿深陷其中并发现宝藏。

本文开始
项目使用整体架构:
- 代码:java
- 项目框架:maven
- 自动化驱动框架:junit
- 自动化测试驱动框架: Selenium-WebDriver
- 支持浏览器类型:chrome, firefox
1. 搭建环境
- 首先下载好对应浏览器驱动:以chrome为例,需要下载与浏览器版本一样的chromedriver
- 搭建Maven项目
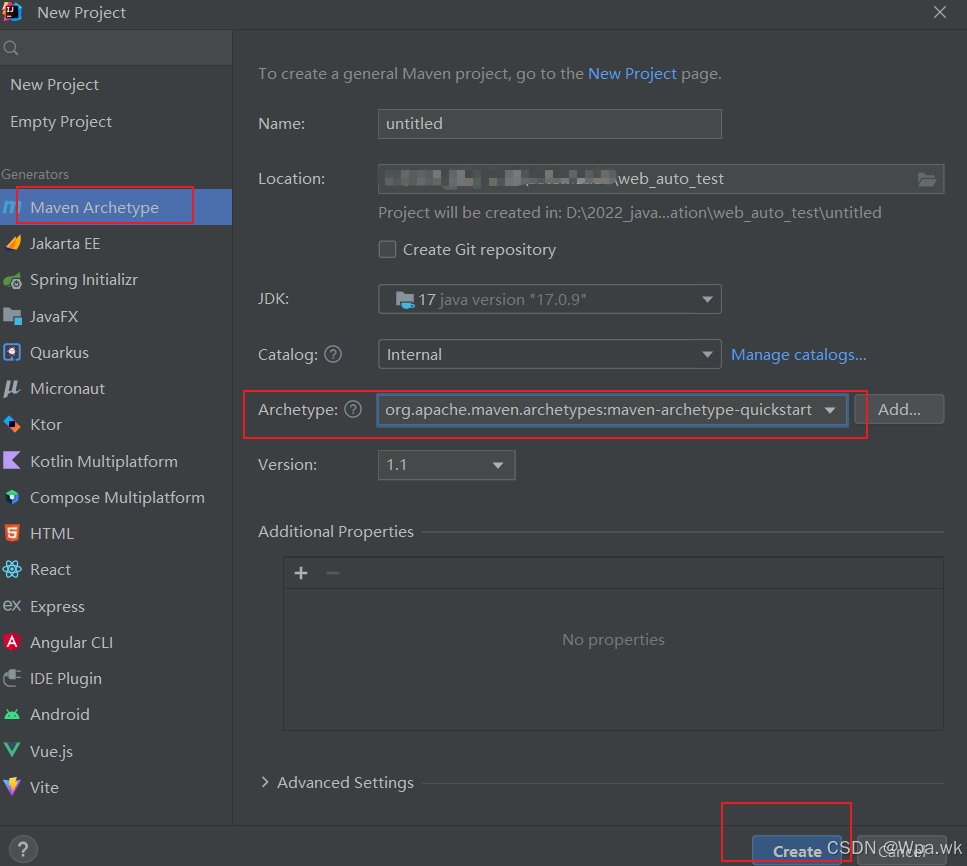
如何选取:Archetype: 下列是简单参考
1)普通 Java 应用 → maven-archetype-quickstart
默认的Archetype,基本内容包括:
一个包含junit依赖声明的pom.xml
src/main/java主代码目录及一个名为App的类
src/test/java测试代码目录及一个名为AppTest的测试用例
2)Web 应用(传统) → maven-archetype-webapp
一个最简单的Maven war项目模板,当需要快速创建一个Web应用的时候可以使用它。
生成的项目内容包括:
一个packaging为war且带有junit依赖声明的pom.xml
src/main/webapp/目录
src/main/webapp/index.jsp文件
src/main/webapp/WEB-INF/web.xml文件
Archetype 选取参考:
bash
maven-archetype-archetype:一个样例原型

maven-archetype-j2ee-simple:简单的J2EE应用程序样例

maven-archetype-mojo:Maven插件样本的示例

maven-archetype-plugin:Maven插件样本

maven-archetype-plugin-site:Mave插件网站的样例

maven-archetype-portlet:JSR-268门户样例

maven-archetype-quickstart:Maven工程样例

maven-archetype-site-simple:Maven简单网站样例

maven-archetype-webapp:Maven的Webapp工程样例- 在pom.xml中添加需要的依赖
添加:junit, selenium, log4j, allure依赖
xml
<!-- 直接将下列文件复制到你的pom.xml文件中 -->
<properties>
<project.build.sourceEncoding>UTF-8</project.build.sourceEncoding>
<junit.api.version>5.6.2</junit.api.version>
<junit.jupiter.version>5.6.2</junit.jupiter.version>
<maven.compiler.source>17</maven.compiler.source>
<maven.compiler.target>17</maven.compiler.target>
<allure.version>2.13.2</allure.version>
</properties>
<dependencies>
<dependency>
<groupId>io.qameta.allure</groupId>
<artifactId>allure-junit5</artifactId>
<version>${allure.version}</version>
<scope>test</scope>
</dependency>
<dependency>
<groupId>org.junit.jupiter</groupId>
<artifactId>junit-jupiter-engine</artifactId>
<version>${junit.jupiter.version}</version>
<scope>test</scope>
</dependency>
<dependency>
<groupId>org.junit.jupiter</groupId>
<artifactId>junit-jupiter-api</artifactId>
<version>${junit.api.version}</version>
<scope>test</scope>
</dependency>
<dependency>
<groupId>org.junit.jupiter</groupId>
<artifactId>junit-jupiter-params</artifactId>
<version>${junit.api.version}</version>
<scope>test</scope>
</dependency>
<!-- log4j -->
<dependency>
<groupId>log4j</groupId>
<artifactId>log4j</artifactId>
<version>1.2.16</version>
</dependency>
<!--selenium-->
<dependency>
<groupId>org.seleniumhq.selenium</groupId>
<artifactId>selenium-java</artifactId>
<version>4.22.0</version>
</dependency>
<dependency>
<groupId>junit</groupId>
<artifactId>junit</artifactId>
<version>4.13.2</version>
<scope>test</scope>
</dependency>
</dependencies>
<build>
<plugins>
<plugin>
<groupId>org.apache.maven.plugins</groupId>
<artifactId>maven-compiler-plugin</artifactId>
<version>3.8.1</version>
</plugin>
<plugin>
<groupId>org.apache.maven.plugins</groupId>
<artifactId>maven-surefire-plugin</artifactId>
<version>3.0.0-M5</version>
<configuration>
<statelessTestsetReporter implementation="org.apache.maven.plugin.surefire.extensions.junit5.JUnit5Xml30StatelessReporter">
<disable>false</disable>
<version>3.0</version>
<usePhrasedFileName>false</usePhrasedFileName>
<usePhrasedTestSuiteClassName>true</usePhrasedTestSuiteClassName>
<usePhrasedTestCaseClassName>true</usePhrasedTestCaseClassName>
<usePhrasedTestCaseMethodName>true</usePhrasedTestCaseMethodName>
</statelessTestsetReporter>
<consoleOutputReporter implementation="org.apache.maven.plugin.surefire.extensions.junit5.JUnit5ConsoleOutputReporter">
<disable>false</disable>
<encoding>UTF-8</encoding>
<usePhrasedFileName>false</usePhrasedFileName>
</consoleOutputReporter>
<statelessTestsetInfoReporter implementation="org.apache.maven.plugin.surefire.extensions.junit5.JUnit5StatelessTestsetInfoReporter">
<disable>false</disable>
<usePhrasedFileName>false</usePhrasedFileName>
<usePhrasedClassNameInRunning>true</usePhrasedClassNameInRunning>
<usePhrasedClassNameInTestCaseSummary>true</usePhrasedClassNameInTestCaseSummary>
</statelessTestsetInfoReporter>
</configuration>
</plugin>
</plugins>
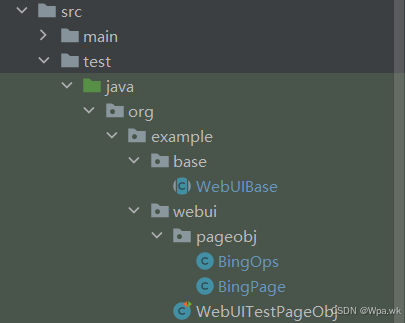
</build>创建项目的目录结构如下:
通用配置-运行项目:
1.配置文件:src/resources/iselenium.properites, 将自我电脑的中驱动位置,放置到该文件中,再将该文件放置到系统的${user.home}下
xml
// 下列是你自己电脑上的驱动位置,放置到iselenium.properites文件中
FIREFOX_PATH=D:\\software_tool\\testing_driver\\drvier\\geckodriver.exe
CHROME_PATH=D:\\software_tool\\testing_driver\\drvier\\chromedriver.exe- 配置文件中对应的浏览器webdriver驱动程序路径,根据运行环境预先设定-提前下载好
2. 配置公共类
配置抽象类:将创建驱动,获取驱动,判断不同浏览的驱动等方法放置到公共类中, 考虑使用junit中的前置和后置处理方法;
定义抽象类是为了其他测试类继承,不然使用其他测试类使用还需要new类
java
package org.example.base;


import org.apache.log4j.Logger;
import org.junit.jupiter.api.AfterEach;
import org.junit.jupiter.api.BeforeEach;
import org.openqa.selenium.WebDriver;
import org.openqa.selenium.chrome.ChromeDriver;
import org.openqa.selenium.chrome.ChromeOptions;
import org.openqa.selenium.firefox.FirefoxDriver;
import org.openqa.selenium.support.ui.WebDriverWait;

import java.io.*;
import java.util.Properties;

//自动化前置处理类

/**
 * 1.从系统环境读取驱动-当安装好不同浏览器驱动
 * 2.判断不同浏览,加载不同驱动
 */
public abstract class WebUIBase {
    //自定义日志
    //需要选用apache.log4j.Logger
    private Logger logger = Logger.getLogger(WebUIBase.class);
    //配置文件名称
    private String propFileName = "iselenium.properties";
    //测试用例名称
    protected String testcaseName = "";
    //默认浏览-当前浏览器是什么-用于不同浏览器的判断
    protected String curBrowser = "chrome";
    //获取驱动
    protected WebDriver driver;
    //显示等待
    protected WebDriverWait driverWait;
    //导航组件:前进,刷新,后退back,to-导航到url页面
    protected WebDriver.Navigation navigation;
    //火狐驱动路径,chrome驱动路径
    protected String firefoxPath = "";
    protected String chromePath = "";
    //项目根目录
    protected String projRootPath;

    //前置处理
    @BeforeEach
    public void begin() {
     	//项目根目录获取
        projRootPath = System.getProperty("user.dir");
        //加载配置文件
        logger.info("Load properties file: " + propFileName);
        //从配置文件中读取
        Properties prop = loadFromEnvProperties(propFileName);

        //获取浏览器driver
        logger.info("Load webdriver path");
        //获取火狐或者谷歌驱动
        firefoxPath = prop.getProperty("FIREFOX_PATH");
        chromePath = prop.getProperty("CHROME_PATH");
        logger.info("firefoxPath = " + firefoxPath);
        logger.info("chromePath = " + chromePath);

        //设定当前运行浏览器
        //需要在环境变量"currentBrowser"中配置当前运行什么浏览器, 可选值"firefox","chrome","nogui"
        setCurBrowser();
        logger.info("Current browser is " +curBrowser);
        //设置当前运行浏览器驱动
        setWebDriver(curBrowser);
    }

    //设置当前运行浏览器驱动-浏览器兼容时使用,在不同浏览器运行相同的代码
    protected void setWebDriver(String curBrowser) {
        //逻辑判断当前浏览器驱动
        if(curBrowser.equalsIgnoreCase("firefox")) {
            System.setProperty("webdriver.gecko.driver", firefoxPath);
            driver = new FirefoxDriver();
        }else if(curBrowser.equalsIgnoreCase("chrome")) {
            System.setProperty("webdriver.chrome.driver", chromePath);
            driver = new ChromeDriver();
        }else if(curBrowser.equalsIgnoreCase("nogui")) {
            System.setProperty("webdriver.chrome.driver", chromePath);
            ChromeOptions chromeOptions = new ChromeOptions();
            chromeOptions.addArguments("--headless");
            driver = new ChromeDriver(chromeOptions);
        }else {
            //其他情况
            System.setProperty("webdriver.chrom.driver", chromePath);
            driver = new ChromeDriver();
        }
        navigation = driver.navigate();
    }

    //重置浏览器驱动
    protected void resetWebDriver() {
        if(driver == null) {
            logger.info("----------------driver is null------------");
            return;
        }
        driver.quit();
    }

    //后置方法处理
    @AfterEach
    public void tearDown() {
        logger.info("Automation test " + testcaseName +" finish! ");
        resetWebDriver();
    }

    //加载配置文件
    private Properties loadFromEnvProperties(String propFileName) {
        Properties prop = null;
        String path = System.getProperty("user.home");

        //读取envProperties属性文件
        try {
            prop = new Properties();
            InputStream in = new BufferedInputStream(
                    new FileInputStream(path + File.separator + propFileName)
            );
            prop.load(in);
            in.close();
        } catch (IOException ioException) {
            logger.error(ioException.getMessage());
            logger.error("Load config file fail, please check " + path +
                    " to confirm if the " + propFileName + " file exist!");
        }
        return prop;
    }

    //设置当前浏览器
    private void setCurBrowser() {
        String value = System.getenv("currentBrowser");
        if(value == null || value.equalsIgnoreCase("")) {
            return;
        }
        //判断当前浏览器是否属于firefox || chrome || nogui
        if(value.equalsIgnoreCase("firefox") ||
                value.equalsIgnoreCase("chrome") ||
                value.equalsIgnoreCase("nogui")) {
            curBrowser = value.toLowerCase();
        }
    }

    protected void wait5s() {
        wait(5);
    }

    protected void wait1s() {
        wait(1);
    }

    protected void wait(int sec) {
        try {
            Thread.sleep(sec * 1000);
        } catch (InterruptedException e) {
            logger.info("wait() is error!!");
            throw new RuntimeException(e);
        }
    }


}
3. 自动化代码-PO模式
将获取页面元素,页面元素动作,测试页面元素的过程分离就是PO模式,方便后期代码维护
3.1 页面元素类-获取页面元素
作用:将需要测试的核心功能所需要的元素全部获取,存到当前类中
设置静态方法,不需要new实例类,直接通过类名.方法调用;如:BingPage.inputTxt();
java
import org.openqa.selenium.By;
import org.openqa.selenium.WebDriver;
import org.openqa.selenium.WebElement;

/**
 * 页面元素类:获取的页面元素,封装元素
 */
public class BingPage {

    //发现输入框
    public static WebElement inputTxt(WebDriver webDriver) {
        return webDriver.findElement(By.cssSelector("#sb_form_q"));
    }

    //查询按钮图标获取
    public static WebElement searchIcon(WebDriver webDriver) {
        return webDriver.findElement(By.id("search_icon"));
    }
}
3.2 页面操作类-封装页面操作过程
将测试用例中操作过程封装,也就是如登录过程,需要找到输入框,输入账号密码,再点击登录按钮,这是一个操作过程;这里直接将操作过程封装成一个方法,在测试时直接调用;
java
import org.openqa.selenium.OutputType;
import org.openqa.selenium.TakesScreenshot;
import org.openqa.selenium.WebDriver;
import org.openqa.selenium.WebElement;

import java.io.IOException;
import java.nio.file.Files;
import java.nio.file.Path;
import java.nio.file.Paths;
import java.util.Base64;

/**
 * 页面操作类:记录操作步骤
 */
public class BingOps {
    //输入框输入元素
    public static void inputText(WebDriver webDriver, String keyWords) {
        WebElement inputTxt = BingPage.inputTxt(webDriver);
        inputTxt.sendKeys(keyWords);
    }
    //点击搜索
    public static void clickSearch(WebDriver webDriver) {
        WebElement searchIcon = BingPage.searchIcon(webDriver);
        searchIcon.click();
    }

    //截图并保存
    public static void takeScreenshot(WebDriver webDriver, String imgPath) throws IOException {
        //截取屏幕并返回 Base64 编码的字符串,
        //Base64 是一种将二进制数据编码为文本字符串的方式,便于传
        String base64 = ((TakesScreenshot)webDriver).getScreenshotAs(OutputType.BASE64);
        //移除 Base64 字符串中的换行符(某些情况下会包含)
        //并将将Base64 字符串解码回原始的字节数组
        byte[] decodedBytes = Base64.getDecoder().decode(base64.replace("\n", ""));
        //将字符串路径转换为 Path 对象
        Path file = Paths.get(imgPath);
        //file.getParent()获取文件所在的目录路径
        //Files.createDirectories():递归创建所有不存在的父目录
        //如果 imgPath = "reports/screenshots/test1.png",会创建 reports/screenshots/ 目录
        Files.createDirectories(file.getParent());
        //将解码后的字节数组写入指定路径的文件
        Files.write(file,decodedBytes);
    }
}
3.3 测试流程类-测试过程的真正执行
使用封装好的页面操作类,执行真正的测试用例过程
如:在bing页面,输入文字"po模式",进行点击搜索, 这个过程中无需再定位元素,点击操作等,直接使用封装好的方法调用即可;
java
package org.example.webui;

import org.apache.log4j.Logger;
import org.example.base.WebUIBase;
import org.example.webui.pageobj.BingOps;
import org.junit.jupiter.api.Test;

import java.io.File;
import java.io.IOException;


/**
 * 测试流程类:真正的测试流程
 */
public class WebUITestPageObj extends WebUIBase {
    private Logger logger = Logger.getLogger(WebUITestPageObj.class);

    //在bing页面,输入po模式,进行点击搜索
    @Test
    public void bingPO() {
        navigation.to("https://cn.bing.com/");
        BingOps.inputText(driver, "PO模式");
        BingOps.clickSearch(driver);
    }

    /**
     * 输入,点击,过程记录截图
     * @throws IOException
     */
    @Test
    public void bingPOScreenShot() throws IOException {
        navigation.to("https://cn.bing.com/");
        BingOps.inputText(driver, "什么是PO模式?");
        String imgPath1 = projRootPath + File.separator + "testdata" + File.separator
                + "bing_input" + System.currentTimeMillis() + ".png";
        logger.info("保存图形路径:" + imgPath1);

        BingOps.clickSearch(driver);
        wait5s();
        String imgPath2 = projRootPath + File.separator + "testdata" + File.separator
                + "bing_search" + System.currentTimeMillis() + ".png";
        logger.info("保存图像路径:" + imgPath2);
        BingOps.takeScreenshot(driver, imgPath2);

    }
}
总结
✨✨✨各位读友,本篇分享到内容是否更好的让你理解了 (),如果对你有帮助给个👍赞鼓励一下吧!!
🎉🎉🎉世上没有绝望的处境,只有对处境绝望的人。
🎉🎉🎉一遇挫折就灰心丧气的人,永远是个失败者。而一向努力奋斗,坚韧不拔的人会走向成功。
感谢每一位一起走到这的伙伴,我们可以一起交流进步!!!一起加油吧!!!
