在MongoDB的使用过程中,当数据量增长到单机或普通副本集无法承载时,分片集群(Sharded Cluster)就成为解决大规模数据存储与高并发写入的核心方案。本文将从分片集群的适用场景、架构原理出发,一步步带你完成从环境部署到高可用测试的全流程实战,帮助你快速掌握MongoDB分片集群的搭建与验证方法。
一、什么时候该用MongoDB分片集群?
并非所有场景都需要分片集群------普通副本集(Replica Set)已能满足大部分中小规模业务的高可用需求。只有当出现以下情况时,才需要考虑引入分片:
-
数据量过大,单机性能瓶颈凸显
当单机MongoDB的磁盘占用过高(如超过TB级),或单机备份/恢复耗时过长(如超过数小时),会导致运维效率下降、故障恢复风险升高,此时需要通过分片将数据分散到多台机器。
-
数据持续增长,未来存在扩容需求
如果业务预估数据量或请求量会持续增长(如用户量、日志量按月翻倍),提前规划分片集群可避免后续因单机瓶颈导致的业务中断,实现"按需扩容"。
-
副本集无法满足高并发写入需求
副本集的写入操作仅在主节点(Primary)执行,再同步到从节点(Secondary),当写入QPS超过主节点性能上限(如每秒数万次写入)时,即使增加从节点也无法提升写入能力,而分片可将写入压力分散到多个分片的主节点。
注意:分片集群的组件更多(路由、配置、分片节点),维护成本高于副本集。若副本集能满足业务需求,优先选择副本集。
二、MongoDB分片集群的核心特点
分片集群之所以成为大规模MongoDB部署的首选,源于其三大核心优势:
-
对应用透明,低改造成本
应用只需连接
mongos(路由节点),无需感知后端分片结构,操作语法与单机/MongoDB完全一致(如insert、find),无需大量修改业务代码。 -
数据自动平衡,避免"冷热分片"
集群会实时监测各分片的数据量,当某个分片数据量远超其他分片时,自动将部分数据迁移到空闲分片,确保所有分片负载均衡,无需人工干预。
-
动态扩容,不中断业务
扩容时只需新增分片节点,加入集群后数据会自动迁移,整个过程中MongoDB可正常提供服务,实现"在线扩容",满足生产环境的高可用要求。
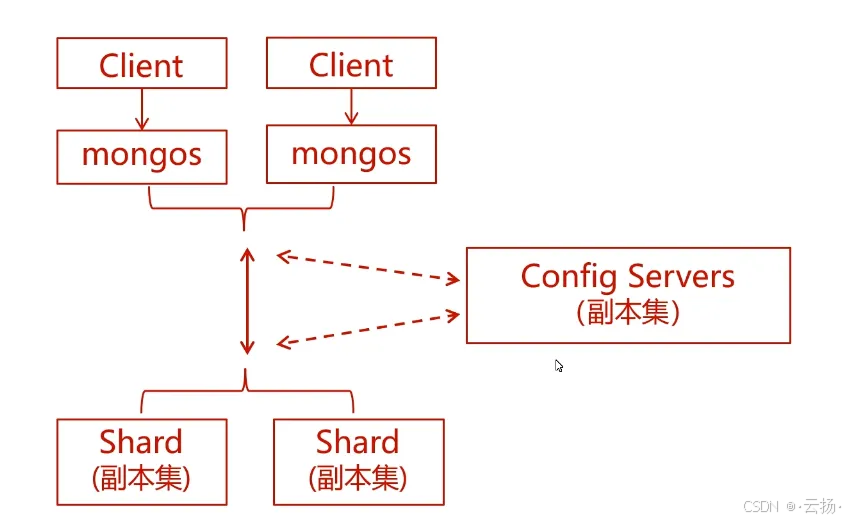
三、分片集群架构解析
MongoDB分片集群由三大核心组件构成,各组件各司其职,且均通过副本集保证高可用:
| 组件 | 作用 | 高可用设计 |
|---|---|---|
mongos |
路由节点,接收应用请求并转发到对应分片 | 多台部署(如每台应用机1个) |
Config Servers |
配置服务器,存储集群元数据(分片映射) | 固定3节点副本集(无Arbiter) |
Shard |
分片节点,实际存储数据 | 每个Shard为1个副本集(3节点) |
本次实验架构规划
为了降低实验成本,我们使用3台物理机搭建完整分片集群,具体规划如下:
- Config Servers :3台机器均部署,端口
27020,组成副本集config_repl; - Shard节点 :每台机器部署2个分片实例(端口
27021和27022),其中:- 3台机器的
27021实例组成分片1(副本集shardsvr_repl_27021); - 3台机器的
27022实例组成分片2(副本集shardsvr_repl_27022);
- 3台机器的
- mongos :任选1台机器部署,端口
27017(生产环境建议多机部署)。
四、实战部署:从0搭建MongoDB分片集群
前置准备
- 3台Linux机器(本文使用CentOS 7,IP分别为
192.168.184.151、192.168.184.152、192.168.184.153); - 每台机器已安装MongoDB 5.0+(安装步骤参考MongoDB官方文档);
- 关闭防火墙或开放所需端口(
27017、27020、27021、27022)。
4.1 部署Config Servers(配置服务器)
Config Servers是集群的"大脑",需先部署且必须为3节点副本集(不支持Arbiter)。
步骤1:在3台机器上创建目录
bash
# 创建Config Server的数据、配置、日志、进程文件目录
mkdir -p /data/mongodbconfig27020/{data,conf,run,logs}
步骤2:编写Config Server配置文件
在每台机器上编辑/data/mongodbconfig27020/conf/mongod.conf,内容如下:
yaml
sharding:
  clusterRole: configsvr  # 标识为Config Server
systemLog:
  destination: file
  logAppend: true
  path: /data/mongodbconfig27020/logs/mongod.log  # 日志路径
storage:
  dbPath: /data/mongodbconfig27020/data  # 数据存储路径
  journal:
    enabled: true  # 开启日志 journal,防止数据丢失
processManagement:
  fork: true  # 后台运行
  pidFilePath: /data/mongodbconfig27020/run/mongod.pid  # PID文件路径
  timeZoneInfo: /usr/share/zoneinfo  # 时区信息
net:
  port: 27020  # 端口
  bindIp: 0.0.0.0  # 允许所有IP访问(生产环境需限制)
replication:
  oplogSizeMB: 4096  #  oplog大小(4GB,根据数据量调整)
  replSetName: config_repl  # 副本集名称,3台机器需一致
步骤3:启动Config Server
在3台机器上分别执行启动命令:
bash
mongod -f /data/mongodbconfig27020/conf/mongod.conf步骤4:初始化Config Server副本集
仅在其中1台机器(如192.168.184.151)上执行初始化:
bash
# 连接Config Server
mongosh --port 27020

# 初始化副本集(执行后会自动选举主节点)
rs.initiate({
  _id: "config_repl",
  configsvr: true,  # 必须指定为Config Server副本集
  members: [
    {_id: 0, host: '192.168.184.151:27020'},
    {_id: 1, host: '192.168.184.152:27020'},
    {_id: 2, host: '192.168.184.153:27020'}
  ]
})

# 查看副本集状态(确认所有节点正常)
rs.status()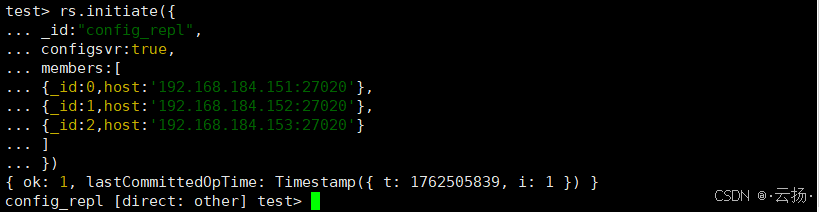
注意 :Config Server副本集不能添加Arbiter节点,必须由3个数据节点组成。
4.2 部署Shard节点(分片实例)
每个Shard是一个独立的副本集,本文部署2个Shard(分别使用端口27021和27022)。
步骤1:在3台机器上创建Shard目录
bash
# 为2个Shard分别创建目录(27021和27022)
mkdir -p /data/mongodbshard27021/{data,conf,run,logs}
mkdir -p /data/mongodbshard27022/{data,conf,run,logs}
步骤2:编写Shard配置文件
(1)Shard 1(端口27021)的配置文件
编辑/data/mongodbshard27021/conf/mongod.conf:
yaml
sharding:
  clusterRole: shardsvr  # 标识为Shard节点
systemLog:
  destination: file
  logAppend: true
  path: /data/mongodbshard27021/logs/mongod.log
storage:
  dbPath: /data/mongodbshard27021/data
  journal:
    enabled: true
processManagement:
  fork: true
  pidFilePath: /data/mongodbshard27021/run/mongod.pid
  timeZoneInfo: /usr/share/zoneinfo
net:
  port: 27021
  bindIp: 0.0.0.0
replication:
  oplogSizeMB: 4096
  replSetName: shardsvr_repl_27021  # Shard 1的副本集名称
(2)Shard 2(端口27022)的配置文件
编辑/data/mongodbshard27022/conf/mongod.conf:
yaml
sharding:
  clusterRole: shardsvr
systemLog:
  destination: file
  logAppend: true
  path: /data/mongodbshard27022/logs/mongod.log
storage:
  dbPath: /data/mongodbshard27022/data
  journal:
    enabled: true
processManagement:
  fork: true
  pidFilePath: /data/mongodbshard27022/run/mongod.pid
  timeZoneInfo: /usr/share/zoneinfo
net:
  port: 27022
  bindIp: 0.0.0.0
replication:
  oplogSizeMB: 4096
  replSetName: shardsvr_repl_27022  # Shard 2的副本集名称
步骤3:启动Shard节点
在3台机器上分别启动2个Shard实例:
bash
# 启动Shard 1(27021)
mongod -f /data/mongodbshard27021/conf/mongod.conf

# 启动Shard 2(27022)
mongod -f /data/mongodbshard27022/conf/mongod.conf
步骤4:初始化Shard副本集
分别初始化Shard 1和Shard 2的副本集(仅在其中1台机器执行)。
(1)初始化Shard 1(27021)
bash
# 连接Shard 1
mongosh --port 27021

# 初始化副本集
rs.initiate({
  _id: "shardsvr_repl_27021",
  members: [
    {_id: 0, host: '192.168.184.151:27021'},
    {_id: 1, host: '192.168.184.152:27021'},
    {_id: 2, host: '192.168.184.153:27021'}
  ]
})

# 查看状态
rs.status()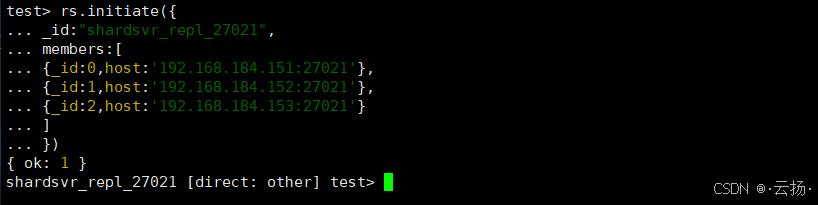
(2)初始化Shard 2(27022)
bash
# 连接Shard 2
mongosh --port 27022

# 初始化副本集
rs.initiate({
  _id: "shardsvr_repl_27022",
  members: [
    {_id: 0, host: '192.168.184.151:27022'},
    {_id: 1, host: '192.168.184.152:27022'},
    {_id: 2, host: '192.168.184.153:27022'}
  ]
})

# 查看状态
rs.status()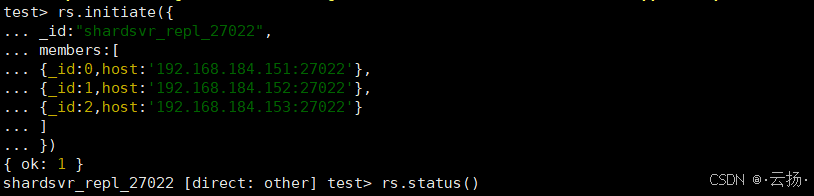
4.3 部署mongos(路由节点)
mongos是应用的接入点,需指定Config Server地址以获取集群元数据。
步骤1:创建mongos目录
在部署mongos的机器(如192.168.184.151)上执行:
bash
mkdir -p /data/mongos27017/{logs,conf,run}步骤2:编写mongos配置文件
编辑/data/mongos27017/conf/mongos.conf:
yaml
sharding:
  configDB: config_repl/192.168.184.151:27020,192.168.184.152:27020,192.168.184.153:27020  # 关联Config Server副本集
systemLog:
  destination: file
  logAppend: true
  path: /data/mongos27017/logs/mongos.log
processManagement:
  fork: true
  pidFilePath: /data/mongos27017/run/mongod.pid
net:
  port: 27017  # 默认MongoDB端口,方便应用连接
  bindIp: 0.0.0.0
步骤3:启动mongos
bash
mongos --config /data/mongos27017/conf/mongos.conf步骤4:创建集群用户
mongos本身不存储数据,用户信息会同步到Config Server。
(1)创建管理员用户(root)
bash
# 连接mongos
mongosh --port 27017

# 切换到admin库
use admin

# 创建管理员用户(拥有所有库的用户管理权限)
db.createUser({
  user: "root",
  pwd: passwordPrompt(),  # 输入密码(本文示例:U8agi79Qa)
  roles: [{role: "userAdminAnyDatabase", db: "admin"}]
})

# 退出后重新登录(验证权限)
mongosh --port 27017 -u root -p
(2)创建业务用户(martin_rw)
为业务库martin创建读写用户:
bash
# 切换到martin库(不存在会自动创建)
use martin

# 创建业务用户(仅拥有martin库的读写权限)
db.createUser({
  user: "martin_rw",
  pwd: passwordPrompt(),  # 输入密码(本文示例:Augacad8G)
  roles: [{role: "readWrite", db: "martin"}]
})
4.4 配置分片集群与数据测试
步骤1:添加Shard到集群
通过管理员用户登录mongos,将2个Shard加入集群:
bash
# 连接mongos(管理员权限)
mongosh --port 27017 -u root -p
# 添加Shard 1
sh.addShard("shardsvr_repl_27021/192.168.184.151:27021,192.168.184.152:27021,192.168.184.153:27021")
# 添加Shard 2
sh.addShard("shardsvr_repl_27022/192.168.184.151:27022,192.168.184.152:27022,192.168.184.153:27022")
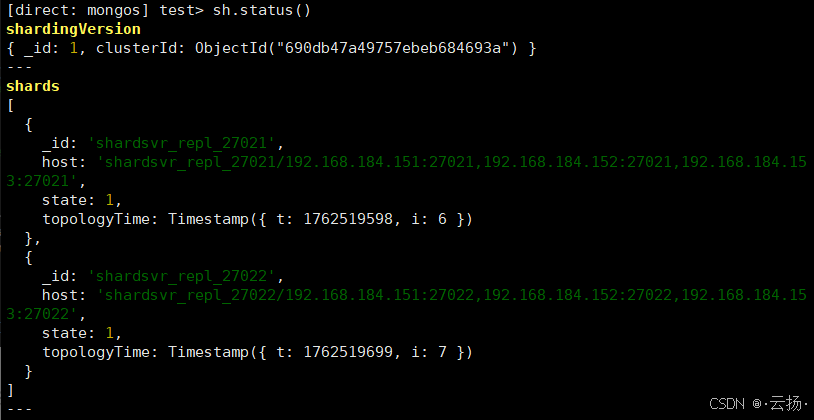
# 查看集群状态(确认Shard已添加)
sh.status()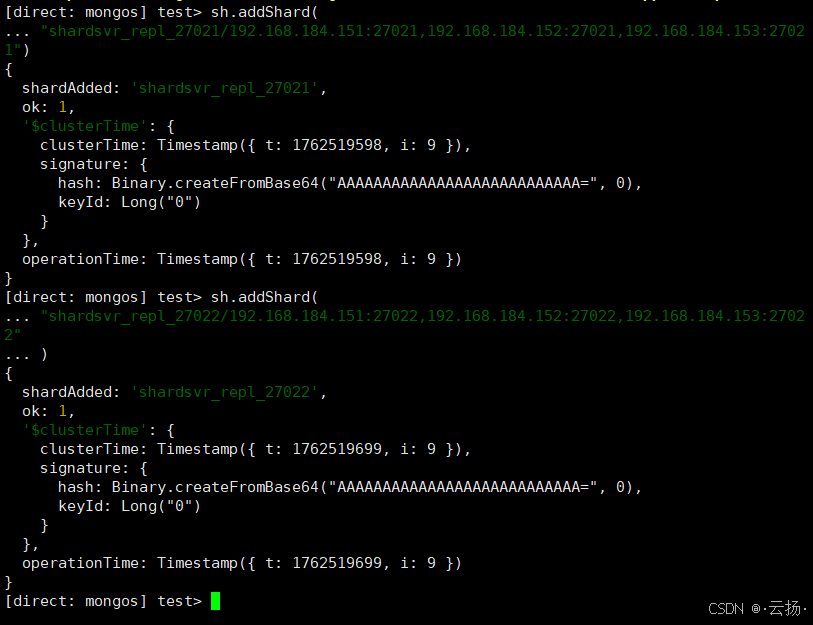
步骤2:启用数据库分片
为martin库启用分片功能:
bash
# 启用martin库的分片
sh.enableSharding("martin")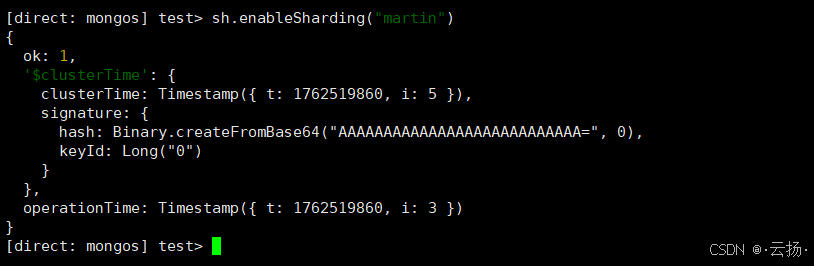
步骤3:配置集合分片规则
选择userinfo集合,按_id字段的哈希值分片(哈希分片适合数据均匀分布场景):
bash
# 对martin.userinfo集合配置分片规则
sh.shardCollection("martin.userinfo", {_id: "hashed"})

# 查看分片详情
sh.status()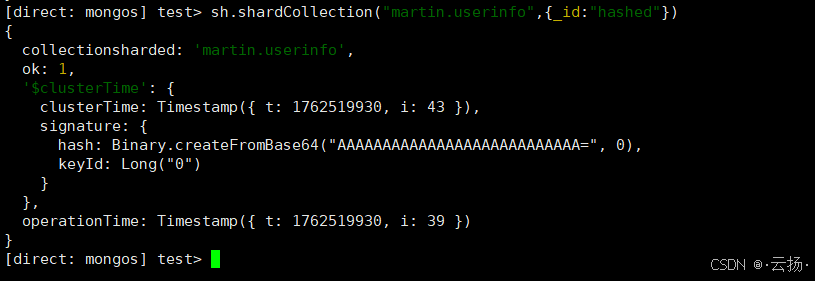
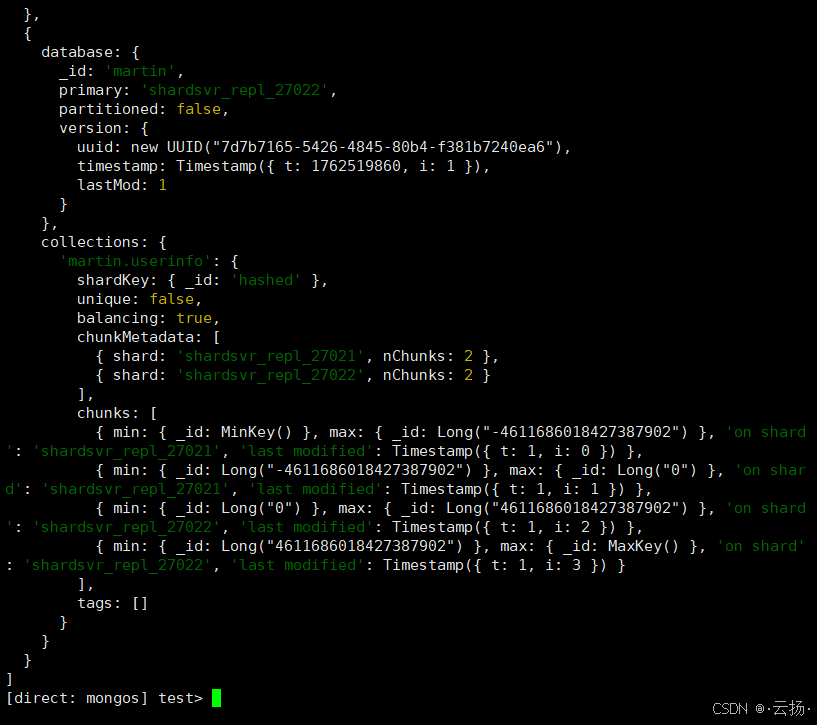
步骤4:验证数据分布
通过业务用户插入测试数据,验证数据是否分散到2个Shard:
bash
# 用业务用户登录mongos
mongosh --port 27017 -u martin_rw -p --authenticationDatabase martin

# 切换到martin库
use martin

# 插入20条测试数据
for (var i=1; i<=20; i++) db.userinfo.insertOne({userid:i, username:'test_user_' + i});

# 查看总数据量(应返回20)
db.userinfo.countDocuments()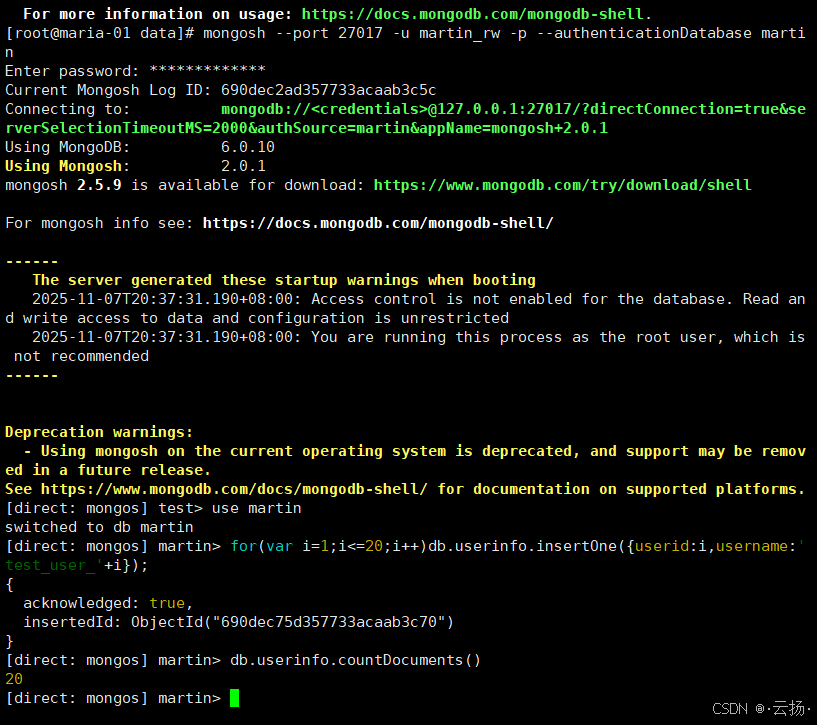
分别登录2个Shard查看数据分布:
bash
# 登录Shard 1(27021),查看数据量(约10条)
mongosh --port 27021 martin
db.getMongo().setReadPref("secondaryPreferred")
db.userinfo.countDocuments()

# 登录Shard 2(27022),查看数据量(约10条)
mongosh --port 27022 martin
db.getMongo().setReadPref("secondaryPreferred")
db.userinfo.countDocuments()
结果会显示数据均匀分布在2个Shard,验证分片规则生效。
五、高可用测试:模拟节点故障
分片集群的高可用依赖于副本集的自动故障转移。本节通过"kill Shard主节点"模拟故障,验证集群是否能正常提供服务。
5.1 编写Go语言数据写入程序
首先编写一个Go程序,每秒向集群写入1条数据,并打印日志(模拟业务持续写入):
go
package main

import (
	"context"
	"fmt"
	"log"
	"time"

	"go.mongodb.org/mongo-driver/bson"
	"go.mongodb.org/mongo-driver/mongo"
	"go.mongodb.org/mongo-driver/mongo/options"
)

func main() {
	// 连接mongos(指定业务用户、密码、认证库)
	uri := "mongodb://martin_rw:Augacad8G@192.168.184.151:27017/?authSource=martin"
	clientOpts := options.Client().ApplyURI(uri)
	client, err := mongo.Connect(context.TODO(), clientOpts)
	if err != nil {
		log.Fatalf("连接MongoDB失败:%v", err)
	}

	// 验证连接
	if err := client.Ping(context.TODO(), nil); err != nil {
		log.Fatalf("Ping MongoDB失败:%v", err)
	}
	fmt.Println("已连接到MongoDB分片集群,开始每秒写入数据...")

	// 获取集合(shard_write_test)
	col := client.Database("martin").Collection("shard_write_test")

	// 每秒写入1条数据
	for i := 1; ; i++ {
		// 构造数据(包含时间戳和自增ID)
		data := bson.M{
			"write_id": i,
			"content":  "shard_ha_test",
			"write_at": time.Now(),
		}

		// 插入数据
		_, err := col.InsertOne(context.TODO(), data)
		if err != nil {
			log.Printf("[%s] 写入失败:%v", time.Now().Format("2006-01-02 15:04:05"), err)
		} else {
			log.Printf("[%s] 写入成功:write_id=%d", time.Now().Format("2006-01-02 15:04:05"), i)
		}

		// 休眠1秒
		time.Sleep(time.Second)
	}
}
5.2 运行程序并模拟故障
步骤1:运行Go程序
bash
# 编译并运行(需提前安装Go环境和MongoDB驱动:go get go.mongodb.org/mongo-driver/mongo)
go run mongo_shard_write.go
程序会持续打印写入日志,此时集群正常运行。
步骤2:找到Shard 1的主节点
bash
# 连接Shard 1(27021)
mongosh --port 27021 -u martin_rw -p --authenticationDatabase martin

# 查看当前主节点(输出中"primary"对应的IP即为当前主节点)
rs.status()
假设当前Shard 1的主节点是192.168.184.151:27021。
步骤3:Kill主节点进程
在192.168.184.151上找到Shard 1的进程并kill:
bash
# 查找Shard 1(27021)的进程ID
ps -ef | grep mongodbshard27021

# Kill进程(替换为实际PID)
kill -9 12345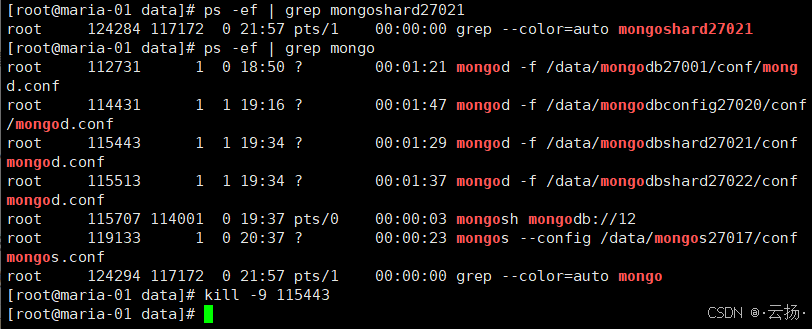
步骤4:观察程序写入情况
查看Go程序的日志,会发现:
- 仅出现1秒左右的写入失败(副本集选举新主节点的耗时);
- 选举完成后,程序恢复正常写入,无持续故障。
步骤5:验证数据完整性
故障恢复后,登录mongos查看数据总量,确认无数据丢失:
bash
mongosh --port 27017 -u martin_rw -p --authenticationDatabase martin
use martin
db.shard_write_test.countDocuments()
数据量应与程序写入的总次数一致,验证集群高可用生效。
六、总结与注意事项
-
架构核心要点:
- Config Server必须是3节点副本集,无Arbiter;
- 每个Shard必须是副本集(至少3节点),确保单个Shard的高可用;
- mongos建议多机部署(如每台应用机1个),避免路由节点单点故障。
-
分片键选择:
- 哈希分片(如本文的
_id: hashed)适合数据均匀分布,无明显访问热点; - 范围分片(如
createTime: 1)适合按范围查询(如查询某时间段数据),但需避免热点分片。
- 哈希分片(如本文的
-
生产环境建议:
- 关闭
bindIp: 0.0.0.0,限制仅应用机器可访问; - 使用更复杂的密码,并定期更换;
- 监控各组件状态(如mongos路由效率、Shard数据均衡情况),可使用MongoDB Compass或Prometheus+Grafana。
- 关闭
通过本文的实战,你已掌握MongoDB分片集群的部署、配置与高可用验证方法。在实际业务中,需根据数据量、访问模式调整集群规模与分片策略,确保集群稳定高效运行。