-
最近在写一个自动化测试软件,写tesecase的时候总要借助其他工具(比如
inspect.exe)来查看一个ui元素的automation_id、name等,感觉很麻烦,所以想着怎么自定义实现一个UI探测器,将它集成在我写的软件中。 -
幸运的是我找到了一个开源的工具 FlaUInspect,但是它是C#编写的,我写的自动化测试软件是基于python实现的,但是可以借鉴下是它底层是如何实现的。
- 按住
Ctrl就能高亮鼠标所在位置的UI元素,如下图所示
- 按住
-
查看了下源码,底层思路大概是这个样子:
c#AutomationElement? hoveredElement = _automation?.FromPoint(screenPos); ElementHighlighter.HighlightElement(hoveredElement, _logger);- 获取鼠标坐标处的ui元素,然后调用
HighlightElement直接高亮 - 随后看了下
HighlightElement处的代码,大体就是显示一个winform窗口,2秒后自动消失。
- 获取鼠标坐标处的ui元素,然后调用
一次绕远路的尝试
-
既然知道了原理,那么只需要完成这两步就好了:获取鼠标处元素 + 高亮显示
-
chatgpt告诉我
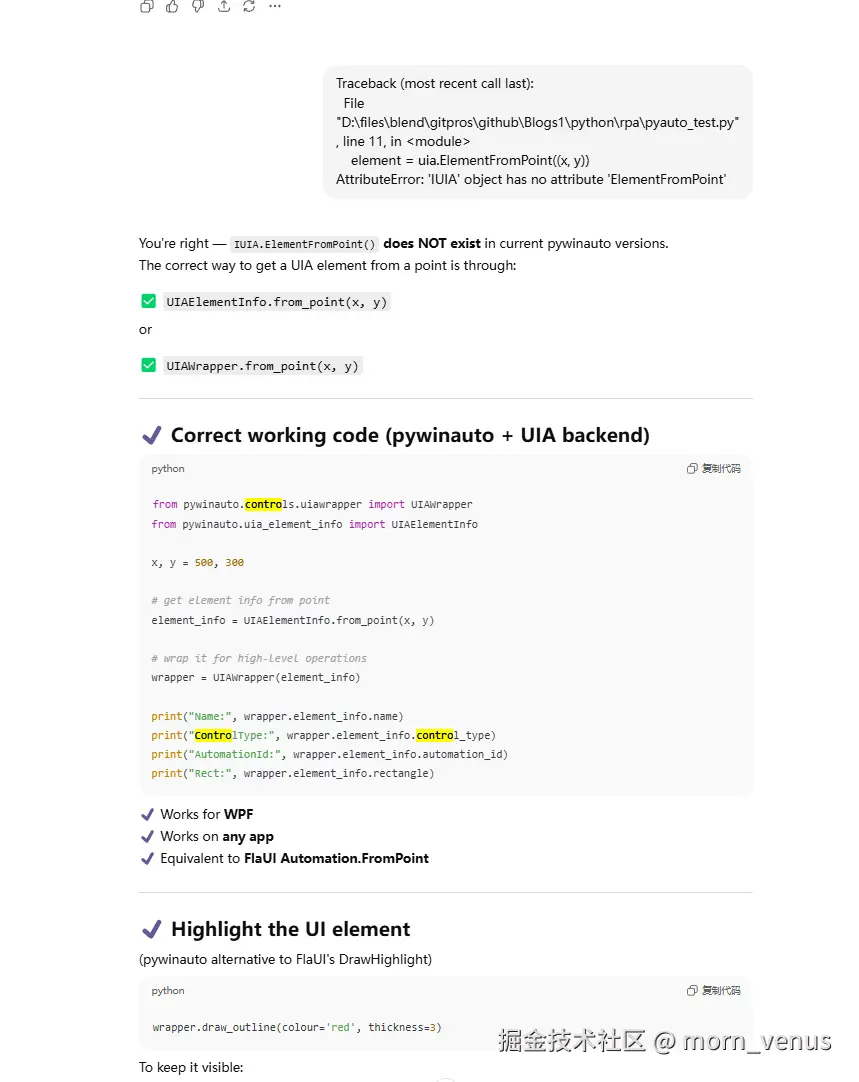
uiautomation这个包有一个函数可以直接获取鼠标处的元素,还有pywinauto也可以- 我先试了
pywinauto发现chatgpt给的是错误答案,又问了deepseek,结果deepseek也给了我错误的答案,如下图所示,左边是chatgpt给出的代码,右边是deepseek给出的方案
- 我先试了
-
在尝试chatgpt的代码报错之后(uia无ElementFromPoint方法),我选择了
uiautomation+ 自己绘制高亮窗口的方案。 -
根据鼠标坐标获取元素
pythonimport uiautomation as auto from PyQt6.QtGui import QCursor pos = QCursor.pos() element = auto.ControlFromPoint(pos.x(), pos.y()) print(element, element.Name, element.ControlTypeName) -
自己绘制高亮窗口
pythonimport tkinter as tk def highlight_rect_with_tkinter(rect, color='red', duration=2000): """ rect: 一个包含(left, top, right, bottom)的元组或对象。 duration: 高亮显示时长(毫秒),默认3秒后自动关闭。 """ # 创建主窗口 root = tk.Tk() root.overrideredirect(True) # 无标题栏边框 root.attributes('-topmost', True) # 窗口置顶 root.attributes('-transparentcolor', 'white') # 设置白色为透明色 root.geometry('{width}x{height}+{x}+{y}'.format( width=rect.right - rect.left, height=rect.bottom - rect.top, x=rect.left, y=rect.top )) # 创建画布并绘制矩形框 canvas = tk.Canvas(root, width=rect.right - rect.left, height=rect.bottom - rect.top, highlightthickness=0) canvas.pack() # 在画布边缘绘制一个矩形框,可根据需要调整线条宽度 canvas.create_rectangle( 0, 0, # 左上角坐标(相对于画布) rect.right - rect.left - 1, # 右下角X坐标(减1确保边框可见) rect.bottom - rect.top - 1, # 右下角Y坐标 outline=color, width=3, fill='' # 红色边框,无填充 ) # 设置定时关闭 root.after(duration, root.destroy) root.mainloop() -
写完之后测试了一个qt程序,很丝滑的找到了鼠标所在位置的控件,但是当我尝试去探测wpf程序的控件时,它却只能识别到整个wpf窗口,窗口中的子控件无法识别到,说明
uiautomation是不支持uia的。

回归到 pywinauto
-
前路走不通就再尝试一下
pywinauto,这次我直接贴出了它给的代码运行的报错,这次它给出了正确答案,并且还给出了高亮的方案:pywinauto自带高亮的方法 -
于是将它封装成一个类,构造的时候传入回调函数,想要获取元素的时候调用
start_capture即可(捕获元素按ctrl+enter)pythonfrom pywinauto.controls.uiawrapper import UIAWrapper from pywinauto.uia_element_info import UIAElementInfo from PyQt6.QtCore import QTimer from PyQt6.QtGui import QCursor import keyboard class AutoInspect(object): def __init__(self, callback): self.callback = callback self.is_capture = False self.ctrl_down = False self.enter_down = False self.timer = QTimer() self.timer.setInterval(1000) self.timer.timeout.connect(self.__timeout) self.init() def init(self): keyboard.on_press_key("ctrl", lambda e: self.__on_ctrl_down(e)) keyboard.on_release_key("ctrl", lambda e: self.__on_ctrl_up(e)) keyboard.on_press_key("enter", lambda e: self.__on_enter_down(e)) keyboard.on_release_key("enter", lambda e: self.__on_enter_up(e)) keyboard.on_press_key("esc", lambda e: self.__on_esc_enter(e)) def start_capture(self): self.is_capture = True self.timer.start() def __timeout(self): if not self.is_capture: return if not self.ctrl_down: return # 监控鼠标位置 并获取元素 pos = QCursor.pos() element_info = UIAElementInfo.from_point(pos.x(), pos.y()) element = UIAWrapper(element_info) if element is None: return if self.enter_down: self.__stop_capture() self.callback(element) else: # 高亮显示元素 element.draw_outline(colour='red', thickness=2) def __stop_capture(self): self.timer.stop() self.is_capture = False def __on_ctrl_down(self, e): self.ctrl_down = True def __on_ctrl_up(self, e): self.ctrl_down = False def __on_enter_down(self, e): self.enter_down = True def __on_enter_up(self, e): self.enter_down = False def __on_esc_enter(self, e): self.__stop_capture() def __del__(self): del self.timer