步骤概览:
- 准备 JSON 数据结构
- 定义 Node 抽象类及子类
- 使用 Jackson 多态解析 JSON
- 实现 convert() 方法生成 FlowElement
- 构建 SequenceFlow 连接节点
- 导出 .bpmn20.xml 文件
开发Flowable实战项目时,需要用到工作流的前端绘制页面,而该页面转换保存的数据为Json格式,在Flowable等工作流引擎中均使用Bpmn文件,其后缀为.bpmn20.xml 或.bpmn.xml 。通过后缀可以看出该文件为xml文档文件,由此官方提供了flowable-bpmn-converter的Maven依赖,我们可以通过该依赖实现Json转xml:
xml
<dependency>
   <groupId>org.flowable</groupId>
   <artifactId>flowable-bpmn-converter</artifactId>
   <version>7.2.0</version>
</dependency>
准备工作已完成,接下来就是准备转换的Model,我们需要做的是将Json映射到不同的类中,对应好相关的继承关系,最后使用依赖中的转换完成文件的导出。
注:本文中"节点"指 JSON 中的流程节点,"FlowElement"指 Flowable 中的 BPMN 元素。
一、准备工作
1.1 抽象类Node
在开始之前先要理清楚每一个工作流的节点以及他们之间的关系,需要抽象出来一个最开始的Node节点,Node与其继承类的关系大致长这个样子:
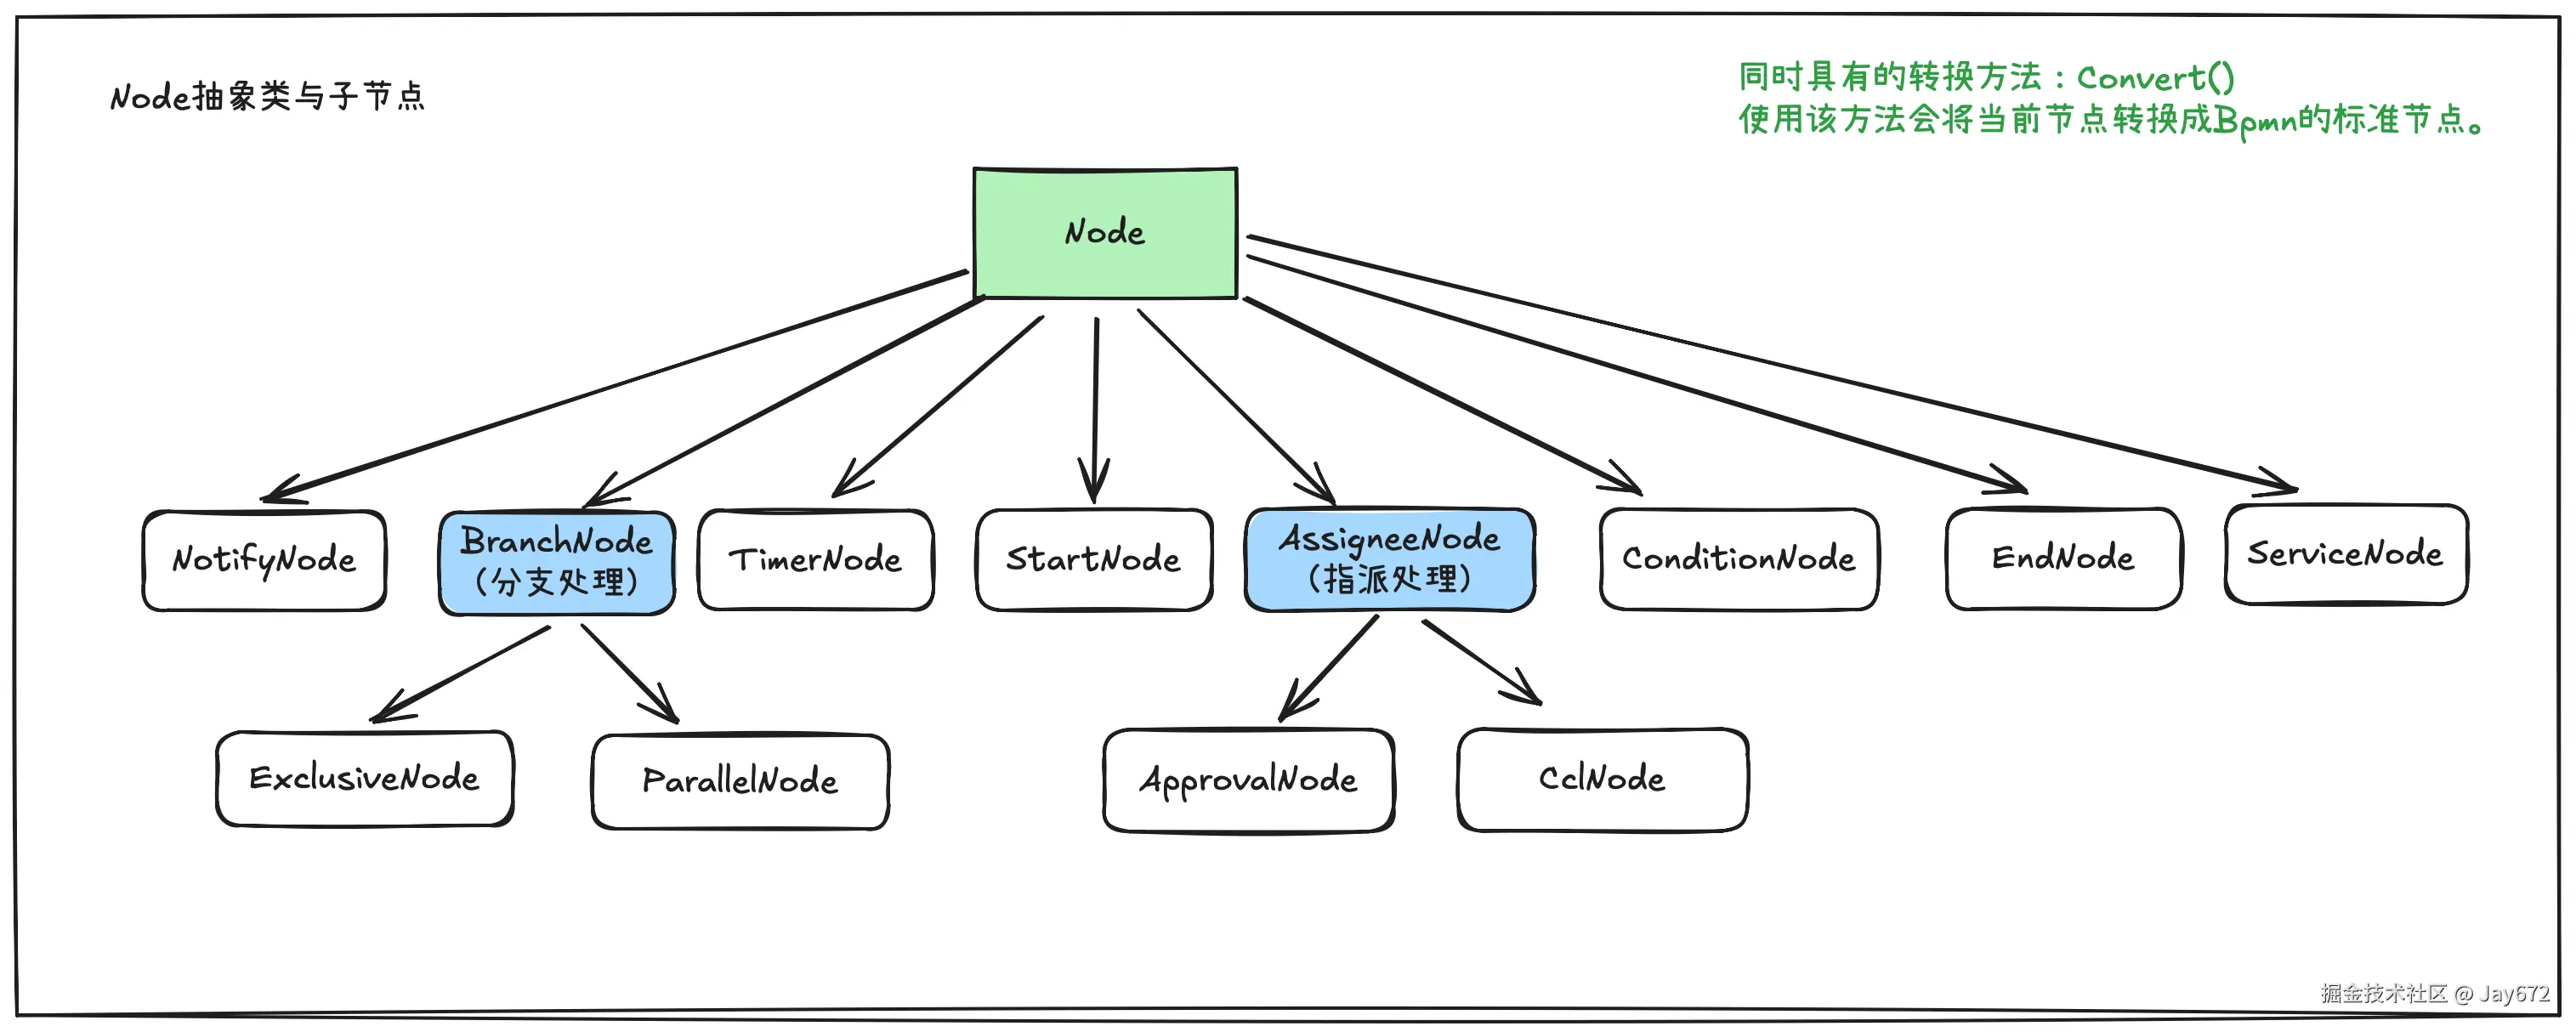
图中可以看出,子类Node均有节点id、父节点id、节点名称等等共同点,因此可以抽象出来,即:
java
private String id;          // 节点id
private String parentId;    // 父节点id
private String name;        // 节点名称
private String type;        // 节点类型
private Node next;          // 子节点
private JsonNode props;     // 属性配置
@JsonIgnore
private String branchId; // 分支id(辅助属性)因为后续还有转换动作,而每一个节点均需要进行转换,所以需要添加一个convert()的抽象方法,方便后续进行转换。
java
public abstract List<FlowElement> convert();1.2 Jackson的多态类型
为了方便做转换,这里我准备了一段Json数据,该数据是由wflow-web-next Vue3版本生成,稍微做了一些小调整,添加了next属性,并将子节点嵌套入了next,后续使用递归转换也可以做到这一点:
-
简单的Json测试数据
json{ "name": "未命名流程", "groupId": 222, "process": { "id": "node_root", "type": "Start", "name": "发起人", "parentId": null, "next": { "id": "node_17628242120246176", "type": "Approval", "name": "审批人", "parentId": "node_root", "next": { "id": "node_end", "type": "End", "name": "流程结束", "parentId": "node_17628242120246176", "props": {} }, "props": { "mode": "USER", "ruleType": "ROOT_SELF", "taskMode": { "type": "AND", "percentage": 100 }, "needSign": false, "assignUser": [], "rootSelect": { "multiple": false }, "leader": { "level": 1, "emptySkip": false }, "leaderTop": { "level": 0, "toEnd": false, "emptySkip": false }, "assignDept": { "dept": [], "type": "LEADER" }, "assignRole": [], "noUserHandler": { "type": "TO_NEXT", "assigned": [] }, "sameRoot": { "type": "TO_SELF", "assigned": [] }, "timeout": { "enable": false, "time": 1, "timeUnit": "M", "type": "TO_PASS" } } }, "props": {} }, "remark": "" }
Json数据中包含嵌套的节点,这样就很方便我们使用Jackson的多态类型来进行嵌套的转换。
java
@Data
@JsonTypeInfo(use = JsonTypeInfo.Id.NAME,include = JsonTypeInfo.As.PROPERTY,property = "type",defaultImpl = Node.class,visible = true)
@JsonSubTypes({
        @JsonSubTypes.Type(value = StartNode.class,name = "Start"),
        @JsonSubTypes.Type(value = ApprovalNode.class, name = "Approval"),
        @JsonSubTypes.Type(value = EndNode.class, name = "End")
})上述代码中,@JsonTypeInfo用来确定我们需要转换的标识,如iJsonTypeInfo.As.PROPERTY代表使用的是属性的名称来确定我们需要转换的不同的类型,所以在@JsonSubTypes中可以看到子类型的注释,当属性type的值为Start时,指定转换为StartNode类的实体,当我们有更多不同的节点时,就需要在这里添加转换的标识了。
二、Node节点
在转换时需要StartEvent、UserTask、EndEvent这三个工作流节点,现在我们来创建他们,值得一提的是,我们在上面的Node节点关系图中看到,AssigneeNode有多个子节点,这是因为用户任务可以在这个基础上分支出Approval类型和抄送类型 ,有多种不同的用户指派方式,所以需要再次抽象出一个类:
java
@EqualsAndHashCode(callSuper = true)
@Data
public abstract class AssigneeNode extends Node {
    // 审批对象
    private AssigneeTypeEnum assigneeType;
    // 表单内人员
    private String formUser;
    // 表单内角色
    private String formRole;
    // 审批人
    private List<String> users;
    // 审批人角色
    private List<String> roles;
    // 主管
    private Integer leader;
    // 组织主管
    private Integer orgLeader;
    // 发起人自选:true-单选,false-多选
    private Boolean choice;
    // 发起人自己
    private Boolean self;

    public abstract List<FlowElement> convert();
}
Approval类型的属性声明及转换方法:
java
@EqualsAndHashCode(callSuper = true)
@Data
@ToString(callSuper = true)
public class ApprovalNode extends AssigneeNode{

    private ApprovalMultiEnum multi;    // 多人审批方式
    private BigDecimal multiPercent;    // 多人会签通过百分比
    private Node next;                  // 子节点

    @Override
    public List<FlowElement> convert() {

        // 所有节点集合
        ArrayList<FlowElement> elements = new ArrayList<>();
        // 用户节点
        UserTask userTask = new UserTask();
        userTask.setId(this.getId());
        userTask.setName(this.getName());
        // 审批人
        MultiInstanceLoopCharacteristics multiInstanceLoopCharacteristics = new MultiInstanceLoopCharacteristics();
        if (this.getMulti() == ApprovalMultiEnum.SEQUENTIAL) { // 多人审批方式-顺序审批
            multiInstanceLoopCharacteristics.setSequential(true);
        } else if (this.getMulti() == ApprovalMultiEnum.JOINT) { // 多人审批方式-并行审批
            multiInstanceLoopCharacteristics.setSequential(false);
            if (Objects.nonNull(this.getMultiPercent()) && this.getMultiPercent().compareTo(BigDecimal.ZERO) > 0) {
                BigDecimal percent = this.getMultiPercent().divide(new BigDecimal(100), 2, RoundingMode.DOWN);
                multiInstanceLoopCharacteristics.setCompletionCondition(String.format("${nrOfCompletedInstances/nrOfInstances >= %s}", percent));
            }
        } else if (this.getMulti() == ApprovalMultiEnum.SINGLE) { // 正常签名
            multiInstanceLoopCharacteristics.setSequential(false);
            multiInstanceLoopCharacteristics.setCompletionCondition("${nrOfCompletedInstances > 0}");
        }

        String variable = String.format("%sItem", this.getId());
        multiInstanceLoopCharacteristics.setElementVariable(variable);
        multiInstanceLoopCharacteristics.setInputDataItem(String.format("${%sCollection}", this.getId()));
        userTask.setLoopCharacteristics(multiInstanceLoopCharacteristics);
        userTask.setAssignee(String.format("${%s}", variable));
        elements.add(userTask);
        // 下一个节点的连线
        Node next = this.getNext();
        SequenceFlow sequenceFlow = this.buildSequence(next);
        elements.add(sequenceFlow);
        // 下一个节点
        if (Objects.nonNull(next)) {
            next.setBranchId(this.getBranchId());
            List<FlowElement> flowElements = next.convert();
            elements.addAll(flowElements);
        }

        return elements;
    }
}
StartEvent和EndEvent较为简单,所以只需实现转换代码。
java
public class StartNode extends Node {
    @Override
    public List<FlowElement> convert() {
        ArrayList<FlowElement> elements = new ArrayList<>();
        // 创建开始节点
        StartEvent startEvent = new StartEvent();
        startEvent.setId(this.getId());
        startEvent.setName(this.getName());
        // startEvent.setExecutionListeners(this.buidEventListener()); 监听器
        // 添加节点
        elements.add(startEvent);
        // 获取下一个节点
        Node next = this.getNext();
        SequenceFlow sequenceFlow = this.buildSequence(next);
        elements.add(sequenceFlow);
        // 递归下一个节点及之后的所有节点
        if (Objects.nonNull(next)) {
            List<FlowElement> flowElements = next.convert();
            elements.addAll(flowElements);
        }
        return elements;
    }
}
java
@ToString(callSuper = true)
@EqualsAndHashCode(callSuper = true)
@Data
public class EndNode extends Node {

    @Override
    public List<FlowElement> convert() {
        ArrayList<FlowElement> elements = new ArrayList<>();
        // 结束节点
        EndEvent endEvent = new EndEvent();
        endEvent.setId(this.getId());
        endEvent.setName(this.getName());
//        endEvent.setExecutionListeners(this.buidEventListener());
        elements.add(endEvent);
        return elements;
    }
}
三、构建SequenceFlow
每一个节点都需要使用一个SequenceFlow来进行连接,实质上SequenceFlow也是一个节点,因此可以在Node抽象类中增加buildSequence()方法,转换时,构建每个节点的子节点为SequenceFlow:
java
public SequenceFlow buildSequence(Node next) {
        String sourceRef;
        String targetRef;
        if (Objects.nonNull(next)) {
            sourceRef = next.getParentId();
            targetRef = next.getId();
        } else { // Try to find branch
            if (StringUtils.isNotBlank(this.branchId)) {
                sourceRef = this.id;
                targetRef = this.branchId;
            } else {
                throw new RuntimeException(String.format("节点 %s 的下一个节点不能为空", this.id));
            }
        }
        // Build SequenceFlow
        SequenceFlow sequenceFlow = new SequenceFlow();
        sequenceFlow.setId(String.format("%s-%s", sourceRef, targetRef));
        sequenceFlow.setSourceRef(sourceRef);
        sequenceFlow.setTargetRef(targetRef);
        return sequenceFlow;
 }
四、审批方式枚举
补充上面代码的审批角色枚举类,如果有特殊的需求和审批方式,均可以在这里添加,后续在转换时可以根据类型进行功能调整:
java
@Getter
@AllArgsConstructor
public enum AssigneeTypeEnum {
    USER("user", "用户"),
    ROLE("role", "角色"),
    CHOICE("choice", "发起人自选"),
    SELF("self", "发起人自己"),
    LEADER("leader", "部门主管"),
    ORG_LEADER("orgLeader", "组织主管"),
    FORM_USER("formUser", "表单用户"),
    FORM_ROLE("formRole", "表单角色"),
    AUTO_REFUSE("autoRefuse", "自动拒绝"),
    AUTO_PASS("autoPass", "自动通过");

    @JsonValue
    private final String type;
    private final String description;
}
审批方式枚举
java
@Getter
public enum ApprovalMultiEnum {
    SEQUENTIAL("sequential", "多人审批方式-顺序审批"),
    JOINT("joint", "多人审批方式-并行审批"),
    SINGLE("single", "多人审批方式-任何人审批");

    @JsonValue
    private final String multi;
    private final String description;

    ApprovalMultiEnum(String method, String description) {
        this.multi = method;
        this.description = description;
    }

}
五、开始转换
准备工作已经做好,使用压缩转义后的Json代码进行转换:
json
{"name":"未命名流程","groupId":222,"process":{"id":"node_root","type":"Start","name":"发起人","parentId":null,"next":{"id":"node_17628242120246176","type":"Approval","name":"审批人","parentId":"node_root","next":{"id":"node_end","type":"End","name":"流程结束","parentId":"node_17628242120246176","props":{}},"props":{"mode":"USER","ruleType":"ROOT_SELF","taskMode":{"type":"AND","percentage":100},"needSign":false,"assignUser":[],"rootSelect":{"multiple":false},"leader":{"level":1,"emptySkip":false},"leaderTop":{"level":0,"toEnd":false,"emptySkip":false},"assignDept":{"dept":[],"type":"LEADER"},"assignRole":[],"noUserHandler":{"type":"TO_NEXT","assigned":[]},"sameRoot":{"type":"TO_SELF","assigned":[]},"timeout":{"enable":false,"time":1,"timeUnit":"M","type":"TO_PASS"}}},"props":{}},"remark":""}在开始转换之前,需要实例化ProcessModel,然后进行转换,我们先使用下面的代码进行测试:
java
ProcessModel person = objectMapper.readValue(jsonString, ProcessModel.class);
System.out.println(person);

BpmnModel bpmnModel = person.toBpmnModel();
byte[] xmlBytes = new BpmnXMLConverter().convertToXML(bpmnModel);测试结果出来,如果next没有正常被转换,需要注意添加@ToString(callSuper = true),这样在转换时会包含父类的属性。正常转换打印输出:
python
ProcessModel(id=null, name=未命名流程, process=Node(id=node_root, parentId=null, name=发起人, type=Start, next=ApprovalNode(super=AssigneeNode(assigneeType=null, formUser=null, formRole=null, users=null, roles=null, leader=null, orgLeader=null, choice=null, self=null), multi=null, multiPercent=null, next=EndNode(super=Node(id=node_end, parentId=node_17628242120246176, name=流程结束, type=End, next=null, props={}, branchId=null))), props={}, branchId=null), groupId=222, remark=)完整Main方法构建代码:
java
public class Main {
		// 代码中就不做try catch了,输出失败会正常出错误信息
    public static void main(String[] args) throws IOException {
        String jsonString = "{\"name\":\"未命名流程\",\"groupId\":222,\"process\":{\"id\":\"node_root\",\"type\":\"Start\",\"name\":\"发起人\",\"parentId\":null,\"next\":{\"id\":\"node_17628242120246176\",\"type\":\"Approval\",\"name\":\"审批人\",\"parentId\":\"node_root\",\"next\":{\"id\":\"node_end\",\"type\":\"End\",\"name\":\"流程结束\",\"parentId\":\"node_17628242120246176\",\"props\":{}},\"props\":{\"mode\":\"USER\",\"ruleType\":\"ROOT_SELF\",\"taskMode\":{\"type\":\"AND\",\"percentage\":100},\"needSign\":false,\"assignUser\":[],\"rootSelect\":{\"multiple\":false},\"leader\":{\"level\":1,\"emptySkip\":false},\"leaderTop\":{\"level\":0,\"toEnd\":false,\"emptySkip\":false},\"assignDept\":{\"dept\":[],\"type\":\"LEADER\"},\"assignRole\":[],\"noUserHandler\":{\"type\":\"TO_NEXT\",\"assigned\":[]},\"sameRoot\":{\"type\":\"TO_SELF\",\"assigned\":[]},\"timeout\":{\"enable\":false,\"time\":1,\"timeUnit\":\"M\",\"type\":\"TO_PASS\"}}},\"props\":{}},\"remark\":\"\"}";

        ObjectMapper objectMapper = new ObjectMapper();

        // 方式一:先转换为JsonNode,再转换为实体类
        // JsonNode jsonNode = objectMapper.readTree(jsonString);
        // ProcessModel person2 = objectMapper.treeToValue(jsonNode, ProcessModel.class);

        // 方式一:直接转换为实体类
        ProcessModel person = objectMapper.readValue(jsonString, ProcessModel.class);
        System.out.println(person);

        BpmnModel bpmnModel = person.toBpmnModel();
        byte[] xmlBytes = new BpmnXMLConverter().convertToXML(bpmnModel);

        BufferedOutputStream outputStream = new BufferedOutputStream(new FileOutputStream("/Users/macbook/文件/Studio/Java/JsonToBpmnDemo/target/test.bpmn20.xml"));
        BufferedInputStream in = new BufferedInputStream(new ByteArrayInputStream(xmlBytes));
        byte[] buffer = new byte[8096];
        while (true) {
            int count = in.read(buffer);
            if (count == -1) {
                break;
            }
            outputStream.write(buffer, 0, count);
        }

        // 刷新并关闭流
        outputStream.flush();
        outputStream.close();
    }
}输出成功后,在target文件夹总会正常出现test.bpmn20.xml文件。 
六、最后
该代码适用wflow-web-next 设计器的Json数据,感谢wflow-web-next: wflow-web作者willianfu提供的设计器 ,可以结合该设计器使用,当然也可以使用任何以Flowable为项目的设计器数据,本案例只提供大致的思路,具体可以参考开源代码:lowflow-design-converter: 低代码流程设计器转bpmn,非常感谢蔡晓峰老师项目,给了我很大的启发,后续本项目完成后,我会开源发布在Github上,本篇博客如有任何问题欢迎评论区或私信建议,再次感谢。