引言
在现代企业级应用开发中,工作流引擎是不可或缺的组成部分。Bpmn.js作为最流行的BPMN 2.0建模工具之一,为开发者提供了强大的流程建模能力。然而,将Bpmn.js深度集成到Vue2项目中,并实现符合业务需求的自定义功能,是一个充满挑战的过程。
本文将详细介绍如何在Vue2项目中集成Bpmn.js,并实现一个完整的表单绑定解决方案,让你掌握从基础集成到高级定制的完整技能链。
Vue2中深度集成Bpmn.js的全过程,重点实现了:
- 基础集成:正确初始化Bpmn.js并配置中文支持
- 表单绑定:通过DOM操作增强属性面板,实现自定义表单选择功能
- 状态管理:为流程元素添加丰富的状态可视化
- 模式切换:实现编辑与预览模式的无缝切换
- 用户体验:添加工具提示、状态消息等交互细节
一、环境准备与基础集成
1.1 安装依赖包
首先,我们需要安装Bpmn.js及其相关扩展包,这是Vue2中常用稳定版本:
bash
npm install bpmn-js@8.9.0 bpmn-js-properties-panel@0.46.0 camunda-bpmn-moddle@5.1.1 --save1.2 创建基础组件结构
创建一个Flow.vue组件作为我们的流程编辑器容器:
html
<template>
  <div class="bpmn-container">
    <div class="toolbar">
      <!-- 工具栏 -->
    </div>
    <div class="canvas-wrapper">
      <div ref="bpmnContainer" class="canvas"></div>
      <div ref="propertiesPanel" class="properties-panel"></div>
    </div>
  </div>
</template>
1.3 初始化Bpmn Modeler
在Vue2组件中初始化Bpmn.js的核心代码:
javascript
import BpmnModeler from 'bpmn-js/lib/Modeler'
import 'bpmn-js/dist/assets/diagram-js.css'
import 'bpmn-js/dist/assets/bpmn-font/css/bpmn.css'
import 'bpmn-js-properties-panel/dist/assets/bpmn-js-properties-panel.css'
import propertiesPanelModule from 'bpmn-js-properties-panel'
import propertiesProviderModule from 'bpmn-js-properties-panel/lib/provider/camunda'
import camundaModdleDescriptor from 'camunda-bpmn-moddle/resources/camunda'

export default {
  data() {
    return {
      bpmnModeler: null
    }
  },

  methods: {
    async initDiagram() {
      this.bpmnModeler = new BpmnModeler({
        container: this.$refs.bpmnContainer,
        propertiesPanel: {
          parent: this.$refs.propertiesPanel
        },
        additionalModules: [
          propertiesPanelModule,
          propertiesProviderModule
        ],
        moddleExtensions: {
          camunda: camundaModdleDescriptor
        }
      })

      // 加载基础模板
      await this.createNewDiagram()
    }
  }
}
二、实现中文化支持
2.1 创建自定义翻译模块
bpmnjs汉化的方式有多种,使用官方的扩展、自定义汉化文件等,我建议使用自定义汉化,bpmnjs使用的key作为字段,对应翻译界面英文就行。
javascript
// utils/customTranslate.js
export default function customTranslate(translations) {
  return function(key, options) {
    return translations[key] || key
  }
}

// il8n/bpmn-cn.js
export default {
  'Append EndEvent': '追加结束事件',
  'Append Task': '追加任务',
  'Append Gateway': '追加网关',
  'Activate the hand tool': '激活手动工具',
  // ... 更多翻译
}
2.2 集成到Bpmn Modeler
javascript
import CustomTranslate from './utils/customTranslate'
import bpmnTranslations from '@/il8n/bpmn-cn'

const customTranslateModule = {
  translate: ['value', CustomTranslate(bpmnTranslations)]
}

this.bpmnModeler = new BpmnModeler({
  // ... 其他配置
  additionalModules: [
    propertiesPanelModule,
    propertiesProviderModule,
    customTranslateModule  // 添加到这个位置
  ]
})
三、实现表单绑定功能
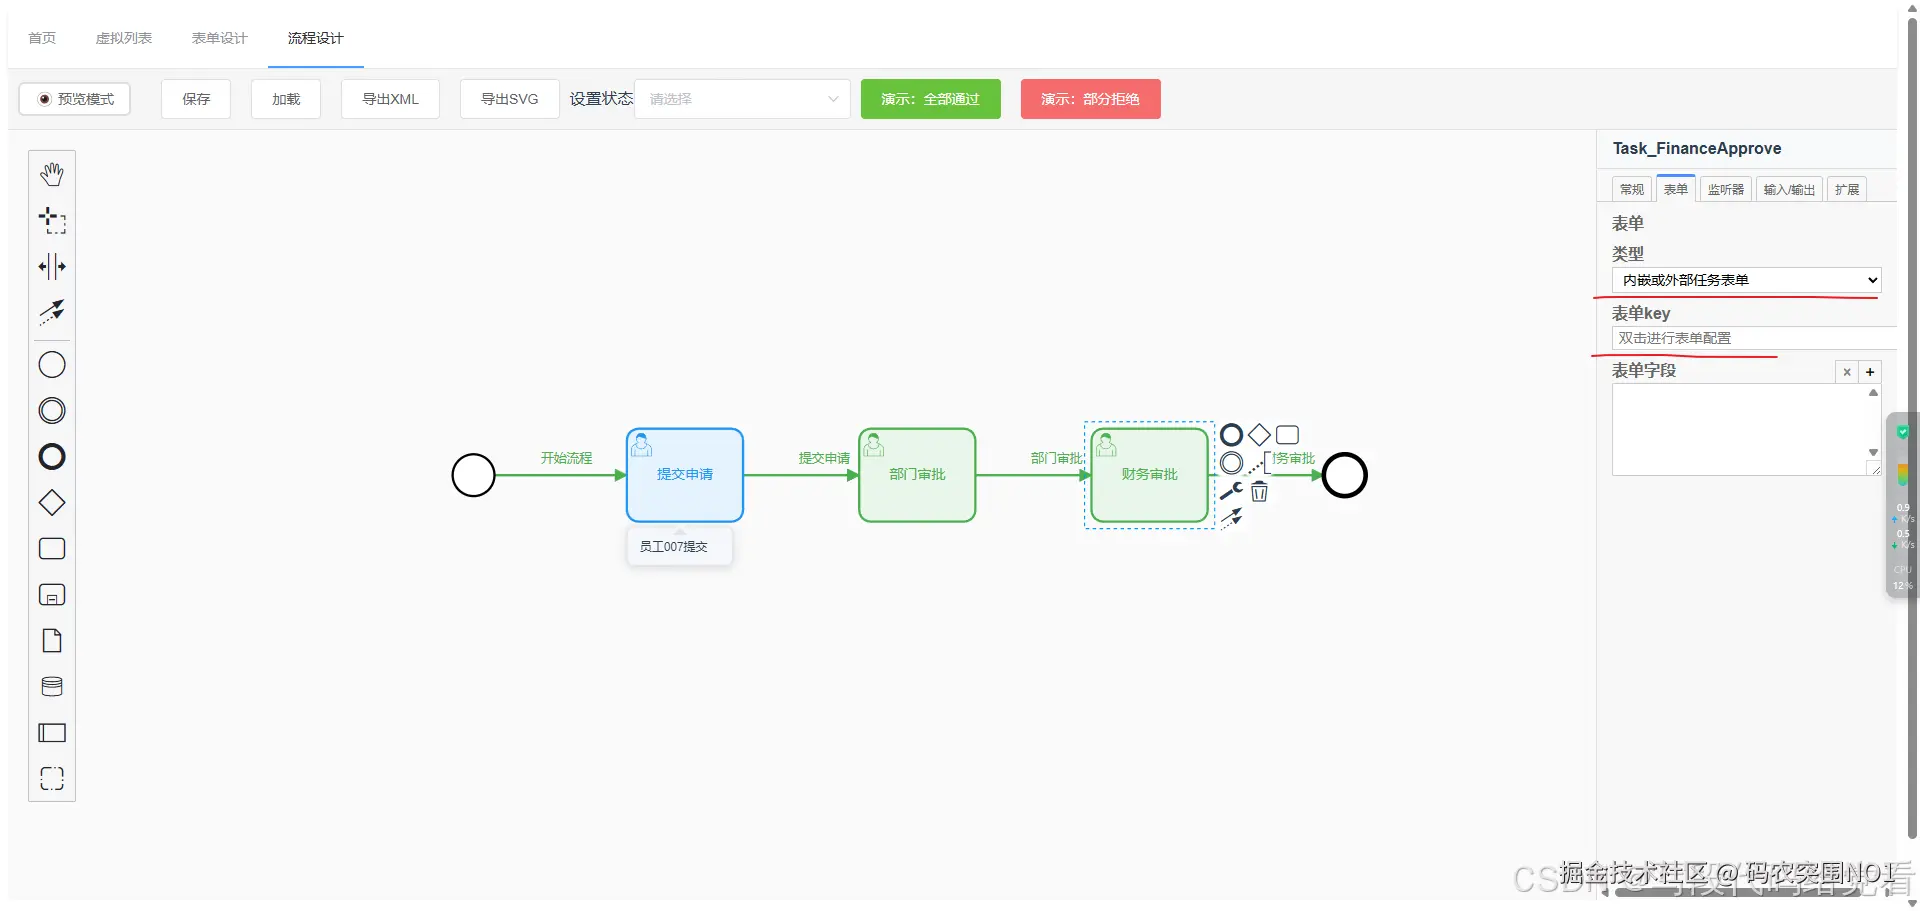
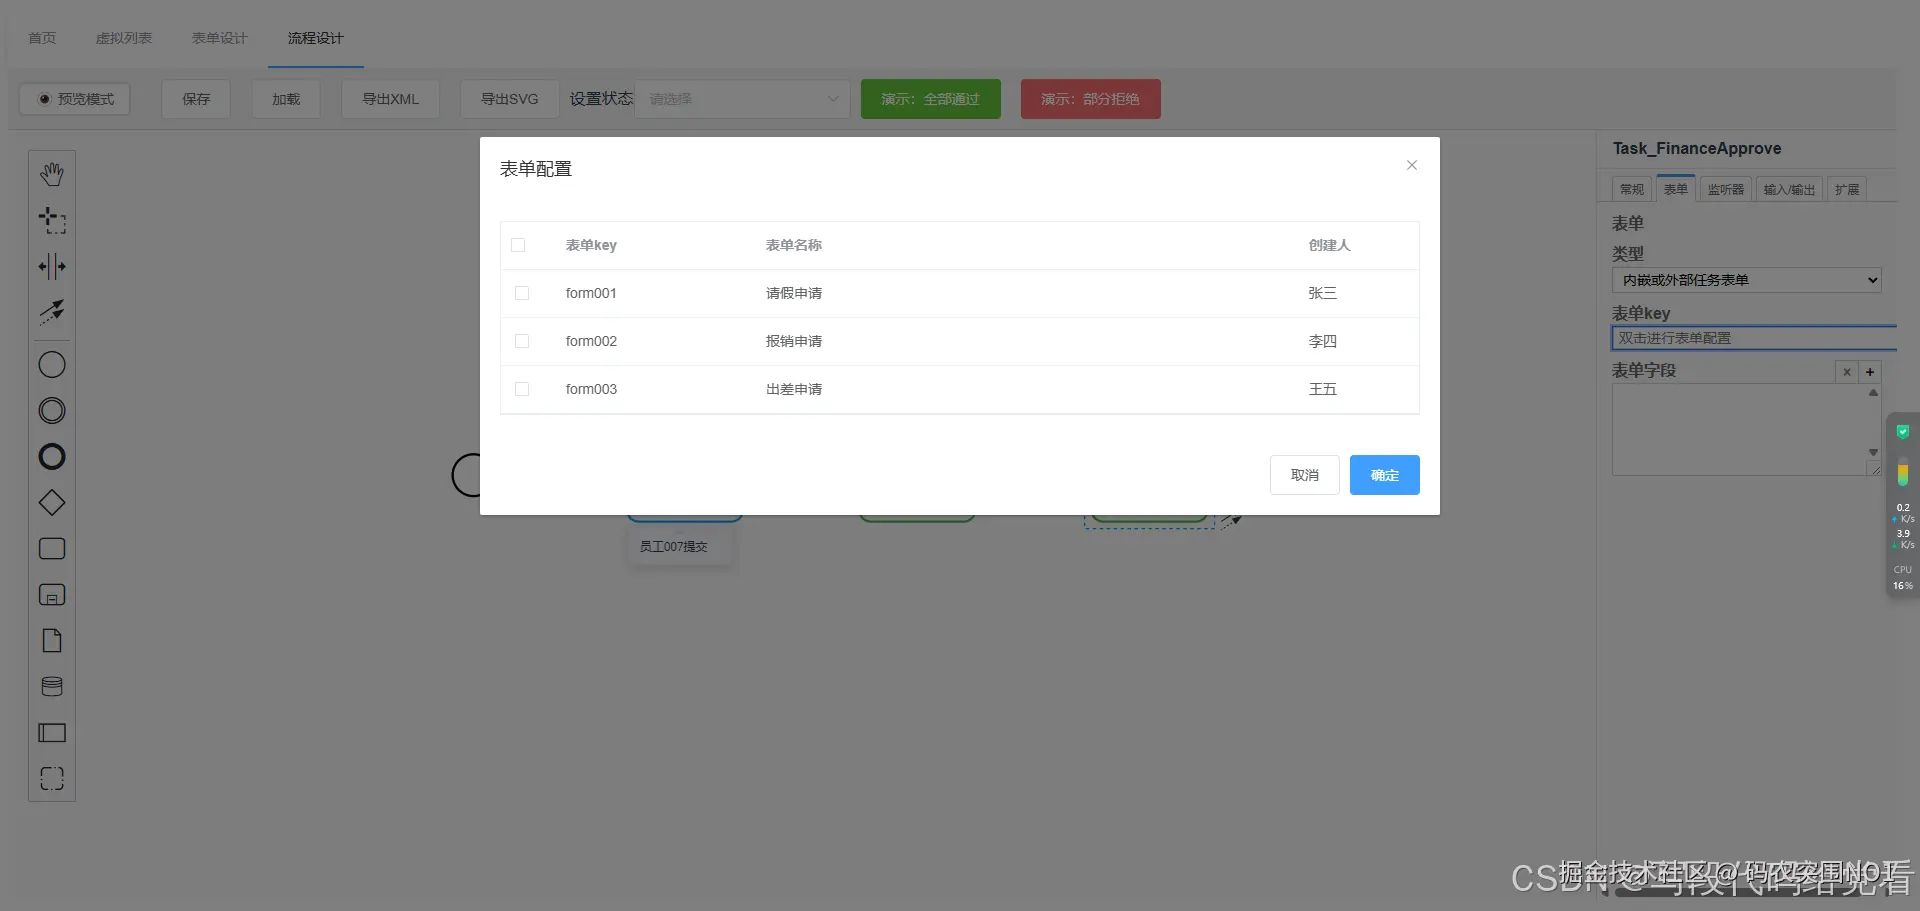
3.1 表单配置弹窗组件
创建SysFormTable组件用于表单选择:
html
<!-- SysFormTable.vue -->
<template>
  <el-table
    ref="formTable"
    :data="formList"
    @selection-change="handleSelectionChange"
  >
    <el-table-column type="selection" width="55"></el-table-column>
    <el-table-column prop="formName" label="表单名称"></el-table-column>
    <el-table-column prop="formKey" label="表单Key"></el-table-column>
  </el-table>
</template>

<script>
export default {
  methods: {
    getSelectedKey() {
      const selection = this.$refs.formTable.selection
      return selection.length > 0 ? selection[0].formKey : ''
    }
  }
}
</script>
3.2 增强表单Key输入框
通过DOM操作增强Bpmn.js属性面板中的表单输入框:
javascript
// 查找并增强表单Key输入框
enhanceFormKeyInput() {
  const input = this.findFormKeyInput()
  if (!input) return false

  if (input.dataset.enhanced === 'true') return true

  // 添加双击事件
  input.addEventListener('dblclick', (e) => {
    e.preventDefault()
    e.stopPropagation()
    this.openFormDialog(input)
  })

  input.title = '双击打开表单配置弹窗'
  input.style.cursor = 'pointer'
  input.dataset.enhanced = 'true'

  return true
}

// 查找输入框的多种策略
findFormKeyInput() {
  // 方法1:通过ID查找
  const inputById = document.getElementById('camunda-form-key')
  if (inputById) return inputById

  // 方法2:通过name属性查找
  const inputByName = document.querySelector('input[name="formKey"]')
  if (inputByName) return inputByName

  // 方法3:通过属性选择器查找
  return document.querySelector('input[id*="form-key"], input[id*="formKey"]')
}
3.3 实现表单配置弹窗
modeling.updateProperties是关键,修改完,写回xml中
javascript
openFormDialog(input) {
  this.currentFormInput = input
  this.formConfig.value = input.value || ''
  this.showFormDialog = true
}

saveFormConfig() {
  const selectedKey = this.$refs.formTable.getSelectedKey()

  if (this.selectedElement) {
    this.updateFormKeyInBPMN(selectedKey)
  }

  this.closeFormDialog()
  this.showStatusMessage('表单配置已保存', 'success')
}

updateFormKeyInBPMN(formKey) {
  if (!this.selectedElement || !this.bpmnModeler) return

  const modeling = this.bpmnModeler.get('modeling')
  modeling.updateProperties(this.selectedElement, {
    'camunda:formKey': formKey || undefined
  })
}
3.4 监听属性面板变化
使用MutationObserver监听属性面板变化
javascript
watchPropertiesPanel() {
  const observer = new MutationObserver(() => {
    // 当属性面板内容变化时,重新增强表单Key输入框
    this.enhanceFormKeyInput()
  })

  if (this.$refs.propertiesPanel) {
    observer.observe(this.$refs.propertiesPanel, {
      childList: true,
      subtree: true
    })
  }

  return observer
}
四、实现状态管理与可视化
每一个流程节点都有不同的状态,需要不同的颜色区分,这个和后端对齐就行
4.1 定义状态配置
javascript
// utils/pointConfig.js
export const STATUS_CONFIG = {
  APPROVED: {
    fill: '#e8f5e9',
    stroke: '#4caf50',
    strokeWidth: 2,
    strokeDasharray: '0'
  },
  REJECTED: {
    fill: '#ffebee',
    stroke: '#f44336',
    strokeWidth: 2,
    strokeDasharray: '5,5'
  },
  // ... 更多状态
}
4.2 设置元素状态
modeling.setColor是关键
javascript
setElementStatus(elementId, status, options = {}) {
  if (!this.bpmnModeler) return false

  const elementRegistry = this.bpmnModeler.get('elementRegistry')
  const modeling = this.bpmnModeler.get('modeling')
  const canvas = this.bpmnModeler.get('canvas')

  const element = elementRegistry.get(elementId)
  if (!element) return false

  const statusConfig = STATUS_CONFIG[status]
  if (!statusConfig) return false

  // 设置颜色和样式
  modeling.setColor(element, {
    fill: statusConfig.fill,
    stroke: statusConfig.stroke,
    strokeWidth: statusConfig.strokeWidth,
    strokeDasharray: statusConfig.strokeDasharray
  })

  // 添加评论覆盖层
  if (options.text) {
    this.addCommentOverlay(elementId, options)
  }

  return true
}
五、实现预览模式
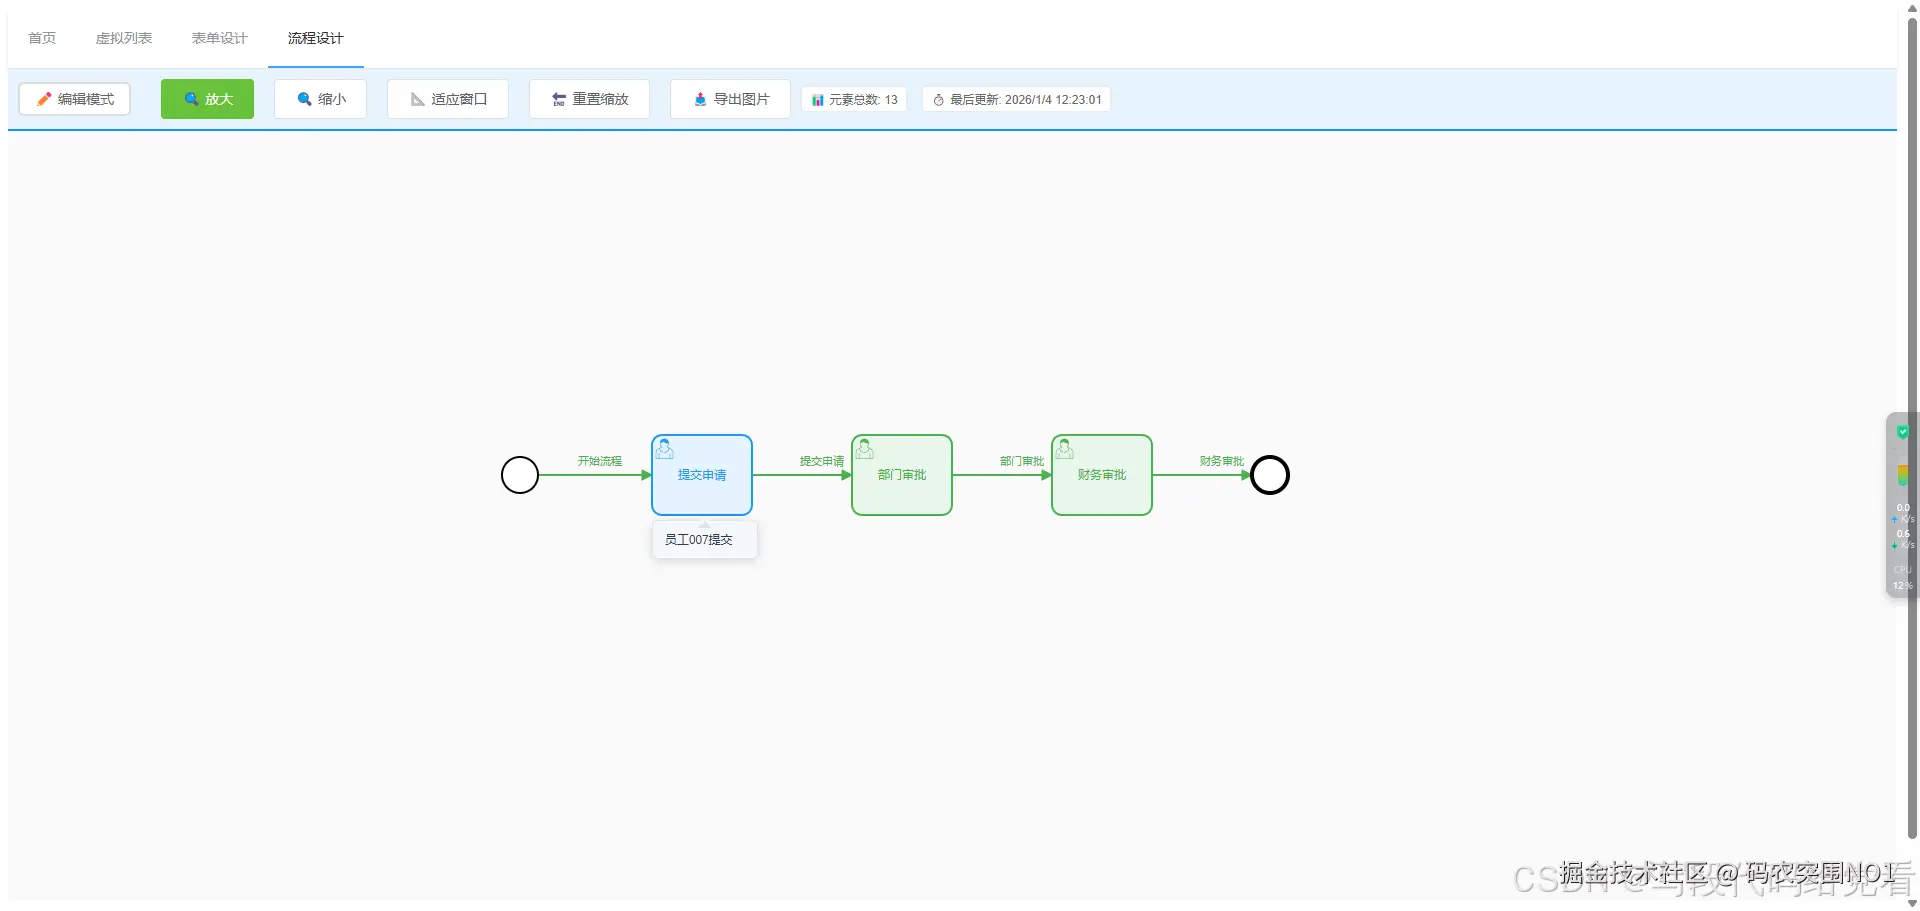
5.1 模式切换逻辑
javascript
togglePreviewMode() {
  this.isPreviewMode = !this.isPreviewMode
  this.updatePreviewMode()

  if (this.isPreviewMode) {
    this.showStatusMessage('已切换到预览模式', 'info')
    this.updateElementCount()
    this.fitViewport()
  }
}

updatePreviewMode() {
  if (!this.bpmnModeler) return

  const eventBus = this.bpmnModeler.get('eventBus')

  if (this.isPreviewMode) {
    // 预览模式:禁用编辑,启用悬停
    eventBus.off('element.click', this.handleElementClick)
    eventBus.on('element.hover', this.handleElementHover)
  } else {
    // 编辑模式:启用编辑
    eventBus.on('element.click', this.handleElementClick)
    eventBus.off('element.hover', this.handleElementHover)
  }
}
5.2 预览信息展示
javascript
updateElementCount() {
  if (!this.bpmnModeler) return

  const elementRegistry = this.bpmnModeler.get('elementRegistry')
  const elements = elementRegistry.getAll()

  // 过滤基础元素
  const validElements = elements.filter(el =>
    !el.type.includes('bpmn:Process') &&
    !el.type.includes('bpmn:Participant')
  )

  this.elementCount = validElements.length
}

getElementInfo(element) {
  const businessObject = element.businessObject
  const info = []

  if (businessObject.name) {
    info.push(`<strong>${businessObject.name}</strong>`)
  }

  info.push(`类型: ${this.getElementTypeName(element.type)}`)
  info.push(`ID: ${element.id}`)

  // 添加状态信息
  const status = this.getElementStatus(element)
  if (status) {
    info.push(`状态: ${status}`)
  }

  return info.join('<br>')
}
六、样式优化与自定义
6.1 SCSS样式文件
css
// flow.scss
.bpmn-container {
  height: 100vh;
  display: flex;
  flex-direction: column;

  &.preview-mode {
    .properties-panel {
      display: none;
    }

    .canvas {
      width: 100%;
    }
  }

  .toolbar {
    padding: 10px;
    background: #f5f5f5;
    border-bottom: 1px solid #ddd;
    display: flex;
    justify-content: space-between;
    align-items: center;
  }

  .canvas-wrapper {
    flex: 1;
    display: flex;
    overflow: hidden;
  }

  .canvas {
    flex: 3;
    position: relative;
  }

  .properties-panel {
    flex: 1;
    min-width: 250px;
    max-width: 300px;
    border-left: 1px solid #ddd;
    overflow-y: auto;
  }
}
七、实用工具函数
7.1 导出功能
javascript
// utils/exportUtils.js
export async function exportXML(bpmnModeler) {
  const { xml } = await bpmnModeler.saveXML({ format: true })
  const blob = new Blob([xml], { type: 'application/xml' })
  const url = URL.createObjectURL(blob)

  const link = document.createElement('a')
  link.href = url
  link.download = 'diagram.bpmn'
  link.click()

  URL.revokeObjectURL(url)
}

export async function exportSVG(bpmnModeler) {
  const { svg } = await bpmnModeler.saveSVG()
  const blob = new Blob([svg], { type: 'image/svg+xml' })
  const url = URL.createObjectURL(blob)

  const link = document.createElement('a')
  link.href = url
  link.download = 'diagram.svg'
  link.click()

  URL.revokeObjectURL(url)
}
八、性能优化与最佳实践
8.1 资源清理
javascript
beforeDestroy() {
  // 清理Bpmn.js实例
  if (this.bpmnModeler) {
    this.bpmnModeler.destroy()
  }

  // 清理观察者
  if (this.panelObserver) {
    this.panelObserver.disconnect()
  }
}
8.2 延迟加载优化
javascript
initFormEnhancement() {
  // 延迟执行,确保DOM已渲染
  setTimeout(() => {
    this.panelObserver = this.watchPropertiesPanel()

    // 30秒后停止监听,避免内存泄漏
    setTimeout(() => {
      if (this.panelObserver) {
        this.panelObserver.disconnect()
      }
    }, 30000)
  }, 2000)
}