目录
[一、控制反转 IOC](#一、控制反转 IOC)
[使用 XML 标签方式](#使用 XML 标签方式)
[二、面向切面 AOP](#二、面向切面 AOP)
[AOP 典型使用场景](#AOP 典型使用场景)
[Spring 事务的传播特性](#Spring 事务的传播特性)
Spring
Spring介绍
Spring简介,Spring框架**是一个控制反转(ioc)和面向切面(aop)**的容器框架。
Spring框架的作用
1.降低模块之间的耦合性
2.提供许多工具类,可以简化开发
3.提供面向切面编程
4.提供声明式事务,简化事务的使用
5.可以融合市面上几乎所有的流行框架
Spring的基本使用
1.导入资源jar spring-context
<!-- https://mvnrepository.com/artifact/org.springframework/spring-context -->
<dependency>
  <groupId>org.springframework</groupId>
  <artifactId>spring-context</artifactId>
  <version>5.2.25.RELEASE</version>
</dependency>2.配置spring的核心配置文件
<?xml version="1.0" encoding="UTF-8"?>
<beans xmlns="http://www.springframework.org/schema/beans"
xmlns:xsi="http://www.w3.org/2001/XMLSchema-instance"
xsi:schemaLocation="http://www.springframework.org/schema/beans http://www.springframework.org/schema/beans/spring-beans.xsd">
<bean id="stu" class="com.itdemo.domain.Student">
<property name="id" value="1"/>
<property name="name" value="张三"/>
<property name="sex" value="男"/>
</bean>
</beans>3.在Java类中进行容器的启用 ClassPathXmlApplicationContext
public class App {
public static void main( String[] args ) {
// 引用Spring容器 ClassPathXmlApplicationContext
ClassPathXmlApplicationContext context = new ClassPathXmlApplicationContext("application.xml");
// 获取对象
Object object = context.getBean("stu");
Student student = (Student)object;
System.out.println(student.toString());
}
}一、控制反转 IOC
**什么是IOC:**应用程序本身不再创建维护对象,依赖外部的spring容器创建和维护对象
**依赖注入DI:**依赖容器往应用程序中注入对象
容器创建对象的方式
1.通过构造方法创建对象
配置文件中使用 <property > 标签创建对象时,默认使用的是无参构造方法,通过setter方法给属性赋值
Bean property 'id' is not writable or has an invalid setter method.
<bean id="beanName" class="包名.类名">
<property name="属性名" value="属性值"/>
<property name="属性名" value="属性值"/>
</bean>配置文件中使用 <constructor-arg> 标签创建对象时,使用有参构造方法,通过有参构造方法的形参接收值,根据配置的形参个数和形参的名称 匹配 构造方法
这里面的 index 对应的是有参构造方法中的参数名
<bean id="beanName" class="包名.类名">
<constructor-arg index="0" value=""/>
<constructor-arg index="1" value=""/>
<constructor-arg index="2" value=""/>
</bean>对象类型的属性 值的注入
<!--****************************给一个实体类类型的属性赋值****************************-->
<!--第一种情况,如果容器中存在这种实体的bean,那么可以直接使用ref属性引用-->
    <bean id="stu" class="com.itdemo.domain.Student">
        <property name="id" value="1"/>
        <property name="name" value="张三"/>
        <property name="sex" value="男"/>
        <property name="room" ref="classRoom"/>
    </bean>
    <bean id="classRoom" class="com.itdemo.domain.ClassRoom">
       <property name="id" value="1"/>
       <property name="name" value="java"/>
    </bean>
<!-- 第二种情况,如果容器中不存在这种实体的bean,那么可以直接在property标签内添加-->
    <bean id="stu2" class="com.itdemo.domain.Student">
        <property name="id" value="2"/>
        <property name="name" value="李四"/>
        <property name="sex" value="男"/>
        <property name="room">
            <bean class="com.itdemo.domain.ClassRoom">
                <property name="id" value="2"/>
                <property name="name" value="Python"/>
            </bean>
        </property>
    </bean>
数组类型的属性 值的注入
<!--**************************** 给一个数组类型的属性赋值 ****************************-->
    <bean id="classRoomArray" class="com.itdemo.domain.ClassRoom">
        <property name="id" value="3"/>
        <property name="name" value="C++"/>
        <property name="students">
            <array>
                <!--如果容器中已经有数组中存放数据类型的bean,直接ref引用-->
                <ref bean="stu"/>
                <ref bean="stu2"/>
                <!--如果容器中没有数组中存放数据类型的bean可以直接创建-->
                <bean class="com.itdemo.domain.Student">
                    <property name="id" value="3"/>
                    <property name="name" value="王五"/>
                    <property name="sex" value="男"/>
                </bean>
            </array>
        </property>
    </bean>
集合类型的属性 值的注入
List
<bean id="tea1" class="com.itdemo.domain.Teacher">
    <property name="id" value="1"/>
    <property name="name" value="Mrs1"/>
    <property name="gender" value="女"/>
    <property name="classRooms">
        <list>
            <!--如果容器中已经有集合中存放数据类型的bean,直接ref引用-->
            <ref bean="cla0"/>
            <!--如果容器中没有集合中存放数据类型的bean,可以嵌套bean标签直接创建-->
            <bean class="com.itdemo.domain.ClassRoom">
                <property name="id" value="4"/>
                <property name="name" value="C#"/>
            </bean>
        </list>
    </property>
</bean>
Set
<bean id="tea2" class="com.itdemo.domain.Teacher">
    <property name="id" value="2"/>
    <property name="name" value="Mr2"/>
    <property name="gender" value="男"/>
    <property name="students">
        <set>
            <!--如果容器中已经有集合中存放数据类型的bean,直接ref引用-->
            <ref bean="stu0"/>
            <ref bean="stu1"/>
            <ref bean="stu2"/>
            <!--如果容器中没有集合中存放数据类型的bean,可以嵌套bean标签直接创建-->
            <bean class="com.itdemo.domain.Student">
                <property name="id" value="4"/>
                <property name="name" value="赵六"/>
                <property name="sex" value="男"/>
            </bean>
        </set>
    </property>
</bean>
Map
<bean id="tea3" class="com.itdemo.domain.Teacher">
    <property name="id" value="3"/>
    <property name="name" value="Mrs3"/>
    <property name="gender" value="女"/>
    <property name="classRoomMap">
        <map>
            <!--key-value  如果 键-值 对容器中存在,引用,key-ref=""  value-ref=""-->
            <entry key="key1" value-ref="cla0"/>
            <!--key-value  如果键容器中不存在,则嵌套bean标签 key=""  value=""-->
            <entry key="key2">
                <bean class="com.itdemo.domain.ClassRoom">
                    <property name="id" value="5"/>
                    <property name="name" value="Vue"/>
                </bean>
            </entry>
        </map>
    </property>
</bean>
P命名空间注入
p名称空间出现的目地为了简化注入方式,通过无参构造方法,通过属性的setter方法赋值
引入p名称空间约束头
<beans xmlns="http://www.springframework.org/schema/beans"
xmlns:p="http://www.springframework.org/schema/p"
xmlns:xsi="http://www.w3.org/2001/XMLSchema-instance"
xsi:schemaLocation="
http://www.springframework.org/schema/beans
http://www.springframework.org/schema/beans/spring-beans.xsd">
<!--p名称空间属性注入-->
<bean id="stu3" class="com.itdemo.domain.Student" p:id="5" p:name="张三丰" p:sex="男" p:room-ref="cla1">
</bean>
<bean id="cla1" class="com.itdemo.domain.ClassRoom">
<property name="id" value="6"/>
<property name="name" value="javaEE"/>
</bean>使用spring实例化各层对象
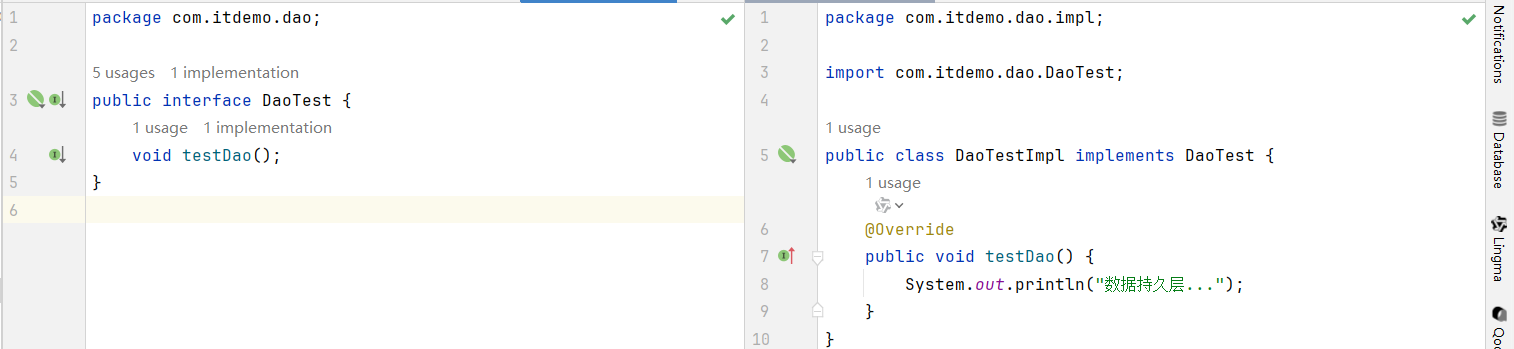
dao
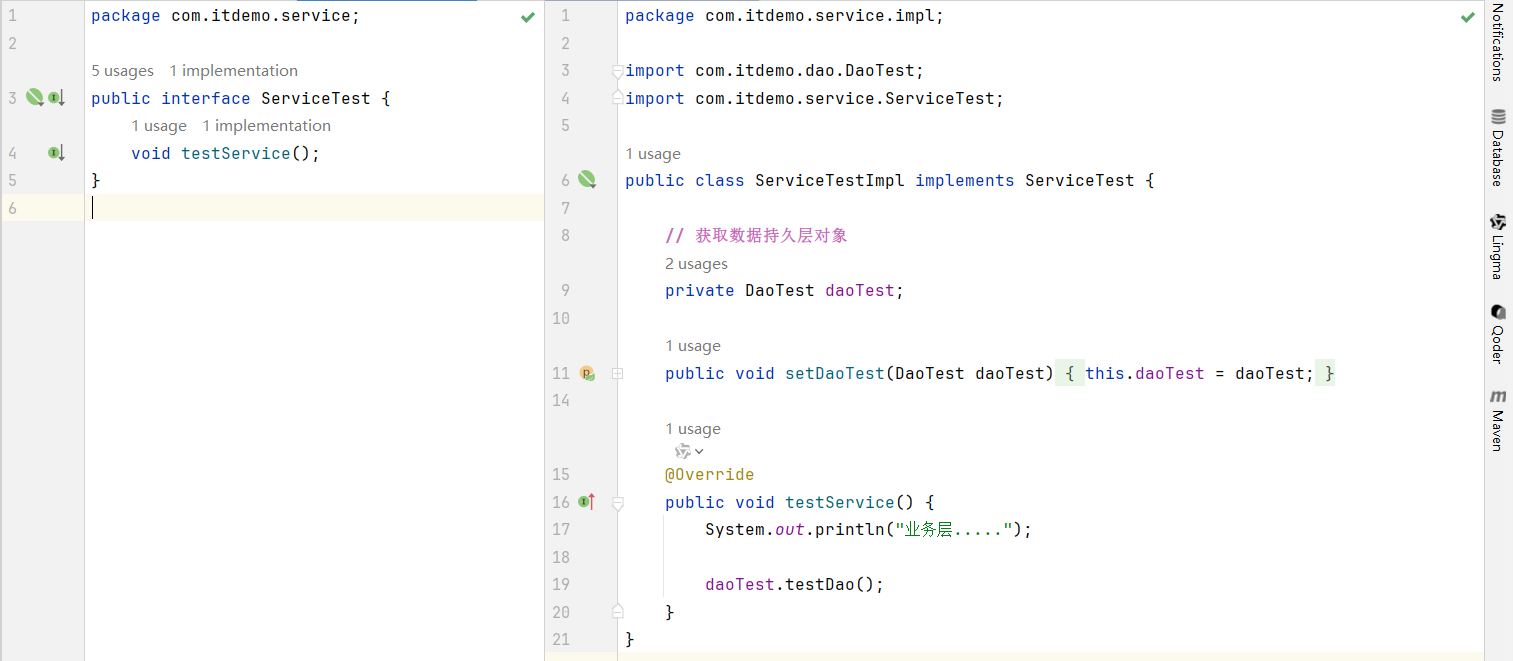
Service
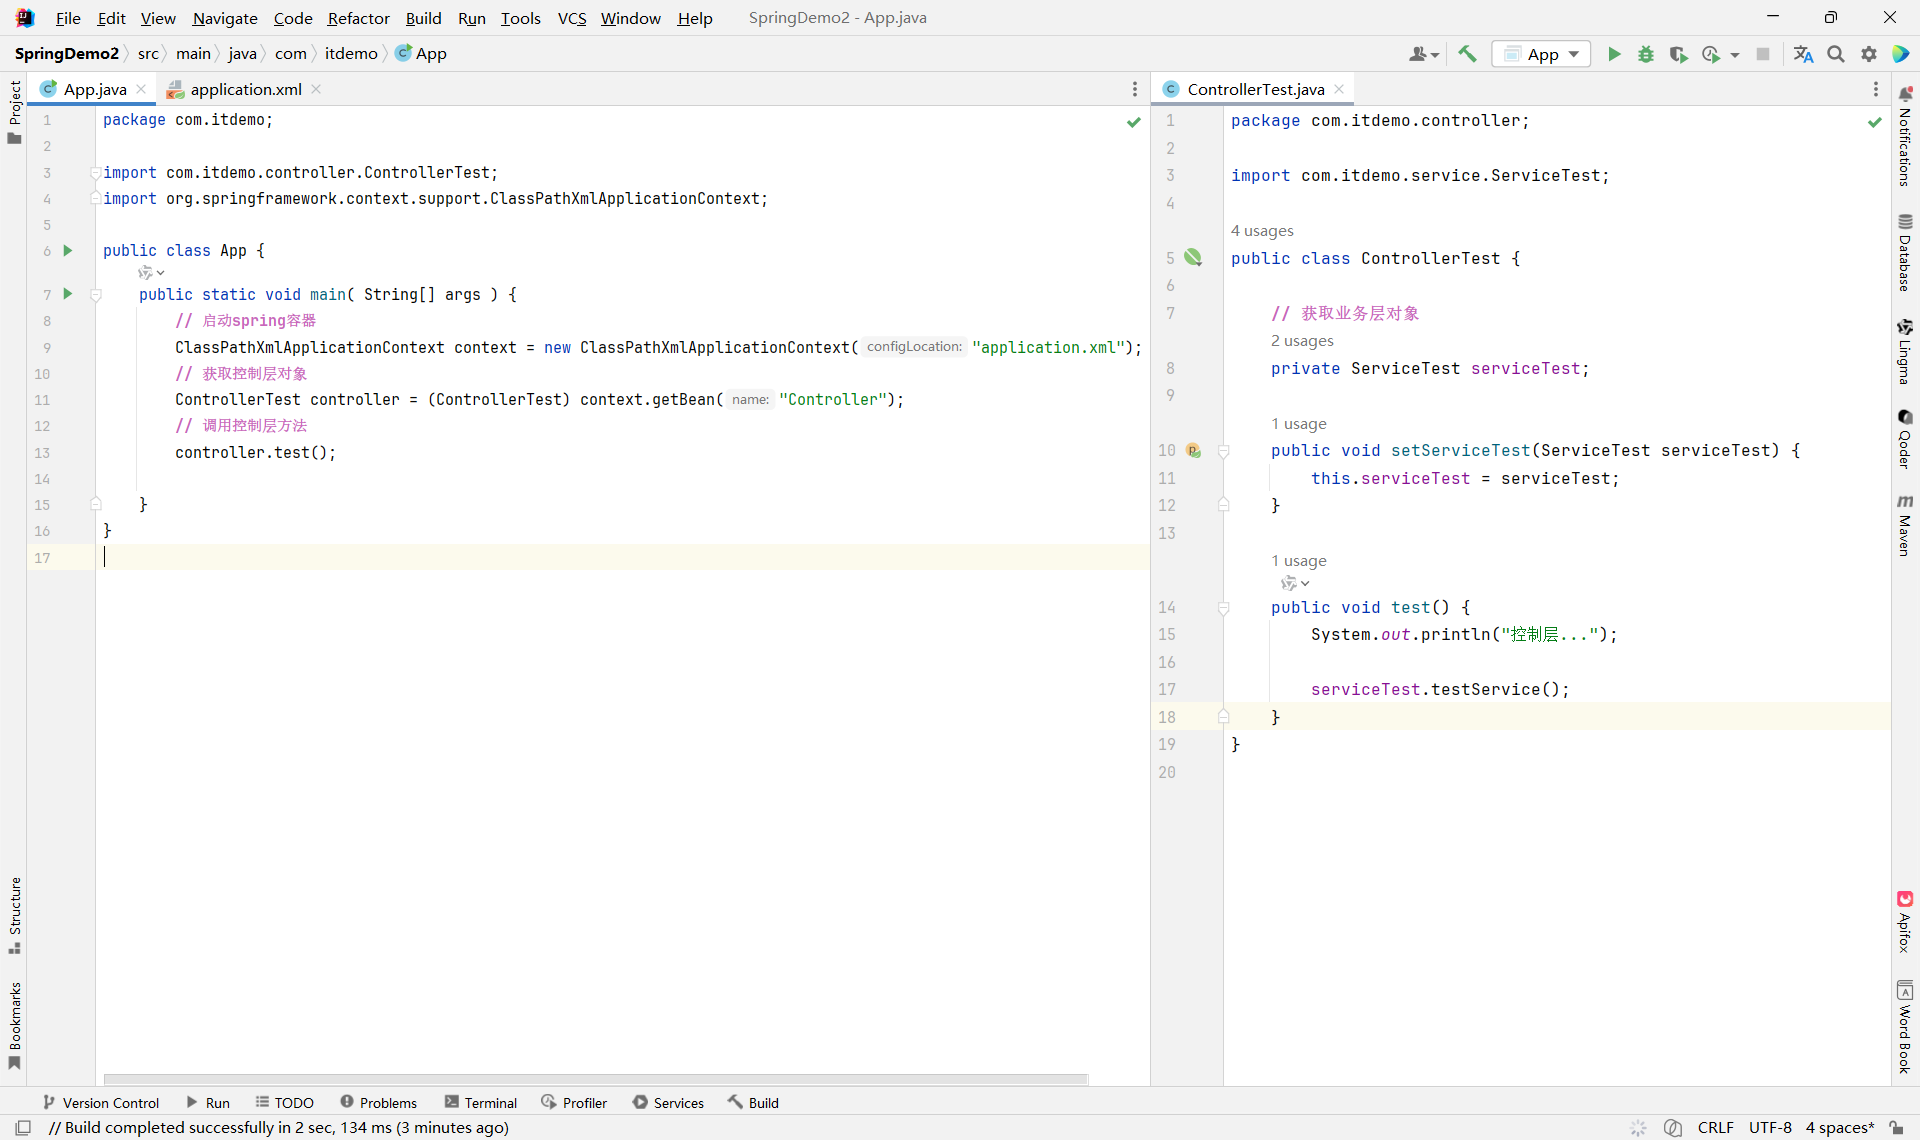
controller & app
xml
<?xml version="1.0" encoding="UTF-8"?>
<beans xmlns="http://www.springframework.org/schema/beans"
xmlns:xsi="http://www.w3.org/2001/XMLSchema-instance"
xsi:schemaLocation="http://www.springframework.org/schema/beans http://www.springframework.org/schema/beans/spring-beans.xsd">
<!--创建一个数据持久层对象-->
<bean id="Dao" class="com.itdemo.dao.impl.DaoTestImpl"/>
<!--创建一个业务层对象-->
<bean id="Service" class="com.itdemo.service.impl.ServiceTestImpl">
<!-- private DaoTest daoTest; -->
<property name="daoTest" ref="Dao"/>
</bean>
<!--创建一个控制层对象-->
<bean id="Controller" class="com.itdemo.controller.ControllerTest">
<!-- private ServiceTest serviceTest; -->
<property name="serviceTest" ref="Service"/>
</bean>
</beans>如果需要新增业务功能,直接修改xml配置文件,ref新的业务实现类就可以
2.通过工厂类创建对象
- 实例化工厂对象
StudentFactory 学生工厂,用于生产学生对象
public class StudentFactory {
// 创建一个Map集合,用于存放学生信息
static HashMap<String,Student> studentHashMap = new HashMap<String, Student>();
// 静态方法,用于创建Student对象
static {
Student s1 = new Student("S01", "张三");
studentHashMap.put("stu1", s1);
Student s2 = new Student("S02", "李四");
studentHashMap.put("stu2", s2);
Student s3 = new Student("S03", "王五");
studentHashMap.put("stu3", s3);
Student s4 = new Student("S04", "赵六");
studentHashMap.put("stu4", s4);
}
// 创建一个方法,返回 Student 对象
public Student createStudent(String key) {
return studentHashMap.get(key);
}
}xml文件
<?xml version="1.0" encoding="UTF-8"?>
<beans xmlns="http://www.springframework.org/schema/beans"
xmlns:xsi="http://www.w3.org/2001/XMLSchema-instance"
xsi:schemaLocation="http://www.springframework.org/schema/beans http://www.springframework.org/schema/beans/spring-beans.xsd">
<!-- 创建工场实例化对象,调用工厂方法生产对象 -->
<bean id="StuFactory" class="com.itdemo.factory.StudentFactory"/>
<!-- StuFactory.createStudent("stu1") -->
<bean id="S1" factory-bean="StuFactory" factory-method="createStudent">
<constructor-arg name="key" value="stu1"/>
</bean>
</beans>Test
public class App {
public static void main( String[] args ) {
// 创建容器对象
ClassPathXmlApplicationContext context = new ClassPathXmlApplicationContext("application.xml");
// 获取对象
Student student = (Student)context.getBean("S1");
System.out.println(student.toString());
}
}- 静态工厂
StudentFactory
public class StudentFactory {
// 创建一个Map集合,用于存放学生信息
static HashMap<String,Student> studentHashMap = new HashMap<String, Student>();
// 静态方法,用于创建Student对象
static {
Student s1 = new Student("S01", "张三");
studentHashMap.put("stu1", s1);
Student s2 = new Student("S02", "李四");
studentHashMap.put("stu2", s2);
Student s3 = new Student("S03", "王五");
studentHashMap.put("stu3", s3);
Student s4 = new Student("S04", "赵六");
studentHashMap.put("stu4", s4);
}
// 创建一个方法,返回 Student 对象
public static Student createStudent(String key) {
return studentHashMap.get(key);
}
}xml
<?xml version="1.0" encoding="UTF-8"?>
<beans xmlns="http://www.springframework.org/schema/beans"
xmlns:xsi="http://www.w3.org/2001/XMLSchema-instance"
xsi:schemaLocation="http://www.springframework.org/schema/beans http://www.springframework.org/schema/beans/spring-beans.xsd">
<!-- StudentFactory.createStudent("stu1") -->
<bean id="S1" class="com.itdemo.factory.StudentFactory" factory-method="createStudent">
<constructor-arg name="key" value="stu1"/>
</bean>
</beans>Test
public class App {
public static void main( String[] args ) {
// 创建容器对象
ClassPathXmlApplicationContext context = new ClassPathXmlApplicationContext("application.xml");
// 获取对象
Student student = (Student)context.getBean("S1");
System.out.println(student.toString());
}
}3.通过注解创建对象
- 将类注册为 Spring Bean
@Component 创建的对象,默认命名规则为类名首字母小写,如果修改名字可以在@Component后面添加
| 注解 | 所属层 | 职责说明 |
|---|---|---|
@Controller |
表现层(Web 层) | 处理 HTTP 请求,接收参数,返回视图或 JSON。通常与 @RequestMapping 配合使用。 |
@Service |
业务逻辑层 | 封装核心业务逻辑,协调多个 Repository 或其他 Service。 |
@Repository |
数据访问层(DAO) | 访问数据库、执行 CRUD 操作。Spring 会自动将底层异常(如 SQLException)转换为 DataAccessException。 |
@Component |
通用组件 | 不属于上述三层的通用工具类、配置类、自定义组件等。 |
-
@Service -
@Repository -
@Controller
这三个注解 都标注了 @Component ,因此它们本质上都是 @Component 的特化形式(Specializations)。
- 依赖注入(Dependency Injection, DI)
| 注解 | 来源 | 注入方式 | 是否 Spring 专属 | 是否需要额外依赖 | 备注 |
|---|---|---|---|---|---|
@Autowired |
Spring | 按类型 | ✅ 是 | ❌ 否 | 最常用,支持 @Qualifier |
@Qualifier |
Spring | 指定名称 | ✅ 是 | ❌ 否 | 必须配合 @Autowired |
@Resource |
JSR-250 (Java) | 按名称 | ❌ 否 | ❌(JDK 自带) | 字段名即默认 Bean 名 |
*************************Controller*************************
// @Component
@Controller
public class TestController {
// 获取业务层对象
@Autowired
private TestService testService;
public void test() {
System.out.println("控制层...");
testService.testService();
}
}
*************************Service*************************
public interface TestService {
void testService();
}
// @Component
@Service
public class TestServiceImpl implements TestService {
// 获取数据持久层对象
@Autowired
private TestDao testDao;
@Override
public void testService() {
System.out.println("业务层...");
testDao.testDao();
}
}
*************************Dao*************************
public interface TestDao {
void testDao();
}
// @Component
@Repository
public class TestDaoImpl implements TestDao {
@Override
public void testDao() {
System.out.println("数据持久层...");
}
}
xml
<?xml version="1.0" encoding="UTF-8"?>
<beans xmlns="http://www.springframework.org/schema/beans"
xmlns:xsi="http://www.w3.org/2001/XMLSchema-instance"
xmlns:context="http://www.springframework.org/schema/context"
xsi:schemaLocation="http://www.springframework.org/schema/beans http://www.springframework.org/schema/beans/spring-beans.xsd http://www.springframework.org/schema/context https://www.springframework.org/schema/context/spring-context.xsd">
<context:component-scan base-package="com.itdemo"/>
</beans>Test
public class App {
    public static void main( String[] args ) {
        // 启动spring容器
        ClassPathXmlApplicationContext context = new ClassPathXmlApplicationContext("application.xml");
        // 获取bean
        TestController testController = (TestController)context.getBean("testController");
        // 调用方法
        testController.test();
    }
}
基本类型,数组类型,集合类型的属性赋值
@Value("1")
private int id;
@Value("张三")
private String name;
@Value("20")
private int age;
@Value("#{'Java,Spring,MySQL'.split(',')}")
private String[] courses;
@Autowired
private Course course;
@Value("#{'Spring,SpringMVC,MyBatis'.split(',')}")
private List<String> courseList;
@Value("#{'Java基础,Spring框架,数据库'.split(',')}")
private Set<String> courseSet;
@Value("#{{'course1':'Java基础','course2':'Spring框架','course3':'数据库'}}")
private Map<String, String> courseMap;
Spring容器对象的创建
1.BeanFactory
这是IOC容器的顶级接口 它定义了IOC的最基础的功能, 但是其功能比较简单,一般面向Spring自身使用
在第一次使用到某个Bean时(调用getBean()),才对该Bean进行加载实例化用的时候再创建 --> 【懒汉设计】
2.ApplicationContext
这是在BeanFactory基础上衍生出的接口,它扩展了BeanFactory的功能,一般面向程序员使用
在容器启动时,一次性创建并加载了所有的Bean 初始化的时候全创建好 --> 【饿汉设计】
public static void main( String[] args ) {
/****************************** 方式一:BeanFactory ********************************/
XmlBeanFactory xmlBeanFactory = new XmlBeanFactory(new ClassPathResource("application.xml"));
// 在获取Bean的时候,Spring会自动创建对象,并返回
Student stu1 = (Student)xmlBeanFactory.getBean("student");
System.out.println(stu1.toString());
Student stu1_1 = (Student)xmlBeanFactory.getBean("student");
System.out.println(stu1_1.toString());
System.out.println(stu1 == stu1_1); // true
/***************************** 方式二:ApplicationContext **************************/
// 在创建Bean的时候,Spring会自动创建对象,并返回
ClassPathXmlApplicationContext context = new ClassPathXmlApplicationContext("application.xml");
Student stu2 = (Student) context.getBean("student");
System.out.println(stu2.toString());
Student stu2_2 = (Student) context.getBean("student");
System.out.println(stu2_2.toString());
System.out.println(stu2 == stu2_2); // true
}两种获取容器对象的方式都是单例模式 ,即创建对象一次,获取对象多次,区别在于创建对象的时机不同。
1.
BeanFactory:默认采用懒加载(Lazy Initialization) ,即首次调用getBean()时才创建 Bean 2.ApplicationContext:默认采用预加载(Eager Initialization) ,即容器启动时就创建所有单例 Bean
| 特性 | BeanFactory |
ApplicationContext |
|---|---|---|
| 初始化策略 | 懒加载(Lazy) | 预加载(Eager,默认) |
| 启动速度 | 快 | 较慢(取决于 Bean 数量) |
| 内存占用 | 低 | 高 |
getBean方法获取对象
xml
<?xml version="1.0" encoding="UTF-8"?>
<beans xmlns="http://www.springframework.org/schema/beans"
xmlns:xsi="http://www.w3.org/2001/XMLSchema-instance"
xsi:schemaLocation="http://www.springframework.org/schema/beans http://www.springframework.org/schema/beans/spring-beans.xsd">
<bean id="student" class="com.itdemo.domain.Student">
<property name="id" value="1"/>
<property name="name" value="张三"/>
<property name="age" value="18"/>
</bean>
<bean id="student2" class="com.itdemo.domain.Student">
<property name="id" value="2"/>
<property name="name" value="李四"/>
<property name="age" value="19"/>
</bean>
</beans>测试类
public static void main( String[] args ) {
ClassPathXmlApplicationContext context = new ClassPathXmlApplicationContext("application2.xml");
/****************************方式一:根据beanName ***********************************/
Student stu1 = (Student) context.getBean("student");
System.out.println(stu1.toString());
/****************************方式二:根据bean.class *********************************/
// Exception: expected single matching bean but found 2
Student stu2 = context.getBean(Student.class);
System.out.println(stu2.toString());
/****************** 方式三:如果有多个相同对象,beanName + bean.class ******************/
Student stu3 = context.getBean("student2", Student.class);
System.out.println(stu3.toString());
}根据beanName 需要进行强转 ,根据bean.class 不需要强转,但是如果有一个bean的多个对象,会出现异常,需要使用beanName + bean.class
Spring实例的其他功能使用
1.Bean实例的作用域
| 作用域(Scope) | 适用环境 | 实例数量规则 | 生命周期管理 | 典型使用场景 |
|---|---|---|---|---|
singleton |
所有环境 | 整个 Spring 容器中仅一个实例 | ✅ 完整 | 无状态服务类(Service、DAO 等) |
prototype |
所有环境 | 每次请求(注入或 getBean())都创建新实例 |
❌ 仅创建 | 有状态对象(如购物车、任务上下文) |
request |
Web 环境 | 每个 HTTP 请求创建一个实例,同一请求内共享 | ✅ | 请求级数据封装(如请求日志上下文) |
session |
Web 环境 | 每个 HTTP 会话创建一个实例,同一会话内共享 | ✅ | 用户会话数据(如登录用户信息) |
application |
Web 环境 | 每个 ServletContext(Web 应用)中一个实例 |
✅ | Web 应用全局配置 |
websocket |
Web 环境(WebSocket) | 每个 WebSocket 会话一个实例 | ✅ | WebSocket 会话状态 |
📝 补充说明:
-
默认作用域 :
singleton -
非 Web 环境 (如普通 Java SE 应用)仅支持
singleton和prototype -
若在非 Web 环境使用 Web 作用域(如
request),启动时会报错:java.lang.IllegalStateException: No Scope registered for scope name 'request'
💡 提示:可通过
@Scope("scopeName")或 XML<bean scope="...">指定作用域。
注解设置scope
@Component
@Scope(scopeName = "singleton")
@Scope(scopeName = "prototype")
xml bean标签设置scope
<?xml version="1.0" encoding="UTF-8"?>
<beans xmlns="http://www.springframework.org/schema/beans"
xmlns:xsi="http://www.w3.org/2001/XMLSchema-instance"
xsi:schemaLocation="http://www.springframework.org/schema/beans http://www.springframework.org/schema/beans/spring-beans.xsd">
<!-- singleton:默认,单例模式,即一个bean只创建出一个对象,该bean在整个程序,无论获取多少次都是同一个对象 -->
<bean id="studentSingleton" class="com.itdemo.domain.Student" scope="singleton">
<property name="id" value="1"/>
<property name="name" value="张三"/>
<property name="age" value="18"/>
</bean>
<!-- prototype:原型模式。每次获取,都重新创建对象 -->
<bean id="studentPrototype" class="com.itdemo.domain.Student" scope="prototype">
<property name="id" value="2"/>
<property name="name" value="李四"/>
<property name="age" value="19"/>
</bean>
</beans>测试类
public static void main( String[] args ) {
ClassPathXmlApplicationContext context = new ClassPathXmlApplicationContext("application3.xml");
// 方式一:scope="singleton" 单例模式
Student stu1 = context.getBean("studentSingleton", Student.class);
Student stu2 = context.getBean("studentSingleton", Student.class);
System.out.println(stu1 == stu2); // true
// 方式二:scope="prototype" 原型模式
Student stu3 = context.getBean("studentPrototype", Student.class);
Student stu4 = context.getBean("studentPrototype", Student.class);
System.out.println(stu3 == stu4); // false
}2.Bean实例的延迟加载
延迟创建对象只针对于单例模式
在bean标签内使用 lazy-init="true" 可以让 ClassPathXmlApplicationContext 创建对象的时机延迟到第一次getBean
<?xml version="1.0" encoding="UTF-8"?>
<beans xmlns="http://www.springframework.org/schema/beans"
xmlns:xsi="http://www.w3.org/2001/XMLSchema-instance"
xsi:schemaLocation="http://www.springframework.org/schema/beans http://www.springframework.org/schema/beans/spring-beans.xsd">
<!-- scope="singleton" 默认 lazy-init="true" 开启延迟创建 -->
<bean id="student" class="com.itdemo.domain.Student" lazy-init="true">
<property name="id" value="1"/>
<property name="name" value="张三"/>
<property name="age" value="18"/>
</bean>
</beans>如果是以注解的方式创建bean对象,在上面加 @Lazy 也可以实现延迟创建对象
3.Bean实例的生命周期方法
使用注解方式(推荐)
初始化方法:@PostConstruct 销毁方法:`@PreDestroy`
来源:
javax.annotation.PostConstruct和javax.annotation.PreDestroy(JSR-250 标准)
📌 示例代码
import javax.annotation.PostConstruct;
import javax.annotation.PreDestroy;
import org.springframework.stereotype.Component;
@Component
public class MyService {
// 构造函数
public MyService() {
System.out.println("1. Bean 实例化");
}
// 初始化方法
@PostConstruct
public void init() {
System.out.println("2. 初始化:@PostConstruct");
}
// 业务方法
public void doWork() {
System.out.println("3. 执行业务逻辑");
}
// 销毁方法
@PreDestroy
public void cleanup() {
System.out.println("4. 销毁:@PreDestroy");
}
}-
无需在 XML 或配置类中额外声明方法名。
-
方法必须是 无参、无返回值、非静态。
-
容器关闭时(如调用
context.close()),才会触发@PreDestroy。 -
仅对单例 Bean 有效 (
prototype不会调用销毁方法)。
使用 XML <bean> 标签方式
通过 init-method 和 destroy-method 属性指定方法名。
📌 示例 Java 类(不能用注解,方法名任意)
public class MyService {
public MyService() {
System.out.println("1. Bean 实例化");
}
// 自定义初始化方法(方法名任意)
public void myInit() {
System.out.println("2. 初始化:myInit()");
}
public void doWork() {
System.out.println("3. 执行业务逻辑");
}
// 自定义销毁方法(方法名任意)
public void myDestroy() {
System.out.println("4. 销毁:myDestroy()");
}
}📌 XML 配置(applicationContext.xml)
<?xml version="1.0" encoding="UTF-8"?>
<beans xmlns="http://www.springframework.org/schema/beans"
xmlns:xsi="http://www.w3.org/2001/XMLSchema-instance"
xsi:schemaLocation="
http://www.springframework.org/schema/beans
http://www.springframework.org/schema/beans/spring-beans.xsd">
<bean id="myService"
class="com.example.MyService"
init-method="myInit"
destroy-method="myDestroy" />
</beans>-
方法名必须与
init-method/destroy-method指定的名称一致。 -
方法必须是 public、无参、无返回值。
-
同样,销毁方法只对单例 Bean 调用。
| 特性 | 注解方式 (@PostConstruct / @PreDestroy) |
XML <bean> 方式 (init-method / destroy-method) |
|---|---|---|
| 标准来源 | JSR-250(Java 标准) | Spring 特有 |
| 是否侵入代码 | 是(需加注解) | 否(配置与代码分离) |
| 方法命名限制 | 方法名任意,但必须用注解标记 | 方法名必须与 XML 中指定的一致 |
| 适用场景 | 推荐用于现代 Spring / Spring Boot 项目 | 适用于 XML 配置为主的传统项目,或无法修改第三方类源码时 |
| 能否用于第三方类 | ❌(无法加注解) | ✅(只需知道方法名即可配置) |
补充:Java 配置类中的 @Bean 方式(也属于注解体系)
@Configuration
public class AppConfig {
@Bean(initMethod = "myInit", destroyMethod = "myDestroy")
public MyService myService() {
return new MyService();
}
}这种方式结合了注解的便利性和 XML 的灵活性,适合需要精细控制 Bean 生命周期的场景。
-
新项目优先使用
@PostConstruct/@PreDestroy:简洁、标准、可读性强。 -
集成第三方库时 (无法修改源码),使用 XML 或
@Bean(initMethod=...)指定生命周期方法。 -
避免混合使用多种方式 (如同时用
@PostConstruct和init-method),以免造成混淆或重复执行。
Spring测试操作(单元测试)
导入相关依赖 spring-test应于spring-context版本保持一致
<dependencies>

    <!-- https://mvnrepository.com/artifact/org.springframework/spring-context -->
    <dependency>
      <groupId>org.springframework</groupId>
      <artifactId>spring-context</artifactId>
      <version>5.2.25.RELEASE</version>
    </dependency>

    <!-- https://mvnrepository.com/artifact/junit/junit -->
    <dependency>
      <groupId>junit</groupId>
      <artifactId>junit</artifactId>
      <version>4.13.2</version>
      <scope>test</scope>
    </dependency>

    <!-- https://mvnrepository.com/artifact/org.springframework/spring-test -->
    <dependency>
      <groupId>org.springframework</groupId>
      <artifactId>spring-test</artifactId>
      <version>5.2.25.RELEASE</version>
      <scope>test</scope>
    </dependency>

</dependencies>
示例测试Controller
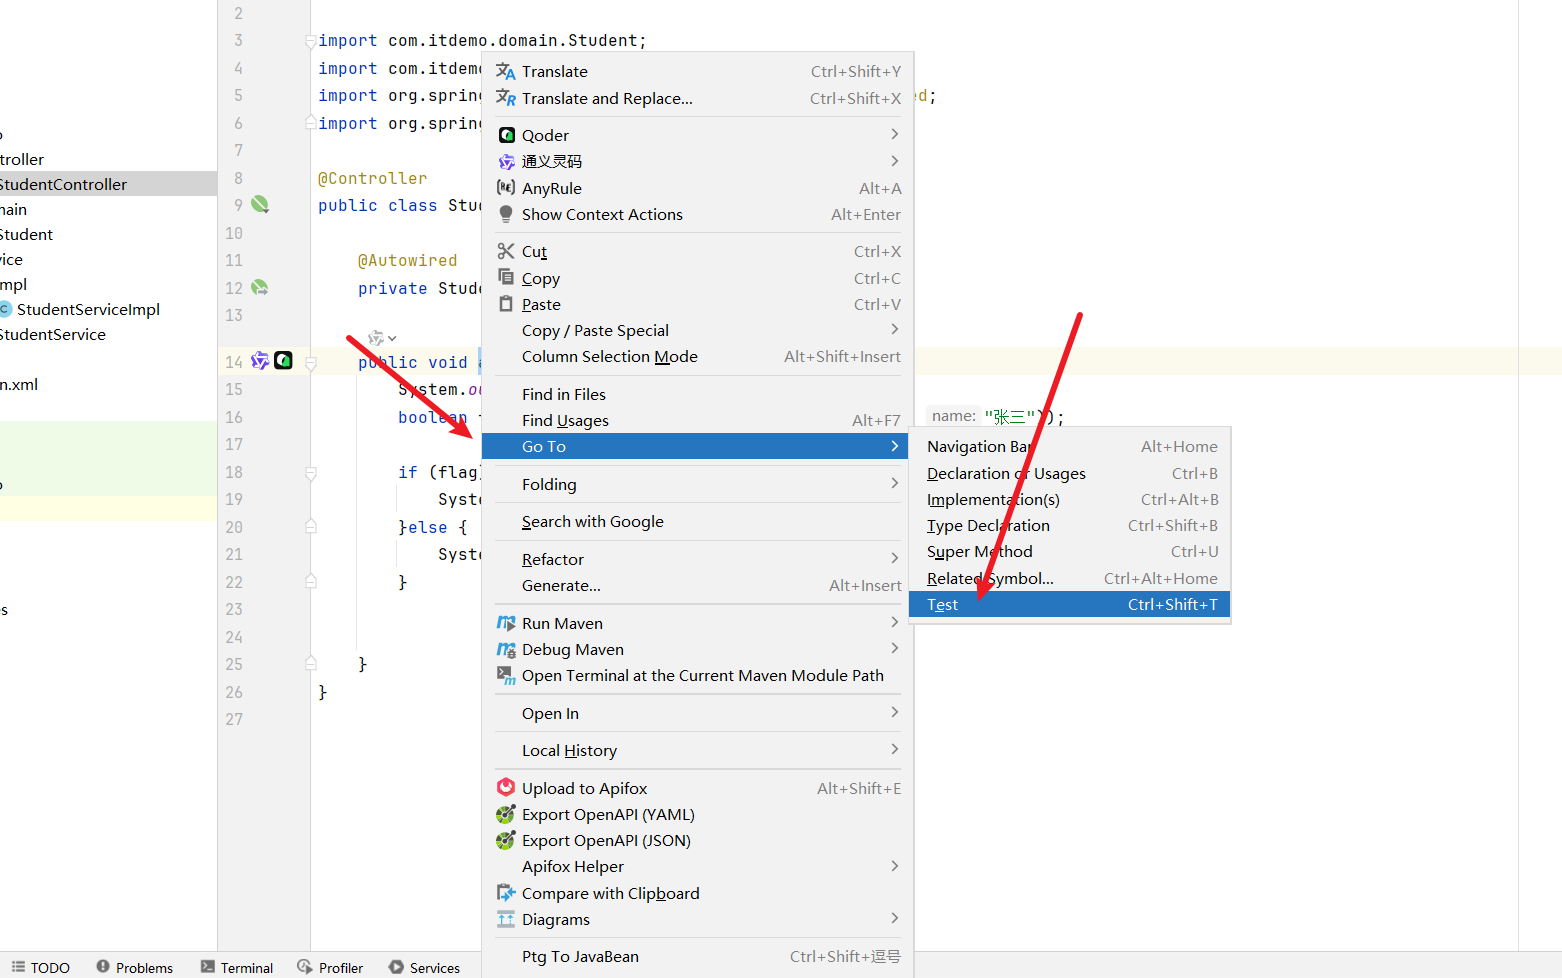
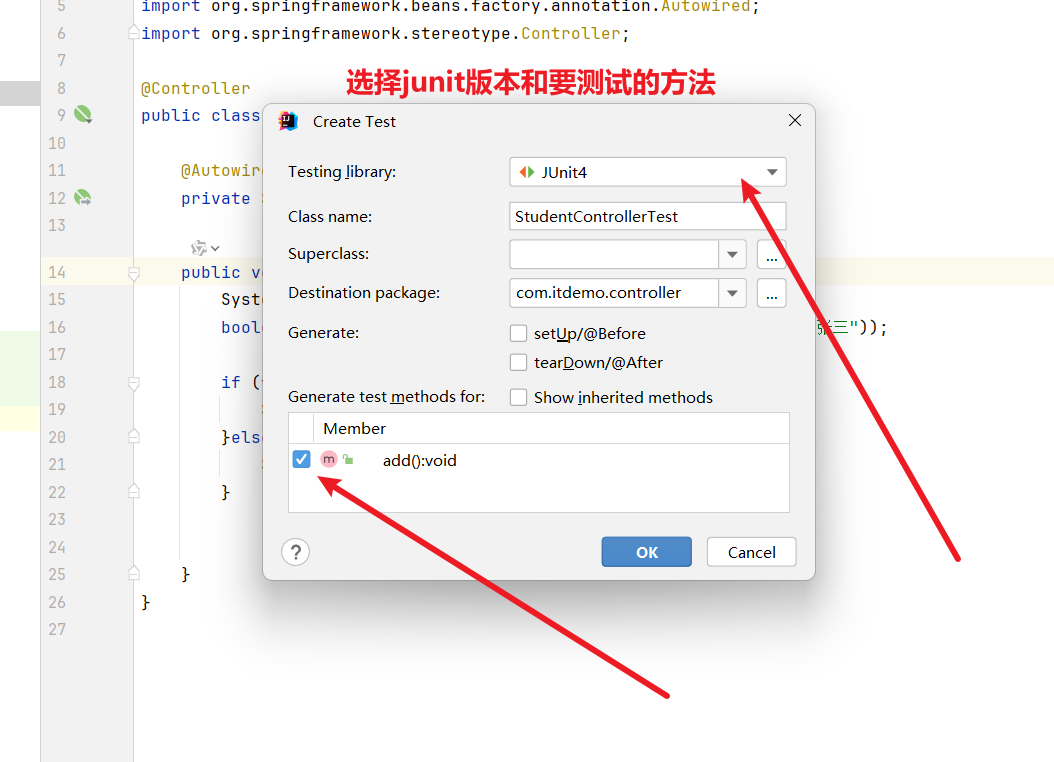
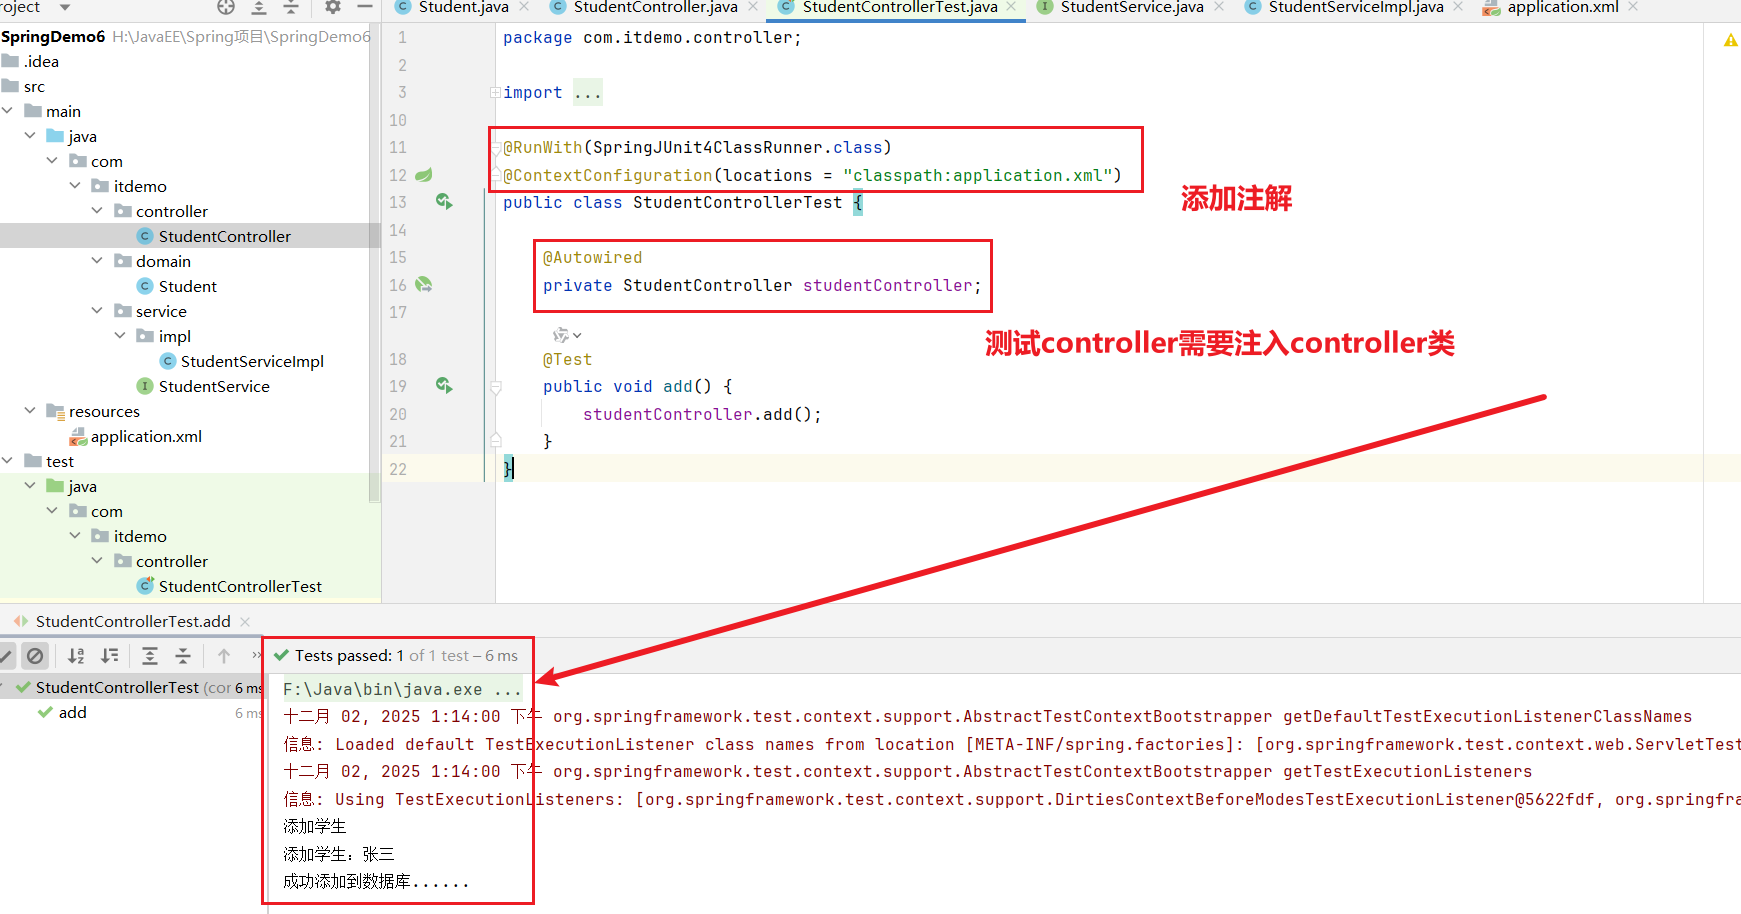
@RunWith(SpringJUnit4ClassRunner.class) 注解的作用:指定使用 Spring 的 JUnit 4 测试运行器来执行测试,这样可以启用 Spring 的测试框架支持,包括依赖注入和事务管理等功能。
@ContextConfiguration(locations = "classpath:application.xml") 注解的作用: 指定 Spring 配置文件的位置,用于加载应用程序上下文。这里指定从类路径下的 application.xml 文件加载配置,使得测试环境中能够正确初始化 Spring 容器和相关 Bean。
Spring连接数据库操作
导入资源依赖
<project xmlns="http://maven.apache.org/POM/4.0.0" xmlns:xsi="http://www.w3.org/2001/XMLSchema-instance"
xsi:schemaLocation="http://maven.apache.org/POM/4.0.0 http://maven.apache.org/xsd/maven-4.0.0.xsd">
<modelVersion>4.0.0</modelVersion>
<groupId>com.itdemo</groupId>
<artifactId>SpringDemo7</artifactId>
<version>1.0-SNAPSHOT</version>
<packaging>jar</packaging>
<name>SpringDemo7</name>
<url>http://maven.apache.org</url>
<properties>
<project.build.sourceEncoding>UTF-8</project.build.sourceEncoding>
<!-- Spring版本的统一 -->
<project.Spring.version>5.2.25.RELEASE</project.Spring.version>
</properties>
<dependencies>
<!-- https://mvnrepository.com/artifact/org.springframework/spring-context -->
<dependency>
<groupId>org.springframework</groupId>
<artifactId>spring-context</artifactId>
<version>${project.Spring.version}</version>
</dependency>
<!-- https://mvnrepository.com/artifact/org.springframework/spring-jdbc -->
<dependency>
<groupId>org.springframework</groupId>
<artifactId>spring-jdbc</artifactId>
<version>${project.Spring.version}</version>
</dependency>
<!-- https://mvnrepository.com/artifact/mysql/mysql-connector-java -->
<dependency>
<groupId>mysql</groupId>
<artifactId>mysql-connector-java</artifactId>
<version>8.0.26</version>
</dependency>
<!-- https://mvnrepository.com/artifact/com.mchange/c3p0 -->
<dependency>
<groupId>com.mchange</groupId>
<artifactId>c3p0</artifactId>
<version>0.9.5.2</version>
</dependency>
<!-- https://mvnrepository.com/artifact/junit/junit -->
<dependency>
<groupId>junit</groupId>
<artifactId>junit</artifactId>
<version>4.13.2</version>
<scope>test</scope>
</dependency>
<!-- https://mvnrepository.com/artifact/org.springframework/spring-test -->
<dependency>
<groupId>org.springframework</groupId>
<artifactId>spring-test</artifactId>
<version>${project.Spring.version}</version>
<scope>test</scope>
</dependency>
</dependencies>
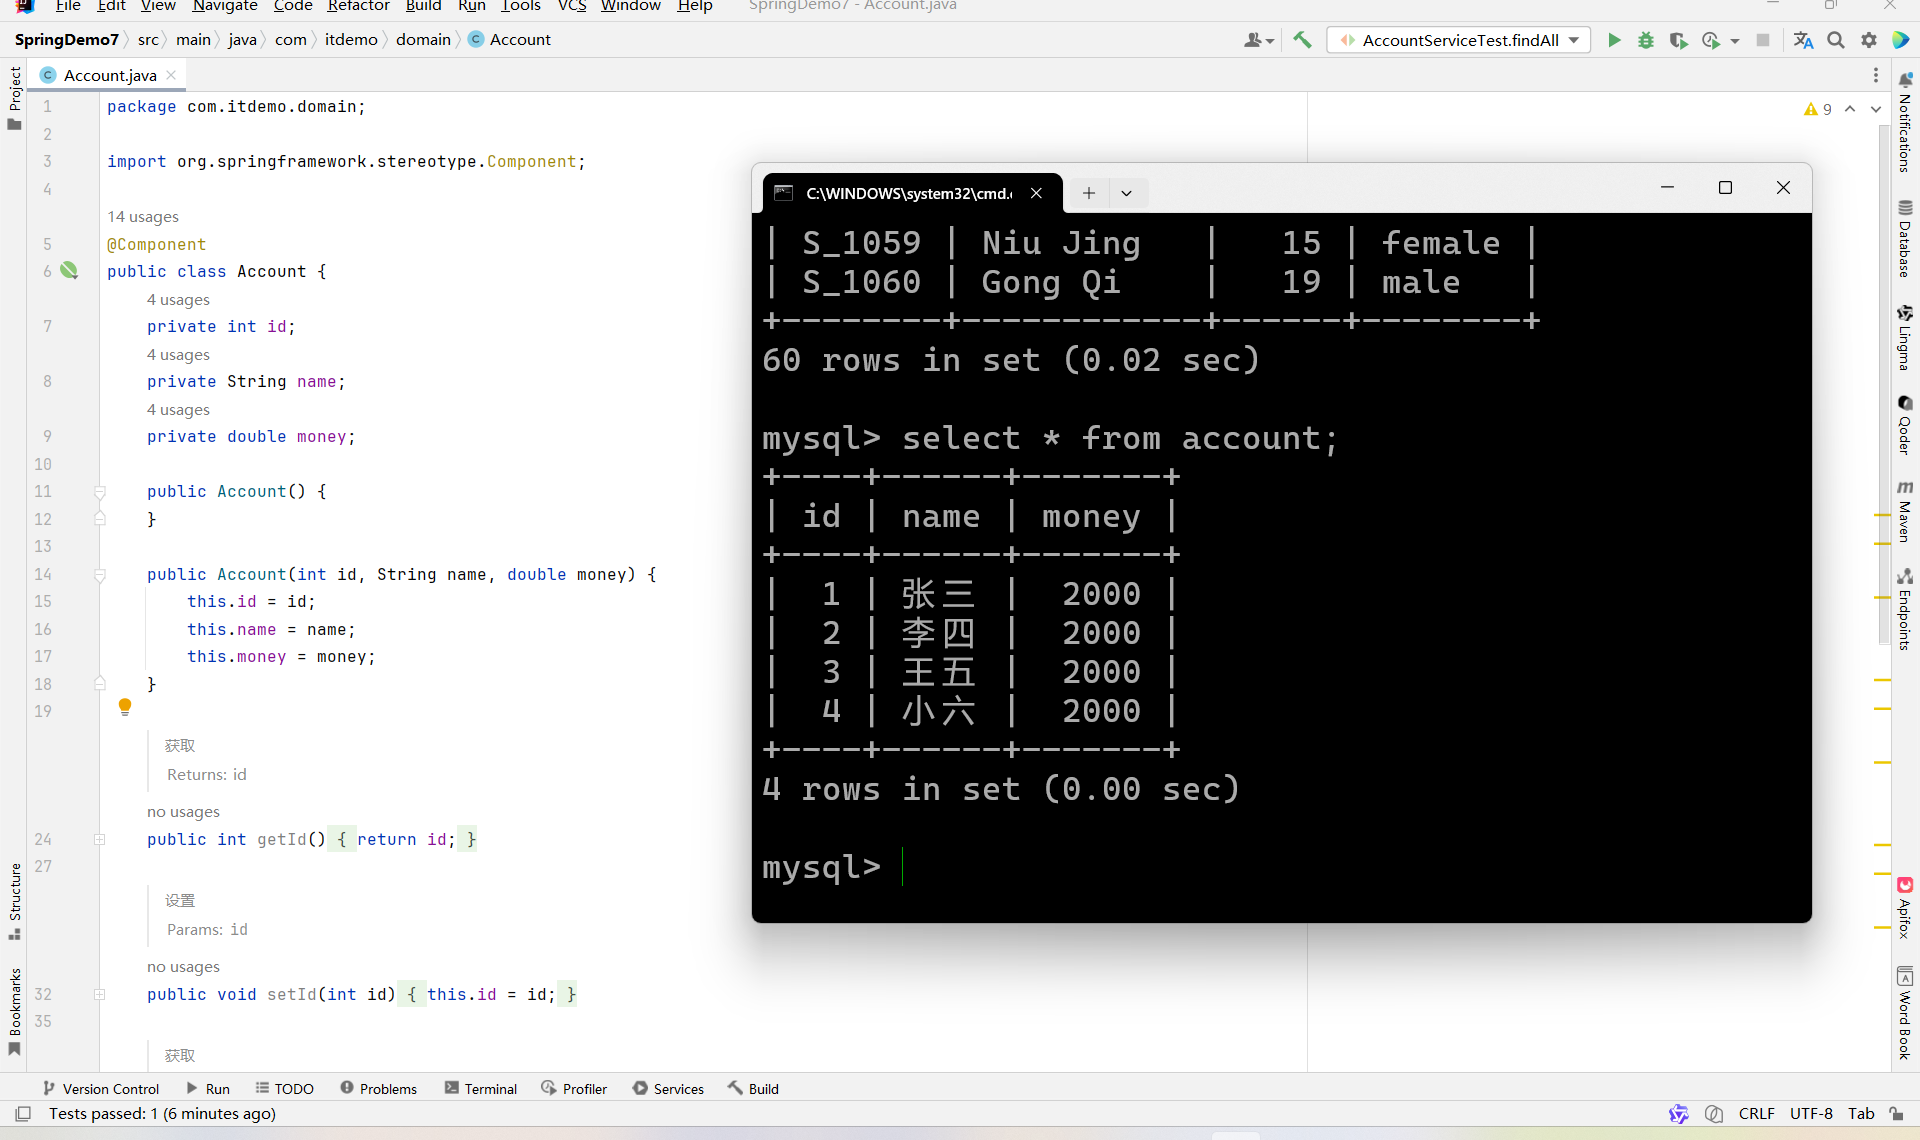
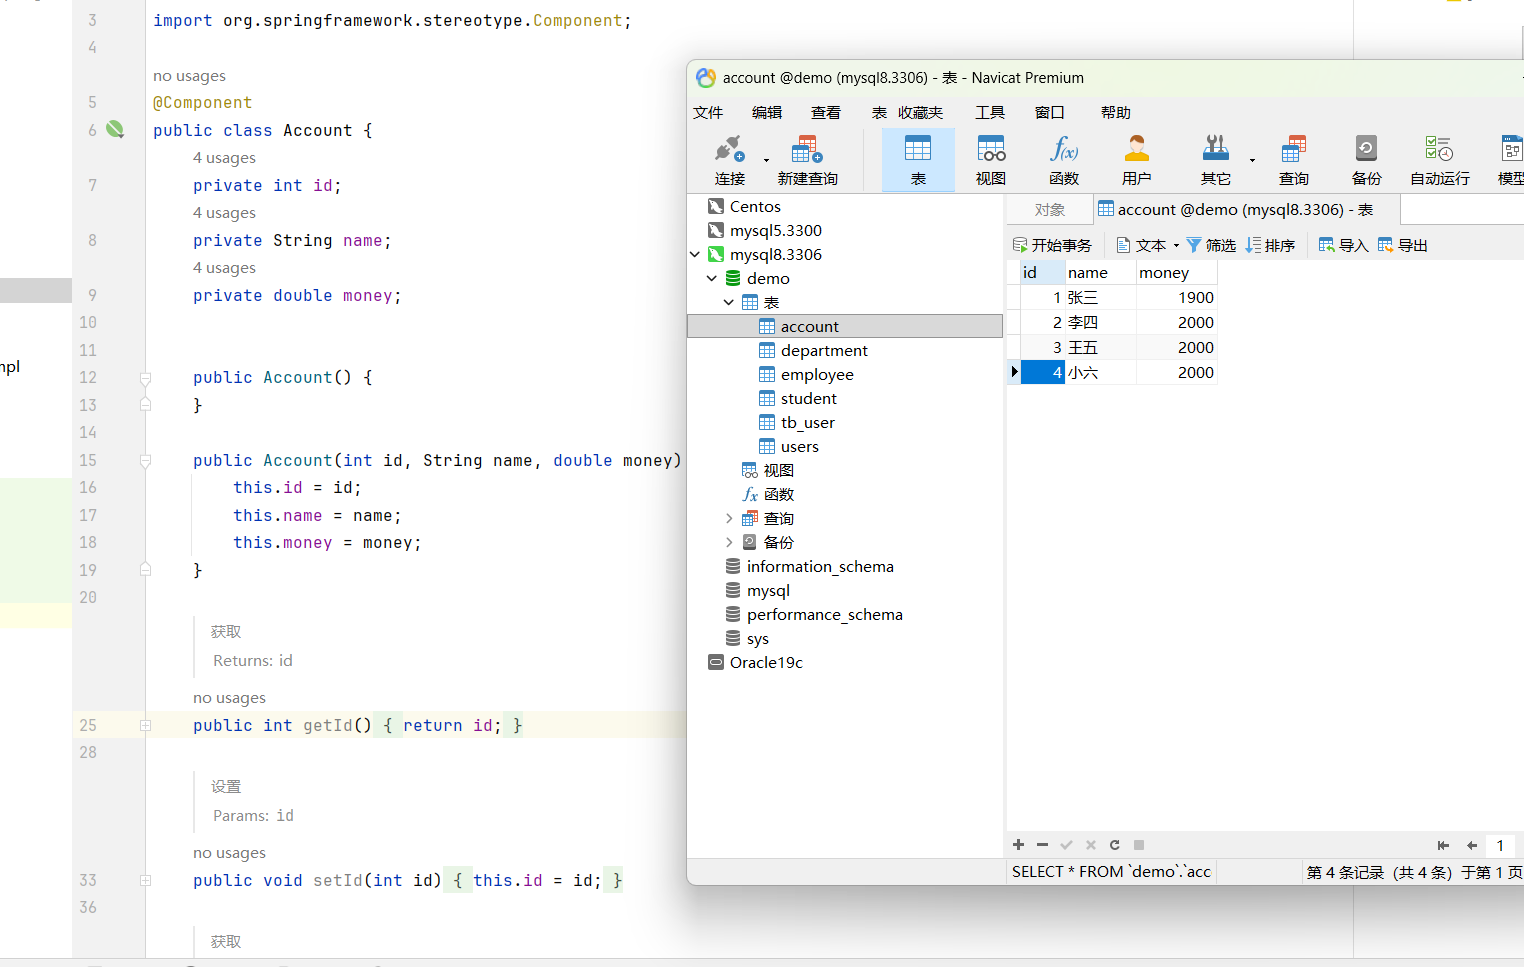
</project>实体类 + 数据库
业务代码 Service + Dao
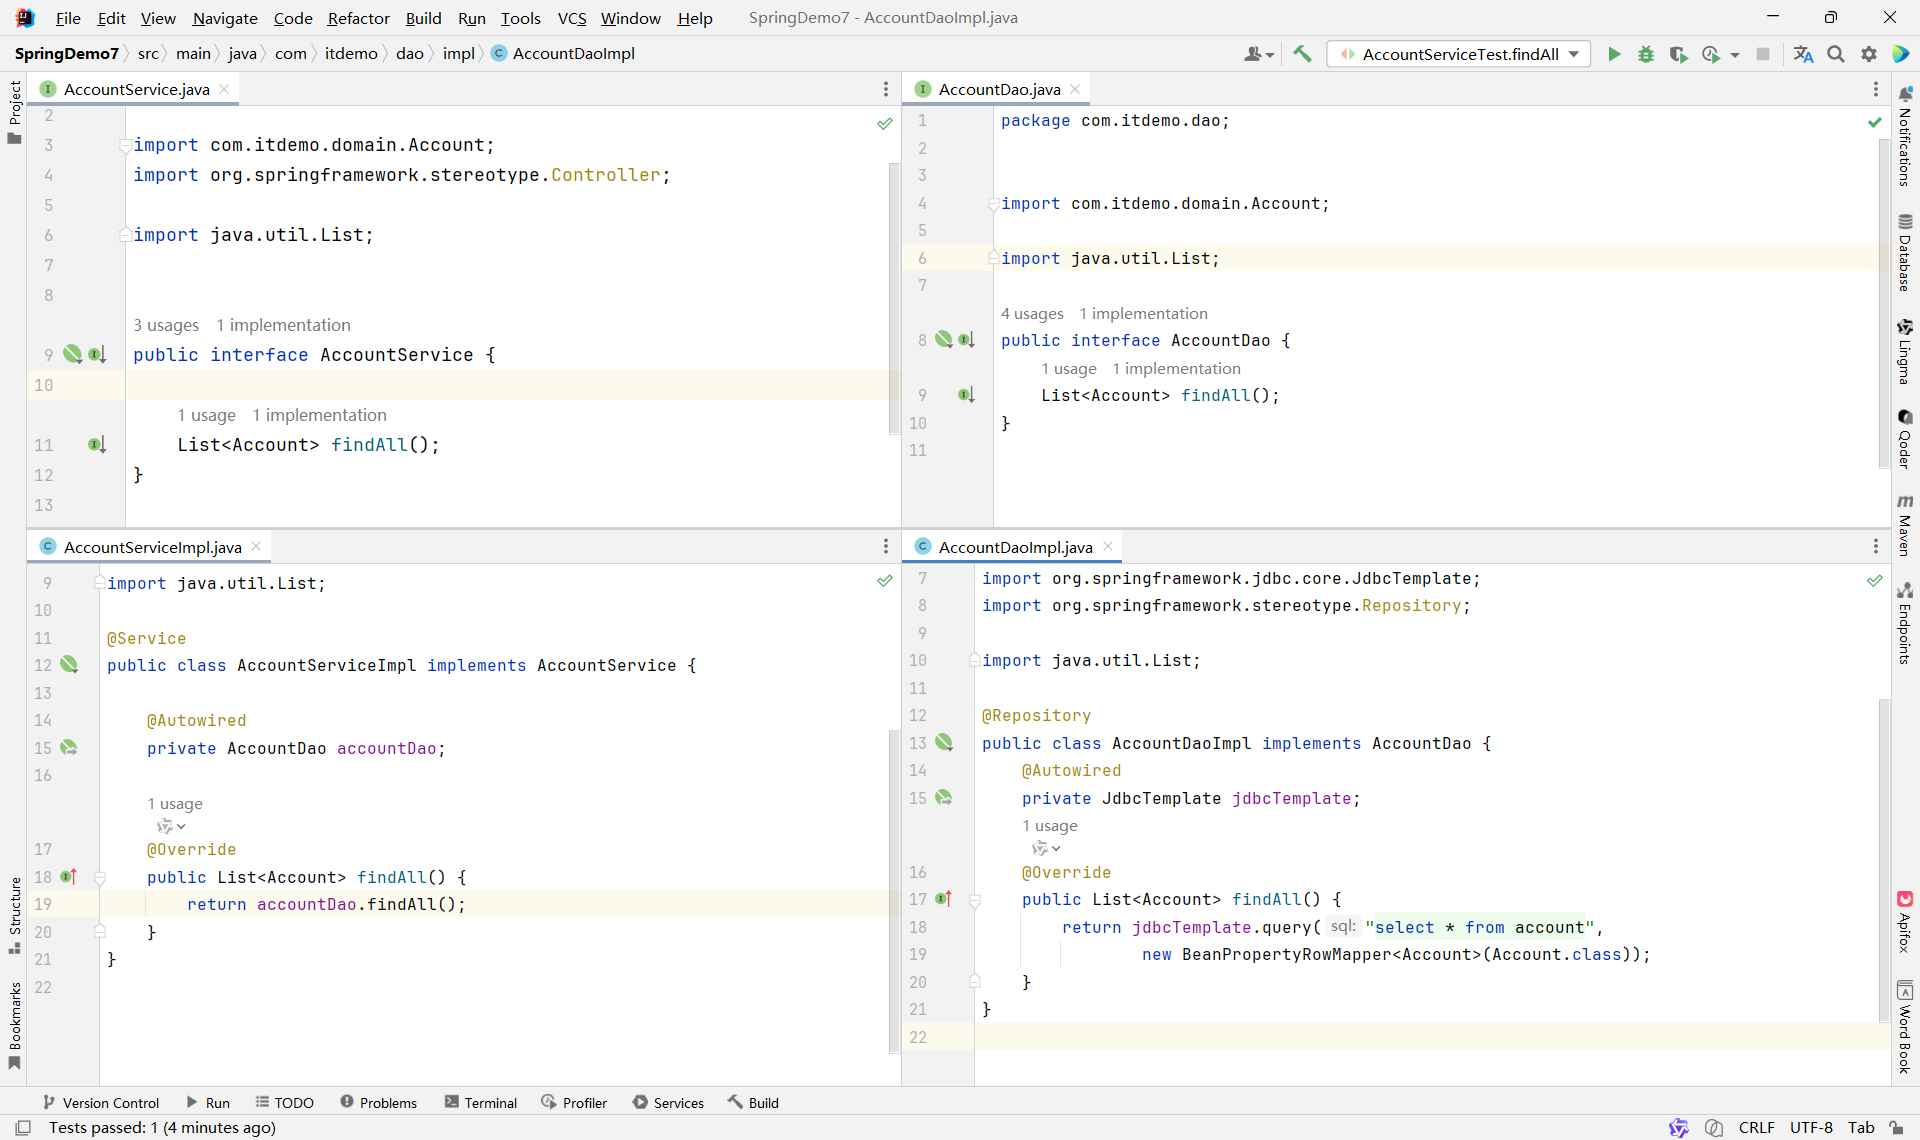
Xml配置文件
这里面的JdbcTemplate 和 ComboPooledDataSource 不会创建多个,因为bean标签默认是单例模式
<?xml version="1.0" encoding="UTF-8"?>
<beans xmlns="http://www.springframework.org/schema/beans"
       xmlns:xsi="http://www.w3.org/2001/XMLSchema-instance" xmlns:jdbc="http://www.springframework.org/schema/jdbc"
       xmlns:context="http://www.springframework.org/schema/context"
       xsi:schemaLocation="http://www.springframework.org/schema/beans http://www.springframework.org/schema/beans/spring-beans.xsd http://www.springframework.org/schema/jdbc http://www.springframework.org/schema/jdbc/spring-jdbc.xsd http://www.springframework.org/schema/context https://www.springframework.org/schema/context/spring-context.xsd">

    <!--  用于扫描bean  -->
    <context:component-scan base-package="com.itdemo"/>

    <!--  JdbcTemplate 用于Autowired注入jdbcTemplate对象  -->
    <bean id="jdbcTemplate" class="org.springframework.jdbc.core.JdbcTemplate">
        <property name="dataSource" ref="dataSource"></property>
    </bean>
    <!-- dataSource 创建一个连接池对象 用于创建配置c3p0对象-->
    <bean id="dataSource" class="com.mchange.v2.c3p0.ComboPooledDataSource">
        <property name="driverClass" value="com.mysql.cj.jdbc.Driver"/>
        <property name="jdbcUrl" value="jdbc:mysql://localhost:3306/demo?serverTimezone=UTC"/>
        <property name="user" value="root"/>
        <property name="password" value="123456"/>
    </bean>


</beans>
编写测试类
package com.itdemo.service;

import com.itdemo.domain.Account;
import org.junit.Test;
import org.junit.runner.RunWith;
import org.springframework.beans.factory.annotation.Autowired;
import org.springframework.test.context.ContextConfiguration;
import org.springframework.test.context.junit4.SpringJUnit4ClassRunner;

import java.util.Iterator;
import java.util.List;

import static org.junit.Assert.*;

@RunWith(SpringJUnit4ClassRunner.class)
@ContextConfiguration(locations = "classpath:application.xml")
public class AccountServiceTest {

    @Autowired
    private AccountService accountService;

    @Test
    public void findAll() {
       List<Account> accountList = accountService.findAll();
       Iterator<Account> iterator = accountList.iterator();
       while (iterator.hasNext()) {
          Account account = iterator.next();
          System.out.println(account.toString());
       }
    }
}
二、面向切面 AOP
**什么是AOP:**面向切面编程不是一种新的编程思想,是面向对象编程OOP的扩展与补充
AOP 的核心思想:在不修改原有业务代码的前提下,统一处理横切关注点(Cross-Cutting Concerns)。
**作用:**把逻辑代码和核心业务代码区分开管理,是业务代码更加清晰,逻辑代码放入到同一个类中管理,方便逻辑进行升级和维护
代理模式
代理模式:代替接口 管理实现类中重写的方法
静态代理 :代理类需要和 所有实现类 实现相同的接口,在代理类的重写方法中 管理 其他实现类的同名方法
动态代理 :代理类中通过一个方法,管理实现类中所有方法的执行
示例:
静态代理示例
package com.itdemo.proxy;

import com.itdemo.service.MathService;

public class MathProxy implements MathService {

    /**
     * 被代理对象
     */
    private MathService mathService;

    public MathProxy() {
    }

    public MathProxy(MathService mathService) {
       this.mathService = mathService;
    }

    @Override
    public int sum(int a, int b) {
       System.out.println("sum开始计算" + a + " + " + b);
       int result = mathService.sum(a, b);
       System.out.println("sum计算结果为:" + result);
       System.out.println("sum计算结束");
       return result;
    }

    @Override
    public int sub(int a, int b) {
       System.out.println("sub开始计算" + a + " - " + b);
       int result = mathService.sub(a, b);
       System.out.println("sub计算结果为:" + result);
       System.out.println("sub计算结束");
       return result;
    }

    @Override
    public double mul(double a, double b) {
       System.out.println("mul开始计算" + a + " * " + b);
       double result = mathService.mul(a, b);
       System.out.println("mul计算结果为:" + result);
       System.out.println("mul计算结束");
       return result;
    }

    @Override
    public double div(double a, double b) {
       System.out.println("div开始计算" + a + " / " + b);
       double result = mathService.div(a, b);
       System.out.println("div计算结果为:" + result);
       System.out.println("div计算结束");
       return result;
    }
}
动态代理
package com.itdemo.proxy;

import com.itdemo.service.MathService;

import java.lang.reflect.InvocationHandler;
import java.lang.reflect.Method;
import java.lang.reflect.Proxy;
import java.util.Arrays;

public class MathProxy2{

    private MathService mathService;

    public MathProxy2() {
    }

    public MathProxy2(MathService mathService) {
       this.mathService = mathService;
    }

    /***************************** 动态代理 *****************************/
    public MathService proxy(){
       // ClassLoader loader,
       ClassLoader classLoader = mathService.getClass().getClassLoader();
       // Class<?>[] interfaces,
       Class<?>[] interfaces = mathService.getClass().getInterfaces();
       // InvocationHandler h  通过匿名内部类

       MathService mProxy = (MathService) Proxy.newProxyInstance(classLoader, interfaces, new InvocationHandler() {
          @Override
          public Object invoke(Object proxy, Method method, Object[] args) throws Throwable {
             // 获取方法名称
             String name = method.getName();
             System.out.println(name + "开始计算:" + Arrays.toString(args));

             // 执行方法
             Object result = method.invoke(mathService, args);
             System.out.println(name + "计算结果为:" + result);
             System.out.println(name + "结束计算");

             return result;
          }
       });
       return mProxy;
    }

}
AOP相关专业术语
-
目标对象(Target):真正干活的原始对象。
-
连接点(JoinPoint) :程序中能被拦截的地方(Spring 里就是方法)。
-
代理对象(Proxy) :包装了目标对象的"增强版",调用它来间接执行原方法 + 额外功能。
-
通知(Advice) :要加的额外功能 (比如日志、事务),定义"做什么"。
-
切入点(Pointcut) :指定"在哪些方法上"加通知(比如所有 service 方法)。
-
切面(Aspect) :把"在哪加 "(Pointcut)和"加什么"(Advice)合在一起的配置。
-
织入(Weaving) :把通知"织"进目标对象,生成代理对象的过程。
💡 一句话总结: 切面 = 在哪(切入点)+ 干啥(通知);通过代理,把增强功能织入目标对象。
Spring中AOP的使用
依赖 → 开启 AOP → 写通知 → 配切面 → 测试
依赖
在项目中引入 Spring AOP 和 AspectJ 的相关依赖(如 spring-aop、spring-aspects),确保 AOP 功能可用。
开启 AOP
在 Spring 配置文件中添加 (注解方式)或使用(XML 方式),启用 AOP 支持。
写通知
创建一个普通 Java 类,在其中编写增强逻辑方法(如前置通知 before()、后置通知 after() 等)。
配切面
通过 XML 或注解,将通知方法与切点(要拦截的目标方法)关联起来,形成"切面"(Aspect)。
测试
调用被拦截的目标方法,验证通知逻辑是否按预期执行(如是否打印日志、是否记录耗时等)。
引入AOP资源
<dependencies>
  <!--  基本核心依赖  -->
  <dependency>
    <groupId>org.springframework</groupId>
    <artifactId>spring-context</artifactId>
    <version>5.2.5.RELEASE</version>
  </dependency>

  <!--  AOP  -->
  <dependency>
    <groupId>org.springframework</groupId>
    <artifactId>spring-aspects</artifactId>
    <version>5.2.5.RELEASE</version>
  </dependency>


</dependencies>
方式1.基于XML形式
before + afterReturning + after + afterThrowing 创建切面类,设计通知方法
beforepackage com.itdemo.aspect;

import org.aspectj.lang.JoinPoint;
import org.aspectj.lang.ProceedingJoinPoint;

import java.util.Arrays;

public class MathAop {

	/**
	 * 前置通知 业务代码执行之前执行
	 * @param joinPoint
	 */
	public void before(JoinPoint joinPoint){
		System.out.println("************ 前置方法before ************");
		String methodName = joinPoint.getSignature().getName();
		Object[] args = joinPoint.getArgs();
		System.out.println(methodName + " 方法开始计算: " + Arrays.toString(args));
	}

	/**
	 * 获取返回值通知 业务代码获取到返回值之后执行
	 * @param result
	 */
	public void afterReturning(JoinPoint joinPoint,Object result){
		System.out.println("************ 获取到返回值之后执行result ************");
		String methodName = joinPoint.getSignature().getName();
		System.out.println(methodName + " 方法计算结果为: " + result);
	}

	/**
	 * 后置通知 业务代码执行之后执行
	 * @param joinPoint
	 */
	public void after(JoinPoint joinPoint){
		System.out.println("************ 后置方法after ************");
		String methodName = joinPoint.getSignature().getName();
		System.out.println(methodName + " 方法计算结束");
	}

	/**
	 * 异常通知
	 * @param joinPoint
	 * @param e
	 */
	public void afterThrowing(JoinPoint joinPoint, Exception e){
		System.out.println("************ 异常方法afterThrowing ************");
		String methodName = joinPoint.getSignature().getName();
		System.out.println(methodName + " 方法出现异常");
		String ExceptionMessage = e.getMessage();
		System.out.println("异常信息为: " + ExceptionMessage);
	}

}
before + afterReturning + after + afterThrowing 可以合并到一个 around
package com.itdemo.aspect;

import org.aspectj.lang.JoinPoint;
import org.aspectj.lang.ProceedingJoinPoint;

import java.util.Arrays;

public class MathAroundAop {
    /**
     *  环绕通知
     * @param joinPoint
     * @return
     */
    public Object around(ProceedingJoinPoint joinPoint){
       System.out.println("************ 环绕方法around ************");
       // 获取方法名称 + 参数
       String methodName = joinPoint.getSignature().getName();
       Object[] args = joinPoint.getArgs();
       // 执行方法
       Object result = null;
       try {
          // 前置方法 before + 业务代码 + 获取返回值通知 afterReturning
          System.out.println(methodName + " 方法开始计算: " + Arrays.toString(args));
          result = joinPoint.proceed(args);
          System.out.println(methodName + " 方法计算结果为: " + result);
       } catch (Throwable e) {
          // 异常方法 afterThrowing
          System.out.println(methodName + " 方法出现异常");
          String ExceptionMessage = e.getMessage();
          System.out.println("异常信息为: " + ExceptionMessage);
       } finally {
          // 后置方法 after
          System.out.println(methodName + " 方法计算结束");
       }
       // 返回结果
       return result;
    }


}
before + afterReturning + after + afterThrowing 配置切面信息
<?xml version="1.0" encoding="UTF-8"?>
<beans xmlns="http://www.springframework.org/schema/beans"
       xmlns:xsi="http://www.w3.org/2001/XMLSchema-instance" xmlns:aop="http://www.springframework.org/schema/aop"
       xsi:schemaLocation="http://www.springframework.org/schema/beans http://www.springframework.org/schema/beans/spring-beans.xsd http://www.springframework.org/schema/aop https://www.springframework.org/schema/aop/spring-aop.xsd">

    <!--  实例化切面类  -->
    <bean id="aop" class="com.itdemo.aspect.MathAop"/>

    <!--  实例化实现类对象  -->
    <bean id="MSI1" class="com.itdemo.service.impl.MathServiceImpl"/>
    <bean id="MSI2" class="com.itdemo.service.impl.MathServiceImpl2"/>

    <!--  配置AOP,进行切面配置  -->
    <aop:config>
        <!--配置切入点:就是要拦截到哪些方法-->
        <aop:pointcut id="MathAopPointcut" expression="execution(public int com.itdemo.service.impl.MathServiceImpl.sum(int,int))"/>
        <!--配置切面:用来关联切入点和切面,指要对哪些方法进行增强-->
        <aop:aspect ref="aop">

            <!-- 配置前置通知 -->
            <aop:before method="before" pointcut-ref="MathAopPointcut"/>
            <!-- 配置异常通知 -->
            <aop:after-throwing method="afterThrowing" pointcut-ref="MathAopPointcut" throwing="e"/>
            <!-- 配置返回结果后通知 -->
            <aop:after-returning method="afterReturning" pointcut-ref="MathAopPointcut" returning="result"/>
            <!-- 配置后置通知 -->
            <aop:after method="after" pointcut-ref="MathAopPointcut"/>

        </aop:aspect>
    </aop:config>


</beans>
before + afterReturning + after + afterThrowing 可以合并到一个 around
<?xml version="1.0" encoding="UTF-8"?>
<beans xmlns="http://www.springframework.org/schema/beans"
       xmlns:xsi="http://www.w3.org/2001/XMLSchema-instance" xmlns:aop="http://www.springframework.org/schema/aop"
       xsi:schemaLocation="http://www.springframework.org/schema/beans http://www.springframework.org/schema/beans/spring-beans.xsd http://www.springframework.org/schema/aop https://www.springframework.org/schema/aop/spring-aop.xsd">

    <!--  实例化切面类  -->
    <bean id="aop" class="com.itdemo.aspect.MathAroundAop"/>

    <!--  实例化实现类对象  -->
    <bean id="MSI1" class="com.itdemo.service.impl.MathServiceImpl"/>
    <bean id="MSI2" class="com.itdemo.service.impl.MathServiceImpl2"/>

    <!--  配置AOP,进行切面配置  -->
    <aop:config>
        <!--配置切入点:就是要拦截到哪些方法-->
        <aop:pointcut id="MathAopPointcut" expression="execution(public int com.itdemo.service.impl.MathServiceImpl.sum(int,int))"/>
        <!--配置切面:用来关联切入点和切面,指要对哪些方法进行增强-->
        <aop:aspect ref="aop">

            <!-- 配置环绕通知 -->
            <aop:around method="around" pointcut-ref="MathAopPointcut"/>

        </aop:aspect>
    </aop:config>


</beans>
测试Test
package com.itdemo;

import com.itdemo.service.MathService;
import org.springframework.context.support.ClassPathXmlApplicationContext;

public class App {
    public static void main( String[] args ) {
        // 启动spring容器
        ClassPathXmlApplicationContext context = new ClassPathXmlApplicationContext("application.xml");
        // 获取MathServiceImpl
        MathService msi1 = context.getBean("MSI1", MathService.class);
        // 调用方法
        msi1.sum(2,5);

        System.out.println();
        System.out.println();

        // 启动spring容器
        ClassPathXmlApplicationContext contextAround = new ClassPathXmlApplicationContext("applicationAround.xml");
        // 获取MathServiceImpl
        MathService aroundMsi1 = contextAround.getBean("MSI1", MathService.class);
        // 调用方法
        aroundMsi1.sum(2,5);
    }
}
运行结果
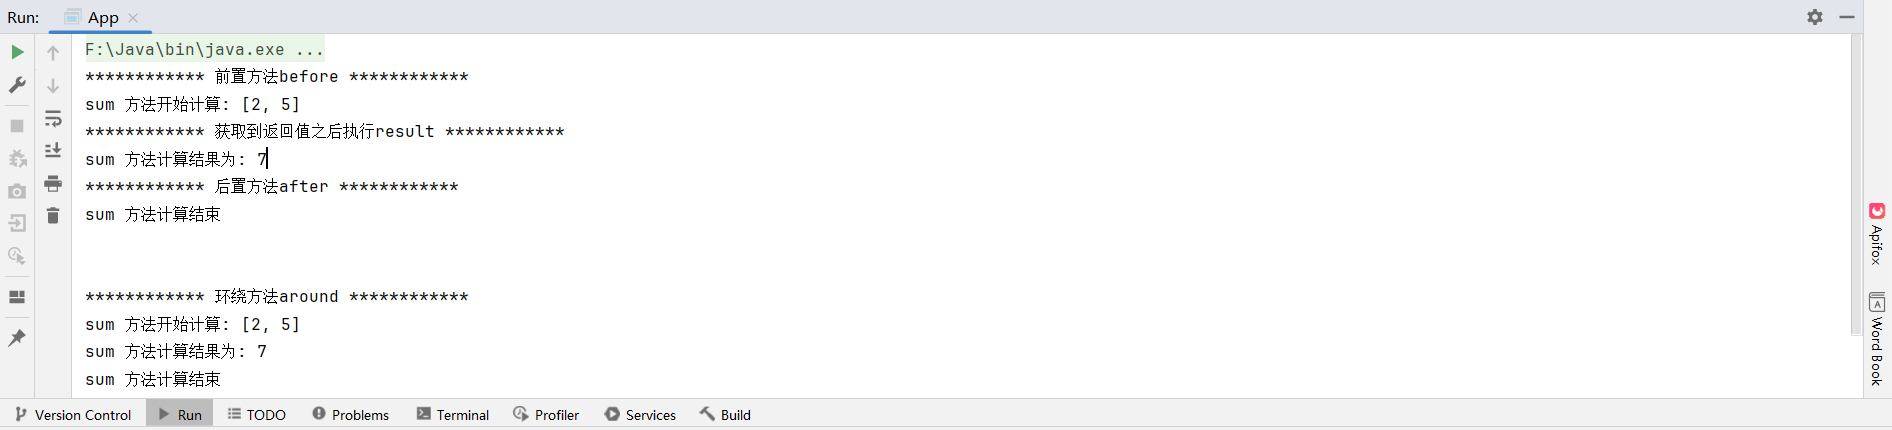
方式2.基于注解
切面类
package com.itdemo.aspect;


import org.aspectj.lang.JoinPoint;
import org.aspectj.lang.annotation.*;
import org.springframework.stereotype.Component;

import java.util.Arrays;

@Component
@Aspect  // 声明切面类
public class MathAop {
    /**
     * 定义切点
     */
    @Pointcut("execution(* com.itdemo.service.impl.MathServiceImpl.*(..))")
    public void pointcut(){};

    /**
     * 前置方法
     * @param joinPoint
     */
    @Before("pointcut()")
    public void before(JoinPoint joinPoint){
       System.out.println("************ 前置方法before ************");
       String methodName = joinPoint.getSignature().getName();
       Object[] args = joinPoint.getArgs();
       System.out.println(methodName + " 方法开始计算: " + Arrays.toString(args));
    }

    /**
     * 获取返回值
     * @param joinPoint
     * @param result
     */
    @AfterReturning(value = "pointcut()",returning = "result")
    public void afterReturning(JoinPoint joinPoint,Object result){
       System.out.println("************ 获取到返回值之后执行result ************");
       String methodName = joinPoint.getSignature().getName();
       System.out.println(methodName + " 方法计算结果为: " + result);
    }

    /**
     * 后置方法
     * @param joinPoint
     */
    @After("pointcut()")
    public void after(JoinPoint joinPoint){
       System.out.println("************ 后置方法after ************");
       String methodName = joinPoint.getSignature().getName();
       System.out.println(methodName + " 方法计算结束");
    }

    /**
     * 抛出异常方法
     * @param joinPoint
     * @param e
     */
    @AfterThrowing(value = "pointcut()",throwing = "e")
    public void afterThrowing(JoinPoint joinPoint, Exception e){
       System.out.println("************ 异常方法afterThrowing ************");
       String methodName = joinPoint.getSignature().getName();
       System.out.println(methodName + " 方法出现异常");
       String ExceptionMessage = e.getMessage();
       System.out.println("异常信息为: " + ExceptionMessage);
    }

}
xml配置
<?xml version="1.0" encoding="UTF-8"?>
<beans xmlns="http://www.springframework.org/schema/beans"
       xmlns:xsi="http://www.w3.org/2001/XMLSchema-instance"
       xmlns:context="http://www.springframework.org/schema/context"
       xmlns:aop="http://www.springframework.org/schema/aop"
       xsi:schemaLocation="http://www.springframework.org/schema/beans http://www.springframework.org/schema/beans/spring-beans.xsd http://www.springframework.org/schema/context https://www.springframework.org/schema/context/spring-context.xsd http://www.springframework.org/schema/aop https://www.springframework.org/schema/aop/spring-aop.xsd">

    <!--  启用实例化注解扫描器  -->
    <context:component-scan base-package="com.itdemo"/>

    <!--  AOP注解驱动  -->
    <aop:aspectj-autoproxy/>

</beans>
两种方式的 service + serviceImpl
package com.itdemo.service;

// 接口
public interface MathService {
    public int sum(int a,int b);

    public int sub(int a,int b);

    public double mul(double a,double b);

    public double div(double a,double b);
}package com.itdemo.service.impl;
import com.itdemo.service.MathService;
import org.springframework.stereotype.Service;
@Service("MSI1") // 在方式2中需要声明
public class MathServiceImpl implements MathService {
@Override
public int sum(int a, int b) {
if (a < 0 || b < 0){
throw new RuntimeException("参数不能小于0");
}else{
int result = a + b;
return result;
}
}
@Override
public int sub(int a, int b) {
int result = a - b;
return result;
}
@Override
public double mul(double a, double b) {
double result = a * b;
return result;
}
@Override
public double div(double a, double b) {
double result = a / b;
return result;
}
}配置切入点Pointcut,要拦截方法的expression表达式书写
execution(修饰符? 返回类型 方法名(参数列表) throws异常?)-
优先使用全限定类名 + 精确方法签名 进行调试,确保切点生效;
-
逐步放宽条件 :先精确匹配,再用
*或..泛化; -
注意参数类型 :基本类型 vs 包装类(如
int≠Integer); -
包路径中的
..表示任意层级子包,*表示当前包下的任意类; -
避免过度宽泛 :如
execution(* *(..))会切入所有方法,影响性能
AOP 典型使用场景
| 场景 | 说明 |
|---|---|
| 🔒 权限校验 | 在执行敏感操作前,自动检查用户是否有权限 |
| 📝 日志记录 | 方法调用前后自动记录入参、出参、时间等 |
| ⏱️ 性能监控 | 统计方法执行耗时,用于性能分析 |
| 💾 事务管理 | 方法执行前开启事务,成功提交,异常回滚(Spring 声明式事务底层就是 AOP) |
| 🛡️ 异常处理 | 统一捕获并处理特定异常,避免到处写 try-catch |
| 🔄 缓存增强 | 方法执行前先查缓存,命中则直接返回,避免重复计算 |
✅ 关键优势:业务代码专注"做什么",横切逻辑由 AOP 统一"何时做、怎么做"。
三、Spring事务
**什么是事务:**SQL执行的最小单元,一组SQL执行要么全部成功,要么全部失败
特征:ACID
事务具备四大核心特性,简称 ACID,确保其可靠性和安全性。
| 特性 | 英文全称 | 含义 |
|---|---|---|
| A | Atomicity | 原子性 :事务中的所有操作不可分割,要么全部成功,要么全部失败。 |
| C | Consistency | 一致性 :事务执行前后,数据库从一个合法状态转换到另一个合法状态。 |
| I | Isolation | 隔离性 :多个事务并发执行时互不干扰,每个事务都像独立运行一样。 |
| D | Durability | 持久性 :事务一旦提交,对数据库的修改将永久保存,即使系统崩溃也不会丢失。 |
事务操作
引入相关资源
<project xmlns="http://maven.apache.org/POM/4.0.0" xmlns:xsi="http://www.w3.org/2001/XMLSchema-instance"
  xsi:schemaLocation="http://maven.apache.org/POM/4.0.0 http://maven.apache.org/xsd/maven-4.0.0.xsd">
  <modelVersion>4.0.0</modelVersion>

  <groupId>com.itdemo</groupId>
  <artifactId>SpringTransactionDemo1</artifactId>
  <version>1.0-SNAPSHOT</version>
  <packaging>jar</packaging>

  <name>SpringTransactionDemo1</name>
  <url>http://maven.apache.org</url>

  <properties>
    <project.build.sourceEncoding>UTF-8</project.build.sourceEncoding>
  </properties>

  <dependencies>
    <!-- 基本资源 -->
    <dependency>
      <groupId>org.springframework</groupId>
      <artifactId>spring-context</artifactId>
      <version>5.2.25.RELEASE</version>
    </dependency>

    <!-- AOP资源 -->
    <dependency>
      <groupId>org.springframework</groupId>
      <artifactId>spring-aspects</artifactId>
      <version>5.2.5.RELEASE</version>
    </dependency>

    <!-- jdbc资源 -->
    <dependency>
      <groupId>org.springframework</groupId>
      <artifactId>spring-jdbc</artifactId>
      <version>5.2.25.RELEASE</version>
    </dependency>

    <!-- Spring-test -->
    <dependency>
      <groupId>org.springframework</groupId>
      <artifactId>spring-test</artifactId>
      <version>5.2.25.RELEASE</version>
    </dependency>

    <!-- junit测试 -->
    <dependency>
      <groupId>junit</groupId>
      <artifactId>junit</artifactId>
      <version>4.13.2</version>
      <scope>test</scope>
    </dependency>

    <!-- mysql驱动 -->
    <dependency>
      <groupId>mysql</groupId>
      <artifactId>mysql-connector-java</artifactId>
      <version>8.0.26</version>
    </dependency>

    <!-- druid -->
    <dependency>
      <groupId>com.alibaba</groupId>
      <artifactId>druid</artifactId>
      <version>1.2.20</version>
    </dependency>
  </dependencies>
</project>
实体层 + 数据库
dao层
package com.itdemo.dao;

public interface UserDao {
    void subtractMoney(String fromUsername, double money);

    void sumbitMoney(String toUsername, double money);
}package com.itdemo.dao.impl;
import com.itdemo.dao.UserDao;
import org.springframework.beans.factory.annotation.Autowired;
import org.springframework.jdbc.core.JdbcTemplate;
import org.springframework.stereotype.Repository;
@Repository
public class UserDaoImpl implements UserDao {
// jdbcTemplate
@Autowired
private JdbcTemplate jdbcTemplate;
/**
* 转出
* @param fromUsername
* @param money
*/
@Override
public void subtractMoney(String fromUsername, double money) {
String sql = "update account set money = money - ? where name = ?";
jdbcTemplate.update(sql, money, fromUsername);
}
/**
* 转入
* @param toUsername
* @param money
*/
@Override
public void sumbitMoney(String toUsername, double money) {
String sql = "update account set money = money + ? where name = ?";
jdbcTemplate.update(sql, money, toUsername);
}
}Service层
package com.itdemo.service;

public interface UserService {
    public void transfer(String fromUsername, String toUsername, double money);
}package com.itdemo.service.impl;
import com.itdemo.dao.UserDao;
import com.itdemo.service.UserService;
import org.springframework.beans.factory.annotation.Autowired;
import org.springframework.stereotype.Service;
@Service
public class UserServiceImpl implements UserService {
@Autowired
private UserDao userDao;
/**
* 转账
* @param fromUsername
* @param toUsername
* @param money
*/
@Override
public void transfer(String fromUsername, String toUsername, double money) {
// 转出
userDao.subtractMoney(fromUsername, money);
// 制造异常
int sum = 1 / 0;
// 接收
userDao.sumbitMoney(toUsername, money);
}
}测试
package com.itdemo.service;

import org.junit.Test;
import org.junit.runner.RunWith;
import org.springframework.beans.factory.annotation.Autowired;
import org.springframework.context.annotation.Configuration;
import org.springframework.test.context.ContextConfiguration;
import org.springframework.test.context.junit4.SpringJUnit4ClassRunner;


@RunWith(SpringJUnit4ClassRunner.class)
@ContextConfiguration(locations = "classpath:application.xml")
public class UserServiceTest {

    @Autowired
    private UserService userService;

    @Test
    public void transfer() {
       userService.transfer("李四", "张三", 100);
    }
}
在添加事务管理之前 ,运行后会出现 李四 的钱少了100,但是张三的钱没有增加,出现了异常数据
方式1.基于XML文件
<?xml version="1.0" encoding="UTF-8"?>
<beans xmlns="http://www.springframework.org/schema/beans"
       xmlns:xsi="http://www.w3.org/2001/XMLSchema-instance"
       xmlns:context="http://www.springframework.org/schema/context" xmlns:tx="http://www.springframework.org/schema/tx"
       xmlns:aop="http://www.springframework.org/schema/aop"
       xsi:schemaLocation="http://www.springframework.org/schema/beans http://www.springframework.org/schema/beans/spring-beans.xsd http://www.springframework.org/schema/context https://www.springframework.org/schema/context/spring-context.xsd http://www.springframework.org/schema/tx http://www.springframework.org/schema/tx/spring-tx.xsd http://www.springframework.org/schema/aop https://www.springframework.org/schema/aop/spring-aop.xsd">

    <!-- 启动实例化注解扫描器-->
    <context:component-scan base-package="com.itdemo"/>

    <!-- 实例化JDBCTemplate -->
    <bean id="jdbcTemplate" class="org.springframework.jdbc.core.JdbcTemplate">
        <property name="dataSource" ref="dataSource"/>
    </bean>

    <!-- 实例化数据源 -->
    <bean id="dataSource" class="com.alibaba.druid.pool.DruidDataSource">
        <property name="driverClassName" value="com.mysql.jdbc.Driver"/>
        <property name="url" value="jdbc:mysql://localhost:3306/demo"/>
        <property name="username" value="root"/>
        <property name="password" value="123456"/>
    </bean>

    <!--  实例化数据源事务管理器   管事务 -->
    <bean id="transactionManager" class="org.springframework.jdbc.datasource.DataSourceTransactionManager">
        <!-- 管理哪个数据源 -->
        <property name="dataSource" ref="dataSource"/>
    </bean>

    <!-- 配置事务方法   定规则 -->
    <tx:advice id="txAdvice" transaction-manager="transactionManager">
        <!--  进一步筛选-->
        <tx:attributes>
            <!--  给哪个方法添加-->
            <tx:method name="transfer"/>
        </tx:attributes>
    </tx:advice>

    <!-- 配置AOP 切方法 -->
    <aop:config>
        <!-- 切入点表达式 -->
        <aop:pointcut id="pt" expression="execution(* com.itdemo.service.impl.*.*(..))"/>
        <!-- 关联  织进去 -->
        <aop:advisor advice-ref="txAdvice" pointcut-ref="pt"/>
    </aop:config>

</beans>
管事务 → 定规则 → 切方法 → 织进去
用于定义事务属性(如传播行为、隔离级别、超时时间等)
| 属性 | 说明 | 默认值 |
|---|---|---|
name |
必填!指定要应用事务的方法名(支持通配符 *) |
无 |
propagation |
事务传播行为 | REQUIRED |
isolation |
事务隔离级别 | DEFAULT |
timeout |
事务超时时间(秒) | -1(永不超时) |
read-only |
是否只读事务(优化性能) | false |
rollback-for |
触发回滚的异常类(全限定名,多个用逗号分隔) | 运行时异常(RuntimeException 及其子类) |
no-rollback-for |
不触发回滚的异常类(即使抛出也不回滚) | 无 |
方式2.基于注解形式
<?xml version="1.0" encoding="UTF-8"?>
<beans xmlns="http://www.springframework.org/schema/beans"
       xmlns:xsi="http://www.w3.org/2001/XMLSchema-instance"
       xmlns:context="http://www.springframework.org/schema/context" xmlns:tx="http://www.springframework.org/schema/tx"
       xmlns:aop="http://www.springframework.org/schema/aop"
       xsi:schemaLocation="http://www.springframework.org/schema/beans http://www.springframework.org/schema/beans/spring-beans.xsd http://www.springframework.org/schema/context https://www.springframework.org/schema/context/spring-context.xsd http://www.springframework.org/schema/tx http://www.springframework.org/schema/tx/spring-tx.xsd http://www.springframework.org/schema/aop https://www.springframework.org/schema/aop/spring-aop.xsd">

    <!-- 启动实例化注解扫描器-->
    <context:component-scan base-package="com.itdemo"/>

    <!-- 实例化JDBCTemplate -->
    <bean id="jdbcTemplate" class="org.springframework.jdbc.core.JdbcTemplate">
        <property name="dataSource" ref="dataSource"/>
    </bean>

    <!-- 实例化数据源 -->
    <bean id="dataSource" class="com.alibaba.druid.pool.DruidDataSource">
        <property name="driverClassName" value="com.mysql.jdbc.Driver"/>
        <property name="url" value="jdbc:mysql://localhost:3306/demo"/>
        <property name="username" value="root"/>
        <property name="password" value="123456"/>
    </bean>

    <!--  实例化数据源事务管理器  -->
    <bean id="transactionManager" class="org.springframework.jdbc.datasource.DataSourceTransactionManager">
        <!-- 管理哪个数据源 -->
        <property name="dataSource" ref="dataSource"/>
    </bean>

    <!--  开启注解式事务 关联一下数据源事务管理器 -->
    <tx:annotation-driven transaction-manager="transactionManager"/>

</beans>
在要进行事务管理的方法上添加注解 @Transactional
@Transactional
@Override
public void transfer(String fromUsername, String toUsername, double money) {
    // 转出
    userDao.subtractMoney(fromUsername, money);

    int sum = 1 / 0;

    // 接收
    userDao.sumbitMoney(toUsername, money);
}
Spring 事务的传播特性
| 传播行为 | 当前无事务 | 当前有事务 |
|---|---|---|
| REQUIRED | 创建新事务 | 加入当前事务 |
| SUPPORTS | 非事务执行 | 加入当前事务 |
| MANDATORY | 抛出异常 | 加入当前事务 |
| REQUIRES_NEW | 创建新事务 | 挂起当前,创建新事务 |
| NOT_SUPPORTED | 非事务执行 | 挂起当前,非事务执行 |
| NEVER | 非事务执行 | 抛出异常 |
| NESTED | 创建新事务 | 在嵌套事务中执行 |
使用建议
-
默认使用
REQUIRED。 -
需要独立提交/回滚逻辑(如日志)用
REQUIRES_NEW。 -
只读查询可考虑
SUPPORTS或不加事务。 -
谨慎使用
NESTED,需了解底层数据库对 savepoint 的支持情况。