一、基础单节点Nginx服务
1.1 基础快速部署
-
最简单启动的 Nginx 容器
bash# 拉取 Nginx 镜像 docker pull nginx:alpine # 直接运行Nginx容器 docker run -d --name my-nginx -p 80:80 nginx:alpine # 测试访问 curl http://localhost -
常用参数启动的 Nginx 容器
bash# 完整命令示例 docker run -d \ --name my-nginx \ --restart unless-stopped \ -p 80:80 \ -p 443:443 \ -v /my/custom/nginx.conf:/etc/nginx/nginx.conf:ro \ -v /my/html:/usr/share/nginx/html:ro \ -v /my/logs:/var/log/nginx \ -v /my/certs:/etc/nginx/certs:ro \ -e TZ=Asia/Shanghai \ nginx:alpine
1.2 完整生产环境配置
1.2.1 目录结构准备
bash
# 创建目录结构
mkdir -p /usr/local/src/nginx/nginx-docker/{conf,html,logs,certs,conf.d}

# 切换到工作目录
cd /usr/local/src/nginx/nginx-docker

# 目录结构
/usr/local/src/nginx/nginx-docker/
├── docker-compose.yml
├── conf/
│   ├── nginx.conf          # 主配置文件
│   └── mime.types          # MIME类型配置
├── conf.d/
│   ├── default.conf        # 默认主机配置
├── html/
│   ├── index.html
│   └── error/
│       ├── 50x.html
│       └── 404.html
├── logs/                  # 日志目录(自动挂载)
└── certs/                 # SSL证书目录
1.2.2 Docker Compose 配置
yaml
# /usr/local/src/nginx/nginx-docker/docker-compose.yml
version: '3.8'

services:
  nginx:
    image: nginx:1.24-alpine  # 指定稳定版本
    container_name: nginx-prod
    restart: unless-stopped
    ports:
      - "80:80"
      - "443:443"
    volumes:
      # 主配置文件
      - ./conf/nginx.conf:/etc/nginx/nginx.conf:ro
      # MIME类型配置
      - ./conf/mime.types:/etc/nginx/mime.types:ro
      # 虚拟主机配置
      - ./conf.d:/etc/nginx/conf.d
      # 网站文件
      - ./html:/usr/share/nginx/html:ro
      # 日志目录
      - ./logs:/var/log/nginx
      # SSL证书
      - ./certs:/etc/nginx/certs:ro
    environment:
      - TZ=Asia/Shanghai
      - NGINX_ENV=production
    networks:
      - nginx-network
    healthcheck:
      test: ["CMD-SHELL", "curl -f http://localhost/health || exit 1"]
      interval: 30s
      timeout: 10s
      retries: 3
      start_period: 40s
    logging:
      driver: "json-file"
      options:
        max-size: "10m"
        max-file: "3"
    labels:
      - "traefik.enable=true"
      - "traefik.http.routers.nginx.rule=Host(`localhost`)"
      - "traefik.http.services.nginx.loadbalancer.server.port=80"

volumes:
  nginx-certs:
    external: false

networks:
  nginx-network:
    driver: bridge
    ipam:
      config:
        - subnet: 172.20.0.0/16
1.2.3 Nginx 主配置文件
bash
# /usr/local/src/nginx/nginx-docker/conf/nginx.conf

# 运行用户
user nginx;

# 工作进程数,通常设置为CPU核心数
worker_processes auto;

# 错误日志路径和级别
error_log /var/log/nginx/error.log warn;

# PID文件路径
pid /var/run/nginx.pid;

# 事件模块配置
events {
    # 每个工作进程的最大连接数
    worker_connections 10240;

    # 使用epoll事件模型(Linux)
    use epoll;

    # 尽可能接受更多的连接
    multi_accept on;
}

# HTTP模块配置
http {
    # 包含MIME类型定义
    include /etc/nginx/mime.types;

    # 默认MIME类型
    default_type application/octet-stream;

    # 日志格式定义
    log_format main '$remote_addr - $remote_user [$time_local] "$request" '
                    '$status $body_bytes_sent "$http_referer" '
                    '"$http_user_agent" "$http_x_forwarded_for"';

    log_format json escape=json '{'
        '"time_local":"$time_local",'
        '"remote_addr":"$remote_addr",'
        '"remote_user":"$remote_user",'
        '"request":"$request",'
        '"status": "$status",'
        '"body_bytes_sent":"$body_bytes_sent",'
        '"request_time":"$request_time",'
        '"http_referrer":"$http_referer",'
        '"http_user_agent":"$http_user_agent",'
        '"http_x_forwarded_for":"$http_x_forwarded_for"'
    '}';

    # 访问日志
    access_log /var/log/nginx/access.log main buffer=32k flush=5s;

    # 性能优化
    sendfile on;
    tcp_nopush on;
    tcp_nodelay on;

    # 连接超时时间
    keepalive_timeout 65;
    keepalive_requests 1000;

    # 客户端相关
    client_max_body_size 100m;
    client_body_buffer_size 128k;
    client_header_buffer_size 1k;
    large_client_header_buffers 4 4k;
    client_body_timeout 12;
    client_header_timeout 12;

    # 代理相关
    proxy_connect_timeout 75s;
    proxy_send_timeout 600s;
    proxy_read_timeout 600s;
    proxy_buffer_size 4k;
    proxy_buffers 8 32k;
    proxy_busy_buffers_size 64k;
    proxy_temp_file_write_size 64k;

    # 响应超时
    send_timeout 60;

    # 隐藏Nginx版本号
    server_tokens off;

    # 开启文件缓存
    open_file_cache max=100000 inactive=20s;
    open_file_cache_valid 30s;
    open_file_cache_min_uses 2;
    open_file_cache_errors on;

    # Gzip压缩配置(可以在单独的gzip.conf中配置)
    gzip on;
    gzip_vary on;
    gzip_proxied any;
    gzip_comp_level 6;
    gzip_buffers 16 8k;
    gzip_http_version 1.1;
    gzip_min_length 1024;
    gzip_types
        text/plain
        text/css
        text/xml
        text/javascript
        application/json
        application/javascript
        application/xml+rss
        application/atom+xml
        image/svg+xml;

    # 包含虚拟主机配置
    include /etc/nginx/conf.d/*.conf;

    # 限制请求速率(防攻击)
    limit_req_zone $binary_remote_addr zone=api:10m rate=10r/s;
    limit_req_zone $binary_remote_addr zone=auth:10m rate=5r/m;

    # 限制连接数
    limit_conn_zone $binary_remote_addr zone=addr:10m;

    # 响应头安全配置
    map $sent_http_content_type $x_content_type_options {
        ~*text/html "nosniff";
        default "";
    }
}
1.2.4 MIME 类型配置(使用 Nginx 默认)
bash
# 复制 Nginx 默认的 mime.types 文件
docker run --rm nginx:alpine cat /etc/nginx/mime.types > /usr/local/src/nginx/nginx-docker/conf/mime.types
1.2.5 默认主机配置
bash
# Nginx 默认服务器配置
server {
    listen 80;
    listen [::]:80;
    server_name _;

    root /usr/share/nginx/html;
    index index.html index.htm;

    # 安全头部
    add_header X-Frame-Options SAMEORIGIN always;
    add_header X-Content-Type-Options nosniff always;
    add_header X-XSS-Protection "1; mode=block" always;

    # 主路由
    location / {
        try_files $uri $uri/ /index.html;
    }

    # 静态文件缓存
    location ~* \.(jpg|jpeg|png|gif|ico|webp|svg)$ {
        expires 365d;
        add_header Cache-Control "public, immutable";
        access_log off;
        log_not_found off;
    }

    location ~* \.(css|js)$ {
        expires 30d;
        add_header Cache-Control "public, immutable";
        access_log off;
        log_not_found off;
    }

    location ~* \.(woff|woff2|ttf|eot|otf)$ {
        expires 365d;
        add_header Cache-Control "public, immutable";
        access_log off;
        log_not_found off;
    }

    # 健康检查
    location /health {
        access_log off;
        return 200 "healthy\n";
        add_header Content-Type text/plain;
    }

    # 禁止访问隐藏文件
    location ~ /\. {
        deny all;
        access_log off;
        log_not_found off;
    }

    # 错误页面
    error_page 404 /error/404.html;
    error_page 500 502 503 504 /error/50x.html;

    location /error/ {
        internal;
        alias /usr/share/nginx/html/error/;
    }
}
1.2.6 HTML 文件
bash
<!-- /usr/local/src/nginx/nginx-docker/html/index.html -->
<!DOCTYPE html>
<html lang="zh-CN">
<head>
    <meta charset="UTF-8">
    <meta name="viewport" content="width=device-width, initial-scale=1.0">
    <title>Docker Nginx 服务</title>
    <meta name="description" content="运行在Docker容器中的Nginx Web服务器">
    <meta name="keywords" content="Docker, Nginx, Web服务器, 容器">
    <style>
        * {
            margin: 0;
            padding: 0;
            box-sizing: border-box;
        }

        body {
            font-family: -apple-system, BlinkMacSystemFont, 'Segoe UI', Roboto, Oxygen, Ubuntu, Cantarell, sans-serif;
            line-height: 1.6;
            color: #333;
            background: linear-gradient(135deg, #667eea 0%, #764ba2 100%);
            min-height: 100vh;
        }

        .container {
            max-width: 1200px;
            margin: 0 auto;
            padding: 20px;
        }

        header {
            text-align: center;
            padding: 4rem 0;
            color: white;
        }

        header h1 {
            font-size: 3rem;
            margin-bottom: 1rem;
            text-shadow: 2px 2px 4px rgba(0,0,0,0.3);
        }

        header p {
            font-size: 1.2rem;
            opacity: 0.9;
        }

        .status-badge {
            display: inline-block;
            background: #4CAF50;
            color: white;
            padding: 5px 15px;
            border-radius: 20px;
            font-size: 0.9rem;
            margin-top: 10px;
        }

        .main-content {
            background: white;
            border-radius: 10px;
            padding: 30px;
            box-shadow: 0 10px 30px rgba(0,0,0,0.1);
            margin-bottom: 30px;
        }

        .info-grid {
            display: grid;
            grid-template-columns: repeat(auto-fit, minmax(300px, 1fr));
            gap: 20px;
            margin: 30px 0;
        }

        .info-card {
            background: #f8f9fa;
            border-radius: 8px;
            padding: 20px;
            border-left: 4px solid #667eea;
        }

        .info-card h3 {
            color: #667eea;
            margin-bottom: 10px;
        }

        .code-block {
            background: #282c34;
            color: #abb2bf;
            padding: 15px;
            border-radius: 5px;
            font-family: 'Courier New', monospace;
            overflow-x: auto;
            margin: 15px 0;
        }

        .button-group {
            display: flex;
            gap: 10px;
            flex-wrap: wrap;
            margin: 20px 0;
        }

        .btn {
            display: inline-block;
            padding: 10px 20px;
            background: #667eea;
            color: white;
            text-decoration: none;
            border-radius: 5px;
            transition: background 0.3s;
        }

        .btn:hover {
            background: #5a67d8;
        }

        .btn-secondary {
            background: #718096;
        }

        .btn-secondary:hover {
            background: #4a5568;
        }

        footer {
            text-align: center;
            padding: 20px;
            color: white;
            opacity: 0.8;
        }

        .server-info {
            background: #2d3748;
            color: #e2e8f0;
            padding: 15px;
            border-radius: 5px;
            margin: 20px 0;
        }

        @media (max-width: 768px) {
            header h1 {
                font-size: 2rem;
            }

            .container {
                padding: 10px;
            }
        }
    </style>
</head>
<body>
    <div class="container">
        <header>
            <h1>🚀 Docker Nginx 服务</h1>
            <p>基于 Docker Compose 的现代化 Nginx 部署方案</p>
            <div class="status-badge" id="status">运行中</div>
        </header>

        <div class="main-content">
            <h2>📋 服务概览</h2>
            <p>这是一个运行在 Docker 容器中的 Nginx Web 服务器,配置了生产级的安全和性能优化。</p>

            <div class="info-grid">
                <div class="info-card">
                    <h3>📁 目录结构</h3>
                    <div class="code-block">
nginx-docker/
├── docker-compose.yml
├── conf/
│   ├── nginx.conf
│   └── mime.types
├── conf.d/
│   ├── default.conf
│   ├── ssl.conf
│   └── gzip.conf
├── html/
│   ├── index.html
│   └── error/
├── logs/
└── certs/
                    </div>
                </div>

                <div class="info-card">
                    <h3>⚙️ 配置特性</h3>
                    <ul>
                        <li>性能优化(Gzip、缓存)</li>
                        <li>安全头部(CSP、HSTS)</li>
                        <li>SSL/TLS 支持</li>
                        <li>HTTP/2 支持</li>
                        <li>健康检查</li>
                        <li>访问控制</li>
                    </ul>
                </div>

                <div class="info-card">
                    <h3>🔧 管理命令</h3>
                    <div class="code-block">
# 启动服务
docker-compose up -d

# 查看日志
docker-compose logs -f

# 重启服务
docker-compose restart

# 测试配置
docker exec nginx-prod nginx -t
                    </div>
                </div>
            </div>

            <div class="server-info">
                <h3>📊 服务器信息</h3>
                <p><strong>服务器地址:</strong> <span id="server-addr">获取中...</span></p>
                <p><strong>当前协议:</strong> <span id="protocol">获取中...</span></p>
                <p><strong>环境:</strong> <span id="environment">production</span></p>
                <p><strong>启动时间:</strong> <span id="uptime">获取中...</span></p>
            </div>

            <h3>🔗 快速链接</h3>
            <div class="button-group">
                <a href="/health" class="btn">健康检查</a>
                <a href="/error/404.html" class="btn">404 页面</a>
                <a href="/error/50x.html" class="btn">50x 页面</a>
                <a href="/nginx_status" class="btn">Nginx 状态</a>
                <a href="https://github.com/nginx/nginx" class="btn" target="_blank">Nginx 文档</a>
                <a href="https://docs.docker.com" class="btn" target="_blank">Docker 文档</a>
            </div>

            <h3>📝 部署说明</h3>
            <div class="code-block">
# 1. 克隆或创建项目目录
mkdir -p /usr/local/src/nginx/nginx-docker

# 2. 复制配置文件到对应目录

# 3. 启动服务
cd /usr/local/src/nginx/nginx-docker
docker-compose up -d

# 4. 验证部署
curl http://localhost
            </div>
        </div>

        <footer>
            <p>© 2024 Docker Nginx 服务 | 基于 Nginx {{NGINX_VERSION}} 和 Docker</p>
            <p>最后更新: <span id="current-time">加载中...</span></p>
        </footer>
    </div>

    <script>
        // 更新当前时间
        function updateTime() {
            const now = new Date();
            document.getElementById('current-time').textContent =
                now.toLocaleString('zh-CN', {
                    year: 'numeric',
                    month: '2-digit',
                    day: '2-digit',
                    hour: '2-digit',
                    minute: '2-digit',
                    second: '2-digit'
                });
        }

        // 获取服务器信息
        function updateServerInfo() {
            // 服务器地址
            document.getElementById('server-addr').textContent = window.location.hostname;

            // 协议
            document.getElementById('protocol').textContent = window.location.protocol;

            // 更新时间
            updateTime();

            // 定期更新时间
            setInterval(updateTime, 1000);

            // 检查健康状态
            fetch('/health')
                .then(response => {
                    const statusBadge = document.getElementById('status');
                    if (response.ok) {
                        statusBadge.style.background = '#4CAF50';
                        statusBadge.textContent = '运行正常';
                    } else {
                        statusBadge.style.background = '#F44336';
                        statusBadge.textContent = '服务异常';
                    }
                })
                .catch(error => {
                    console.error('健康检查失败:', error);
                });
        }

        // 页面加载完成后执行
        document.addEventListener('DOMContentLoaded', updateServerInfo);
    </script>
</body>
</html>
}

# HTTP重定向到HTTPS
server {
    listen 80;
    listen [::]:80;
    server_name your-domain.com;
    return 301 https://$server_name$request_uri;
}
1.2.7 404 错误页面
bash
<!-- /usr/local/src/nginx/nginx-docker/html/error/404.html -->
<!DOCTYPE html>
<html lang="zh-CN">
<head>
    <meta charset="UTF-8">
    <meta name="viewport" content="width=device-width, initial-scale=1.0">
    <title>404 - 页面未找到</title>
    <style>
        body {
            font-family: -apple-system, BlinkMacSystemFont, 'Segoe UI', Roboto, sans-serif;
            background: linear-gradient(135deg, #667eea 0%, #764ba2 100%);
            min-height: 100vh;
            display: flex;
            align-items: center;
            justify-content: center;
            color: white;
            text-align: center;
            padding: 20px;
        }

        .error-container {
            max-width: 600px;
            background: rgba(255, 255, 255, 0.1);
            backdrop-filter: blur(10px);
            padding: 40px;
            border-radius: 20px;
            box-shadow: 0 15px 35px rgba(0, 0, 0, 0.2);
        }

        .error-code {
            font-size: 8rem;
            font-weight: bold;
            line-height: 1;
            margin: 0;
            text-shadow: 5px 5px 0 rgba(0, 0, 0, 0.2);
        }

        .error-message {
            font-size: 1.8rem;
            margin: 20px 0;
        }

        .error-description {
            font-size: 1.1rem;
            opacity: 0.9;
            margin-bottom: 30px;
            line-height: 1.6;
        }

        .home-link {
            display: inline-block;
            padding: 12px 30px;
            background: white;
            color: #667eea;
            text-decoration: none;
            border-radius: 50px;
            font-weight: bold;
            transition: all 0.3s ease;
        }

        .home-link:hover {
            background: #f8f9fa;
            transform: translateY(-2px);
            box-shadow: 0 10px 20px rgba(0, 0, 0, 0.2);
        }

        .error-details {
            margin-top: 30px;
            font-size: 0.9rem;
            opacity: 0.7;
            border-top: 1px solid rgba(255, 255, 255, 0.2);
            padding-top: 20px;
        }

        @media (max-width: 768px) {
            .error-code {
                font-size: 5rem;
            }

            .error-message {
                font-size: 1.4rem;
            }
        }
    </style>
</head>
<body>
    <div class="error-container">
        <h1 class="error-code">404</h1>
        <h2 class="error-message">页面未找到</h2>
        <div class="error-description">
            抱歉,您请求的页面不存在或已被移动。<br>
            请检查URL是否正确,或返回首页。
        </div>
        <a href="/" class="home-link">返回首页</a>
        <div class="error-details">
            请求的URL: <span id="requested-url">未知</span><br>
            时间: <span id="error-time">加载中...</span>
        </div>
    </div>

    <script>
        // 显示请求的URL
        document.getElementById('requested-url').textContent =
            window.location.pathname + window.location.search;

        // 更新时间
        function updateTime() {
            const now = new Date();
            document.getElementById('error-time').textContent =
                now.toLocaleString('zh-CN');
        }

        updateTime();
        setInterval(updateTime, 1000);
    </script>
</body>
</html>
1.2.8 50x 错误页面
bash
<!-- /usr/local/src/nginx/nginx-docker/html/error/50x.html -->
<!DOCTYPE html>
<html lang="zh-CN">
<head>
    <meta charset="UTF-8">
    <meta name="viewport" content="width=device-width, initial-scale=1.0">
    <title>服务器错误</title>
    <style>
        body {
            font-family: -apple-system, BlinkMacSystemFont, 'Segoe UI', Roboto, sans-serif;
            background: linear-gradient(135deg, #f093fb 0%, #f5576c 100%);
            min-height: 100vh;
            display: flex;
            align-items: center;
            justify-content: center;
            color: white;
            text-align: center;
            padding: 20px;
        }

        .error-container {
            max-width: 600px;
            background: rgba(255, 255, 255, 0.1);
            backdrop-filter: blur(10px);
            padding: 40px;
            border-radius: 20px;
            box-shadow: 0 15px 35px rgba(0, 0, 0, 0.2);
        }

        .error-icon {
            font-size: 5rem;
            margin-bottom: 20px;
        }

        .error-title {
            font-size: 2.5rem;
            margin: 0 0 20px 0;
        }

        .error-description {
            font-size: 1.1rem;
            opacity: 0.9;
            margin-bottom: 30px;
            line-height: 1.6;
        }

        .action-buttons {
            display: flex;
            gap: 15px;
            justify-content: center;
            flex-wrap: wrap;
        }

        .btn {
            padding: 12px 25px;
            border-radius: 50px;
            text-decoration: none;
            font-weight: bold;
            transition: all 0.3s ease;
        }

        .btn-primary {
            background: white;
            color: #f5576c;
        }

        .btn-secondary {
            background: rgba(255, 255, 255, 0.2);
            color: white;
            border: 2px solid rgba(255, 255, 255, 0.3);
        }

        .btn:hover {
            transform: translateY(-2px);
            box-shadow: 0 10px 20px rgba(0, 0, 0, 0.2);
        }

        .error-details {
            margin-top: 30px;
            font-size: 0.9rem;
            opacity: 0.7;
            border-top: 1px solid rgba(255, 255, 255, 0.2);
            padding-top: 20px;
        }

        .status-info {
            display: flex;
            justify-content: space-around;
            margin-top: 20px;
            font-size: 0.9rem;
        }

        .status-item {
            padding: 10px;
        }

        @media (max-width: 768px) {
            .action-buttons {
                flex-direction: column;
                align-items: center;
            }

            .btn {
                width: 100%;
                max-width: 250px;
            }
        }
    </style>
</head>
<body>
    <div class="error-container">
        <div class="error-icon">⚠️</div>
        <h1 class="error-title">服务器遇到问题</h1>
        <div class="error-description">
            抱歉,服务器在处理您的请求时遇到了问题。<br>
            我们的技术团队已经收到通知,正在努力修复。
        </div>

        <div class="action-buttons">
            <a href="/" class="btn btn-primary">返回首页</a>
            <a href="javascript:location.reload()" class="btn btn-secondary">刷新页面</a>
            <a href="javascript:history.back()" class="btn btn-secondary">返回上一页</a>
        </div>

        <div class="error-details">
            <div class="status-info">
                <div class="status-item">
                    <strong>错误类型:</strong> 50x 服务器错误
                </div>
                <div class="status-item">
                    <strong>时间:</strong> <span id="error-time">加载中...</span>
                </div>
                <div class="status-item">
                    <strong>状态:</strong> <span id="server-status">检查中...</span>
                </div>
            </div>
            <p style="margin-top: 20px; font-size: 0.8rem;">
                如果问题持续存在,请联系系统管理员。
            </p>
        </div>
    </div>

    <script>
        // 更新时间
        function updateTime() {
            const now = new Date();
            document.getElementById('error-time').textContent =
                now.toLocaleString('zh-CN');
        }

        // 检查服务器状态
        function checkServerStatus() {
            fetch('/health')
                .then(response => {
                    if (response.ok) {
                        document.getElementById('server-status').textContent = '服务器运行中';
                        document.getElementById('server-status').style.color = '#4CAF50';
                    } else {
                        document.getElementById('server-status').textContent = '服务器异常';
                        document.getElementById('server-status').style.color = '#F44336';
                    }
                })
                .catch(() => {
                    document.getElementById('server-status').textContent = '无法连接服务器';
                    document.getElementById('server-status').style.color = '#FF9800';
                });
        }

        // 初始化
        updateTime();
        setInterval(updateTime, 1000);
        checkServerStatus();

        // 30秒后重新检查状态
        setInterval(checkServerStatus, 30000);
    </script>
</body>
</html>
1.2.9 一键启动脚本
bash
#!/bin/bash
# /usr/local/src/nginx/nginx-docker/deploy.sh
set -e
echo "🚀 开始部署 Nginx Docker 服务..."
cd /usr/local/src/nginx/nginx-docker
# 1. 检查 Docker 和 Docker Compose
if ! command -v docker &> /dev/null; then
echo "❌ Docker 未安装"
exit 1
fi
if ! command -v docker-compose &> /dev/null; then
echo "❌ Docker Compose 未安装"
exit 1
fi
# 2. 生成自签名证书(如果不存在)
if [ ! -f certs/fullchain.pem ] || [ ! -f certs/privkey.pem ]; then
echo "🔐 生成自签名SSL证书..."
mkdir -p certs
# 生成私钥
openssl genrsa -out certs/privkey.pem 2048
# 生成证书签名请求
openssl req -new -key certs/privkey.pem -out certs/cert.csr \
-subj "/C=CN/ST=Beijing/L=Beijing/O=MyCompany/OU=IT/CN=localhost"
# 生成自签名证书
openssl x509 -req -days 365 -in certs/cert.csr \
-signkey certs/privkey.pem -out certs/fullchain.pem
# 生成Diffie-Hellman参数(可选)
openssl dhparam -out certs/dhparam.pem 2048
# 创建默认证书(防止IP直接访问SSL时的错误)
cp certs/fullchain.pem certs/default.crt
cp certs/privkey.pem certs/default.key
rm certs/cert.csr
echo "✅ SSL证书生成完成"
fi
# 3. 创建日志目录
mkdir -p logs
# 4. 构建并启动服务
echo "📦 启动 Docker 服务..."
docker-compose up -d --build
# 5. 等待服务启动
echo "⏳ 等待服务启动..."
sleep 5
# 6. 验证部署
echo "🔍 验证部署..."
if docker-compose ps | grep -q "Up"; then
echo "✅ 服务启动成功"
# 测试HTTP访问
HTTP_STATUS=$(curl -s -o /dev/null -w "%{http_code}" http://localhost/health)
if [ "$HTTP_STATUS" = "200" ]; then
echo "✅ HTTP 服务正常 (状态码: $HTTP_STATUS)"
else
echo "⚠️ HTTP 服务异常 (状态码: $HTTP_STATUS)"
fi
# 获取服务器IP
SERVER_IP=$(hostname -I | awk '{print $1}')
echo ""
echo "🌐 服务信息:"
echo " HTTP 地址: http://$SERVER_IP"
echo " HTTP 地址: http://localhost"
echo " HTTPS 地址: https://localhost (使用自签名证书)"
echo ""
echo "📊 管理命令:"
echo " 查看日志: docker-compose logs -f"
echo " 停止服务: docker-compose down"
echo " 重启服务: docker-compose restart"
echo " 进入容器: docker-compose exec nginx sh"
echo ""
echo "📁 配置文件位置: /usr/local/src/nginx/nginx-docker/"
else
echo "❌ 服务启动失败"
echo "查看日志: docker-compose logs"
exit 1
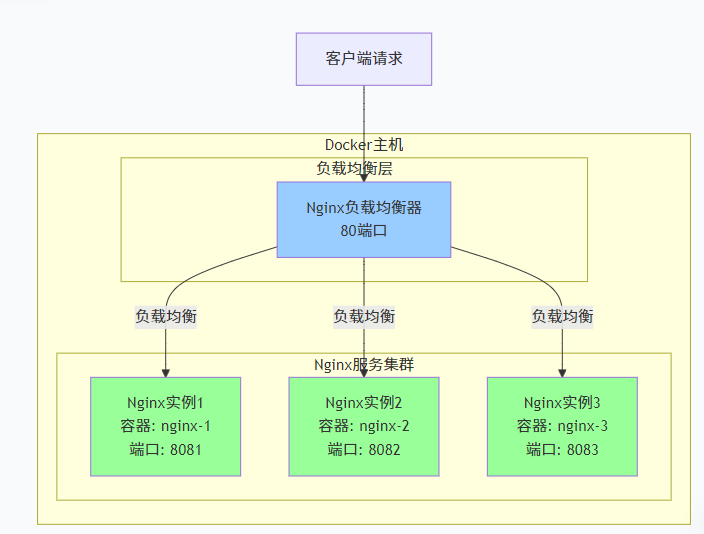
fi二、使用Docker Compose搭建Nginx集群
2.1 单机多 Nginx 容器集群(基础版)
2.1.1 架构图
2.1.2 创建目录
bash
# 目录结构
/usr/local/src/nginx/nginx-cluster/
├── docker-compose.yml          # 主配置文件
├── ssl/
│   ├── cert.pem          # SSL证书
│   └── key.pem           # SSL私钥
├── nginx/
│   ├── loadbalancer/          # 负载均衡器配置
│   │   ├── nginx.conf
│   │   └── conf.d/
│   │       └── upstream.conf
│   ├── server1/               # 服务器1配置
│   │   ├── nginx.conf
│   │   └── html/
│   │       └── index.html
│   ├── server2/               # 服务器2配置
│   │   ├── nginx.conf
│   │   └── html/
│   │       └── index.html
│   └── server3/               # 服务器3配置
│       ├── nginx.conf
│       └── html/
│           └── index.html
├── logs/
└── ...其他目录

# 创建必要的目录
mkdir -p nginx/{loadbalancer/conf.d,server1/html,server2/html,server3/html}
mkdir -p logs/{loadbalancer,server1,server2,server3}
mkdir -p ssl
2.1.3 docker-compose.yml 配置
bash
version: '3.8'

services:
  # 负载均衡器
  loadbalancer:
    image: nginx:alpine
    container_name: nginx-lb
    hostname: nginx-loadbalancer
    ports:
      - "80:80"
      - "443:443" # 不需要https可以注释掉
    volumes:
      # 负载均衡器配置
      - ./nginx/loadbalancer/nginx.conf:/etc/nginx/nginx.conf:ro
      - ./nginx/loadbalancer/conf.d/upstream.conf:/etc/nginx/conf.d/upstream.conf:ro
      # SSL证书目录(可选,不需要https可以注释掉)
      - ./ssl:/etc/nginx/ssl:ro

      # 日志目录
      - ./logs/loadbalancer:/var/log/nginx
    networks:
      nginx-cluster:
        ipv4_address: 172.20.0.10
    depends_on:
      - server1
      - server2
      - server3
    restart: unless-stopped
    healthcheck:
      test: ["CMD", "curl", "-f", "http://localhost/health"]
      interval: 30s
      timeout: 10s
      retries: 3
      start_period: 20s

  # Nginx服务器1
  server1:
    image: nginx:alpine
    container_name: nginx-server-1
    hostname: nginx-01
    volumes:
      # 服务器1配置
      - ./nginx/server1/nginx.conf:/etc/nginx/nginx.conf:ro

      # 网站文件
      - ./nginx/server1/html:/usr/share/nginx/html:ro

      # 日志
      - ./logs/server1:/var/log/nginx
    networks:
      nginx-cluster:
        ipv4_address: 172.20.0.11
    expose:
      - "80"
    environment:
      - SERVER_ID=1
      - SERVER_NAME=nginx-01
      - TZ=Asia/Shanghai
    restart: unless-stopped
    healthcheck:
      test: ["CMD", "curl", "-f", "http://localhost"]
      interval: 30s
      timeout: 10s
      retries: 3

  # Nginx服务器2
  server2:
    image: nginx:alpine
    container_name: nginx-server-2
    hostname: nginx-02
    volumes:
      - ./nginx/server2/nginx.conf:/etc/nginx/nginx.conf:ro
      - ./nginx/server2/html:/usr/share/nginx/html:ro
      - ./logs/server2:/var/log/nginx
    networks:
      nginx-cluster:
        ipv4_address: 172.20.0.12
    expose:
      - "80"
    environment:
      - SERVER_ID=2
      - SERVER_NAME=nginx-02
      - TZ=Asia/Shanghai
    restart: unless-stopped
    healthcheck:
      test: ["CMD", "curl", "-f", "http://localhost"]
      interval: 30s
      timeout: 10s
      retries: 3

  # Nginx服务器3
  server3:
    image: nginx:alpine
    container_name: nginx-server-3
    hostname: nginx-03
    volumes:
      - ./nginx/server3/nginx.conf:/etc/nginx/nginx.conf:ro
      - ./nginx/server3/html:/usr/share/nginx/html:ro
      - ./logs/server3:/var/log/nginx
    networks:
      nginx-cluster:
        ipv4_address: 172.20.0.13
    expose:
      - "80"
    environment:
      - SERVER_ID=3
      - SERVER_NAME=nginx-03
      - TZ=Asia/Shanghai
    restart: unless-stopped
    healthcheck:
      test: ["CMD", "curl", "-f", "http://localhost"]
      interval: 30s
      timeout: 10s
      retries: 3

  # 监控服务(可选)
  monitor:
    image: dockersamples/visualizer:latest
    container_name: nginx-cluster-monitor
    ports:
      - "8080:8080"
    volumes:
      - /var/run/docker.sock:/var/run/docker.sock:ro
    networks:
      - nginx-cluster
    restart: unless-stopped
    deploy:
      placement:
        constraints:
          - node.role==manager

networks:
  nginx-cluster:
    driver: bridge
    ipam:
      driver: default
      config:
        - subnet: 172.20.0.0/24
          gateway: 172.20.0.1
2.1.4 Nginx配置文件
- 负载均衡器配置
-
nginx/loadbalancer/nginx.conf
bashuser nginx; worker_processes auto; error_log /var/log/nginx/error.log warn; pid /var/run/nginx.pid; events { worker_connections 1024; use epoll; multi_accept on; } http { include /etc/nginx/mime.types; default_type application/octet-stream; log_format main '$remote_addr - $remote_user [$time_local] "$request" ' '$status $body_bytes_sent "$http_referer" ' '"$http_user_agent" "$http_x_forwarded_for" ' 'upstream: $upstream_addr response_time: $upstream_response_time'; access_log /var/log/nginx/access.log main; # 性能优化 sendfile on; tcp_nopush on; tcp_nodelay on; keepalive_timeout 65; keepalive_requests 1000; client_max_body_size 10M; # Gzip压缩 gzip on; gzip_vary on; gzip_min_length 1024; gzip_comp_level 6; gzip_types text/plain text/css text/xml text/javascript application/json application/javascript application/xml+rss application/x-javascript; # 包含上游服务器配置 include /etc/nginx/conf.d/*.conf; } -
nginx/loadbalancer/conf.d/upstream.conf
bash# 定义上游服务器组 upstream nginx_backend { # 负载均衡算法(可选): # 默认轮询,其他选项: # least_conn; # 最少连接数 # ip_hash; # IP哈希(会话保持) # hash $request_uri consistent; # URL哈希 # 服务器配置 server server1:80 weight=3 max_fails=3 fail_timeout=30s; server server2:80 weight=2 max_fails=3 fail_timeout=30s; server server3:80 weight=1 max_fails=3 fail_timeout=30s; # 健康检查(需要Nginx Plus) # health_check interval=5s fails=3 passes=2; # 连接池 keepalive 32; } # 负载均衡器虚拟主机 server { listen 80; server_name localhost; # 安全头部 add_header X-Frame-Options "SAMEORIGIN" always; add_header X-Content-Type-Options "nosniff" always; add_header X-XSS-Protection "1; mode=block" always; # 负载均衡状态页面 location /nginx_status { stub_status on; access_log off; allow 172.20.0.0/24; # 只允许集群内访问 deny all; } # 健康检查端点 location /health { access_log off; return 200 "loadbalancer healthy\n"; add_header Content-Type text/plain; } # 集群状态页面 location /cluster_status { proxy_pass http://nginx_backend; proxy_set_header Host $host; # 自定义响应头,显示负载均衡信息 add_header X-Upstream-Addr $upstream_addr always; add_header X-Upstream-Response-Time $upstream_response_time always; } # 默认代理到后端服务器 location / { proxy_pass http://nginx_backend; # 传递真实客户端信息 proxy_set_header Host $host; proxy_set_header X-Real-IP $remote_addr; proxy_set_header X-Forwarded-For $proxy_add_x_forwarded_for; proxy_set_header X-Forwarded-Proto $scheme; proxy_set_header X-Forwarded-Host $host; proxy_set_header X-Forwarded-Port $server_port; # 超时设置 proxy_connect_timeout 5s; proxy_send_timeout 10s; proxy_read_timeout 10s; # 连接池 proxy_http_version 1.1; proxy_set_header Connection ""; # 缓冲设置 proxy_buffering on; proxy_buffer_size 4k; proxy_buffers 8 4k; proxy_busy_buffers_size 8k; # 错误处理 proxy_next_upstream error timeout http_500 http_502 http_503 http_504; proxy_next_upstream_timeout 0; proxy_next_upstream_tries 3; # 添加响应头,显示后端服务器 add_header X-Backend-Server $upstream_addr; } } # HTTPS配置(可选,不需要https可以注释掉) server { listen 443 ssl; http2 on; server_name localhost; ssl_certificate /etc/nginx/ssl/cert.pem; ssl_certificate_key /etc/nginx/ssl/key.pem; ssl_protocols TLSv1.2 TLSv1.3; ssl_ciphers ECDHE-RSA-AES256-GCM-SHA512:DHE-RSA-AES256-GCM-SHA512:ECDHE-RSA-AES256-GCM-SHA384:DHE-RSA-AES256-GCM-SHA384; ssl_prefer_server_ciphers off; # SSL会话缓存 ssl_session_cache shared:SSL:10m; ssl_session_timeout 10m; # 其他配置与HTTP相同 location / { proxy_pass http://nginx_backend; proxy_set_header Host $host; proxy_set_header X-Real-IP $remote_addr; proxy_set_header X-Forwarded-Proto https; proxy_set_header X-Forwarded-For $proxy_add_x_forwarded_for; } } -
nginx/server2/nginx.conf 和 nginx/server3/nginx.conf 类似,只需修改:
- X-Server-ID 和 X-Server-Name 头
- /api/server-info 返回的JSON内容
- 如果需要,可以有不同的root路径或配置
-
2.1.5 生成证书(可选,不需要https可以不用)
bash
# 创建ssl目录
mkdir -p ssl

# 生成证书(使用-subj避免交互式提问)
openssl req -x509 -nodes -days 3650 -newkey rsa:2048 \
  -keyout ssl/key.pem \
  -out ssl/cert.pem \
  -subj "/C=CN/ST=Beijing/L=Beijing/O=LocalDev/CN=localhost"
2.1.6 HTML文件示例
-
nginx/server1/html/index.html
bash<!DOCTYPE html> <html lang="zh-CN"> <head> <meta charset="UTF-8"> <meta name="viewport" content="width=device-width, initial-scale=1.0"> <title>Nginx Server 1 - Docker集群示例</title> <style> * { margin: 0; padding: 0; box-sizing: border-box; } body { font-family: 'Segoe UI', Tahoma, Geneva, Verdana, sans-serif; line-height: 1.6; background: linear-gradient(135deg, #4a90e2 0%, #7b4397 100%); min-height: 100vh; color: #333; } .container { max-width: 1200px; margin: 0 auto; padding: 20px; } header { text-align: center; color: white; margin-bottom: 40px; padding: 40px; background: rgba(255, 255, 255, 0.1); border-radius: 20px; backdrop-filter: blur(10px); } .server-card { background: white; border-radius: 15px; padding: 30px; margin-bottom: 30px; box-shadow: 0 15px 35px rgba(0, 0, 0, 0.1); border-left: 5px solid #4a90e2; } .server-id { display: inline-block; background: #4a90e2; color: white; padding: 5px 15px; border-radius: 20px; font-weight: bold; margin-bottom: 15px; } .info-grid { display: grid; grid-template-columns: repeat(auto-fit, minmax(250px, 1fr)); gap: 20px; margin-top: 20px; } .info-item { background: #f8f9fa; padding: 15px; border-radius: 10px; border-left: 4px solid #7b4397; } .links { display: flex; gap: 15px; margin-top: 20px; flex-wrap: wrap; } .link-btn { display: inline-block; padding: 10px 20px; background: #4a90e2; color: white; text-decoration: none; border-radius: 8px; transition: all 0.3s ease; } .link-btn:hover { background: #7b4397; transform: translateY(-2px); } footer { text-align: center; color: white; margin-top: 40px; padding: 20px; font-size: 0.9rem; opacity: 0.8; } </style> </head> <body> <div class="container"> <header> <h1>🚀 Nginx Server 1</h1> <p>Docker容器集群 - 节点1</p> </header> <div class="server-card"> <div class="server-id">Server ID: 1</div> <h2>服务器信息</h2> <p>这是Nginx集群中的第一个服务器节点。</p> <div class="info-grid"> <div class="info-item"> <strong>容器名称:</strong> nginx-server-1 </div> <div class="info-item"> <strong>主机名:</strong> nginx-01 </div> <div class="info-item"> <strong>IP地址:</strong> 172.20.0.11 </div> <div class="info-item"> <strong>端口:</strong> 80 </div> </div> <div class="links"> <a href="/health" class="link-btn">健康检查</a> <a href="/api/server-info" class="link-btn">服务器信息API</a> <a href="/status" class="link-btn">Nginx状态</a> </div> </div> <div class="server-card"> <h2>集群信息</h2> <p>当前服务器属于一个三节点Nginx集群,通过负载均衡器提供服务。</p> <div class="info-grid"> <div class="info-item"> <strong>负载均衡器:</strong> nginx-lb:80 </div> <div class="info-item"> <strong>集群网络:</strong> 172.20.0.0/24 </div> <div class="info-item"> <strong>节点数量:</strong> 3 </div> <div class="info-item"> <strong>部署方式:</strong> Docker Compose </div> </div> </div> <footer> <p>© 2024 Docker Nginx Cluster Example | <a href="http://localhost:8080" target="_blank" style="color:white;">监控面板</a> | <a href="http://localhost/nginx_status" target="_blank" style="color:white;">负载均衡器状态</a> </p> </footer> </div> </body> </html> -
Server2和Server3的HTML文件只需修改:
- 标题和服务器ID
- 服务器信息内容
- 颜色方案(可选,用于区分不同服务器)
bash<!-- 修改标题和ID --> <h1>🚀 Nginx Server 2</h1> <div class="server-id">Server ID: 2</div> <!-- 修改颜色 --> <style> .server-card { border-left-color: #e24a4a; /* 不同颜色 */ } .link-btn { background: #e24a4a; } </style>
2.1.7 部署脚本 deploy-cluster.sh
bash
#!/bin/bash

set -e

# 颜色定义
RED='\033[0;31m'
GREEN='\033[0;32m'
YELLOW='\033[1;33m'
BLUE='\033[0;34m'
NC='\033[0m' # No Color

echo -e "${BLUE}================================${NC}"
echo -e "${GREEN}  Nginx Docker集群部署脚本${NC}"
echo -e "${BLUE}================================${NC}"

# 检查依赖
check_dependencies() {
    echo -e "\n${YELLOW}[1/3] 检查依赖...${NC}"

    if ! command -v docker &> /dev/null; then
        echo -e "${RED}错误: 未安装Docker${NC}"
        exit 1
    fi

    if ! command -v docker-compose &> /dev/null; then
        echo "使用docker compose替代docker-compose"
        COMPOSE_CMD="docker compose"
    else
        COMPOSE_CMD="docker-compose"
    fi

    echo -e "${GREEN}✓ Docker和Docker Compose已安装${NC}"
}

# 启动集群
start_cluster() {
    echo -e "\n${YELLOW}[2/3] 启动Docker集群...${NC}"

    # 停止并清理旧容器
    echo "清理旧容器..."
    $COMPOSE_CMD down 2>/dev/null || true

    # 启动新集群
    echo "启动集群..."
    $COMPOSE_CMD up -d --build

    echo -e "${GREEN}✓ 集群启动完成${NC}"
}

# 显示部署信息
show_info() {
    echo -e "\n${YELLOW}[3/3] 部署完成!${NC}"

    echo -e "\n${GREEN}========== 集群信息 ==========${NC}"
    echo "🌐 负载均衡器: http://localhost"
    echo "📊 监控面板:    http://localhost:8080"
    echo "🔧 管理命令:    ./manage-cluster.sh"
    echo -e "${GREEN}==============================${NC}"

    echo -e "\n${BLUE}容器状态:${NC}"
    $COMPOSE_CMD ps
}

# 主流程
main() {
    check_dependencies
    start_cluster
    show_info
}

main