目录
1.Nginx安装部署
见往期博文:https://blog.csdn.net/2403_87491401/article/details/155575959?spm=1001.2014.3001.5501
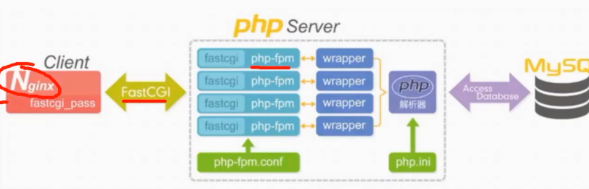
2.安装PHP服务
PHP安装包地址:https://pan.baidu.com/s/1v-NDOM4ErS2HkqkDXkh9zA?pwd=ghqr
bash
安装方式有两种
1.通过PHP仓库安装
	1)配置PHP仓库
    rpm -Uvh https://dl.fedoraproject.org/pub/epel/epel-release-latest-7.noarch.rpm
    rpm -Uvh https://mirror.webtatic.com/yum/el7/webtatic-release.rpm
	2)yum安装
	yum -y install php71w php71w-cli php71w-common php71w-devel php71w-embedded php71w-gd php71w-mcrypt php71w-mbstring php71w-pdo php71w-xml php71w-fpm php71w-mysqlnd php71w-opcache php71w-pecl-memcached php71w-pecl-redis php71w-pecl-mongodb --nogpgcheck

2.通过本地rpm包安装方式安装
	1)上传rpm包
	[root@web01 ~]#ll
	total 19444
	-rw-r--r-- 1 root root 19908563 Jul 25 11:07 	php71.tar.gz
    [root@web01 ~]#tar xf php71.tar.gz
	2)本地安装
	[root@web01 ~]#yum -y localinstall *.rpm
	3)检查是否安装成功
	[root@web01 ~]#rpm -qa|grep php|wc -l
    19

3.启动php服务,开启开机自启动
    [root@web01 ~]#systemctl start php-fpm
	[root@web01 ~]#systemctl enable php-fpm

4.检查端口是否开启
    [root@web01 ~]#netstat -tunlp
    Active Internet connections (only servers)
    Proto Recv-Q Send-Q Local Address           Foreign Address         State       PID/Program name
    tcp        0      0 127.0.0.1:9000          0.0.0.0:*               LISTEN      10457/php-fpm: mast
3.安装数据库
bash
1.安装Mariadb数据库
[root@web01 ~]#yum -y install mariadb-server

2.启动数据库
[root@web01 ~]#systemctl start mariadb
[root@web01 ~]#systemctl enable  mariadb

3.检查端口
[root@web01 ~]#netstat -tunlp
Active Internet connections (only servers)
Proto Recv-Q Send-Q Local Address           Foreign Address         State       PID/Program name
tcp        0      0 127.0.0.1:9000          0.0.0.0:*               LISTEN      10457/php-fpm: mast
tcp        0      0 0.0.0.0:3306            0.0.0.0:*               LISTEN      10776/mysqld

4.修改数据库密码
[root@web01 ~]#mysqladmin password 'j.20030704'

5.登陆检查
[root@web01 ~]#mysql -uroot -p'j.20030704'
4.LNMP架构部署
1)连接nginx和php
bash
1.修改nginx配置文件
[root@web01 /etc/nginx/conf.d]#cat php.conf
server {
	listen 80;
	server_name www.joren.com ;
	root /php;

	location / {
		index index.php index.html;
	}

	location ~ \.php$ {
		fastcgi_pass 127.0.0.1:9000;
		fastcgi_param SCRIPT_FILENAME $document_root$fastcgi_script_name;
		include fastcgi_params;
	}
}

2.创建/php目录并创建index.php文件
[root@web01 /etc/nginx/conf.d]#mkdir /php
[root@web01 /etc/nginx/conf.d]#touch /php/index.php

3.在index.php写入以下内容
[root@web01 conf.d]#cat /php/index.php
<?php
    phpinfo();
?>

4.windows做hosts解析
浏览器访问: www.joren.com 显示php的信息
2)php连接Mysql数据库
bash
[root@web01 /etc/nginx/conf.d]#cat /php/mysql.php
<?php
	$servername = "localhost";
	$username = "root";
	$password = "j.20030704";
	// 创建连接
	$conn = mysqli_connect($servername, $username, $password);
	// 检测连接
	if (!$conn) {
		die("Connection failed: " . mysqli_connect_error());
	}
	echo "php可以连接MySQL...";
?>
<img style='width:100%;height:100%;' src=/666.jpg>

浏览器访问:www.joren.com/mysql.php
3)部署业务wordpress
bash
1.配置nginx
[root@web01 /etc/nginx/conf.d]#cat wordpress.conf
server {
	listen 80;
	server_name www.wp.com ;
	root /code/wordpress;

	location / {
		index index.php index.html;
	}
	location ~ \.php$ {
		fastcgi_pass 127.0.0.1:9000;
		fastcgi_param SCRIPT_FILENAME $document_root$fastcgi_script_name;
		include fastcgi_params;
	}
}
[root@web01 /etc/nginx/conf.d]#nginx -t
[root@web01 /etc/nginx/conf.d]#systemctl restart nginx

2.创建代码目录
[root@web01 /etc/nginx/conf.d]#mkdir /code/wordpress

3.下载wordpress代码
[root@web01 /code/wordpress]#wget https://cn.wordpress.org/wordpress-5.8.7-zh_CN.tar.gz

4.解压代码
[root@web01 /code/wordpress]#tar xf wordpress-5.8.7-zh_CN.tar.gz
[root@web01 /code/wordpress]#mv wordpress/* .

5.访问页面
windows做hosts解析
10.0.0.7 www.wp.com
点击现在就开始
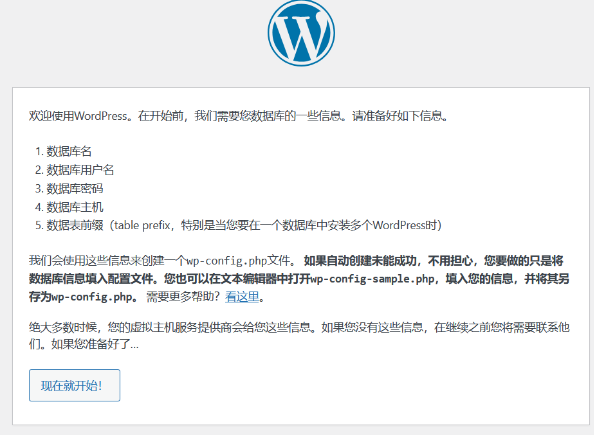
输入数据库信息(没有就先去创建)
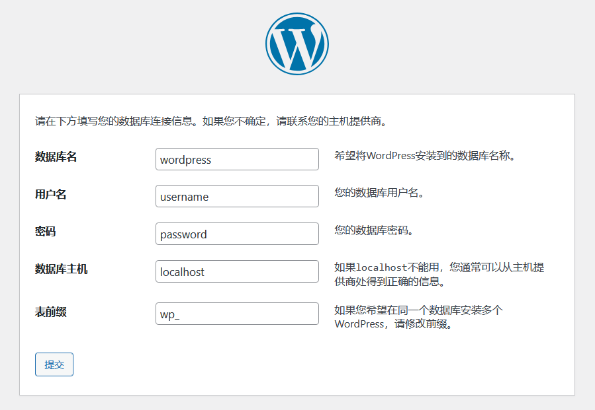
bash
创建数据库
[root@web01]#mysql -uroot -p'j.20030704' -e "create database wordpress"

检查是否创建成功
[root@web01 /code/wordpress]#mysql -uroot -p'j.20030704' -e "show databases"
+--------------------+
| Database           |
+--------------------+
| information_schema |
| mysql              |
| performance_schema |
| test               |
| wordpress          |
+--------------------+
4)统一服务的启动用户
bash
groupadd -g666 www
useradd -u666 -g666 -M -s /sbin/nologin www

修改nginx启动用户
[root@web01 /code/wordpress]#head -2 /etc/nginx/nginx.conf
user  www;

修改后重启nginx
[root@web01 ~]#systemctl restart nginx

修改php启动用户
[root@web01 /code/wordpress]#egrep '^user|^group' /etc/php-fpm.d/www.conf
user = www
group = www

检查是否修改成功
[root@web01 /code/wordpress]#ps aux | grep nginx
root      11295  0.0  0.0  69696  1128 ?        Ss   14:44   0:00 nginx: master process /usr/sbin/nginx -c /etc/nginx/nginx.conf
www       11296  0.0  0.0  70148  2020 ?        S    14:44   0:00 nginx: worker process
root      11516  0.0  0.0 112808   964 pts/0    R+   14:49   0:00 grep --color=auto nginx
[root@web01 /code/wordpress]#ps aux | grep php-fpm
root      11467  0.0  1.6 490176 32640 ?        Ss   14:47   0:00 php-fpm: master process (/etc/php-fpm.conf)
www       11468  0.0  0.3 490176  7588 ?        S    14:47   0:00 php-fpm: pool www
www       11469  0.0  0.3 490176  7588 ?        S    14:47   0:00 php-fpm: pool www
www       11470  0.0  0.3 490176  7592 ?        S    14:47   0:00 php-fpm: pool www
www       11471  0.0  0.3 490176  7592 ?        S    14:47   0:00 php-fpm: pool www
www       11472  0.0  0.3 490176  7596 ?        S    14:47   0:00 php-fpm: pool www
root      11518  0.0  0.0 112808   964 pts/0    R+   14:49   0:00 grep --color=auto php-fpm

最后将/code/wordpress属组属主修改为www
[root@web01 /code/wordpress]#chown -R www.www /code/wordpress/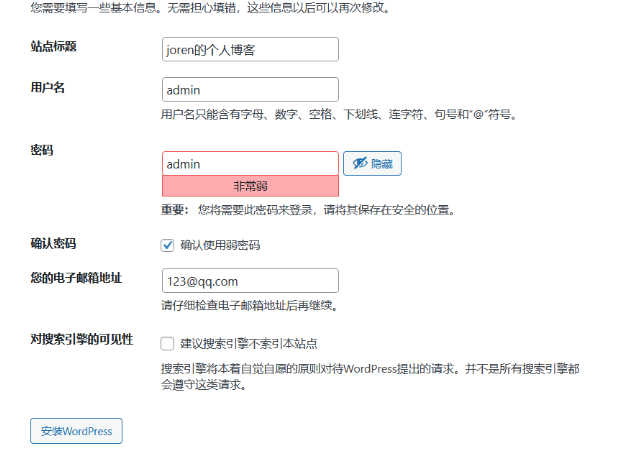
后台登陆地址:http://www.wp.com/wp-login.php
5.LNMP拆分流程
1)拆分数据库
bash
第一步:准备一台10.0.0.51服务器
1.部署Mariadb服务
[root@db01 ~]#yum -y install mariadb-server

2.启动mariadb
[root@db01 ~]#systemctl start mariadb
[root@db01 ~]#systemctl enable mariadb

第二步:将web01上的数据库中的所有内容导入到文件中all.sql
[root@web01 ~]#mysqldump -uroot -p'j.20030704' -A >all.sql

#数据库其他参数
# 1. 备份所有数据库(-A)
mysqldump -u root -p -A > all_databases.sql

# 2. 备份单个数据库
mysqldump -u root -p database_name > database_name.sql

# 3. 备份多个指定数据库
mysqldump -u root -p --databases db1 db2 db3 > multiple_dbs.sql

# 4. 备份单个数据库的特定表
mysqldump -u root -p database_name table1 table2 > tables.sql


第三步:将all.sql 拷贝到db01(10.0.0.51)
[root@web01 ~]#scp all.sql 10.0.0.51:/root/

第四步:db01服务器将all.sql导入到本地数据
[root@db01 ~]#mysql -uroot < all.sql
[root@db01 ~]#systemctl restart mariadb

第五步:授权一个用户可以实现远程连接
[root@db01 ~]#mysql -uroot -p'j.20030704'
Welcome to the MariaDB monitor.  Commands end with ; or \g.
Your MariaDB connection id is 2
Server version: 5.5.68-MariaDB MariaDB Server

Copyright (c) 2000, 2018, Oracle, MariaDB Corporation Ab and others.

Type 'help;' or '\h' for help. Type '\c' to clear the current input statement.
                    #使用以下命令授权远程用户joren 管理所有的库和密码
MariaDB [(none)]> grant all on *.* to joren@'%' identified by 'j.20030704';
Query OK, 0 rows affected (0.00 sec)

第六步:web01服务器修改业务
web01服务器停止数据库
[root@web01 ~]#systemctl stop mariadb
[root@web01 ~]#systemctl disable mariadb

授权用户测试
[root@web01 ~]#mysql -h 172.16.1.51  -ujoren -p'j.20030704'


第七步:修改代码中的数据库代码信息
1)查找数据库信息位于哪个文件
[root@web01 /code/wordpress]#grep j.20030704 -r
wp-config.php:define( 'DB_PASSWORD', 'j.20030704' );

2)修改数据库连接信息
define( 'DB_NAME', 'wordpress' );

/** MySQL database username */
define( 'DB_USER', 'joren' );

/** MySQL database password */
define( 'DB_PASSWORD', 'j.20030704' );

/** MySQL hostname */
define( 'DB_HOST', '172.16.1.51' );
2)扩展web服务
bash
1.准备一台web02服务器 10.0.0.8
2.创建虚拟用户www
[root@web02 ~]#groupadd -g666 www
[root@web02 ~]#useradd -u666 -g666 -M -s /sbin/nologin www

3.web02服务器部署nginx
[root@web02 ~]#scp 172.16.1.7:/etc/yum.repos.d/nginx.repo /etc/yum.repos.d/
[root@web02 ~]#yum -y install nginx

4.web02服务器部署php
1)上传php.zip
[root@web02 ~]#scp 172.16.1.7:/root/php71.tar.gz ./

2)解压
[root@web02 ~]#tar xf php71.tar.gz

3)本地安装
[root@web02 ~]#yum -y localinstall *.rpm

5.nginx配置无差异同步web01
[root@web02 ~]#rsync -avz --delete 172.16.1.7:/etc/nginx /etc/

6.php配置无差异同步web01
[root@web02 /etc/nginx]#rsync -zva --delete 172.16.1.7:/etc/php-fpm.d/www.conf /etc/php-fpm.d/www.conf

7.web01将整个代码目录拷贝到web02
[root@web01 ~]#tar zcvf code.tar.gz /code/
[root@web01 ~]#scp code.tar.gz 172.16.1.8:/

web02解压代码目录
[root@web02 /]#tar xf code.tar.gz

8.修改session目录权限
[root@web02 /code]#chown www.www /var/lib/php/session/

9.启动服务
[root@web02 /code]#systemctl start nginx php-fpm
[root@web02 /code]#systemctl enable nginx php-fpm

10.测试服务
将hosts 解析到web02
10.0.0.8 www.wp.com
3)配置NFS服务
bash
服务端配置:
1.安装nfs
yum -y install nfs-utils

2.配置nfs服务
[root@nfs ~]#cat /etc/exports
/code/wp  172.16.1.0/24(rw,sync,all_squash,anonuid=666,anongid=666)
/code/she  172.16.1.0/24(rw,sync,all_squash,anonuid=666,anongid=666)

3.创建必要数据:
[root@nfs ~]#groupadd -g666 www
[root@nfs ~]#useradd -u666 -g666 -M -s /sbin/nologin www

创建目录文件
[root@nfs ~]#mkdir -p /code/wp
[root@nfs ~]#mkdir -p /code/she
[root@nfs ~]#chown -R www.www /code/wp/

4.启动服务
systemctl start nfs
systemctl enable nfs

5.检查服务
[root@nfs ~]#cat /var/lib/nfs/etab
/code/she	172.16.1.0/24(rw,sync,wdelay,hide,nocrossmnt,secure,root_squash,all_squash,no_subtree_check,secure_locks,acl,no_pnfs,anonuid=666,anongid=666,sec=sys,rw,secure,root_squash,all_squash)
/code/wp	172.16.1.0/24(rw,sync,wdelay,hide,nocrossmnt,secure,root_squash,all_squash,no_subtree_check,secure_locks,acl,no_pnfs,anonuid=666,anongid=666,sec=sys,rw,secure,root_squash,all_squash)


客户端挂载:
1.安装nfs-utils 不需要启动
yum install -y nfs-utils

2.将web01和web02上本地磁盘上的图片推送到nfs服务器
[root@web02 /code]#scp -r /code/wordpress/wp-content/uploads/* 172.16.1.31:/code/wp/

3.挂载查看图片
[root@web02 /code]#mount -t nfs 172.16.1.31:/code/wp /code/wordpress/wp-content/uploads/
[root@web01 ~]#df -h
Filesystem Size Used Avail Use% Mounted on
devtmpfs 980M 0 980M 0% /dev
tmpfs 991M 0 991M 0% /dev/shm
tmpfs 991M 9.5M 981M 1% /run
tmpfs 991M 0 991M 0% /sys/fs/cgroup
/dev/sda3 18G 2.6G 16G 15% /
/dev/sda1 197M 110M 88M 56% /boot
tmpfs 199M 0 199M 0% /run/user/0
172.16.1.31:/code/wp 18G 2.0G 16G 12% /code/wordpress/wp-content/uploads

4.修改NFS上共享目录下权限
[root@nfs ~]#chown -R www.www /code/wp/
[root@nfs ~]#ll /code/wp/
total 0
drwxr-xr-x 3 www www 16 Apr 18 11:36 2024