一、介绍
**本期内容通过私有化部署的Dify,创建Chatflow应用,通过应用编排搭建实现一个可以上传简历并进行意见反馈和简历优化的智能助手;****并开发一个基于SpringBoot+Vue的前后端分离式项目;****最终将两者集成在一起,实现完整的用户可使用的项目,**并使用Dockerfile和DockerCompose进行Linux系统(CentOS)的容器化部署,实现在Windows系统下的访问。
基于Dify实现的简历优化助手的完整详细步骤见:
https://blog.csdn.net/2401_84926677/article/details/154994183
本文主要介绍 :
前后端分离式系统的开发与Dify简历优化助手的集成。
二、步骤
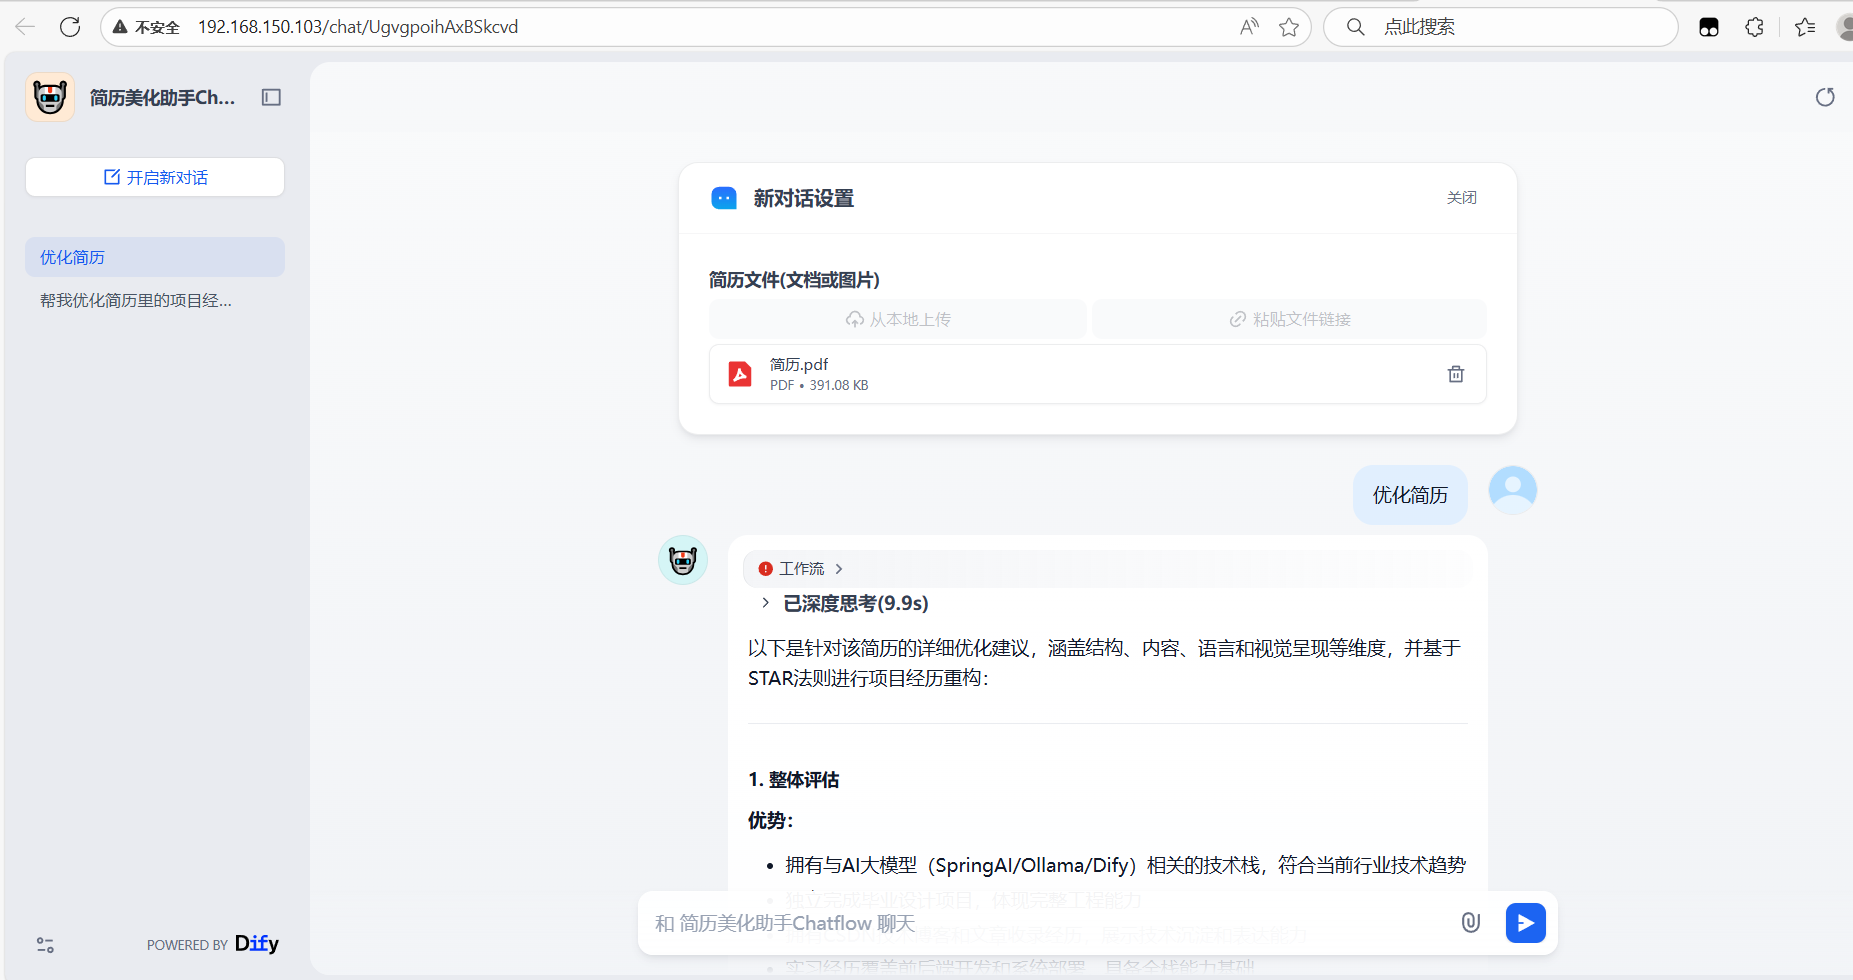
1.测试运行
确保dify控制台的简历优化智能体工作流可以正常运行

点击运行进行测试:
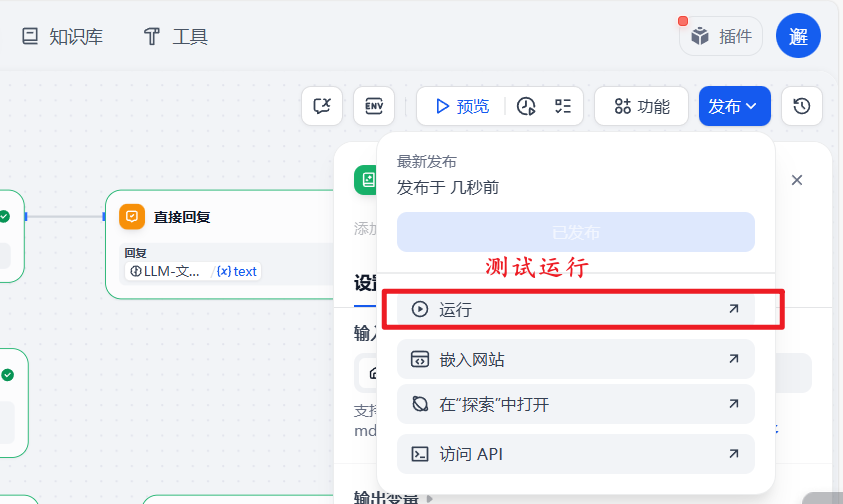
正常运行:
2.访问API,获取密钥
点击已发布的简历优化助手,访问API:
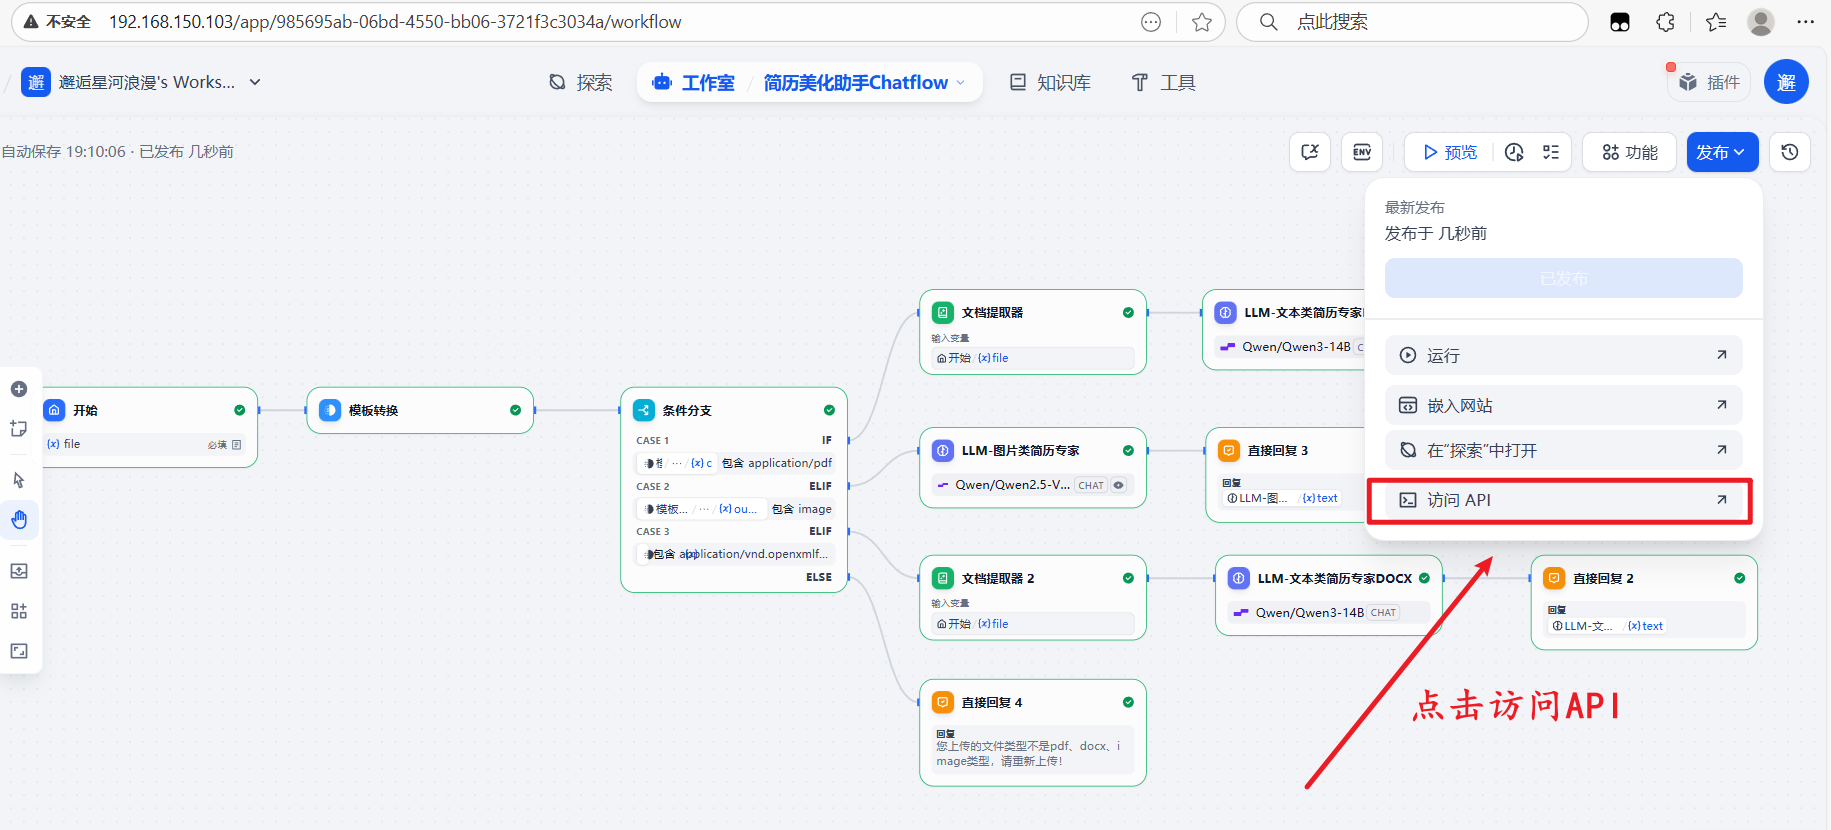
可以看到你的基础URL、鉴权格式、右上角的API密钥:
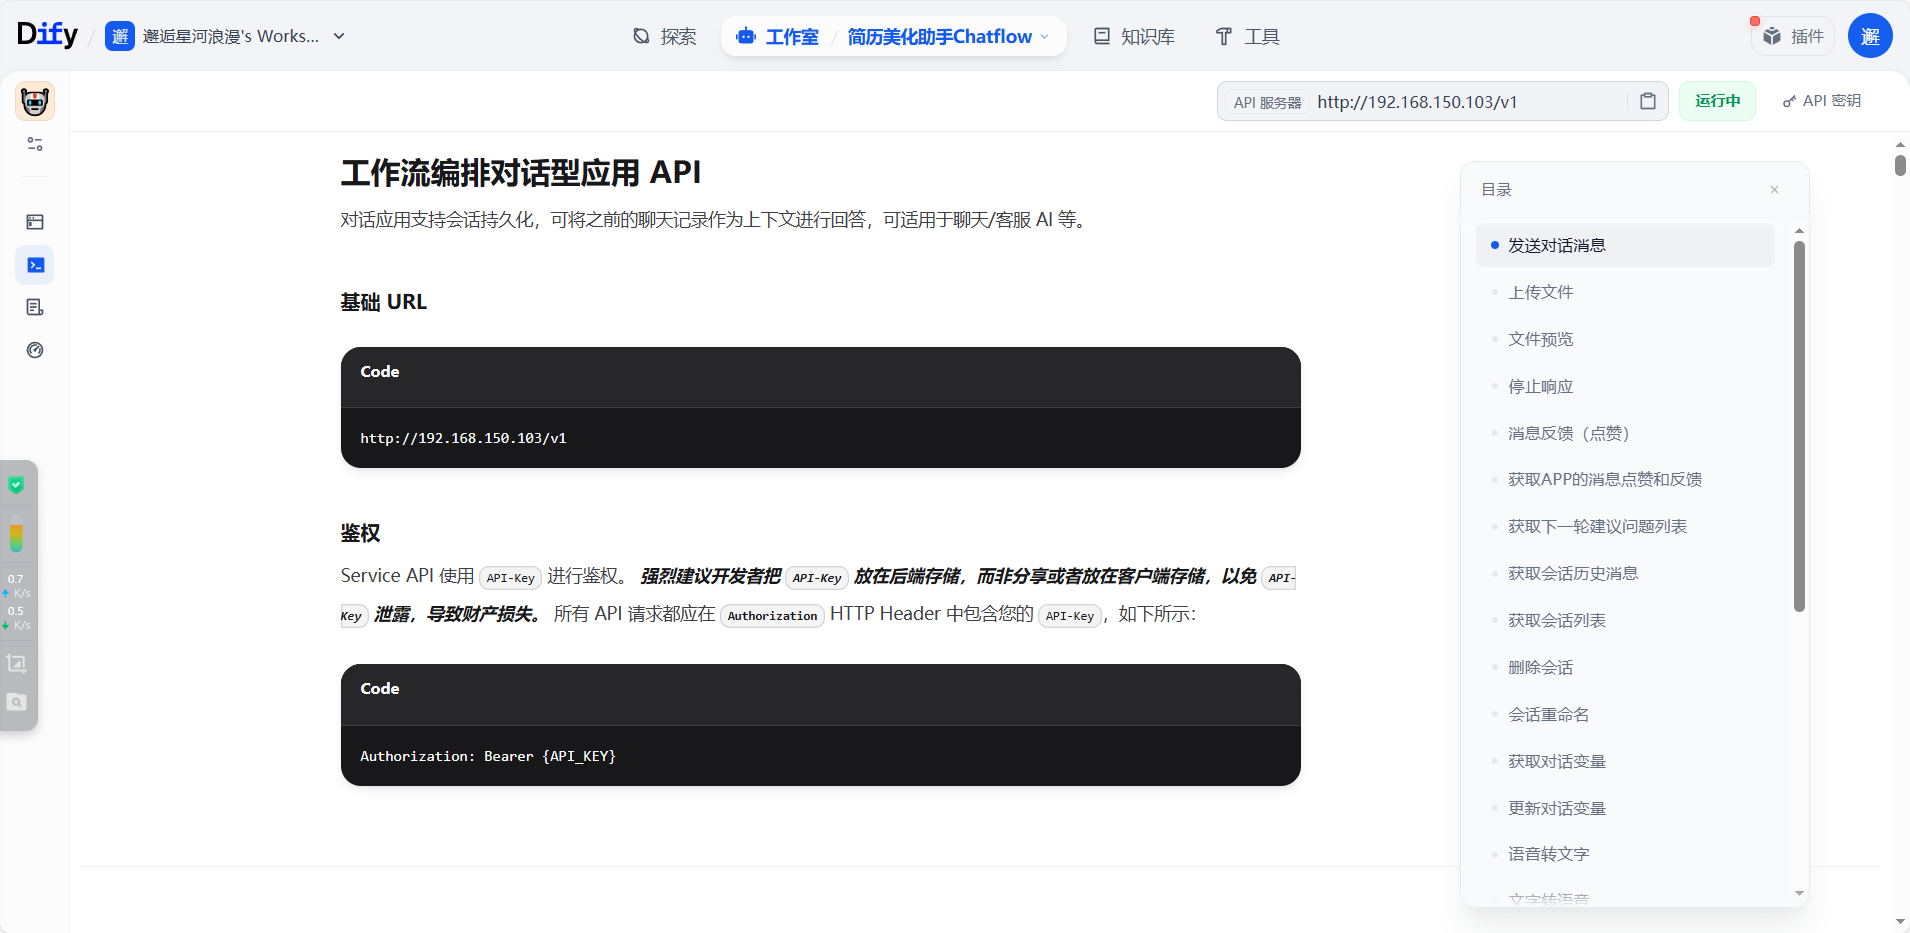
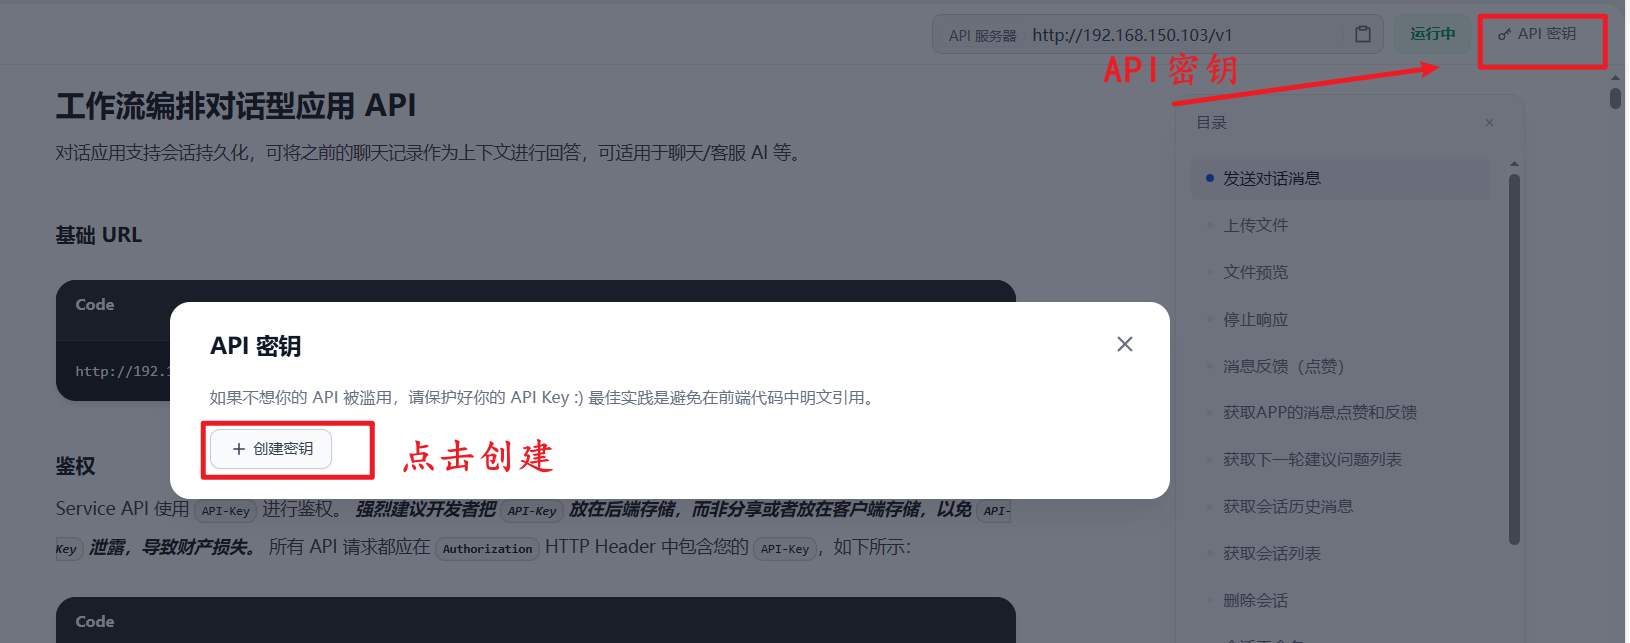
点击右上角的API密钥,复制保存,以供后续鉴权使用:
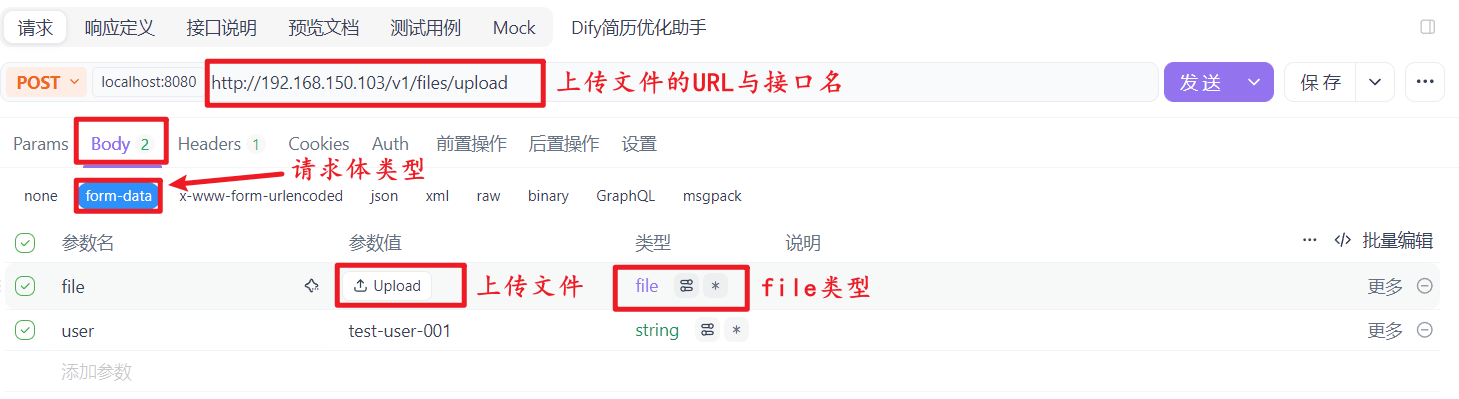
3.Apifox接口调用测试
a.新建接口,输入基础URL,请求方式改为POST

b.添加Header鉴权,引入API密钥

c.文件上传接口测试(/files/upload)
准备测试材料:
- 简历文件(比如
resume.pdf)
- 确定
user标识(例如test-user-001)
构造请求:
- 请求方法:
POST - 请求地址:
http://192.168.150.103/v1/files/upload(你的请求地址) - 请求头:
Authorization: Bearer {api_key} - 请求体:
multipart/form-data格式,包含:file:选择本地简历文件user:填写test-user-001
点击上传简历文件:
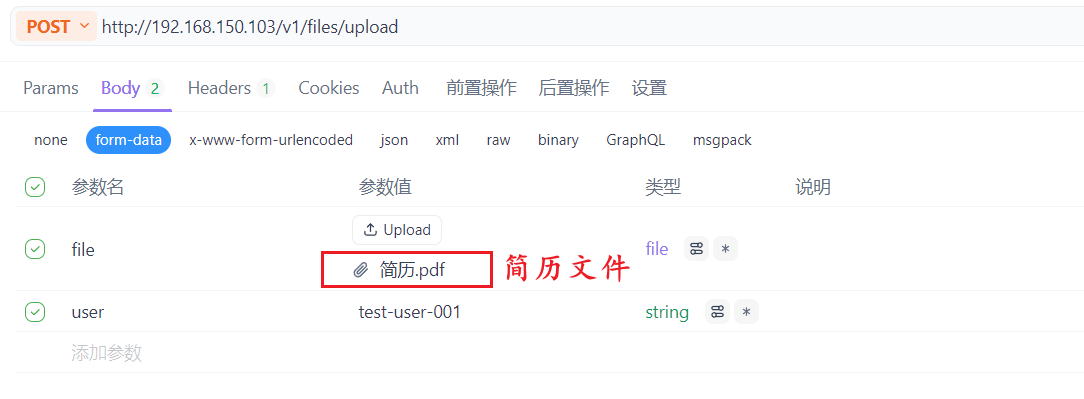
执行请求,验证响应:
- 响应体需包含
id(文件唯一标识)、name(文件名)等信息,记录id(后续步骤用)
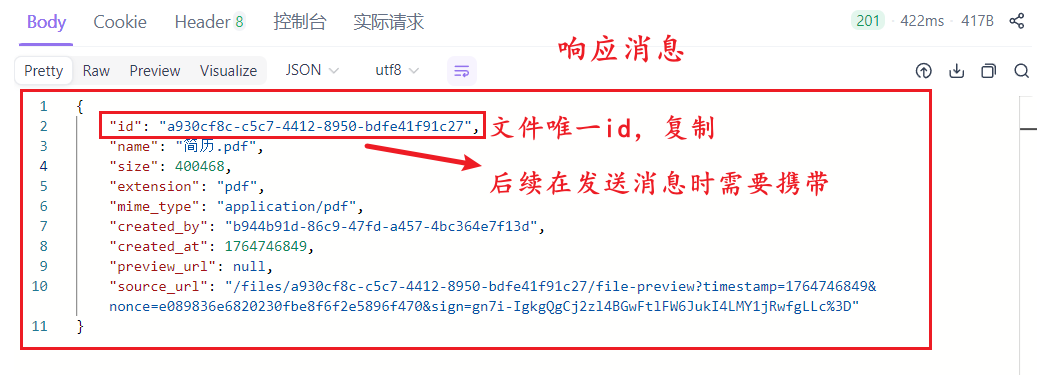
简历是上传到提供该 API 的服务端存储中
- 仅当前用户可用:接口说明提到 "上传的文件仅供当前终端用户使用",所以只有上传时填写的
user标识对应的用户,才能在发送消息接口中引用这个文件。 - 临时 / 应用内存储:这类文件通常是存储在服务端的临时或应用专属存储中(不会公开到外部),主要用于配合
/chat-messages接口完成对话中的多模态(文件 + 文本)交互。
d.发送消息接口测试(/chat-messages)
准备测试材料:
- 步骤 1 中获取的文件
id - 优化需求的
query(例如 "帮我优化这份简历的求职意向和项目描述") - 相同的
user标识(test-user-001)
构造请求:
- 请求方法:
POST - 请求地址:
http://192.168.150.103/v1/chat-messages - 请求头:
Authorization: Bearer {api_key}Content-Type: application/json
- 请求体(JSON 格式):
bash
{
  "inputs":{
    "file":{
      "transfer_method":"local_file",
      "upload_file_id":"a930cf8c-c5c7-4412-8950-bdfe41f91c27",
      "type":"document"
    }
  },
  "query": "帮我优化简历",
  "response_mode":"blocking",
  "user":"test-user-001"
}
执行请求,验证响应:
- 响应状态码应为
200 - 能收到 AI 返回的简历优化内容

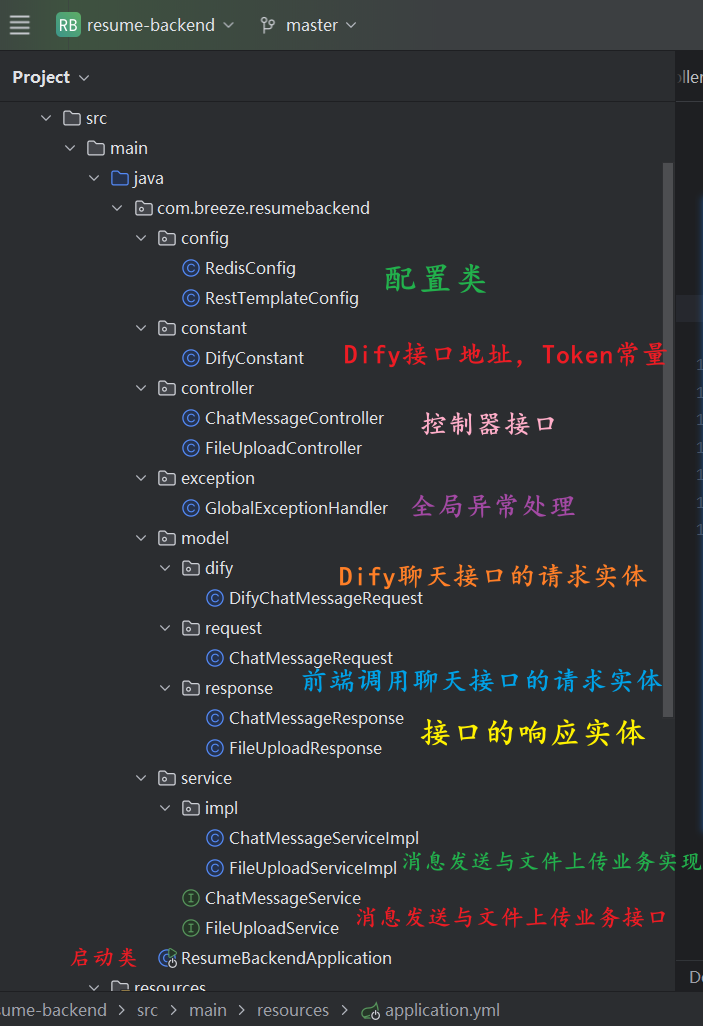
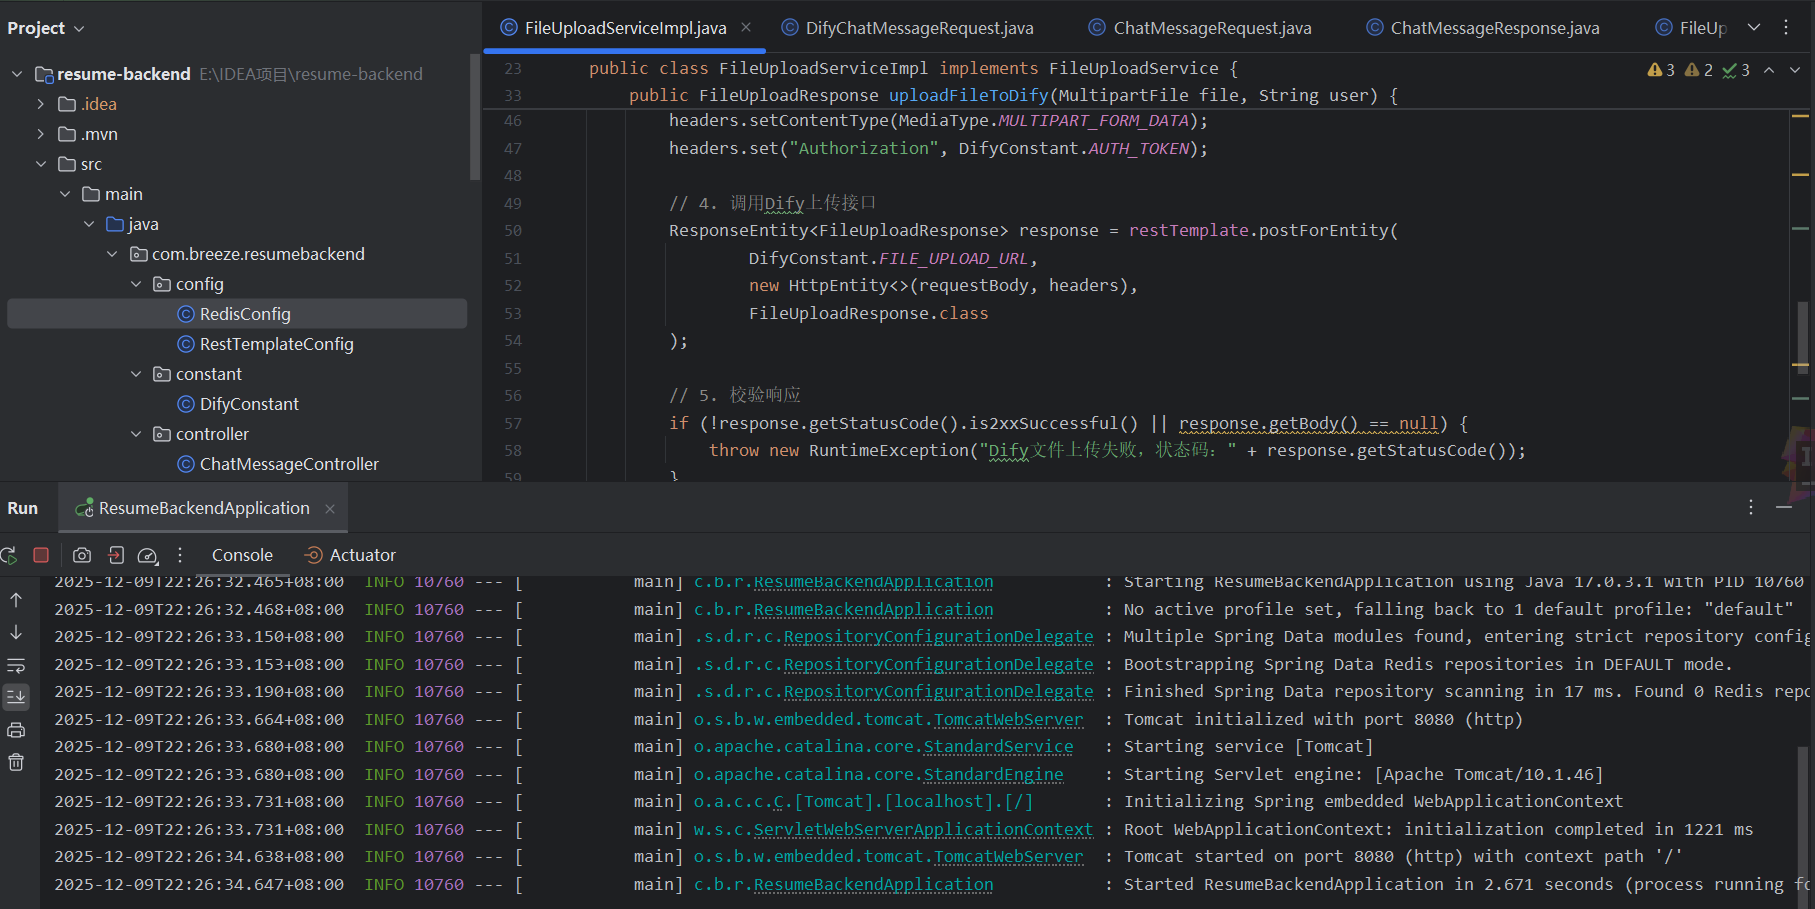
4.服务端(后端)主要代码
后端项目结构如下:
a. pom.xml文件
引入web开发、文件上传、校验等依赖:
XML
        <dependency>
            <groupId>org.springframework.boot</groupId>
            <artifactId>spring-boot-starter-web</artifactId>
        </dependency>
        <dependency>
            <groupId>org.springframework.boot</groupId>
            <artifactId>spring-boot-starter-validation</artifactId>
        </dependency>
        <dependency>
            <groupId>commons-fileupload</groupId>
            <artifactId>commons-fileupload</artifactId>
            <version>1.4</version>
        </dependency>
        <dependency>
            <groupId>org.projectlombok</groupId>
            <artifactId>lombok</artifactId>
            <optional>true</optional>
        </dependency>
        <dependency>
            <groupId>org.springframework.boot</groupId>
            <artifactId>spring-boot-starter-data-redis</artifactId>
        </dependency>
b. application.yml
bash
spring:
  servlet:
    multipart:
      max-file-size: 10MB
      max-request-size: 10MB
  data:
    redis:
      timeout: 100000000ms
      database: 0
      password:
      port: 6379
      host: localhost

server:
  port: 8080
c. Service业务实现类
java
@Service
public class ChatMessageServiceImpl implements ChatMessageService {
@Autowired
private RestTemplate restTemplate;
@Autowired
private RedisTemplate<String, String> redisTemplate;
@Override
public ChatMessageResponse sendChatMessageToDify(ChatMessageRequest request) {
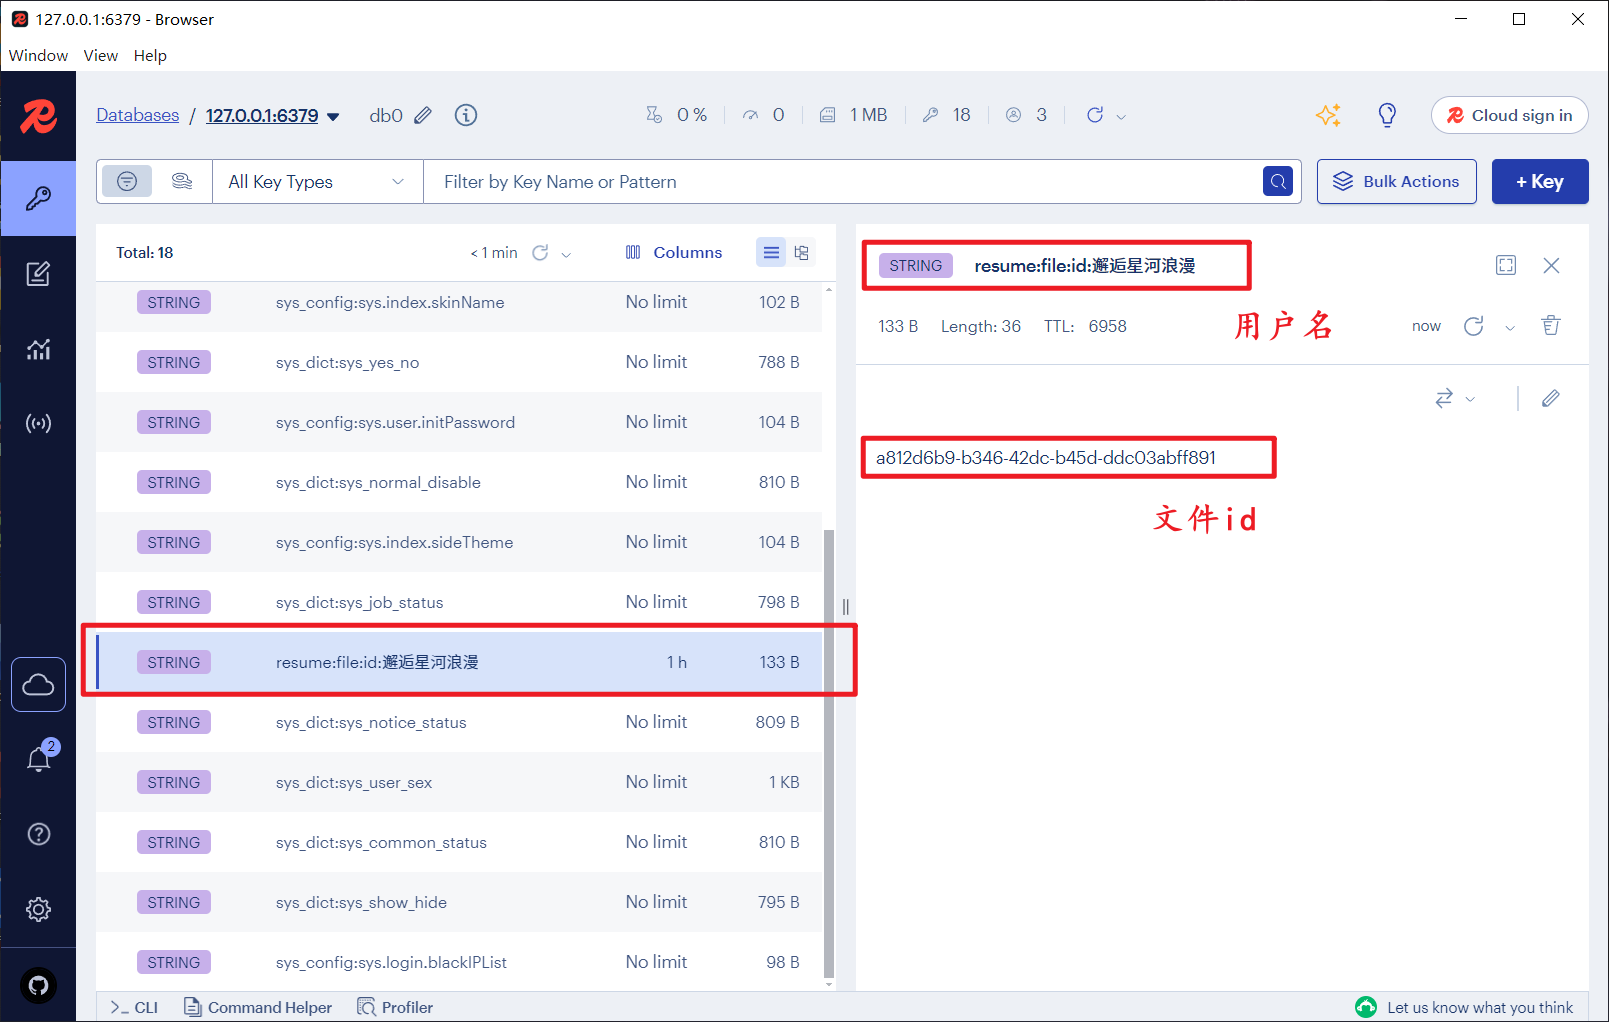
// 1. 从Redis获取FileId(原有逻辑不变)
String fileId = redisTemplate.opsForValue().get("resume:file:id:" + request.getUser());
if (fileId == null || fileId.isEmpty()) {
throw new RuntimeException("请先上传简历文件,再发送优化请求");
}
// 2. 构造Dify请求体(修改response_mode为streaming)
DifyChatMessageRequest difyRequest = new DifyChatMessageRequest();
difyRequest.setQuery(request.getQuery());
difyRequest.setResponse_mode("streaming"); // 改为流式模式
difyRequest.setUser(request.getUser());
DifyChatMessageRequest.Inputs inputs = new DifyChatMessageRequest.Inputs();
DifyChatMessageRequest.FileInfo fileInfo = new DifyChatMessageRequest.FileInfo();
fileInfo.setTransfer_method("local_file");
fileInfo.setUpload_file_id(fileId);
fileInfo.setType("document");
inputs.setFile(fileInfo);
difyRequest.setInputs(inputs);
// 3. 设置请求头(原有逻辑不变)
HttpHeaders headers = new HttpHeaders();
headers.setContentType(MediaType.APPLICATION_JSON);
headers.set("Authorization", DifyConstant.AUTH_TOKEN);
// 4. 调用Dify接口并处理流式响应(核心修改)
HttpEntity<DifyChatMessageRequest> requestEntity = new HttpEntity<>(difyRequest, headers);
// 执行请求,获取流式响应
ResponseEntity<org.springframework.core.io.Resource> response = restTemplate.exchange(
DifyConstant.CHAT_MESSAGES_URL,
HttpMethod.POST,
requestEntity,
org.springframework.core.io.Resource.class // 接收流式资源
);
// 5. 解析流式响应(拼接所有分片结果)
StringBuilder fullAnswer = new StringBuilder();
try (BufferedReader reader = new BufferedReader(
new InputStreamReader(response.getBody().getInputStream(), StandardCharsets.UTF_8))) {
String line;
while ((line = reader.readLine()) != null) {
// Dify的SSE格式示例:data: {"answer": "优化建议1"}
if (line.startsWith("data: ")) {
String jsonStr = line.substring(6); // 去掉前缀"data: "
// 解析JSON片段(可根据Dify实际返回格式调整)
// 简化处理:直接拼接answer内容(生产环境建议用Jackson解析)
if (jsonStr.contains("\"answer\":")) {
// 提取answer值(示例逻辑,需根据Dify实际返回调整)
String answer = jsonStr.split("\"answer\":\"")[1].split("\"")[0];
fullAnswer.append(answer);
}
}
}
} catch (Exception e) {
throw new RuntimeException("解析流式响应失败:" + e.getMessage());
}
// 6. 封装返回结果
ChatMessageResponse result = new ChatMessageResponse();
result.setAnswer(fullAnswer.toString());
return result;
}
}
java
@Service
public class FileUploadServiceImpl implements FileUploadService {

    @Autowired
    private RestTemplate restTemplate;

    // 注入RedisTemplate
    @Autowired
    private RedisTemplate<String, String> redisTemplate;

    @Override
    public FileUploadResponse uploadFileToDify(MultipartFile file, String user) {
        // 1. 校验文件
        if (file.isEmpty()) {
            throw new RuntimeException("上传文件不能为空");
        }

        // 2. 构造Dify文件上传请求
        MultiValueMap<String, Object> requestBody = new LinkedMultiValueMap<>();
        requestBody.add("file", file.getResource()); // 简化文件传递方式
        requestBody.add("user", user);

        // 3. 设置请求头
        HttpHeaders headers = new HttpHeaders();
        headers.setContentType(MediaType.MULTIPART_FORM_DATA);
        headers.set("Authorization", DifyConstant.AUTH_TOKEN);

        // 4. 调用Dify上传接口
        ResponseEntity<FileUploadResponse> response = restTemplate.postForEntity(
                DifyConstant.FILE_UPLOAD_URL,
                new HttpEntity<>(requestBody, headers),
                FileUploadResponse.class
        );

        // 5. 校验响应
        if (!response.getStatusCode().is2xxSuccessful() || response.getBody() == null) {
            throw new RuntimeException("Dify文件上传失败,状态码:" + response.getStatusCode());
        }

        // 6. 核心:将user和fileId存入Redis(2小时过期)
        String fileId = response.getBody().getId();
        if (fileId != null && !fileId.isEmpty()) {
            redisTemplate.opsForValue().set(
                    "resume:file:id:" + user, // Redis Key格式:resume:file:id:用户名
                    fileId,
                    2, // 过期时间:2小时
                    TimeUnit.HOURS
            );
        }

        return response.getBody();
    }
}
d. Controller接口类
java
@RestController
@RequestMapping("/api/v1/resume")
public class FileUploadController {

    @Autowired
    private FileUploadService fileUploadService;

    /**
     * 上传简历文件(自动缓存FileId)
     */
    @PostMapping("/upload")
    public ResponseEntity<Map<String, Object>> uploadResume(
            @RequestParam("file") MultipartFile file,
            @RequestParam("user") String user) {
        FileUploadResponse response = fileUploadService.uploadFileToDify(file, user);

        // 构造友好的返回结果
        Map<String, Object> result = new HashMap<>();
        result.put("success", true);
        result.put("message", "文件上传成功");
        result.put("fileName", response.getName());
        result.put("fileSize", response.getSize());

        return new ResponseEntity<>(result, HttpStatus.OK);
    }
}
java
@RestController
@RequestMapping("/api/v1/resume")
public class ChatMessageController {

    @Autowired
    private ChatMessageService chatMessageService;

    /**
     * 发送简历优化请求(自动关联已上传的文件)
     */
    @PostMapping("/optimize")
    public ResponseEntity<ChatMessageResponse> optimizeResume(
            @Valid @RequestBody ChatMessageRequest request) {
        ChatMessageResponse response = chatMessageService.sendChatMessageToDify(request);
        return new ResponseEntity<>(response, HttpStatus.OK);
    }
}
5.客户端(前端)主要代码
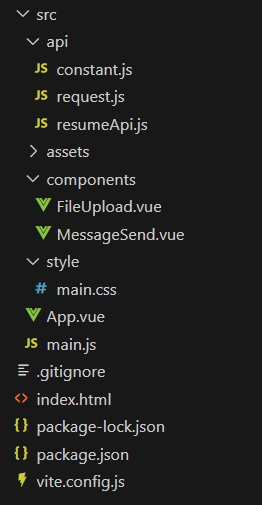
前端项目结构:
a.vite.config.js
javascript
import { defineConfig } from 'vite'
import vue from '@vitejs/plugin-vue'

export default defineConfig({
  plugins: [vue()],
  server: {
    port: 3000, // 前端运行端口
    proxy: {
      // 代理后端接口解决跨域
      '/api': {
        target: 'http://localhost:8080', // 后端SpringBoot地址
        changeOrigin: true,
        rewrite: (path) => path.replace(/^\/api/, '/api')
      }
    }
  }
})
b. api
javascript
// src/api/constant.js
// 接口基础前缀(与Vite代理配置一致)
export const API_BASE_URL = '/api';
javascript
// src/api/request.js
import axios from 'axios';
import { API_BASE_URL } from './constant';

// axios实例(保持不变)
const axiosInstance = axios.create({
  baseURL: API_BASE_URL,
  timeout: 60000
});

axiosInstance.interceptors.response.use(
  (response) => response.data,
  (error) => {
    alert(`请求失败:${error.message}`);
    return Promise.reject(error);
  }
);

/**
 * 修复:用回调函数(onStream)实时传递流式数据,替代Promise
 * @param {string} url - 接口路径
 * @param {object} data - 请求参数
 * @param {function} onStream - 流式数据回调(接收片段)
 * @param {function} onDone - 完成回调(接收完整结果)
 * @param {function} onError - 错误回调
 */
export const sseRequest = (url, data, onStream, onDone, onError) => {
  fetch(`${API_BASE_URL}${url}`, {
    method: 'POST',
    headers: {
      'Content-Type': 'application/json'
    },
    body: JSON.stringify(data)
  }).then(response => {
    if (!response.ok) {
      throw new Error(`HTTP错误:${response.status} ${response.statusText}`);
    }
    const reader = response.body.getReader();
    const decoder = new TextDecoder('utf-8');
    let fullAnswer = '';

    const readStream = () => {
  reader.read().then(({ done, value }) => {
    if (done) {
      onDone(fullAnswer);
      return;
    }
    const chunk = decoder.decode(value);
    // 1. 清理多余的``前缀
    const cleanChunk = chunk.replace(/^\s*\s*/g, '');
    if (!cleanChunk.trim()) {
      readStream();
      return;
    }

    try {
      // 2. 解析JSON(后端返回的是{"answer": "..."}格式)
      const res = JSON.parse(cleanChunk);
      if (res.answer) {
        // 3. 解析转义字符(如\\n→\n)
        const parsedAnswer = res.answer.replace(/\\n/g, '\n');
        fullAnswer += parsedAnswer;
        onStream(parsedAnswer); // 传递处理后的内容
      }
    } catch (e) {
      onError(`解析失败:${e.message}`);
    }
    readStream();
  }).catch(error => {
    onError(`流式读取失败:${error.message}`);
  });
};
    readStream();
  }).catch(error => {
    onError(`请求失败:${error.message}`);
  });
};

export default axiosInstance;
javascript
// src/api/resumeApi.js
import axiosInstance, { sseRequest } from './request';

export const uploadResumeFile = (formData) => {
  return axiosInstance.post('/v1/resume/upload', formData, {
    headers: {
      'Content-Type': 'multipart/form-data'
    }
  });
};

export const checkHasUploaded = (user) => {
  return axiosInstance.get('/v1/resume/hasFile', { params: { user } });
};

/**
 * 适配回调参数:将params和三个回调传递给sseRequest
 */
export const optimizeResume = (params, onStream, onDone, onError) => {
  sseRequest('/v1/resume/optimize', params, onStream, onDone, onError);
};
c.components
javascript
<template>
  <div class="upload-container">
    <h3>📤 上传简历文件</h3>
    <!-- 用户名回显(从父组件传入) -->
    <div class="user-tip" v-if="userValue">当前用户名:{{ userValue }}</div>

    <div class="upload-box">
      <input type="file" ref="fileInput" accept=".pdf,.docx,.doc,.txt" @change="handleFileChange" class="file-input"
        :disabled="!userValue" />
      <button @click="handleUpload" :disabled="!selectedFile || !userValue || isUploading" class="upload-btn">
        {{ isUploading ? '上传中...' : '确认上传' }}
      </button>
    </div>
    <div v-if="uploadMsg" class="upload-msg">{{ uploadMsg }}</div>
  </div>
</template>

<script setup>
import { ref, inject, computed } from 'vue'
import { uploadResumeFile } from '../api/resumeApi'

// 从父组件注入用户名(添加默认值,增强健壮性)
const user = inject('user', ref(''))
// 计算属性:获取user的实际值
const userValue = computed(() => user.value)

// 响应式数据
const fileInput = ref(null)
const selectedFile = ref(null)
const isUploading = ref(false)
const uploadMsg = ref('')

// 选择文件
const handleFileChange = (e) => {
  const file = e.target.files[0]
  if (file) {
    selectedFile.value = file
    uploadMsg.value = `已选择文件:${file.name}`
  }
}

// 上传文件(携带用户输入的用户名)
const handleUpload = async () => {
  if (!selectedFile.value || !userValue.value) return

  isUploading.value = true
  uploadMsg.value = ''

  try {
    // 构造FormData,携带用户输入的user
    const formData = new FormData()
    formData.append('file', selectedFile.value)
    formData.append('user', userValue.value)

    // 调用上传接口
    const res = await uploadResumeFile(formData)
    if (res.success) {
      uploadMsg.value = `✅ 文件上传成功(用户:${userValue.value}):${res.fileName}`
      // 清空文件选择框
      fileInput.value.value = ''
      selectedFile.value = null
    }
  } catch (error) {
    uploadMsg.value = `❌ 上传失败:${error.message}`
  } finally {
    isUploading.value = false
  }
}
</script>
javascript
<template>
<div class="message-container">
<h3>✍️ 简历优化需求</h3>
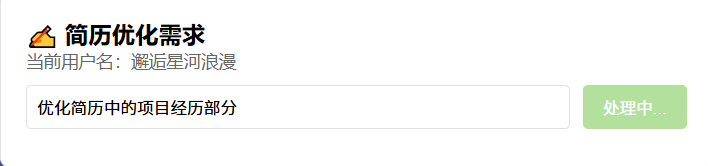
<div class="user-tip" v-if="userValue">当前用户名:{{ userValue }}</div>
<div class="input-box">
<input type="text" v-model="query" placeholder="请输入优化需求(如:优化简历,突出Java项目经验)" class="query-input"
:disabled="!userValue" />
<button @click="handleOptimize" :disabled="!query || !userValue || isOptimizing" class="optimize-btn">
{{ isOptimizing ? '处理中...' : '发送优化请求' }}
</button>
</div>
</div>
<div v-if="errorMsg" class="error-msg">{{ errorMsg }}</div>
</template>
<script setup>
import { ref, inject, computed } from 'vue'
import { optimizeResume } from '../api/resumeApi'
// 注入用户名
const user = inject('user', ref(''))
const userValue = computed(() => user.value)
// 响应式数据
const query = ref('')
const isOptimizing = ref(false)
const errorMsg = ref('')
// 定义 emits 用于向父组件传递结果
const emit = defineEmits(['update-result'])
// 发送优化请求(用回调接收流式数据)
const handleOptimize = () => {
if (!query.value || !userValue.value) {
alert('请输入优化需求和用户名!')
return
}
isOptimizing.value = true
errorMsg.value = ''
// 调用优化接口,传入三个回调
optimizeResume(
{ user: userValue.value, query: query.value },
// 流式片段回调:实时传递结果给父组件
(chunk) => {
emit('update-result', chunk)
},
// 完成回调
() => {
isOptimizing.value = false
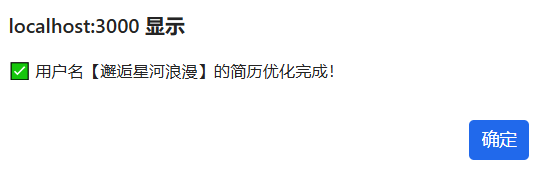
alert(`✅ 用户名【${userValue.value}】的简历优化完成!`)
},
// 错误回调
(error) => {
errorMsg.value = `❌ 优化失败:${error}`
isOptimizing.value = false
}
)
}
</script>6. 运行程序,验证结果
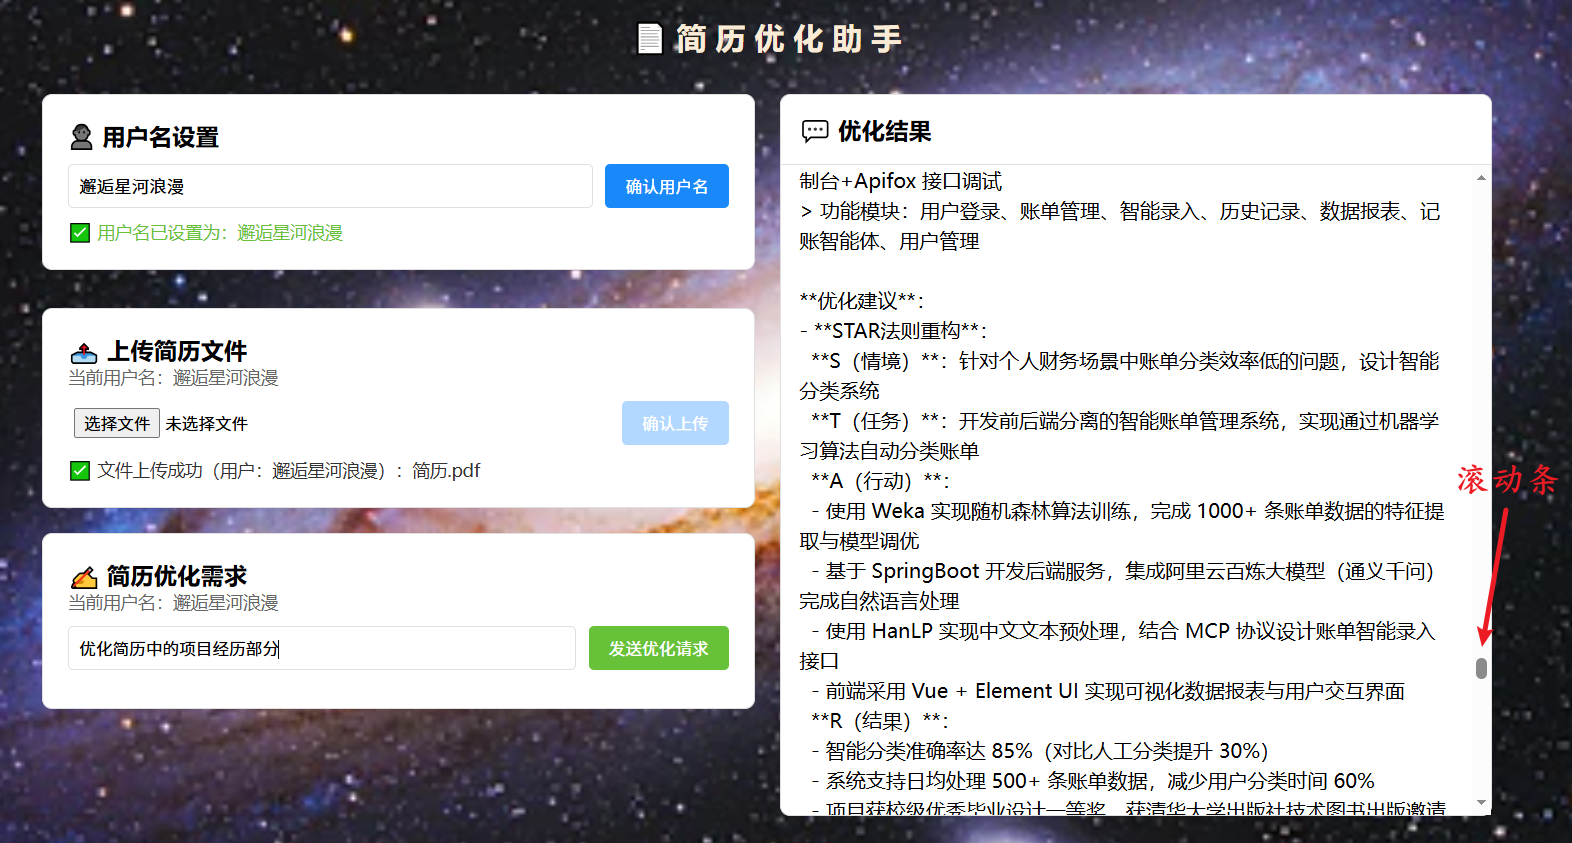
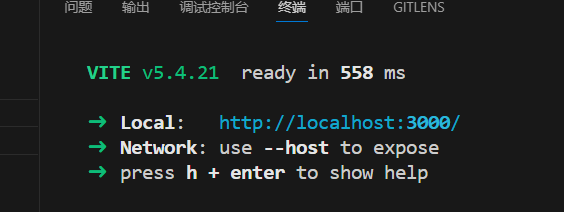
a. 启动前后端与Dify服务
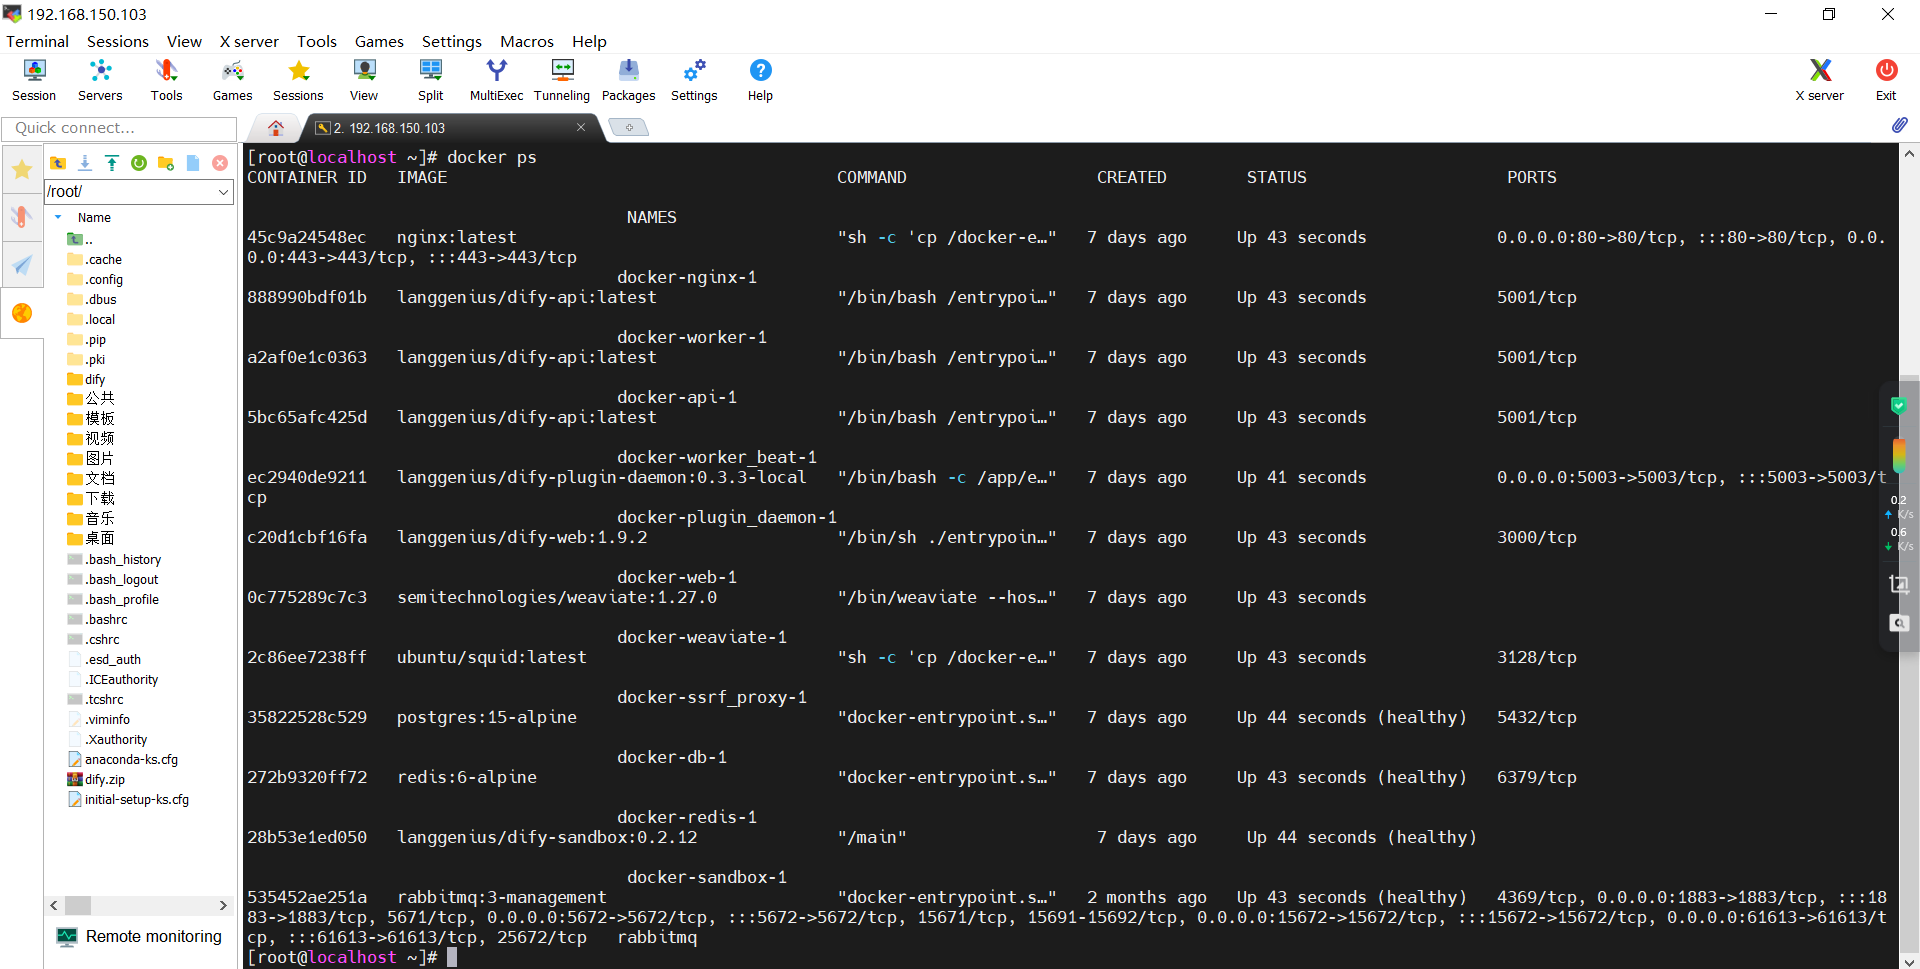
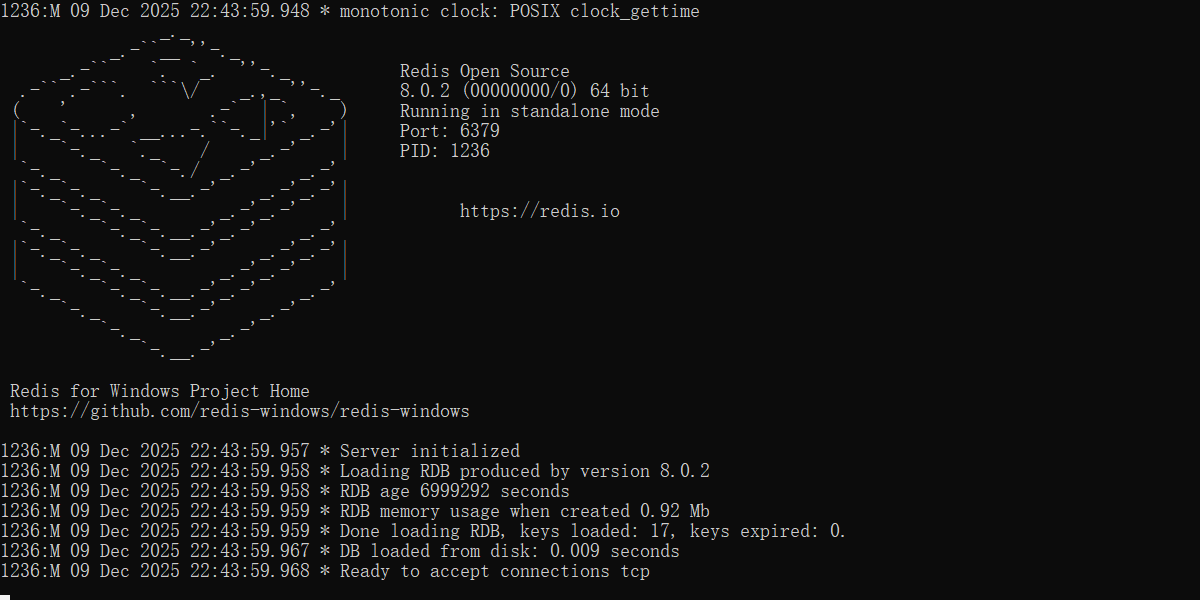
b. 启动redis

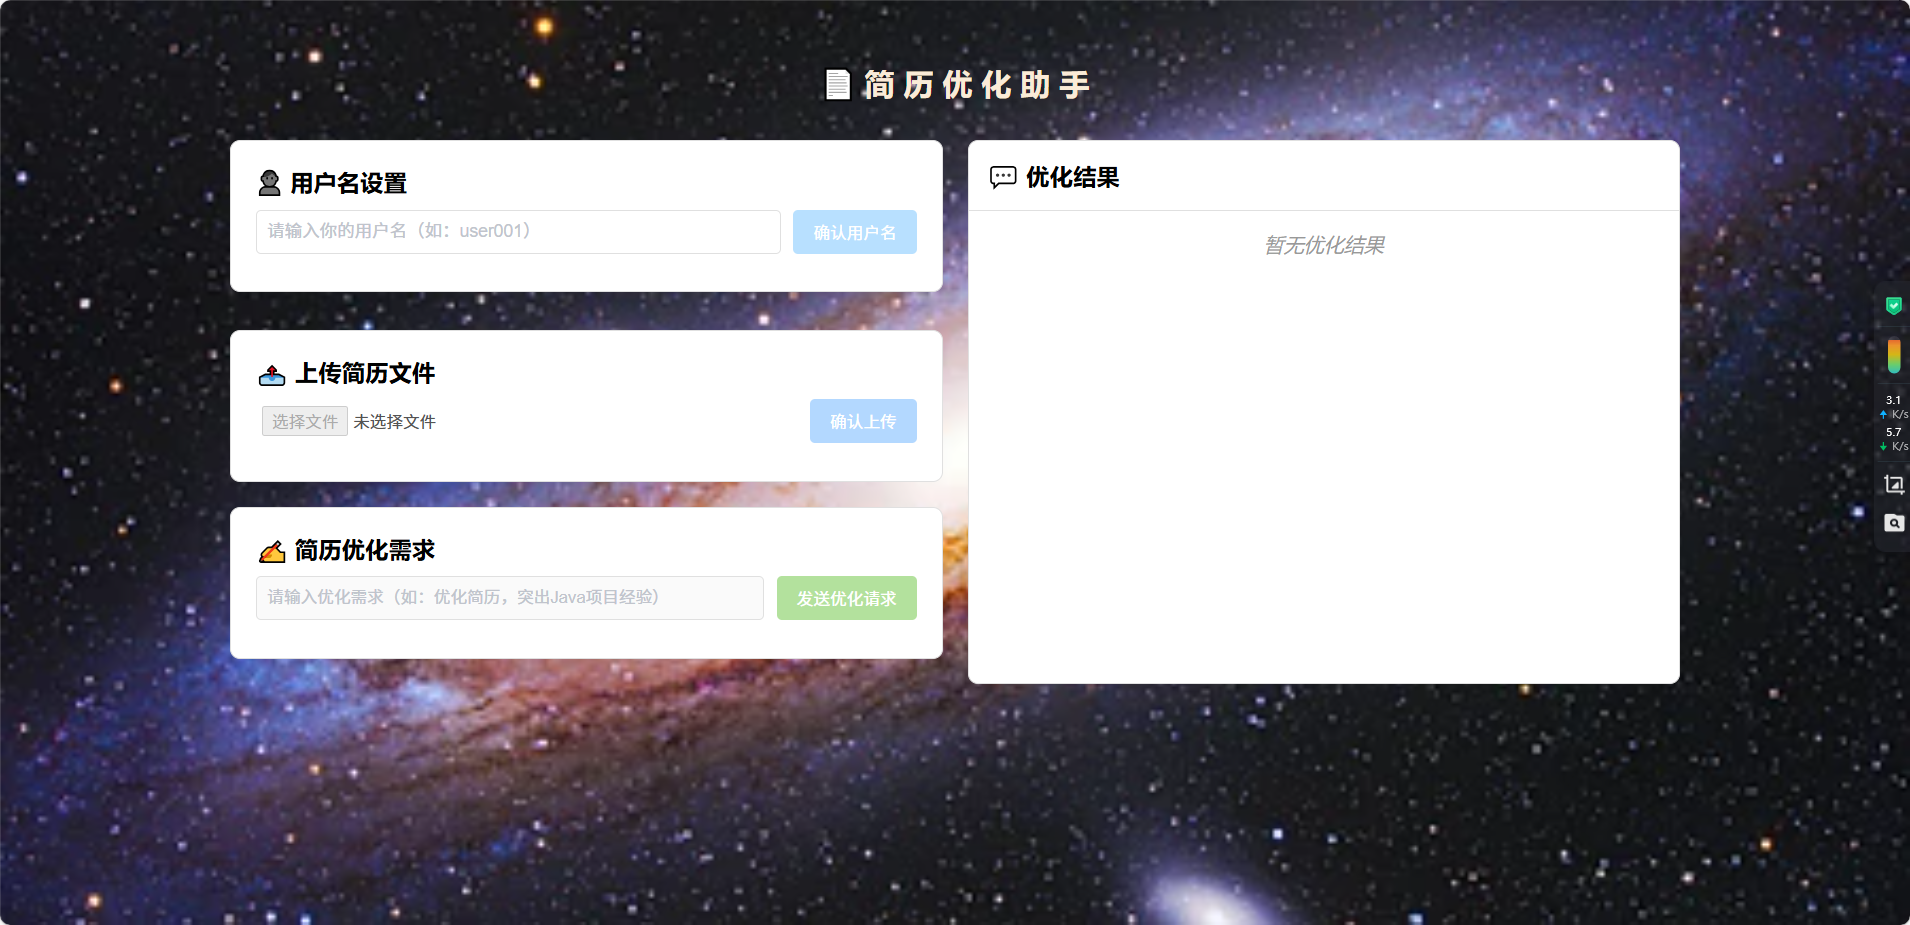
c. 前端页面
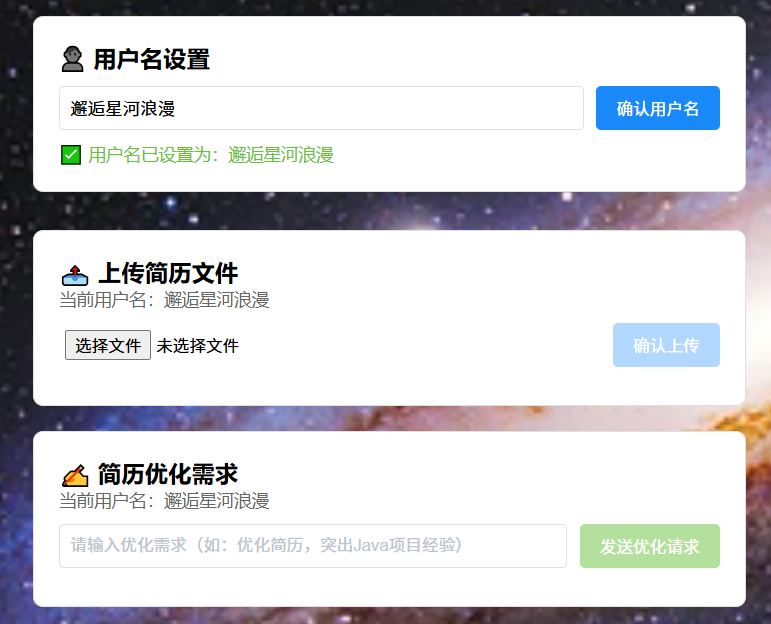
d. 设置用户名
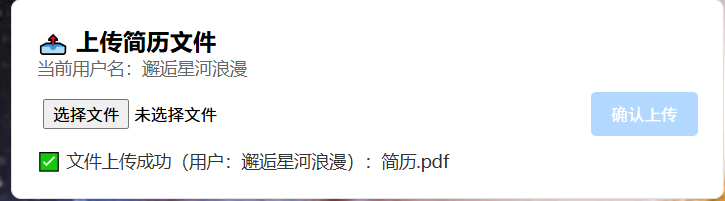
e. 上传简历文件
f. 查看redis存储的文件id
g. 发送需求消息
h. 得到正确响应