主题建模
-
- BERTopic:模块化主题建模框架
- 可视化分析
- 表示模型增强
-
- KeyBERT启发式表示
- 最大边际相关性
- Flan-T5文本生成
- [OpenAI GPT模型](#OpenAI GPT模型)
- DataMap可视化
- 附加功能:词云生成
BERTopic:模块化主题建模框架
需要提前下载BERTopic
pip install bertopic==0.12.0。
python
from bertopic import BERTopic

# 使用之前定义的模型训练BERTopic
topic_model = BERTopic(
    embedding_model=embedding_model,
    umap_model=umap_model,
    hdbscan_model=hdbscan_model,
    verbose=True
).fit(abstracts, embeddings)代码解释:
BERTopic:基于预训练语言模型的主题建模框架- 重用之前创建的嵌入模型、UMAP降维和HDBSCAN聚类
verbose=True:显示训练过程的详细信息
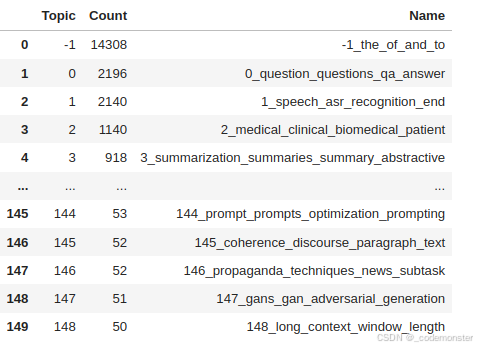
查看主题信息
python
topic_model.get_topic_info()代码解释:
- 返回包含所有主题信息的表格
- 包括主题ID、文档数量、主题名称、关键词表示等
输出
获取特定主题的关键词
python
topic_model.get_topic(1)代码解释:
- 获取第0个主题的TOP10关键词及其c-TF-IDF权重
- 返回列表格式:(关键词1, 权重1), (关键词2, 权重2), ...
输出
[('speech', 0.02916771933942931),
('asr', 0.019493756916806926),
('recognition', 0.013777033749370282),
('end', 0.010404587510925803),
('acoustic', 0.009845264369644571),
('speaker', 0.006988546126537315),
('audio', 0.006985468019898262),
('error', 0.006632519454240728),
('the', 0.00657799288783312),
('wer', 0.006572205206134124)]
搜索相关主题
python
topic_model.find_topics("topic modeling")代码解释:
- 搜索与"topic modeling"相关的主题
- 返回相关主题ID列表和相似度分数
- 可用于发现特定主题或验证模型效果
输出
(22, 81, 57, 143, 21,
[0.9116786059372053,
0.8885478270047166,
0.8884254750613314,
0.886235835453459,
0.8851704089679455])
说明topic modeling和主题22的相似度最高,我们可以查看下该主题的关键词
python
topic_model.get_topic(22)输出
[('topic', 0.06726436387618918),
('topics', 0.03579845294271458),
('lda', 0.015623738508090517),
('latent', 0.013025146733638438),
('document', 0.012794247088366911),
('documents', 0.012590347778107424),
('modeling', 0.011939202193266057),
('dirichlet', 0.009348055571065867),
('word', 0.008570152851314879),
('allocation', 0.0072828353158293745)]
可以看到与topic modeling的关键词相吻合。
检查BERTopic论文所在主题
python
topic_model.topics_[titles.index('BERTopic: Neural topic modeling with a class-based TF-IDF procedure')]代码解释:
- 查找特定论文被分配到的主题ID
- 验证主题模型是否将相关论文正确归类
输出
22
可视化分析
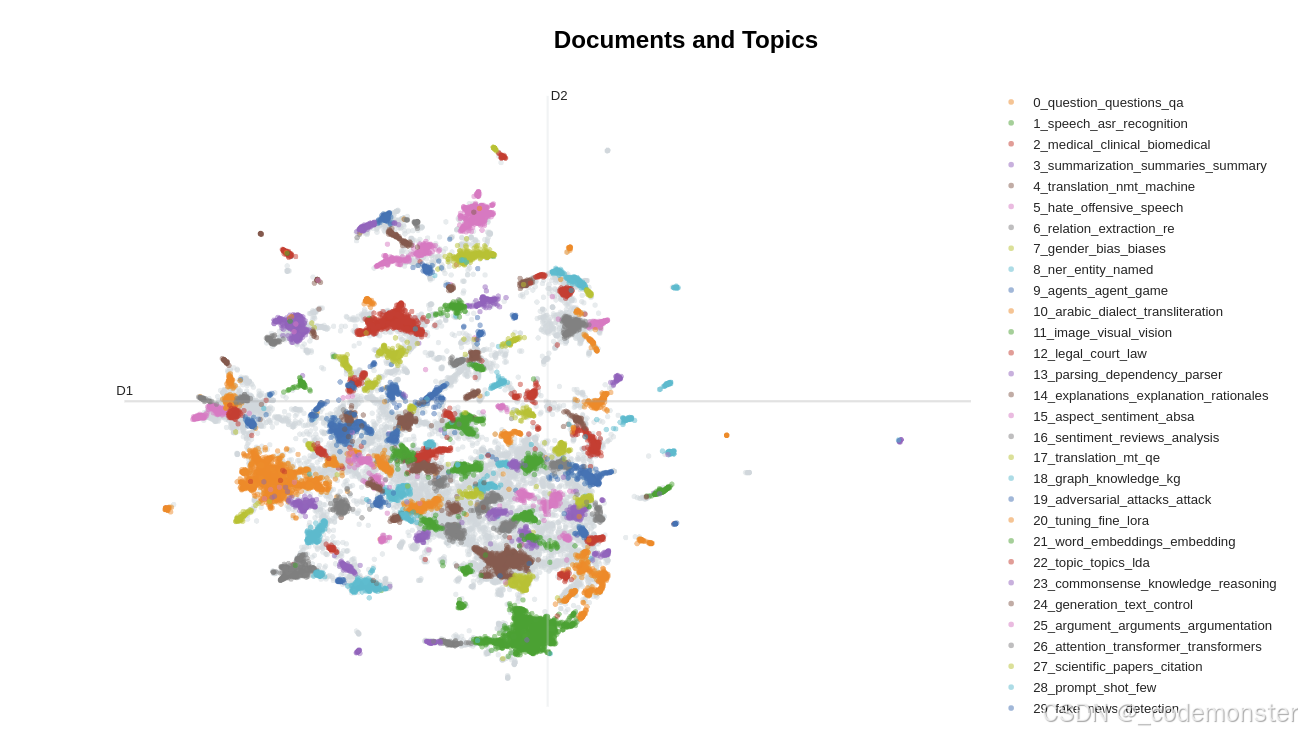
文档可视化
python
# 可视化主题和文档分布
fig = topic_model.visualize_documents(
    titles,
    reduced_embeddings=reduced_embeddings,
    width=1200,
    hide_annotations=True
)

# 更新图例字体以便更好显示
fig.update_layout(font=dict(size=16))代码解释:
visualize_documents():在2D空间中可视化文档分布reduced_embeddings:使用之前计算的2维降维结果hide_annotations=True:隐藏密集区域的标签避免重叠
如果在jupyter环境中显示不出可以用render进行渲染
python
# 方法 1: 使用 renderer 参数
fig = topic_model.visualize_documents(
    titles,
    reduced_embeddings=reduced_embeddings,
    width=1200,
    hide_annotations=True
)

# 指定渲染器
fig.show(renderer="notebook")  # 或 "browser", "png" 等
输出
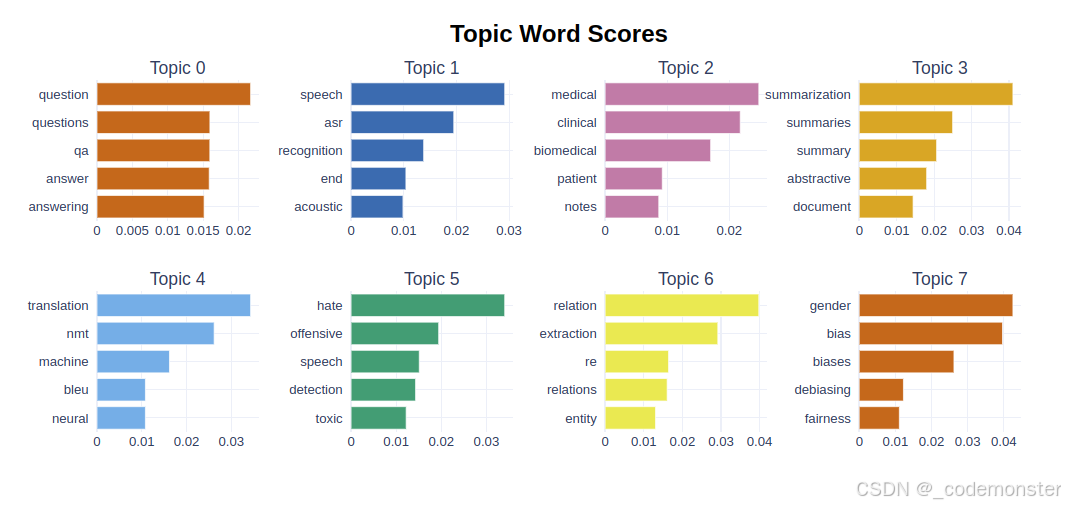
条形图可视化
python
topic_model.visualize_barchart()代码解释:
- 显示每个主题的关键词条形图
- 按c-TF-IDF权重排序的关键词
如果在jupyter可能显示不出来,可以用下面方式渲染
python
# 在代码开头添加
import plotly.io as pio

# 尝试不同的渲染器
pio.renderers.default = "notebook"  # 尝试这个
# pio.renderers.default = "jupyterlab"  # 或这个
# pio.renderers.default = "iframe"  # 或这个

# 然后运行可视化代码
barchart = topic_model.visualize_barchart()
barchart.show()  # 现在应该能显示
输出
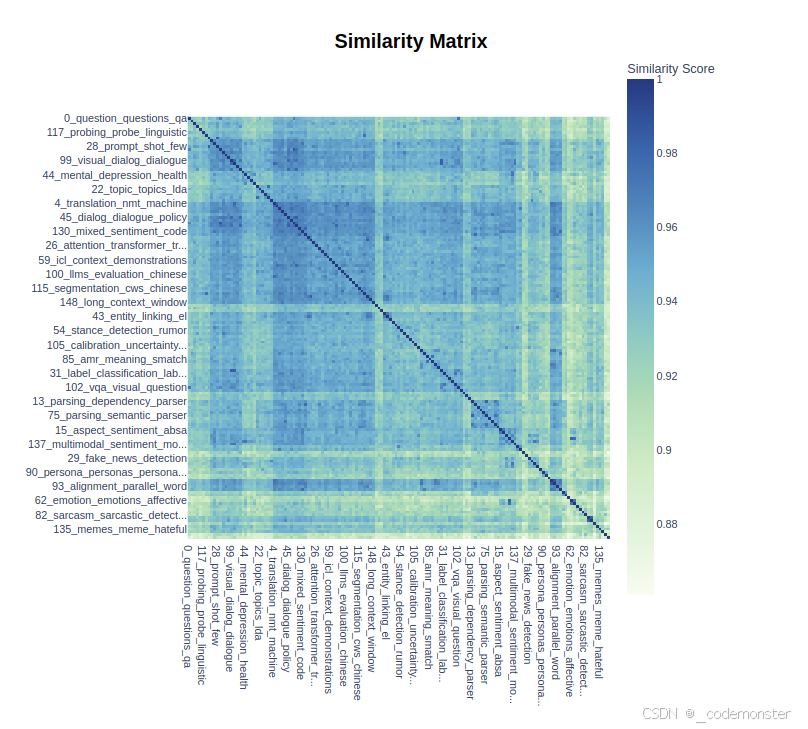
热力图可视化
python
topic_model.visualize_heatmap(n_clusters=30)代码解释:
- 显示主题间相似度的热力图
n_clusters=30:将主题分成30个簇进行聚类显示
如果在jupyter可能显示不出来,可以用下面方式渲染
python
heatmap = topic_model.visualize_heatmap(n_clusters=30)
heatmap.show()
输出
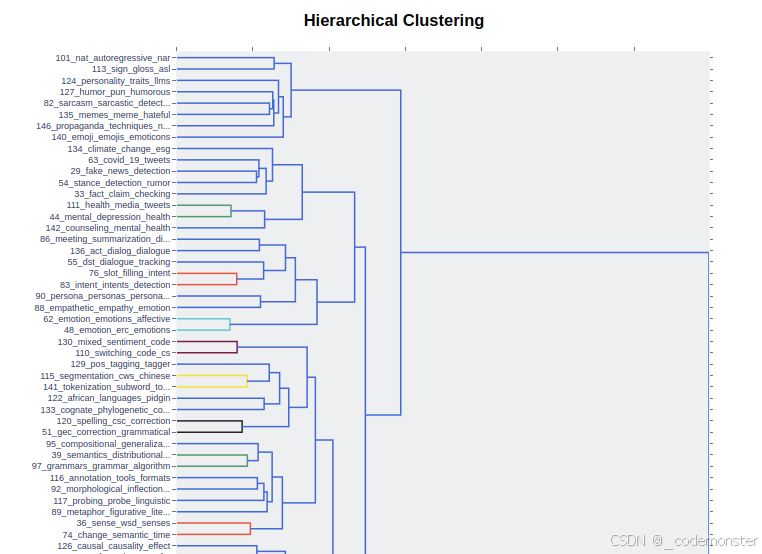
层次结构可视化
python
topic_model.visualize_hierarchy()代码解释:
- 显示主题的层次聚类结构
- 展示主题间的层级关系
如果在jupyter可能显示不出来,可以用下面方式渲染
python
hierarchy = topic_model.visualize_hierarchy()
hierarchy.show()
输出
表示模型增强
我们上面介绍的 BERTopic 处理流程虽然具有快速且模块化的优点,但仍有一个缺点:它仍然通过词袋模型来表示主题,没有考虑语义结构。
在 BERTopic 中,我们可以使用一类重排序模型它也被称为表示模型。这种方法的一个主要优势是,优化主题表示的过程只需要循环执行与主题数量相等的次数。例如,我们有数百万个文档和一百个主题,表示模块只需要对每个主题应用一次,而无须对每个文档都应用一次。
KeyBERT启发式表示
python
from bertopic.representation import KeyBERTInspired
from bertopic import BERTopic

# 创建表示模型
representation_model = KeyBERTInspired()

# 在BERTopic中使用表示模型
topic_model = BERTopic(representation_model=representation_model)代码解释:
KeyBERTInspired:基于KeyBERT的关键词提取算法- 用于改进主题的关键词表示质量
最大边际相关性
python
from bertopic.representation import MaximalMarginalRelevance

# 更新主题表示使用MMR
representation_model = MaximalMarginalRelevance(diversity=0.5)
topic_model.update_topics(abstracts, representation_model=representation_model)代码解释:
MaximalMarginalRelevance:最大边际相关性算法diversity=0.5:多样性参数,平衡相关性和多样性- 减少关键词之间的冗余,增加多样性
Flan-T5文本生成
python
from transformers import pipeline
from bertopic.representation import TextGeneration

prompt = """我有一个包含以下文档的主题:
[文档]

该主题由以下关键词描述:'[关键词]'

基于这些文档和关键词,这个主题是关于什么的?"""

# 使用Flan-T5更新主题表示
generator = pipeline('text2text-generation', model='google/flan-t5-small')
representation_model = TextGeneration(
    generator, prompt=prompt, doc_length=50, tokenizer="whitespace"
)
topic_model.update_topics(abstracts, representation_model=representation_model)代码解释:
- 使用Flan-T5模型为每个主题生成自然语言描述
prompt:自定义提示模板,指导模型生成主题描述doc_length=50:限制输入文档的长度- 可以将关键词列表转化为连贯的主题描述
OpenAI GPT模型
python
import openai
from bertopic.representation import OpenAI

prompt = """
我有一个包含以下文档的主题:
[文档]

该主题由以下关键词描述:[关键词]

基于以上信息,提取一个简短的主题标签,格式如下:
主题: <简短主题标签>
"""

# 使用GPT-3.5更新主题表示
client = openai.OpenAI(api_key="YOUR_KEY_HERE")
representation_model = OpenAI(
    client, model="gpt-3.5-turbo", exponential_backoff=True, chat=True, prompt=prompt
)
topic_model.update_topics(abstracts, representation_model=representation_model)代码解释:
- 使用OpenAI GPT模型生成更高质量的主题标签
exponential_backoff=True:启用指数退避策略处理API限制chat=True:使用聊天模式- 生成更加连贯和准确的主题描述
DataMap可视化
python
# 可视化主题和文档分布的高级视图
fig = topic_model.visualize_document_datamap(
    titles,
    topics=list(range(20)),
    reduced_embeddings=reduced_embeddings,
    width=1200,
    label_font_size=11,
    label_wrap_width=20,
    use_medoids=True,
)
plt.savefig("datamapplot.png", dpi=300)代码解释:
visualize_document_datamap():高级文档地图可视化topics=list(range(20)):只显示前20个主题label_font_size=11:设置标签字体大小use_medoids=True:使用簇中心点作为代表- 生成出版质量的图表
附加功能:词云生成
首先确保安装wordcloud库:!pip install wordcloud
扩展主题关键词
python
topic_model.update_topics(abstracts, top_n_words=500)代码解释:
top_n_words=500:将每个主题的关键词扩展到500个- 为词云生成提供更多词汇选择
创建词云
python
from wordcloud import WordCloud
import matplotlib.pyplot as plt

def create_wordcloud(model, topic):
    plt.figure(figsize=(10,5))
    text = {word: value for word, value in model.get_topic(topic)}
    wc = WordCloud(background_color="white", max_words=1000, width=1600, height=800)
    wc.generate_from_frequencies(text)
    plt.imshow(wc, interpolation="bilinear")
    plt.axis("off")
    plt.show()

# 显示词云
create_wordcloud(topic_model, topic=17)代码解释:
create_wordcloud():创建指定主题的词云可视化get_topic(topic):获取主题的关键词和权重字典WordCloud():创建词云对象,设置背景色、最大词数、尺寸等参数generate_from_frequencies():根据词频生成词云- 直观展示主题的关键词分布和重要性