文本聚类与主题建模
本章介绍使用各种语言模型进行文档聚类和主题建模的方法。
安装依赖包
python
# %%capture
!pip install bertopic datasets openai datamapplot
补丁
由于本节依然要用到SentenceTransformer前面我们已经提到过可能会出现版本不兼容的问题,这里我将前面的两个补丁代码写进了llm这个文件夹下,相当于是llm包。之后我们只需要调用包里面的llm.apply_monkey_patches()和llm.apply_comprehensive_patches()这两个方法就行。
由于llm包的路径在这个路径下,所以我们需要将这个路径引入到运行代码中,不然有可能无法识别到llm这个包。
python
import sys
import os
sys.path.append("换成你自己的路径")
执行补丁
python
import llm
llm.apply_monkey_patches()
llm.apply_comprehensive_patches()
ArXiv计算与语言领域论文数据集
首先从Hugging Face加载数据集:
python
# 从Hugging Face加载数据
from datasets import load_dataset
dataset = load_dataset("maartengr/arxiv_nlp")["train"]

# 提取元数据
abstracts = dataset["Abstracts"]  # 论文摘要
titles = dataset["Titles"] # 论文标题代码解释:
load_dataset("maartengr/arxiv_nlp")["train"]:加载arXiv NLP领域的数据集,只使用训练集abstracts = dataset["Abstracts"]:获取所有论文摘要文本titles = dataset["Titles"]:获取所有论文标题
同样的我们也可以使用离线下载的方式进行
python
from datasets import load_dataset

import os
os.environ['HTTP_PROXY'] = 'http://127.0.0.1:10809'
os.environ['HTTPS_PROXY'] = 'http://127.0.0.1:10809'

# 或者使用数据集加载时的参数
data = load_dataset(
    "maartengr/arxiv_nlp",
    cache_dir="D:/huggingface_cache/datasets"
)
然后离线加载即可
python
# Load data from huggingface

from datasets import load_dataset
dataset = load_dataset("/workspace/huggingface_cache/datasets/maartengr___arxiv_nlp")["train"]

# Extract metadata
abstracts = dataset["Abstracts"]
titles = dataset["Titles"]
print(dataset.shape)
输出
(44949, 4)
文本聚类的通用流程
1. 文档嵌入表示
python
from sentence_transformers import SentenceTransformer

# 为每篇摘要创建嵌入向量
embedding_model = SentenceTransformer('thenlper/gte-small')
embeddings = embedding_model.encode(abstracts, show_progress_bar=True)代码解释:
SentenceTransformer('thenlper/gte-small'):加载一个预训练的小型文本嵌入模型(GTE-small)embedding_model.encode():将文本转换为稠密向量表示show_progress_bar=True:显示处理进度条embeddings:得到44949个文档的384维向量表示
离线下载
python
from huggingface_hub import snapshot_download
import os
os.environ['HTTP_PROXY'] = 'http://127.0.0.1:10809'
os.environ['HTTPS_PROXY'] = 'http://127.0.0.1:10809'

# 设置模型路径
model_id = "cardiffnlp/twitter-roberta-base-sentiment-latest"
local_dir = "D:/huggingface_cache/models/twitter-roberta-base-sentiment-latest"

# 确保目录存在
os.makedirs(local_dir, exist_ok=True)

# 下载模型(对应 hf download 命令)
print(f"开始下载模型: {model_id}")
print(f"保存到: {local_dir}")

try:
    snapshot_download(
        repo_id=model_id,
        local_dir=local_dir,
        local_dir_use_symlinks=False,  # 不使用符号链接
        force_download=True,           # 强制重新下载
        resume_download=False          # 不续传
    )
    print("✅ 模型下载完成!")

except Exception as e:
    print(f"❌ 下载失败: {e}")
离线加载
python
from sentence_transformers import SentenceTransformer

# Create an embedding for each abstract
embedding_model = SentenceTransformer('/workspace/models/gte-small')
embeddings = embedding_model.encode(abstracts, show_progress_bar=True)
embeddings.shape
(44949, 384)
这里由原来的(44949, 4)中的4个维度慢慢变成384个维度
2. 降维处理
这里做点说明:我在jupyter lab里面执行! pip install umap-learn,一直报网络有问题。但在命令行里面安装 pip install umap-learn是没有问题的。有可能是因为jupyter lab里面的某些权限受限,所以安装某些包的时候最好直接在容器命令行里面执行,而不是jupyter lab里面。
python
from umap import UMAP

# 将384维嵌入向量降维到5维
umap_model = UMAP(
    n_components=5, min_dist=0.0, metric='cosine', random_state=42
)
reduced_embeddings = umap_model.fit_transform(embeddings)

reduced_embeddings.shape代码解释:
UMAP:一种流行的非线性降维算法n_components=5:降维到5维min_dist=0.0:允许嵌入点之间的距离为0metric='cosine':使用余弦相似度作为距离度量random_state=42:设置随机种子确保结果可复现
输出
(44949, 5)
这里由原来的(44949, 384)中的384个维度直接降维到5维
3. 聚类分析
这里需要提前下载安装hdbscan包pip install hdbscan==0.8.29。
可能会遇到几个问题
ERROR: Failed building wheel for hdbscan
Failed to build hdbscan
ERROR: Could not build wheels for hdbscan which use PEP 517 and cannot be installed directly
解决方法是
pip install hdbscan==0.8.26 --no-use-pep517
需要添加--no-use-pep517 之所以能成功,是因为它绕过了 PEP 517 的严格构建环境,使用了更传统的、对系统环境更宽容的构建方式。
TypeError: delayed() got an unexpected keyword argument 'check_pickle'
解决方法是
pip install joblib==0.17.0
python
from hdbscan import HDBSCAN

# 拟合模型并提取聚类结果
hdbscan_model = HDBSCAN(
    min_cluster_size=50, metric='euclidean', cluster_selection_method='eom'
).fit(reduced_embeddings)
clusters = hdbscan_model.labels_

# 查看生成了多少个簇
len(set(clusters))代码解释:
HDBSCAN:基于密度的层次聚类算法min_cluster_size=50:每个簇至少包含50个样本metric='euclidean':使用欧氏距离cluster_selection_method='eom':使用超额最大值方法选择聚类clusters = hdbscan_model.labels_:获取每个样本的簇标签(-1表示噪声点)
输出
150
上面可能会有兼容性问题,我们可以使用DBSCAN来代替HDBSCAN(这种方法不推荐,)
python
from sklearn.cluster import DBSCAN

# 使用 DBSCAN 代替 HDBSCAN
dbscan_model = DBSCAN(
    eps=0.5,  # 需要指定 eps 参数
    min_samples=50,  # DBSCAN 的参数名是 min_samples,不是 min_cluster_size
    metric='euclidean'
).fit(reduced_embeddings)

clusters = dbscan_model.labels_

# 查看生成了多少个簇(排除噪声点,噪声点标记为-1)
num_clusters = len(set(clusters)) - (1 if -1 in clusters else 0)
print(f"生成的簇数量:{num_clusters}")
print(f"所有标签:{set(clusters)}")
print(f"噪声点数量:{list(clusters).count(-1)}")
输出
生成的簇数量:25
所有标签:{0, 1, 2, 3, 4, 5, 6, 7, 8, 9, 10, 11, 12, 13, 14, 15, 16, 17, 18, 19, 20, 21, 22, 23, 24, -1}
噪声点数量:614
聚类结果分析
手动检查聚类内容
python
import numpy as np

# 打印第0个聚类中的前三篇文档
cluster = 1
for index in np.where(clusters==cluster)[0][:3]:
print(abstracts[index][:300] + "... \n")代码解释:
np.where(clusters==cluster)[0]:找到属于指定簇的所有文档索引abstracts[index][:300]:只显示每篇文档的前300个字符
输出
We report on work in progress on extracting lexical simplifications (e.g.,
"collaborate" -> "work together"), focusing on utilizing edit histories in
Simple English Wikipedia for this task. We consider two main approaches: (1)
deriving simplification probabilities via an edit model that accounts f...
Overall, the two main contributions of this work include the application ofsentence simplification to association extraction as described above, and the
use of distributional semantics for concept extraction. The proposed work on
concept extraction amalgamates for the first time two diverse resea...
An inter-rater agreement study is performed for readability assessment inBengali. A 1-7 rating scale was used to indicate different levels of
readability. We obtained moderate to fair agreement among seven independent
annotators on 30 text passages written by four eminent Bengali authors. As a by...
上面三篇文章基本又有关于词汇提取的内容所以被聚类到一起
可视化聚类结果
python
import pandas as pd

# 将384维嵌入向量降维到2维以便可视化
reduced_embeddings = UMAP(
    n_components=2, min_dist=0.0, metric='cosine', random_state=42
).fit_transform(embeddings)

# 创建数据框
df = pd.DataFrame(reduced_embeddings, columns=["x", "y"])
df["title"] = titles
df["cluster"] = [str(c) for c in clusters]

# 分离异常值(噪声)和正常聚类点
clusters_df = df.loc[df.cluster != "-1", :]
outliers_df = df.loc[df.cluster == "-1", :]代码解释:
- 再次使用UMAP降维到2维用于可视化
- 创建包含坐标、标题和聚类标签的数据框
- 分离正常聚类点(簇标签不是-1)和噪声点(簇标签为-1)
静态可视化
python
import matplotlib.pyplot as plt

# 分别绘制噪声点和聚类点
plt.scatter(outliers_df.x, outliers_df.y, alpha=0.05, s=2, c="grey")
plt.scatter(
    clusters_df.x, clusters_df.y, c=clusters_df.cluster.astype(int),
    alpha=0.6, s=2, cmap='tab20b'
)
plt.axis('off')代码解释:
- 灰色小点表示噪声文档(未分配到任何簇)
- 彩色点表示不同聚类中的文档
cmap='tab20b':使用tab20b色彩映射,适合显示多个类别
输出
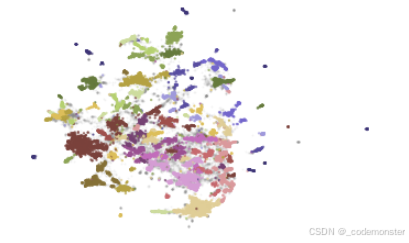
上面的图形显示,拥有相似的会被分为同一簇。