引言:当你的 Flutter 项目超过 10 万行代码
初期,一个简单的 main.dart + 几个页面就能满足需求。但随着业务增长,代码逐渐演变为:
- 所有逻辑塞进 StatefulWidget;
- 网络请求、状态管理、UI 混杂在一起;
- 修改一处,多处意外崩溃;
- 新成员入职两周仍不敢提交代码;
- 构建时间超过 5 分钟。
这正是 架构缺失 的典型症状。许多团队误以为"Flutter 天生组件化",却忽略了分层、解耦、可测试性才是大型项目的生命线。
本文将带你完成一次 真实项目的架构演进 :从混乱的 MVC 式代码,逐步重构为 Clean Architecture + Modularization + Feature-Sliced Design 的现代化结构。我们将覆盖 目录组织、依赖注入、状态管理、模块边界、CI/CD 优化 等核心议题,并提供可直接复用的模板。
目标读者:负责 Flutter 项目架构、技术选型或大型应用维护的工程师与技术负责人。
一、为什么需要 Clean Architecture?
1.1 核心原则:关注点分离(SoC)
Clean Architecture 由 Robert C. Martin 提出,核心思想是:
- 内层(Entities, Use Cases)不依赖外层(UI, Frameworks);
- 依赖方向永远指向内层;
- 业务逻辑独立于框架、数据库、UI。
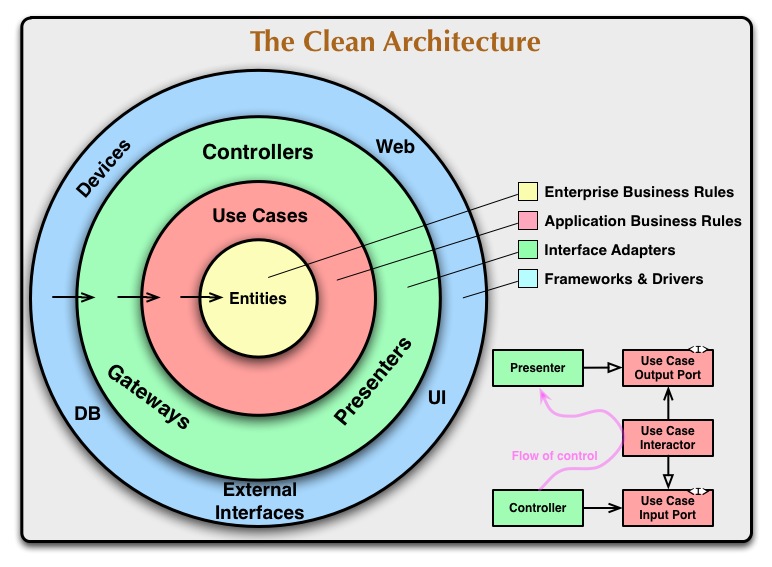
1.2 Flutter 中的四层模型
| 层级 | 职责 | 技术栈 |
|---|---|---|
| Presentation | UI、用户交互、路由 | Flutter Widgets, Riverpod, GoRouter |
| Domain | 业务逻辑、实体、Use Case | Pure Dart, Entities, Repositories(接口) |
| Data | 数据源实现(网络、本地) | Dio, Hive, Shared Preferences |
| Common | 工具、扩展、常量 | utils/, extensions/, constants/ |
✅ 关键 :Domain 层 零依赖 Flutter SDK,可独立测试与复用。
二、重构第一步:目录结构标准化
2.1 反面教材:按类型组织(Type-Based)
cs
1lib/
2├── models/
3├── services/
4├── widgets/
5├── screens/
6└── main.dart
❌ 问题:修改一个功能需横跨多个目录,认知负荷高。
2.2 推荐方案:按特性组织(Feature-Sliced)
cs
1lib/
2├── core/                  # 跨特性共享(DI、网络、主题)
3│   ├── di/
4│   ├── network/
5│   └── theme/
6├── features/
7│   ├── auth/              # 登录/注册
8│   │   ├── data/          # Auth 数据源
9│   │   ├── domain/        # Auth 业务逻辑
10│   │   └── presentation/  # 登录页面、状态
11│   └── profile/           # 个人资料
12└── main.dart
✅ 优势:
- 功能内聚,修改集中;
- 新成员快速定位代码;
- 支持模块懒加载。
三、依赖注入:解耦的核心引擎
3.1 为什么不用 GetIt?
虽然 get_it 简单,但在大型项目中存在:
- 隐式依赖,难以追踪;
- 无法按需初始化;
- 测试时需手动重置。
3.2 推荐:Riverpod + AsyncNotifier
Dart
1// features/auth/domain/use_cases/sign_in_use_case.dart
2class SignInUseCase {
3  final AuthRepository repository;
4  SignInUseCase(this.repository);
5
6  Future<User> execute(String email, String password) async {
7    return await repository.signIn(email, password);
8  }
9}
10
11// features/auth/data/repositories/auth_repository_impl.dart
12final authRepositoryProvider = Provider<AuthRepository>((ref) {
13  final dio = ref.watch(dioProvider);
14  return AuthRepositoryImpl(AuthApiClient(dio));
15});
16
17// features/auth/domain/use_cases/sign_in_use_case_provider.dart
18final signInUseCaseProvider = Provider<SignInUseCase>((ref) {
19  final repo = ref.watch(authRepositoryProvider);
20  return SignInUseCase(repo);
21});
✅ 优势:
- 依赖显式声明;
- 自动生命周期管理;
- 测试时可轻松 Override。
四、状态管理:从 setState 到 AsyncNotifier
4.1 反模式:巨型 StatefulWidget
Dart
1class ProfilePage extends StatefulWidget {
2  @override
3  _ProfilePageState createState() => _ProfilePageState();
4}
5
6class _ProfilePageState extends State<ProfilePage> {
7  User? user;
8  bool loading = false;
9
10  void loadUser() async {
11    setState(() => loading = true);
12    final user = await api.getUser(); // 直接调用 API!
13    setState(() {
14      this.user = user;
15      loading = false;
16    });
17  }
18}
❌ 问题:逻辑与 UI 耦合,无法复用,难以测试。
4.2 正确姿势:AsyncNotifier + Use Case
Dart
1// features/profile/presentation/notifiers/profile_notifier.dart
2@riverpod
3class ProfileNotifier extends _$ProfileNotifier {
4  @override
5  Future<User?> build() async => null;
6
7  Future<void> loadUser() async {
8    final useCase = ref.read(getUserUseCaseProvider);
9    state = const AsyncLoading();
10    state = await AsyncValue.guard(() => useCase.execute());
11  }
12}
13
14// UI 层
15class ProfilePage extends ConsumerWidget {
16  @override
17  Widget build(BuildContext context, WidgetRef ref) {
18    final userAsync = ref.watch(profileNotifierProvider);
19    return userAsync.when(
20      loading: () => CircularProgressIndicator(),
21      error: (err, _) => Text('Error'),
22      data: (user) => user != null ? UserProfile(user) : LoginButton(),
23    );
24  }
25}
✅ 效果:
- 业务逻辑移至 Use Case;
- 状态可预测、可测试;
- UI 仅负责渲染。
五、模块化(Modularization):拆分巨型 App
5.1 为什么需要模块化?
- 编译速度慢(全量编译);
- 团队并行开发冲突多;
- 无法按需加载功能。
5.2 使用 flutter_modular 实现
(1)定义模块
Dart
1// features/auth/auth_module.dart
2class AuthModule extends Module {
3  @override
4  List<Bind> get binds => [
5        Bind.singleton((i) => AuthRepositoryImpl(i())),
6        Bind.singleton((i) => SignInUseCase(i())),
7      ];
8
9  @override
10  List<ModularRoute> get routes => [
11        ChildRoute('/', child: (_, __) => const LoginPage()),
12        ChildRoute('/register', child: (_, __) => const RegisterPage()),
13      ];
14}
(2)主应用集成
Dart
1// main.dart
2void main() {
3  runApp(ModularApp(
4    module: AppModule(),
5    child: const MyApp(),
6  ));
7}
8
9class MyApp extends StatelessWidget {
10  @override
11  Widget build(BuildContext context) {
12    return MaterialApp.router(
13      routeInformationParser: Modular.routeInformationParser,
14      routerDelegate: Modular.routerDelegate,
15    );
16  }
17}
✅ 优势:
- 模块自治(路由、依赖、生命周期);
- 支持动态加载(未来);
- 团队按模块分工。
六、测试策略:分层保障质量
| 层级 | 测试内容 | 工具 |
|---|---|---|
| Domain | Use Case 逻辑、Entity 方法 | test |
| Data | Repository 实现、API Client | mocktail, http_mock_adapter |
| Presentation | Widget 渲染、用户交互 | flutter_test |
| Integration | 跨模块流程 | integration_test |
✅ 覆盖率目标:Domain ≥ 90%,Data ≥ 80%,Presentation ≥ 70%。
七、CI/CD 优化:加速大型项目构建
7.1 问题:全量构建太慢
- 每次 PR 都需编译整个 App;
- 浪费 CI 资源。
7.2 解决方案:按模块缓存
cs
1# .github/workflows/test.yml
2- name: Cache modules
3  uses: actions/cache@v4
4  with:
5    path: |
6      **/build/
7      **/.dart_tool/
8    key: ${{ runner.os }}-modules-${{ hashFiles('**/pubspec.lock') }}
7.3 增量测试
bash
1# 仅测试变更模块
2changed_files=$(git diff --name-only HEAD~1)
3if echo "$changed_files" | grep -q "features/auth/"; then
4  flutter test test/features/auth/
5fi
八、演进路线图:分阶段重构
| 阶段 | 目标 | 周期 |
|---|---|---|
| 1. 拆分目录 | 按特性组织代码 | 1 周 |
| 2. 提取 Domain | 将业务逻辑移出 UI | 2 周 |
| 3. 引入 DI | 替换硬编码依赖 | 1 周 |
| 4. 模块化 | 拆分为独立模块 | 3 周 |
| 5. 自动化 | CI + 覆盖率门禁 | 持续 |
✅ 原则 :小步快跑,持续交付,不追求一步到位。
结语:架构不是设计出来的,而是演进出来的
没有银弹架构,只有适合当前团队与业务的结构。本文提供的 Clean + Modular 方案,已在多个百万级用户 App 中验证有效。记住:好的架构让正确的事容易做,错误的事难以发生。
行动清单:
- 本周内将一个功能迁移到 feature 目录;
- 为核心 Use Case 编写单元测试;
- 在团队内推行目录规范;
- 监控构建时间,设定优化目标。
唯有持续演进,才能让 Flutter 项目在规模膨胀中依然保持敏捷与健壮。
欢迎大家加入开源鸿蒙跨平台开发者社区(https://openharmonycrossplatform.csdn.net),一起共建开源鸿蒙跨平台生态。