最近在学习 AI Agent 开发,所以避免不了的了解到了 LangChain 这个框架。由于本人一直从事前端开发,所以一直将 JS 语言作为整个全栈的生态语言的选择。LangChain 在今年 10 月份发布了 1.0 版本,但是内外网对于 TS 版本的 LangChain 相关的介绍和实践的资料都非常少,所以我尝试将我最近的学习总结记录一下。
介绍
由于最近才开始学习 Agent 开发,对于 LangChain 1.0 之前的版本只是在文档中的迁移变更模块中大概了解一下。本着学新不学旧的原则,1.0 之前版本的什么 createReactAgent pipe chian 等概念,通通都不去详细了解了(我也学不动了),直接最新版本一把梭。
初始化 NestJs
为了更好地演示生产中的场景,我选择 NestJs 框架,Nest 中所提供的原始脚手架以及模块等概念,能够更好地演示编写一个 Agent 在生产环境中的逻辑划分。
使用 Nestjs 创建两个模块:
AgentModule:编写 Agent 逻辑,提供AgentService。ChatModule:编写我们的聊天对话接口,提供调用 Agent 的 API。
相关命令:
bash
# 全局安装 NestJs cli
npm install -g @nest/cli
# 使用 Nest Cli 创建一个 Nest 项目
nest new project-name
# 创建 AgentModule
nest g module agent
# 创建 AgentService
nest g service agent
# 创建 ChatModule
nest g module chat
# 创建 ChatController
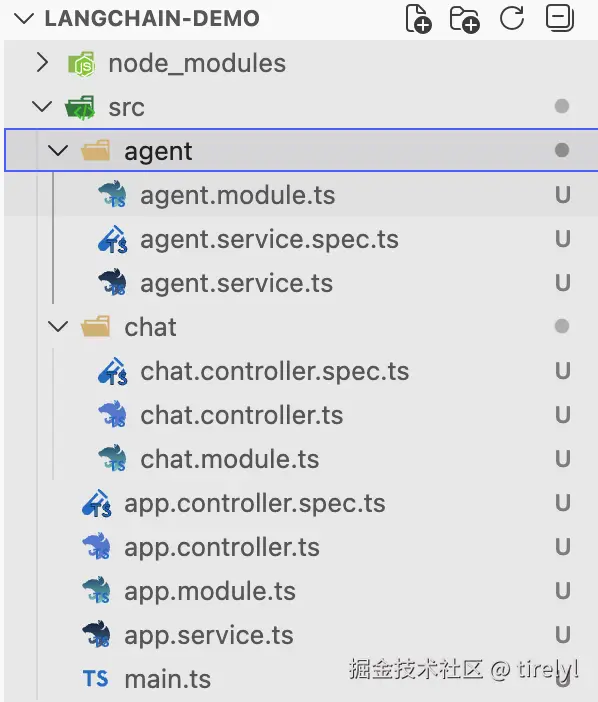
nest g controller chat最终我们的 Nest 项目结构如下图所示:
最后我们将做一些导入和导出的处理:
AgentModule 中需要导出 AgentService,供 ChatModule 中的 Controller 使用。
typescript
// agent.module.ts
import { Module } from '@nestjs/common';
import { AgentService } from './agent.service';

@Module({
  providers: [AgentService],
  exports: [AgentService], // 导出 AgentService
})
export class AgentModule {}
ChatModule 中导入 AgentModule,以供在 ChatController 中使用 AgentService 来编写 API 逻辑。
typescript
// chat.module.ts
import { Module } from '@nestjs/common';
import { ChatController } from './chat.controller';
import { AgentModule } from '../agent/agent.module';

@Module({
  imports: [AgentModule],
  controllers: [ChatController],
})
export class ChatModule {}
typescript
// chat.controller.ts
import { Controller } from '@nestjs/common';
import { AgentService } from '../agent/agent.service';

@Controller('chat')
export class ChatController {
  // 使用依赖注入 `AgentService`
  constructor(private readonly agentService: AgentService) {}
}
AppModule 中导入 ChatModule 让我们的 API 接口能够注册到整个项目中。
typescript
// app.module.ts
import { Module } from '@nestjs/common';
import { ChatModule } from './chat/chat.module';

@Module({
  imports: [ChatModule], // 确保 `ChatModule` 导入
})
export class AppModule {}
到此为止我们项目的初始结构就搭建完成了
安装 LangChain
bash
npm install langchain @langchain/openai @langchain/coreAgentService 逻辑
使用 LangChain 1.0 来编写我们的 Agent 逻辑,在这个简单的 demo 中,提供以下功能:
- LLM 的初始化以及简单配置。
- 提供一个简单的查询天气的 tool,供 Agent 使用(以官方文档中展示的 demo 为例)。
- 提供基于本地内存的 Memory,保证一次简单 Agent 对话流程的完整性。
完整代码:
typescript
// agent.service.ts
import { Injectable } from '@nestjs/common';
import { ConfigService } from '@nestjs/config';

import { ChatOpenAI } from '@langchain/openai';
import { HumanMessage } from '@langchain/core/messages';
import { tool } from '@langchain/core/tools';
import { createAgent, type ReactAgent } from 'langchain';
import { MemorySaver } from '@langchain/langgraph';
import z from 'zod';

@Injectable()
export class AgentService {
  private agent: ReactAgent;

  constructor(private readonly configService: ConfigService) {
    // 初始化 LLM 语言模型
    const model = new ChatOpenAI({
      model: 'qwen-plus', // 使用 Qwen-Plus 模型,任何兼容 OpenAI API 的模型均可使用
      apiKey: this.configService.get<string>('AI_API_KEY'), // 配置自己获取的 api key
      configuration: {
        baseURL: 'https://dashscope.aliyuncs.com/compatible-mode/v1', // 针对自己使用的模型提供商,调整该值
      },
      temperature: 0.1,
    });

    // 定义天气查询工具
    const getWeatherTool = tool(
      ({ location }) => `${location} 的天气是: 晴天☀️, 72°F`, // 此处是写死的逻辑,生产中应该使用真实的接口进行查询
      {
        name: 'get_weather',
        description: '获取某个地点的天气信息',
        schema: z.object({
          location: z.string().describe('用户获取天气预报的地点'),
        }),
      },
    );

    // 初始化检查点存储器
    const checkpointer = new MemorySaver();

    // 初始化 Agent
    this.agent = createAgent({
      model,
      systemPrompt: '你是一个帮助人们查找信息的人工智能助手。',
      tools: [getWeatherTool],
      checkpointer,
    });
  }

  /**
   * 与 agent 对话(普通响应)
   */
  async chatWithAgent(message: string, threadId: string) {
    const result = await this.agent.invoke(
      {
        messages: [new HumanMessage(message)],
      },
      {
        configurable: {
          thread_id: threadId, // thread_id 提供给 checkpointer,用于识别当前对话应该使用哪个聊天会话的记忆
        },
      },
    );

    // 简单粗暴返回最后的 AI 总结的信息
    return result.messages[result.messages.length - 1].content as string;
  }
}
checkpointer 变量
由于最简单的大模型对话流程中,AI 是没有自己的记忆的,对话历史需要自己编写逻辑保存,然后将保存后的记录整体扔给大模型,这样的操作过于复杂。引入 checkpointer,它是 langgraph 的 MemorySaver,用来给 Agent 做"检查点"存储,解决多轮/多次调用时状态丢失的问题。在我们这个简单的接口对话 demo 中,让 AI 具备连续对话的能力。 设置了 checkpointer 后,在后续的 agent 调用时,需要传入 thread_id,它会作为对话的 key 值,针对唯一的 key,来保存某次会话的聊天记忆。 在本 demo 中,使用了@langchain/langgraph 包中的 MemorySaver,该类使用内存最为一次对话的临时存储,在 node 进程重启后,会丢失所有记忆。所以只适合在 demo 中演示。实际生产环境的后端项目,可以考虑和数据库作持久储存。
关于 AgentService.agent 成员变量的 ts 提示
这里不选择在 agent 变量定义时初始化,而是在 constructor 方法中初始化,是因为 createAgent 方法所需要的参数有很多需要复杂的编排逻辑,以及从依赖注入中获取(例如从 ConfigService 中获取环境变量等)。由于 ReactAgent 类型有着复杂的泛型参数定义,如果不能和后续的 createAgent 方法返回的 agent 类型对齐的话,在严格的 ts 类型校验模式下会出现类型报错,对于不喜欢把 TypeScript 当 AnyScript 的人来说,建议转到 ReactAgent的类型定义中详细看下泛型参数的定义。
typescript
import { type ReactAgent } from 'langchain';

// 定义上下文 Schema
const agentContextSchema = z.object({
  // 上下文中,永远不变的 userId,可以用于数据库查询,身份验证等
  userId: z.number(),
});

@Injectable()
export class AgentService {
  // 第一个泛型参数 StructuredResponseFormat(结构化后的模型输出结构), 默认值为 `Record<string, any>`
  // 第二个泛型参数 StateSchema(graph state 数据结构),默认值为 undefined
  // 第三个泛型参数为 ContextSchema(graph context 数据结构),需要传入自己定义的上下文 schema
  private agent: ReactAgent<Record<string, any>, undefined, typeof agentContextSchema>;
}
ChatController 提供对话接口
这部分代码很简单,将我们编写好的 Agent 服务封装成 restful 接口,此处只演示一个 chat 接口 全部代码:
typescript
import { Body, Controller, Post } from '@nestjs/common';
import { AgentService } from '../agent/agent.service';
@Controller('chat')
export class ChatController {
constructor(private readonly agentService: AgentService) {}
// 访问该接口:http://localhost:3000/chat
@Post()
async chat(@Body() body: { message: string; threadId: string }) {
const content = await this.agentService.chatWithAgent(
body.message,
body.threadId,
);
return {
content,
};
}
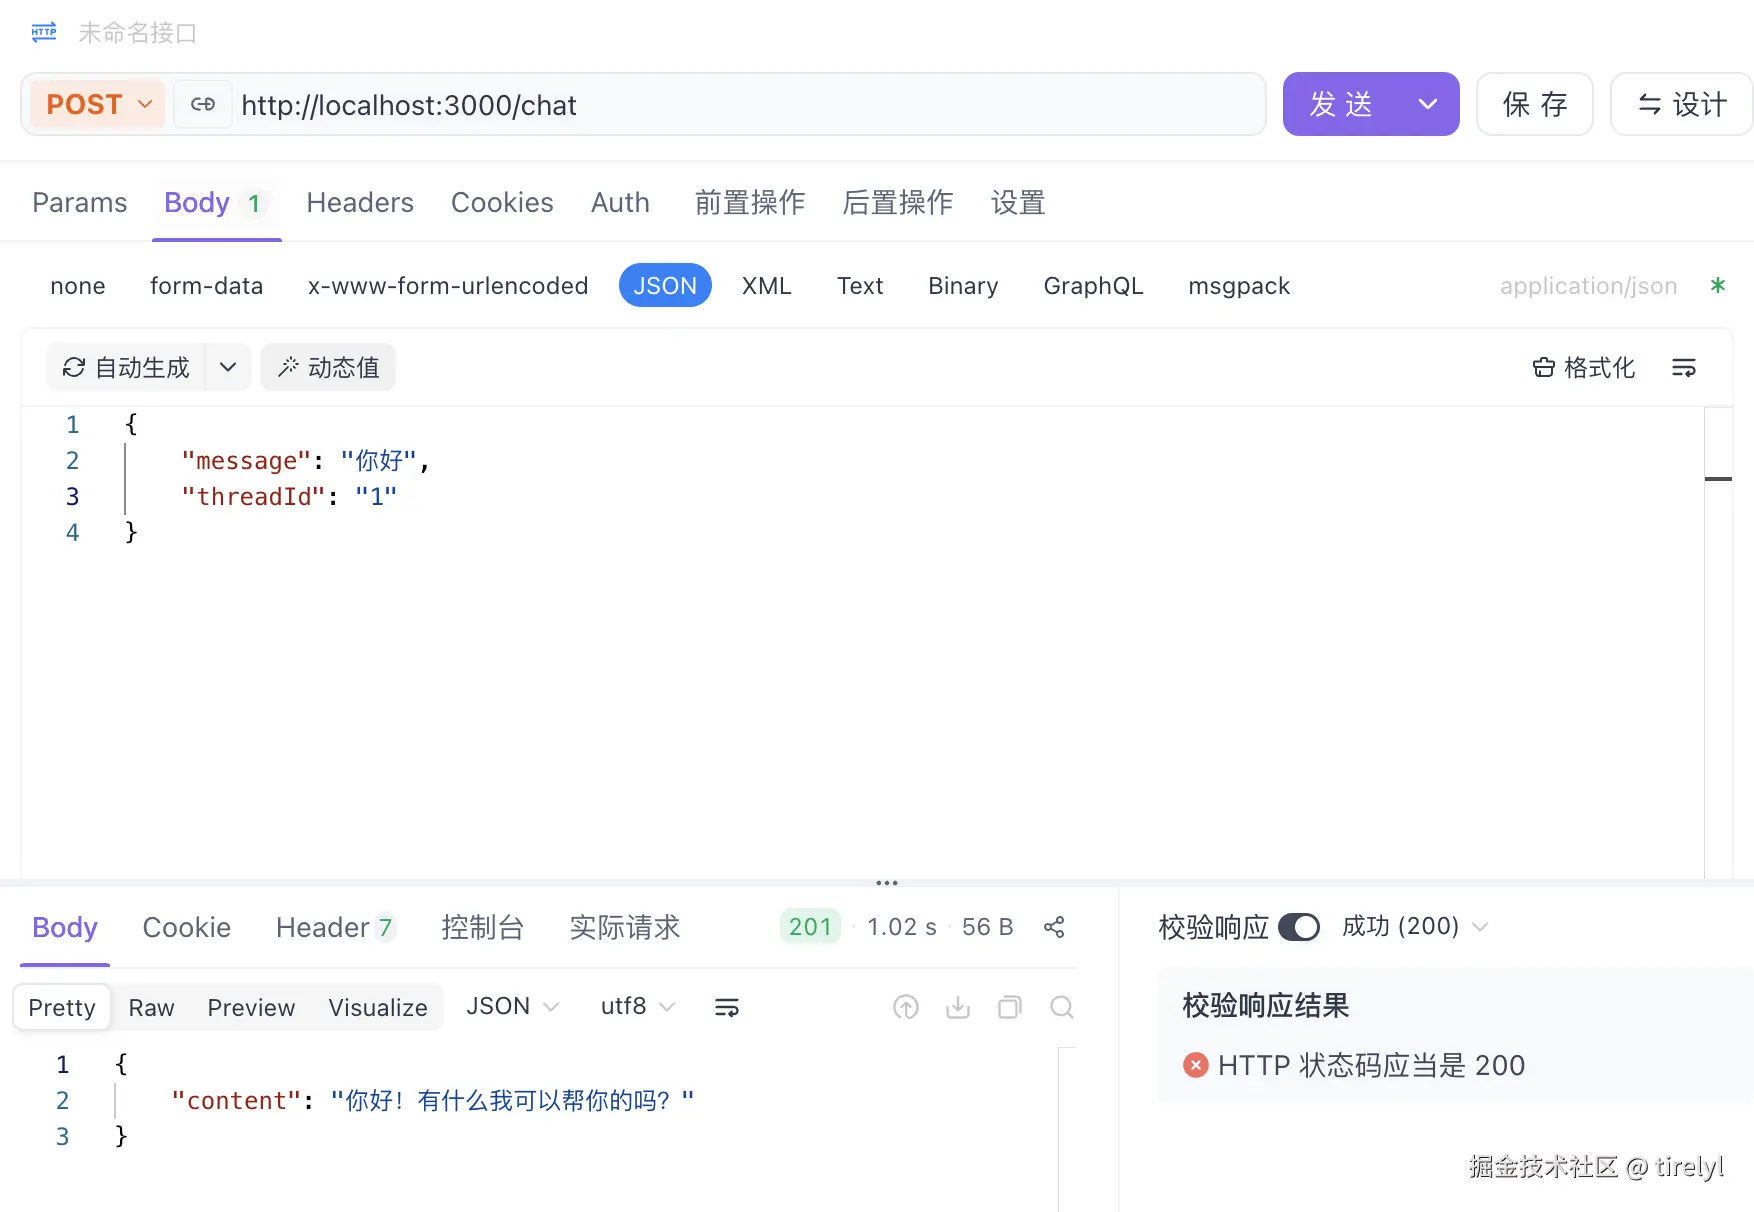
}尝试访问接口:
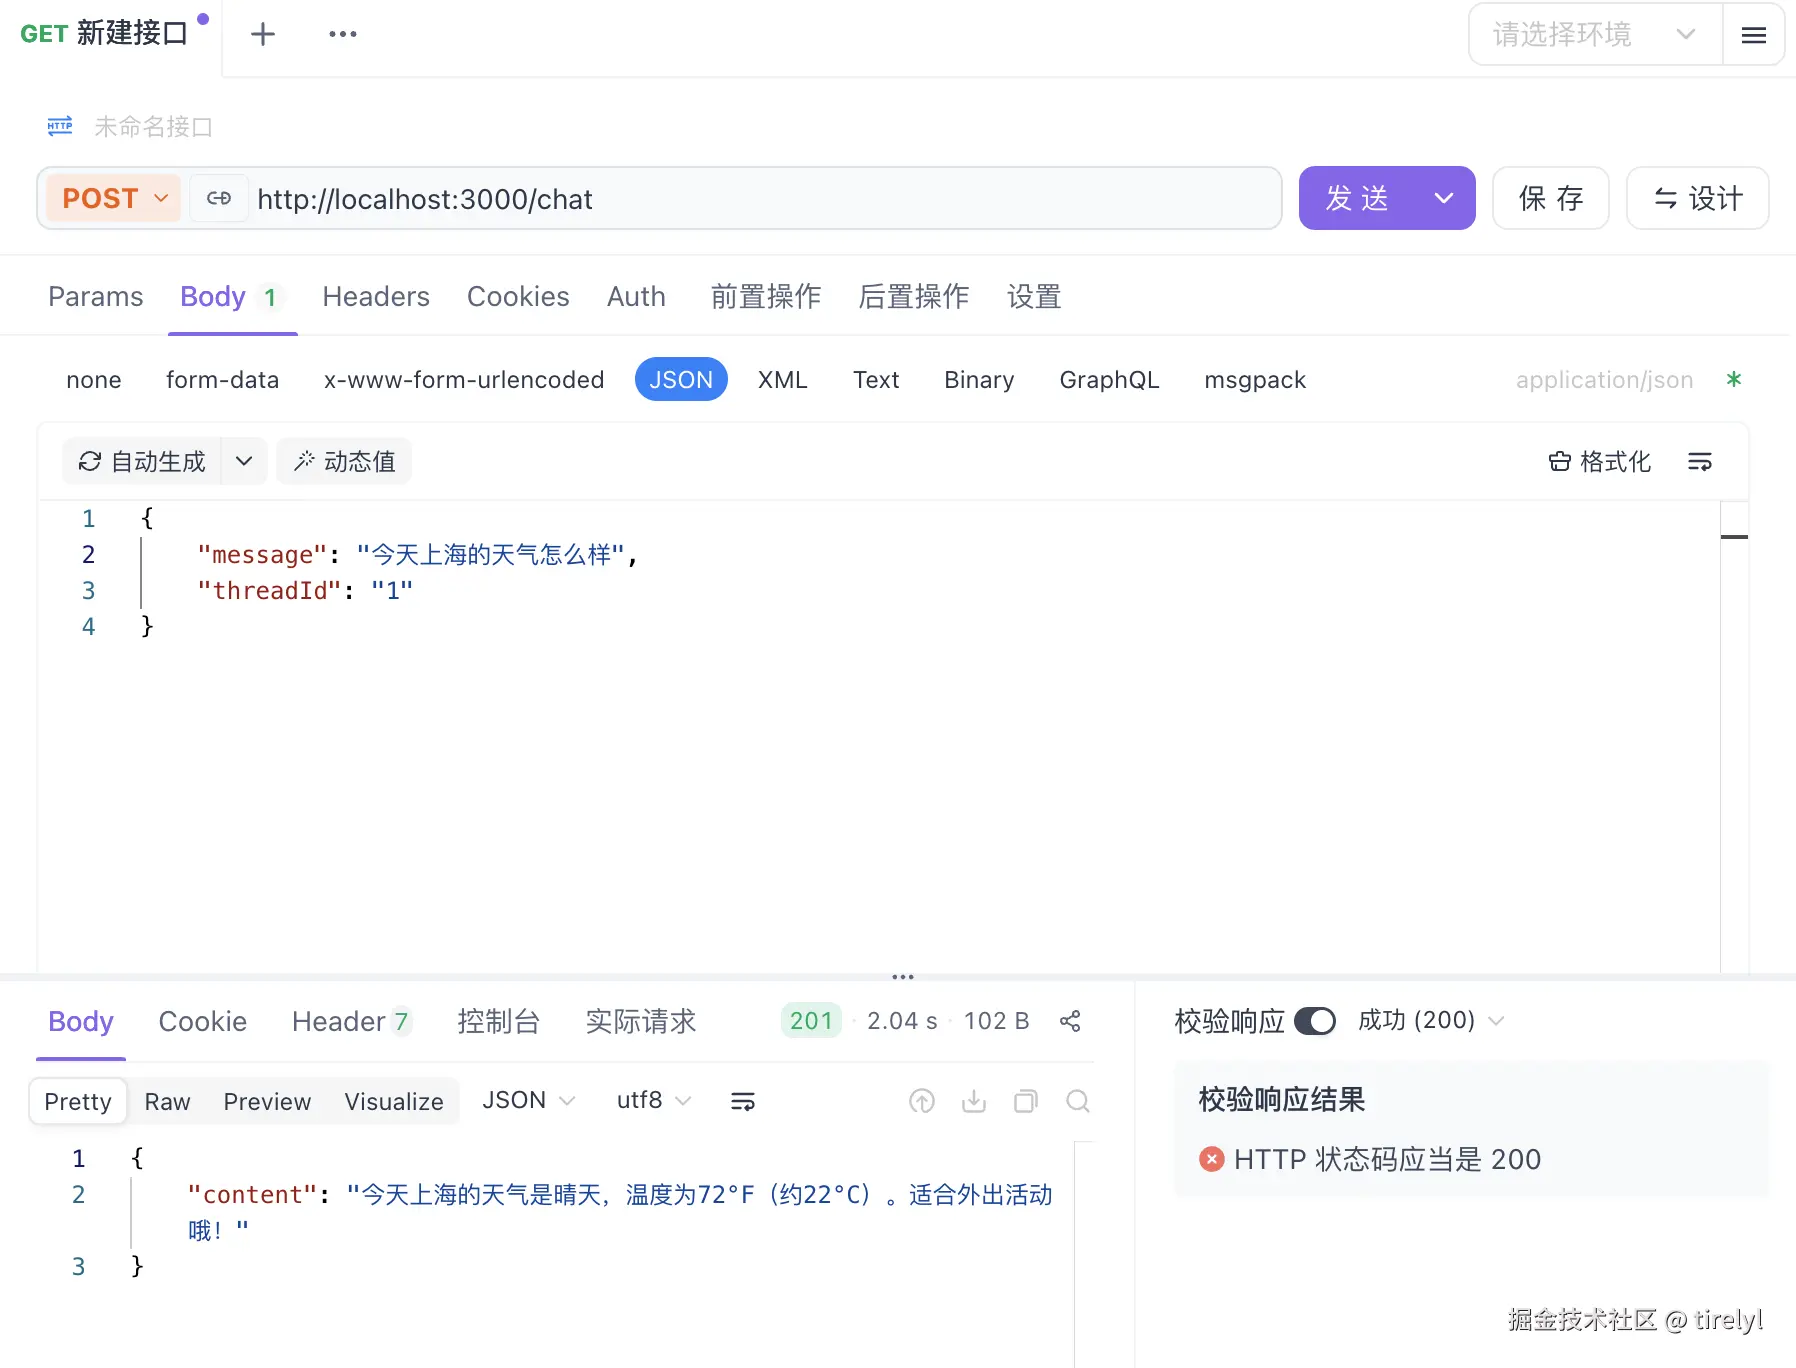
调用天气工具:
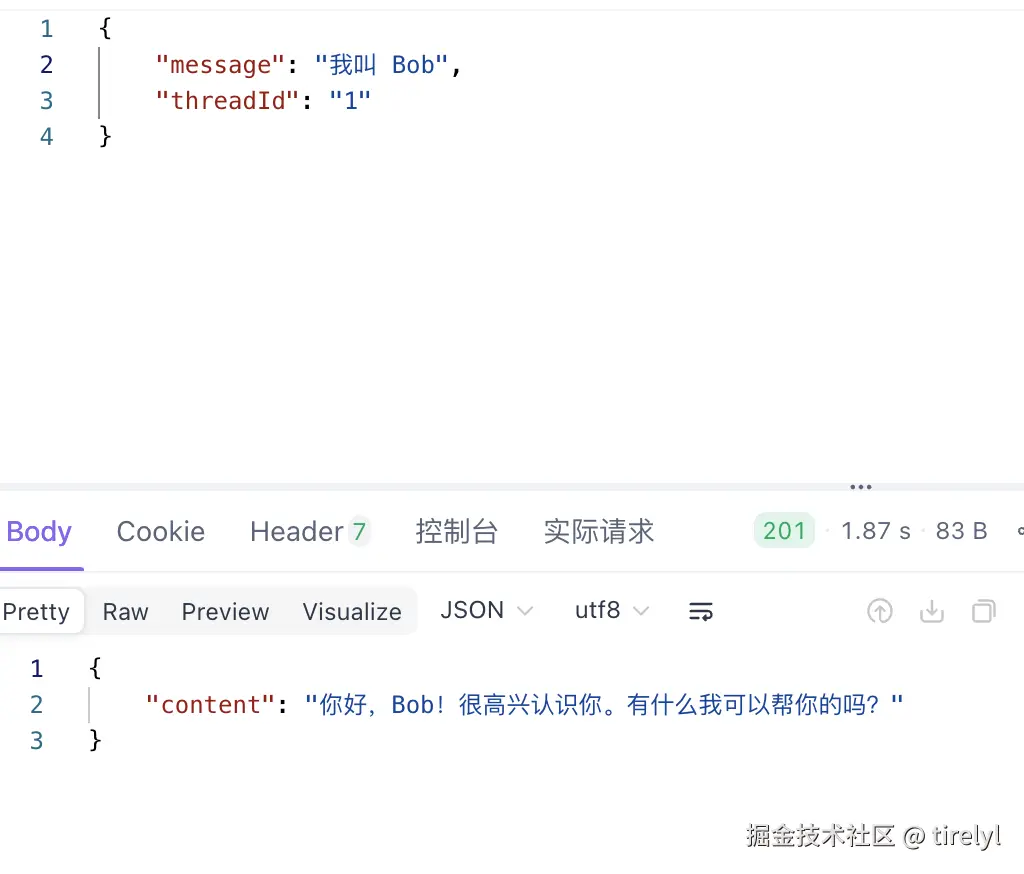
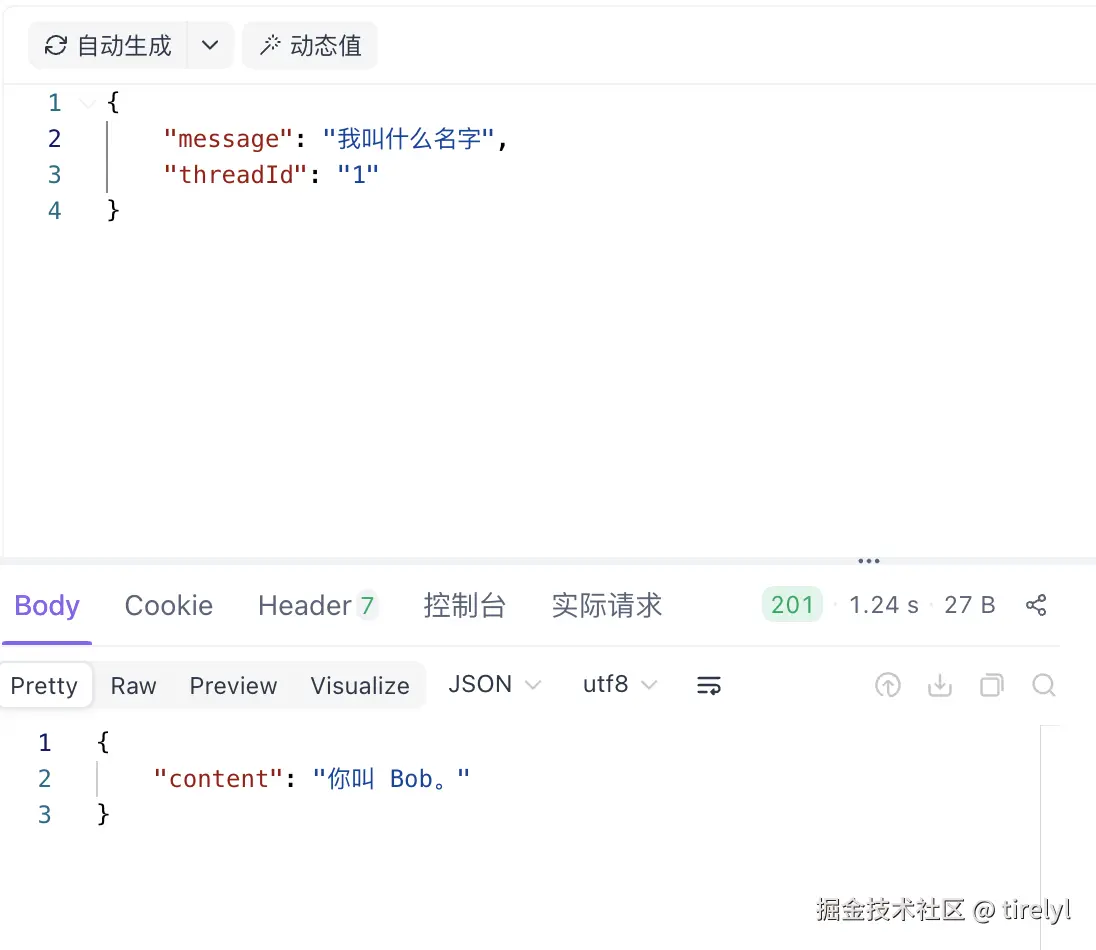
展示记忆功能:
总结
作为 LangChain 框架官方重点支持的两种语言之一,TypeScript 在 1.0 版本中与 NestJS 结合使用的实践资料相对较少。希望这篇文章能帮助到入门的同学。
在实际使用过程中,LangChain 强大的编排能力往往依赖于大量的泛型参数来完善类型约束。如果不希望频繁使用 as any 进行类型断言,就需要对其源码中的类型设计有较为深入的理解,这对使用者的 TypeScript 基础提出了更高要求。
本人也是一名后端方向的初学者,以上内容更多是个人在学习和实践过程中的一些总结与思考。如果本文能对你有所帮助,欢迎点赞和交流,非常感谢 🙏