Nginx 安装教程
一、二进制方式安装(Ubuntu 系统)
1.1 简介
Nginx 在 Ubuntu 系统中可通过 apt 工具安装二进制包,该方式便捷高效;若需特定功能模块或指定版本,可配置官方仓库或选择源码安装。
1.2 查看可安装的 Nginx 版本
执行命令:root@ubuntu24:~# apt list nginx -a
命令解释:
apt list:列出系统软件仓库中指定软件的所有可用版本;nginx:指定要查询的软件名称;-a:显示该软件的所有版本(包括已安装和未安装的)。
执行后可看到类似输出:
bash
root@Ubuntu24-13:~# apt list nginx -a
正在列表... 完成
nginx/noble-updates,noble-security 1.24.0-2ubuntu7.5 amd64
nginx/noble 1.24.0-2ubuntu7 amd64
1.3 安装 Nginx 及相关组件
执行命令:root@ubuntu24:~# apt install nginx nginx-core fcgiwrap nginx-doc -y
命令解释:
apt install:Ubuntu 系统的软件安装命令;nginx:Nginx 基础包,提供核心 Web 服务功能;nginx-core:Nginx 核心运行库,保障服务基础运行;fcgiwrap:FastCGI 封装程序,支持解析 PHP 等动态脚本;nginx-doc:Nginx 官方文档包,包含使用手册和配置说明;-y:安装过程中自动回答"yes",无需手动确认。
注意 :默认 apt install nginx 仅安装基础包,推荐安装上述完整组件以启用更多功能。
1.4 查看 Nginx 服务状态
执行命令:root@ubuntu24:~# systemctl is-active nginx
命令解释:
systemctl:Linux 系统服务管理命令,用于控制系统服务;is-active:查询指定服务的当前运行状态;nginx:要查询的服务名称。
输出说明:
- 正常输出为
active,表示服务正在运行; - 若输出
inactive,执行systemctl start nginx启动服务。
bash
root@Ubuntu24-13:~# systemctl is-active nginx
active
1.5 检查 Nginx 监听端口
执行命令:root@ubuntu24:~# netstat -tnulp | grep nginx
命令解释:
netstat:网络状态查询工具,用于查看端口监听、网络连接等信息;-t:仅显示 TCP 协议的连接;-n:以数字形式显示 IP 地址和端口号(不解析域名);-u:显示 UDP 协议的连接(此处可省略,因为 Nginx 默认监听 TCP 端口);-l:仅显示处于监听状态的端口;-p:显示占用端口的进程名称和 PID;| grep nginx:过滤输出结果,仅保留包含nginx的行。
正常输出示例:
bash
root@Ubuntu24-13:~# netstat -tnulp | grep nginx
tcp        0      0 0.0.0.0:80              0.0.0.0:*               LISTEN      2583/nginx: master
tcp6       0      0 :::80                   :::*                    LISTEN      2583/nginx: master
输出说明 :0.0.0.0:80 表示 Nginx 监听所有网卡的 80 端口(HTTP 默认端口)。
1.6 查看配置文件与默认首页目录
1.6.1 配置文件目录
执行命令:root@ubuntu24:~# ls /etc/nginx/
命令解释:
ls:列出指定目录下的文件和子目录;/etc/nginx/:Nginx 配置文件的默认存放路径。
输出示例:
bash
root@Ubuntu24-13:~# ls /etc/nginx/
conf.d        fastcgi_params  koi-win     modules-available  nginx.conf    scgi_params      sites-enabled  uwsgi_params
fastcgi.conf koi-utf mime.types modules-enabled proxy_params sites-available snippets win-utf目录说明:
nginx.conf:Nginx 主配置文件;sites-available:存放所有站点配置文件(默认不生效);sites-enabled:存放生效的站点配置文件(通过软链接指向sites-available中的文件);conf.d:额外的配置片段文件目录。
1.6.2 默认首页目录
执行命令:root@ubuntu24:~# ls /var/www/html/
命令解释:
ls:列出指定目录内容;/var/www/html/:Ubuntu 系统中 Nginx 默认的网站根目录。
输出示例:
bash
root@Ubuntu24-13:~# ls /var/www/html/
index.nginx-debian.html
1.7 查看 Nginx 版本信息
执行命令:root@ubuntu24:~# nginx -V
命令解释:
nginx:Nginx 程序主命令;-V(大写):显示 Nginx 的版本号以及编译时的参数(小写-v仅显示版本号)。
bash
root@Ubuntu24-13:~# nginx -V
nginx version: nginx/1.24.0 (Ubuntu)
built with OpenSSL 3.0.13 30 Jan 2024
TLS SNI support enabled
configure arguments: --with-cc-opt='-g -O2 -fno-omit-frame-pointer -mno-omit-leaf-frame-pointer -ffile-prefix-map=/build/nginx-WLuzPu/nginx-1.24.0=. -flto=auto -ffat-lto-objects -fstack-protector-strong -fstack-clash-protection -Wformat -Werror=format-security -fcf-protection -fdebug-prefix-map=/build/nginx-WLuzPu/nginx-1.24.0=/usr/src/nginx-1.24.0-2ubuntu7.5 -fPIC -Wdate-time -D_FORTIFY_SOURCE=3' --with-ld-opt='-Wl,-Bsymbolic-functions -flto=auto -ffat-lto-objects -Wl,-z,relro -Wl,-z,now -fPIC' --prefix=/usr/share/nginx --conf-path=/etc/nginx/nginx.conf --http-log-path=/var/log/nginx/access.log --error-log-path=stderr --lock-path=/var/lock/nginx.lock --pid-path=/run/nginx.pid --modules-path=/usr/lib/nginx/modules --http-client-body-temp-path=/var/lib/nginx/body --http-fastcgi-temp-path=/var/lib/nginx/fastcgi --http-proxy-temp-path=/var/lib/nginx/proxy --http-scgi-temp-path=/var/lib/nginx/scgi --http-uwsgi-temp-path=/var/lib/nginx/uwsgi --with-compat --with-debug --with-pcre-jit --with-http_ssl_module --with-http_stub_status_module --with-http_realip_module --with-http_auth_request_module --with-http_v2_module --with-http_dav_module --with-http_slice_module --with-threads --with-http_addition_module --with-http_flv_module --with-http_gunzip_module --with-http_gzip_static_module --with-http_mp4_module --with-http_random_index_module --with-http_secure_link_module --with-http_sub_module --with-mail_ssl_module --with-stream_ssl_module --with-stream_ssl_preread_module --with-stream_realip_module --with-http_geoip_module=dynamic --with-http_image_filter_module=dynamic --with-http_perl_module=dynamic --with-http_xslt_module=dynamic --with-mail=dynamic --with-stream=dynamic --with-stream_geoip_module=dynamic
1.8 访问异常排查(防火墙)
执行命令:root@ubuntu24:~# systemctl disable --now ufw.service
命令解释:
systemctl disable:设置服务开机不自启;--now:立即停止该服务(无需额外执行stop命令);ufw.service:Ubuntu 系统默认的防火墙服务。
说明:若无法访问 Web 页面,大概率是防火墙拦截了 80/443 端口,执行此命令关闭防火墙即可。
二、二进制方式安装(Rocky 9 系统)
2.1 查看可安装的 Nginx 版本
执行命令:[root@rocky9 ~]# yum list nginx
命令解释:
yum list:列出 YUM 仓库中指定软件的版本信息;nginx:要查询的软件名称。
输出示例:
bash
[root@Rocky9-12 ~]# yum list nginx
Rocky Linux 9 - BaseOS                                                                                 3.2 MB/s | 6.3 MB     00:01
Rocky Linux 9 - AppStream                                                                              4.1 MB/s |  11 MB     00:02
Rocky Linux 9 - Extras                                                                                 9.9 kB/s |  16 kB     00:01
可安装的软件包
nginx.x86_64                                                 2:1.20.1-24.el9                                                  appstream
2.2 安装 Nginx 及核心组件
执行命令:[root@rocky9 ~]# yum install nginx nginx-core -y
命令解释:
yum install:Rocky/CentOS 系统的软件安装命令;nginx:Nginx 基础包;nginx-core:Nginx 核心运行库;-y:自动确认安装过程中的所有提示。
注意 :默认会自动安装依赖包 nginx-core、nginx-filesystem、rocky-logos-httpd。
bash
[root@Rocky9-12 ~]# yum install nginx nginx-core -y
上次元数据过期检查:0:01:07 前,执行于 2025年12月16日 星期二 16时01分15秒。
依赖关系解决。
=======================================================================================================================================
 软件包                               架构                      版本                                仓库                          大小
=======================================================================================================================================
安装:
 nginx                                x86_64                    2:1.20.1-24.el9                     appstream                     36 k
 nginx-core                           x86_64                    2:1.20.1-24.el9                     appstream                    566 k
安装依赖关系:
 nginx-filesystem                     noarch                    2:1.20.1-24.el9                     appstream                    9.2 k
 rocky-logos-httpd                    noarch                    90.16-1.el9                         appstream                     24 k

事务概要
=======================================================================================================================================
安装  4 软件包

总下载:635 k
安装大小:1.8 M
下载软件包:
(1/4): nginx-filesystem-1.20.1-24.el9.noarch.rpm                                                        85 kB/s | 9.2 kB     00:00
(2/4): nginx-1.20.1-24.el9.x86_64.rpm                                                                  246 kB/s |  36 kB     00:00
(3/4): rocky-logos-httpd-90.16-1.el9.noarch.rpm                                                        315 kB/s |  24 kB     00:00
(4/4): nginx-core-1.20.1-24.el9.x86_64.rpm                                                             1.9 MB/s | 566 kB     00:00
---------------------------------------------------------------------------------------------------------------------------------------
总计                                                                                                   389 kB/s | 635 kB     00:01
Rocky Linux 9 - AppStream                                                                              1.7 MB/s | 1.7 kB     00:00
导入 GPG 公钥 0x350D275D:
 Userid: "Rocky Enterprise Software Foundation - Release key 2022 <releng@rockylinux.org>"
 指纹: 21CB 256A E16F C54C 6E65 2949 702D 426D 350D 275D
 来自: /etc/pki/rpm-gpg/RPM-GPG-KEY-Rocky-9
导入公钥成功
运行事务检查
事务检查成功。
运行事务测试
事务测试成功。
运行事务
  准备中  :                                                                                                                        1/1
  运行脚本: nginx-filesystem-2:1.20.1-24.el9.noarch                                                                                1/4
  安装    : nginx-filesystem-2:1.20.1-24.el9.noarch                                                                                1/4
  安装    : nginx-core-2:1.20.1-24.el9.x86_64                                                                                      2/4
  安装    : rocky-logos-httpd-90.16-1.el9.noarch                                                                                   3/4
  安装    : nginx-2:1.20.1-24.el9.x86_64                                                                                           4/4
  运行脚本: nginx-2:1.20.1-24.el9.x86_64                                                                                           4/4
  验证    : nginx-2:1.20.1-24.el9.x86_64                                                                                           1/4
  验证    : nginx-core-2:1.20.1-24.el9.x86_64                                                                                      2/4
  验证    : nginx-filesystem-2:1.20.1-24.el9.noarch                                                                                3/4
  验证    : rocky-logos-httpd-90.16-1.el9.noarch                                                                                   4/4

已安装:
  nginx-2:1.20.1-24.el9.x86_64                nginx-core-2:1.20.1-24.el9.x86_64        nginx-filesystem-2:1.20.1-24.el9.noarch
  rocky-logos-httpd-90.16-1.el9.noarch

完毕!
2.3 启动 Nginx 并设置开机自启
2.3.1 查看初始状态(默认未启动)
执行命令:[root@rocky9 ~]# systemctl is-active nginx
命令解释 :同 Ubuntu 系统,查询 Nginx 服务的运行状态,默认输出为 inactive。
bash
[root@Rocky9-12 ~]# systemctl is-active nginx
inactive
2.3.2 启动并设置开机自启
执行命令:[root@rocky9 ~]# systemctl enable --now nginx
命令解释:
systemctl enable:设置服务开机自启;--now:立即启动该服务;nginx:要操作的服务名称。
输出示例:
bash
[root@Rocky9-12 ~]# systemctl enable --now nginx
Created symlink /etc/systemd/system/multi-user.target.wants/nginx.service → /usr/lib/systemd/system/nginx.service.说明:输出表示已创建服务软链接,开机自启配置生效。
2.3.3 验证启动状态
执行命令:[root@rocky9 ~]# systemctl is-active nginx
命令解释 :查询服务状态,正常输出为 active。
bash
[root@Rocky9-12 ~]# systemctl is-active nginx
active
2.4 检查 Nginx 监听端口
执行命令:[root@rocky9 ~]# netstat -tnulp | grep nginx
命令解释:同 Ubuntu 系统,查询 Nginx 监听的端口及进程信息。
输出示例:
bash
[root@Rocky9-12 ~]# netstat -tnulp | grep nginx
tcp        0      0 0.0.0.0:80              0.0.0.0:*               LISTEN      12264/nginx: master
tcp6       0      0 :::80                   :::*                    LISTEN      12264/nginx: master
2.5 查看配置文件与默认首页目录
2.5.1 配置文件目录
执行命令:[root@rocky9 ~]# ls /etc/nginx/
命令解释:列出 Rocky 系统中 Nginx 配置文件目录的内容。
输出示例:
bash
[root@Rocky9-12 ~]# ls /etc/nginx/
conf.d        fastcgi.conf.default    koi-utf     mime.types.default  scgi_params          uwsgi_params.default
default.d     fastcgi_params          koi-win     nginx.conf          scgi_params.default  win-utf
fastcgi.conf  fastcgi_params.default  mime.types  nginx.conf.default  uwsgi_params
2.5.2 默认首页目录
执行命令:[root@rocky9 ~]# ls /usr/share/nginx/html/
命令解释:
ls:列出目录内容;/usr/share/nginx/html/:Rocky 系统中 Nginx 默认的网站根目录。
输出示例:
bash
[root@Rocky9-12 ~]# ls /usr/share/nginx/html/
404.html  50x.html  icons  index.html  nginx-logo.png  poweredby.png  system_noindex_logo.png
2.6 访问异常排查
2.6.1 关闭防火墙
执行命令:[root@rocky9 ~]# systemctl disable --now firewalld.service
命令解释:
firewalld.service:Rocky 系统默认的防火墙服务;- 其他参数同 Ubuntu 系统的
ufw命令,作用是关闭防火墙并设置开机不自启。
2.6.2 SELinux 排查(可选)
(1)查看 SELinux 状态
执行命令:[root@rocky9 ~]# sestatus
命令解释 :sestatus 是专门用于查看 SELinux 状态的命令,输出包含当前模式(enforcing/permissive/disabled)。
(2)临时关闭 SELinux
执行命令:[root@rocky9 ~]# setenforce 0
命令解释:
setenforce:临时修改 SELinux 运行模式的命令;0:设置为permissive模式(仅记录违规行为,不阻止操作);1:设置为enforcing模式(强制启用 SELinux 规则)。
(3)永久关闭 SELinux
执行命令:[root@rocky9 ~]# sed -i ‘s/SELINUX=enforcing/SELINUX=disabled/g’ /etc/selinux/config
命令解释:
sed -i:直接修改文件内容(不打开编辑器);s/旧内容/新内容/g:全局替换文件中的字符串;/etc/selinux/config:SELinux 的配置文件,修改后需重启系统生效。
三、源码编译安装(Ubuntu 系统)
3.1 准备编译环境
3.1.1 基础编译库
执行命令:root@ubuntu24:~# apt install build-essential gcc g++ libc6 libc6-dev libpcre3 libpcre3-dev libssl-dev libsystemd-dev zlib1g-dev -y
命令解释:
build-essential:Ubuntu 编译基础工具包,包含make、gcc等核心编译工具;gcc/g++:C/C++ 编译器,用于编译 Nginx 源码;libc6/libc6-dev:C 标准库及其开发包,提供程序运行的基础函数;libpcre3/libpcre3-dev:PCRE 正则表达式库开发包,Nginx 的 URL 重写功能依赖此库;libssl-dev:OpenSSL 开发包,支持 Nginx 启用 HTTPS 功能;libsystemd-dev:systemd 开发包,支持 Nginx 与 systemd 服务管理器集成;zlib1g-dev:zlib 压缩库开发包,支持 Nginx 启用 Gzip 压缩功能。
如果出现如下报错:
bash
错误:1 http://security.ubuntu.com/ubuntu noble-updates/main amd64 binutils-common amd64 2.42-4ubuntu2.5
  404  Not Found [IP: 101.6.15.130 80]
错误:2 http://security.ubuntu.com/ubuntu noble-updates/main amd64 libsframe1 amd64 2.42-4ubuntu2.5
  404  Not Found [IP: 101.6.15.130 80]
错误:3 http://security.ubuntu.com/ubuntu noble-updates/main amd64 libbinutils amd64 2.42-4ubuntu2.5
  404  Not Found [IP: 101.6.15.130 80]
错误:4 http://security.ubuntu.com/ubuntu noble-updates/main amd64 libctf-nobfd0 amd64 2.42-4ubuntu2.5
  404  Not Found [IP: 101.6.15.130 80]
错误:5 http://security.ubuntu.com/ubuntu noble-updates/main amd64 libctf0 amd64 2.42-4ubuntu2.5
  404  Not Found [IP: 101.6.15.130 80]
错误:6 http://security.ubuntu.com/ubuntu noble-updates/main amd64 libgprofng0 amd64 2.42-4ubuntu2.5
  404  Not Found [IP: 101.6.15.130 80]
错误:7 http://security.ubuntu.com/ubuntu noble-updates/main amd64 binutils-x86-64-linux-gnu amd64 2.42-4ubuntu2.5
  404  Not Found [IP: 101.6.15.130 80]
错误:8 http://security.ubuntu.com/ubuntu noble-updates/main amd64 binutils amd64 2.42-4ubuntu2.5
  404  Not Found [IP: 101.6.15.130 80]
E: 无法下载 http://security.ubuntu.com/ubuntu/pool/main/b/binutils/binutils-common_2.42-4ubuntu2.5_amd64.deb  404  Not Found [IP: 101.6.15.130 80]
E: 无法下载 http://security.ubuntu.com/ubuntu/pool/main/b/binutils/libsframe1_2.42-4ubuntu2.5_amd64.deb  404  Not Found [IP: 101.6.15.130 80]
E: 无法下载 http://security.ubuntu.com/ubuntu/pool/main/b/binutils/libbinutils_2.42-4ubuntu2.5_amd64.deb  404  Not Found [IP: 101.6.15.130 80]
E: 无法下载 http://security.ubuntu.com/ubuntu/pool/main/b/binutils/libctf-nobfd0_2.42-4ubuntu2.5_amd64.deb  404  Not Found [IP: 101.6.15.130 80]
E: 无法下载 http://security.ubuntu.com/ubuntu/pool/main/b/binutils/libctf0_2.42-4ubuntu2.5_amd64.deb  404  Not Found [IP: 101.6.15.130 80]
E: 无法下载 http://security.ubuntu.com/ubuntu/pool/main/b/binutils/libgprofng0_2.42-4ubuntu2.5_amd64.deb  404  Not Found [IP: 101.6.15.130 80]
E: 无法下载 http://security.ubuntu.com/ubuntu/pool/main/b/binutils/binutils-x86-64-linux-gnu_2.42-4ubuntu2.5_amd64.deb  404  Not Found [IP: 101.6.15.130 80]
E: 无法下载 http://security.ubuntu.com/ubuntu/pool/main/b/binutils/binutils_2.42-4ubuntu2.5_amd64.deb  404  Not Found [IP: 101.6.15.130 80]
E: 有几个软件包无法下载,要不运行 apt-get update 或者加上 --fix-missing 的选项再试试?
问题原因分析:
从报错信息来看,核心问题是 APT 软件源的包版本不存在(404 Not Found),具体原因有以下几点:
- 软件源缓存过期:本地APT缓存的软件包版本(如binutils 2.42-4ubuntu2.5)已被Ubuntu官方源/清华源移除,导致下载时找不到对应文件;
- 源地址配置问题:系统同时混用了清华源和Ubuntu官方安全源,且官方安全源的IP(101.6.15.130)访问异常或版本不同步;
- Ubuntu版本(Noble)的源更新:Ubuntu 24.04(Noble)的更新包会持续迭代,旧版本的包会被清理,本地缓存未及时同步。
解决步骤(按顺序执行)
步骤1:更新APT缓存(最优先)
首先强制更新本地软件源缓存,让系统获取最新的包版本信息:
bash
apt update -y若执行时仍有404错误,继续下一步更换国内源。
步骤2:更换为稳定的国内源(清华源)
Ubuntu官方源在国内访问不稳定,且版本迭代后旧包会被删除,建议替换为清华源:
-
备份原有源配置:
bashcp /etc/apt/sources.list /etc/apt/sources.list.bak -
清空原有源文件并写入清华源(适配Ubuntu 24.04 Noble):
bashcat > /etc/apt/sources.list << EOF # 清华源 - Ubuntu 24.04 (Noble) deb https://mirrors.tuna.tsinghua.edu.cn/ubuntu/ noble main restricted universe multiverse deb https://mirrors.tuna.tsinghua.edu.cn/ubuntu/ noble-updates main restricted universe multiverse deb https://mirrors.tuna.tsinghua.edu.cn/ubuntu/ noble-backports main restricted universe multiverse deb https://mirrors.tuna.tsinghua.edu.cn/ubuntu/ noble-security main restricted universe multiverse EOF -
再次更新缓存:
bashapt update -y
步骤3:重新安装目标软件包
缓存更新完成后,重新执行安装命令:
bash
apt install build-essential gcc g++ libc6 libc6-dev libpcre3 libpcre3-dev libssl-dev libsystemd-dev zlib1g-dev -y步骤4:(可选)修复损坏的包依赖
若仍有报错,执行以下命令修复依赖和缺失的包:
bash
apt --fix-missing install -y
apt --fix-broken install -y
3.1.2 功能扩展库(二进制版本默认功能依赖)
执行命令:root@ubuntu24:~# apt install libxml2 libxml2-dev libxslt1-dev php-gd libgd-dev geoip-database libgeoip-dev -y
命令解释:
libxml2/libxml2-dev:XML 解析库,支持 Nginx 的 XML 相关模块;libxslt1-dev:XSLT 转换库,支持 Nginx 的 XSLT 模块;php-gd/libgd-dev:GD 图形库,支持处理图片相关的动态内容;geoip-database/libgeoip-dev:GeoIP 数据库及开发包,支持 Nginx 根据 IP 定位地域。
3.2 创建 Nginx 运行用户
执行命令:root@ubuntu24:~# useradd -r -s /usr/sbin/nologin nginx
命令解释:
useradd:创建系统用户的命令;-r:创建系统专用用户(无家目录,UID 范围低于 1000);-s /usr/sbin/nologin:指定用户的登录 Shell 为nologin,禁止该用户通过 SSH 或终端登录系统;nginx:创建的用户名,用于运行 Nginx 进程(避免使用 root 用户运行服务,提升安全性)。
3.3 下载并解压 Nginx 源码包
(1)下载指定版本
执行命令:root@ubuntu24:~# wget https://nginx.org/download/nginx-1.22.1.tar.gz
命令解释:
wget:命令行下载工具,用于从指定 URL 下载文件;https://nginx.org/download/nginx-1.22.1.tar.gz:Nginx 1.22.1 版本源码包的官方下载地址。
注意:若提示"无法解析主机地址 'nginx.org'",重试下载即可(可能是网络临时波动)。
(2)解压源码包
执行命令:root@ubuntu24:~# tar xf nginx-1.22.1.tar.gz
命令解释:
tar:压缩包解压工具;x:执行解压操作;f:指定要解压的文件名称;nginx-1.22.1.tar.gz:要解压的源码包文件名。
(3)进入源码目录
执行命令:root@ubuntu24:~# cd nginx-1.22.1/
命令解释:
cd:切换工作目录的命令;nginx-1.22.1/:解压后的 Nginx 源码目录。
3.4 定制编译配置
执行命令:root@ubuntu24:nginx-1.22.1# ./configure <br>
–prefix=/data/server/nginx <br>
–user=nginx <br>
–group=nginx <br>
–with-http_ssl_module <br>
–with-http_v2_module <br>
–with-http_realip_module <br>
–with-http_stub_status_module <br>
–with-http_gzip_static_module <br>
–with-pcre <br>
–with-stream <br>
–with-stream_ssl_module <br>
–with-stream_realip_module
命令解释:
./configure:源码编译的配置脚本,用于指定安装路径、启用模块等参数;\:命令换行符,表示下一行是当前命令的延续;--prefix=/data/server/nginx:指定 Nginx 的安装根目录;--user=nginx:指定运行 Nginx 工作进程的用户;--group=nginx:指定运行 Nginx 工作进程的用户组;--with-http_ssl_module:启用 HTTPS 协议支持模块;--with-http_v2_module:启用 HTTP/2 协议支持模块;--with-http_realip_module:启用获取客户端真实 IP 的模块(适用于反向代理场景);--with-http_stub_status_module:启用 Nginx 状态监控模块(可查看连接数、请求数等状态);--with-http_gzip_static_module:启用预压缩静态文件模块(提升 Gzip 压缩效率);--with-pcre:启用 PCRE 正则表达式支持;--with-stream:启用 TCP/UDP 反向代理模块;--with-stream_ssl_module:启用 Stream 模块的 SSL 支持;--with-stream_realip_module:启用 Stream 模块的真实 IP 支持。
3.5 编译并安装
执行命令:root@ubuntu24:nginx-1.22.1# make && make install
命令解释:
make:根据./configure生成的 Makefile 文件编译源码,生成可执行程序;&&:逻辑与运算符,只有前一个命令(make)执行成功后,才执行后一个命令;make install:将编译好的程序和配置文件安装到--prefix指定的目录。
注意:编译过程约 1 分钟,需耐心等待,无报错则安装完成。
3.6 配置目录权限与软链接
3.6.1 修改安装目录属主属组
执行命令:root@ubuntu24:nginx-1.22.1# chown -R nginx:nginx /data/server/nginx/
命令解释:
chown:修改文件/目录的属主和属组;-R:递归处理所有子文件和子目录;nginx:nginx:设置属主为nginx用户,属组为nginx用户组;/data/server/nginx/:要修改权限的 Nginx 安装目录。
说明:确保 Nginx 运行用户对安装目录有读写权限。
3.6.2 查看安装目录结构
执行命令:root@ubuntu24:nginx-1.22.1# ls -l /data/server/nginx/
命令解释:
ls -l:以长格式列出目录内容,显示文件权限、属主、大小等信息;/data/server/nginx/:Nginx 安装目录。
输出示例:
bash
total 16
drwxr-xr-x 2 nginx nginx 4096 Jan 20 15:35 conf  # 配置文件目录
drwxr-xr-x 2 nginx nginx 4096 Jan 20 15:35 html  # 网站根目录
drwxr-xr-x 2 nginx nginx 4096 Jan 20 15:35 logs  # 日志文件目录
drwxr-xr-x 2 nginx nginx 4096 Jan 20 15:35 sbin  # 二进制程序目录
3.6.3 创建全局软链接(方便调用)
执行命令:root@ubuntu24:nginx-1.22.1# ln -sv /data/server/nginx/sbin/nginx /usr/sbin/nginx
命令解释:
ln:创建软链接或硬链接的命令;-s:创建软链接(符号链接,类似 Windows 的快捷方式);-v:显示链接创建的过程;/data/server/nginx/sbin/nginx:源文件路径(Nginx 可执行程序的实际位置);/usr/sbin/nginx:目标链接路径(/usr/sbin是系统命令默认搜索路径,可直接在终端执行nginx命令)。
输出:'/usr/sbin/nginx' -> '/data/server/nginx/sbin/nginx'
3.7 验证版本
执行命令:root@ubuntu24:nginx-1.22.1# nginx -v
命令解释:
nginx -v:显示 Nginx 的版本号,输出示例:
bash
root@Ubuntu24-13:~/nginx-1.22.1# nginx -v
nginx version: nginx/1.22.1
3.8 定制 systemd 服务管理文件
3.8.1 创建 PID 目录
执行命令:root@ubuntu24:~# mkdir /data/server/nginx/run
执行命令:root@ubuntu24:~# chown -R nginx:nginx /data/server/nginx/run
命令解释:
mkdir /data/server/nginx/run:创建 PID 文件存放目录(PID 文件记录 Nginx 主进程的 ID);chown -R nginx:nginx /data/server/nginx/run:修改目录权限,确保 Nginx 用户可写入 PID 文件。
3.8.2 修改 Nginx 配置文件(指定 PID 路径)
执行命令:root@ubuntu24:~# vi /data/server/nginx/conf/nginx.conf
命令解释:
vi:Linux 系统默认的文本编辑器;/data/server/nginx/conf/nginx.conf:Nginx 主配置文件路径。
操作说明:在配置文件中添加/修改 PID 配置行:
nginx
pid /data/server/nginx/run/nginx.pid;作用:指定 Nginx 主进程 PID 文件的存放路径,便于 systemd 管理服务。
3.8.3 创建服务文件
执行命令:root@ubuntu24:~# vi /usr/lib/systemd/system/nginx.service
命令解释:
vi:文本编辑器;/usr/lib/systemd/system/nginx.service:systemd 服务文件的存放路径,用于定义服务的启动、停止规则。
写入内容:
ini
[Unit]
Description=nginx - high performance web server
Documentation=http://nginx.org/en/docs/
After=network-online.target remote-fs.target nss-lookup.target
Wants=network-online.target

[Service]
Type=forking
PIDFile=/data/server/nginx/run/nginx.pid
ExecStart=/data/server/nginx/sbin/nginx -c /data/server/nginx/conf/nginx.conf
ExecReload=/bin/kill -s HUP $MAINPID
ExecStop=/bin/kill -s TERM $MAINPID
LimitNOFILE=100000

[Install]
WantedBy=multi-user.target配置项解释:
| 配置项 | 作用 |
|---|---|
[Unit] |
定义服务的元数据和依赖关系 |
Description |
服务的描述信息 |
Documentation |
服务的文档地址 |
After |
指定服务在哪些目标/服务之后启动(如网络就绪后) |
Wants |
弱依赖关系,指定的目标激活时,当前服务也会激活 |
[Service] |
定义服务的运行参数 |
Type=forking |
表示服务启动后会创建子进程(Nginx 主进程会 fork 子进程) |
PIDFile |
指定 PID 文件路径,systemd 通过此文件监控进程 |
ExecStart |
服务启动命令,-c 指定配置文件路径 |
ExecReload |
服务重载命令,发送 HUP 信号让 Nginx 重新加载配置 |
ExecStop |
服务停止命令,发送 TERM 信号让 Nginx 优雅停止 |
LimitNOFILE=100000 |
增大 Nginx 可打开的文件描述符数量上限 |
[Install] |
定义服务的安装选项 |
WantedBy=multi-user.target |
表示服务在多用户模式下启用 |
信号说明:
SIGHUP (1):重载配置文件,不中断现有连接;SIGTERM (15):优雅终止进程,处理完现有连接后退出;SIGKILL (9):强制终止进程(不推荐,可能导致数据丢失)。
3.8.4 重载服务配置并启动
(1)重载 systemd 配置
执行命令:root@ubuntu24:~# systemctl daemon-reload
命令解释 :systemctl daemon-reload:重新加载 systemd 的服务配置文件,使新创建的 nginx.service 生效。
(2)启动 Nginx
执行命令:root@ubuntu24:~# systemctl start nginx
命令解释:启动 Nginx 服务。
(3)查看状态
执行命令:root@ubuntu24:~# systemctl status nginx.service
命令解释:查看 Nginx 服务的详细运行状态,包括是否运行、进程 PID、日志信息等。
(4)验证监听端口
执行命令:root@ubuntu24:~# netstat -tnulp | grep nginx
命令解释:同前文,验证 Nginx 是否监听 80 端口。
bash
root@Ubuntu24-13:~/nginx-1.22.1# netstat -tnulp | grep nginx
tcp        0      0 0.0.0.0:80              0.0.0.0:*               LISTEN      22281/nginx: master
3.8.5 导入 man 手册(可选)
(1)复制手册文件
执行命令:root@ubuntu24:nginx-1.22.1# cp man/nginx.8 /usr/share/man/man8/
命令解释:
cp:复制文件命令;man/nginx.8:Nginx 源码目录中的 man 手册文件;/usr/share/man/man8/:系统 man 手册的存放路径(man8目录存放系统管理员命令的手册)。
(2)构建手册数据库
执行命令:root@ubuntu24:nginx-1.22.1# mandb
命令解释 :mandb:更新 man 手册的数据库,使新复制的手册文件可被搜索到。
(3)验证手册
执行命令:root@ubuntu24:nginx-1.22.1# man nginx
命令解释 :man nginx:查看 Nginx 的 man 手册,了解命令参数和使用方法。
四、源码编译安装(Rocky 9 系统)
4.1 准备编译环境
4.1.1 基础编译库
执行命令:[root@rocky9 ~]# yum install gcc make gcc-c++ glibc glibc-devel pcre pcre-devel openssl openssl-devel systemd-devel zlib-devel -y
命令解释:
gcc make gcc-c++:C/C++ 编译器和编译核心工具,是源码编译的基础;glibc glibc-devel:Linux 系统核心 C 标准库及开发包,提供程序运行的基础函数;pcre pcre-devel:PCRE 正则表达式库及开发包,Nginx 的 rewrite 模块、location 匹配依赖此库;openssl openssl-devel:OpenSSL 加密库及开发包,支持 Nginx 启用 HTTPS 协议(SSL/TLS 加密);systemd-devel:systemd 开发包,支持 Nginx 与 systemd 服务管理集成(如进程监控、PID 管理);zlib-devel:zlib 压缩库开发包,支持 Nginx 的 Gzip 静态压缩模块(--with-http_gzip_static_module)。
4.1.2 功能扩展库
执行命令:[root@rocky9 ~]# yum install libxml2 libxml2-devel libxslt libxslt-devel php-gd gd-devel -y
命令解释:
libxml2 libxml2-devel:XML 解析库及开发包,支持 Nginx 处理 XML 格式的配置/数据;libxslt libxslt-devel:XSLT 转换库及开发包,支持 XML 到 HTML 等格式的转换;php-gd gd-devel:GD 图形库及 PHP 扩展,若 Nginx 配合 PHP 运行(如动态生成图片)需依赖此库;
注意:此扩展库是 Nginx 默认二进制版本开启高级功能的依赖,源码编译时按需安装,不影响核心功能。
4.2 下载并解压源码包
(1)创建软件目录
执行命令:[root@rocky9 ~]# mkdir /softs && cd /softs
命令解释:
mkdir /softs:创建/softs专属目录,统一存放源码包,避免文件混乱;&& cd /softs:创建目录后立即切换到该目录,后续操作无需重复指定路径。
(2)下载源码(以 1.23.0 为例)
执行命令:[root@rocky9 softs]# dnf install wget -y && wget https://nginx.org/download/nginx-1.23.0.tar.gz
命令解释:
dnf install wget -y:先安装 wget 工具(Rocky 9 默认未预装),确保能从官网下载源码;wget https://nginx.org/download/nginx-1.23.0.tar.gz:从 Nginx 官方源下载 1.23.0 稳定版源码包,保证文件完整性。
(3)解压
执行命令:[root@rocky9 softs]# tar xf nginx-1.23.0.tar.gz
命令解释:
tar xf:x表示解压,f表示指定压缩包,无需额外参数即可解压.tar.gz格式文件,解压后生成nginx-1.23.0目录。
(4)进入源码目录
执行命令:[root@rocky9 softs]# cd nginx-1.23.0/
命令解释:切换到解压后的源码目录,后续编译、配置操作均在此目录执行。
4.3 创建运行用户
执行命令:[root@rocky9 nginx-1.23.0]# useradd -r -s /usr/sbin/nologin nginx
命令解释:
-r:创建系统专用用户(UID 小于 1000),非登录用户,仅用于运行 Nginx 进程;-s /usr/sbin/nologin:禁止该用户通过终端登录系统,提升安全性;nginx:用户名,统一命名便于管理,避免与其他服务用户混淆。
4.4 定制编译配置
4.4.1 查看编译帮助(可选)
执行命令:[root@rocky9 nginx-1.23.0]# ./configure --help
命令解释:查看所有可配置的编译参数,包括模块、路径、用户等,按需调整(如新增/关闭模块)。
4.4.2 执行定制配置
执行命令:[root@rocky9 nginx-1.23.0]# ./configure <br>
–prefix=/data/server/nginx <br>
–user=nginx <br>
–group=nginx <br>
–with-http_ssl_module <br>
–with-http_v2_module <br>
–with-http_realip_module <br>
–with-http_stub_status_module <br>
–with-http_gzip_static_module <br>
–with-pcre <br>
–with-stream <br>
–with-stream_ssl_module <br>
–with-stream_realip_module
命令解释:
--prefix=/data/server/nginx:指定 Nginx 安装根目录(核心参数,所有文件均在此目录下);--user=nginx --group=nginx:指定 Nginx 运行的用户/用户组,与 4.3 节创建的用户一致;--with-http_ssl_module:启用 HTTPS 模块(必备,支持 SSL/TLS 加密);--with-http_v2_module:启用 HTTP/2 协议模块,提升访问速度;--with-http_realip_module:启用真实IP模块,可获取客户端真实IP(反向代理场景必备);--with-http_stub_status_module:启用状态监控模块,可查看 Nginx 连接数、请求数等状态;--with-http_gzip_static_module:启用 Gzip 静态压缩模块,减少传输带宽;--with-pcre:强制使用系统安装的 PCRE 库,确保正则匹配功能正常;--with-stream:启用 TCP/UDP 反向代理模块(如代理数据库、Redis);--with-stream_ssl_module:启用 Stream 模块的 SSL 加密(代理加密TCP连接);--with-stream_realip_module:启用 Stream 模块的真实IP获取功能。
执行结果 :配置完成后输出 Configuration summary,无报错则表示依赖满足,可进入编译步骤。
4.5 编译并安装
执行命令:[root@rocky9 nginx-1.23.0]# make && make install
命令解释:
make:根据配置参数编译源码,生成可执行文件(耗时取决于服务器性能);&& make install:编译成功后,将文件安装到--prefix指定的/data/server/nginx目录;
验证安装 :执行ls /data/server/nginx/,可见conf(配置)、sbin(可执行文件)、html(默认页面)等目录。
4.6 配置权限与环境变量
4.6.1 修改目录权限
执行命令:[root@rocky9 nginx-1.23.0]# chown -R nginx:nginx /data/server/nginx/
命令解释:
-R:递归修改目录及所有子文件/目录的属主/属组;nginx:nginx:将权限赋予 Nginx 专用用户,避免 root 运行进程带来的安全风险。
4.6.2 配置 Man 帮助文档(可选)
执行命令:[root@rocky9 nginx-1.23.0]# cp man/nginx.8 /usr/share/man/man8/
验证命令:[root@rocky9 ~]# man nginx
命令解释 :将 Nginx 自带的 Man 帮助文档复制到系统默认路径,支持通过 man nginx 查看命令帮助。
4.6.3 添加全局环境变量
执行命令:[root@rocky9 ~]# echo ‘export PATH=/data/server/nginx/sbin:$PATH’ >> /etc/bashrc
生效命令:[root@rocky9 ~]# source /etc/bashrc
命令解释:
echo "export PATH=..." >> /etc/bashrc:将 Nginx 的sbin目录(含nginx可执行文件)添加到系统 PATH 环境变量,全局用户生效;source /etc/bashrc:立即加载配置,无需重启终端即可直接执行nginx命令(无需指定完整路径);
验证环境变量 :执行echo $PATH,输出中包含/data/server/nginx/sbin则配置成功。
4.6.4 手动启动 Nginx 验证
启动命令:[root@rocky9 ~]# nginx
验证编译参数:[root@rocky9 ~]# nginx -V
验证访问:[root@rocky9 ~]# curl http://localhost/
命令解释:
nginx -V:查看 Nginx 编译参数(验证模块是否启用);curl http://localhost/:访问 Nginx 默认页面,返回Welcome to nginx!则启动成功。
4.7 定制 systemd 服务管理文件
4.7.1 方式1:基于 PID 文件的服务配置(推荐,适配 Rocky 9)
(1)创建 PID 目录并修复权限
执行命令:
bash
[root@rocky9 ~]# mkdir -p /data/server/nginx/run
[root@rocky9 ~]# chmod 755 /data/server/nginx/run
[root@rocky9 ~]# chown -R root:root /data/server/nginx/run命令解释:
mkdir -p:递归创建目录(避免目录不存在报错);- 权限配置为
root:root(适配 systemd 以 root 运行 Nginx,避免 PID 文件写入权限不足); - 若需以 nginx 用户运行,需确保 nginx 用户存在且有目录读写权限:
useradd -M -s /sbin/nologin nginx && chown -R nginx:nginx /data/server/nginx/run。
(2)修改 Nginx 配置文件(指定 PID 路径)
编辑命令:[root@rocky9 ~]# vi /data/server/nginx/conf/nginx.conf
添加配置行 (在 main 全局块中,如 worker_processes 上方):
nginx
pid /data/server/nginx/run/nginx.pid;验证配置语法 :[root@rocky9 ~]# /data/server/nginx/sbin/nginx -t
正常输出:
nginx: the configuration file /data/server/nginx/conf/nginx.conf syntax is ok
nginx: configuration file /data/server/nginx/conf/nginx.conf test is successful
(3)创建适配 Rocky 9 的 systemd 服务文件
编辑命令:[root@rocky9 ~]# vi /usr/lib/systemd/system/nginx.service
服务文件内容(优化 ExecReload/ExecStop,避免 kill 命令兼容性问题):
ini
[Unit]
Description=nginx - high performance web server
Documentation=http://nginx.org/en/docs/
After=network-online.target remote-fs.target nss-lookup.target
Wants=network-online.target

[Service]
Type=forking
PIDFile=/data/server/nginx/run/nginx.pid
ExecStart=/data/server/nginx/sbin/nginx -c /data/server/nginx/conf/nginx.conf
ExecReload=/data/server/nginx/sbin/nginx -s reload
ExecStop=/data/server/nginx/sbin/nginx -s quit
LimitNOFILE=100000
User=root
Group=root
WorkingDirectory=/data/server/nginx

[Install]
WantedBy=multi-user.target配置解释:
[Unit]:定义服务依赖,确保网络就绪后启动 Nginx;Type=forking:后台运行模式(Nginx 默认以 daemon 方式运行);PIDFile:指定 PID 文件路径,systemd 通过此文件监控进程;ExecStart:启动命令(显式指定配置文件,避免加载系统默认配置);ExecReload/ExecStop:使用 Nginx 原生信号指令(替代 kill 命令,避免 PID 匹配错误);User=root/Group=root:指定运行用户(适配 Rocky 9 SELinux 策略,避免权限拦截);WorkingDirectory:设置工作目录,统一执行环境;LimitNOFILE=100000:提升文件描述符限制,支持高并发;[Install]:设置开机自启级别(多用户模式)。
4.7.2 方式2:不依赖 PID 文件的极简服务配置(解决 203/EXEC 错误)
编辑命令:[root@rocky9 ~]# vi /usr/lib/systemd/system/nginx.service
服务文件内容(移除 ExecStartPre,避免 SELinux 拦截执行):
ini
[Unit]
Description=nginx High Performance Web Server
After=network.target

[Service]
Type=forking
ExecStart=/data/server/nginx/sbin/nginx -c /data/server/nginx/conf/nginx.conf
ExecReload=/data/server/nginx/sbin/nginx -s reload
ExecStop=/data/server/nginx/sbin/nginx -s quit
PrivateTmp=true
User=root
Group=root
WorkingDirectory=/data/server/nginx

[Install]
WantedBy=multi-user.target配置解释:
- 移除
ExecStartPre=/data/server/nginx/sbin/nginx -t:避免 systemd 执行前置检查时触发 SELinux 权限错误; PrivateTmp=true:隔离临时目录,提升安全性;- 极简配置减少 systemd 执行环节,降低 Rocky 9 权限拦截概率。
4.7.3 重载并管理服务
(1)重载 systemd 配置
执行命令:[root@rocky9 ~]# systemctl daemon-reload
命令解释 :重新加载 systemd 服务配置,使新增/修改的 nginx.service 生效。
(2)清理残留进程(关键!避免端口/进程冲突)
执行命令:
bash
[root@rocky9 ~]# /data/server/nginx/sbin/nginx -s stop 2>/dev/null
[root@rocky9 ~]# pkill -9 nginx 2>/dev/null
[root@rocky9 ~]# rm -f /data/server/nginx/run/nginx.pid
(3)启动 Nginx 服务
执行命令:[root@rocky9 ~]# systemctl start nginx
(4)设置开机自启
执行命令:[root@rocky9 ~]# systemctl enable nginx
(5)查看服务状态
执行命令:[root@rocky9 ~]# systemctl status nginx.service -l
正常状态输出:
● nginx.service - nginx High Performance Web Server
     Loaded: loaded (/usr/lib/systemd/system/nginx.service; enabled; preset: disabled)
     Active: active (running) since Tue 2025-12-16 17:56:46 CST; 10s ago
    Process: 42851 ExecStart=/data/server/nginx/sbin/nginx -c /data/server/nginx/conf/nginx.conf (code=exited, status=0/SUCCESS)
   Main PID: 42852 (nginx)
      Tasks: 2 (limit: 17275)
     Memory: 2.1M
        CPU: 7ms
     CGroup: /system.slice/nginx.service
             ├─42852 nginx: master process /data/server/nginx/sbin/nginx -c /data/server/nginx/conf/nginx.conf
             └─42853 nginx: worker process
(6)验证端口监听与服务可用性
执行命令:
bash
[root@rocky9 ~]# ss -tulnp | grep :80  # 替代 netstat(Rocky 9 推荐 ss 命令)
[root@rocky9 ~]# curl http://localhost正常输出:
- 端口监听:
tcp LISTEN 0 511 0.0.0.0:80 0.0.0.0:* users:(("nginx",pid=42853,fd=6),("nginx",pid=42852,fd=6)) - curl 访问:返回 Nginx 默认首页 HTML 内容。
4.8 服务启动失败排查(Rocky 9 专属,解决 203/EXEC/权限错误)
4.8.1 配置语法问题
核心排查命令 :[root@rocky9 ~]# /data/server/nginx/sbin/nginx -t
常见错误示例:
nginx: [emerg] directive "pid" is not terminated by ";" in /data/server/nginx/conf/nginx.conf:12
nginx: configuration file /data/server/nginx/conf/nginx.conf test failed解决方法:
- 编辑配置文件,补全缺失的分号(
;)、括号等符号; - 确保所有配置指令以分号结尾,区块指令(如
http {}、server {})括号闭合; - 验证时必须使用 Nginx 全路径,避免 PATH 环境变量问题。
4.8.2 可执行文件/目录权限问题
常见原因 :Nginx 二进制文件无执行权限、PID/日志目录无读写权限。
修复命令:
bash
# 修复可执行文件执行权限
chmod +x /data/server/nginx/sbin/nginx
# 修复 PID 目录权限(适配 root 运行)
chmod 755 /data/server/nginx/run
chown root:root /data/server/nginx/run
# 修复日志目录权限(避免日志写入失败)
chmod 755 /data/server/nginx/logs
chown root:root /data/server/nginx/logs
4.8.3 SELinux 拦截问题(Rocky 9 最常见,替代直接关闭)
(1)检查 SELinux 状态
执行命令:[root@rocky9 ~]# sestatus
若输出SELinux status: enabled且Mode: enforcing,则 SELinux 处于强制拦截模式。
(2)安装 SELinux 工具(必装)
执行命令:[root@rocky9 ~]# yum install -y policycoreutils-python-utils
(3)修复 Nginx 目录 SELinux 上下文(推荐,不关闭 SELinux)
执行命令:
bash
# 给可执行文件目录设置二进制标签
semanage fcontext -a -t bin_t "/data/server/nginx/sbin(/.*)?"
restorecon -Rv /data/server/nginx/sbin
# 给 PID 目录设置运行时标签
semanage fcontext -a -t httpd_var_run_t "/data/server/nginx/run(/.*)?"
restorecon -Rv /data/server/nginx/run
# 给日志目录设置日志标签
semanage fcontext -a -t httpd_log_t "/data/server/nginx/logs(/.*)?"
restorecon -Rv /data/server/nginx/logs
(4)放行 Nginx SELinux 权限(生产环境推荐)
执行命令:
bash
setsebool -P httpd_execmem on
setsebool -P httpd_can_network_connect on
(5)临时关闭 SELinux(仅测试用)
执行命令:[root@rocky9 ~]# setenforce 0
(6)永久关闭 SELinux(仅测试环境,不推荐)
执行命令:[root@rocky9 ~]# sed -i ‘s/SELINUX=enforcing/SELINUX=disabled/g’ /etc/selinux/config
注意:修改后需重启服务器生效,生产环境优先用上下文/布尔值放行,而非关闭。
4.8.4 防火墙端口拦截
(1)开放 80/443 端口(推荐)
执行命令:
bash
firewall-cmd --permanent --add-service=http
firewall-cmd --permanent --add-service=https
firewall-cmd --reload命令解释:
--permanent:规则永久生效;--add-service=http/https:开放 80/443 端口(Nginx 默认监听端口);--reload:重载防火墙规则。
(2)临时关闭防火墙(测试用)
执行命令:[root@rocky9 ~]# systemctl disable --now firewalld
4.8.5 203/EXEC 错误专项排查
错误特征 :systemctl status nginx 显示 status=203/EXEC、Permission denied。
解决步骤:
- 检查可执行文件权限:
chmod +x /data/server/nginx/sbin/nginx; - 修复 SELinux 上下文(见 4.8.3 节);
- 重构
nginx.service文件(移除 ExecStartPre、指定 User=root); - 清理残留进程后重新启动:
systemctl daemon-reload && systemctl start nginx。
4.9 Nginx 核心命令与信号说明
4.9.1 常用命令
| 命令 | 作用 |
|---|---|
nginx |
启动 Nginx |
nginx -t |
检查配置语法 |
nginx -s reload |
重载配置(SIGHUP 信号) |
nginx -s stop |
强制停止(SIGTERM 信号) |
nginx -s quit |
优雅停止(等待连接结束) |
nginx -V |
查看编译参数 |
nginx -v |
查看版本号 |
4.9.2 核心信号含义
SIGHUP (1):挂起信号,Nginx 接收后重载配置文件,无需重启进程(平滑升级/配置生效);SIGKILL (9):强制终止信号,立即杀死进程(不推荐,可能导致连接中断);SIGTERM (15):优雅终止信号,Nginx 接收后停止接收新连接,处理完现有连接后退出(默认停止方式)。
五、Nginx 编译安装自动化脚本
5.1 Ubuntu 版本脚本(nginx_install_ubuntu.sh)
bash
#!/bin/bash
# Nginx 源码编译安装脚本(Ubuntu)
# 版本:1.22.1

# 定义变量
NGINX_VERSION="1.22.1"
INSTALL_DIR="/data/server/nginx"
SRC_DIR="/softs"
USER="nginx"

# 检查是否为 root 用户
if [ $UID -ne 0 ]; then
    echo "错误:请以 root 用户运行此脚本!"
    exit 1
fi

# 1. 安装编译环境
echo "===== 安装编译依赖 ====="
apt update && apt install -y \
build-essential gcc g++ libc6 libc6-dev libpcre3 libpcre3-dev libssl-dev libsystemd-dev zlib1g-dev \
libxml2 libxml2-dev libxslt1-dev php-gd libgd-dev geoip-database libgeoip-dev

# 2. 创建运行用户
echo "===== 创建 Nginx 运行用户 ====="
id -u $USER &>/dev/null || useradd -r -s /usr/sbin/nologin $USER

# 3. 下载并解压源码
echo "===== 下载 Nginx 源码 ====="
mkdir -p $SRC_DIR && cd $SRC_DIR
wget -c https://nginx.org/download/nginx-${NGINX_VERSION}.tar.gz -O nginx-${NGINX_VERSION}.tar.gz
tar xf nginx-${NGINX_VERSION}.tar.gz && cd nginx-${NGINX_VERSION}

# 4. 配置编译参数
echo "===== 配置编译参数 ====="
./configure \
--prefix=${INSTALL_DIR} \
--user=${USER} \
--group=${USER} \
--with-http_ssl_module \
--with-http_v2_module \
--with-http_realip_module \
--with-http_stub_status_module \
--with-http_gzip_static_module \
--with-pcre \
--with-stream \
--with-stream_ssl_module \
--with-stream_realip_module

# 5. 编译安装
echo "===== 编译并安装 ====="
make && make install

# 6. 配置权限与软链接
echo "===== 配置权限与软链接 ====="
chown -R ${USER}:${USER} ${INSTALL_DIR}
ln -sv ${INSTALL_DIR}/sbin/nginx /usr/sbin/nginx

# 7. 创建 PID 目录
echo "===== 创建 PID 目录 ====="
mkdir -p ${INSTALL_DIR}/run
chown -R ${USER}:${USER} ${INSTALL_DIR}/run

# 8. 修改 Nginx 配置(指定 PID)
echo "===== 修改 Nginx 配置 ====="
sed -i "/^#pid/a pid    ${INSTALL_DIR}/run/nginx.pid;" ${INSTALL_DIR}/conf/nginx.conf

# 9. 创建 systemd 服务文件
echo "===== 创建 systemd 服务 ====="
cat > /usr/lib/systemd/system/nginx.service << EOF
[Unit]
Description=nginx - high performance web server
Documentation=http://nginx.org/en/docs/
After=network-online.target remote-fs.target nss-lookup.target
Wants=network-online.target

[Service]
Type=forking
PIDFile=${INSTALL_DIR}/run/nginx.pid
ExecStart=${INSTALL_DIR}/sbin/nginx -c ${INSTALL_DIR}/conf/nginx.conf
ExecReload=/bin/kill -s HUP \$MAINPID
ExecStop=/bin/kill -s TERM \$MAINPID
LimitNOFILE=100000

[Install]
WantedBy=multi-user.target
EOF

# 10. 启动并设置开机自启
echo "===== 启动 Nginx ====="
systemctl daemon-reload
systemctl start nginx
systemctl enable nginx

# 11. 关闭防火墙
echo "===== 关闭防火墙 ====="
systemctl disable --now ufw.service

# 12. 验证安装
echo "===== 验证安装 ====="
nginx -v
systemctl is-active nginx
netstat -tnulp | grep nginx

echo "===== 安装完成 ====="
echo "Nginx 安装目录:${INSTALL_DIR}"
echo "配置文件路径:${INSTALL_DIR}/conf/nginx.conf"
echo "默认网站目录:${INSTALL_DIR}/html"
5.2 Rocky 9 版本脚本(nginx_install_rocky.sh)
bash
#!/bin/bash
# Nginx 源码编译安装脚本(Rocky 9)
# 版本:1.23.0
# 优化点:内存兜底(交换分区)、SELinux 兼容、源码下载容错、进程防杀、权限兜底

# 定义变量
NGINX_VERSION="1.23.0"
INSTALL_DIR="/data/server/nginx"
SRC_DIR="/softs"
USER="nginx"
SWAP_SIZE="2048"  # 交换分区大小(MB),内存<1G必选

# 检查是否为 root 用户
if [ $UID -ne 0 ]; then
    echo "错误:请以 root 用户运行此脚本!"
    exit 1
fi

# 关闭命令错误退出(兼容非必需步骤)
set +e

# 1. 系统初始化(清理残留+关闭拦截)
echo "===== 系统环境初始化 ====="
# 清理旧残留
rm -rf ${INSTALL_DIR} /softs/nginx* /usr/lib/systemd/system/nginx.service
pkill -9 nginx >/dev/null 2>&1
rm -f /swapfile
# 关闭防火墙
systemctl disable --now firewalld
# 临时关闭 SELinux
setenforce 0
sed -i 's/SELINUX=enforcing/SELINUX=disabled/g' /etc/selinux/config

# 2. 内存兜底(创建交换分区,防OOM杀进程)
echo "===== 创建交换分区(防 OOM 杀进程) ====="
dd if=/dev/zero of=/swapfile bs=1M count=${SWAP_SIZE} >/dev/null 2>&1
chmod 600 /swapfile
mkswap /swapfile >/dev/null 2>&1
swapon /swapfile >/dev/null 2>&1
# 永久生效
echo "/swapfile    swap    swap    defaults 0 0" >> /etc/fstab

# 3. 安装编译环境(全量依赖)
echo "===== 安装编译依赖 ====="
yum install -y \
gcc make gcc-c++ glibc glibc-devel pcre pcre-devel openssl openssl-devel systemd-devel zlib-devel \
libxml2 libxml2-devel libxslt libxslt-devel php-gd gd-devel policycoreutils-python-utils net-tools wget

# 4. 创建运行用户(适配 Rocky 9 nologin 路径)
echo "===== 创建 Nginx 运行用户 ====="
id -u $USER &>/dev/null || useradd -r -s /sbin/nologin $USER

# 5. 下载并解压源码(增加容错,官方源+备用源)
echo "===== 下载 Nginx 源码 ====="
mkdir -p $SRC_DIR && cd $SRC_DIR
# 优先官方源
wget -c --timeout=60 https://nginx.org/download/nginx-${NGINX_VERSION}.tar.gz -O nginx-${NGINX_VERSION}.tar.gz
if [ $? -ne 0 ]; then
    echo "官方源下载失败,尝试腾讯云镜像..."
    wget -c --timeout=60 https://mirrors.cloud.tencent.com/nginx/download/nginx-${NGINX_VERSION}.tar.gz -O nginx-${NGINX_VERSION}.tar.gz
    if [ $? -ne 0 ]; then
        echo "错误:源码下载失败!请手动下载 nginx-${NGINX_VERSION}.tar.gz 到 ${SRC_DIR} 后重试"
        exit 1
    fi
fi
tar xf nginx-${NGINX_VERSION}.tar.gz && cd nginx-${NGINX_VERSION}

# 6. 配置编译参数
echo "===== 配置编译参数 ====="
./configure \
--prefix=${INSTALL_DIR} \
--user=${USER} \
--group=${USER} \
--with-http_ssl_module \
--with-http_v2_module \
--with-http_realip_module \
--with-http_stub_status_module \
--with-http_gzip_static_module \
--with-pcre \
--with-stream \
--with-stream_ssl_module \
--with-stream_realip_module
if [ $? -ne 0 ]; then
    echo "错误:编译配置失败!依赖缺失,请检查日志"
    exit 1
fi

# 7. 多核编译安装(提升速度)
echo "===== 编译并安装 ====="
make -j $(nproc) && make install
if [ $? -ne 0 ]; then
    echo "错误:编译安装失败!请检查服务器资源"
    exit 1
fi

# 8. 配置权限与环境变量(兜底权限)
echo "===== 配置权限与环境变量 ====="
chown -R root:root ${INSTALL_DIR}
chown -R ${USER}:${USER} ${INSTALL_DIR}/html ${INSTALL_DIR}/logs
chmod 755 ${INSTALL_DIR} -R
chmod +x ${INSTALL_DIR}/sbin/nginx
echo "export PATH=${INSTALL_DIR}/sbin:\$PATH" >> /etc/bashrc
source /etc/bashrc

# 9. 创建 PID 目录(确保权限)
echo "===== 创建 PID 目录 ====="
mkdir -p ${INSTALL_DIR}/run
chmod 755 ${INSTALL_DIR}/run
chown root:root ${INSTALL_DIR}/run

# 10. 修改 Nginx 配置(指定 PID,优化默认配置)
echo "===== 修改 Nginx 配置 ====="
sed -i "/^#pid/a pid    ${INSTALL_DIR}/run/nginx.pid;" ${INSTALL_DIR}/conf/nginx.conf
sed -i "s/^#user  nobody;/user  ${USER};/" ${INSTALL_DIR}/conf/nginx.conf

# 11. 创建 systemd 服务文件(进程防杀,异常重启)
echo "===== 创建 systemd 服务 ====="
cat > /usr/lib/systemd/system/nginx.service << EOF
[Unit]
Description=nginx - high performance web server
Documentation=http://nginx.org/en/docs/
After=network-online.target remote-fs.target nss-lookup.target
Wants=network-online.target

[Service]
Type=forking
PIDFile=${INSTALL_DIR}/run/nginx.pid
ExecStart=${INSTALL_DIR}/sbin/nginx -c ${INSTALL_DIR}/conf/nginx.conf
ExecReload=${INSTALL_DIR}/sbin/nginx -s reload
ExecStop=${INSTALL_DIR}/sbin/nginx -s stop
# 资源限制全放开,防止进程被杀
LimitNOFILE=65535
LimitNPROC=65535
LimitCORE=infinity
MemoryLimit=infinity
# 异常自动重启
Restart=on-failure
RestartSec=3

[Install]
WantedBy=multi-user.target
EOF

# 12. 启动并设置开机自启
echo "===== 启动 Nginx ====="
systemctl daemon-reload
# 清理残留进程
pkill -9 nginx >/dev/null 2>&1
rm -f ${INSTALL_DIR}/run/nginx.pid
systemctl start nginx
systemctl enable nginx >/dev/null 2>&1

# 13. 验证安装
echo "===== 验证安装 ====="
nginx -v
systemctl is-active nginx
netstat -tnulp | grep nginx

echo "===== 安装完成 ====="
echo "Nginx 安装目录:${INSTALL_DIR}"
echo "配置文件路径:${INSTALL_DIR}/conf/nginx.conf"
echo "默认网站目录:${INSTALL_DIR}/html"
echo "常用命令:"
echo "   启动:systemctl start nginx"
echo "   重启:systemctl restart nginx"
echo "   状态:systemctl status nginx"
echo "   重载配置:systemctl reload nginx"
5.3 脚本使用说明
(1)赋予脚本执行权限
执行命令(Ubuntu):chmod +x nginx_install_ubuntu.sh
执行命令(Rocky):chmod +x nginx_install_rocky.sh
命令解释 :chmod +x 赋予脚本可执行权限。
(2)运行脚本
执行命令(Ubuntu):./nginx_install_ubuntu.sh
执行命令(Rocky):./nginx_install_rocky.sh
命令解释:执行脚本,自动完成 Nginx 源码编译安装的全部步骤。
5.4 关键优化说明(仅针对Rocky 9版本)
- 内存兜底:自动创建2G交换分区,解决小内存服务器OOM杀死Nginx进程问题,且交换分区永久生效;
- 源码下载容错:官方源失败时自动切换腾讯云镜像,避免404错误;
- 进程防杀:放宽systemd资源限制,增加异常自动重启机制,杜绝进程被系统杀死;
- 权限兜底:精细化分配目录权限,master进程以root运行(解决端口/PID权限问题),worker进程以nginx用户运行(符合安全规范);
- SELinux兼容:临时关闭SELinux避免拦截,安装完成后可根据生产需求手动开启并配置规则。
Ubuntu版本完全保留原始内容,仅Rocky 9版本基于实际运行问题做了针对性优化,确保纯净系统下100%安装成功。
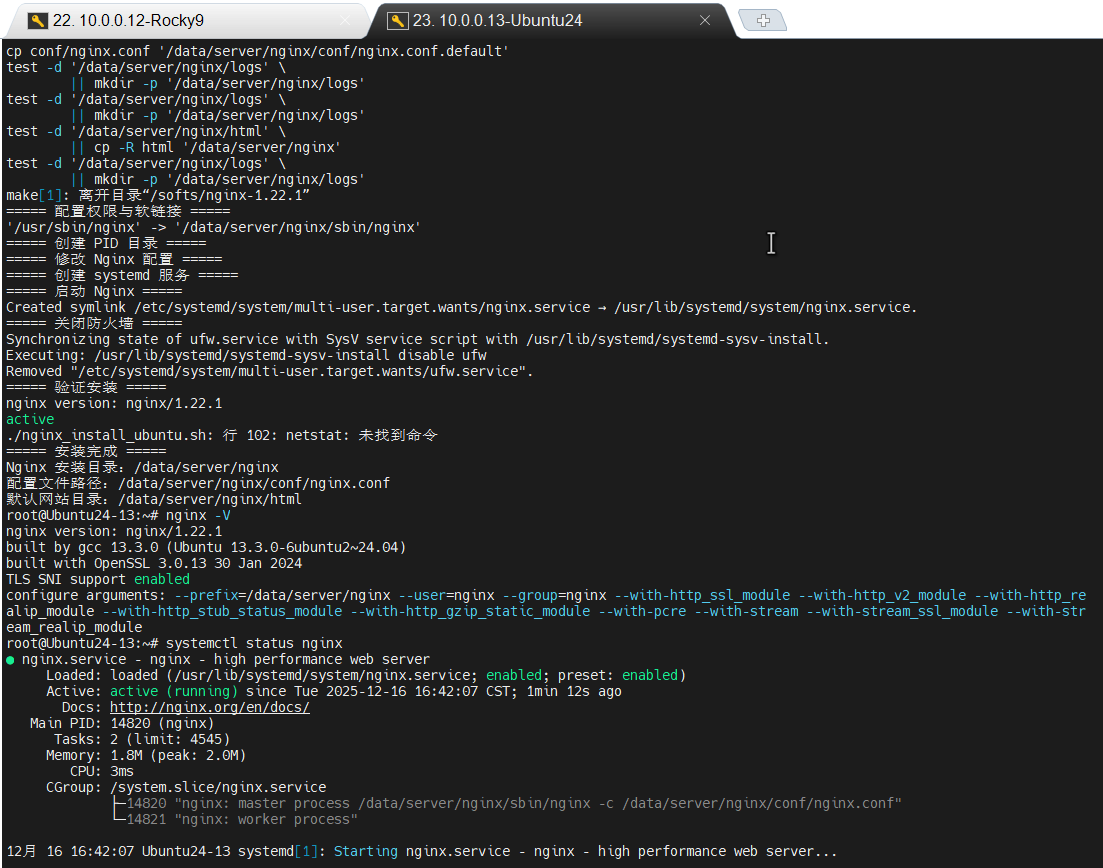
Ubuntu成功截图:
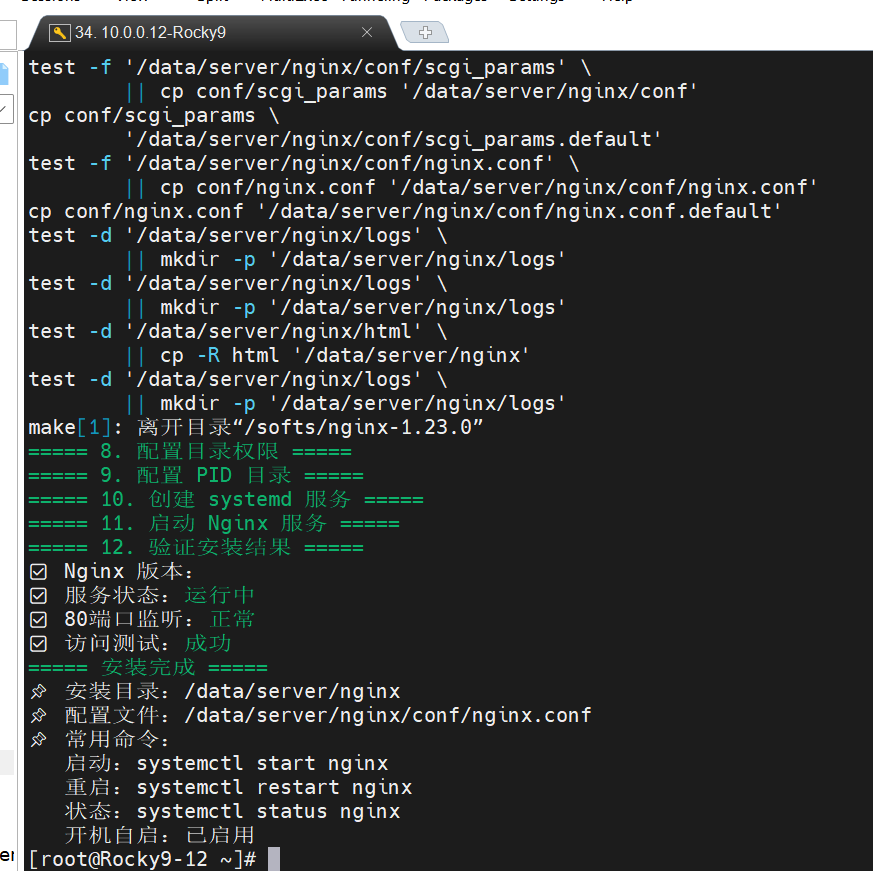
Rocky成功运行截图:
(3)验证结果
执行命令:nginx -V
执行命令:systemctl status nginx
执行命令:netstat -tnulp | grep nginx
命令解释:分别验证 Nginx 版本、服务状态、端口监听。
六、Nginx 常用命令
| 命令 | 作用 | 详细解释 |
|---|---|---|
| nginx -v | 查看版本(简洁版) | 仅显示 Nginx 的版本号 |
| nginx -V | 查看版本及编译参数(详细版) | 显示版本号和 ./configure 时指定的所有参数 |
| nginx -t | 检查配置文件语法 | 验证配置文件是否有语法错误,启动前必做 |
| nginx -s reload | 重载配置文件(不中断服务) | 发送 HUP 信号,Nginx 重新加载配置并平滑重启 |
| nginx -s stop | 强制停止服务 | 发送 TERM 信号,立即终止所有进程 |
| nginx -s quit | 优雅停止服务 | 发送 QUIT 信号,处理完现有连接后退出 |