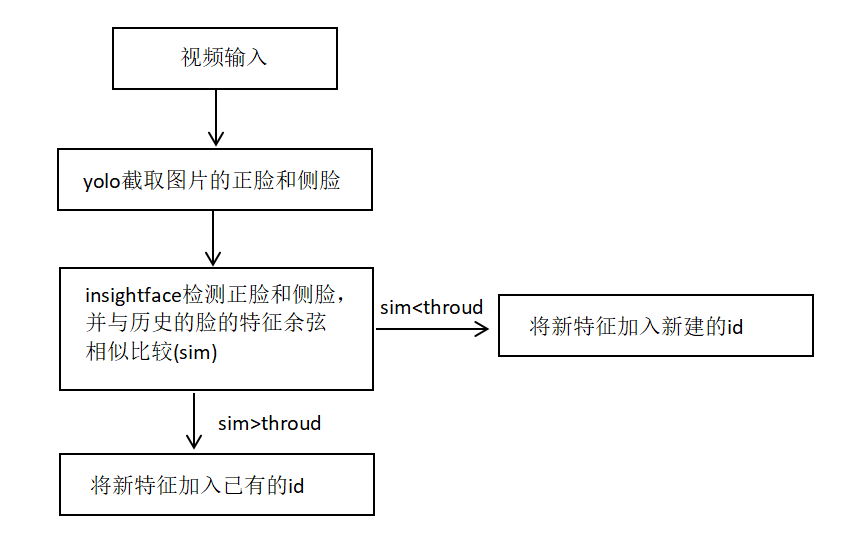
1.视频追踪原理
视频追踪原理如下:
2.环境搭建
该模型的环境搭建其实很简单,具体步骤如下:
2.1 insightface模型环境搭建
步骤 1:创建虚拟环境(推荐,避免依赖冲突)
建议用conda(Anaconda/Miniconda)创建独立环境,也可使用venv:
# 1. 安装Anaconda后,创建conda环境(名称自定义,如insightface_env)
conda create -n insightface_env python=3.8
# 2. 激活环境
# Windows
conda activate insightface_env
# Linux/macOS
source activate insightface_env
步骤 2:安装 PyTorch(GPU/CPU 版,核心依赖)
InsightFace 基于 PyTorch,需先安装适配的 PyTorch 版本:
-
查看系统 CUDA 版本(GPU 用户):
nvcc -V # 如输出CUDA 11.7,则对应安装torch的cu117版本
-
安装命令(从 PyTorch 官网复制,示例如下):
GPU 版(CUDA 11.7):
pip3 install torch==2.0.1 torchvision==0.15.2 torchaudio==2.0.2 --index-url https://download.pytorch.org/whl/cu1173. 验证 PyTorch 安装:
import torch
print(torch.cuda.is_available())  # GPU版返回True,CPU版返回False
步骤 3:安装 InsightFace
方式 1:pip 安装官方稳定版(推荐)
pip install insightface方式 2:源码安装(需最新功能 / 修复 bug)
# 克隆源码
git clone https://github.com/deepinsight/insightface.git
cd insightface
# 安装依赖
pip install -r requirements.txt
# 安装库(开发模式)
pip install -e .
步骤4:安装额外依赖
InsightFace 依赖onnxruntime(模型推理)、mxnet(部分功能)、opencv-python等,若安装后报错,补充安装:
# 基础依赖
pip install opencv-python pillow numpy onnxruntime-gpu  # GPU版onnxruntime
# 若CPU版,替换为:onnxruntime
# 可选:mxnet(部分旧模型需要)
pip install mxnet-cu117  # 对应CUDA 11.7,CPU版用mxnet
步骤5:验证环境是否搭建成功
执行以下代码,测试 InsightFace 核心功能(需先下载预训练模型,首次运行会自动下载):
import insightface
import cv2
import time

# 1. 初始化模型(首次加载耗时不计入检测耗时)
app = insightface.app.FaceAnalysis(name='E:/AI/1.1_track/models/buffalo_s')
# ctx_id=0:GPU加速(需装onnxruntime-gpu);ctx_id=-1:CPU
app.prepare(ctx_id=0, det_size=(320, 320))

# 2. 读取图片(提前读取,排除IO耗时)
img_path = "images/1.png"
img = cv2.imread(img_path)
if img is None:
    raise ValueError("图片读取失败,请检查路径")

# 3. 多次检测取平均(消除偶然误差)
test_times = 100  # 测试次数,越多越精准
total_time = 0.0

for i in range(test_times):
    start_time = time.time()
    # 核心检测逻辑
    faces = app.get(img)
    end_time = time.time()

    # 累加耗时(单位:秒)
    detect_time = end_time - start_time
    total_time += detect_time

    # 打印单次耗时(可选)
    if i % 10 == 0:
        print(f"第{i}次检测耗时:{detect_time * 1000:.2f}ms")

# 计算平均耗时
avg_time = (total_time / test_times) * 1000  # 转换为毫秒
print(f"\n平均检测耗时:{avg_time:.2f}ms")
print(f"检测到人脸数量:{len(faces)}")
2.2 yolov8环境搭建
在2.1搭建环境里运行以下代码即可
pip install ultralytics3.python代码实现
代码实现如下(代码注释了每个函数的功能):
from ultralytics import YOLO
import cv2
import time
import numpy as np
# import insightface
from insightface.app import FaceAnalysis
import os

# ---------------------- 初始化InsightFace人脸特征提取器 ----------------------
# 修复1:统一使用CPU(报错显示无CUDA,故删除CUDA配置,避免警告)
face_app = FaceAnalysis(
    name='buffalo_s',
    root='E:/AI/1.1_track',
    # providers=['CPUExecutionProvider']  # 仅保留CPU,匹配环境实际支持的Provider
    providers=['CUDAExecutionProvider']  # 根据实际情况选择CPU或GPU
)

face_app.prepare(ctx_id=0, det_size=(128, 128), det_thresh=0.5)  # ctx_id=-1  det_size=(128, 128)

# 修复2:调整已知人脸存储结构(用numpy数组存储特征,避免列表/tuple混淆)
known_faces = np.array([])  # 存储特征向量(每行:[face_id, 特征1, 特征2, ..., 特征511])
next_face_id = 0  # 下一个新面孔的ID
saves_dir = "images"  # 统一人脸保存目录变量(避免函数参数重复)
os.makedirs(saves_dir, exist_ok=True)  # 确保保存目录存在,防止报错


# 修复3:简化余弦相似度计算(直接处理numpy数组,避免列表索引错误)
def cosine_similarity(feat1, feat2):
    """
    计算已知人脸特征与当前人脸特征的余弦相似度
    :param feat1: 已知人脸特征矩阵(shape: [N, 512],N为已知人脸数,512=ID+511维特征)
    :param feat2: 当前人脸特征向量(shape: [511])
    :return: 最大相似度对应的ID、最大相似度值
    """
    if feat1.size == 0:  # 无已知人脸时直接返回
        return None, -1.0

    # 分离ID列和特征列(避免tuple索引错误的核心修复)
    known_ids = feat1[:, 0]  # 所有已知人脸的ID(第一列)
    known_feat = feat1[:, 1:]  # 所有已知人脸的特征(第2列到最后一列)

    # 批量计算余弦相似度(numpy矩阵运算,避免循环)
    dot_product = np.dot(known_feat, feat2)  # 点积
    norm_known = np.linalg.norm(known_feat, axis=1)  # 已知特征的范数(每行1个值)
    norm_current = np.linalg.norm(feat2)  # 当前特征的范数

    # 处理范数为0的极端情况(避免除以0)
    if norm_current == 0 or np.all(norm_known == 0):
        return None, -1.0

    similarities = dot_product / (norm_known * norm_current)
    max_idx = np.argmax(similarities)  # 最大相似度的索引
    return known_ids[max_idx].astype(int), similarities[max_idx]  # ID转int,匹配预期类型


# 提取人脸特征(保持逻辑,补充异常处理)
def get_face_feature(img):
    """从图像中提取人脸特征(返回numpy数组,避免列表操作)"""
    try:
        faces = face_app.get(img)
        if len(faces) == 0:
            return None
        # 返回numpy数组格式的特征向量(511维)
        return faces[0].embedding.astype(np.float32)
    except Exception as e:
        print(f"提取人脸特征失败: {e}")
        return None


# 修复4:人脸识别逻辑(适配numpy数组存储,避免列表插入错误)
def recognize_face(face_img, threshold=0.3):
    """识别人脸,返回对应的ID和相似度"""
    global known_faces, next_face_id
    # 提取当前人脸特征
    current_feat = get_face_feature(face_img)

    if current_feat is None:
        return None, None

    # 与已知人脸比较
    matched_id, max_sim = cosine_similarity(known_faces, current_feat)
    # 无匹配时,添加新人脸(用numpy拼接,避免列表insert错误)
    if matched_id is None or max_sim < threshold:
        matched_id = next_face_id
        # 构造新特征行:[ID, 511维特征](确保为numpy数组)
        new_face_row = np.hstack([np.array([matched_id]), current_feat])
        # 拼接新行到已知人脸矩阵(首次添加时初始化矩阵)
        if known_faces.size == 0:
            known_faces = np.expand_dims(new_face_row, axis=0)
        else:
            known_faces = np.vstack([known_faces, new_face_row])
        next_face_id += 1  # 更新下一个ID

    if matched_id is not None and max_sim > threshold and max_sim < (threshold + 30):
        # 构造新特征行:[ID, 511维特征](确保为numpy数组)
        new_face_row = np.hstack([np.array([matched_id]), current_feat])
        # 拼接新行到已知人脸矩阵(首次添加时初始化矩阵)
        if known_faces.size == 0:
            known_faces = np.expand_dims(new_face_row, axis=0)
        else:
            known_faces = np.vstack([known_faces, new_face_row])

    return matched_id, round(max_sim, 2)  # 相似度保留2位小数,优化显示


###############################################  hash对比  ###############################################
def calculate_image_hash(image, hash_size=8):
    """
    计算图片的感知哈希值(基于cv2实现,用于去重)
    :param image: cv2读取的图片(BGR格式NumPy数组)
    :param hash_size: 哈希尺寸,默认8x8(生成64位哈希)
    :return: 哈希值字符串
    """
    # 转为灰度图
    gray = cv2.cvtColor(image, cv2.COLOR_BGR2GRAY)
    # 缩放至(hash_size+1)xhash_size,保留结构特征
    resized = cv2.resize(gray, (hash_size + 1, hash_size))
    # 计算相邻像素差异(二值化:左侧>右侧为1,否则为0)
    diff = resized[:, 1:] > resized[:, :-1]
    # 转换为哈希字符串
    return ''.join(str(int(pixel)) for pixel in np.nditer(diff))


def hamming_distance(hash1, hash2):
    """
    计算两个哈希值的汉明距离(差异位数,用于判断相似度)
    :param hash1: 第一个哈希字符串
    :param hash2: 第二个哈希字符串
    :return: 汉明距离(值越小越相似)
    """
    if len(hash1) != len(hash2):
        raise ValueError("两个哈希值长度必须一致")
    return sum(c1 != c2 for c1, c2 in zip(hash1, hash2))


def deduplicate_images_by_hash(image_entries, hash_threshold=5):
    """
    对图片列表按哈希去重(保留第一张相似图片)
    :param image_entries: 图片条目列表,每个条目为(conf_score, frame_img, frame_num, face_cls)
    :param hash_threshold: 汉明距离阈值,小于等于此值视为相似图片
    :return: 去重后的图片条目列表
    """
    if not image_entries:
        return []

    deduplicated = []
    hash_records = []  # 存储已保留图片的哈希值

    for entry in image_entries:
        # conf_score, frame_img, frame_num, face_cls = entry
        conf_score, frame_img, frame_num, face_roi_index, face_detections, face_cls = entry
        # 计算当前图片的哈希值
        current_hash = calculate_image_hash(frame_img)
        # 判断是否与已保留图片相似
        is_duplicate = False
        for existing_hash in hash_records:
            distance = hamming_distance(current_hash, existing_hash)
            if distance <= hash_threshold:
                is_duplicate = True
                break
        # 非相似图片则保留,并记录哈希值
        if not is_duplicate:
            deduplicated.append(entry)
            hash_records.append(current_hash)

    return deduplicated


# 初始化参数
top_n = 1
hash_threshold = 5
# ---------------------- YOLOv8人脸检测与追踪主函数 ----------------------
def yolo_insightface_tracking(
        video_path,
        model_path="best.pt",
        save_output=True,
        face_conf_thresh=0.4,
        saves=saves_dir,  # 用统一目录变量,避免重复定义
):
    # 1. 加载YOLOv8模型
    model = YOLO(model_path)
    print(f"✅ 成功加载YOLO人脸模型:{model_path}")

    # 2. 打开视频源
    cap = cv2.VideoCapture(video_path)
    if not cap.isOpened():
        raise ValueError(f"❌ 无法打开视频源:{video_path}")

    # 3. 获取视频信息
    fps = int(cap.get(cv2.CAP_PROP_FPS))
    width = int(cap.get(cv2.CAP_PROP_FRAME_WIDTH))
    height = int(cap.get(cv2.CAP_PROP_FRAME_HEIGHT))
    total_frames = int(cap.get(cv2.CAP_PROP_FRAME_COUNT))
    total_duration = total_frames / fps  # 总时长(秒)
    calculated_fps = int(total_frames / total_duration if total_duration > 0 else 0)
    print(f"📹 视频信息:帧率={fps},分辨率={width}x{height},总帧数={total_frames}")

    # 存储结构:{track_id: [(人脸置信度, 完整帧, 帧号, 人脸检测类别), ...]}
    track_frame_data = {}

    # 存贮最终输出结果
    outs = {}

    # 5. 逐帧处理(修复6:补充current_fps初始化,避免未定义报错)
    frame_count = 0
    print("\n🚀 开始人脸检测与追踪(按 'q' 退出)...")
    start_time = time.time()
    while cap.isOpened():
        ret, frame = cap.read()
        if not ret:
            break
        frame_count += 1
        if frame_count % 30 == 0:
            # YOLO检测(指定CPU,匹配环境)
            results = model(frame, conf=face_conf_thresh, iou=0.45)[0]# , device="cpu"

            face_detections = []
            # 处理每个检测框
            for result in results:
                for box in result.boxes:
                    x1, y1, x2, y2 = map(int, box.xyxy[0])
                    face_detections.append([x1, y1, x2, y2])
                    # 截取人脸(修复7:确保边界框有效,避免空图像)
                    if x1 >= x2 or y1 >= y2:
                        continue
                    face_img = frame[y1:y2, x1:x2]
                    # 人脸识别与追踪
                    # end3 = time.time()
                    face_id, similarity = recognize_face(face_img)

                    # 初始化当前追踪ID的存储列表
                    if face_id not in track_frame_data:
                        track_frame_data[face_id] = []

                    # (1. outs 加入 id
                    if face_id not in outs:
                        outs[face_id] = {}
                        outs[face_id]['fps_id_list'] = [frame_count]
                    else:
                        outs[face_id]['fps_id_list'].append(frame_count)

                    face_cls = int(box.cls[0])
                    face_conf = float(box.conf[0])
                    face_roi = frame[y1:y2, x1:x2]
                    face_roi_index = [x1, y1, x2, y2]
                    if face_roi.size == 0:
                        continue
                    # # 新增当前图片条目到存储列表
                    current_entry = (face_conf, frame.copy(), frame_count, face_roi_index, face_detections, face_cls)
                    track_frame_data[face_id].append(current_entry)

                    # 按"类别0优先、同类置信度降序"排序
                    track_frame_data[face_id].sort(key=lambda x: (x[3], -x[0]))

                    # 保留前N个条目(未去重状态)
                    if len(track_frame_data[face_id]) > top_n:
                        track_frame_data[face_id] = track_frame_data[face_id][:top_n]

    # 资源释放(确保所有窗口关闭)
    cap.release()
    cv2.destroyAllWindows()

    # -------------------------- 核心修改:先去重,再保存 --------------------------
    # 1. 对每个追踪ID的图片条目进行哈希去重
    deduplicated_track_data = {}
    for track_id, entries in track_frame_data.items():
        deduplicated_entries = deduplicate_images_by_hash(entries, hash_threshold=hash_threshold)
        deduplicated_track_data[track_id] = deduplicated_entries

    # 2. 按原格式保存去重后的图片
    for track_id, entries in deduplicated_track_data.items():  #
        for idx, (conf_score, frame_img, frame_num, face_roi_index, face_detections, face_cls) in enumerate(entries, 1):
            # 处理置信度格式(替换小数点为下划线,避免文件系统异常)
            score_str = f"{conf_score:.2f}".replace(".", "_")
            # 保存图片
            # 1.保存原图
            save_primitive_path = os.path.join(saves, f"id_{track_id}_frame_{frame_num}.jpg")
            cv2.imwrite(save_primitive_path, frame_img)
            outs[track_id]["oringe_path"] = save_primitive_path

            # 2. 保存当前帧对应的头像图
            # 步骤4:人脸检测(检测类别0和1)
            face_results = model(frame_img, conf=face_conf_thresh, iou=0.45)[0]
            if not face_results.boxes:
                continue
            x1, y1, x2, y2 = face_roi_index
            img = frame_img[y1:y2, x1:x2]
            saves_img_path = os.path.join(saves, f"id_{track_id}_keys.jpg")
            cv2.imwrite(saves_img_path, img)
            outs[track_id]["face_path"] = saves_img_path

            # 3.保存画了关键帧人头的图片
            face_results = model(frame_img, classes=[0, 1], conf=0.3)[0]
            for box in face_results.boxes:
                x11, y11, x22, y22 = box.xyxy[0].cpu().numpy().astype(int)
                cv2.rectangle(frame_img, (x11, y11), (x22, y22), (255, 0, 0), 2)

            save_range_path = os.path.join(saves, f"id_{track_id}_key_frame_{frame_num}.jpg")
            cv2.imwrite(save_range_path, frame_img)
            outs[track_id]["picture_path"] = save_range_path

    # 统计信息
    total_time = time.time() - start_time
    avg_fps = frame_count / total_time if total_time > 0 else 0.0
    print("\n✅ 处理完成!")
    print(f"📊 统计:总帧数={frame_count},总耗时={total_time:.2f}s,平均帧率={avg_fps:.1f} FPS")
    print(f"👥 共识别到 {next_face_id} 个不同的人脸")
    print("帧频率:", calculated_fps)
    return outs


# ---------------------- 运行示例 ----------------------
if __name__ == "__main__":
    # 配置参数(路径使用原始配置,确保文件存在)
    VIDEO_SOURCE = r"vedio/2.mp4"  # 注意:确认视频路径拼写正确(vedio→video?)
    MODEL_PATH = "face_best.pt"  # 确认best.pt在当前代码目录下
    CONF_THRESHOLD = 0.5

    start = time.time()
    try:
        outs = yolo_insightface_tracking(
            video_path=VIDEO_SOURCE,
            model_path=MODEL_PATH,
            save_output=True,
            face_conf_thresh=CONF_THRESHOLD,
            saves = "images"
        )
        for item in outs:
            print(item, outs[item])


    except Exception as e:
        print(f"❌ 处理出错:{str(e)}")  # 修复9:用str(e)确保异常信息完整
    finally:
        end = time.time()
        print(f"总运行时间:{end - start:.2f}s")
4.实现效果
代码运行的效果如下:
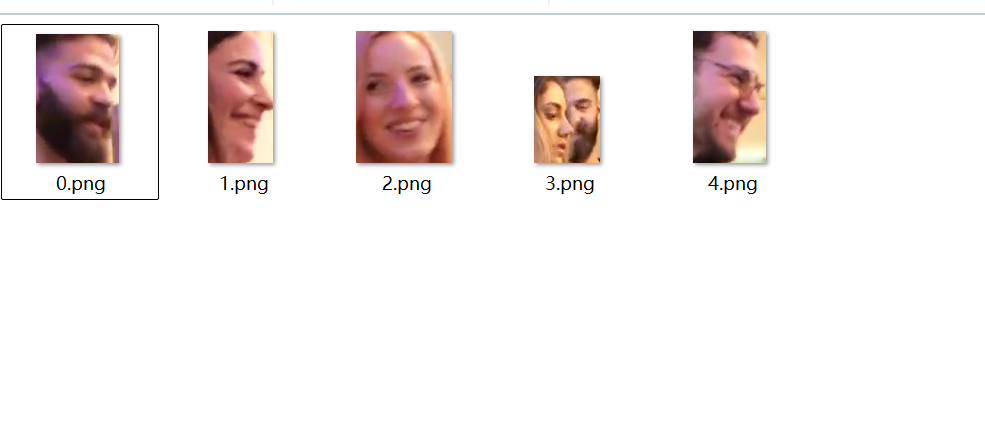
在视频中提取出了5个id,而视频中实际上只有这5个人,我另外运行了3个视频,最后追踪的结果没有重复的头像,也没有漏掉的头像。运行时间和图片中的人头个数成正比,insightface检测每个头像的时间约为0.08s~0.2s之间。