全文目录,一步到位
- 1.前言简介
-
- [1.1 专栏传送门](#1.1 专栏传送门)
-
- [1.1.1 上文小总结](#1.1.1 上文小总结)
- [1.1.2 上文传送门](#1.1.2 上文传送门)
- [2. springboot基础使用](#2. springboot基础使用)
-
- [2.1 pom的依赖安装](#2.1 pom的依赖安装)
- [2.2 yml配置文件](#2.2 yml配置文件)
-
- [2.2.1 代码如下](#2.2.1 代码如下)
- [2.3 java代码如下](#2.3 java代码如下)
-
- [2.3.1 创建topic](#2.3.1 创建topic)
- [2.3.2 创建生产者(`发送消息`)](#2.3.2 创建生产者(
发送消息)) - [2.3.3 创建消费者(`接收消息`)](#2.3.3 创建消费者(
接收消息)) - [2.3.4 执行效果](#2.3.4 执行效果)
- [2.3.5 定时接收消息(定时消费-手动消费)](#2.3.5 定时接收消息(定时消费-手动消费))
- [3. 文章的总结与预告](#3. 文章的总结与预告)
-
- [3.1 本文总结](#3.1 本文总结)
- [3.2 下文预告](#3.2 下文预告)
1.前言简介
1.1 专栏传送门
1.1.1 上文小总结
上文主要介绍了如何使用docker安装使用kafka,以及遇到问题如何排查
1.1.2 上文传送门
08 Docker安装kafka与zookeeper, 遇到异常排查方法与springboot如何使用
2. springboot基础使用

Kafka作为高吞吐、低延迟的分布式消息系统,常用于解耦数据生产者和消费者,实现实时数据流处理与日志聚合
2.1 pom的依赖安装
如果使用
高版本jdk请对应更换, 不然会报错的
xml
     <!--kafka的版本是2.8.1,使用springboot的-->
        <dependency>
            <groupId>org.apache.kafka</groupId>
            <artifactId>kafka-clients</artifactId>
            <version>2.8.1</version>
        </dependency>
        <dependency>
            <groupId>org.springframework.kafka</groupId>
            <artifactId>spring-kafka</artifactId>
            <version>2.7.9</version>
        </dependency>
2.2 yml配置文件
2.2.1 代码如下
没有安全校验的普通yml 后面会介绍进阶版
yaml
spring:
  kafka:
    # 消费者
    consumer:
      group-id: test-consumer
      auto-offset-reset: earliest
      bootstrap-servers: ip:9092
      key-deserializer: org.apache.kafka.common.serialization.StringDeserializer
      value-deserializer: org.apache.kafka.common.serialization.StringDeserializer
    # 生产者(增加超时/重试配置)
    producer:
      bootstrap-servers: ip:9092
      key-serializer: org.apache.kafka.common.serialization.StringSerializer
      value-serializer: org.apache.kafka.common.serialization.StringSerializer
      retries: 3  # 重试次数
      batch-size: 16384
      buffer-memory: 33554432
      properties:
        linger.ms: 1  # 批量发送延迟
        request.timeout.ms: 30000  # 请求超时(默认30s,可适当调大)
        delivery.timeout.ms: 60000  # 投递超时(默认120s,适配报错的120s超时)
2.3 java代码如下
2.3.1 创建topic
避免自动创建的topic没有leader
java
import org.apache.kafka.clients.admin.NewTopic;
import org.springframework.context.annotation.Bean;
import org.springframework.context.annotation.Configuration;
import org.springframework.kafka.config.TopicBuilder;

@Configuration
public class KafkaTopicConfig {
    @Bean
    public NewTopic testTopic() {
        // 分区数与分区数
        return TopicBuilder.name("pzy1")
                .partitions(1)
                .replicas(1)
                .build();
    }
}
2.3.2 创建生产者(发送消息)
写个controller 增加成功与失败回调
java
import lombok.AllArgsConstructor;
import lombok.extern.slf4j.Slf4j;
import org.springframework.kafka.core.KafkaTemplate;
import org.springframework.web.bind.annotation.GetMapping;
import org.springframework.web.bind.annotation.PathVariable;
import org.springframework.web.bind.annotation.RestController;

@Slf4j
@RestController
@AllArgsConstructor
public class KafkaSimpleController {

    private final KafkaTemplate<Object, Object> kafkaTemplate;

    @GetMapping("/send/{messge}")
    public String send(@PathVariable String messge) {
        kafkaTemplate.send("test", "topci1:" + messge)
                .addCallback(result -> {
                    // 发送成功处理
                    log.info("===> 消息发送成功: {}",result);

                }, failure -> {
                    // 发送失败处理
                    log.error("===> 消息发送失败: {}",failure.getMessage());
                });
        kafkaTemplate.send("test", "topci2:" + messge);
        return messge;
    }
}
2.3.3 创建消费者(接收消息)
java
import lombok.extern.slf4j.Slf4j;
import org.springframework.beans.factory.annotation.Autowired;
import org.springframework.data.redis.core.RedisTemplate;
import org.springframework.data.redis.core.StringRedisTemplate;
import org.springframework.kafka.annotation.KafkaListener;
import org.springframework.stereotype.Component;
@Slf4j
@Component
public class SimpleListener {
@Autowired
private StringRedisTemplate redisTemplate;
@KafkaListener(topics = {"test"},groupId = "test-consumer")
public void listen1(String data) {
log.info("===> topic:test的消费者消息成功 , 消息是: {}",data);
redisTemplate.opsForValue().set("kafka:test", data);
}
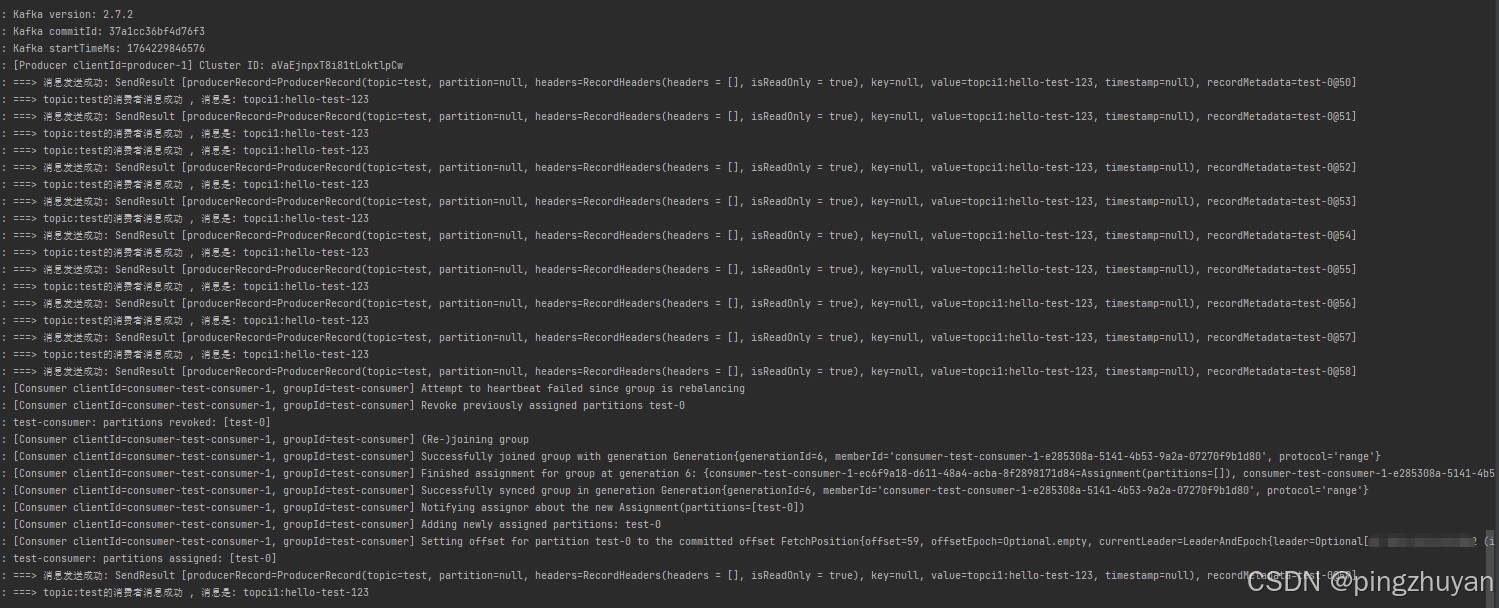
}2.3.4 执行效果
篇幅太长了, 拆开吧, 先存几张图片

2.3.5 定时接收消息(定时消费-手动消费)
看到其他人代码的写法 我记录一下哈 (业务需求 改手动拉取消费)
java
@Component
@EnableScheduling
@Slf4j
public class TimedKafkaConsumer {

    @Autowired
    private StringRedisTemplate redisTemplate;

    // 注入Spring管理的ConsumerFactory(替代直接注入KafkaConsumer)
    @Autowired
    private ConsumerFactory<String, String> consumerFactory;

    // Redis List的Key(按Topic命名,便于管理)
    private static final String REDIS_LIST_KEY = "kafka:msg:test";

    // 声明KafkaConsumer,后续通过ConsumerFactory创建
    private KafkaConsumer<String, String> kafkaConsumer;

    // 订阅的Topic(改成你实际的Topic,比如之前的"test")
    private static final String TOPIC = "test";

    // 可选:Redis key过期时间(单位秒,避免数据堆积,比如7天)
    private static final long REDIS_KEY_EXPIRE_SECONDS = 60 * 60 * 24 * 7L;

    @PostConstruct
    public void init() {
        // 通过ConsumerFactory创建KafkaConsumer实例(Spring会自动填充配置)
        kafkaConsumer = (KafkaConsumer<String, String>) consumerFactory.createConsumer();
        // 订阅Topic
        kafkaConsumer.subscribe(Collections.singletonList(TOPIC));
    }

    // 核心:每5秒执行一次消费(fixedRate=5000)
    @Scheduled(fixedRate = 5000, initialDelay = 1000)
    public void consume() {
        try {
            // 拉取消息(超时时间设为1秒,避免阻塞)
            ConsumerRecords<String, String> records = kafkaConsumer.poll(Duration.ofMillis(1000));
            if (records.isEmpty()) {
                log.info("本次拉取无消息,5秒后重试");
                return;
            }
            int msgCount = 0;
            // 处理消息
            for (ConsumerRecord<String, String> record : records) {
//                System.out.printf("消费消息:offset = %d, key = %s, value = %s%n", record.offset(), record.key(), record.value());
//                // 业务逻辑处理...

                msgCount++;
                // 1. 格式化消息内容(包含offset/key/value,便于后续解析)
                String msgContent = String.format(
                        "offset=%d,key=%s,value=%s,topic=%s,timestamp=%d",
                        record.offset(),
                        record.key() == null ? "null" : record.key(),
                        record.value() == null ? "null" : record.value(),
                        record.topic(),
                        record.timestamp()
                );

                // 2. 核心:追加消息到Redis List(右追加,保证时序)
                redisTemplate.opsForList().rightPush(REDIS_LIST_KEY, msgContent);

                // 打印日志(替代System.out)
                log.info("消费并存储消息:{}", msgContent);

            }

            // 手动提交偏移量(需确保配置中enable-auto-commit=false)
            kafkaConsumer.commitSync();
            log.info("本次消费{}条消息,已全部追加到Redis List", msgCount);
        } catch (Exception e) {
            log.error("消费/存储消息异常", e);
            e.printStackTrace();
            // 异常处理(如重试、告警)
        }
    }

    @PreDestroy
    public void close() {
        // 关闭消费者
        if (kafkaConsumer != null) {
            kafkaConsumer.close();
        }
    }
}
3. 文章的总结与预告
3.1 本文总结
简单的实现kafka的基础操作, 请先完成上篇文章后使用
3.2 下文预告
@author: pingzhuyan
@description: ok
@year: 2024