文章目录
- 前言
- [一、QPainter 在 QPixmap 上绘图](#一、QPainter 在 QPixmap 上绘图)
-
- 1.方法一:离屏绘制
- [2.方法二:自定义 QLabel 子类(paintEvent 中绘制)](#2.方法二:自定义 QLabel 子类(paintEvent 中绘制))
- 3.两种方法对比
- [二、QPainter 创建遮罩和光标](#二、QPainter 创建遮罩和光标)
- [三、QPicture 绘图命令的记录器和回放器](#三、QPicture 绘图命令的记录器和回放器)
- 总结
前言
本节主要讲解 QPainter 类在 QPixmap、QBitmap、QPicture 上的 基础操作 和 常规应用 。
一、QPainter 在 QPixmap 上绘图
在 QLabel 上显示 QPixmap 并在其上进行绘图有两种主要方法:离屏绘制 和 直接在 QLabel 的 paintEvent 中绘制。
1.方法一:离屏绘制
先在一个临时的 QPixmap 上绘制,然后将结果设置到 QLabel,该方式简单易懂,还易操作。
python
		# QPainter 在 QPixmap 上绘图
        self.pixmap = QPixmap("Resources/image/jd.png")  # 加载图像文件
        self.current_pixmap = self.pixmap.copy()
        self.update_label_image()

        # 方法一:离屏绘制  先在一个临时的 QPixmap 上绘制,然后将结果设置到 QLabel
        # 对齐方式
        self.ui.lab_Show.setAlignment(Qt.AlignmentFlag.AlignCenter)  # 图片在Label中居中显示

        # 槽函数
        self.ui.btn_Rect.clicked.connect(self.draw_rectangle)
        self.ui.btn_Circle.clicked.connect(self.draw_circle)
        self.ui.btn_Text.clicked.connect(self.draw_text)
        self.ui.btn_Line.clicked.connect(self.draw_line)
        self.ui.btn_Reset.clicked.connect(self.reset_image)
        self.ui.btn_Save.clicked.connect(self.save_image)

    def draw_rectangle(self):
        """绘制矩形"""
        painter = QPainter(self.current_pixmap)
        painter.setRenderHint(QPainter.RenderHint.Antialiasing)

        # 设置画笔和画刷
        painter.setPen(QPen(QColor(0, 0, 255), 3))
        painter.setBrush(QBrush(QColor(0, 0, 255).lighter(150)))

        # 随机位置绘制矩形
        x = random.randint(50, self.current_pixmap.width() - 150)
        y = random.randint(50, self.current_pixmap.height() - 150)
        width = random.randint(50, 150)
        height = random.randint(50, 150)

        painter.drawRect(x, y, width, height)
        painter.end()

        self.update_label_image()
        self.statusBar().showMessage(f"绘制矩形: ({x}, {y}, {width}, {height})", 3000)

    def draw_circle(self):
        """绘制圆形"""
        painter = QPainter(self.current_pixmap)
        painter.setRenderHint(QPainter.RenderHint.Antialiasing)

        painter.setPen(QPen(QColor(255, 255, 0), 3))
        painter.setBrush(Qt.BrushStyle.NoBrush)  # 设置"无填充"画刷
        #painter.setBrush(QBrush(QColor(255, 255, 0).lighter(200)))

        x = random.randint(50, self.current_pixmap.width() - 150)
        y = random.randint(50, self.current_pixmap.height() - 150)
        diameter = random.randint(100, 150)

        painter.drawEllipse(x, y, diameter, diameter)
        painter.end()

        self.update_label_image()
        self.statusBar().showMessage(f"绘制圆形: ({x}, {y}, {diameter})", 3000)

    def draw_text(self):
        """绘制文字"""
        painter = QPainter(self.current_pixmap)
        painter.setRenderHint(QPainter.RenderHint.Antialiasing)

        painter.setPen(QPen(QColor(255, 0, 0)))

        # 设置字体
        font = QFont()
        font.setPointSize(random.randint(24, 36))
        font.setBold(random.choice([True, False]))
        painter.setFont(font)

        texts = ["Hello!", "PySide6", "绘图演示", "QLabel", "QPixmap", "QPainter"]
        text = random.choice(texts)

        x = random.randint(50, self.current_pixmap.width() - 150)
        y = random.randint(50, self.current_pixmap.height() - 50)

        painter.drawText(x, y, text)
        painter.end()

        self.update_label_image()
        self.statusBar().showMessage(f"绘制文字: '{text}' 位置: ({x}, {y})", 3000)

    def draw_line(self):
        """绘制线条"""
        painter = QPainter(self.current_pixmap)
        painter.setRenderHint(QPainter.RenderHint.Antialiasing)

        painter.setPen(QPen(QColor(255, 0, 255), random.randint(3, 6)))

        x1 = random.randint(50, self.current_pixmap.width() - 50)
        y1 = random.randint(50, self.current_pixmap.height() - 50)
        x2 = random.randint(50, self.current_pixmap.width() - 50)
        y2 = random.randint(50, self.current_pixmap.height() - 50)

        painter.drawLine(x1, y1, x2, y2)
        painter.end()

        self.update_label_image()
        self.statusBar().showMessage(f"绘制线条: ({x1}, {y1}) -> ({x2}, {y2})", 3000)

    def reset_image(self):
        """重置图像"""
        self.current_pixmap = self.pixmap.copy()
        self.update_label_image()
        self.statusBar().showMessage("图像已重置", 3000)

    def save_image(self):
        """保存图像"""
        file_path, _ = QFileDialog.getSaveFileName(self, "保存图像", "", "PNG图像 (*.png);;JPEG图像 (*.jpg)")

        if file_path:
            if self.current_pixmap.save(file_path):
                self.statusBar().showMessage(f"图像已保存到: {file_path}", 3000)
            else:
                self.statusBar().showMessage("保存失败", 3000)

    def update_label_image(self):
        """更新QLabel显示的图像"""
        # 保持宽高比缩放
        scaled_pixmap = self.current_pixmap.scaled(self.ui.lab_Show.geometry().width(),
                                             self.ui.lab_Show.geometry().height(),
                                             Qt.AspectRatioMode.KeepAspectRatio,  # 保持宽高比
                                             Qt.TransformationMode.SmoothTransformation)  # 平滑变换
        self.ui.lab_Show.setPixmap(scaled_pixmap)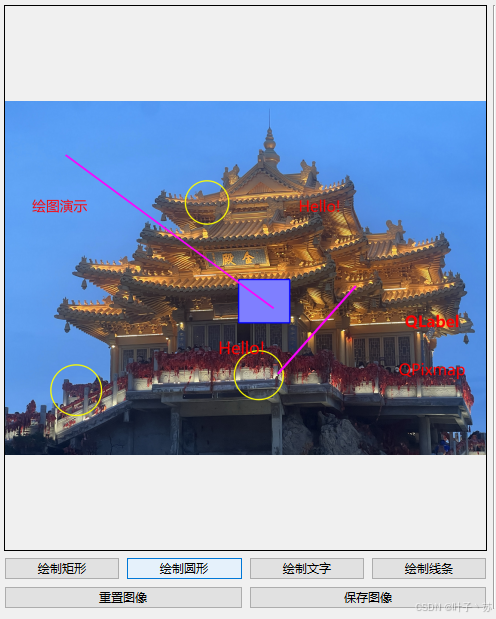
① 大体逻辑是 copy() 函数复制一张 QPixmap 图像,然后在这张图进行 QPainter 各图形绘制操作,然后将绘制完的图显示在 QLabel 上;
② 绘制矩形时,矩形内部有填充,但是绘制的圆形图形内部没有填充,通过 painter.setBrush(Qt.BrushStyle.NoBrush) 进行"无填充"画刷的设置;
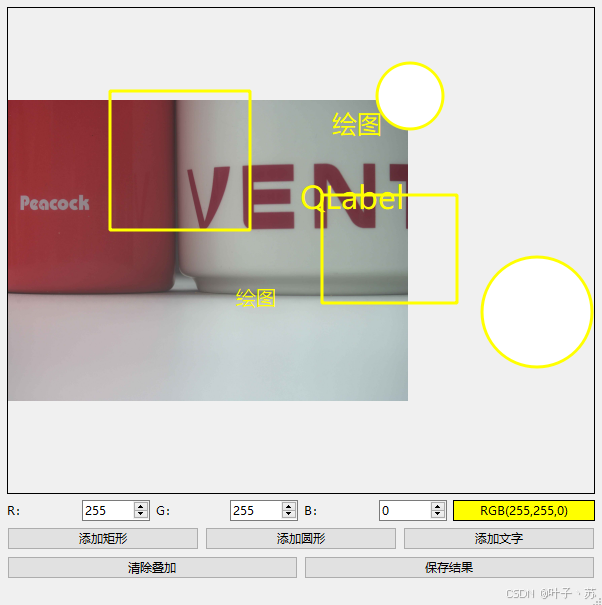
2.方法二:自定义 QLabel 子类(paintEvent 中绘制)
通过继承 QLabel 并重写 paintEvent 方法,在绘制时叠加图形的方式,较难理解,但能进行丰富的交互功能,并且能对多层 / 多对象进行管理。
主函数程序:
python
		# 方法二:自定义 QLabel 子类(paintEvent 中绘制)  通过继承 QLabel 并重写 paintEvent 方法,在绘制时叠加图形

        # 加载或创建基础图像
        pixmap2 = QPixmap("Resources/image/110.jpg")  # 加载图像文件
        self.ui.add_Show.set_base_pixmap(pixmap2)

        # 槽函数
        self.ui.spin_R.valueChanged.connect(self.update_color_preview)
        self.ui.spin_G.valueChanged.connect(self.update_color_preview)
        self.ui.spin_B.valueChanged.connect(self.update_color_preview)
        self.ui.add_Rect.clicked.connect(self.add_rectangle)
        self.ui.add_Circle.clicked.connect(self.add_circle)
        self.ui.add_Text.clicked.connect(self.add_text)
        self.ui.add_clear.clicked.connect(self.clear_overlay)
        self.ui.add_save.clicked.connect(self.save_result)

        self.ui.spin_R.setValue(255)

	#方法二函数
    def get_current_color(self):
        """获取当前设置的颜色"""
        m_R = self.ui.spin_R.value()
        m_G = self.ui.spin_G.value()
        m_B = self.ui.spin_B.value()

        return QColor(m_R, m_G, m_B)

    def update_color_preview(self):
        """更新颜色预览"""
        color = self.get_current_color()
        self.ui.add_Color.setStyleSheet(f"background-color: {color.name()}; border: 1px solid black;")
        self.ui.add_Color.setText(f"RGB({color.red()},{color.green()},{color.blue()})")

    def add_rectangle(self):
        """添加矩形"""
        color = self.get_current_color()
        x = random.randint(50, 500)
        y = random.randint(50, 300)
        w = random.randint(50, 150)
        h = random.randint(50, 150)

        self.ui.add_Show.add_shape("rectangle", color, x, y, w, h)
        print(f"添加矩形: ({x}, {y}, {w}, {h}) 颜色: {color.name()}")

    def add_circle(self):
        """添加圆形"""
        color = self.get_current_color()
        x = random.randint(50, 500)
        y = random.randint(50, 300)
        diameter = random.randint(50, 150)

        self.ui.add_Show.add_shape("circle", color, x, y, diameter)
        print(f"添加圆形: ({x}, {y}, {diameter}) 颜色: {color.name()}")

    def add_text(self):
        """添加文字"""
        color = self.get_current_color()
        x = random.randint(50, 500)
        y = random.randint(50, 300)
        texts = ["Hello", "World", "PySide6", "绘图", "QLabel", "叠加"]
        text = random.choice(texts)
        font_size = random.randint(12, 24)

        self.ui.add_Show.add_shape("text", color, x, y, text, font_size)
        print(f"添加文字: '{text}' 位置: ({x}, {y}) 大小: {font_size}")

    def clear_overlay(self):
        """清除叠加层"""
        self.ui.add_Show.clear_overlay()
        print("已清除所有叠加图形")

    def save_result(self):
        """保存最终结果(基础图像+叠加图形)"""

        # 创建临时QPixmap来绘制最终结果
        final_pixmap = QPixmap(self.ui.add_Show.base_pixmap.size())
        final_pixmap.fill(Qt.GlobalColor.transparent)

        # 绘制基础图像
        painter = QPainter(final_pixmap)
        painter.drawPixmap(0, 0, self.ui.add_Show.base_pixmap)

        # 绘制所有叠加图形
        for shape_type, args in self.ui.add_Show.overlay_shapes:
            self.draw_shape_on_pixmap(painter, shape_type, *args)

        painter.end()

        # 保存文件
        file_path, _ = QFileDialog.getSaveFileName(self, "保存结果图像", "", "PNG图像 (*.png);;JPEG图像 (*.jpg)")

        if file_path:
            if final_pixmap.save(file_path):
                print(f"结果已保存到: {file_path}")
            else:
                print("保存失败")

    def draw_shape_on_pixmap(self, painter, shape_type, *args):
        """在QPixmap上绘制图形"""
        if shape_type == "rectangle":
            color, x, y, w, h = args
            painter.setPen(QPen(color, 3))
            painter.setBrush(QBrush(color.lighter(150)))
            painter.drawRect(x, y, w, h)

        elif shape_type == "circle":
            color, x, y, diameter = args
            painter.setPen(QPen(color, 3))
            painter.setBrush(QBrush(color.lighter(200)))
            painter.drawEllipse(x, y, diameter, diameter)

        elif shape_type == "text":
            color, x, y, text, font_size = args
            painter.setPen(QPen(color))
            font = QFont()
            font.setPointSize(font_size)
            painter.setFont(font)
            painter.drawText(x, y, text)
DrawableLabel(QLabel) 可绘制的 QLabel 子类程序:
python
class DrawableLabel(QLabel):
    """可绘制的QLabel子类"""
    def __init__(self, parent=None):
        super().__init__(parent)
        self.overlay_shapes = []  # 存储叠加的图形
        self.base_pixmap = None

    def set_base_pixmap(self, pixmap):
        """设置基础图像"""
        self.base_pixmap = pixmap
        # 保持宽高比缩放
        scaled_pixmap = pixmap.scaled(self.geometry().width(),
                                      self.geometry().height(),
                                      Qt.AspectRatioMode.KeepAspectRatio,  # 保持宽高比
                                      Qt.TransformationMode.SmoothTransformation)  # 平滑变换
        self.setPixmap(scaled_pixmap)

    def add_shape(self, shape_type, *args):
        """添加一个图形到叠加层"""
        self.overlay_shapes.append((shape_type, args))
        self.update()  # 触发重绘

    def clear_overlay(self):
        """清除所有叠加图形"""
        self.overlay_shapes.clear()
        self.update()

    def paintEvent(self, event: QPaintEvent):
        """重写绘制事件"""
        # 先调用父类的绘制,显示基础图像
        super().paintEvent(event)

        # 创建QPainter在QLabel上绘制
        painter = QPainter(self)
        painter.setRenderHint(QPainter.RenderHint.Antialiasing)

        # 绘制所有叠加图形
        for shape_type, args in self.overlay_shapes:
            self.draw_shape(painter, shape_type, *args)

        painter.end()

    def draw_shape(self, painter, shape_type, *args):
        """根据类型绘制图形"""
        if shape_type == "rectangle":
            color, x, y, w, h = args
            painter.setPen(QPen(color, 3))
            #painter.setBrush(QBrush(color.lighter(150)))
            painter.setBrush(Qt.BrushStyle.NoBrush)  # 设置"无填充"画刷
            painter.drawRect(x, y, w, h)

        elif shape_type == "circle":
            color, x, y, diameter = args
            painter.setPen(QPen(color, 3))
            painter.setBrush(QBrush(color.lighter(200)))
            painter.drawEllipse(x, y, diameter, diameter)

        elif shape_type == "text":
            color, x, y, text, font_size = args
            painter.setPen(QPen(color))
            font = QFont()
            font.setPointSize(font_size)
            painter.setFont(font)
            painter.drawText(x, y, text)

        elif shape_type == "line":
            color, x1, y1, x2, y2, width = args
            painter.setPen(QPen(color, width))
            painter.drawLine(x1, y1, x2, y2)
然后进行组件提升:
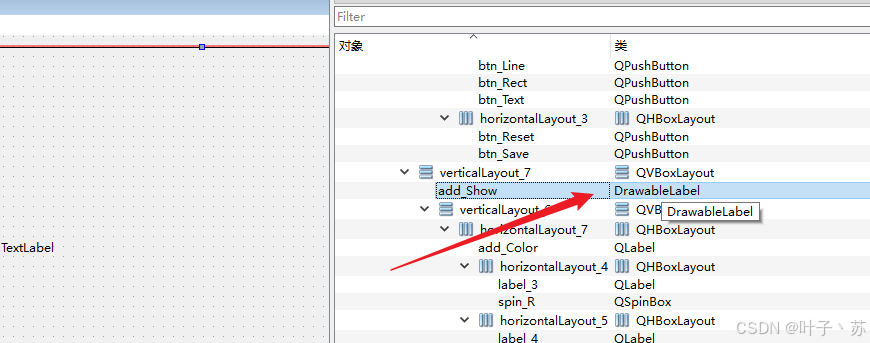
最终效果:
①创建一个继承自QLabel的类;
②重写paintEvent方法,在其中先调用基类的paintEvent,然后使用QPainter在QLabel上绘制图形(注意:绘制图形时,需要考虑到QPixmap的缩放和位置,因为QLabel可能会根据其sizePolicy和缩放设置来调整显示的图像);
③基类的paintEvent会绘制QLabel的内容,包括文本和图像。如果我们已经设置了Pixmap,那么基类会绘制这个Pixmap。然后我们再在上面绘制矩形;
④从上述例程中可以看到使用的常值去进行图形的位置绘制,绘制出的各种图形可能会落在图形的外侧,这里读者可以根据上面缩放设置来优化该代码,让所绘制的图形都落在图像中,实践是最快速的学习方式。
注意点:
DrawableLabel 类中所定义的 self.overlay_shapes = \[\] # 存储叠加的图形,通过改列表可以对所画的图像进行撤销、重画、删除部分图形的操作,能更好的管控所绘画的对象。
3.两种方法对比
| 特性 | 方法一:离屏绘制 | 方法二:自定义QLabel子类 |
|---|---|---|
| 实现复杂度 | 简单,直接操作QPixmap | 中等,需要继承并重写paintEvent |
| 性能 | 较高,一次绘制完成 | 每次重绘都需要重新绘制叠加层 |
| 内存使用 | 需要保持两份图像(原始和当前) | 只需原始图像,叠加层是动态绘制的 |
| 交互性 | 绘制后图像固定,修改需重绘 | 叠加层可独立管理,方便单独清除或修改 |
| 适用场景 | 需要保存绘制结果的场景 | 需要频繁修改叠加层或实时预览的场景 |
| 图像保存 | 直接保存当前QPixmap | 需要重新合成图像再保存 |
基本原则:如果绘制操作本身的计算成本高于复制图像的成本,用方法一;如果绘制操作简单但需要频繁更新和交互,用方法二。
二、QPainter 创建遮罩和光标
python
		# 对齐方式
        self.ui.lab_Show.setAlignment(Qt.AlignmentFlag.AlignCenter)  # 图片在Label中居中显示
        #创建自定义光标(结合遮罩)
        self.pixmap01 = QPixmap("Resources/image/3.jpeg")
        self.update_label_image()

        # 创建光标图像(彩色)
        pixmap = QPixmap(64, 64)
        pixmap.fill(Qt.GlobalColor.transparent)  # 透明背景

        painter = QPainter(pixmap)
        painter.setRenderHint(QPainter.RenderHint.Antialiasing)

        # 绘制一个简单的十字光标
        painter.setPen(QPen(QColor(255, 255, 0), 5))  # 红色十字
        painter.drawLine(32, 0, 32, 64)  # 垂直线
        painter.drawLine(0, 32, 64, 32)  # 水平线

        # 绘制中心点
        painter.setBrush(QBrush(QColor(255, 255, 0)))
        painter.drawEllipse(28, 28, 8, 8)
        painter.end()

        # 从彩色图像创建遮罩位图(会自动抖动)
        mask = QBitmap.fromPixmap(pixmap)

        # 创建自定义光标(需要图像和遮罩)
        cursor = QCursor(mask, mask, 16, 16)  # 热点在中心(16,16)

        #彩色光标显示
        #cursor = QCursor(pixmap, 16, 16)  # 热点在中心(16,16)

        # 设置光标
        self.ui.lab_Show.setCursor(cursor)

    def update_label_image(self):
        """更新QLabel显示的图像"""
        # 保持宽高比缩放
        scaled_pixmap = self.pixmap01.scaled(self.ui.lab_Show.geometry().width(),
                                                   self.ui.lab_Show.geometry().height(),
                                                   Qt.AspectRatioMode.KeepAspectRatio,  # 保持宽高比
                                                   Qt.TransformationMode.SmoothTransformation)  # 平滑变换
        self.ui.lab_Show.setPixmap(scaled_pixmap)
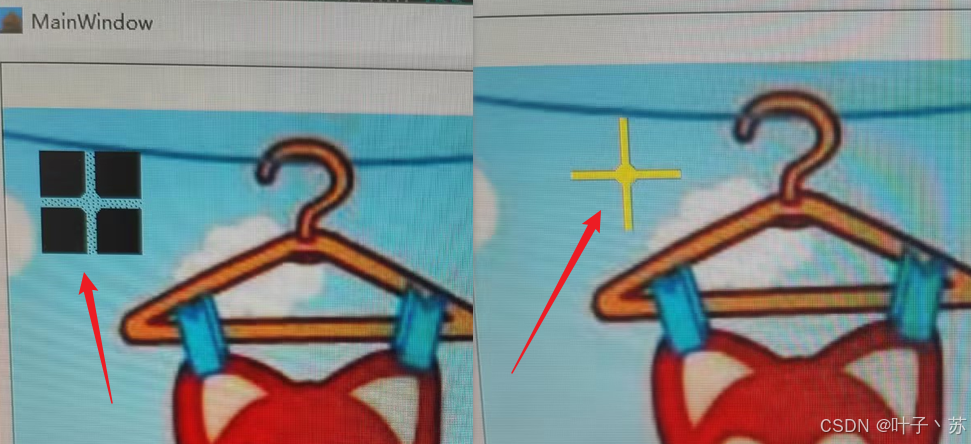
上面例程展示了通过 QPixmap 图形如何制作光标和遮罩,并通过 mask = QBitmap.fromPixmap(pixmap) 操作从彩色图像创建遮罩位图,应用起来简单高效。
三、QPicture 绘图命令的记录器和回放器
1.工作原理:记录与回放
QPicture 的核心工作流程分为两个阶段:
① 记录阶段:创建一个 QPicture,用 QPainter 在上面"录制"所有绘图命令;
②回放阶段:在任意绘图设备(如窗口、打印机、另一张图片)上,用 QPainter "播放"录制的命令。
2.实践应用
python
		#QPicture 保存和加载绘图文件
        self.picture = QPicture()
        self.current_file = None

		self.ui.lab_Show2.setAlignment(Qt.AlignmentFlag.AlignCenter)  # 图片在Label中居中显示

        #槽函数
        self.ui.btn_create.clicked.connect(self.create_sample_picture)
        self.ui.btn_clear.clicked.connect(self.picture_clear)
        self.ui.btn_save.clicked.connect(self.save_picture)
        self.ui.btn_load.clicked.connect(self.load_picture)

        self.ui.lab_Show2.setStyleSheet("border: 2px solid gray; background-color: white;")

    def create_sample_picture(self):
        """创建一个示例图形"""
        self.picture = QPicture()
        painter = QPainter(self.picture)
        painter.setRenderHint(QPainter.RenderHint.Antialiasing)

        # 绘制一个笑脸
        # 脸
        painter.setBrush(QColor(255, 255, 200))
        painter.setPen(QPen(Qt.GlobalColor.black, 2))
        painter.drawEllipse(50, 50, 200, 200)

        # 眼睛
        painter.setBrush(Qt.GlobalColor.white)
        painter.drawEllipse(100, 100, 30, 30)
        painter.drawEllipse(170, 100, 30, 30)
        painter.setBrush(Qt.GlobalColor.black)
        painter.drawEllipse(110, 110, 10, 10)
        painter.drawEllipse(180, 110, 10, 10)

        # 嘴巴
        painter.setBrush(Qt.GlobalColor.red)
        painter.drawChord(80, 120, 140, 80, 30 * 16, 120 * 16)

        # 添加文字
        painter.setPen(Qt.GlobalColor.blue)
        painter.drawText(60, 280, "这是一个保存到 QPicture 的笑脸")

        painter.end()

        self.current_file = None
        self.statusBar().showMessage("状态: 已创建新图形", 3000)
        self.update_preview()

    def picture_clear(self):
        self.ui.lab_Show2.clear()

    def save_picture(self):
        """将 QPicture 保存到文件"""
        if self.picture.isNull():
            QMessageBox.warning(self, "错误", "没有可保存的图形")
            return

        file_path, _ = QFileDialog.getSaveFileName(self, "保存 QPicture", "", "Picture Files (*.pic);;All Files (*)")

        if file_path:
            # 确保文件扩展名
            if not file_path.endswith('.pic'):
                file_path += '.pic'

            if self.picture.save(file_path):
                self.current_file = file_path
                self.statusBar().showMessage(f"状态: 已保存到 {os.path.basename(file_path)}", 3000)

                # 显示文件大小
                file_size = os.path.getsize(file_path)
            else:
                QMessageBox.warning(self, "错误", "保存失败")

    def load_picture(self):
        """从文件加载 QPicture"""
        file_path, _ = QFileDialog.getOpenFileName(self, "加载 QPicture", "", "Picture Files (*.pic);;All Files (*)")

        if file_path and os.path.exists(file_path):
            loaded_picture = QPicture()

            if loaded_picture.load(file_path):
                self.picture = loaded_picture
                self.current_file = file_path

                # 显示文件信息
                file_size = os.path.getsize(file_path)

                self.statusBar().showMessage(f"状态: 已加载 ({file_size} 字节) - {os.path.basename(file_path)}", 3000)
                self.update_preview()
            else:
                QMessageBox.warning(self, "错误", "加载失败,可能不是有效的 QPicture 文件")

    def update_preview(self):
        """更新预览区域的显示"""
        if self.picture.isNull():
            self.ui.lab_Show2.setText("无图形可显示")
            return

        # 创建一个临时的 QPixmap 用于预览
        pixmap = QPixmap(400, 300)
        pixmap.fill(Qt.GlobalColor.white)

        painter = QPainter(pixmap)

        # 获取 QPicture 的边界矩形,以便居中显示
        picture_rect = self.picture.boundingRect()

        if not picture_rect.isEmpty():
            # 计算缩放比例以适应预览区域
            scale_x = 380 / picture_rect.width()
            scale_y = 280 / picture_rect.height()
            scale = min(scale_x, scale_y, 1.0)  # 不超过1倍,防止放大

            # 计算居中位置
            offset_x = (300 - picture_rect.width() * scale) / 2
            offset_y = (160 - picture_rect.height() * scale) / 2

            painter.translate(offset_x, offset_y)
            painter.scale(scale, scale)

        # 绘制 QPicture
        painter.drawPicture(0, 0, self.picture)
        painter.end()

        self.ui.lab_Show2.setPixmap(pixmap)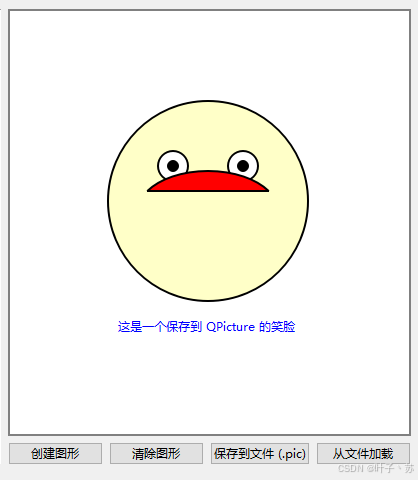
① 先进行 self.picture = QPicture() 、 painter = QPainter(self.picture) 记录器的创建,当笑脸图形绘制完成后,painter 的绘制流程和命令都已被记录并存储在 QPicture 类中,此时可以进行保存或者显示;
② update_preview 函数中 pixmap = QPixmap(400, 300) 创建一个临时的 QPixmap 用于预览,然后 painter.drawPicture(0, 0, self.picture) 进行 保存在 QPicture 类中数据的绘制,并绘制在 pixmap 上,显示于 QLabel 控件上;
③ 通过 self.picture.save(file_path) 函数进行保存 QPicture 类中的绘制数据,后缀为 pic ;
④ 通过 loaded_picture.load(file_path) 函数可以对 QPicture 文件进行加载并进行显示。
总结
设备选择策略
① QWidget:实时交互界面、动画、自定义控件;
② QImage:图像处理、滤镜、像素分析、文件I/O;
③ QPixmap:界面元素、图标、缓存图像、图像合成;
④ QBitmap:遮罩、光标、简单形状、内存敏感场景;
⑤ QPicture:矢量图形、重复绘制、模板化绘图。
本节示例展示了 QPainter 在不同设备上的强大能力。理解每种设备的特性和适用场景,可以让你在 PySide6 开发中选择最合适的绘图方式。
本节源码路径为:PySide6基本窗口控件深度补充_窗口绘图类