Docker:认识Docker镜像仓库并进行拉取推送
- 一.docker是什么
- 二.安装docker
- [三.docker镜像仓库Docker Registry](#三.docker镜像仓库Docker Registry)
-
- 3.1镜像仓库分类
- 3.2镜像仓库工作机制
- 3.3镜像仓库命令
-
- [docker login](#docker login)
- [docker pull(别名docker image pull)](#docker pull(别名docker image pull))
- [docker push(别名docker image push)](#docker push(别名docker image push))
- [docker search](#docker search)
- [docker logout](#docker logout)
- 3.4部分镜像命令
-
- [docker images](#docker images)
- [docker image inspect](#docker image inspect)
- [docker tag](#docker tag)
- 3.5部分容器命令
-
- [docker run](#docker run)
-
- 使用docker在ubuntu上跑一个centos
- 将前台容器分离到后台执行
- [端口映射参数-p -P](#端口映射参数-p -P)
- 环境变量-e,主机名-h与容器名--name参数
- 显示控制容器使用的cpu数量与内存大小
- 单向打通容器之间的网络--link
- [shell 退出的时候自动删除容器 --rm](#shell 退出的时候自动删除容器 --rm)
- [docker ps](#docker ps)
- 四.认识nginx
- 五.综合样例
一.docker是什么
Docker 本质其实是 LXC 之类的增强版,它本身不是容器,而是容器的易用工具。容器是 linux 内核中的技术, Docker 只是把这种技术在使用上简易普及了。 Docker 在早期的版本其核心就是 LXC 的二次封装发行版。
Docker 作为容器技术的一个实现,或者说让容器技术普及开来的最成功的实现。Docker 是基于 Go 语言实现的一个开源项目,它的主要目标是"Build, Ship andRun Any APP, Anywhere",即通过对组件的封装、分发、部署、运行等生命周期的管理,使得用户的应用及其运行环境能够做到"一次封装,到处运行"。早期 Docker 利用 LXC 做容器管理引擎,但是在创建容器时,不再使用模板去安装生成,而是通过镜像技术(把一个操作系统用户空间所需要使用到的组件事先编排好,并整体打包成一个文件, image 文件),镜像文件集中放在一个仓库中。当需要创建容器时, Docker 调用 LXC 的工具 lxc-create,但不再通过 lxc 的模板去安装,而是连接到镜像服务器上下载匹配的镜像文件,而后基于镜像启动容器。所以, Docker 极大的简化了容器的使用难度。以后我们创建启动容器,只需要一个命令, docker-run,docker-stop 就可以启动停止一个容器了。
Docker 早期是基于 LXC 容器管理引擎实现,当后来成熟之后, Docker 自建了一个容器引擎叫 libcontainer,后来 CNCF 的介入, Docker 又研发了一个工业化标准的容器引擎 runC,目前所使用的新版 Docker,所使用的容器引擎就是 RunC。
那他和传统的虚拟机又有什么区别呢?
| 传统虚拟机 | Docker 容器 | |
|---|---|---|
| 磁盘占用 | 几个 GB 到几十个 GB左右 | 几十 MB 到几百 MB 左右 |
| CPU内存占用 | 虚拟操作系统非常占用CPU 和内存,需要通过虚拟层调用占用率高 | Docker 引擎占用资源极低,直接作用于硬件资源占用少 |
| 启动速度 | (从开机到运行项目)几分钟 | (从开启容器到运行项目)几秒 |
| 安装管理 | 需要专门的运维技术 | 安装、管理方便 |
| 应用部署 | 手动部署,速度慢 体系化部署 | 可以自动化,速度快 |
| 隔离性 | 系统级别 | 进程级别 |
| 封装程度 | 打包整个操作系统 | 打包项目代码和依赖信息 |
而docker比虚拟机启动速度快和资源利用率高,主要是因为以下几个原因:
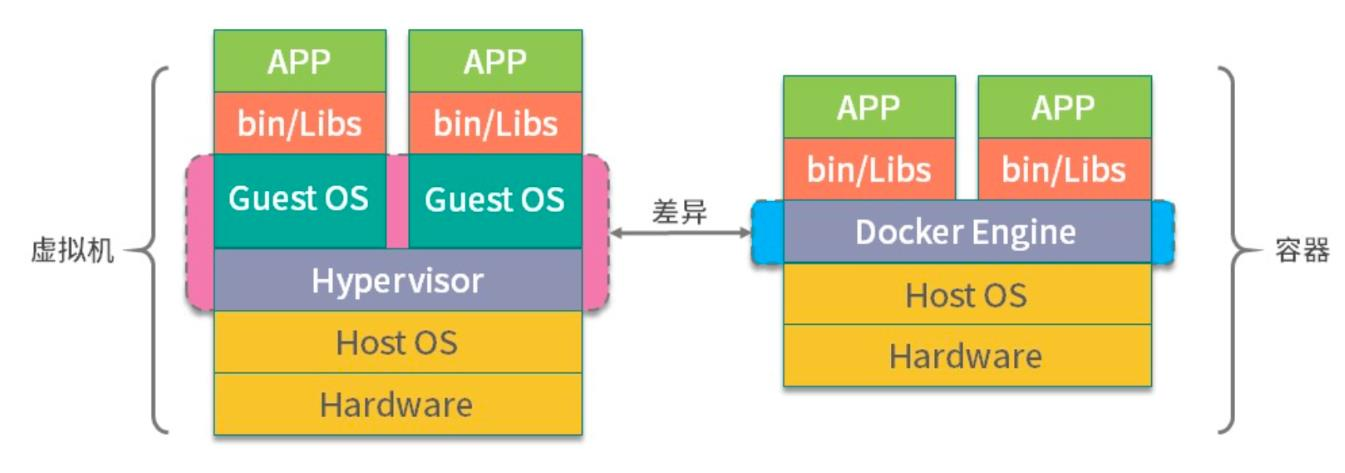
docker 有比虚拟机更少的抽象层。 docker 不需要 Hypervisor 实现硬件资源虚拟化,运行在 docker 容器上的程序直接使用的是实际物理机的硬件资源。因此在 cpu、内存利用率上 docker 将会在效率上有明显的优势。 docker 利用的是宿主机的内核,而不需要Guest OS,节省了 Guest OS 占用的资源。
docker 不需要 Guest OS,创建一个容器时,不需要和虚拟机一样重新加载一个操作系统内核。从而避免引寻、加载操作系统内核返回时耗时耗资源的过程,当新建一个虚拟机时,虚拟机软件需要加载 Guest OS,返回新建过程是分钟级别的。而新建一个docker 容器只需要几秒钟。
docker版本
Docker 发展过程中衍生了以下版本,目前我们学习和使用提到的版本是 docker-ce。
lxc:上文中提到, lxc 是最早的 linux 容器技术,早期版本的 docker 直接使用 lxc 来实现容器的底层功能。虽然使用者相对较少,但 lxc 项目仍在持续开发演进中。
libcontainer: docker 从 0.9 版本开始自行开发了 libcontainer 模块来作为 lxc 的替代品实现容器底层特性,并在 1.10 版本彻底去除了 lxc。在 1.11 版本拆分出 runc 后,libcontainer 也随之成为了 runc 的核心功能模块, runc 后续变成了容器标准。moby: moby 是 docker 公司发起的开源项目,其中最主要的部分就是同名组件 moby,事实上这个 moby 就是 dockerd 目前使用的开源项目名称, docker 项目中的 engine(dockerd)仓库现在就是从 moby 仓库 fork 而来的,使用 containerd 作为运行时标准。 https://mobyproject.org/
docker-ce: docker 的开源版本, CE 指 Community Edition。 docker-ce 中的组件来自于 moby、 containerd 等其他项目。 https://www.docker.com/pricing/
docker-ee: docker 的收费版本, EE 指 Enterprise Edition。其基础组件来源和docker-ce 是一样的,但附加了一些其他的组件和功能。
官方网站
docker解决方案
云时代需要我们针对这些诉求有一套针对的解决方案。
- 我们要处理海量的数据,如何处理呢?购买大量的服务器,并研发对应软件
- 开发的需求需要频繁的变更上线,如何才能将修改的代码快速的分发到几百或者几千台服务器呢?如何共享软件呢?搞一个中心仓库,让各个服务器去下载软件包,安装,所以 CentOS 搞了 yum 仓库,docker 设计了镜像仓库, docker hub 是公共的托管仓库。
- 软件设计好以后,怎么快速安装启动,有问题回滚呢?将 docker 需要的所有信息设计一套软件格式,把所有的依赖搞进去,并打上版本标签,这样不会换一个服务器各种问题,所以 Docker 设计了镜像。
- 不同的开发环境怎么搭建呢,一会 java,一会 c++?docker 设计了镜像来应对,镜像里面存放了需要运行的环境,就像我们的 iPhone 内置 ios,我们的华为 mate 50 内置鸿蒙一样,一条命令就可以完成某个环境的搭建。
二.安装docker
详情安装可以参考下面两篇博客:
Ubuntu 24.04.1 LTS 安装 Docker
Ubuntu 24.04 国内环境下 Docker 安装完整指南
直接安装最新版即可,我使用的ubuntu版本为24.04,如果有其他版本安装需要的读者可自行进行搜索。
最好顺带把docker-compose也安装下,成功之后可以看到如下内容:
bash
knd@Nightcode:~$ docker version
Client: Docker Engine - Community
 Version:           29.1.3
 API version:       1.52
 Go version:        go1.25.5
 Git commit:        f52814d
 Built:             Fri Dec 12 14:49:32 2025
 OS/Arch:           linux/amd64
 Context:           default
permission denied while trying to connect to the docker API at unix:///var/run/docker.sock
knd@Nightcode:~$ sudo docker version
Client: Docker Engine - Community
 Version:           29.1.3
 API version:       1.52
 Go version:        go1.25.5
 Git commit:        f52814d
 Built:             Fri Dec 12 14:49:32 2025
 OS/Arch:           linux/amd64
 Context:           default

Server: Docker Engine - Community
 Engine:
  Version:          29.1.3
  API version:      1.52 (minimum version 1.44)
  Go version:       go1.25.5
  Git commit:       fbf3ed2
  Built:            Fri Dec 12 14:49:32 2025
  OS/Arch:          linux/amd64
  Experimental:     false
 containerd:
  Version:          v2.2.1
  GitCommit:        dea7da592f5d1d2b7755e3a161be07f43fad8f75
 runc:
  Version:          1.3.4
  GitCommit:        v1.3.4-0-gd6d73eb8
 docker-init:
  Version:          0.19.0
  GitCommit:        de40ad0
knd@Nightcode:~$ docker-compose version
Docker Compose version v2.13.0
这里运行下hello-world命令试试:
bash
knd@Nightcode:~$ sudo docker run hello-world
Unable to find image 'hello-world:latest' locally
latest: Pulling from library/hello-world
ea52d2000f90: Download complete
17eec7bbc9d7: Pull complete
Digest: sha256:d4aaab6242e0cace87e2ec17a2ed3d779d18fbfd03042ea58f2995626396a274
Status: Downloaded newer image for hello-world:latest

Hello from Docker!
This message shows that your installation appears to be working correctly.

To generate this message, Docker took the following steps:
 1. The Docker client contacted the Docker daemon.
 2. The Docker daemon pulled the "hello-world" image from the Docker Hub.
    (amd64)
 3. The Docker daemon created a new container from that image which runs the
    executable that produces the output you are currently reading.
 4. The Docker daemon streamed that output to the Docker client, which sent it
    to your terminal.

To try something more ambitious, you can run an Ubuntu container with:
 $ docker run -it ubuntu bash

Share images, automate workflows, and more with a free Docker ID:
 https://hub.docker.com/

For more examples and ideas, visit:
 https://docs.docker.com/get-started/
出现如上结果则说明正确无误。但是如果爆出如下错误:
bash
knd@Nightcode:~$ sudo docker run hello-world
Unable to find image 'hello-world:latest' locally
docker: Error response from daemon: failed to resolve reference "docker.io/library/hello-world:latest": failed to do request: Head "https://registry-1.docker.io/v2/library/hello-world/manifests/latest": dial tcp 31.13.96.192:443: i/o timeout

Run 'docker run --help' for more information
如果你用的腾讯云服务器,可以进行如下配置:
bash
sudo nano /etc/docker/daemon.json在打开的文件中写入如下内容:
bash
{
  "registry-mirrors" : [
    "https://docker.m.daocloud.io",
    "https://docker-cf.registry.cyou"
  ],
  "insecure-registries" : [
    "docker.mirrors.ustc.edu.cn"
  ],
  "debug": true,
  "experimental": false
}
然后重启docker服务:
bash
sudo systemctl restart docker这时执行docker info命令如果看到了Registry Mirrors则配置成功。此时在运行上面的hello world命令就没问题了。
三.docker镜像仓库Docker Registry
镜像仓库 (Docker Registry) 负责存储、管理和分发镜像,并且提供了登录认证能力,建立了仓库的索引。
镜像仓库管理多个 Repository, Repository 通过命名来区分。每个 Repository 包含一个或多个镜像,镜像通过镜像名称和标签 (Tag)来区分。
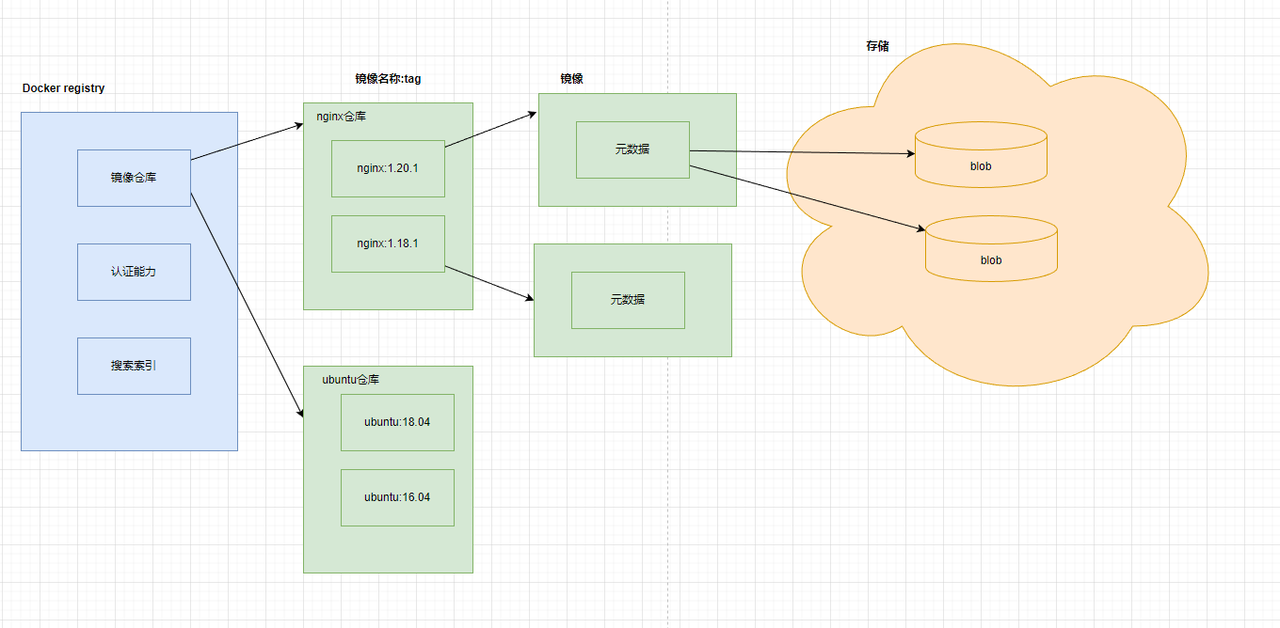
镜像仓库(Registry):要从哪一个镜像仓库拉取镜像,通常通过 DNS 或 IP 地址来确定一个镜像仓库如 hub.docker.com;一个 Registry 中可以存在多个Repository·Repository 可分为"顶层仓库"和"用户仓库";·用户仓库名称格式为"用户名/仓库名"·每个仓库可以包含多个 Tag(标签),每个标签对应一个镜像
- Repository: ·由某特定的 docker 镜像的所有迭代版本组成的镜像仓库
- 镜像名称(name) +标签(tag):如 nginx:latest
- 认证能力:提供用户注册,登录、登出能力
- 索引:提供镜像的索引信息,方便检索
一个容器镜像包含了两个部分,一个是元数据,其实就是由 dockerfile 构建出来的描述文件,这个描述文件会说这个容器镜像有多少层,每一层里面有什么内容,它的checksum 这些信息都会记录下来,还有最终的可执行文件在哪就是在存储数据里面,就是在一个一个的 blob 里面,真正占有空间的就是这些 blob。
3.1镜像仓库分类
按是否对外开放划分,也是研发人员常说的
- 公有仓库:像阿里云、 dockerhub 等放到公有网络上,不用登录就可以下载镜像,供大家访问使用
- 私有仓库:不对外开放,往往位于私有网络,只有公司内部人员可以使用。
按供应商和面向群体划分
- sponsor(赞助) registry:第三方的 registry,供客户和 docker 社区版使用
- mirror(镜像) registry:第三方的 registry,只让客户使用,例如阿里云必须注册才能使用
- vendor(供应商) registry:由发布 docker 镜像的供应商提供的 registry,例如像Google 和 Redhat 提供了镜像仓库服务
- private registry:通过没有防火墙和额外的安全层的私有实体提供的 registry,仅供内部使用
3.2镜像仓库工作机制
- 开发环境:开发人员使用的一套环境
- 测试环境:需求开发完成后,发布到供测试人员进行测试的环境
- 预发布环境:版本测试完成后,发布到和生产类似的环境,提前模拟生产发布
- 生产环境:真正面向客户的环境
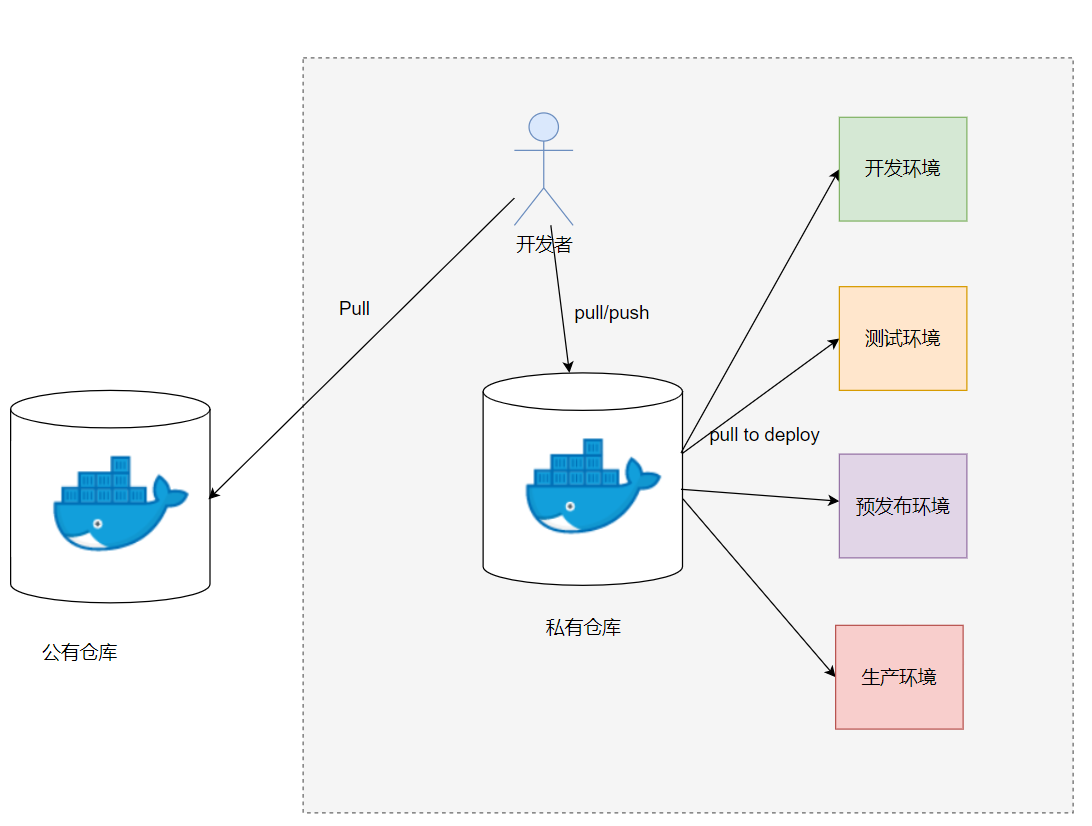
镜像仓库的拉取机制
启动容器时, docker daemon 会试图从本地获取相关的镜像;本地镜像不存在时,其将从 Registry 中下载该镜像并保存到本地;
3.3镜像仓库命令
如果对一个命令的使用方式比较困惑,可以这样子去写:(比如docker login)
bash
knd@Nightcode:~$ docker login --help
Usage:  docker login [OPTIONS] [SERVER]

Authenticate to a registry.
Defaults to Docker Hub if no server is specified.

Options:
  -p, --password string   Password or Personal Access Token (PAT)
      --password-stdin    Take the Password or Personal Access Token (PAT) from stdin
  -u, --username string   Username
当然也可以到官方网站上搜索:
docker login
常用的镜像仓库命令有:
| 命令 | 别名 | 功能 | 备注 |
|---|---|---|---|
| docker login | 登录仓库 | 必须掌握 | |
| docker pull | docker image pull | 拉取镜像 | 必须掌握 |
| docker push | docker image push | 推送镜像 | 必须掌握 |
| docker search | 查找镜像 | ||
| docker logout | 登出仓库 | 必须掌握 |
docker login
在此之前请读者到docker hub网站进行一个注册,下面登录时使用的用户名密码就是注册时的用户名密码。
docker hub
国内访问可能有些卡,建议使用科学上网。注册过程这里不再演示。
接下来便可以进行登录,但是因为一些不可阻力,我的登录是失败的(当然如果你是香港或海外地区的服务器应该没有这问题,我的云服务器是国内的):
bash
knd@Nightcode:~$ docker login
Failed to start web-based login - falling back to command line login...

Log in with your Docker ID or email address to push and pull images from Docker Hub. If you don't have a Docker ID, head over to https://hub.docker.com/ to create one.
You can log in with your password or a Personal Access Token (PAT). Using a limited-scope PAT grants better security and is required for organizations using SSO. Learn more at https://docs.docker.com/go/access-tokens/

Username: xiu114514

i Info → A Personal Access Token (PAT) can be used instead.
         To create a PAT, visit https://app.docker.com/settings


Password:
Get "https://registry-1.docker.io/v2/": net/http: request canceled while waiting for connection (Client.Timeout exceeded while awaiting headers)
超时了,所以我们这里换用阿里云的个人镜像仓库,大家可以通过这篇文章进行镜像仓库服务配置
https://blog.csdn.net/2201_75443644/article/details/144310495
文章里面有登录成功的样例,这里我登录成功后是这样的:
bash
Password:

WARNING! Your credentials are stored unencrypted in '/home/knd/.docker/config.json'.
Configure a credential helper to remove this warning. See
https://docs.docker.com/go/credential-store/

Login Succeeded
docker pull(别名docker image pull)
语法:
bash
docker pull [OPTIONS] NAME[:TAG|@DIGEST]关键参数
- -a :拉取所有 tagged 镜像
- --disable-content-trust :忽略镜像的校验,默认开启
通过tag下载:
比如我们这里拉取一个nginx镜像下来:
https://hub.docker.com/_/nginx/tags
我们可以在overview中看到它的最新版本是1.29.4,此时我们给他拉取下来:
bash
knd@Nightcode:~$ sudo docker pull nginx:1.29.4
1.29.4: Pulling from library/nginx
5b5fa0b64d74: Pull complete
ee3a09d2248a: Pull complete
9ee60c6c0558: Pull complete
5b219a92f92a: Pull complete
1733a4cd5954: Pull complete
7382b41547b8: Pull complete
114e699da838: Pull complete
adeb5aba46ee: Download complete
11488ed04caf: Download complete
Digest: sha256:fb01117203ff38c2f9af91db1a7409459182a37c87cced5cb442d1d8fcc66d19
Status: Downloaded newer image for nginx:1.29.4
docker.io/library/nginx:1.29.4
当然因为毕竟docker hub在海外,这个过程可能有些漫长。
通过id下载:
还是以上面的nginx为例子,这里我们换个版本,我们可以看到如下页面中有一行Index digest。我们把他后面的内容复制下来:

bash
knd@Nightcode:~$ sudo docker pull nginx@sha256:fc0cff8d49db19250104d2fba8bd1ee3fc2a09ed8163de582804e5d137df7821
docker.io/library/nginx@sha256:fc0cff8d49db19250104d2fba8bd1ee3fc2a09ed8163de582804e5d137df7821: Pulling from library/nginx
25f453064fd3: Pull complete
085c5e5aaa8e: Pull complete
0abf9e567266: Pull complete
567f84da6fbd: Pull complete
da7c973d8b92: Pull complete
33f95a0f3229: Pull complete
1074353eec0d: Pull complete
9df852dd4906: Download complete
d4d098ca792a: Download complete
Digest: sha256:fc0cff8d49db19250104d2fba8bd1ee3fc2a09ed8163de582804e5d137df7821
Status: Downloaded newer image for nginx@sha256:fc0cff8d49db19250104d2fba8bd1ee3fc2a09ed8163de582804e5d137df7821
docker.io/library/nginx@sha256:fc0cff8d49db19250104d2fba8bd1ee3fc2a09ed8163de582804e5d137df7821
这样就成功拉取下来了。
当然一般使用第一种方法进行拉取,毕竟可以看到他是什么版本的:
bash
knd@Nightcode:~$ sudo docker image ls
                                                                                                                                                                                                                                                        i Info →   U  In Use
IMAGE                                                                           ID             DISK USAGE   CONTENT SIZE   EXTRA
hello-world:latest                                                              d4aaab6242e0       25.9kB         9.52kB    U
nginx:1.29.4                                                                    fb01117203ff        228MB         62.6MB
nginx@sha256:fc0cff8d49db19250104d2fba8bd1ee3fc2a09ed8163de582804e5d137df7821   fc0cff8d49db         21MB         6.23MB
docker push(别名docker image push)
语法:
bash
docker push [OPTIONS] NAME[:TAG]关键参数
- -a :推送所有 tagged 镜像
- --disable-content-trust :忽略镜像的校验,默认开启
这里呢我们向我们阿里云的个人仓库进行推送,就像你推送代码一样,不是你的仓库或者没有权限的仓库我们是无法进行推送的(当然在此之前请先在阿里云容器镜像服务上创建自己的镜像仓库)。
当然不太熟悉如何去创建一个自己的镜像仓库的读者可以参考这篇博客:
26-把自己制作的镜像上传至阿里云镜像仓库实战
阿里云官方给的推送命令样例为:
bash
$ docker login --username=aliyun6856023570 crpi-x8xxo8bkwhrzozzr.cn-hangzhou.personal.cr.aliyuncs.com
$ docker tag [ImageId] crpi-x8xxo8bkwhrzozzr.cn-hangzhou.personal.cr.aliyuncs.com/xiu114514/nginx:[镜像版本号]
$ docker push crpi-x8xxo8bkwhrzozzr.cn-hangzhou.personal.cr.aliyuncs.com/xiu114514/nginx:[镜像版本号]crpi-x8xxo8bkwhrzozzr.cn-hangzhou.personal.cr.aliyuncs.com/xiu114514/nginx:这一大段东西就是你的仓库,xiu114514是命名空间,nginx是镜像仓库。需要先给本地的镜像制作一个阿里云标签的镜像才能去push。否则默认是push到docker hub的仓库去了,因为我们这里没办法登录,所以就不进行了。
bash
knd@Nightcode:~$ sudo docker login --username=aliyun6856023570 crpi-x8xxo8bkwhrzozzr.cn-hangzhou.personal.cr.aliyuncs.com
Password:

WARNING! Your credentials are stored unencrypted in '/root/.docker/config.json'.
Configure a credential helper to remove this warning. See
https://docs.docker.com/go/credential-store/

Login Succeeded
knd@Nightcode:~$ sudo docker tag nginx:1.29.4 crpi-x8xxo8bkwhrzozzr.cn-hangzhou.personal.cr.aliyuncs.com/xiu114514/nginx:1.29.4
knd@Nightcode:~$ sudo docker image ls
                                                                                                                                                                                                                                                        i Info →   U  In Use
IMAGE                                                                               ID             DISK USAGE   CONTENT SIZE   EXTRA
crpi-x8xxo8bkwhrzozzr.cn-hangzhou.personal.cr.aliyuncs.com/xiu114514/nginx:1.29.4   fb01117203ff        228MB         62.6MB
hello-world:latest                                                                  d4aaab6242e0       25.9kB         9.52kB    U
nginx:1.29.4                                                                        fb01117203ff        228MB         62.6MB
nginx@sha256:fc0cff8d49db19250104d2fba8bd1ee3fc2a09ed8163de582804e5d137df7821       fc0cff8d49db         21MB         6.23MB
knd@Nightcode:~$ sudo docker push crpi-x8xxo8bkwhrzozzr.cn-hangzhou.personal.cr.aliyuncs.com/xiu114514/nginx:1.29.4
The push refers to repository [crpi-x8xxo8bkwhrzozzr.cn-hangzhou.personal.cr.aliyuncs.com/xiu114514/nginx]
5b5fa0b64d74: Pushed
ee3a09d2248a: Pushed
7382b41547b8: Pushed
1733a4cd5954: Pushed
9ee60c6c0558: Pushed
5b219a92f92a: Pushed
114e699da838: Pushed
1.29.4: digest: sha256:547c8c6863a88abd0c987779413489ff0e9a693c24d2d88ce9eb8515e0ae0335 size: 2290

i Info → Not all multiplatform-content is present and only the available single-platform image was pushed
sha256:fb01117203ff38c2f9af91db1a7409459182a37c87cced5cb442d1d8fcc66d19 -> sha256:547c8c6863a88abd0c987779413489ff0e9a693c24d2d88ce9eb8515e0ae0335 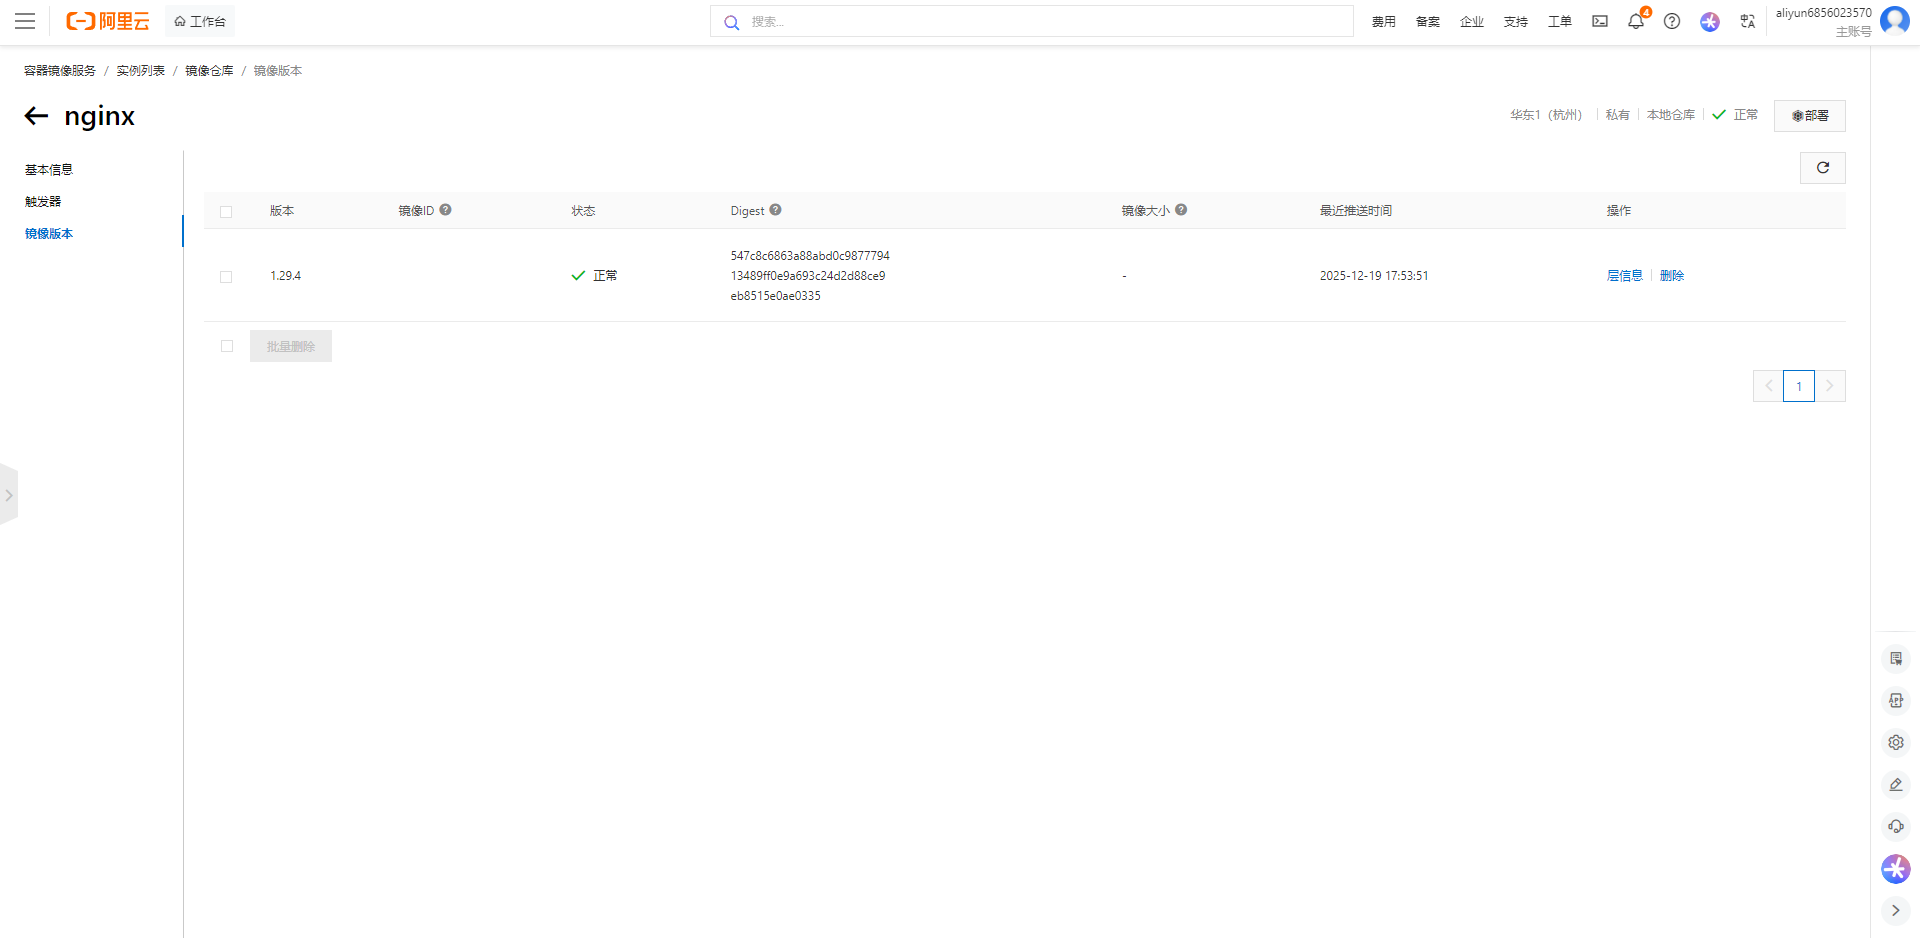
这里我们再对我们刚刚上传的镜像进行下拉取:
bash
#未删除原来镜像拉取效果
knd@Nightcode:~$ sudo docker pull crpi-x8xxo8bkwhrzozzr.cn-hangzhou.personal.cr.aliyuncs.com/xiu114514/nginx:1.29.4
1.29.4: Pulling from xiu114514/nginx
Digest: sha256:547c8c6863a88abd0c987779413489ff0e9a693c24d2d88ce9eb8515e0ae0335
Status: Downloaded newer image for crpi-x8xxo8bkwhrzozzr.cn-hangzhou.personal.cr.aliyuncs.com/xiu114514/nginx:1.29.4
crpi-x8xxo8bkwhrzozzr.cn-hangzhou.personal.cr.aliyuncs.com/xiu114514/nginx:1.29.4
#删除原来镜像拉取效果
knd@Nightcode:~$ sudo docker pull crpi-x8xxo8bkwhrzozzr.cn-hangzhou.personal.cr.aliyuncs.com/xiu114514/nginx:1.29.4
1.29.4: Pulling from xiu114514/nginx
1733a4cd5954: Pull complete
5b5fa0b64d74: Pull complete
5b219a92f92a: Pull complete
ee3a09d2248a: Pull complete
7382b41547b8: Pull complete
9ee60c6c0558: Pull complete
114e699da838: Pull complete
Digest: sha256:547c8c6863a88abd0c987779413489ff0e9a693c24d2d88ce9eb8515e0ae0335
Status: Downloaded newer image for crpi-x8xxo8bkwhrzozzr.cn-hangzhou.personal.cr.aliyuncs.com/xiu114514/nginx:1.29.4
crpi-x8xxo8bkwhrzozzr.cn-hangzhou.personal.cr.aliyuncs.com/xiu114514/nginx:1.29.4
docker search
从 Docker Hub 查找镜像,因 docker 网站被封,该命令暂时国内无法实操,需要国外网络联系。
语法:
bash
docker search [OPTIONS] TERM关键参数
- --no-trunc :显示完整的镜像描述;
- -f <过滤条件>:列出收藏数不小于指定值的镜像。
我们这里看一个成功的样例,比如我们想找nginx:
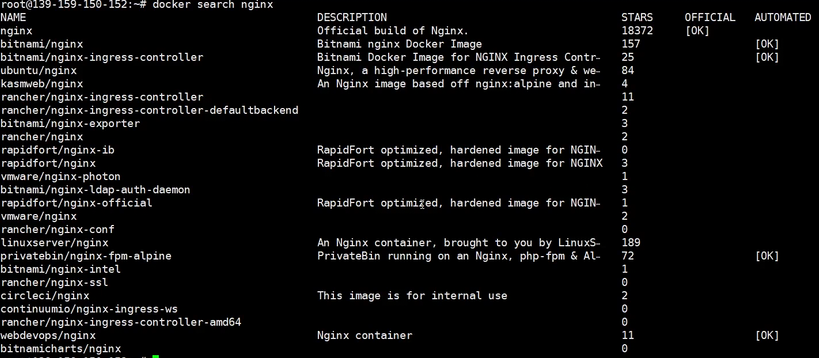
找收藏数等于10的:

当然一般我们也不用它,直接从docker hub网站上搜不香吗。
docker logout
登出一个 Docker 镜像仓库,如果未指定镜像仓库地址,默认为官方仓库 DockerHub,因 docker 网站被封,该命令可以用阿里云或者腾讯云的镜像仓库练习。
语法:
bash
docker logout [SERVER]示例:
bash
knd@Nightcode:~$ docker logout crpi-x8xxo8bkwhrzozzr.cn-hangzhou.personal.cr.aliyuncs.com
Removing login credentials for crpi-x8xxo8bkwhrzozzr.cn-hangzhou.personal.cr.aliyuncs.com
这时候我再去拉取我的私人仓库就不让我拉取了:
bash
knd@Nightcode:~$ sudo docker pull crpi-x8xxo8bkwhrzozzr.cn-hangzhou.personal.cr.aliyuncs.com/xiu114514/nginx:1.29.4
Error response from daemon: pull access denied for crpi-x8xxo8bkwhrzozzr.cn-hangzhou.personal.cr.aliyuncs.com/xiu114514/nginx, repository does not exist or may require 'docker login'
3.4部分镜像命令
docker images
列出本地镜像。
语法:
bash
docker images [OPTIONS] [REPOSITORY[:TAG]]别名:
bash
docker image ls, docker image list关键参数
- -a :列出本地所有的镜像(含中间映像层,默认情况下,过滤掉中间映像层);
- --digests :显示镜像的摘要信息;
- -f :显示满足条件的镜像;
- --format :指定返回值的模板文件;
- --no-trunc :显示完整的镜像信息;
- -q :只显示镜像 ID。
比如我们只想看nginx的镜像:
bash
knd@Nightcode:~$ sudo docker images nginx -a
                                                                                                                                                                                                                                                        i Info →   U  In Use
IMAGE                                                                           ID             DISK USAGE   CONTENT SIZE   EXTRA
nginx@sha256:fc0cff8d49db19250104d2fba8bd1ee3fc2a09ed8163de582804e5d137df7821   fc0cff8d49db         21MB         6.23MB
当然也可以与grep命令搭配使用。
上面我们或多或少已经使用过这个命令了,大家可以自行尝试下各个选项。
docker image inspect
功能
查看镜像详细信息
语法:
bash
docker image inspect [OPTIONS] IMAGE [IMAGE...]样例:
bash
knd@Nightcode:~$ sudo docker inspect nginx:1.29.4
[
    {
        "Id": "sha256:547c8c6863a88abd0c987779413489ff0e9a693c24d2d88ce9eb8515e0ae0335",
        "RepoTags": [
...
也可以通过id进行查看:
bash
knd@Nightcode:~$ sudo docker inspect 547c8c6863a8
[
    {
        "Id": "sha256:547c8c6863a88abd0c987779413489ff0e9a693c24d2d88ce9eb8515e0ae0335",
...
docker tag
功能
标记本地镜像,将其归入某一仓库。
语法:
bash
docker tag SOURCE_IMAGE[:TAG] TARGET_IMAGE[:TAG]别名:
bash
docker image tag详情使用样例可以见上面的docker pull部分。
3.5部分容器命令
docker run
功能
创建一个新的容器并运行一个命令
语法
bash
docker run [OPTIONS] IMAGE [COMMAND] [ARG...]别名:
bash
docker container run关键参数
- -d: 后台运行容器,并返回容器 ID;
- -i: 以交互模式运行容器,通常与 -t 同时使用;
- -P: 随机端口映射,容器内部端口随机映射到主机的端口
- -p: 指定端口映射,格式为: 主机(宿主)端口:容器端口
- -t: 为容器重新分配一个伪输入终端,通常与 -i 同时使用;
- --name="nginx-lb": 为容器指定一个名称;
- -h "mars": 指定容器的 hostname;
- -e username="ritchie": 设置环境变量;
- --cpuset-cpus="0-2" or --cpuset-cpus="0,1,2": 绑定容器到指定 CPU 运行;
- -m :设置容器使用内存最大值;
- --network="bridge": 指定容器的网络连接类型;
- --link=\[\]: 添加链接到另一个容器;
- --volume , -v: 绑定一个卷
- --rm :shell 退出的时候自动删除容器
-v与--network放到后面介绍网络与存储卷的时候再进行熟悉。下面我们来看几个样例熟悉下其他几个参数:
使用docker在ubuntu上跑一个centos
bash
knd@Nightcode:~/dockertest$ sudo docker pull centos:7
[sudo] password for knd:
7: Pulling from library/centos
2d473b07cdd5: Pull complete
Digest: sha256:be65f488b7764ad3638f236b7b515b3678369a5124c47b8d32916d6487418ea4
Status: Downloaded newer image for centos:7
docker.io/library/centos:7
knd@Nightcode:~/dockertest$ sudo docker run centos:7
此时我们发现它运行之后立马退出了,这是因为centos7默认执行的命令是创建一个命令解释器/bin/bash,它一看没人和它进行交互就自动断开了,所以我们使用docker ps 命令查看运行中的容器时无法看到它在运行,但是加上-a选项即可看到:
bash
knd@Nightcode:~/dockertest$ sudo docker ps -a
CONTAINER ID   IMAGE         COMMAND       CREATED         STATUS                     PORTS     NAMES
b3b0d78ca70d   centos:7      "/bin/bash"   9 seconds ago   Exited (0) 8 seconds ago             great_wright
那有没有什么办法能让我进入容器中的centos系统去使用它的/bin/bash呢,可以加上-i与-t选项:
bash
knd@Nightcode:~/dockertest$ hostname
Nightcode
knd@Nightcode:~/dockertest$ sudo docker run -it centos:7
[root@57a797687c52 /]# hostname
57a797687c52
[root@57a797687c52 /]# exit
exit
当然你也可以尝试下单独使用-i或-t选项,一般我们不把他们分离使用。
将前台容器分离到后台执行
我们这里先不加任何参数启动下nginx容器:
bash
knd@Nightcode:~/dockertest$ sudo docker run nginx:1.29.4
/docker-entrypoint.sh: /docker-entrypoint.d/ is not empty, will attempt to perform configuration
...
此时我们可以看到它处于前台运行并且一旦我们关闭终端或使用ctrl + c他也会退出。这时就可以加上-d选项让其在后台运行:
bash
knd@Nightcode:~/dockertest$ sudo docker run -d nginx:1.29.4
19e49c6b087d449e33daac99d0c053f96351fd6bf9739eae9155125be15d045f
knd@Nightcode:~/dockertest$ sudo docker ps
CONTAINER ID   IMAGE          COMMAND                  CREATED          STATUS          PORTS     NAMES
19e49c6b087d   nginx:1.29.4   "/docker-entrypoint...."   10 seconds ago   Up 10 seconds   80/tcp    silly_banzai
端口映射参数-p -P
这里我在云服务器上关闭了8080端口的防火墙,我们先以-p举个例子,还是用nginx:
bash
knd@Nightcode:~/dockertest$ sudo docker run -d -p 8080:80 nginx:1.29.4
bba880dac508e811cbaf939d02f41968a4730221acf2ab5d03d84711c2eb9f66
knd@Nightcode:~/dockertest$ sudo docker ps -a
CONTAINER ID   IMAGE          COMMAND                  CREATED          STATUS                      PORTS                                     NAMES
bba880dac508   nginx:1.29.4   "/docker-entrypoint...."   47 seconds ago   Up 46 seconds               0.0.0.0:8080->80/tcp, [::]:8080->80/tcp   vigorous_villani
b3b0d78ca70d   centos:7       "/bin/bash"              33 minutes ago   Exited (0) 33 minutes ago                                             great_wright
此时便可以从公网进行ip+端口号的访问看到nginx的欢迎界面了。
如果我们使用-P呢?
bash
knd@Nightcode:~/dockertest$ sudo docker run -d -P nginx:1.29.4
81aeb5dc55d47ddf42a2df077c79abf95f1f5da5c9863546ed057f8a9a8c1716
knd@Nightcode:~/dockertest$ sudo docker ps -a
CONTAINER ID IMAGE COMMAND CREATED STATUS PORTS NAMES
81aeb5dc55d4 nginx:1.29.4 "/docker-entrypoint...." 6 seconds ago Up 6 seconds 0.0.0.0:32768->80/tcp, [::]:32768->80/tcp blissful_varahamihira
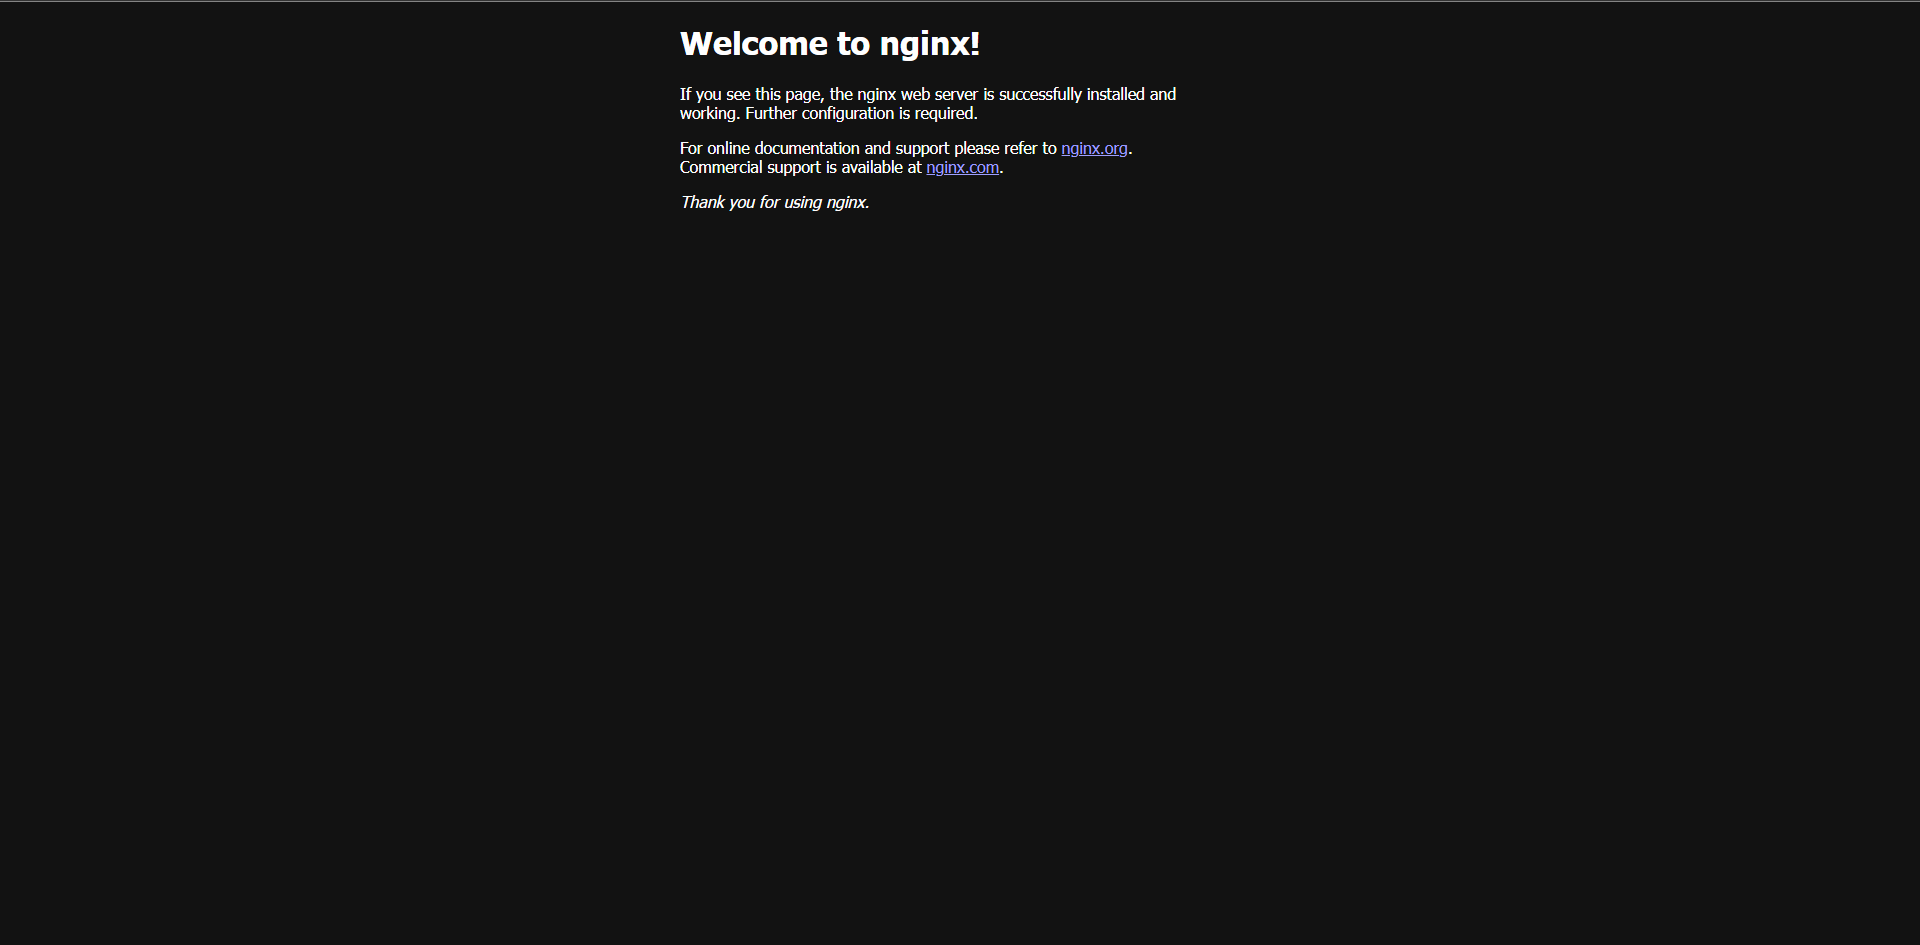
b3b0d78ca70d centos:7 "/bin/bash" 34 minutes ago Exited (0) 34 minutes ago great_wright此时我们可以看到它随机给我搞了一个端口进行映射,如果没有开防火墙,我们可以用curl对其进行访问可以发现是能访问通的:
bash
knd@Nightcode:~/dockertest$ curl 127.0.0.1:32768
<!DOCTYPE html>
<html>
<head>
<title>Welcome to nginx!</title>
<style>
html { color-scheme: light dark; }
body { width: 35em; margin: 0 auto;
font-family: Tahoma, Verdana, Arial, sans-serif; }
</style>
</head>
<body>
<h1>Welcome to nginx!</h1>
<p>If you see this page, the nginx web server is successfully installed and
working. Further configuration is required.</p>

<p>For online documentation and support please refer to
<a href="http://nginx.org/">nginx.org</a>.<br/>
Commercial support is available at
<a href="http://nginx.com/">nginx.com</a>.</p>

<p><em>Thank you for using nginx.</em></p>
</body>
</html>
环境变量-e,主机名-h与容器名--name参数
首先如果默认我们没有指定-name时,docker会随便给我们的容器起一个名字,如果我们对一个容器起名字之后,我们便可以通过容器名对其进行操作:
bash
knd@Nightcode:~/dockertest$ sudo docker run -d --name nginx nginx:1.29.4
a5b7ce7d9eeea308747169866e8b34a3591fccc9db7268f8e664840dae9a91a0
knd@Nightcode:~/dockertest$ sudo docker ps
CONTAINER ID   IMAGE          COMMAND                  CREATED         STATUS         PORTS     NAMES
a5b7ce7d9eee   nginx:1.29.4   "/docker-entrypoint...."   6 seconds ago   Up 6 seconds   80/tcp    nginx
knd@Nightcode:~/dockertest$ sudo docker stop nginx
nginx
knd@Nightcode:~/dockertest$ sudo docker ps
CONTAINER ID   IMAGE     COMMAND   CREATED   STATUS    PORTS     NAMES
如果我们指定了主机名称,那么-it进入交互模式时显示的主机名就是我们所指定的,-e则是为容器内主机添加一个环境变量:
bash
knd@Nightcode:~/dockertest$ sudo docker run -h knd -e mytest=test -it centos:7
[root@knd /]# hostname
knd
[root@knd /]# env | grep mytest
mytest=test
显示控制容器使用的cpu数量与内存大小
我的云服务器是一个4核4G的,使用cat /proc/cpuinfo即可查看cpu信息。
这里我们限制centos容器使用0-1核心,同时限制其内存使用为1G:
bash
knd@Nightcode:~/dockertest$ sudo docker run -it --cpuset-cpus="0-1" -m 1G centos:7可以新起一个终端使用docker stats进行资源占用查看(后面会细说这个命令)
bash
sudo docker stats inspiring_brown
CONTAINER ID   NAME              CPU %     MEM USAGE / LIMIT   MEM %     NET I/O         BLOCK I/O   PIDS
803efe3bb7cc   inspiring_brown   0.00%     764KiB / 1GiB       0.07%     1.02kB / 126B   0B / 0B     1
再来看下容器绑定的cpu信息:
bash
knd@Nightcode:~$ sudo docker ps -a
CONTAINER ID   IMAGE      COMMAND       CREATED         STATUS         PORTS     NAMES
803efe3bb7cc   centos:7   "/bin/bash"   5 minutes ago   Up 5 minutes             inspiring_brown
knd@Nightcode:~$ sudo docker inspect inspiring_brown | grep -i cpuset
            "CpusetCpus": "0-1",
            "CpusetMems": "",
单向打通容器之间的网络--link
比如我们创建一个nginx容器然后通过一个centos容器对其进行访问:
bash
knd@Nightcode:~/dockertest$ sudo docker run -d --name nginx nginx:1.29.4
c4e05a157cc45895ac1ee1d2f13a4c29cc13f048cfd04a89d0143d5db56e3b02
knd@Nightcode:~/dockertest$ sudo docker run -it --name mycentos --link=nginx centos:7
[root@56030ba491a2 /]# curl nginx:80
<!DOCTYPE html>
<html>
<head>
<title>Welcome to nginx!</title>
<style>
html { color-scheme: light dark; }
body { width: 35em; margin: 0 auto;
font-family: Tahoma, Verdana, Arial, sans-serif; }
</style>
</head>
<body>
<h1>Welcome to nginx!</h1>
<p>If you see this page, the nginx web server is successfully installed and
working. Further configuration is required.</p>

<p>For online documentation and support please refer to
<a href="http://nginx.org/">nginx.org</a>.<br/>
Commercial support is available at
<a href="http://nginx.com/">nginx.com</a>.</p>

<p><em>Thank you for using nginx.</em></p>
</body>
</html>
可以看到它成功访问了,其实就是做了一个本地的DNS:(查看 hosts 文件(本地域名解析)命令cat /etc/hosts)
bash
[root@56030ba491a2 /]# cat /etc/hosts
127.0.0.1       localhost
::1     localhost ip6-localhost ip6-loopback
fe00::  ip6-localnet
ff00::  ip6-mcastprefix
ff02::1 ip6-allnodes
ff02::2 ip6-allrouters
172.17.0.2      nginx c4e05a157cc4
172.17.0.3      56030ba491a2
shell 退出的时候自动删除容器 --rm
比如我们这里新启动一个centos容器给他加上--rm选项:
bash
knd@Nightcode:~/dockertest$ sudo docker run --rm -it --name mycentos centos:7
[root@5d880c42da15 /]# exit
exit
knd@Nightcode:~/dockertest$ sudo docker ps -a
CONTAINER ID   IMAGE     COMMAND   CREATED   STATUS    PORTS     NAMES
可以看到退出容器时它自动对容器进行了删除,使用docker ps -a也无法查到此容器的任何信息。
docker ps
功能
列出容器
语法
bash
docker ps [OPTIONS]别名:
bash
docker container ls, docker container list, docker container ps关键参数
- -a :显示所有的容器,包括未运行的。
- -f :根据条件过滤显示的内容。
- --format :指定返回值的模板文件。如 json 或者 table
- -l :显示 latest 的容器。
- -n :列出最近创建的 n 个容器。
- --no-trunc :不截断输出。
- -q :静默模式,只显示容器编号。
- -s :显示总的文件大小。
这里我们不再进行演示,感兴趣的读者可以结合ai进行相关操作的测试。
四.认识nginx
4.1基础知识
Web 服务器
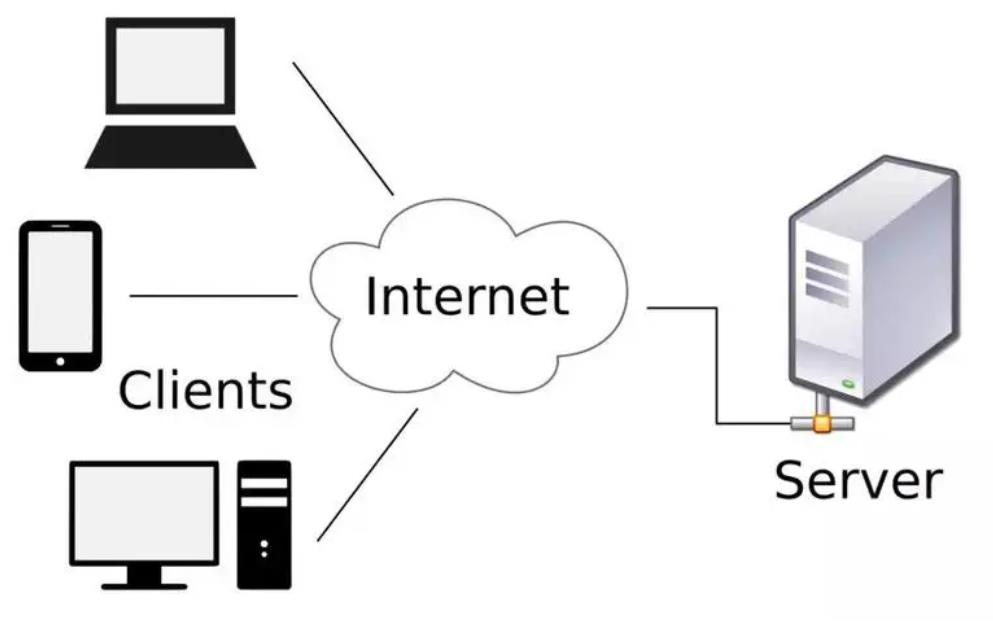
Web 服务器,一般是指"网站服务器",是指驻留于互联网上某种类型计算机的程序。Web 服务器可以向 Web 浏览器等客户端提供文档,也可以放置网站文件,让全世界浏览,更可以放置数据文件,让全世界下载。
Web 服务器,也称为"WWW 服务器"( 英文全写: World Wide Web,翻译成中文:万维网或环球信息网 ),主要功能是"提供网上信息浏览服务"。 WWW 是 Internet(互联网)的多媒体信息查询工具,是 Internet(互联网)上发展起来的服务,也是发展最快和目前使用最广泛的服务。正是因为有了 WWW 工具,才使得近十几年来互联网迅速繁荣发展,用户数量飞速飙升。据最新数据显示,目前全球人口数量达到 76.76 亿人,其中全球"网民"(互联网用户)达到惊人的 43.88 亿。
例如百度就是一个 web 服务器,提供搜索服务
Nginx
Nginx 是一款自由的、开源的、高性能的 HTTP 服务器和反向代理服务器;同时也是一个 IMAP、 POP3、 SMTP 代理服务器; Nginx 可以作为一个 HTTP 服务器进行网站的发布处理,另外 Nginx 可以作为反向代理进行负载均衡的实现。可以理解 Nginx 是 web 服务器的一种实现。
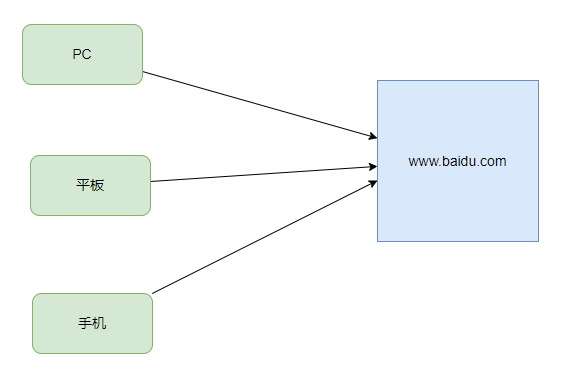
Nginx 作为 Web 服务器可以向各种浏览器等客户端提供浏览服务,比如我们通过手机、电脑、平板可以访问百度来实现对 web 服务器的访问。
正反向代理

由于防火墙的原因,我们并不能直接访问谷歌,那么我们可以借助 VPN 来实现,这就是一个简单的正向代理的例子。这里你能够发现,正向代理"代理"的是客户端,而且客户端是知道目标的,而目标是不知道客户端是通过 VPN 访问的。
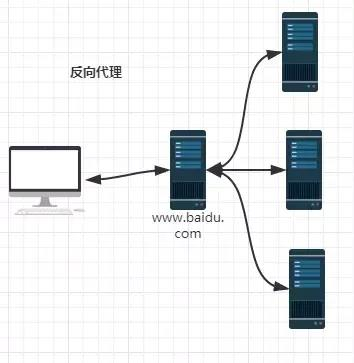
当我们在外网访问百度的时候,其实会进行一个转发,代理到内网去,这就是所谓的反向代理,即反向代理"代理"的是服务器端,而且这一个过程对于客户端而言是透明的。
4.2ubuntu安装nginx
bash
knd@Nightcode:sudo apt install nginx -y
knd@Nightcode:~$ nginx -v
nginx version: nginx/1.24.0 (Ubuntu)
knd@Nightcode:~$ ps -ef |grep nginx
root     3160178       1  0 19:00 ?        00:00:00 nginx: master process /usr/sbin/nginx -g daemon on; master_process on;
www-data 3160180 3160178  0 19:00 ?        00:00:00 nginx: worker process
www-data 3160181 3160178  0 19:00 ?        00:00:00 nginx: worker process
www-data 3160182 3160178  0 19:00 ?        00:00:00 nginx: worker process
www-data 3160183 3160178  0 19:00 ?        00:00:00 nginx: worker process
knd 3160820 3107202 0 19:03 pts/0 00:00:00 grep --color=auto nginx如果没有启动过可以使用sudo nginx进行启动。
接下来可以通过在浏览器的网址输入框中输入你自己云服务器的ip进行访问(注意把80与443端口放行)会看到如下的界面:
当然你要是显示的是ubuntu的页面也不奇怪,这时因为ubuntu自己修改了,不用担心。接下来我们介绍如何修改浏览的首页。
nginx修改浏览首页
注意看/etc/nginx/nginx.conf下的内容:
bash
knd@Nightcode:~$ cat /etc/nginx/nginx.conf
http {
...
        include /etc/nginx/conf.d/*.conf;
        include /etc/nginx/sites-enabled/*;
...
主要是上面的两行,我们看下这两个目录下的内容:
bash
knd@Nightcode:~$ ll /etc/nginx/conf.d/
total 8
drwxr-xr-x 2 root root 4096 Aug 22 20:45 ./
drwxr-xr-x 8 root root 4096 Dec 19 19:00 ../
knd@Nightcode:~$ ll /etc/nginx/sites-enabled/
total 8
drwxr-xr-x 2 root root 4096 Dec 19 19:00 ./
drwxr-xr-x 8 root root 4096 Dec 19 19:00 ../
lrwxrwxrwx 1 root root   34 Dec 19 19:00 default -> /etc/nginx/sites-available/default
打开这个文件看下面这一行:
bash
server {
...
        root /var/www/html;
...
我们当时访问自己服务器时展示的就是/var/www/html下的那个html文件index.nginx-debian.html
你如果本来就是我上面展示的那个页面,便不用作修改。如果显示的是ubuntu的默认页面,可以把root 后面的目录更改为/usr/share/nginx/html就是上面的页面了。
文件内容:
html
<!DOCTYPE html>
<html>
<head>
<title>Welcome to nginx!</title>
<style>
html { color-scheme: light dark; }
body { width: 35em; margin: 0 auto;
font-family: Tahoma, Verdana, Arial, sans-serif; }
</style>
</head>
<body>
<h1>Welcome to nginx!</h1>
<p>If you see this page, the nginx web server is successfully installed and
working. Further configuration is required.</p>

<p>For online documentation and support please refer to
<a href="http://nginx.org/">nginx.org</a>.<br/>
Commercial support is available at
<a href="http://nginx.com/">nginx.com</a>.</p>

<p><em>Thank you for using nginx.</em></p>
</body>
</html>
这里我们可以修改对应目录下的html文件让其显示不同的内容,这里我让goole geimini pro3帮我生成了一个简单的仿b站首页的html文件,大家可以将其粘贴到对应的html文件中然后再访问服务器:
html
<!DOCTYPE html>
<html lang="zh-CN">
<head>
<meta charset="UTF-8">
<meta name="viewport" content="width=device-width, initial-scale=1.0">
<title>仿Bilibili首页 - 简单静态版</title>
<link href="https://cdnjs.cloudflare.com/ajax/libs/font-awesome/6.0.0/css/all.min.css" rel="stylesheet">
<style>
/* --- 1. 全局重置与基础样式 --- */
* {
margin: 0;
padding: 0;
box-sizing: border-box;
}
body {
font-family: -apple-system, BlinkMacSystemFont, "Segoe UI", Roboto, "Helvetica Neue", Arial, sans-serif;
background-color: #f4f4f4; /* 浅灰背景 */
color: #18191c;
}
a {
text-decoration: none;
color: inherit;
}
ul {
list-style: none;
}
/* 容器限制最大宽度,保持页面居中 */
.container {
max-width: 1400px;
margin: 0 auto;
padding: 0 20px;
}
/* --- 2. 顶部导航栏 (Header) --- */
.header {
background-color: #ffffff;
height: 64px;
box-shadow: 0 2px 4px rgba(0,0,0,0.05);
position: sticky;
top: 0;
z-index: 100;
display: flex;
align-items: center;
justify-content: space-between;
padding: 0 24px;
}
.header-left, .header-right {
display: flex;
align-items: center;
gap: 20px; /* 元素间距 */
}
/* 菜单链接 */
.nav-link {
font-size: 14px;
cursor: pointer;
transition: color 0.2s;
}
.nav-link:hover {
color: #FB7299; /* B站粉 */
}
.nav-link i {
margin-right: 5px;
}
/* 搜索框 */
.search-bar {
background-color: #f1f2f3;
border-radius: 8px;
display: flex;
align-items: center;
padding: 0 10px;
width: 400px; /* 固定宽度 */
height: 36px;
}
.search-bar input {
border: none;
background: transparent;
outline: none;
width: 100%;
margin-left: 8px;
font-size: 14px;
color: #61666d;
}
.search-bar:hover {
background-color: #fff;
border: 1px solid #e3e5e7;
}
/* 用户头像 */
.avatar {
width: 38px;
height: 38px;
border-radius: 50%;
background-color: #e7e7e7;
display: flex;
align-items: center;
justify-content: center;
color: #FB7299;
font-size: 20px;
border: 2px solid white;
box-shadow: 0 0 5px rgba(0,0,0,0.1);
cursor: pointer;
}
/* 投稿按钮 */
.upload-btn {
background-color: #FB7299;
color: white;
padding: 8px 20px;
border-radius: 8px;
font-size: 14px;
display: flex;
align-items: center;
cursor: pointer;
transition: background 0.3s;
}
.upload-btn:hover {
background-color: #fc8bab;
}
/* --- 3. 主内容区域 --- */
.main-content {
padding-top: 20px;
}
/* 分类菜单 */
.channel-menu {
display: flex;
gap: 24px;
margin-bottom: 20px;
color: #61666d;
font-size: 14px;
}
.channel-item {
cursor: pointer;
padding: 5px 10px;
background-color: #f6f7f8;
border-radius: 6px;
}
.channel-item:hover {
color: #FB7299;
}
/* 顶部横幅布局 (左侧轮播图 + 右侧视频) */
.hero-section {
display: grid;
grid-template-columns: 550px 1fr; /* 左侧固定,右侧自适应 */
gap: 20px;
margin-bottom: 30px;
height: 380px; /* 固定高度 */
}
.carousel {
background-color: #ddd;
border-radius: 6px;
position: relative;
overflow: hidden;
/* 模拟一张图片 */
background-image: url('https://via.placeholder.com/550x380/FB7299/ffffff?text=Banner+Recommend');
background-size: cover;
}
.carousel-title {
position: absolute;
bottom: 0;
left: 0;
right: 0;
padding: 40px 20px 15px;
background: linear-gradient(transparent, rgba(0,0,0,0.7));
color: white;
font-size: 18px;
}
/* 视频网格布局 */
.video-grid {
display: grid;
/* 自适应列数,每列最小230px */
grid-template-columns: repeat(auto-fill, minmax(230px, 1fr));
gap: 20px;
padding-bottom: 40px;
}
/* 视频卡片样式 */
.video-card {
background: transparent;
cursor: pointer;
}
.video-card-img {
width: 100%;
height: 150px;
background-color: #e7e7e7;
border-radius: 6px;
overflow: hidden;
position: relative;
margin-bottom: 10px;
box-shadow: 0 1px 2px rgba(0,0,0,0.1);
}
.video-card-img img {
width: 100%;
height: 100%;
object-fit: cover;
transition: transform 0.3s;
}
/* 鼠标悬停放大效果 */
.video-card:hover .video-card-img img {
transform: scale(1.05);
}
.video-info {
padding: 0 4px;
}
.video-title {
font-size: 15px;
font-weight: 500;
line-height: 22px;
color: #18191c;
margin-bottom: 6px;
/* 限制显示两行,超出省略 */
display: -webkit-box;
-webkit-line-clamp: 2;
-webkit-box-orient: vertical;
overflow: hidden;
}
.video-card:hover .video-title {
color: #FB7299;
}
.video-meta {
font-size: 13px;
color: #9499a0;
display: flex;
align-items: center;
}
.video-meta i {
margin-right: 4px;
font-size: 12px;
}
.up-name {
margin-right: 15px;
}
</style>
</head>
<body>
<header class="header">
<div class="header-left">
<div style="font-weight:bold; color:#FB7299; font-size:24px; margin-right:10px;">
<i class="fab fa-bilibili"></i> Bilibili
</div>
<a href="#" class="nav-link">首页</a>
<a href="#" class="nav-link">番剧</a>
<a href="#" class="nav-link">直播</a>
<a href="#" class="nav-link">游戏中心</a>
<a href="#" class="nav-link">会员购</a>
<a href="#" class="nav-link">漫画</a>
</div>
<div class="search-bar">
<i class="fas fa-search" style="color:#a0a0a0"></i>
<input type="text" placeholder="搜索视频、番剧、UP主">
</div>
<div class="header-right">
<div class="avatar">
<i class="fas fa-user"></i>
</div>
<a href="#" class="nav-link"><i class="fas fa-envelope"></i> 消息</a>
<a href="#" class="nav-link"><i class="fas fa-history"></i> 历史</a>
<div class="upload-btn">
<i class="fas fa-upload" style="margin-right:5px;"></i> 投稿
</div>
</div>
</header>
<div class="container main-content">
<div class="channel-menu">
<div class="channel-item"><i class="fas fa-home"></i> 首页</div>
<div class="channel-item">动画</div>
<div class="channel-item">番剧</div>
<div class="channel-item">国创</div>
<div class="channel-item">音乐</div>
<div class="channel-item">舞蹈</div>
<div class="channel-item">游戏</div>
<div class="channel-item">知识</div>
<div class="channel-item">科技</div>
<div class="channel-item">生活</div>
<div class="channel-item">鬼畜</div>
<div class="channel-item">时尚</div>
</div>
<div class="hero-section">
<div class="carousel">
<div class="carousel-title">【本周推荐】这是一个占位的大Banner,通常这里放轮播图</div>
</div>
<div class="video-grid" style="grid-template-columns: repeat(3, 1fr); padding-bottom:0;">
<div class="video-card">
<div class="video-card-img"><img src="https://via.placeholder.com/300x190/333/fff?text=Hot+1" alt="video"></div>
<div class="video-title">年度最强新番导视!</div>
</div>
<div class="video-card">
<div class="video-card-img"><img src="https://via.placeholder.com/300x190/444/fff?text=Hot+2" alt="video"></div>
<div class="video-title">HTML5+CSS3 从入门到精通</div>
</div>
<div class="video-card">
<div class="video-card-img"><img src="https://via.placeholder.com/300x190/555/fff?text=Hot+3" alt="video"></div>
<div class="video-title">猫咪的迷惑行为大赏</div>
</div>
<div class="video-card">
<div class="video-card-img"><img src="https://via.placeholder.com/300x190/666/fff?text=Hot+4" alt="video"></div>
<div class="video-title">【4K】极致画质 视觉盛宴</div>
</div>
<div class="video-card">
<div class="video-card-img"><img src="https://via.placeholder.com/300x190/777/fff?text=Hot+5" alt="video"></div>
<div class="video-title">科技区UP主电脑配置大公开</div>
</div>
<div class="video-card">
<div class="video-card-img"><img src="https://via.placeholder.com/300x190/888/fff?text=Hot+6" alt="video"></div>
<div class="video-title">十分钟学会做红烧肉</div>
</div>
</div>
</div>
<h2 style="margin: 20px 0; font-size: 20px;"><i class="fas fa-video" style="color:#FB7299; margin-right:8px;"></i>推荐视频</h2>
<div class="video-grid">
<div class="video-card">
<div class="video-card-img">
<img src="https://via.placeholder.com/400x250/87CEEB/ffffff?text=Video+Thumbnail" alt="封面">
</div>
<div class="video-info">
<div class="video-title">【教程】如何用HTML写一个B站首页?保姆级教学!</div>
<div class="video-meta">
<span class="up-name"><i class="fas fa-user-alt"></i> 前端小哥</span>
<span><i class="fas fa-play-circle"></i> 102.4万</span>
</div>
</div>
</div>
<div class="video-card">
<div class="video-card-img">
<img src="https://via.placeholder.com/400x250/90EE90/ffffff?text=Game" alt="封面">
</div>
<div class="video-info">
<div class="video-title">这游戏画质简直逆天了,显卡在燃烧</div>
<div class="video-meta">
<span class="up-name"><i class="fas fa-user-alt"></i> 游戏狂魔</span>
<span><i class="fas fa-play-circle"></i> 56.2万</span>
</div>
</div>
</div>
<div class="video-card">
<div class="video-card-img">
<img src="https://via.placeholder.com/400x250/FFB6C1/ffffff?text=Food" alt="封面">
</div>
<div class="video-info">
<div class="video-title">挑战全网最难吃的鲱鱼罐头,UP主当场去世</div>
<div class="video-meta">
<span class="up-name"><i class="fas fa-user-alt"></i> 美食作家</span>
<span><i class="fas fa-play-circle"></i> 233.3万</span>
</div>
</div>
</div>
<div class="video-card">
<div class="video-card-img">
<img src="https://via.placeholder.com/400x250/FFD700/ffffff?text=Tech" alt="封面">
</div>
<div class="video-info">
<div class="video-title">苹果发布会总结:这也太贵了吧?</div>
<div class="video-meta">
<span class="up-name"><i class="fas fa-user-alt"></i> 科技评测</span>
<span><i class="fas fa-play-circle"></i> 88.8万</span>
</div>
</div>
</div>
<div class="video-card">
<div class="video-card-img">
<img src="https://via.placeholder.com/400x250/D8BFD8/ffffff?text=Music" alt="封面">
</div>
<div class="video-info">
<div class="video-title">【钢琴】好听到耳朵怀孕的经典动漫串烧</div>
<div class="video-meta">
<span class="up-name"><i class="fas fa-user-alt"></i> 音乐区UP</span>
<span><i class="fas fa-play-circle"></i> 45.1万</span>
</div>
</div>
</div>
<div class="video-card">
<div class="video-card-img">
<img src="https://via.placeholder.com/400x250/20B2AA/ffffff?text=Vlog" alt="封面">
</div>
<div class="video-info">
<div class="video-title">毕业旅行Vlog:去大理看苍山洱海</div>
<div class="video-meta">
<span class="up-name"><i class="fas fa-user-alt"></i> 生活记录者</span>
<span><i class="fas fa-play-circle"></i> 12.9万</span>
</div>
</div>
</div>
<div class="video-card">
<div class="video-card-img">
<img src="https://via.placeholder.com/400x250/ddd/888?text=More" alt="封面">
</div>
<div class="video-info">
<div class="video-title">更多精彩内容正在加载中...</div>
<div class="video-meta">
<span class="up-name"><i class="fas fa-user-alt"></i> B站助手</span>
<span><i class="fas fa-play-circle"></i> 0</span>
</div>
</div>
</div>
<div class="video-card">
<div class="video-card-img">
<img src="https://via.placeholder.com/400x250/ddd/888?text=More" alt="封面">
</div>
<div class="video-info">
<div class="video-title">占位视频:CSS Grid布局非常强大</div>
<div class="video-meta">
<span class="up-name"><i class="fas fa-user-alt"></i> 布局测试</span>
<span><i class="fas fa-play-circle"></i> 100</span>
</div>
</div>
</div>
</div>
</div>
</body>
</html>五.综合样例
我们一共4个样例,阿里云创建私人仓库就不说了,还有搭建一个nginx服务,在docker hub上创建自己的私人镜像仓库及腾讯云创建自己的私人镜像仓库。为了确保第二个样例能成功,这里博主用的是一台海外服务器。前两个操作均在境外服务器上操作,最后一个操作在境内服务器上操作,特此说明下。(当然你要有自己的门路能成功登录上docker hub也行,博主太菜了不会整)
我们这里换成境外服务器就能成功登录docker hub了:
bash
ena@NightCode:~$ sudo docker login
[sudo] password for ena:
Log in with your Docker ID or email address to push and pull images from Docker Hub. If you don't have a Docker ID, head over to https://hub.docker.com/ to create one.
You can log in with your password or a Personal Access Token (PAT). Using a limited-scope PAT grants better security and is required for organizations using SSO. Learn more at https://docs.docker.com/go/access-tokens/

Username: xiu114514
Password:
WARNING! Your password will be stored unencrypted in /root/.docker/config.json.
Configure a credential helper to remove this warning. See
https://docs.docker.com/engine/reference/commandline/login/#credentials-store

Login Succeeded
另外说明下docker版本只要是最新的就可以,没有特殊要求。
5.1搭建一个nginx服务
首先我们拉取一个1.29.4版本的nginx:
bash
ena@NightCode:~$ sudo docker pull nginx:1.29.4
1.29.4: Pulling from library/nginx
1733a4cd5954: Pull complete
5b219a92f92a: Pull complete
ee3a09d2248a: Pull complete
7382b41547b8: Pull complete
9ee60c6c0558: Pull complete
114e699da838: Pull complete
5b5fa0b64d74: Pull complete
Digest: sha256:fb01117203ff38c2f9af91db1a7409459182a37c87cced5cb442d1d8fcc66d19
Status: Downloaded newer image for nginx:1.29.4
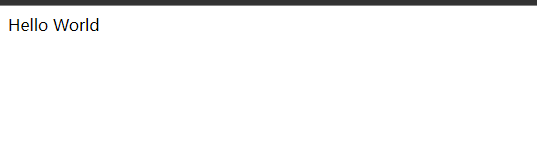
docker.io/library/nginx:1.29.4这里我们启动容器后先不让他去跑nginx,先对其首页进行修改,修改其首页内容为Hello world:
bash
root@0925c90000c9:/home# echo "Hello World" > /usr/share/nginx/html/index.html
root@0925c90000c9:/home# nginx
这时我们可以访问下我们的网站首页:
5.2拉取BusyBox镜像到本地并推送到dockerhub的私人仓库
BusyBox 是一个集成了三百多个最常用 Linux 命令和工具的软件。 BusyBox 包含了一些简单的工具,例如 ls、 cat 和 echo 等等,还包含了一些更大、更复杂的工具,例grep、 find、 mount 以及 telnet。有些人将 BusyBox 称为 Linux 工具里的瑞士军刀。简单的说 BusyBox 就好像是个大工具箱,它集成压缩了 Linux 的许多工具和命令,也包含了 Linux 系统的自带的 shell。 busybox 是一个集成了一百多个最常用 linux 命令和工具的软件,他甚至还集成了一个 http 服务器和一个 telnet 服务器,而所有这一切功能却只有区区 1M 左右的大小.因海外带宽较小,我们拉取该镜像推送到自己的仓库。
我们先原生安装去用下他,比如我们ping一下百度官网:
bash
ena@NightCode:~$ sudo busybox ping baidu.com
PING baidu.com (124.237.177.164): 56 data bytes
64 bytes from 124.237.177.164: seq=0 ttl=46 time=75.402 ms
64 bytes from 124.237.177.164: seq=1 ttl=46 time=83.982 ms
...
--- baidu.com ping statistics ---
35 packets transmitted, 34 packets received, 2% packet loss
round-trip min/avg/max = 75.264/79.669/84.182 ms
就有时候如果我们在一个新机器里面什么常用的命令都没有安装时,一个一个去安装当然麻烦,这里直接安装一个busybox就能解决。
这里我们拉个最新板1.37.0版本的:
bash
ena@NightCode:~$ sudo docker pull busybox:1.37.0
1.37.0: Pulling from library/busybox
e59838ecfec5: Pull complete
Digest: sha256:d80cd694d3e9467884fcb94b8ca1e20437d8a501096cdf367a5a1918a34fc2fd
Status: Downloaded newer image for busybox:1.37.0
docker.io/library/busybox:1.37.0
ena@NightCode:~$ sudo docker images
REPOSITORY   TAG       IMAGE ID       CREATED         SIZE
nginx        1.29.4    576306625d79   10 days ago     152MB
busybox      1.37.0    08ef35a1c3f0   14 months ago   4.43MB
可以看到它很小只有4.43mb,如果仅仅只是软件本体则只有700多kb。
拉取完毕后我们在docker hub个人资料首页拉到最底下有一个create a new repository即可创建一个新的私人仓库:
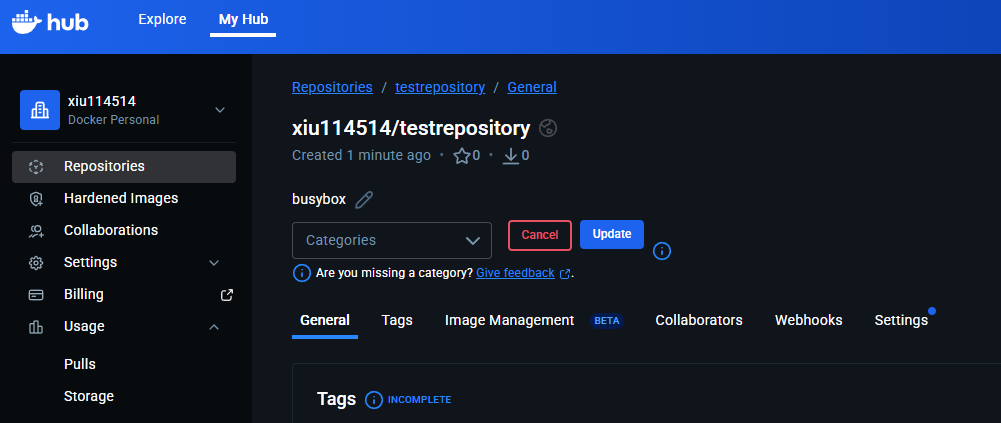
命名空间默认使用的个人用户名称。
然后我们把刚刚拉取下来的busybox镜像给他推送到我们的仓库去:
bash
ena@NightCode:~$ sudo docker tag busybox:1.37.0 xiu114514/testrepository:v1.0
ena@NightCode:~$ sudo docker push xiu114514/testrepository:v1.0
The push refers to repository [docker.io/xiu114514/testrepository]
e14542cc0629: Mounted from library/busybox
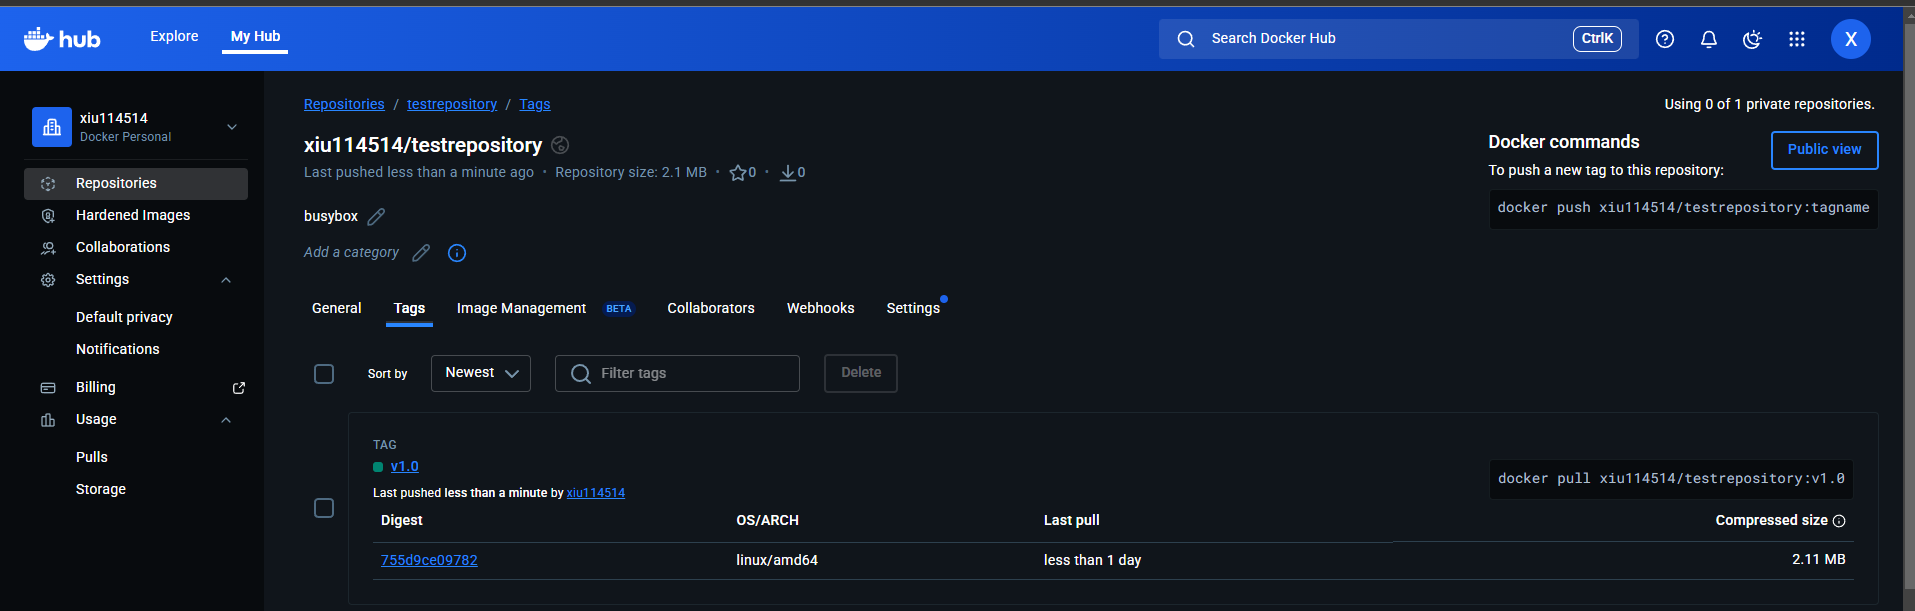
v1.0: digest: sha256:755d9ce09782b2f60fd3321878e611f871817aa8a726e8c605f2f67ae6ffa9e2 size: 527推送成功了可以看到tags下便存放着我们刚刚推送的busybox镜像:
5.3腾讯云创建自己的私人镜像仓库并推送busybox镜像
除了创建仓库,后面的推送操作几乎一致,都是重打标签然后推送上去。先搜索容器镜像服务然后创建一个个人版的镜像仓库(免费的)。然后新建一个命名空间,在命名空间内新建一个镜像仓库。具体操作可以看腾讯云官方的操作指引:
官方操作指引

然后可以点击快捷指令进行登录与镜像推送。流程与docker hub大致一致,这里不再演示。推送成功之后点进去可以看到我们刚刚推送的版本:
