写在开头的话
从今天开始让我们一起来学习链表的相关知识吧。不过这块知识比较多,我会分成三部分来写。现在开始今天的第三部分------复杂链表问题吧。
第一节
知识点:
(1)相邻节点交换(2)任意链表节点交换
相邻节点交换
相邻节点交换定义
相邻节点交换是指交换链表中每对相邻节点的位置。例如,对于链表 1→2→3→4,交换相邻节点后得到 2→1→4→3。
算法步骤
- 创建一个虚拟头节点(dummy node),它的
next指向链表的头节点,以方便处理头节点的交换。 - 初始化指针
prev指向虚拟头节点,current指向链表的头节点。 - 在循环中进行以下步骤:
- 将
current的下一个节点保存到next。 - 将
next的下一个节点保存到next_next。 - 将
prev的下一个节点指向next。 - 将
next的下一个节点指向current。 - 将
current的下一个节点指向next_next。 - 更新
prev为current,current为current的下一个节点。
- 将
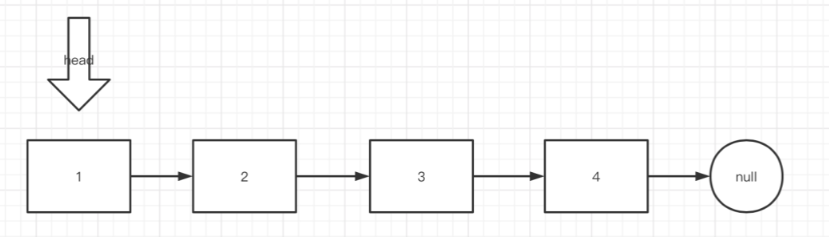
给定如下链表:
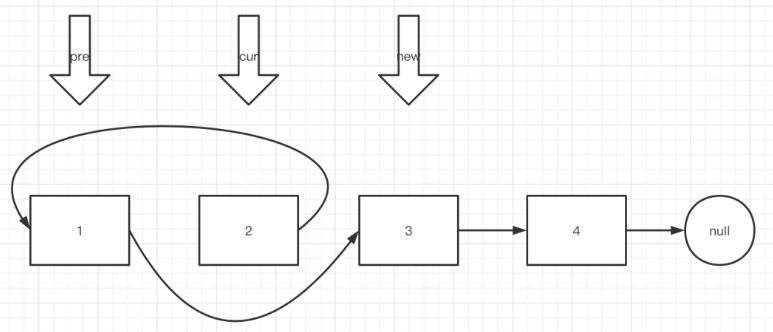
假设我们要交换 1 号和 2 号,则指针变换为:
代码实现
C++代码实现
cpp
#include <iostream>

struct ListNode {
    int val;
    ListNode *next;
    ListNode(int x) : val(x), next(nullptr) {}
};

class Solution {
public:
    ListNode* swapPairs(ListNode* head) {
        ListNode dummy(0);
        dummy.next = head;
        ListNode* prev = &dummy;

        while (prev->next != nullptr && prev->next->next != nullptr) {
            ListNode* first = prev->next;
            ListNode* second = first->next;

            first->next = second->next;
            second->next = first;
            prev->next = second;

            prev = first;
        }

        return dummy.next;
    }
};

int main() {
    ListNode* head = new ListNode(1);
    head->next = new ListNode(2);
    head->next->next = new ListNode(3);
    head->next->next->next = new ListNode(4);

    Solution sol;
    ListNode* result = sol.swapPairs(head);
    while (result != nullptr) {
        std::cout << result->val << " ";
        result = result->next;
    }
    return 0;
}
Java代码实现
java
class ListNode {
    int val;
    ListNode next;
    ListNode(int x) { val = x; next = null; }
}

public class Solution {
    public ListNode swapPairs(ListNode head) {
        ListNode dummy = new ListNode(0);
        dummy.next = head;
        ListNode prev = dummy;

        while (prev.next != null && prev.next.next != null) {
            ListNode first = prev.next;
            ListNode second = first.next;

            first.next = second.next;
            second.next = first;
            prev.next = second;

            prev = first;
        }

        return dummy.next;
    }

    public static void main(String[] args) {
        ListNode head = new ListNode(1);
        head.next = new ListNode(2);
        head.next.next = new ListNode(3);
        head.next.next.next = new ListNode(4);

        Solution sol = new Solution();
        ListNode result = sol.swapPairs(head);
        while (result != null) {
            System.out.print(result.val + " ");
            result = result.next;
        }
    }
}
Python代码实现
python
class ListNode:
    def __init__(self, val=0, next=None):
        self.val = val
        self.next = next

class Solution:
    def swapPairs(self, head: ListNode) -> ListNode:
        dummy = ListNode(0)
        dummy.next = head
        prev = dummy

        while prev.next and prev.next.next:
            first = prev.next
            second = first.next

            first.next = second.next
            second.next = first
            prev.next = second

            prev = first

        return dummy.next

# Example usage
if __name__ == "__main__":
    head = ListNode(1)
    head.next = ListNode(2)
    head.next.next = ListNode(3)
    head.next.next.next = ListNode(4)

    sol = Solution()
    result = sol.swapPairs(head)
    while result:
        print(result.val, end=" ")
        result = result.next
运行结果

任意两个节点交换
交换链表中任意两个节点,通常需要找到这两个节点及其前驱节点,然后进行交换。这里假设要交换的两个节点分别是x和y。
算法步骤
- 初始化指针
prevX和prevY分别指向节点x和y的前驱节点,nodeX和nodeY分别指向节点x和y。 - 遍历链表找到这四个指针。
- 如果
x和y相邻,特别处理;否则,交换prevX和prevY的next指针。 - 最后,交换
nodeX和nodeY的next指针。
假设我们的链表为 1 -> 2 -> 3 -> 4,并且我们要交换值为 2 和 3 的节点。以下是每一步操作的详细说明:
链表初始化
初始链表为:1 -> 2 -> 3 -> 4。
head指向节点1。x = 2和y = 3,表示我们要交换2和3这两个节点。
代码逻辑分解
Step 1: 初始化 dummy 节点
创建 dummy 节点,使其 next 指向 head。这样做的好处是可以简化边界情况(如交换链表第一个节点的情况)的处理。
dummy -> 0 -> 1 -> 2 -> 3 -> 4
Step 2: 查找节点 x 和 y
接下来,我们遍历链表,查找节点 x 和 y 及其前驱节点 prevX 和 prevY。
-
初始状态:
prevX和prevY都指向dummy。nodeX和nodeY都指向head,即节点1。
-
逐步查找:
- 查找
nodeX:找到nodeX为值2的节点,并记录prevX为1。 - 查找
nodeY:找到nodeY为值3的节点,并记录prevY为2。
- 查找
因此:
prevX指向节点1,nodeX指向节点2。prevY指向节点2,nodeY指向节点3。
Step 3: 检查并交换节点
这两节点 2 和 3 是相邻节点,因此 prevX == nodeY 或 prevY == nodeX 成立。
根据逻辑,我们将节点分成相邻和非相邻的情况处理:
- 这里
prevY为nodeX,所以我们走相邻节点交换的逻辑。
- 将
prevX->next设置为nodeY,即1->next指向3。 - 设置
nodeX->next为nodeY->next,即2->next指向4。 - 最后将
nodeY->next设置为nodeX,即3->next指向2。
交换后链表变为:1 -> 3 -> 2 -> 4。
最终输出
遍历链表输出结果为:1 3 2 4。
代码实现
C++代码实现
cpp
#include <iostream>

struct ListNode {
    int val;
    ListNode *next;
    ListNode(int x) : val(x), next(nullptr) {}
};

class Solution {
public:
    ListNode* swapNodes(ListNode* head, int x, int y) {
        if (x == y) return head;

        ListNode *dummy = new ListNode(0);
        dummy->next = head;
        ListNode *prevX = dummy, *prevY = dummy;
        ListNode *nodeX = head, *nodeY = head;

        // Find prevX, prevY, nodeX, and nodeY
        while (nodeX && nodeX->val != x) {
            prevX = nodeX;
            nodeX = nodeX->next;
        }

        while (nodeY && nodeY->val != y) {
            prevY = nodeY;
            nodeY = nodeY->next;
        }

        if (!nodeX || !nodeY) return head; // One or both nodes not found

        // Swap the nodes
        if (prevX != nodeY && prevY != nodeX) { // Non-adjacent nodes
            prevX->next = nodeY;
            prevY->next = nodeX;

            ListNode* temp = nodeX->next;
            nodeX->next = nodeY->next;
            nodeY->next = temp;
        } else { // Adjacent nodes
            if (prevX == nodeY) {
                prevY->next = nodeX;
                nodeY->next = nodeX->next;
                nodeX->next = nodeY;
            } else {
                prevX->next = nodeY;
                nodeX->next = nodeY->next;
                nodeY->next = nodeX;
            }
        }

        return dummy->next;
    }
};

int main() {
    ListNode* head = new ListNode(1);
    head->next = new ListNode(2);
    head->next->next = new ListNode(3);
    head->next->next->next = new ListNode(4);

    Solution sol;
    ListNode* result = sol.swapNodes(head, 2, 3);
    while (result != nullptr) {
        std::cout << result->val << " ";
        result = result->next;
    }
    return 0;
}
Java代码实现
java
class ListNode {
    int val;
    ListNode next;
    ListNode(int x) { val = x; next = null; }
}

public class Solution {
    public ListNode swapNodes(ListNode head, int x, int y) {
        if (x == y) return head;

        ListNode dummy = new ListNode(0);
        dummy.next = head;
        ListNode prevX = dummy, prevY = dummy;
        ListNode nodeX = head, nodeY = head;

        // Find prevX, prevY, nodeX, and nodeY
        while (nodeX != null && nodeX.val != x) {
            prevX = nodeX;
            nodeX = nodeX.next;
        }

        while (nodeY != null && nodeY.val != y) {
            prevY = nodeY;
            nodeY = nodeY.next;
        }

        if (nodeX == null || nodeY == null) return head; // One or both nodes not found

        // Swap the nodes
        if (prevX != nodeY && prevY != nodeX) { // Non-adjacent nodes
            prevX.next = nodeY;
            prevY.next = nodeX;

            ListNode temp = nodeX.next;
            nodeX.next = nodeY.next;
            nodeY.next = temp;
        } else { // Adjacent nodes
            if (prevX == nodeY) {
                prevY.next = nodeX;
                nodeY.next = nodeX.next;
                nodeX.next = nodeY;
            } else {
                prevX.next = nodeY;
                nodeX.next = nodeY.next;
                nodeY.next = nodeX;
            }
        }

        return dummy.next;
    }

    public static void main(String[] args) {
        ListNode head = new ListNode(1);
        head.next = new ListNode(2);
        head.next.next = new ListNode(3);
        head.next.next.next = new ListNode(4);

        Solution sol = new Solution();
        ListNode result = sol.swapNodes(head, 2, 3);
        while (result != null) {
            System.out.print(result.val + " ");
            result = result.next;
        }
    }
}
Python代码实现
python
class ListNode:
    def __init__(self, val=0, next=None):
        self.val = val
        self.next = next

class Solution:
    def swapNodes(self, head: ListNode, x: int, y: int) -> ListNode:
        if x == y:
            return head

        dummy = ListNode(0)
        dummy.next = head
        prevX, prevY = dummy, dummy
        nodeX, nodeY = head, head

        # Find prevX, prevY, nodeX, and nodeY
        while nodeX and nodeX.val != x:
            prevX = nodeX
            nodeX = nodeX.next

        while nodeY and nodeY.val != y:
            prevY = nodeY
            nodeY = nodeY.next

        if not nodeX or not nodeY:
            return head  # One or both nodes not found

        # Swap the nodes
        if prevX.next == nodeY:  # x and y are adjacent, x before y
            prevX.next = nodeY
            nodeX.next = nodeY.next
            nodeY.next = nodeX
        elif prevY.next == nodeX:  # x and y are adjacent, y before x
            prevY.next = nodeX
            nodeY.next = nodeX.next
            nodeX.next = nodeY
        else:  # Non-adjacent
            prevX.next = nodeY
            prevY.next = nodeX
            nodeX.next, nodeY.next = nodeY.next, nodeX.next

        return dummy.next

# Example usage
if __name__ == "__main__":
    head = ListNode(1)
    head.next = ListNode(2)
    head.next.next = ListNode(3)
    head.next.next.next = ListNode(4)

    sol = Solution()
    result = sol.swapNodes(head, 2, 3)
    while result:
        print(result.val, end=" ")
        result = result.next
运行结果

简单总结
链表节点交换问题在面试中很常见,理解和掌握这些方法对处理链表相关的问题非常有帮助。相邻节点交换使用虚拟头节点和双指针,交换链表中任意两个节点的主要步骤包括找到这两个节点及其前驱节点,然后进行节点之间的指针交换。
第二节
知识点:
(1)复杂链表的复制
复杂链表的复制
复杂链表定义
复杂链表是一种特殊的链表结构,每个节点除了包含指向下一个节点的指针外,还包含一个指向链表中任意节点的随机指针。这种链表结构通常用于表示具有复杂关联关系的数据结构,比如图、树等。在复杂链表中,随机指针可以指向链表中的任意节点,包括自身节点或者空节点,因此链表的复制需要考虑如何正确复制这种随机指针关系。
图示
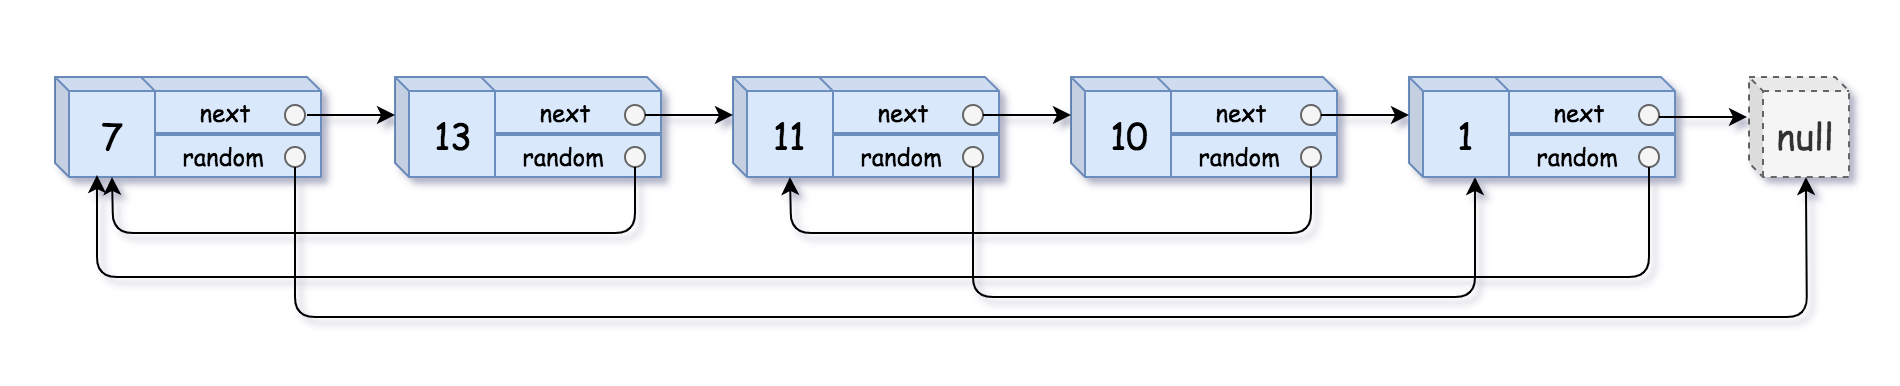
复杂链表的复制指的是对一个包含随机指针的链表进行复制,其中随机指针可以指向链表中的任意节点(包括自己)而不仅仅是下一个节点。在复制过程中,需要创建一个新的链表,使得新链表中的每个节点与原链表中的对应节点具有相同的值,并且随机指针也指向相同的位置。
复杂链表的复制相比普通链表的复制更为复杂,因为需要考虑到随机指针的复制和对应关系。通常的方法是使用哈希表或其他数据结构来建立原链表节点与新链表节点的对应关系,然后进行遍历复制。
在复制过程中,需要注意处理随机指针的复制关系,确保新链表中的节点的随机指针指向正确的位置,即使原链表中的随机指针指向的是原链表中的其他节点。
总的来说,复杂链表的复制需要考虑到原链表节点值的复制、next 指针的复制以及随机指针的复制,并且保持对应关系的正确性。
复制步骤
复杂链表的复制通常可以按照以下步骤进行:
-
第一步:复制链表节点
- 遍历原链表,对每个节点进行复制,创建新的节点并将其插入到原节点的后面。
- 比如原链表节点 A、B、C,则复制后的链表节点序列为 A、A'、B、B'、C、C'。
-
第二步:复制随机指针
- 继续遍历链表,对每个复制的节点设置随机指针。
- 如果原节点的随机指针指向节点 X,则复制节点的随机指针应该指向节点 X 的复制节点。
- 注意处理原节点随机指针为空的情况。
-
第三步:拆分链表
- 将复制后的链表拆分成两个独立的链表,一个是原链表,一个是复制后的链表。
- 这里可以利用奇偶位置来分离,奇数位置是原链表,偶数位置是复制后的链表。
这样就完成了复杂链表的复制过程。需要注意的是,在复制过程中要确保对应关系的正确性,即原链表节点与复制节点之间的关系要保持一致,包括节点值、next 指针和随机指针。
易错点
在复制复杂链表的过程中,有几个易错点需要特别注意:
-
处理随机指针指向的节点是否已复制:
- 当复制节点的随机指针指向的是原链表中的某个节点时,需要确保该节点已经被复制,否则无法正确设置复制节点的随机指针。因此,在设置复制节点的随机指针时,要先检查原节点随机指针指向的节点是否已经被复制。
-
建立复制节点与原节点的对应关系:
- 在复制过程中,需要建立复制节点与原节点的对应关系,以便正确设置随机指针。这个对应关系可以通过哈希表 来实现,确保每个原节点都能与其对应的复制节点进行关联。
-
创建哈希表保存已拷贝结点,格式
{原结点:拷贝结点}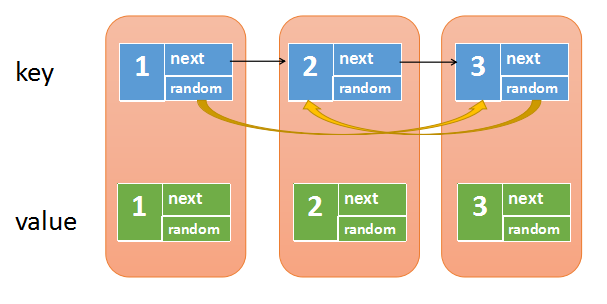
-
我们再遍历原链表,这次我们要将新链表的
next和random指针给链接好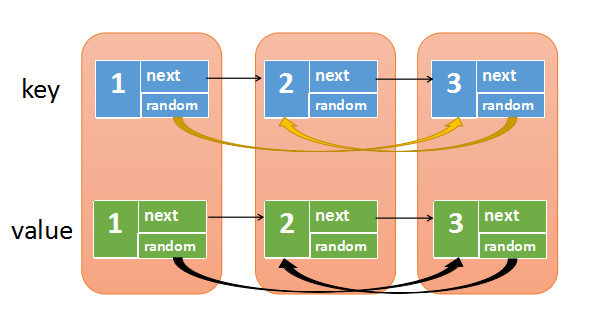
-
- 在复制过程中,需要建立复制节点与原节点的对应关系,以便正确设置随机指针。这个对应关系可以通过哈希表 来实现,确保每个原节点都能与其对应的复制节点进行关联。
-
拆分链表时的边界处理:
- 在拆分链表时,需要注意边界情况。如果链表长度为奇数,则最后一个节点是原链表的尾节点,应该将其
next指针置为null;如果链表长度为偶数,则最后一个节点是复制链表的尾节点,同样也要将其next指针置为null。
- 在拆分链表时,需要注意边界情况。如果链表长度为奇数,则最后一个节点是原链表的尾节点,应该将其
-
遍历时的指针移动:
- 在遍历原链表并复制节点时,要注意及时更新指针位置,确保不会出现遗漏或重复复制节点的情况。特别是在复制节点之后,要正确移动指针到下一个待复制的原节点上。
应用场景
复杂链表的复制在实际应用中有多种场景,以下是一些常见的应用场景:
-
图的表示: 在图的算法中,复杂链表经常被用作图的邻接表的一种形式。每个链表节点表示图中的一个顶点,其中的随机指针可以指向其他节点,表示顶点之间的边。复制复杂链表可以方便地复制整个图结构。
-
深度拷贝对象: 在面向对象编程中,对象间的引用关系可以通过复杂链表来表示,其中的随机指针可以指向其他对象。当需要对对象进行深度拷贝时,复制复杂链表可以方便地复制整个对象图。
-
LRU缓存: 最近最少使用缓存通常使用链表来管理缓存中的数据项。为了实现快速查找和更新,可能需要复制链表。复杂链表的复制可以帮助保存缓存中的数据和其对应的使用情况。
-
链表的合并和分割: 在一些算法和数据结构题目中,可能需要将两个链表合并或将一个链表分割成两个链表。复杂链表的复制可以作为一种预处理步骤,使得原链表的结构得以保留。
-
序列化和反序列化: 在将数据结构(如二叉树)序列化为字符串或字节流时,可以使用复杂链表来表示数据结构中的指针关系。复杂链表的复制可以在反序列化时帮助恢复原始的数据结构。
代码首先创建了一个哈希表,用来存储原链表节点和复制节点之间的映射关系。然后,它进行了两次遍历。第一次遍历创建了新的节点,并建立了原节点和复制节点之间的映射关系。第二次遍历则根据这些映射关系,连接了复制节点的 next 和 random 指针。
代码实现
C++代码实现
cpp
#include <iostream>
#include <unordered_map>
using namespace std;
// 定义链表节点
struct Node {
int val; // 当前节点的值
Node* next; // 指向下一个节点
Node* random; // 指向任意节点
Node(int x) : val(x), next(nullptr), random(nullptr) {}
};
Node* copyRandomList(Node* head) {
if (head == nullptr) return nullptr;
unordered_map<Node*, Node*> nodeMap; // 用于存储原节点和复制节点的映射关系
// 第一遍遍历,复制每个节点,并建立映射关系
Node* current = head;
while (current != nullptr) {
nodeMap[current] = new Node(current->val); // 创建新节点并将其映射到原节点
current = current->next;
}
// 第二遍遍历,连接复制节点的 next 和 random 指针
current = head;
while (current != nullptr) {
nodeMap[current]->next = nodeMap[current->next]; // 复制 next 指针
nodeMap[current]->random = nodeMap[current->random]; // 复制 random 指针
current = current->next;
}
return nodeMap[head]; // 返回复制链表的头节点
}
// 打印链表
void printList(Node* head) {
while (head) {
cout << "(" << head->val << ", ";
if (head->random)
cout << head->random->val << ") -> ";
else
cout << "null) -> ";
head = head->next;
}
cout << "null" << endl;
}
int main() {
// 创建原链表
Node* head = new Node(1);
head->next = new Node(2);
head->next->next = new Node(3);
head->next->next->next = new Node(4);
head->next->next->next->next = new Node(5);
// 为原链表设置 random 指针
head->random = head->next->next; // 1 -> 3
head->next->random = head->next->next->next; // 2 -> 4
head->next->next->random = head; // 3 -> 1
head->next->next->next->random = head->next; // 4 -> 2
head->next->next->next->next->random = head->next->next; // 5 -> 3
// 复制链表
Node* copiedList = copyRandomList(head);
// 打印原链表和复制链表
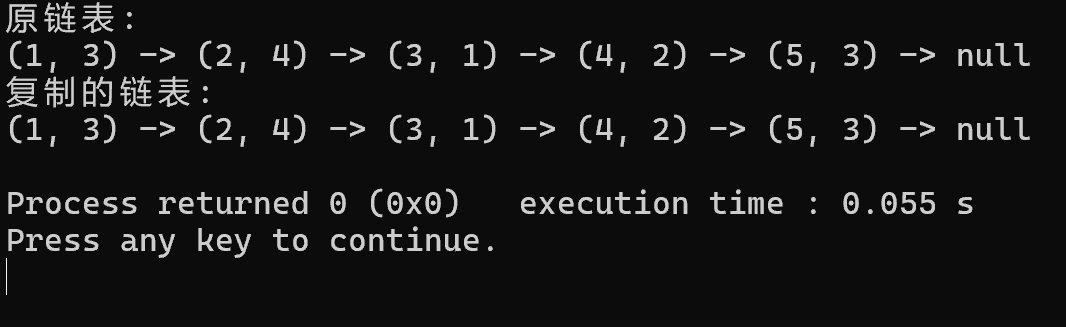
cout << "原链表:" << endl;
printList(head);
cout << "复制的链表:" << endl;
printList(copiedList);
return 0;
}Java代码实现
java
import java.util.HashMap;
import java.util.Map;

// 定义链表节点
class Node {
    int val;        // 当前节点的值
    Node next;      // 指向下一个节点
    Node random;    // 指向任意节点
    Node(int x) {
        val = x;
        next = null;
        random = null;
    }
}

public class CopyRandomList {

    public static Node copyRandomList(Node head) {
        if (head == null) return null;

        Map<Node, Node> nodeMap = new HashMap<>(); // 用于存储原节点和复制节点的映射关系

        // 第一遍遍历,复制每个节点,并建立映射关系
        Node current = head;
        while (current != null) {
            nodeMap.put(current, new Node(current.val)); // 创建新节点并将其映射到原节点
            current = current.next;
        }

        // 第二遍遍历,连接复制节点的 next 和 random 指针
        current = head;
        while (current != null) {
            nodeMap.get(current).next = nodeMap.get(current.next);       // 复制 next 指针
            nodeMap.get(current).random = nodeMap.get(current.random);   // 复制 random 指针
            current = current.next;
        }

        return nodeMap.get(head); // 返回复制链表的头节点
    }

    // 打印链表
    public static void printList(Node head) {
        while (head != null) {
            System.out.print("(" + head.val + ", ");
            if (head.random != null)
                System.out.print(head.random.val + ") -> ");
            else
                System.out.print("null) -> ");
            head = head.next;
        }
        System.out.println("null");
    }

    public static void main(String[] args) {
        // 创建原链表
        Node head = new Node(1);
        head.next = new Node(2);
        head.next.next = new Node(3);
        head.next.next.next = new Node(4);
        head.next.next.next.next = new Node(5);

        // 为原链表设置 random 指针
        head.random = head.next.next;               // 1 -> 3
        head.next.random = head.next.next.next;     // 2 -> 4
        head.next.next.random = head;               // 3 -> 1
        head.next.next.next.random = head.next;     // 4 -> 2
        head.next.next.next.next.random = head.next.next; // 5 -> 3

        // 复制链表
        Node copiedList = copyRandomList(head);

        // 打印原链表和复制链表
        System.out.println("原链表:");
        printList(head);
        System.out.println("复制的链表:");
        printList(copiedList);
    }
}
Python代码实现
python
class Node:
    def __init__(self, x):
        self.val = x  # 当前节点的值
        self.next = None  # 指向下一个节点
        self.random = None  # 指向任意节点


def copyRandomList(head):
    if head is None:
        return None

    node_map = {}  # 用于存储原节点和复制节点的映射关系

    # 第一遍遍历,复制每个节点,并建立映射关系
    current = head
    while current:
        node_map[current] = Node(current.val)  # 创建新节点并将其映射到原节点
        current = current.next

    # 第二遍遍历,连接复制节点的 next 和 random 指针
    current = head
    while current:
        node_map[current].next = node_map.get(current.next)  # 复制 next 指针
        node_map[current].random = node_map.get(current.random)  # 复制 random 指针
        current = current.next

    return node_map[head]  # 返回复制链表的头节点


# 打印链表
def printList(head):
    while head:
        print("({}, {}) -> ".format(head.val, head.random.val if head.random else "null"), end="")
        head = head.next
    print("null")


# 创建原链表
head = Node(1)
head.next = Node(2)
head.next.next = Node(3)
head.next.next.next = Node(4)
head.next.next.next.next = Node(5)

# 为原链表设置 random 指针
head.random = head.next.next  # 1 -> 3
head.next.random = head.next.next.next  # 2 -> 4
head.next.next.random = head  # 3 -> 1
head.next.next.next.random = head.next  # 4 -> 2
head.next.next.next.next.random = head.next.next  # 5 -> 3

# 复制链表
copiedList = copyRandomList(head)

# 打印原链表和复制链表
print("原链表:")
printList(head)
print("复制的链表:")
printList(copiedList)
运行结果
简单总结
在本节中,我们学习了复杂链表的复制。解决这个问题需要分两步进行。首先,遍历原链表,复制每个节点并建立原节点与复制节点的映射关系。然后,再遍历一次原链表,根据映射关系连接复制节点的指针。通过学习复杂链表的复制问题,我不仅加深了对链表数据结构和指针操作的理解,还提高了解决问题的能力和编程技巧。
第三节
知识点:
(1)公共节点查找
公共节点查找
思路讲解
对于单链表来说,每个节点的 next 指针是唯一的,所以当存在公共节点的时候,其后面的所有节点也都是相同的,这时的链表是一个"Y"型,而不是我们惯性思维想到的"X"型。根据这个结论可知,如果两个链表存在公共节点的话,它们的尾结点也肯定是相同的。
具体步骤
- 分别遍历两个链表,记录它们的长度。
- 计算两个链表的长度差,让较长的链表先向前移动长度差的步数。
- 同时遍历两个链表,比较每个节点是否相同,直到找到第一个相同的节点或者遍历结束。
图示
公共节点查找演示
代码实现
C++代码实现
cpp
#include <iostream>
#include <unordered_set>
using namespace std;

class ListNode {
public:
    int val;
    ListNode* next;
    ListNode(int x) : val(x), next(nullptr) {}
};

ListNode* getIntersectionNode(ListNode* headA, ListNode* headB) {
    unordered_set<ListNode*> visited;
    while (headA) {
        visited.insert(headA);
        headA = headA->next;
    }
    while (headB) {
        if (visited.count(headB)) {
            return headB;
        }
        headB = headB->next;
    }
    return nullptr;
}

int main() {
    ListNode* headA = new ListNode(1);
    headA->next = new ListNode(2);
    ListNode* headB = new ListNode(3);
    headB->next = new ListNode(4);
    headB->next->next = headA->next; // Common node
    ListNode* intersectionNode = getIntersectionNode(headA, headB);
    if (intersectionNode) {
        cout << "The intersection node value is: " << intersectionNode->val << endl;
    } else {
        cout << "No intersection node found." << endl;
    }
    return 0;
}
Java代码实现
java
import java.util.HashSet;
import java.util.Set;

class ListNode {
    int val;
    ListNode next;
    ListNode(int x) {
        val = x;
        next = null;
    }
}

public class Main {
    public static ListNode getIntersectionNode(ListNode headA, ListNode headB) {
        Set<ListNode> visited = new HashSet<>();
        while (headA != null) {
            visited.add(headA);
            headA = headA.next;
        }
        while (headB != null) {
            if (visited.contains(headB)) {
                return headB;
            }
            headB = headB.next;
        }
        return null;
    }

    public static void main(String[] args) {
        ListNode headA = new ListNode(1);
        headA.next = new ListNode(2);
        ListNode headB = new ListNode(3);
        headB.next = new ListNode(4);
        headB.next.next = headA.next; // Common node
        ListNode intersectionNode = getIntersectionNode(headA, headB);
        if (intersectionNode != null) {
            System.out.println("The intersection node value is: " + intersectionNode.val);
        } else {
            System.out.println("No intersection node found.");
        }
    }
}
Python代码实现
python
class ListNode:
    def __init__(self, x):
        self.val = x
        self.next = None

def getIntersectionNode(headA: ListNode, headB: ListNode) -> ListNode:
    visited = set()
    while headA:
        visited.add(headA)
        headA = headA.next
    while headB:
        if headB in visited:
            return headB
        headB = headB.next
    return None

headA = ListNode(1)
headA.next = ListNode(2)
headB = ListNode(3)
headB.next = ListNode(4)
headB.next.next = headA.next  # Common node
intersectionNode = getIntersectionNode(headA, headB)
if intersectionNode:
    print("The intersection node value is:", intersectionNode.val)
else:
    print("No intersection node found.")
运行结果

简单总结
本节主要介绍了如何寻找两个链表的共同路径。