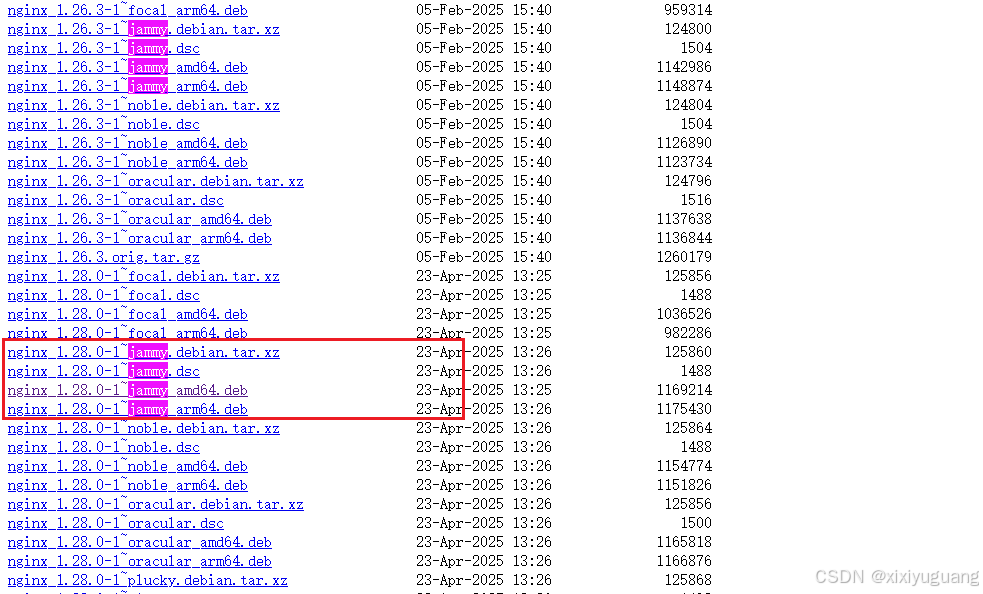
一、下载 Nginx 主包
打开 https://nginx.org/packages/ubuntu/pool/nginx/n/nginx/,选择jammy版本、对应架构(amd64/arm64)的 deb 包;
二、卸载
# 停止 Nginx 服务
sudo systemctl stop nginx

# 完全卸载 Nginx
sudo apt purge nginx nginx-common nginx-full

# 删除残留配置
sudo rm -rf /etc/nginx /var/log/nginx /var/lib/nginx /var/cache/nginx

# 清理依赖
sudo apt autoremove
sudo apt autoclean三、apt-get安装依赖
sudo apt-get install -y build-essential libpcre3 libpcre3-dev zlib1g zlib1g-dev libssl-dev1、内网离线下载依赖
# 创建下载目录
mkdir -p ~/nginx-dependencies && cd ~/nginx-dependencies

# 下载所有依赖包(包括所有子依赖)
sudo apt-get update
sudo apt-get install -d build-essential libpcre3 libpcre3-dev zlib1g zlib1g-dev libssl-dev

# 复制所有下载的deb包到当前目录
sudo cp /var/cache/apt/archives/*.deb ./


# 解压依赖包

tar -xzvf nginx-dependencies.tar.gz


# 进入依赖包目录

cd nginx-dependencies


# 安装所有包(按顺序安装,避免依赖问题)

sudo dpkg -i *.deb


# 如果出现依赖错误,强制修复

sudo apt-get install -f


# 检查gcc
gcc --version
# 输出:gcc (Ubuntu 11.4.0-1ubuntu1~22.04.2) 11.4.0

# 检查pcre
pcre-config --version
# 输出:8.39

# 检查zlib
zlib-config --version
# 输出:1.2.11

# 检查openssl
openssl version
# 输出:OpenSSL 3.0.2 15 Mar 2022
四、deb包安装
sudo dpkg -i nginx_1.28.0-1~jammy_amd64.deb

# 检查版本(必须显示 1.28.0!)
nginx -v

# 检查 Stream 模块
nginx -V | grep stream


nginx -v


nginx version: nginx/1.28.0


 nginx -V | grep stream


nginx version: nginx/1.28.0
built by gcc 11.4.0 (Ubuntu 11.4.0-1ubuntu1~22.04)
built with OpenSSL 3.0.2 15 Mar 2022
TLS SNI support enabled
configure arguments: --prefix=/etc/nginx --sbin-path=/usr/sbin/nginx --modules-path=/usr/lib/nginx/modules --conf-path=/etc/nginx/nginx.conf --error-log-path=/var/log/nginx/error.log --http-log-path=/var/log/nginx/access.log --pid-path=/run/nginx.pid --lock-path=/run/nginx.lock --http-client-body-temp-path=/var/cache/nginx/client_temp --http-proxy-temp-path=/var/cache/nginx/proxy_temp --http-fastcgi-temp-path=/var/cache/nginx/fastcgi_temp --http-uwsgi-temp-path=/var/cache/nginx/uwsgi_temp --http-scgi-temp-path=/var/cache/nginx/scgi_temp --user=nginx --group=nginx --with-compat --with-file-aio --with-threads --with-http_addition_module --with-http_auth_request_module --with-http_dav_module --with-http_flv_module --with-http_gunzip_module --with-http_gzip_static_module --with-http_mp4_module --with-http_random_index_module --with-http_realip_module --with-http_secure_link_module --with-http_slice_module --with-http_ssl_module --with-http_stub_status_module --with-http_sub_module --with-http_v2_module --with-http_v3_module --with-mail --with-mail_ssl_module --with-stream --with-stream_realip_module --with-stream_ssl_module --with-stream_ssl_preread_module --with-cc-opt='-g -O2 -ffile-prefix-map=/home/builder/debuild/nginx-1.28.0/debian/debuild-base/nginx-1.28.0=. -flto=auto -ffat-lto-objects -flto=auto -ffat-lto-objects -fstack-protector-strong -Wformat -Werror=format-security -Wp,-D_FORTIFY_SOURCE=2 -fPIC' --with-ld-opt='-Wl,-Bsymbolic-functions -flto=auto -ffat-lto-objects -flto=auto -Wl,-z,relro -Wl,-z,now -Wl,--as-needed -pie'
五、tar安装
# 安装依赖(直接用apt-get,无需下载rpm包!)

sudo apt-get update

sudo apt-get install -y build-essential libpcre3 libpcre3-dev zlib1g zlib1g-dev libssl-dev


./configure \
  --prefix=/usr/local/nginx \
  --sbin-path=/usr/local/nginx/sbin/nginx \
  --conf-path=/usr/local/nginx/conf/nginx.conf \
  --error-log-path=/usr/local/nginx/logs/error.log \
  --http-log-path=/usr/local/nginx/logs/access.log \
  --pid-path=/usr/local/nginx/logs/nginx.pid \
  --with-http_stub_status_module \
  --with-http_ssl_module \
  --with-http_gzip_static_module \
  --with-pcre \
  --with-stream  # 这个参数是启用stream模块的关键!


make
make install


/usr/local/nginx/sbin/nginx -V | grep stream

ls /usr/local/nginx/modules/ngx_stream_module.so


/usr/local/nginx/sbin/nginx -V | grep stream
nginx version: nginx/1.28.0
built by gcc 11.4.0 (Ubuntu 11.4.0-1ubuntu1~22.04.2)
built with OpenSSL 3.0.2 15 Mar 2022
TLS SNI support enabled
configure arguments: --prefix=/usr/local/nginx --sbin-path=/usr/local/nginx/sbin/nginx --conf-path=/usr/local/nginx/conf/nginx.conf --error-log-path=/usr/local/nginx/logs/error.log --http-log-path=/usr/local/nginx/logs/access.log --pid-path=/usr/local/nginx/logs/nginx.pid --with-http_stub_status_module --with-http_ssl_module --with-http_gzip_static_module --with-pcre --with-stream
六、stream配置
# 启用stream模块(四层代理)
stream {
    # 配置8080端口的TCP转发(目标:8081)
    server {
        listen 8080; # 监听8080端口的TCP流量
        proxy_pass 127.0.0.1:8081; # 转发到后端8081的TCP端口
        proxy_connect_timeout 180s;
        proxy_timeout 180s;
    }
}
代理配置
server {
        listen       1111;
        server_name  192.192.3.20;
       charset utf-8;

        location / {
            root /usr/share/nginx/html;
          try_files $uri $uri/ /index.html;
            index  index.html index.htm;
        }

        location /prod-api/ {
            proxy_set_header Host $http_host;
            proxy_set_header X-Real-IP $remote_addr;
            proxy_set_header REMOTE-HOST $remote_addr;
            proxy_set_header X-Forwarded-For $proxy_add_x_forwarded_for;
            proxy_pass http://127.0.0.1:8080/;
        }

        error_page   500 502 503 504  /50x.html;
        location = /50x.html {
            root   html;
        }
    }