目标
实现的功能:
- 使用YOLOv8模型检测视频中的人物
- 计算人物之间的距离(基于检测框中心点的欧氏距离)
- 当人物之间距离小于设定的安全阈值时,标记为红色并绘制连接线
- 显示人物之间的实时距离值
- 显示当前的安全距离阈值
程序特点:
- 从摄像头实时获取视频流进行处理
- 使用绿色框标记安全距离内的人物,红色框标记距离过近的人物
- 通过红色线条连接距离过近的人物,并显示距离数值
- 按'q'键可退出程序
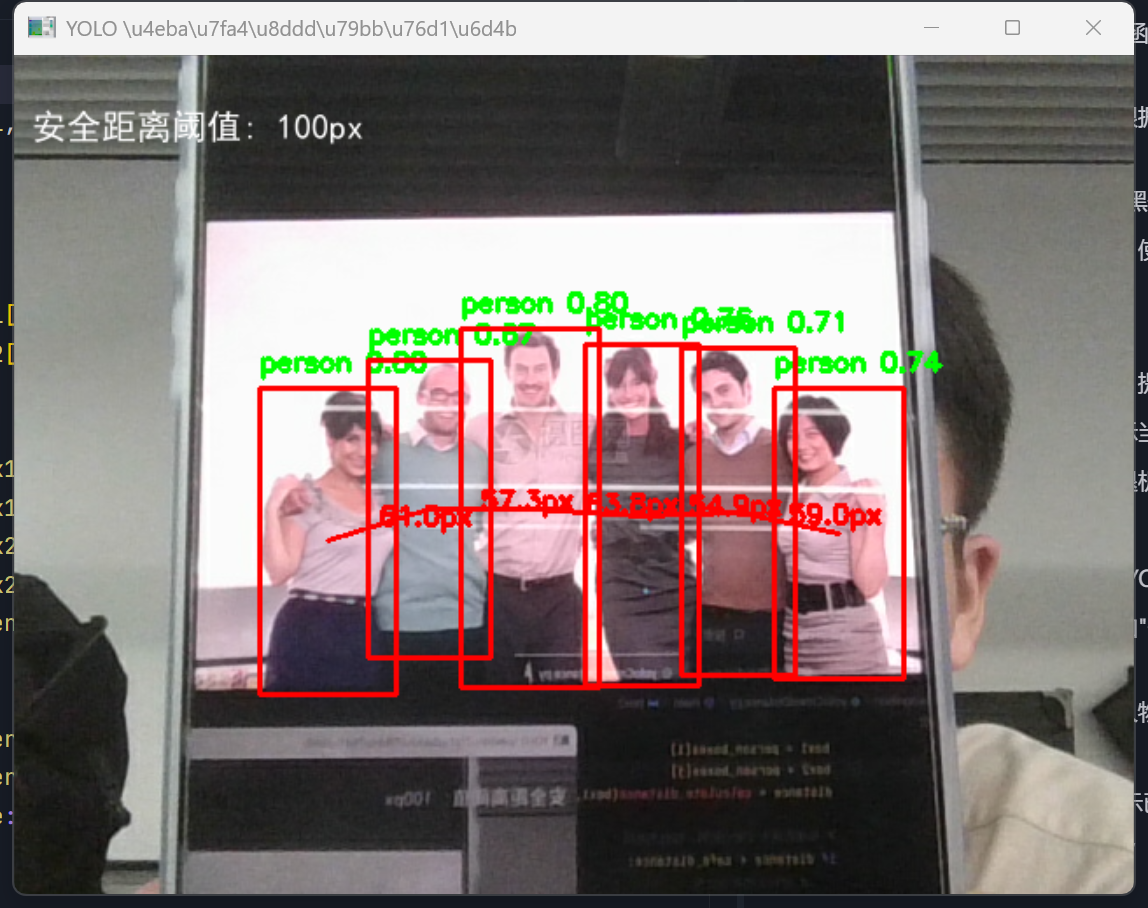
测试结果: 程序运行正常,可以成功检测人物并计算距离,当人物距离过近时会进行适当标记。
看效果
实现思路
- 创建新的Python文件yoloCrowdDistance.py
- 复制yoloUltralytics.py的基本结构
- 添加距离计算功能
- 添加过近人物标记功能
- 测试程序
贴源码
python
import cv2
from ultralytics import YOLO
import numpy as np
import os
import platform
from PIL import ImageFont, ImageDraw, Image

def draw_chinese_text(image, text, position, font_size, color):
    """
    使用PIL在图像上绘制中文文本
    """
    try:
        # 将OpenCV图像转换为PIL图像
        pil_image = Image.fromarray(cv2.cvtColor(image, cv2.COLOR_BGR2RGB))
        draw = ImageDraw.Draw(pil_image)

        # 选择字体
        font_path = None
        system = platform.system()
        if system == "Windows":
            # Windows系统默认字体路径(使用原始字符串)
            font_path = r"C:\Windows\Fonts\simhei.ttf"  # 黑体
            if not os.path.exists(font_path):
                font_path = r"C:\Windows\Fonts\simsun.ttc"  # 宋体
                if not os.path.exists(font_path):
                    font_path = r"C:\Windows\Fonts\msyh.ttc"  # 微软雅黑
        elif system == "Darwin":  # macOS
            font_path = "/Library/Fonts/PingFang.ttc"
        elif system == "Linux":
            font_path = "/usr/share/fonts/truetype/wqy/wqy-zenhei.ttc"

        if font_path and os.path.exists(font_path):
            font = ImageFont.truetype(font_path, font_size)
            print(f"✅ 使用字体: {font_path}")
        else:
            font = ImageFont.load_default()
            print("⚠️ 使用默认字体,中文可能无法正常显示")

        # 绘制文本
        draw.text(position, text, font=font, fill=color)

        # 将PIL图像转换回OpenCV图像
        return cv2.cvtColor(np.array(pil_image), cv2.COLOR_RGB2BGR)
    except Exception as e:
        print(f"⚠️ 绘制中文文本时出错: {e}")
        # 如果绘制中文失败,使用OpenCV的putText(可能显示为方框)
        cv2.putText(image, text, position, cv2.FONT_HERSHEY_SIMPLEX, font_size/20, color, 2)
        return image

def calculate_distance(box1, box2):
    """
    计算两个检测框之间的距离(使用中心点之间的欧氏距离)
    box1, box2: 检测框坐标 (x1, y1, x2, y2)
    """
    # 计算两个检测框的中心点
    center1_x = (box1[0] + box1[2]) / 2
    center1_y = (box1[1] + box1[3]) / 2
    center2_x = (box2[0] + box2[2]) / 2
    center2_y = (box2[1] + box2[3]) / 2

    # 计算欧氏距离
    distance = np.sqrt((center1_x - center2_x) ** 2 + (center1_y - center2_y) ** 2)
    return distance

def main():
    print("开始加载YOLO模型进行人群距离监测...")

    try:
        # 加载YOLOv8模型
        model = YOLO('yolov8n.pt')
        print("✅ 模型加载成功!")

        # 打开摄像头
        cap = cv2.VideoCapture(0)
        if not cap.isOpened():
            print("❌ 无法打开摄像头")
            return

        print("🎥 摄像头已开启,按 'q' 键退出...")
        # 设定安全距离阈值(像素单位)
        safe_distance = 100

        while True:
            ret, frame = cap.read()
            if not ret:
                print("❌ 无法读取视频帧")
                break

            # 使用模型进行预测
            results = model(frame)
            person_boxes = []

            # 遍历每一帧的检测结果
            for r in results:
                # 获取检测框的坐标、置信度和类别ID
                boxes = r.boxes
                if boxes is not None and len(boxes) > 0:
                    for box in boxes:
                        # 获取坐标
                        x1, y1, x2, y2 = box.xyxy[0].tolist()
                        conf = box.conf[0].item()  # 置信度
                        cls_id = int(box.cls[0].item())  # 类别ID
                        class_name = model.names[cls_id]  # 类别名称

                        # 只关注人物类别(COCO数据集中类别ID为0)
                        if cls_id == 0 and conf > 0.5:
                            # 保存人物检测框
                            person_boxes.append((x1, y1, x2, y2))
                            # 绘制人物边界框
                            cv2.rectangle(frame, (int(x1), int(y1)), (int(x2), int(y2)), (0, 255, 0), 2)
                            # 绘制标签
                            label = f"{class_name} {conf:.2f}"
                            cv2.putText(frame, label, (int(x1), int(y1) - 10), cv2.FONT_HERSHEY_SIMPLEX, 0.5,
                                        (0, 255, 0), 2)

            # 检测过近距离的人物对
            if len(person_boxes) > 1:
                for i in range(len(person_boxes)):
                    for j in range(i + 1, len(person_boxes)):
                        box1 = person_boxes[i]
                        box2 = person_boxes[j]
                        distance = calculate_distance(box1, box2)

                        # 如果距离小于安全阈值,标记为危险
                        if distance < safe_distance:
                            # 绘制人物框为红色
                            cv2.rectangle(frame, (int(box1[0]), int(box1[1])), (int(box1[2]), int(box1[3])), (0, 0, 255), 2)
                            cv2.rectangle(frame, (int(box2[0]), int(box2[1])), (int(box2[2]), int(box2[3])), (0, 0, 255), 2)

                            # 绘制连接线
                            center1_x = int((box1[0] + box1[2]) / 2)
                            center1_y = int((box1[1] + box1[3]) / 2)
                            center2_x = int((box2[0] + box2[2]) / 2)
                            center2_y = int((box2[1] + box2[3]) / 2)
                            cv2.line(frame, (center1_x, center1_y), (center2_x, center2_y), (0, 0, 255), 2)

                            # 显示距离
                            mid_x = int((center1_x + center2_x) / 2)
                            mid_y = int((center1_y + center2_y) / 2)
                            cv2.putText(frame, f"{distance:.1f}px", (mid_x, mid_y), cv2.FONT_HERSHEY_SIMPLEX, 0.5,
                                        (0, 0, 255), 2)

            # 显示安全距离阈值信息
            frame = draw_chinese_text(frame, f"安全距离阈值: {safe_distance}px", (10, 30), 20, (255, 255, 255))

            # 显示视频帧
            cv2.imshow('YOLO 人群距离监测', frame)

            # 按'q'键退出
            if cv2.waitKey(1) & 0xFF == ord('q'):
                break

        # 释放资源
        cap.release()
        cv2.destroyAllWindows()
        print("✅ 程序正常退出")

    except Exception as e:
        print(f"❌ 程序执行出错: {e}")


if __name__ == "__main__":
    main()