提示:Elasticsearch单机部署,后续会写集群部署
文章目录
- 前言
- 一、环境需求
- 二、安装JDK环境
- 二、修改主机配置文件
- 三、安装Elasticsearch
-
- 1、上传压缩包并解压文件、创建用户、设置权限
- [2、修改elasticsearch.yml 主配置文件](#2、修改elasticsearch.yml 主配置文件)
- 3、修改配置文件jvm.options
- 4、创建数据和日志路径
- 5、启动ES
- 四、验证测试
- 总结
前言
Elasticsearch 是什么?
Elasticsearch(简称 ES) 是一个分布式、RESTful 风格的搜索与分析引擎
核心特点一句话概括:
能对海量数据进行"近实时搜索 + 统计分析",而且速度非常快。
它底层基于 Apache Lucene(一个全文检索库),但 ES 把 Lucene 封装成了一个:
- 分布式
- 可扩展
- 易使用(HTTP + JSON)
- 适合生产环境的系统
部署特点
- 仅部署一个 ES 实例
- 节点角色全部集中在同一节点
- 不形成真正的集群结构
- 配置简单,部署成本低
优点
- 架构简单,易于安装和维护
- 资源消耗少,启动速度快
- 适合快速验证功能和学习 ES
缺点
- 无高可用能力,节点宕机即服务不可用
- 无数据冗余,存在数据丢失风险
- 扩展性差,无法水平扩容
- 不适合高并发或大数据量场景
适用场景
- 本地开发和测试环境
- 学习和功能验证(PoC)
- 日志量小、对稳定性要求不高的场景
提示:以下是本篇文章正文内容,下面案例可供参考
一、环境需求
| 公网IP | 内网IP | 配置 | 服务 |
|---|---|---|---|
| 150.158.36.214 | 172.17.48.73 | 4C8G | elasticsearch-7.5.1-linux-x86_64.tar.gz、jdk-11.0.11_linux-x64_bin.tar.gz |
二、安装JDK环境
1.安装JDK
bash
mkdir -p /usr/local/ding/jdk
mv jdk-11.0.11_linux-x64_bin.tar.gz /usr/local/ding/jdk/
cd /usr/local/ding/jdk/
tar zxvf jdk-11.0.11_linux-x64_bin.tar.gz
cd jdk-11.0.11/
vim /etc/profile
末尾添加:
export JAVA_HOME="/usr/local/ding/jdk/jdk-11.0.11"
export PATH=$JAVA_HOME/bin:$PATH
source /etc/profile
# 检测jdk11是否安装成功
java -version
java version "11.0.11" 2021-04-20 LTS
Java(TM) SE Runtime Environment 18.9 (build 11.0.11+9-LTS-194)
Java HotSpot(TM) 64-Bit Server VM 18.9 (build 11.0.11+9-LTS-194, mixed mode)
二、修改主机配置文件
bash
[root@VM-48-73-centos ~]# vim /etc/security/limits.conf
末尾添加:
* soft nofile 65536
* hard nofile 131072
* soft nproc 65536
* hard nproc 65536

[root@VM-48-73-centos ~]# vim /etc/security/limits.d/20-nproc.conf
#末尾添加如下配置:
*          soft    nproc     4096(4096是参考别人文档,我自己的是65535)

[root@VM-48-73-centos ~]# vim /etc/sysctl.conf
#末尾添加如下配置:
vm.max_map_count=262144

[root@VM-48-73-centos ~]# sysctl -p
fs.file-max = 102400
net.nf_conntrack_max = 1024000
net.netfilter.nf_conntrack_max = 1024000
vm.max_map_count = 262144
三、安装Elasticsearch
1、上传压缩包并解压文件、创建用户、设置权限
bash
[root@VM-48-73-centos ~]# mv elasticsearch-7.5.1-linux-x86_64.tar.gz /usr/local
[root@VM-48-73-centos ~]# cd /usr/local
[root@VM-48-73-centos local]# tar zxvf elasticsearch-7.5.1-linux-x86_64.tar.gz
[root@VM-48-73-centos local]# groupadd elsearch
[root@VM-48-73-centos local]# useradd  elsearch -g elsearch -p elsearch
[root@VM-48-73-centos local]# chown -R elsearch:elsearch /usr/local/elasticsearch-7.5.1
[root@VM-48-73-centos local]# su elsearch
[elsearch@VM-48-73-centos local]$ cd elasticsearch-7.5.1/config/
2、修改elasticsearch.yml 主配置文件
bash
[elsearch@VM-48-73-centos config]$ cat elasticsearch.yml
# ======================== Elasticsearch Configuration =========================
#
# NOTE: Elasticsearch comes with reasonable defaults for most settings.
#       Before you set out to tweak and tune the configuration, make sure you
#       understand what are you trying to accomplish and the consequences.
#
# The primary way of configuring a node is via this file. This template lists
# the most important settings you may want to configure for a production cluster.
#
# Please consult the documentation for further information on configuration options:
# https://www.elastic.co/guide/en/elasticsearch/reference/index.html
#
# ---------------------------------- Cluster -----------------------------------
#
# Use a descriptive name for your cluster:
#
cluster.name: my-application   ##去掉注释,可以自定义
#
# ------------------------------------ Node ------------------------------------
#
# Use a descriptive name for the node:
#
node.name: node-1   ##去掉注释,可以自定义每个node名字需要唯一
#
# Add custom attributes to the node:
#
#node.attr.rack: r1
#
# ----------------------------------- Paths ------------------------------------
#
# Path to directory where to store the data (separate multiple locations by comma):
#
path.data: /opt/elasticsearch/path/to/data   ##去掉注释,添加数据路径
#
# Path to log files:
#
path.logs: /opt/elasticsearch/path/to/logs   ##去掉注释,添加日志路径
#
# ----------------------------------- Memory -----------------------------------
#
# Lock the memory on startup:
#
#bootstrap.memory_lock: true
#
# Make sure that the heap size is set to about half the memory available
# on the system and that the owner of the process is allowed to use this
# limit.
#
# Elasticsearch performs poorly when the system is swapping the memory.
#
# ---------------------------------- Network -----------------------------------
#
# Set the bind address to a specific IP (IPv4 or IPv6):
#
network.host: 0.0.0.0   ## 0.0.0.0是都可以访问,127.0.0.1是只能内网访问
#
# Set a custom port for HTTP:
#
http.port: 9200   ## 默认端口号
#
# For more information, consult the network module documentation.
#
# --------------------------------- Discovery ----------------------------------
#
# Pass an initial list of hosts to perform discovery when this node is started:
# The default list of hosts is ["127.0.0.1", "[::1]"]
#
#discovery.seed_hosts: ["host1", "host2"]
#
# Bootstrap the cluster using an initial set of master-eligible nodes:
#
cluster.initial_master_nodes: ["node-1"]   ##配置群集节点,对各服务器["node-1","node-2"](本次一台服务器搭建只用一个名称)
#
# For more information, consult the discovery and cluster formation module documentation.
#
# ---------------------------------- Gateway -----------------------------------
#
# Block initial recovery after a full cluster restart until N nodes are started:
#
#gateway.recover_after_nodes: 3
#
# For more information, consult the gateway module documentation.
#
# ---------------------------------- Various -----------------------------------
#
# Require explicit names when deleting indices:
#
#action.destructive_requires_name: true
#解决跨域,添加末尾即可(注意:只是虚拟机搭建,不用跨域)
#http.cors.enabled: true
#http.cors.allow-origin: "*"
3、修改配置文件jvm.options
jvm.options
jvm.options主要是进行内存相关配置,官方建议分配给es的内存不要超出系统内存的50%,预留一半给Lucene,因为Lucene会缓存segment数据提升检索性能;内存配置不要超过32g,如果你的服务器内存没有远远超过64g,那么不建议将es的jvm内存设置为32g,因为超过32g后每个jvm对象指针的长度会翻倍,导致内存与cpu的开销增大。
bash
[elsearch@VM-48-73-centos config]$ cat jvm.options
## JVM configuration

################################################################
## IMPORTANT: JVM heap size
################################################################
##
## You should always set the min and max JVM heap
## size to the same value. For example, to set
## the heap to 4 GB, set:
##
## -Xms4g
## -Xmx4g
##
## See https://www.elastic.co/guide/en/elasticsearch/reference/current/heap-size.html
## for more information
##
################################################################

# Xms represents the initial size of total heap space
# Xmx represents the maximum size of total heap space

-Xms2g   ##本人是4C8G,修改为2G
-Xmx2g   ##本人是4C8G,修改为2G

################################################################
## Expert settings
################################################################
##
## All settings below this section are considered
## expert settings. Don't tamper with them unless
## you understand what you are doing
##
################################################################

## GC configuration  ## 如果在启动不成功的情况下可以吧下面三行注释掉
-XX:+UseConcMarkSweepGC
-XX:CMSInitiatingOccupancyFraction=75
-XX:+UseCMSInitiatingOccupancyOnly

## G1GC Configuration
# NOTE: G1GC is only supported on JDK version 10 or later.
# To use G1GC uncomment the lines below.
# 10-:-XX:-UseConcMarkSweepGC
# 10-:-XX:-UseCMSInitiatingOccupancyOnly
# 10-:-XX:+UseG1GC
# 10-:-XX:G1ReservePercent=25
# 10-:-XX:InitiatingHeapOccupancyPercent=30

## JVM temporary directory
-Djava.io.tmpdir=${ES_TMPDIR}

## heap dumps

# generate a heap dump when an allocation from the Java heap fails
# heap dumps are created in the working directory of the JVM
-XX:+HeapDumpOnOutOfMemoryError

# specify an alternative path for heap dumps; ensure the directory exists and
# has sufficient space
-XX:HeapDumpPath=data

# specify an alternative path for JVM fatal error logs
-XX:ErrorFile=logs/hs_err_pid%p.log

## JDK 8 GC logging
8:-XX:+PrintGCDetails
8:-XX:+PrintGCDateStamps
8:-XX:+PrintTenuringDistribution
8:-XX:+PrintGCApplicationStoppedTime
8:-Xloggc:logs/gc.log
8:-XX:+UseGCLogFileRotation
8:-XX:NumberOfGCLogFiles=32
8:-XX:GCLogFileSize=64m

# JDK 9+ GC logging
9-:-Xlog:gc*,gc+age=trace,safepoint:file=logs/gc.log:utctime,pid,tags:filecount=32,filesize=64m
4、创建数据和日志路径
bash
[root@VM-48-73-centos ~]# mkdir -p /opt/elasticsearch/path/to/data
[root@VM-48-73-centos ~]# mkdir -p /opt/elasticsearch/path/to/logs
[root@VM-48-73-centos ~]# chmod +x /opt/elasticsearch/path/to/data
[root@VM-48-73-centos ~]# chmod +x /opt/elasticsearch/path/to/logs
[root@VM-48-73-centos ~]# chown -R elsearch:elsearch /opt/elasticsearch/path/to/logs
[root@VM-48-73-centos ~]# chown -R elsearch:elsearch /opt/elasticsearch/path/to/data
5、启动ES
bash
[elsearch@VM-48-73-centos config]$ cd ..
[elsearch@VM-48-73-centos elasticsearch-7.5.1]$ cd bin/
[elsearch@VM-48-73-centos bin]$ ./elasticsearch -d ## 不想下面提示的话可以注释掉jvm.options三行注释
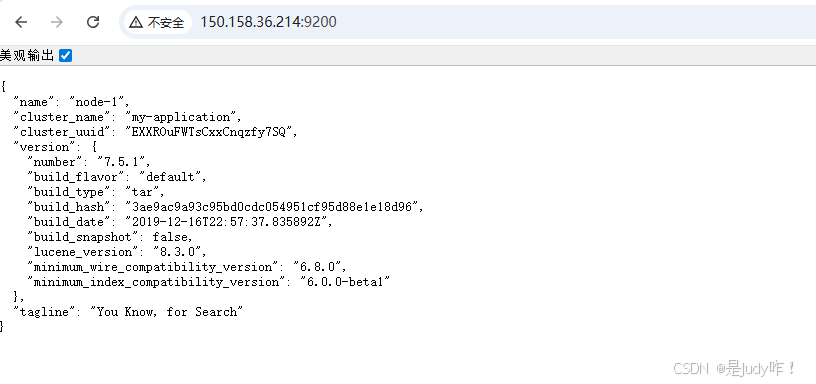
Java HotSpot(TM) 64-Bit Server VM warning: Option UseConcMarkSweepGC was deprecated in version 9.0 and will likely be removed in a future release.四、验证测试
直接访问http://150.158.36.214:9200/
总结
Elasticsearch 单节点部署是指整个 ES 系统仅由 一个节点 组成,该节点同时承担 Master、Data、Ingest、Coordinating 等全部角色。