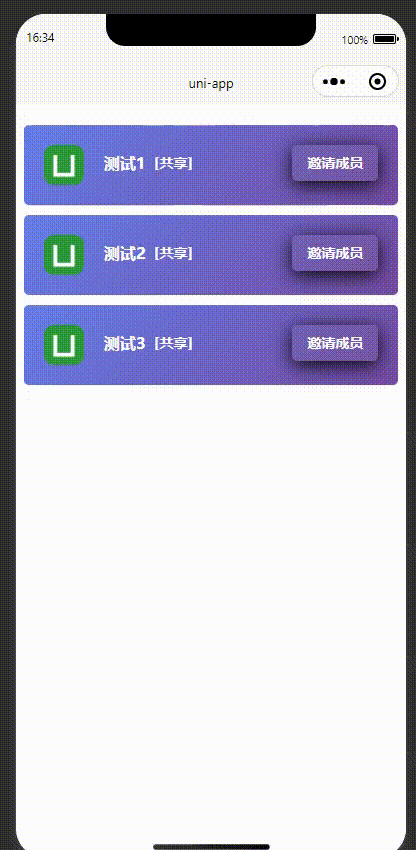
先看效果,还挺丝滑
一、页面代码,东西不多,主要注意
开始触发 @touchstart="drawStart"
滑动 @touchmove="drawMove"
触摸滑动结束@touchend="drawEnd"
html
<template>
<view class="container">
<view class="main">
<view v-for="(item, index) in shareList" :key="index" :data-index="index" class="order-item"
@touchstart="drawStart" @touchmove="drawMove" @touchend="drawEnd" :style="'right:'+item.right+'px'">
<view class="content">
<view class="active" ></view>
<image class="userlogo" :src="item.logo"></image>
<view class="zbname">
{{item.title}}
</view>
<view class="zbcount">
[共享]
</view>
<button class="yqclass" open-type="share">邀请成员</button>
</view>
<view class="zhiding" @click="zdData(item)">置顶</view>
<view class="remove" @click="delData(item)">删除</view>
<view class="edit" @click="editData(item)">编辑</view>
</view>
</view>
</view>
</template>二、js 代码
javascript
 export default {
        data() {
            return { //列表数据,可根据自己的业务获取
                //列表数据,可根据自己的业务获取
                shareList: [{
					id:0,
					logo:'/static/logo.png',
                    title: '测试1',
                    right: 0
                },
				{
					id:1,
					logo:'/static/logo.png',
				    title: '测试2',
				    right: 0
				},
				{
					id:2,
					logo:'/static/logo.png',
				    title: '测试3',
				    right: 0
				}
				],
                //左滑默认宽度
                delBtnWidth: 90,
            }
        },
        methods: {
            //开始触摸滑动
            drawStart(e) {
                console.log("开始触发");
                var touch = e.touches[0];
                this.startX = touch.clientX;
            },
            //触摸滑动
            drawMove(e) {
                console.log("滑动");
                for (var index in this.shareList) {
                    this.$set(this.shareList[index], 'right', 0);
                }
                var touch = e.touches[0];
                var item = this.shareList[e.currentTarget.dataset.index];
                var disX = this.startX - touch.clientX;
                if (disX >= 20) {
                    if (disX > this.delBtnWidth) {
                        disX = this.delBtnWidth;
                    }
                    this.$set(this.shareList[e.currentTarget.dataset.index], 'right', disX);
                } else {
                    this.$set(this.shareList[e.currentTarget.dataset.index], 'right', 0);
                }
            },
            //触摸滑动结束
            drawEnd(e) {
                console.log("滑动结束");
                var item = this.shareList[e.currentTarget.dataset.index];
                if (item.right >= this.delBtnWidth / 2) {
                    this.$set(this.shareList[e.currentTarget.dataset.index], 'right', this.delBtnWidth*2);
                } else {
                    this.$set(this.shareList[e.currentTarget.dataset.index], 'right', 0);
                }
            }

        }
    }
三、css 也是很简单
javascript
<style lang="scss" scoped>

    .main {
        width: 100%;
        height: auto;
        margin: 10px auto;
        overflow: hidden
    }

    .order-item {
            width: 96%;
            display: flex;
            position: relative;
            margin: 10px auto;
            align-items: right;
            flex-direction: row;
    		border-radius: 5px;
    		background: linear-gradient(135deg, #667eea 0%, #764ba2 100%);
        }

        .content {
            width: 100%;
            margin: 0 auto;
        }
    	 .remove, .edit,.zhiding{
    		 width: 50px;
    		 height: 100%;
    		 color: #fff;
    		 position: absolute;
    		 top: 0;
    		 display: flex;
    		 justify-content: center;
    		 align-items: center;
    		 font-size: 14px;
    		 border-radius: 12rpx;
    	 }
        .remove {
            right: -180px;
            margin-left: -5%;
            background-color: #fa4659;
        }
    	.zhiding {
            right: -60px;
            background-color: #08d9d6;
        }
        .edit {
    		right: -120px;
            background-color: #17b978;
        }
	.yqclass{
	    float: right;
	    font-weight: 600;
	    margin: 20px;
	    line-height: 16px;
	    border-radius: 5px;
		color: #fff;
		color: #fff;
		background-color: rgba(128, 128, 128, 0.1);
	}
	.yqclass::after {
		 border: none;
		}

	.yqclass{
		font-size: 14px;
		padding: 10px 15px;
		 box-shadow: 0 4px 20px rgba(0, 0, 0, 1);
	}
	.zbname,.zbcount{
	    float: left;
	    font-weight: 600;
	    padding: 30px 0 0 0;
	    line-height: 16px;
	}
	.zbname{
		 color: #fff;
		 font-size: 16px;
	}
	.zbcount{
		color: #fff;
		font-size: 14px;
	}
	.userlogo {
	    float: left;
	    width: 40px;
	    height: 40px;
	    border-radius: 10px;
	    margin: 20px;
	}
</style>
很简单吧!