outline
- gdb常用命令
- gdb coredump 回放
- 多线程 常用知识
- vscode 挂载 ros 断点调式
- 如何配置多个目录下的文件断点
来源于过去工作中copilot问答 在此总结为笔记 防止忘记
文章目录
- outline
- gdb常用命令
- coredump
- [vscode GUI](#vscode GUI)
-
- [vscode GUI 断点几点笔记](#vscode GUI 断点几点笔记)
-
-
- 调试启动配置
- 调试前自动编译的任务配置(可选但常用)
- [Launch 和attach 区别](#Launch 和attach 区别)
-
- [插件 挂载 ros 断点调式](#插件 挂载 ros 断点调式)
- 加载core文件
- 多线程
gdb常用命令
coredump
coerdump 查看前提
为 了 让 List 和 行 号 定 位 更 准 确 , 建 议 用 -00 -g -fno-omit-frame-pointer 编 译 :
-g: 包 含 调 试 符 号 ;
-00: 关 闭 优 化 , 避 免 行 号 和 代 码 折 叠 影 响 定 位 ;
-fno-omit-frame-pointer: 让 回 溯 更 稳 定 。
为什么
在 编 译 程 序 时 ,-g 表 示 生 成 调 试 符 号 信 息 (Debug Symbols), 这 些 信 息 会 嵌 入 到 可 执 行 文 件 中 , 使 得 调 试 工 具 ( 如 gdb) 能 够 :
- 映 射 机 器 码 到 源 代 码 ( 如 变 量 名 、 函 数 名 、 行 号 等 ) 。
- 提 供 完 整 的 堆 栈 跟 踪 (backtrace), 精 确 定 位 崩 溃 位 置 。
- 支 持 单 步 调 试 、 查 看 变 量 值 等 高 级 调 试 操 作 。
为 什 么 调 试 core dump 需 要 -g 编 译 的 可 执 行 文 件 ?
- 符 号 匹 配
● core 文 件 是 程 序 崩 溃 时 的 内 存 快 照 , 但 本 身 不 包 含 源 代 码 信 息 。
● 必 须 用 生 成 core 的 同 一 份 二 进 制 文 件 ( 最 好 是 -g 编 译 的 未 剥 离 版 本 ) 加 载 到 gdb, 才 能 正 确 解 析 core 文 件 中 的 地 址 。 - 未 剥 离 (Unstripped) 的 重 要 性
● 默 认 编 译 的 可 执 行 文 件 可 能 被 strip 命 令 移 除 调 试 符 号 ( 节 省 空 间 ), 导 致 gdb 无 法 解 析 。
● 调 试 时 应 保 留 未 剥 离 的 二 进 制 文 件 ( 即 不 执 行 strip) 。
如果要在当前文件夹子下 导出coredump文件 同时设置大小防护 需要进行一些设置
命令:
sudo sysctl -w kernel.core_pattern=/home/q670270/H10Research/coredump/core_%e_%p_%t

命令解读:


sysctl -w      :动态修改内核参数(`-w` 表示 write,即写入新值)                       |

kernel.core_pattern 控制 core dump 文件命名和存储路径的内核参数                           |

/home/q670270/...自定义的 core 文件存储路径和命名格式                                  |


存储路径:    core_%e_%p_%t 会被保存到目录:

    /home/q670270/H10Research/coredump/


   需确保该目录存在且可写(否则 core 文件生成失败):

     mkdir -p /home/q670270/H10Research/coredump

     chmod 777 /home/q670270/H10Research/coredump  # 按需调整权限

文件名格式:
	%e:executable

	%p:进程 PID  1234

  	%t: 崩溃时间戳(UNIX timestamp)   1651234567

生成的 core 文件示例:

   /home/q670270/H10Research/coredump/core_nginx_1234_1651234567
作用总结
-
集中管理 core 文件
将所有程序的 core dump 统一存储到指定目录,避免散落在不同路径。
-
避免文件名冲突
通过
%e(程序名)、%p(PID)、%t(时间戳)确保每次崩溃生成唯一的 core 文件。 -
方便调试
文件名直接体现崩溃的程序、进程和时间,快速定位问题。
注意事项
-
临时生效
通过
sysctl -w修改的参数 重启后会失效 。若需永久生效,需将以下内容写入/etc/sysctl.conf:bashkernel.core_pattern=/home/q670270/H10Research/coredump/core_%e_%p_%t然后执行:
bashsudo sysctl -p # 重新加载配置 -
依赖其他配置
-
需确保系统允许生成 core 文件(检查
ulimit -c,建议设为unlimited):bashulimit -c unlimited # 当前会话生效 echo "ulimit -c unlimited" >> ~/.bashrc # 永久生效 -
某些系统(如 Ubuntu)默认禁用 core dump,需关闭
apport服务:bashsudo systemctl stop apport sudo systemctl disable apport
-
-
权限与磁盘空间
-
确保目标目录可写(尤其是崩溃进程的运行用户需有权限)。
-
core 文件可能很大(尤其是内存占用高的程序),需监控磁盘空间
-
GDB 调试常见命令

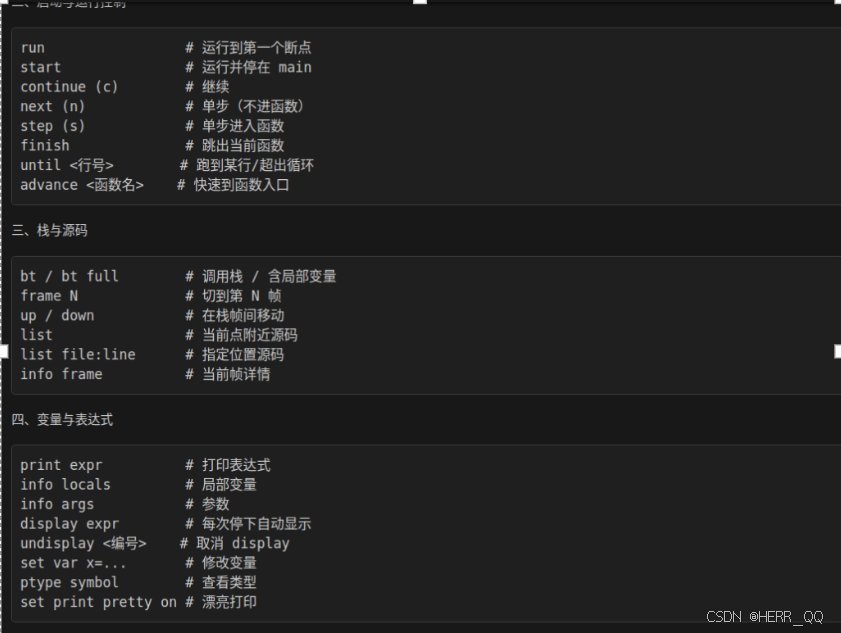
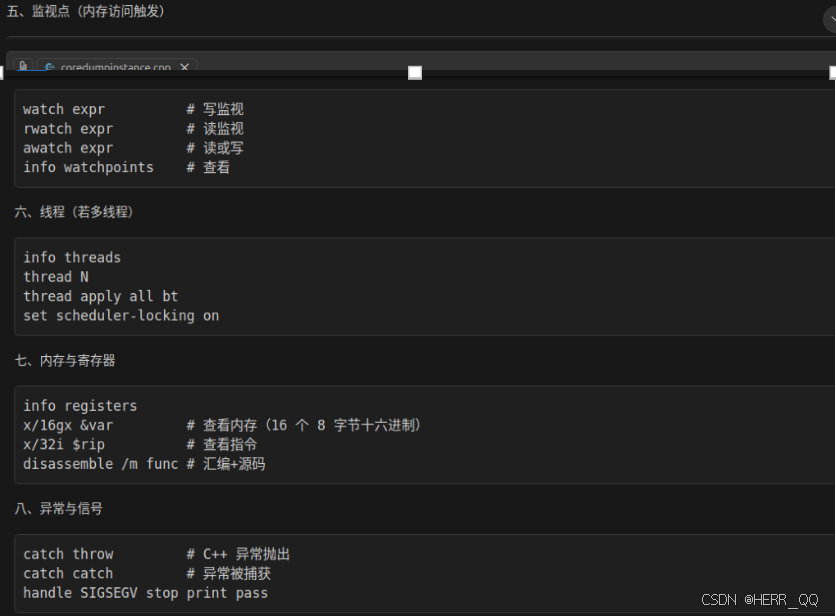
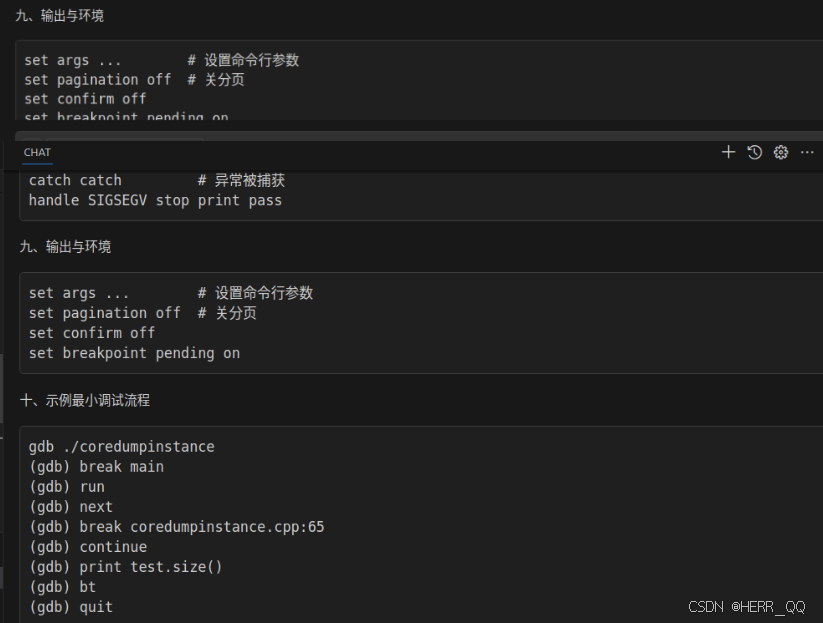
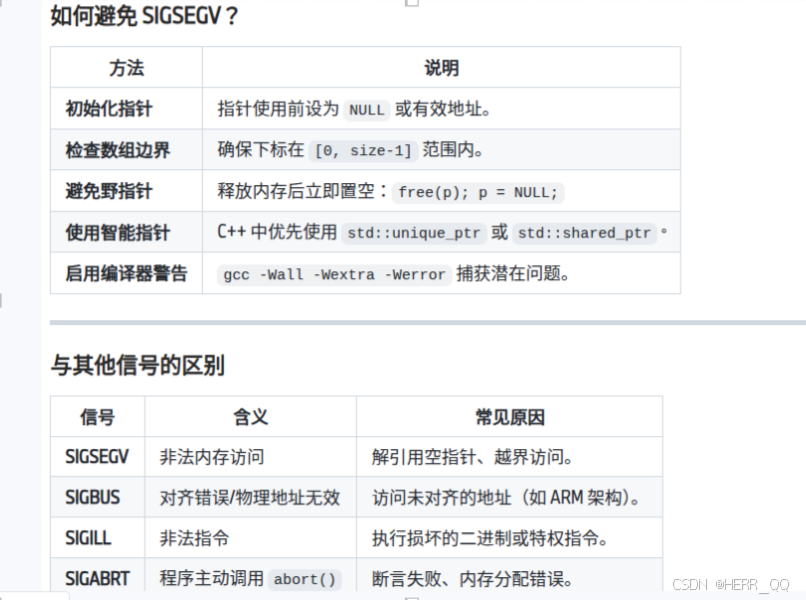
coredump 常见类型
gdb 针对coredump 常用命令 bt回溯

vscode GUI
vscode GUI 断点几点笔记
用的配置在项目的 launch.json 里(如果没有这个文件,VS Code 会让你创建/自动生成)。
调试启动配置
左侧 Run and Debug(运行和调试)面板
顶部下拉框选择一个配置
点齿轮图标(⚙)或 "create a launch.json"
→ 它会打开或创建 launch.json
位置:launch.json
里面每一个对象就是一个可选的调试配置,例如(示意):
"program":要调试的可执行文件路径(比如${workspaceFolder}/build/thread_pool_basic)
"cwd":运行时工作目录(常设为 ${workspaceFolder}/build)
"args":命令行参数
"environment":环境变量
"stopAtEntry":是否停在 main
"MIMode": "gdb":Linux 下用 gdb
"preLaunchTask":调试前先自动编译(配合 tasks.json)
调试前自动编译的任务配置(可选但常用)
位置:tasks.json
如果 launch.json 里写了:
那 VS Code 就会去 tasks.json 里找这个 label 的任务来执行(一般是 cmake --build ... 或 make)
Launch 和attach 区别
- launch(启动调试)
你让 VS Code 自己启动一个新进程,并从一开始就调试它。
典型场景:
调试 thread_pool_basic
需要从 main() 开始单步
想用 preLaunchTask 先编译再启动
关键点:
VS Code 会调用调试器(Linux 常见是 gdb),由调试器 run 启动程序
你在 launch.json 里会写 "program", "args", "cwd"
- attach(附加到已运行的进程)
你的程序已经在运行了(可能是你手动启动,或是后台服务),VS Code 只是连上去调试。
典型场景:
程序启动很复杂(必须先跑脚本/环境)
程序是 daemon/服务
你要调试"运行了一段时间后才出现的问题"
多进程/容器里已经有进程了
关键点:
不会启动程序
你需要提供 "processId"(选进程)或其它方式定位目标进程
如果进程没带调试符号、或被优化裁剪,体验会差
- pipeTransport(通过"管道/远程通道"去跑 gdb)
pipeTransport 不是一种"模式",它是一个机制:
让 VS Code 不在本机直接运行 gdb,而是通过 ssh/docker 等方式,在另一台机器/容器里运行 gdb,再把调试协议转回来。
典型场景:
程序跑在远端 Linux
程序跑在 Docker 容器
本机是 Windows,但要调试 Linux 里的程序(WSL/ssh/container)
你会看到类似配置项:
pipeTransport.pipeProgram: "ssh" / "docker" / "bash" 等
pipeTransport.pipeArgs: ssh 参数、docker exec 参数
pipeTransport.debuggerPath: 远端的 gdb 路径(比如 gdb)
注意:pipeTransport 可以配合 launch 也可以配合 attach:
远端启动调试:launch + pipeTransport
远端附加调试:attach + pipeTransport
所以你说的"pipe attach"大概率就是:attach 到远端进程。
- pipeLaunch(旧/特定扩展里的"通过管道启动")
pipeLaunch 这个名字在不同扩展/版本里出现过,一般可以理解为:
"启动方式是 launch,但启动过程不是本机直接 exec,而是通过一条管道命令在另一端启动"
在 C++ 扩展(cpptools / cppdbg)里,现在更主流/标准的是用 pipeTransport 来做这件事。
你如果在某些旧配置里看到 pipeLaunch,它和 pipeTransport 的目标很像:解决"远端启动/远端调试器"的问题。
一句话对照表
launch:VS Code 启动程序并调试
attach:程序已在跑,VS Code 连上去调试
pipeTransport:调试器在远端/容器里跑(可配合 launch 或 attach)
pipeLaunch:类似"通过管道在远端启动"的旧式/特定配置(现在多用 pipeTransport)
插件 挂载 ros 断点调式
见 https://blog.csdn.net/weixin_46479223/article/details/132814522
加载core文件
{

    "version": "0.2.0",

    "configurations": [

        {

            "name": "Debug core dump",

            "type": "cppdbg",

            "request": "launch",

            "program": "/home/q670270/H10Research/coredump/coredumpinstance",

            "coreDumpPath": "/home/q670270/H10Research/coredump/core_coredumpinstance_XXXX_YYYYYY",  // 替换为实际文件名

            "MIMode": "gdb",

            "stopAtEntry": false,

            "externalConsole": false,

            "cwd": "/home/q670270/H10Research/coredump",

            "environment": []

        }

    ]

}
多线程
几个示例
- 线程的基本创建与管理
- 死锁的产生与解决
- 线程池的实现与使用
- 竞争条件与并发安全
基础
cpp
#include <iostream>
#include <thread>

void hello() {
    std::cout << "Hello from thread!" << std::endl;
}

void nohello() {
    std::cout << "noHello from thread!" << std::endl;
}

int a {0U};

int main() {
int b {1U};
    std::cout << "hardware_concurrency: " << std::thread::hardware_concurrency() << std::endl;

    std::thread t0(nohello);
    std::thread t1(hello);
    std::thread t2([](){ std::cout << "Hello from lambda thread!" << std::endl; std::cout<<a<<std::endl; });
    std::thread t3;
    t3 = std::thread([b](){ std::cout << "Hello from assigned thread!" << std::endl; std::cout<<b<<std::endl;});
    int c {0U};
    std:: cout << "Main thread id: " << std::this_thread::get_id() << std::endl;
    std:: cout << "t0 id: " << t0.get_id() << std::endl;
    std::cout << "t1 id: " << t1.get_id() << std::endl;
    std::cout << "t2 id: " << t2.get_id() << std::endl;
    std::cout << "t3 id: " << t3.get_id() << std::endl;

    std::cout<< "t0 joinable: " << t0.joinable() << std::endl;
    std::cout << "t1 joinable: " << t1.joinable() << std::endl;
    std::cout << "t2 joinable: " << t2.joinable() << std::endl;
    std::cout << "t3 joinable: " << t3.joinable() << std::endl;


    auto handle = t1.native_handle();
    std::cout << "t1 native_handle: " << handle << std::endl;


    std::thread t4([](){ std::cout << "Hello from swapped thread!" << std::endl; });
    t4.swap(t3); // t3现在是swapped thread, t4是assigned thread


    t1.join();
    std::cout << "t1 11111: " << std::endl;
    t2.detach();

    t3.join();
    std::cout << "t3 11111: " << std::endl;
    t4.join();

    std::cout << "t4 11111: " << std::endl;

    std::cout << "Main thread finished." << std::endl;

    t0.detach();

    std::cout << "t0 joinable: " << t0.joinable() << std::endl;
    std::cout << "t1 joinable: " << t1.joinable() << std::endl;
    std::cout << "t2 joinable: " << t2.joinable() << std::endl;
    std::cout << "t3 joinable: " << t3.joinable() << std::endl;
    return 0;
}
dead lock
cpp
#include <iostream>
#include <thread>
#include <mutex>
#include <chrono>

// 演示"潜在死锁"与"正确避免死锁"的两种写法
std::mutex m1, m2;

// 可能产生死锁:两个线程获取锁顺序相反
void bad_task1() {
    std::lock_guard<std::mutex> lk1(m1);
    std::this_thread::sleep_for(std::chrono::milliseconds(50));
    std::lock_guard<std::mutex> lk2(m2);
    std::cout << "bad_task1 acquired both locks\n";
}
void bad_task2() {
    std::lock_guard<std::mutex> lk2(m2);
    std::this_thread::sleep_for(std::chrono::milliseconds(50));
    std::lock_guard<std::mutex> lk1(m1);
    std::cout << "bad_task2 acquired both locks\n";
}

// 正确方式:保持统一获取顺序 或 使用std::lock + std::lock_guard(adopt_lock)
void good_task1() {
    std::lock(m1, m2); // 一次性锁定,避免竞争顺序
    std::lock_guard<std::mutex> lk1(m1, std::adopt_lock);
    std::lock_guard<std::mutex> lk2(m2, std::adopt_lock);
    std::cout << "good_task1 acquired both locks safely\n";
}
void good_task2() {
    std::lock(m1, m2);
    std::lock_guard<std::mutex> lk1(m1, std::adopt_lock);
    std::lock_guard<std::mutex> lk2(m2, std::adopt_lock);
    std::cout << "good_task2 acquired both locks safely\n";
}

int main() {
    std::cout << "--- Potential deadlock demo (may hang depending on timing) ---" << std::endl;
    std::thread t1(bad_task1);
    std::thread t2(bad_task2);
    t1.join();
    t2.join();

    std::cout << "--- Safe locking demo ---" << std::endl;
    std::thread t3(good_task1);
    std::thread t4(good_task2);
    t3.join();
    t4.join();

    std::cout << "Deadlock demo finished." << std::endl;
    return 0;
}
锁
cpp
#include <iostream>
#include <thread>
#include <mutex>
#include <chrono>

std::mutex mtx;
std::timed_mutex tmtx;

void example_lock_guard(int id) {
    std::lock_guard<std::mutex> lk(mtx);
    std::cout << "lock_guard: thread " << id << " inside\n";
}

void example_unique_lock(int id) {
    std::unique_lock<std::mutex> lk(mtx);
    std::cout << "unique_lock: thread " << id << " inside\n";
}

void example_defer_lock(int id) {
    std::unique_lock<std::mutex> lk(mtx, std::defer_lock);
    std::this_thread::sleep_for(std::chrono::milliseconds(10));
    lk.lock();
    std::cout << "defer_lock + lock: thread " << id << " inside\n";
}

void example_try_lock(int id) {
    if (mtx.try_lock()) {
        std::cout << "try_lock: thread " << id << " got lock\n";
        mtx.unlock();
    } else {
        std::cout << "try_lock: thread " << id << " failed to get lock\n";
    }
}

void example_scoped_lock(int id) {
    std::scoped_lock lk(mtx);
    std::cout << "scoped_lock: thread " << id << " inside\n";
}

void example_timed_mutex(int id) {
    using namespace std::chrono_literals;
    if (tmtx.try_lock_for(50ms)) {
        std::cout << "timed_mutex: thread " << id << " got lock\n";
        tmtx.unlock();
    } else {
        std::cout << "timed_mutex: thread " << id << " timeout\n";
    }
}

int main() {
    std::cout << "Mutex tutorial start" << std::endl;

    std::thread a(example_lock_guard, 1);
    std::thread b(example_unique_lock, 2);
    std::thread c(example_defer_lock, 3);

    a.join(); b.join(); c.join();

    // try_lock demo
    std::thread t1(example_try_lock, 1);
    {
      t1.join();
      std::lock_guard<std::mutex> lk(mtx);
      std::this_thread::sleep_for(std::chrono::milliseconds(20));
    }

    // scoped_lock demo (C++17)
    std::thread s1(example_scoped_lock, 1);
    s1.join();

    // timed_mutex demo
    std::thread tm1(example_timed_mutex, 1);
    {
        std::lock_guard<std::timed_mutex> lk(tmtx);
        std::this_thread::sleep_for(std::chrono::milliseconds(60));
    }
    tm1.join();

    std::cout << "Mutex tutorial finished" << std::endl;
    return 0;
}
race
cpp
#include <iostream>
#include <thread>
#include <mutex>
#include <atomic>
std::mutex mtx;
int counter = 0;
std::atomic<int> at_counter {0};

void increment() {
    for (int i = 0; i < 100000; ++i) {
        ++counter;
        ++at_counter;
    }
}

int main() {
    std::thread t1(increment);
    std::thread t2(increment);
    t1.join();
    t2.join();
    std::cout << "Counter: " << counter << std::endl;
    std::cout << "Atomic Counter: " << at_counter.load() << std::endl;
    return 0;
}
线程池
cpp
#include <condition_variable>
#include <functional>
#include <iostream>
#include <mutex>
#include <queue>
#include <thread>
#include <vector>

// 一个"最基础、最容易读"的线程池:
// - 只支持 void() 任务(没有 future / 返回值)
// - 一个任务队列 + 一个条件变量
// - 析构时 stop=true + notify_all + join
class BasicThreadPool {
public:
  explicit BasicThreadPool(std::size_t n) {
    workers.reserve(n);
    for (std::size_t i = 0; i < n; ++i) {
      workers.emplace_back([this, i] {
        while (true) {
          std::function<void()> task;

          // 1) 取任务:持锁访问队列
          {
            std::unique_lock<std::mutex> lock(mtx);

            // 没任务就睡:wait 会"释放 mtx 并阻塞",有人 notify 才醒
            cv.wait(lock, [this] { return stop || !tasks.empty(); });

            // stop=true 且队列空:退出线程
            if (stop && tasks.empty()) {
              return;
            }

            // 从队列取一个任务
            task = std::move(tasks.front());
            tasks.pop();
          }

          // 2) 执行任务:不要持锁执行(否则 enqueue 会被卡住)
          task();
        }
      });
    }
  }

  ~BasicThreadPool() {
    {
      std::lock_guard<std::mutex> lock(mtx);
      stop = true;
    }
    cv.notify_all();
    for (auto &t : workers) {
      t.join();
    }
  }

  // 提交一个任务(无返回值)
  void enqueue(std::function<void()> f) {
    {
      std::lock_guard<std::mutex> lock(mtx);
      tasks.push(std::move(f));
    }
    cv.notify_one();
  }

private:
  std::vector<std::thread> workers;
  std::queue<std::function<void()>> tasks;

  std::mutex mtx;
  std::condition_variable cv;
  bool stop = false;
};

int main() {
  BasicThreadPool pool(4);

  // 提交 8 个打印任务。
  // 注意:cout 多线程打印可能交错,这是正常现象(这里为了简单不加输出锁)。
  for (int i = 0; i < 8; ++i) {
    pool.enqueue([i] {
      std::cout << "[task " << i << "] run on thread "
                << std::this_thread::get_id() << "\n";
    });
  }

  // main 直接结束也没关系:pool 析构会等待所有 worker 退出。
  // 但析构只保证线程退出,不保证队列里任务都执行完吗?
  // 在这个实现里:stop=true 后 worker 会"先把队列清空再退出",因此任务会跑完。
  std::cout << "submitted tasks, leaving main...\n";
  return 0;
}
改进线程池
cpp
#include <condition_variable>
#include <functional>
#include <future>
#include <iostream>
#include <mutex>
#include <queue>
#include <thread>
#include <tuple>
#include <type_traits>
#include <utility>
#include <vector>

namespace {
std::mutex g_cout_mutex;

template <class... Args>
void print_line(Args &&...args) {
  std::lock_guard<std::mutex> lock(g_cout_mutex);
  (std::cout << ... << std::forward<Args>(args)) << std::endl;
}
}  // namespace

class ThreadPool {
public:
    ThreadPool(size_t n) : stop(false) {
        for (size_t i = 0; i < n; ++i) {
            workers.emplace_back([this] {
                while (true) {
                    std::function<void()> task;
                    {
                        std::unique_lock<std::mutex> lock(this->queue_mutex);
                        this->condition.wait(lock, [this] {
                          return this->stop || !this->tasks.empty();
                        });  // 如果队列空并且 stop
                             // 也没触发,就释放锁、睡眠等待;直到"来任务"或"需要停机"才醒来,并且醒来会重新拿锁确认条件成立。
                        if (this->stop && this->tasks.empty()) return;
                        task = std::move(this->tasks.front());  // 移交所有权
                        this->tasks.pop();  // 拿出来之后删除
                    }
                    task();  // 运行这个对象

                    // 任务完成计数:用于 wait_for_all()。
                    {
                      std::lock_guard<std::mutex> lock(this->wait_mutex);
                      --this->unfinished;
                    }
                    this->wait_cv.notify_all();
                }
            });
        }
    }
    ~ThreadPool() {
        {
            std::unique_lock<std::mutex> lock(queue_mutex);
            stop = true;
        }
        condition.notify_all();
        for (std::thread &worker : workers) worker.join();
    }

    // 等待所有已提交的任务执行完成(不要求 stop 发生)。
    void wait_for_all() {
      std::unique_lock<std::mutex> lock(wait_mutex);
      wait_cv.wait(lock, [this] { return unfinished == 0; });
    }

    // 兼容原始用法:提交 void() 任务。
    void enqueue(std::function<void()> f) {
      {
        std::lock_guard<std::mutex> lock(wait_mutex);
        ++unfinished;
      }

        {
            std::unique_lock<std::mutex> lock(queue_mutex);
            if (stop) {
              // 线程池正在析构/停止,拒绝继续入队(避免悬空访问)。
              {
                std::lock_guard<std::mutex> lk(wait_mutex);
                --unfinished;
              }
              wait_cv.notify_all();
              throw std::runtime_error("enqueue on stopped ThreadPool");
            }
            tasks.push(std::move(f));
        }
        condition.notify_one();
    }

    // 升级点 1:支持返回值的 enqueue,返回 future。
    template <class F, class... Args>
    auto enqueue(F &&f, Args &&...args)
        -> std::future<std::invoke_result_t<F, Args...>> {
      using R = std::invoke_result_t<F, Args...>;

      // 用 lambda + tuple 捕获参数,避免 std::bind 在模板推导里带来递归/爆炸。
      auto bound =
          [func = std::forward<F>(f),
           tup = std::make_tuple(std::forward<Args>(args)...)]() mutable -> R {
        return std::apply(std::move(func), std::move(tup));
      };

      auto task_ptr =
          std::make_shared<std::packaged_task<R()>>(std::move(bound));
      std::future<R> fut = task_ptr->get_future();

      // 直接入队(不要再调用 enqueue(...),否则当 R=void 时会递归选中模板版)。
      {
        std::lock_guard<std::mutex> lock(wait_mutex);
        ++unfinished;
      }

      {
        std::unique_lock<std::mutex> lock(queue_mutex);
        if (stop) {
          {
            std::lock_guard<std::mutex> lk(wait_mutex);
            --unfinished;
          }
          wait_cv.notify_all();
          throw std::runtime_error("enqueue on stopped ThreadPool");
        }
        tasks.push([task_ptr] { (*task_ptr)(); });
      }
      condition.notify_one();

      return fut;
    }

private:
    std::vector<std::thread> workers;
    std::queue<std::function<void()>> tasks;
    std::mutex queue_mutex;
    std::condition_variable condition;
    bool stop;

    // 升级点 2:用于等待"所有任务完成"。
    std::mutex wait_mutex;
    std::condition_variable wait_cv;
    std::size_t unfinished = 0;
};

int main() {
    ThreadPool pool(4);

    // 既可以提交 void() 任务,也可以提交带返回值任务并拿到 future。
    std::vector<std::future<int>> results;
    for (int i = 0; i < 8; ++i) {
      // 打印任务:保持原来的演示效果
      pool.enqueue([i] {
        print_line("Task ", i, " is running in thread ",
                   std::this_thread::get_id());
      });

      // 计算任务:演示返回值 future
      results.push_back(pool.enqueue([i] { return i * i; }));
    }

    pool.wait_for_all();

    int sum = 0;
    for (auto &f : results) sum += f.get();
    print_line("Sum of squares = ", sum);
    print_line("Thread pool demo finished.");
    return 0;
}
关于 mutex_tutuorial.cpp
为什么会"抢锁失败"?
- std::thread t1(...) 一创建就开始跑
t1 线程的 example_try_lock() 可能马上就执行到 mtx.try_lock()。
而主线程在下一行 lock_guard,并不代表它已经先执行到了那一行。操作系统可能会这样调度:
主线程创建 t1
OS 立刻把 CPU 切给 t1
t1 执行 mtx.try_lock()
这时主线程可能还没来得及进入 { lock_guard... } 这个代码块
此时就有两种情况:
**情况 A(t1 先跑):**t1 抢到锁(try_lock 成功),输出 "got lock",然后 unlock
**情况 B(主线程先跑):**主线程先进入 lock_guard,把 mtx 锁住,并 sleep 20ms
t1 在这 20ms 内执行 try_lock -> 失败(因为锁已经被主线程持有)
关于 deadlock.cpp
第一段:bad_task1/bad_task2(潜在死锁)
std::thread t1(bad_task1);std::thread t2(bad_task2);t1.join();t2.join();
运行时可能出现的行为
有时程序直接卡住不动(最典型)
bad_task1 先锁 m1,再去锁 m2
bad_task2 先锁 m2,再去锁 m1
如果发生下面的调度顺序:
t1 拿到 m1
t2 拿到 m2
t1 等 m2(等 t2 释放)
t2 等 m1(等 t1 释放)
这就形成"环路等待",两边都等不到,主线程在 t1.join() / t2.join() 永远等不到返回,于是卡死。
有时能正常打印并结束
如果调度刚好让某个线程连续拿到两把锁(比如 t1 很快拿到 m1 后又拿到 m2),那就不会死锁。
所以它叫 "may hang depending on timing"。
结论:第一段不确定,会"有时成功、有时卡死"。
第二段:good_task1/good_task2(安全加锁)
std::thread t3(good_task1);std::thread t4(good_task2);t3.join();t4.join();
运行时的行为
good_task1/good_task2 使用了 std::lock(m1, m2):它会用一种避免死锁的策略一次性把两把锁都锁住(内部会处理顺序和重试)。
然后用 std::lock_guardstd::mutex lk(m1, std::adopt_lock) 接管这两把已经锁好的互斥量,保证函数结束后自动释放。
因此:
不会出现互相等待,只会出现"其中一个线程先拿到两把锁执行,另一个线程等它释放后再继续"。
所以 join() 一定会返回,程序一定能走到 "Deadlock demo finished"。
如何记忆线程是否安全
最短的判断公式
同一份数据,如果可能被多个线程同时访问,并且至少有一个线程会写 → 不加同步就是不线程安全(data race / UB)。
反过来:
只有读(并且期间没人写)→ 通常安全
每个线程只用自己的私有数据(局部变量、线程私有对象)→ 安全
共享数据 + 锁/原子/消息队列/条件变量保护 → 安全(前提是用对)
代码里怎么快速判断:3 步法
Step 1:找"共享"的东西
这些东西通常是共享的:
全局变量/静态变量
堆上对象(多个线程都拿着指针/引用)
类成员变量(比如线程池里的 tasks, stop)
std::cout 这种全局资源
只要是共享的,就要警惕。
Step 2:看有没有"写"
写包括:
赋值:stop = true
容器修改:push/pop/front(front 也可能读到内部结构)
自增:x++
修改对象内部状态:调用非 const 方法(大概率会写)
只要共享 + 写,就默认不安全。
Step 3:找同步点(有没有"保护它")
常见保护方式:
std::mutex(lock_guard/unique_lock)
std::atomic
把共享数据放在线程安全队列里(消息传递)
更高级的读写锁、信号量等
✅ 通常是线程安全的(在正确使用前提下)
- 线程自己的局部变量
比如 worker 函数里的 std::function<void()> task;(每个线程一份) - 不可变数据(const 且不被修改)
-std::atomic 的原子读写(比如 atomic 的 fetch_add) - 每次访问都在同一把 mutex 保护下的共享数据
❌ 通常不是线程安全的(默认都当不安全) - 大部分 STL 容器:std::vector/std::queue/std::map/...
- 多线程同时 push/pop 一定不安全
- 多线程读 + 有线程写,也不安全
- std::cout / std::cin(输出会交错,甚至内部状态互相影响)
- 任意"共享对象"调用非 const 方法(除非文档明确说线程安全)
看到一行代码就问自己:
这行访问的数据是共享的吗?(谁还能访问它?)
这行是读还是写?(push/pop/++ 都算写)
这行是否在同一把锁或原子保护下?
如果没有保护,会不会两个线程同时跑到这里?
只要 1 + 2 的答案是 "是",3 是 "否",那就基本确定:不线程安全。