引言:从识别到生成的技术革命
在人工智能的发展历程中,2015年是一个重要的转折点。当大多数研究者还在专注于如何让神经网络更好地识别 图像时,Google Research团队却反其道而行之,提出了一项突破性的技术------DeepDream。这项技术不仅让我们能够"窥视"神经网络的内部世界,更开创了AI生成艺术的先河。
DeepDream的核心思想简单而深刻:如果我们不再让网络告诉我们图像中有什么,而是让网络告诉我们它"认为"图像中应该有什么,会发生什么? 这个看似简单的问题,却引领了一场神经网络可视化和AI艺术创作的革命。
python
传统图像识别 (2012-2014)
    │
    └── 特征可视化探索 (2014)
         │
         └── DeepDream (2015) - 首次实现神经网络"梦境"
              │
              ├── 艺术创作应用 (2015-2016)
              │
              └── 风格迁移 (2016) - Gatys等人在DeepDream启发下的发展
                   │
                   └── 现代AIGC技术 (2017至今)
一、核心原理:让神经网络"做梦"的魔法
1.1 从识别到生成的思维转变
传统的神经网络工作流程是单向的:
python
输入图像 → 神经网络 → 分类结果DeepDream将这个流程彻底反转:
python
随机噪声/现有图像 → 梯度上升优化 → 增强网络激活 → 梦幻图像1.2 核心技术
1.2.1 梯度上升
在理解DeepDream的核心技术前,我们需要对比传统神经网络训练与DeepDream的根本区别:
| 特性 | 传统神经网络训练 | DeepDream |
|---|---|---|
| 优化目标 | 最小化损失函数(识别误差) | 最大化特定层激活值(增强特征) |
| 优化方向 | 梯度下降(Gradient Descent) | 梯度上升(Gradient Ascent) |
| 可调参数 | 网络权重参数 | 输入图像像素值 |
| 收敛目标 | 损失函数最小值 | 激活函数最大值(或饱和) |
| 数学表达 | W n e w = W − η ⋅ ∂ L ∂ W W_{new} = W - \eta \cdot \frac{\partial L}{\partial W} Wnew=W−η⋅∂W∂L | I n e w = I + η ⋅ ∂ A ∂ I I_{new} = I + \eta \cdot \frac{\partial A}{\partial I} Inew=I+η⋅∂I∂A |
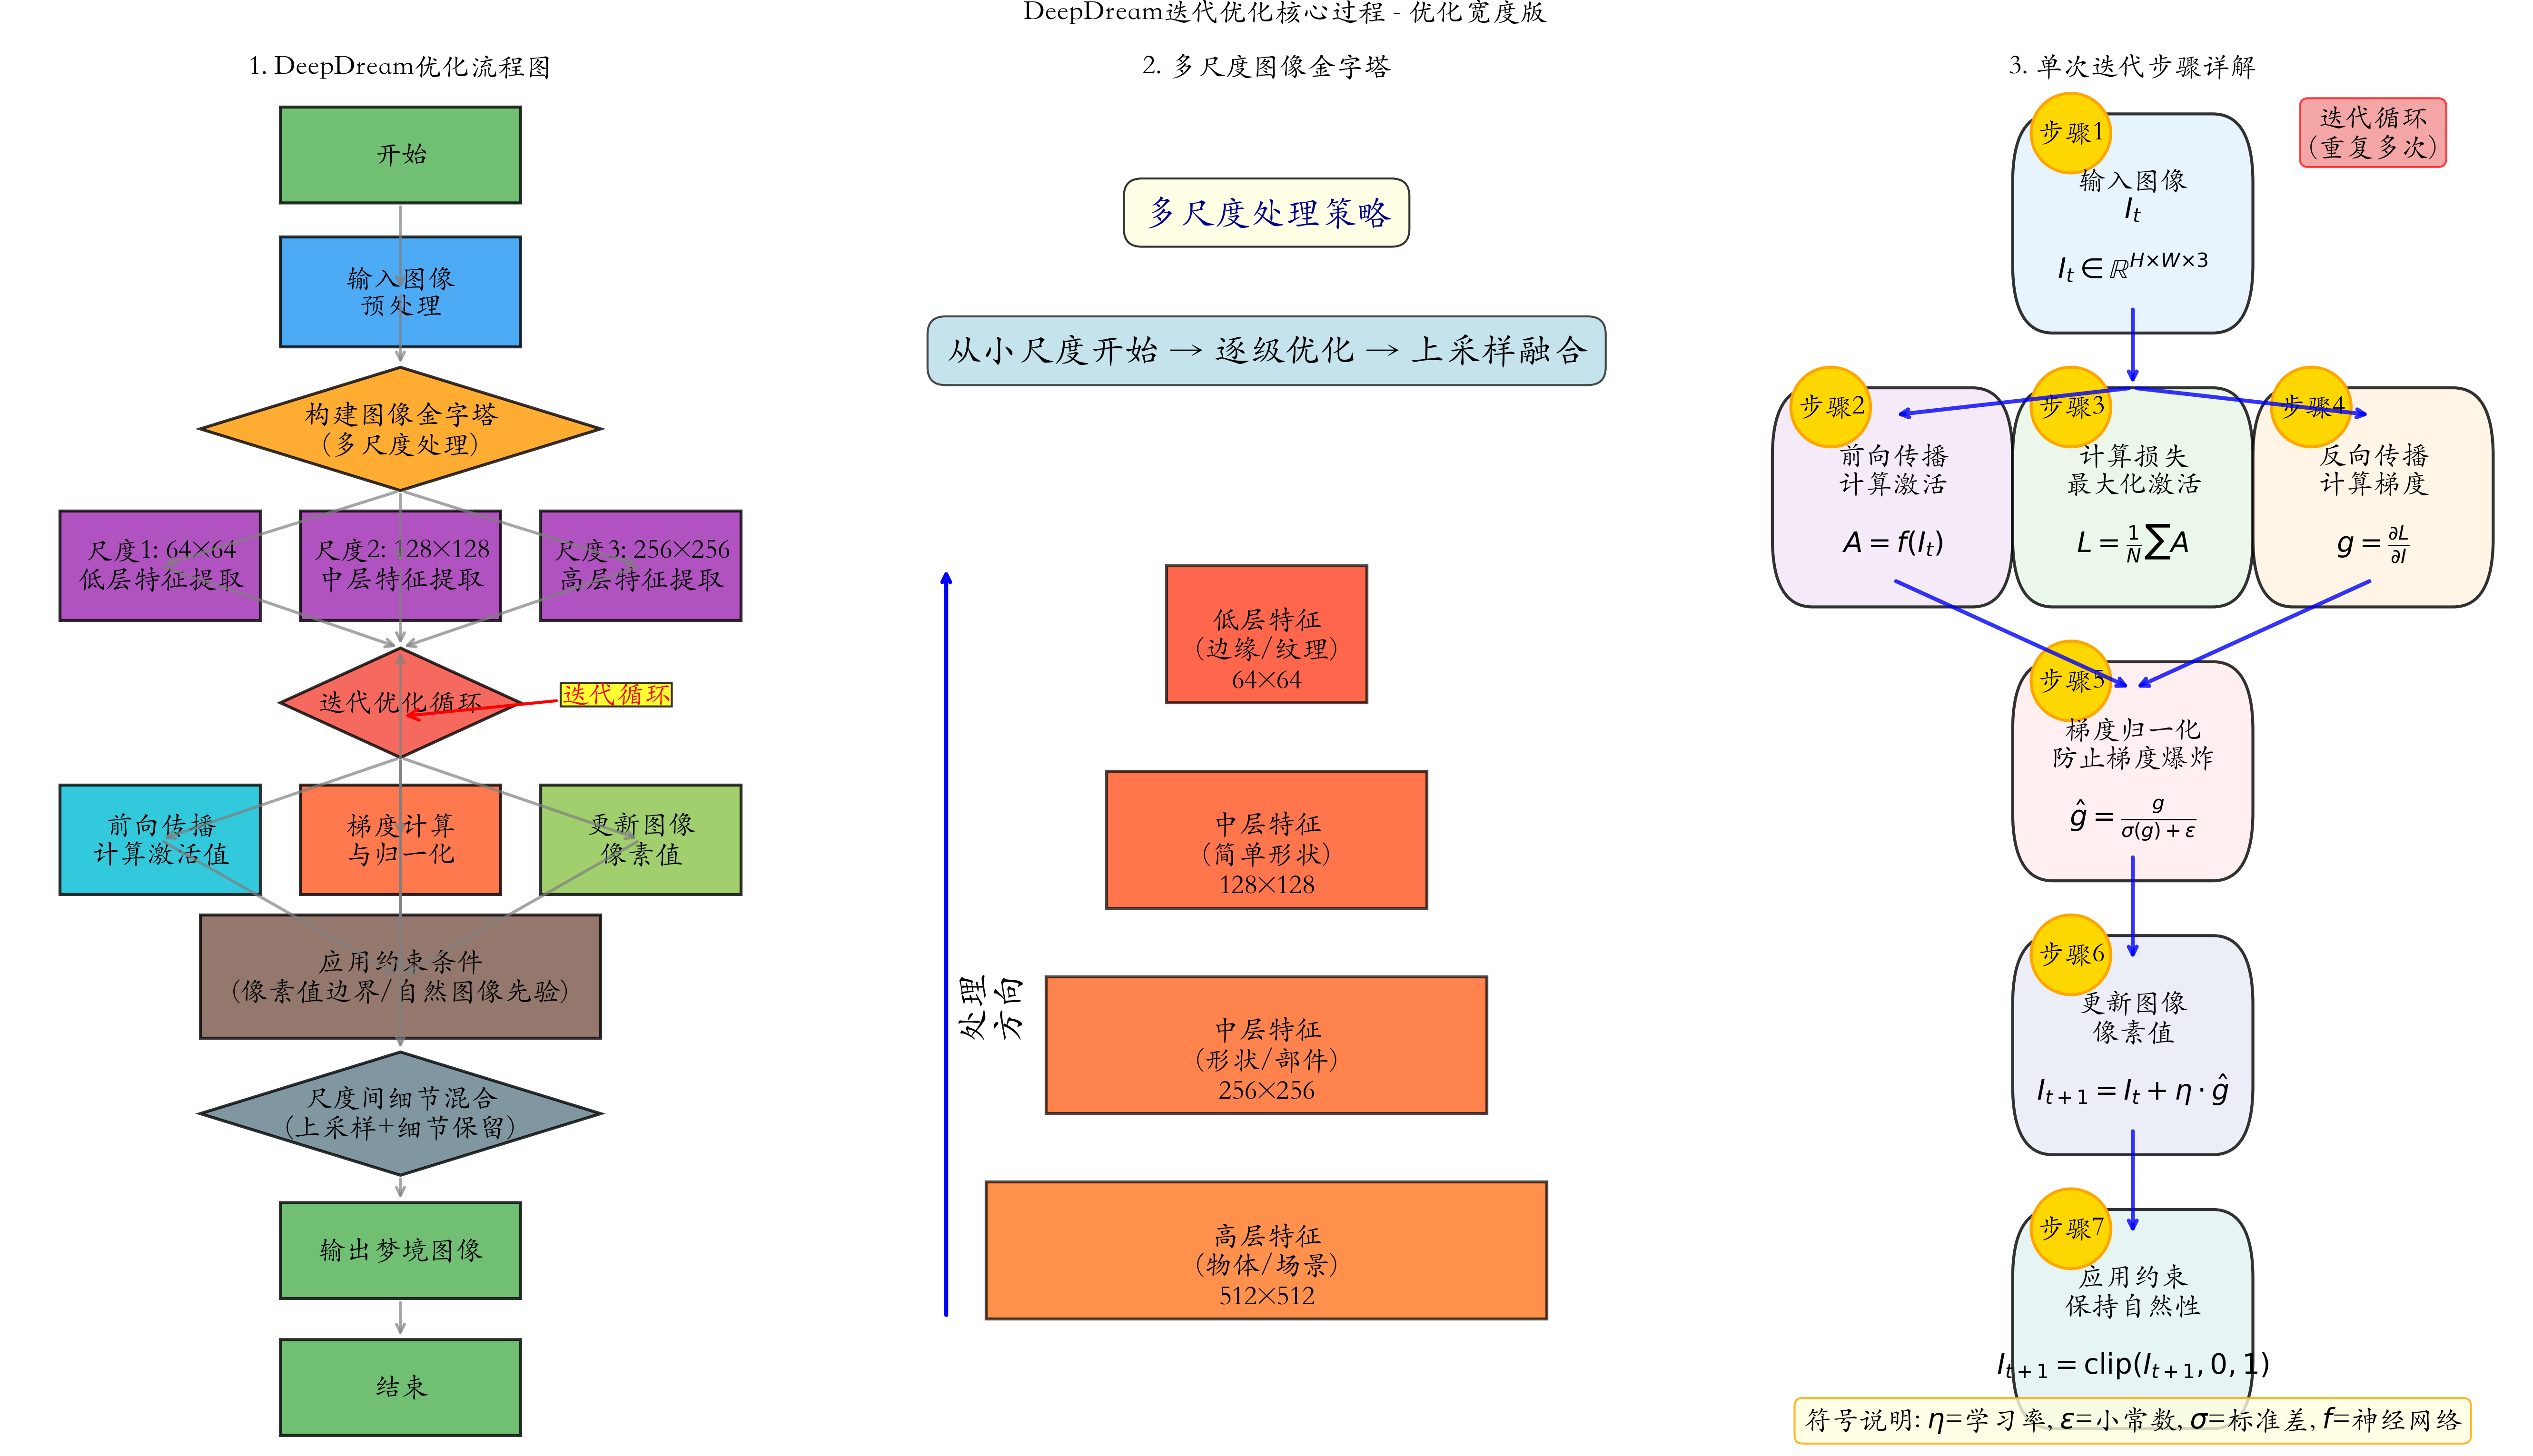
DeepDream的梯度上升过程可以用以下数学公式详细描述:
I ( t + 1 ) = I ( t ) + η ⋅ ∇ I A ℓ ( I ( t ) ) I^{(t+1)} = I^{(t)} + \eta \cdot \nabla_{I} A_{\ell}(I^{(t)}) I(t+1)=I(t)+η⋅∇IAℓ(I(t))
其中:
- I ( t ) I^{(t)} I(t):第 t t t次迭代时的图像
- η \eta η:学习率(通常为0.01-0.1)
- A ℓ ( I ) A_{\ell}(I) Aℓ(I):网络第 ℓ \ell ℓ层在图像 I I I上的激活值
- ∇ I A ℓ ( I ) \nabla_{I} A_{\ell}(I) ∇IAℓ(I):激活值相对于图像像素的梯度
梯度计算的链式法则 :
∂ A ℓ ∂ I i j = ∑ k ∂ A ℓ ∂ h k ⋅ ∂ h k ∂ I i j \frac{\partial A_{\ell}}{\partial I_{ij}} = \sum_{k} \frac{\partial A_{\ell}}{\partial h_k} \cdot \frac{\partial h_k}{\partial I_{ij}} ∂Iij∂Aℓ=k∑∂hk∂Aℓ⋅∂Iij∂hk
这里 h k h_k hk是网络中第 k k k个中间特征。在实际实现中,这个梯度通过反向传播自动计算。
为了避免梯度爆炸和确保平稳优化,DeepDream采用了关键的梯度归一化技术,这种方法确保了无论原始梯度的幅度如何,更新步长都保持稳定。
python
def normalize_gradient(gradient, epsilon=1e-8):
    # 计算梯度的标准差
    grad_std = tf.math.reduce_std(gradient)
    # 归一化:将梯度除以其标准差
    normalized_grad = gradient / (grad_std + epsilon)
    return normalized_grad
# 在实际更新中应用
gradient = tape.gradient(activation, image)
normalized_grad = normalize_gradient(gradient)
image = image + learning_rate * normalized_grad
1.2.2 多尺度特征增强
深度卷积神经网络的魅力在于其层次化特征表示。以Inception网络为例:
python
def inception_feature_hierarchy(image):
    """
    Inception网络的特征层级结构
    """
    features = {
        'layer1': '边缘/纹理 (4×4-8×8分辨率)',
        'layer2': '简单形状 (8×8-16×16分辨率)',
        'layer3': '部件组合 (16×16-32×32分辨率)',
        'layer4': '完整物体 (32×32-64×64分辨率)',
        'layer5': '场景理解 (64×64以上分辨率)'
    }
return featuresDeepDream的强大之处在于可以选择性增强不同层级的特征,在实际应用中,DeepDream通常同时增强多个层级的特征,创建出丰富多变的视觉效果。
| 目标层 | 网络深度 | 增强特征类型 | 视觉效果 | 代码示例 |
|---|---|---|---|---|
| block1_conv1 | 浅层 | 边缘、纹理 | 抽象绘画、漩涡 | layers = ['block1_conv1'] |
| mixed3 | 中层 | 简单形状 | 眼睛、嘴巴雏形 | layers = ['mixed3'] |
| mixed4 | 中深层 | 复杂部件 | 动物面部、翅膀 | layers = ['mixed4'] |
| mixed5 | 深层 | 完整物体 | 狗脸、建筑 | layers = ['mixed5'] |
| 混合多层 | 全范围 | 多层次特征 | 丰富细节梦境 | layers = ['mixed3', 'mixed4', 'mixed5'] |
1.2.3 DeepDream迭代优化过程
二、架构详解:基于Inception网络的梦幻引擎
2.1 Inception网络的基础
Inception网络(GoogLeNet)是Google Research团队在2014年提出的革命性架构,其核心设计理念突破了传统卷积神经网络的单一尺度限制。DeepDream选择Inception网络作为基础并非偶然,而是基于其独特的架构优势。可以参考下面博客。
深度学习:Inception架构
Inception模块的设计优势:
- 多尺度特征提取:同时捕获不同大小的特征模式
- 计算效率优化:通过1x1卷积降维减少计算量
- 信息丰富性:并行路径确保不丢失任何尺度的特征信息
DeepDream主要基于InceptionV3架构,其层次化特征提取过程形成了天然的特征金字塔:
| 网络阶段 | 特征层级 | 感受野大小 | 特征类型 | DeepDream增强效果 |
|---|---|---|---|---|
| Stage 1 (Mixed0) | 低层特征 | 3×3-7×7 | 边缘、纹理 | 抽象笔触、漩涡效果 |
| Stage 2 (Mixed1) | 中低层 | 7×7-15×15 | 简单形状 | 几何图案雏形 |
| Stage 3 (Mixed2) | 中层 | 15×15-31×31 | 部件组合 | 器官特征(眼、嘴) |
| Stage 4 (Mixed3) | 中高层 | 31×31-63×63 | 完整物体 | 动物面部、建筑轮廓 |
| Stage 5 (Mixed4-5) | 高层 | 63×63+ | 场景语义 | 复杂物体组合 |
2.2 DeepDream在Inception架构上的工作流程详解
2.2.1 完整的前向-反向传播流程
python
def deepdream_inception_pipeline(input_image, target_layers, iterations=100):
    # 1. 加载预训练的InceptionV3模型
    base_model = tf.keras.applications.InceptionV3(
        include_top=False,
        weights='imagenet'
    )
    # 2. 提取目标层的输出
    layer_outputs = [base_model.get_layer(name).output
                    for name in target_layers]
    # 3. 创建特征提取模型
    dream_model = tf.keras.Model(inputs=base_model.input,
                                outputs=layer_outputs)
    # 4. 图像预处理
    image = tf.keras.applications.inception_v3.preprocess_input(input_image)
    # 5. 迭代优化循环
    for i in range(iterations):
        with tf.GradientTape() as tape:
            tape.watch(image)
            # 前向传播获取激活
            activations = dream_model(image)

            # 计算损失(最大化激活)
            losses = [tf.reduce_mean(activation) for activation in activations]
            total_loss = tf.reduce_sum(losses)

        # 计算梯度
        gradients = tape.gradient(total_loss, image)

        # 梯度归一化防止爆炸
        gradients /= tf.math.reduce_std(gradients) + 1e-8

        # 梯度上升更新图像
        image += gradients * 0.01
        # 应用约束条件
        image = tf.clip_by_value(image, -1.0, 1.0)
    return image
2.2.2 Inception特定层的梦境特征分析
python
def analyze_inception_dream_characteristics():
"""
分析Inception各层在DeepDream中的特征表现
"""
layer_characteristics = {
'conv2d_0': {
'receptive_field': '3×3',
'dream_effect': '高频噪声、点状纹理',
'abstraction_level': '极低',
'typical_patterns': ['雪花噪声', '细密网格']
},
'mixed0': {
'receptive_field': '5×5-7×7',
'dream_effect': '方向性边缘、基础纹理',
'abstraction_level': '低',
'typical_patterns': ['漩涡', '波浪纹', '斑点']
},
'mixed1': {
'receptive_field': '7×7-15×15',
'dream_effect': '几何形状、重复图案',
'abstraction_level': '中低',
'typical_patterns': ['蜂窝', '条纹', '简单几何形']
},
'mixed2': {
'receptive_field': '15×15-31×31',
'dream_effect': '物体部件、器官特征',
'abstraction_level': '中',
'typical_patterns': ['眼睛', '嘴巴', '翅膀轮廓']
},
'mixed3': {
'receptive_field': '31×31-63×63',
'dream_effect': '完整物体、面部特征',
'abstraction_level': '中高',
'typical_patterns': ['狗脸', '鸟身', '建筑轮廓']
},
'mixed4': {
'receptive_field': '63×63+',
'dream_effect': '复杂场景、物体组合',
'abstraction_level': '高',
'typical_patterns': ['完整动物', '建筑群', '场景组合']
}
}
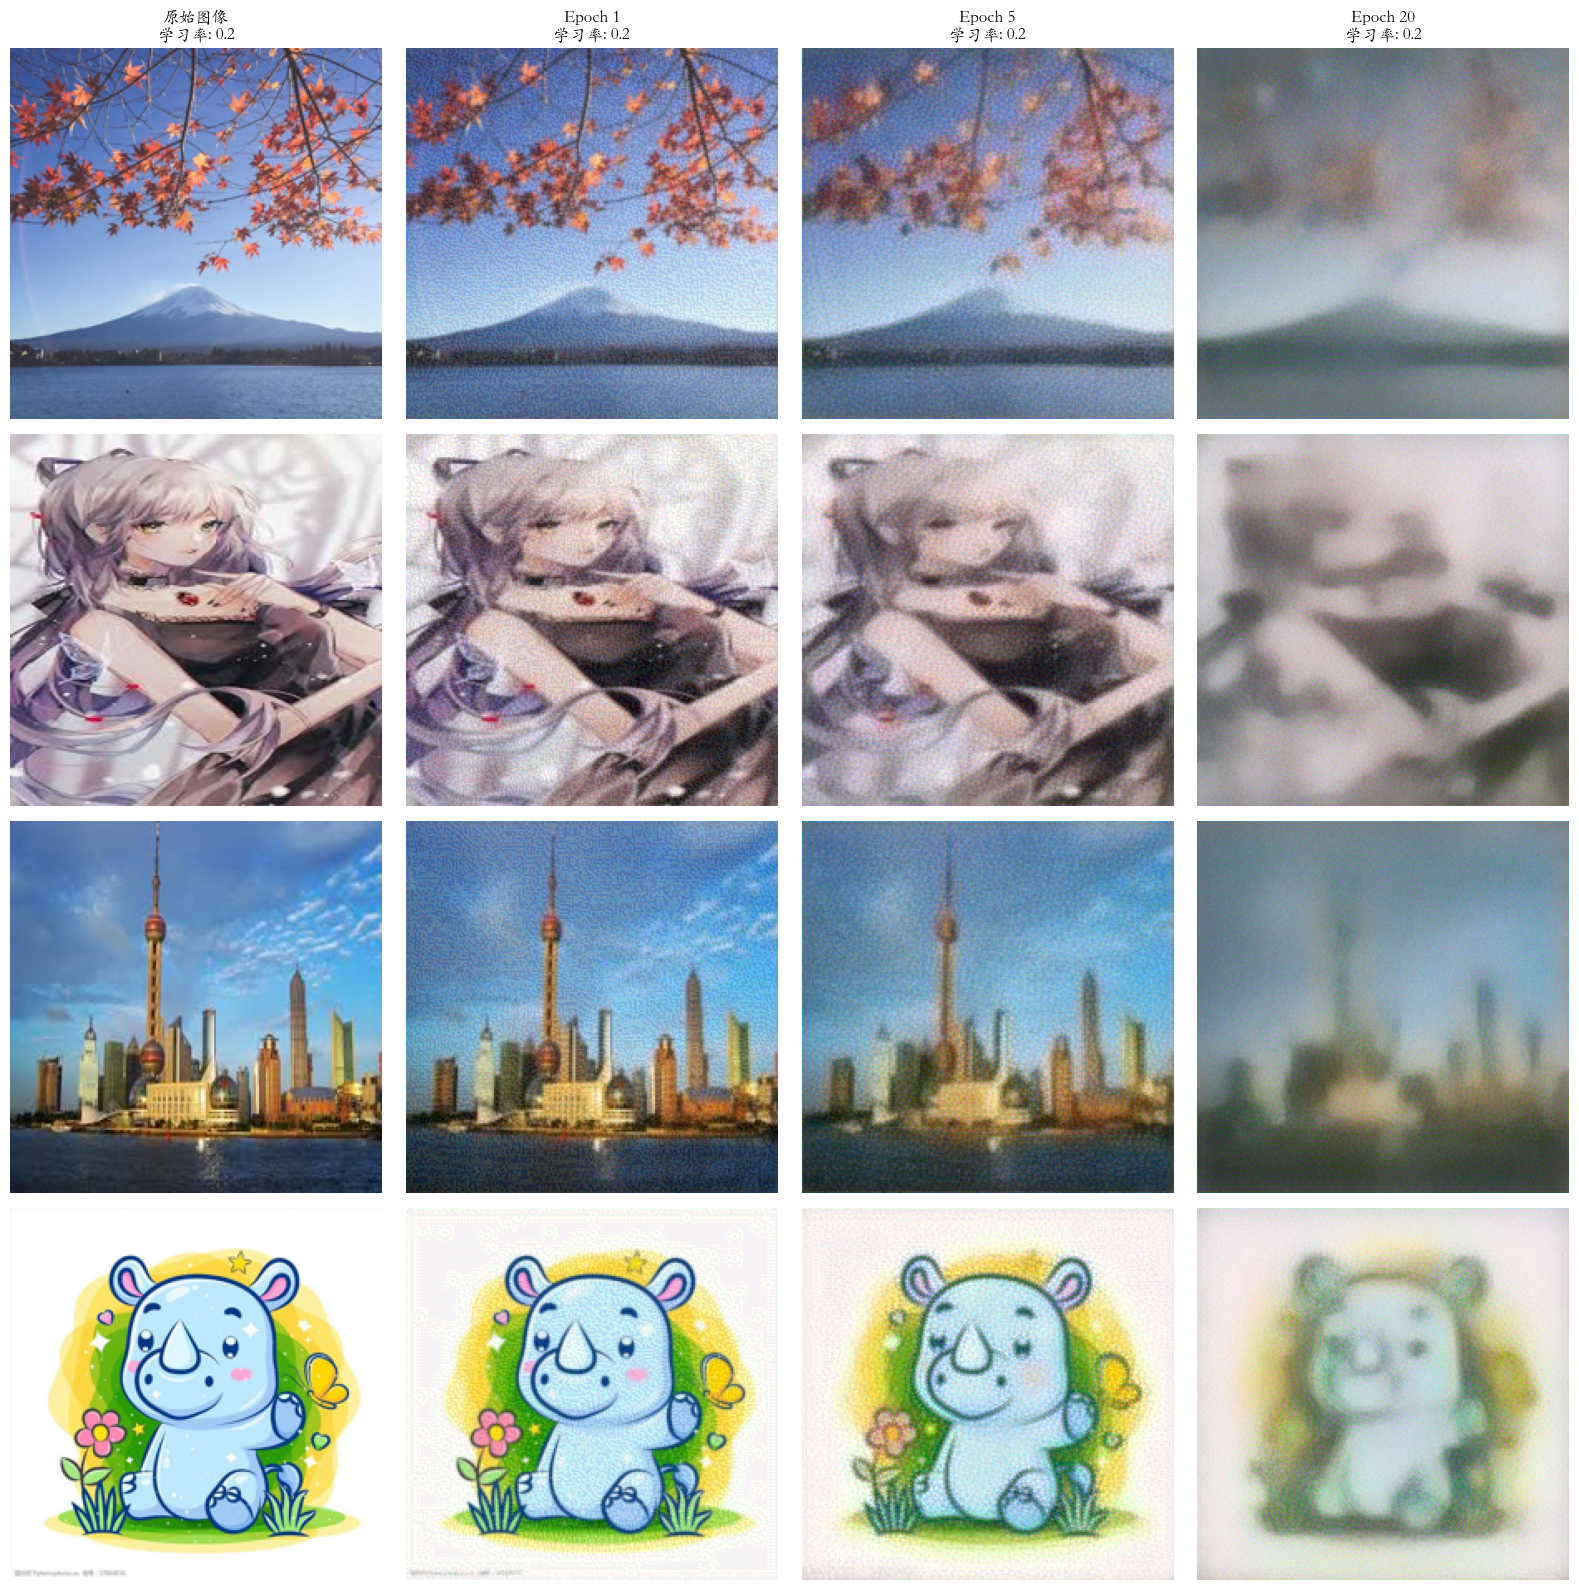
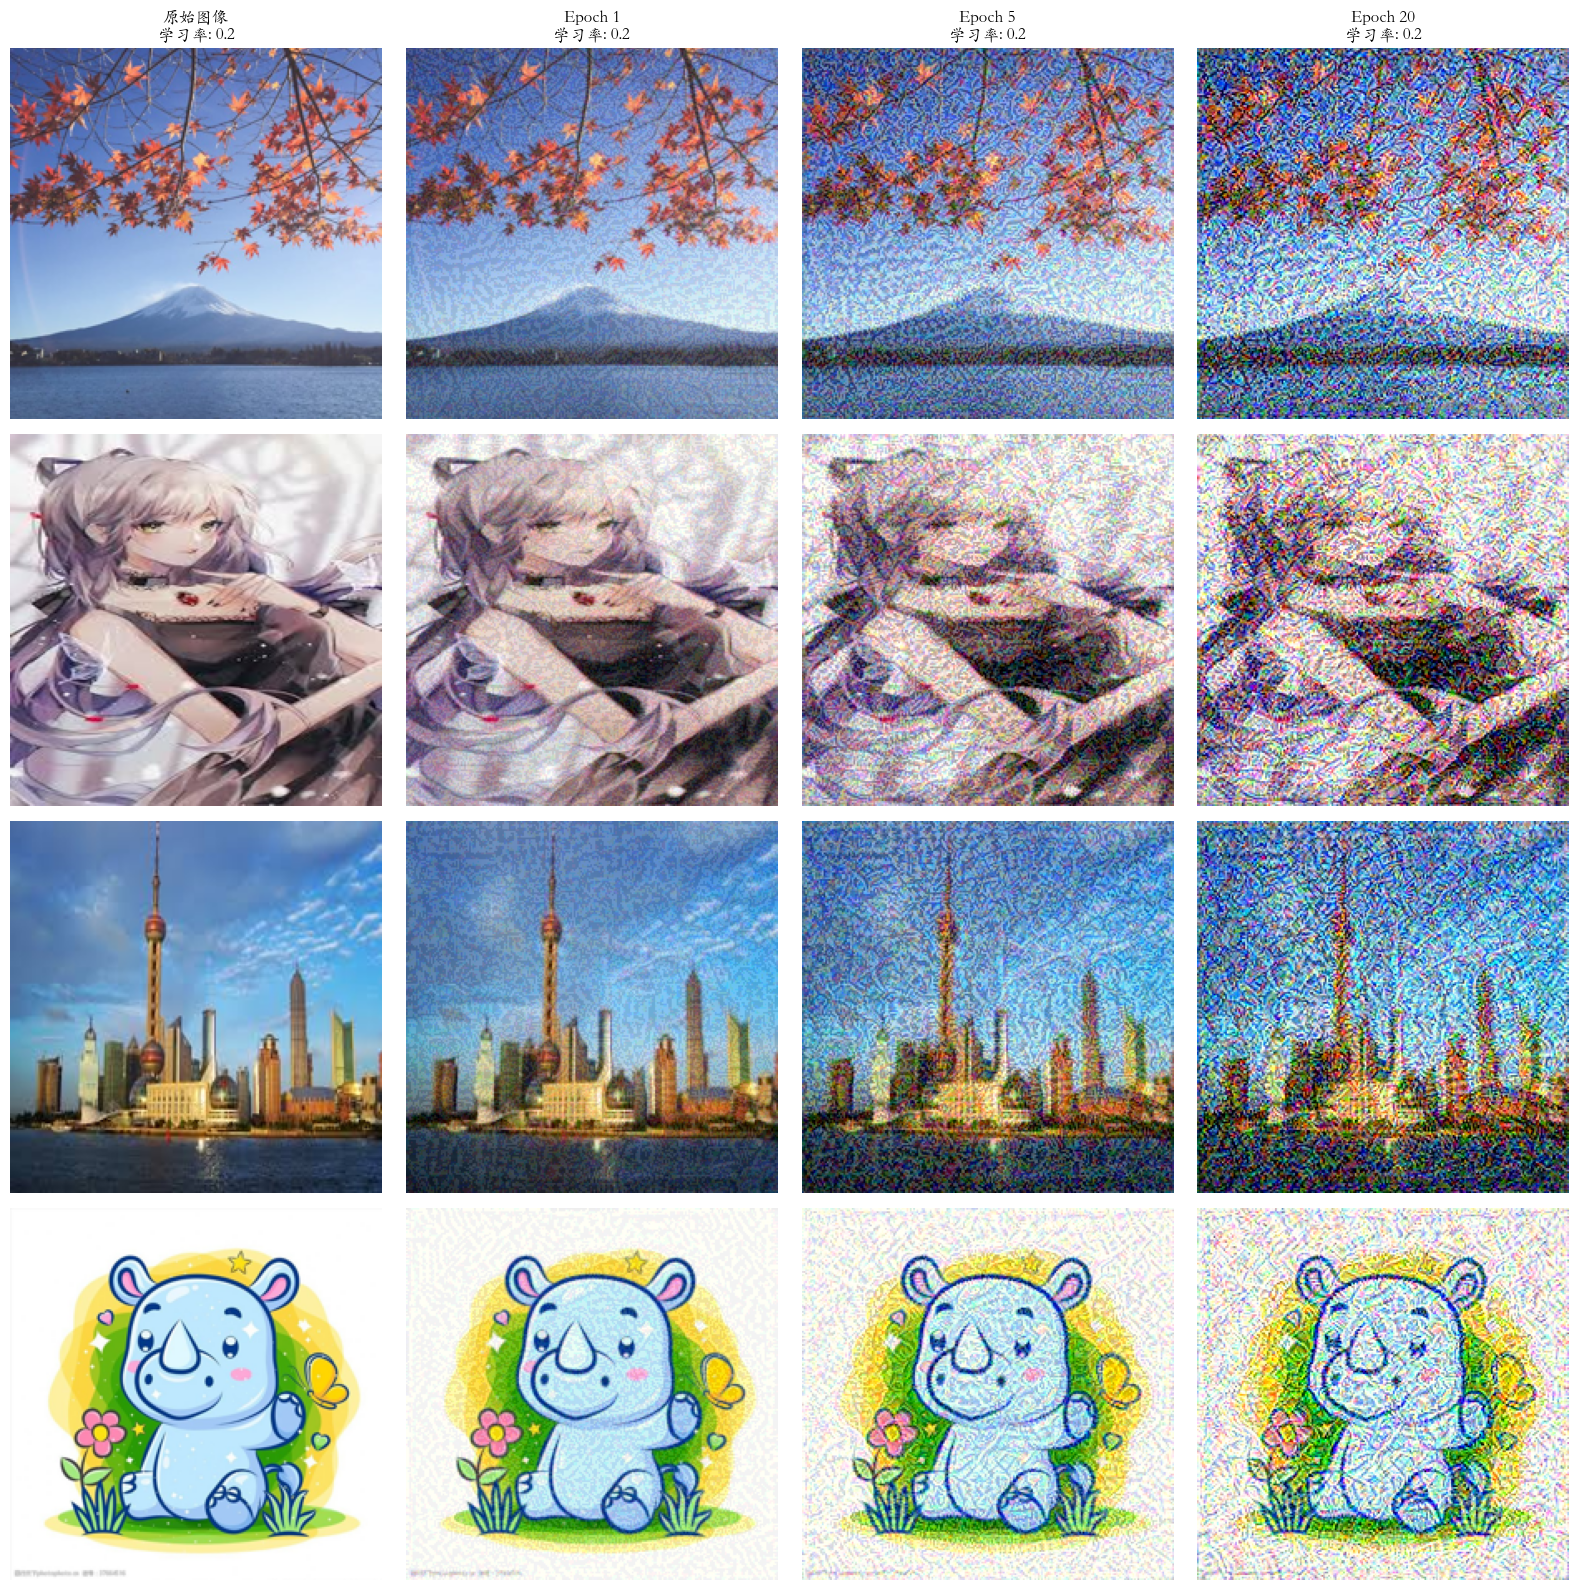
return layer_characteristics三、生成示例
这段代码实现了一个 DeepDream 类,使用预训练的 VGG19 模型生成梦幻效果的图像。通过加载和预处理输入图像,计算损失并执行梯度上升步骤,用户可以在指定的 epoch(如 1、5、20)生成不同风格的图像。
layer_indices = [1, 6]:选择 VGG19 模型中的前几层(通常是低层特征提取层),这些层主要捕捉图像的基本特征,如边缘和纹理。使用这些层生成的 DeepDream 图像通常会强调图像的细节和结构,产生较为细腻的效果。
layer_indices = [26, 29]:选择 VGG19 模型中的后几层(通常是高层特征提取层),这些层主要捕捉更抽象的特征,如物体和场景。使用这些层生成的 DeepDream 图像通常会产生更具艺术感和梦幻效果的图像,可能会出现更复杂的形状和颜色。
python
import os

import numpy as np
import torch
import torchvision.transforms as transforms
from PIL import Image
from torchvision import models
from torchvision.models import VGG19_Weights

torch.manual_seed(42)
np.random.seed(42)
import matplotlib.pyplot as plt
import matplotlib

matplotlib.rcParams['axes.unicode_minus'] = False
matplotlib.rcParams['font.family'] = 'Kaiti SC'


class DeepDream:
    def __init__(self, device=None):
        self.device = device if device else torch.device("mps" if torch.backends.mps.is_available() else "cpu")
        self.model = models.vgg19(weights=VGG19_Weights.DEFAULT).features.to(self.device)

        for param in self.model.parameters():
            param.requires_grad = False

        self.model.eval()

        self.config = {
            'learning_rate': 0.05,
            'target_epochs': [1, 5, 20],
            'clip_value': 2.5
        }

    def compute_loss(self, input_image, layer_indices=None):
        if layer_indices is None:
            layer_indices = [1, 6]
            # layer_indices = [26, 29]
        x = input_image
        total_loss = 0

        for i, layer in enumerate(self.model):
            x = layer(x)
            if i in layer_indices:
                layer_loss = torch.mean(x ** 2)
                total_loss += 0.5 * layer_loss

        return total_loss

    def gradient_ascent_step(self, image, optimizer):
        if not image.requires_grad:
            image.requires_grad_(True)

        if image.grad is not None:
            image.grad.zero_()

        loss = self.compute_loss(image)
        loss.backward()

        with torch.no_grad():
            if image.grad is not None:
                grad = image.grad.data
                grad_norm = torch.norm(grad)
                if grad_norm > 0:
                    grad = grad / grad_norm
                image.grad.data = grad

        optimizer.step()

        with torch.no_grad():
            image.data = torch.clamp(image.data, -self.config['clip_value'], self.config['clip_value'])

        return image, loss.item()

    def load_and_preprocess_image(self, img_path, size=224):
        img = Image.open(img_path).convert('RGB')
        preprocess = transforms.Compose([
            transforms.Resize((size, size)),
            transforms.ToTensor(),
            transforms.Normalize(mean=[0.485, 0.456, 0.406], std=[0.229, 0.224, 0.225]),
        ])
        img_tensor = preprocess(img).unsqueeze(0).to(self.device)
        return img_tensor, img

    def deprocess_image(self, tensor):
        mean = torch.tensor([0.485, 0.456, 0.406]).view(1, 3, 1, 1).to(tensor.device)
        std = torch.tensor([0.229, 0.224, 0.225]).view(1, 3, 1, 1).to(tensor.device)
        tensor = tensor * std + mean
        image = tensor.squeeze(0).permute(1, 2, 0).cpu().detach().numpy()
        return np.clip(image, 0, 1)

    def process_image(self, img_path, lr=None):
        if lr is None:
            lr = self.config['learning_rate']

        img_tensor, original_img = self.load_and_preprocess_image(img_path)
        dream_img = img_tensor.clone().detach().requires_grad_(True)
        optimizer = torch.optim.Adam([dream_img], lr=lr)

        target_epochs = self.config['target_epochs']
        max_epochs = max(target_epochs)

        results = {}
        loss_history = []

        for epoch in range(1, max_epochs + 1):
            dream_img, loss = self.gradient_ascent_step(dream_img, optimizer)
            loss_history.append(loss)

            if epoch in target_epochs:
                result_img = self.deprocess_image(dream_img)
                results[epoch] = {'image': result_img, 'loss': loss}
            elif epoch % 10 == 0 or epoch == 1:
                print(f'image_path{img_path},epoch{epoch}')
                print(f"Epoch {epoch:3d}/{max_epochs}: Loss = {loss:.6f}")

        return original_img, results, loss_history


def visualize_results(img_paths, lr=0.2):
    dreamer = DeepDream()
    n_images = len(img_paths)
    n_columns = 4

    fig, axes = plt.subplots(n_images, n_columns, figsize=(16, 4 * n_images))

    if n_images == 1:
        axes = axes.reshape(1, -1)

    # 只在顶部添加标题
    target_epochs = dreamer.config['target_epochs']
    titles = ['原始图像'] + [f'Epoch {epoch}' for epoch in target_epochs]

    for j in range(n_columns):
        axes[0, j].set_title(f'{titles[j]}\n学习率: {lr}', fontsize=12, fontweight='bold')

    for i, img_path in enumerate(img_paths):
        original_img, results, _ = dreamer.process_image(img_path, lr)
        original_img = original_img.resize((224, 224))

        axes[i, 0].imshow(original_img)
        axes[i, 0].axis('off')

        for j, epoch in enumerate(target_epochs, 1):
            if epoch in results:
                result_data = results[epoch]
                axes[i, j].imshow(result_data['image'])
                axes[i, j].axis('off')

    plt.tight_layout()

    # 保存图片
    plt.savefig('deepdream_results.png', dpi=100, bbox_inches='tight')
    plt.show()


if __name__ == "__main__":
    img_paths = ['1.jpeg', '2.jpeg', '3.jpeg', '4.jpeg']
    valid_paths = [p for p in img_paths if os.path.exists(p)]

    if valid_paths:
        visualize_results(valid_paths)
    else:
        print("未找到有效图像文件")