import cv2
import numpy as np
from tkinter import Tk
from tkinter.filedialog import askopenfilename
import matplotlib.pyplot as plt
# 隐藏Tk窗口
Tk().withdraw()
print("请选择一张刀路图(S形,从下往上走)...")
file_path = askopenfilename(
title="选择刀路图像",
filetypes=[("Image files", "*.jpg *.jpeg *.png *.bmp")]
)
if not file_path:
print("未选择图片,程序退出。")
exit()
src = cv2.imread(file_path)
if src is None:
print("无法读取图片。")
exit()
height, width = src.shape[:2]
# ===================================================================
# === 方法1:宽松 BGR 范围(推荐先用这个)===
# 青色(Cyan):允许偏蓝、偏绿、轻微泛白或泛红
lower_cyan = np.array([150, 150, 0]) # B≥150, G≥150, R≤80
upper_cyan = np.array([255, 255, 80])
# 黄色(Yellow):允许偏橙、偏暗、轻微泛白
lower_yellow = np.array([0, 140, 140]) # B≤80, G≥140, R≥140
upper_yellow = np.array([80, 255, 255])
binary_lit = cv2.inRange(src, lower_cyan, upper_cyan)
binary_unlit = cv2.inRange(src, lower_yellow, upper_yellow)
# ===================================================================
# === 方法2:HSV 更鲁棒(如BGR效果仍不佳,取消注释以下块,注释上面)===
# hsv = cv2.cvtColor(src, cv2.COLOR_BGR2HSV)
#
# # 青色:H=80~120(覆盖蓝绿到青)
# binary_lit = cv2.inRange(hsv, np.array([80, 50, 80]), np.array([120, 255, 255]))
#
# # 黄色:H=15~45(覆盖橙黄到黄)
# binary_unlit = cv2.inRange(hsv, np.array([15, 50, 80]), np.array([45, 255, 255]))
# ===================================================================
# 可选:轻微膨胀连接断点(提升短线检测)
kernel = np.ones((2, 2), np.uint8)
binary_lit = cv2.morphologyEx(binary_lit, cv2.MORPH_CLOSE, kernel)
binary_unlit = cv2.morphologyEx(binary_unlit, cv2.MORPH_CLOSE, kernel)
# === LSD 检测线段(在灰度图上)===
gray = cv2.cvtColor(src, cv2.COLOR_BGR2GRAY)
lsd = cv2.createLineSegmentDetector(refine=cv2.LSD_REFINE_ADV)
all_lines, _, _, _ = lsd.detect(gray)
if all_lines is None or len(all_lines) == 0:
print("未检测到任何线段。")
exit()
# === 按行分组 ===
row_height = 25 # 根据你的图调整(当前图约25px/行)
rows = {}
for line in all_lines:
x1, y1, x2, y2 = line[0]
mid_y = (y1 + y2) / 2
row_id = int(mid_y // row_height)
if row_id not in rows:
rows[row_id] = []
rows[row_id].append((x1, y1, x2, y2))
# === 从下往上找"当前行"(部分点亮+部分未点亮)===
sorted_row_ids = sorted(rows.keys())
current_row_info = None
for row_id in sorted_row_ids:
y_min = row_id * row_height
y_max = (row_id + 1) * row_height
has_lit = False
has_unlit = False
lit_side = None
for (x1, y1, x2, y2) in rows[row_id]:
seg_mask = np.zeros_like(gray, dtype=np.uint8)
cv2.line(seg_mask, (int(x1), int(y1)), (int(x2), int(y2)), 255, thickness=2)
total = cv2.countNonZero(seg_mask)
if total == 0:
continue
lit_px = cv2.countNonZero(cv2.bitwise_and(seg_mask, binary_lit))
unlit_px = cv2.countNonZero(cv2.bitwise_and(seg_mask, binary_unlit))
if lit_px / total > 0.3:
has_lit = True
lit_side = 'left' if (x1 + x2) / 2 < width / 2 else 'right'
if unlit_px / total > 0.3:
has_unlit = True
if has_lit and has_unlit:
current_row_info = {
'row_id': row_id,
'y_range': (y_min, y_max),
'lit_side': lit_side
}
break
# === 处理起始/完成状态 ===
if current_row_info is None:
total_lit_area = cv2.countNonZero(binary_lit)
if total_lit_area / (height * width) > 0.9:
print("\n✅ 刀路已完成:所有区域均已点亮。")
elif sorted_row_ids:
bottom_row_id = sorted_row_ids[0]
y_min = bottom_row_id * row_height
y_max = (bottom_row_id + 1) * row_height
current_row_info = {
'row_id': bottom_row_id,
'y_range': (y_min, y_max),
'lit_side': None
}
print("\nℹ️ 刀路尚未开始,将从最下行左侧开始。")
# === 输出分析结果 ===
if current_row_info:
y_min, y_max = current_row_info['y_range']
lit_side = current_row_info['lit_side']
if lit_side is None:
print("\n✅ 当前刀路状态分析:")
print(f"- 当前行 Y 范围: {y_min:.1f} ~ {y_max:.1f}")
print("- 当前行状态: 全未点亮(起始状态)")
print("- 下一刀方向: 向右切削(从左侧开始)")
else:
side_str = "左边" if lit_side == 'left' else "右边"
print("\n✅ 当前刀路状态分析:")
print(f"- 当前行 Y 范围: {y_min:.1f} ~ {y_max:.1f}")
print(f"- 当前行状态: 既有已点亮线段,也有未点亮线段")
print(f"- 已点亮侧: {side_str}")
print("- 下一刀方向:", "向右切削" if lit_side == 'left' else "向左切削")
# === 可视化:三图并列 ===
fig, axes = plt.subplots(1, 3, figsize=(21, 6))
# 图1:原始图
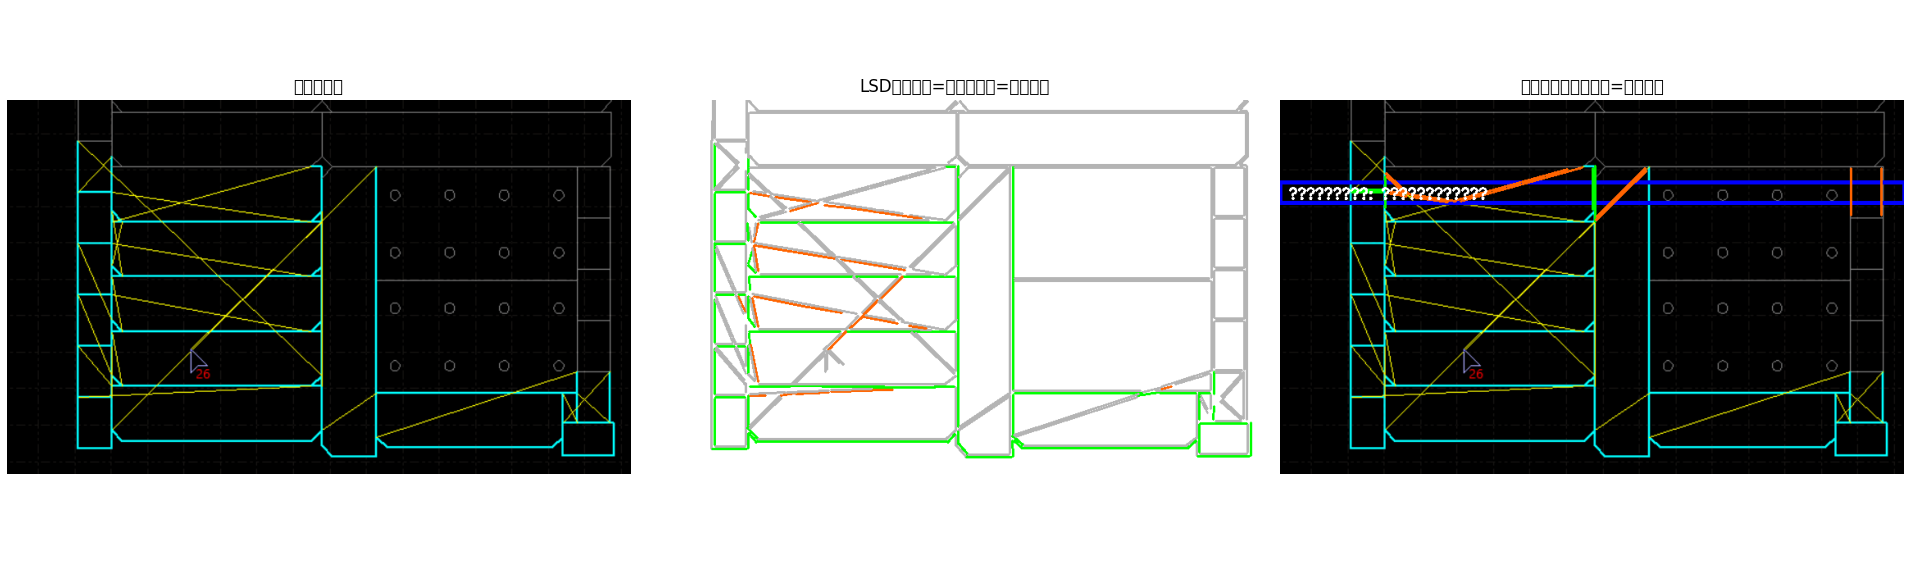
axes[0].imshow(cv2.cvtColor(src, cv2.COLOR_BGR2RGB))
axes[0].set_title('原始刀路图', fontsize=12)
axes[0].axis('off')
# 图2:LSD线段 + 状态颜色
status_canvas = np.ones_like(src) * 255 # 白底
for line in all_lines:
x1, y1, x2, y2 = line[0]
seg_mask = np.zeros_like(gray, dtype=np.uint8)
cv2.line(seg_mask, (int(x1), int(y1)), (int(x2), int(y2)), 255, 2)
total = cv2.countNonZero(seg_mask)
if total == 0:
color = (180, 180, 180) # 灰色
else:
lit_px = cv2.countNonZero(cv2.bitwise_and(seg_mask, binary_lit))
unlit_px = cv2.countNonZero(cv2.bitwise_and(seg_mask, binary_unlit))
if lit_px / total > 0.3:
color = (0, 255, 0) # 绿色:点亮(原青色)
elif unlit_px / total > 0.3:
color = (0, 100, 255) # 橙色:未点亮(原黄色)
else:
color = (180, 180, 180) # 灰色:不确定
cv2.line(status_canvas, (int(x1), int(y1)), (int(x2), int(y2)), color, 2)
axes[1].imshow(cv2.cvtColor(status_canvas, cv2.COLOR_BGR2RGB))
axes[1].set_title('LSD线段(绿=已点亮,橙=未点亮)', fontsize=12)
axes[1].axis('off')
# 图3:分析结果(当前行高亮)
result_img = src.copy()
if current_row_info:
y_min, y_max = current_row_info['y_range']
cv2.rectangle(result_img, (0, int(y_min)), (width, int(y_max)), (255, 0, 0), 3)
row_id = current_row_info['row_id']
if row_id in rows:
for (x1, y1, x2, y2) in rows[row_id]:
mid_y = (y1 + y2) / 2
if y_min <= mid_y <= y_max:
seg_mask = np.zeros_like(gray, dtype=np.uint8)
cv2.line(seg_mask, (int(x1), int(y1)), (int(x2), int(y2)), 255, 2)
lit_px = cv2.countNonZero(cv2.bitwise_and(seg_mask, binary_lit))
unlit_px = cv2.countNonZero(cv2.bitwise_and(seg_mask, binary_unlit))
color = (0, 255, 0) if lit_px > unlit_px else (0, 100, 255)
cv2.line(result_img, (int(x1), int(y1)), (int(x2), int(y2)), color, 2)
text = f"当前行: {'左' if current_row_info['lit_side'] == 'left' else '右'}已点亮" \
if current_row_info['lit_side'] else "起始行"
cv2.putText(result_img, text, (10, int(y_min) + 20),
cv2.FONT_HERSHEY_SIMPLEX, 0.6, (255, 255, 255), 2)
axes[2].imshow(cv2.cvtColor(result_img, cv2.COLOR_BGR2RGB))
axes[2].set_title('刀路状态分析(蓝框=当前行)', fontsize=12)
axes[2].axis('off')
plt.tight_layout()
plt.show()
# === 调试信息 ===
print(f"\n📊 调试信息:")
print(f"- 图像尺寸: {width} x {height}")
print(f"- 检测线段数: {len(all_lines)}")
print(f"- 分组行数: {len(rows)}")
print(f"- 行高度: {row_height} 像素")