1. 背景
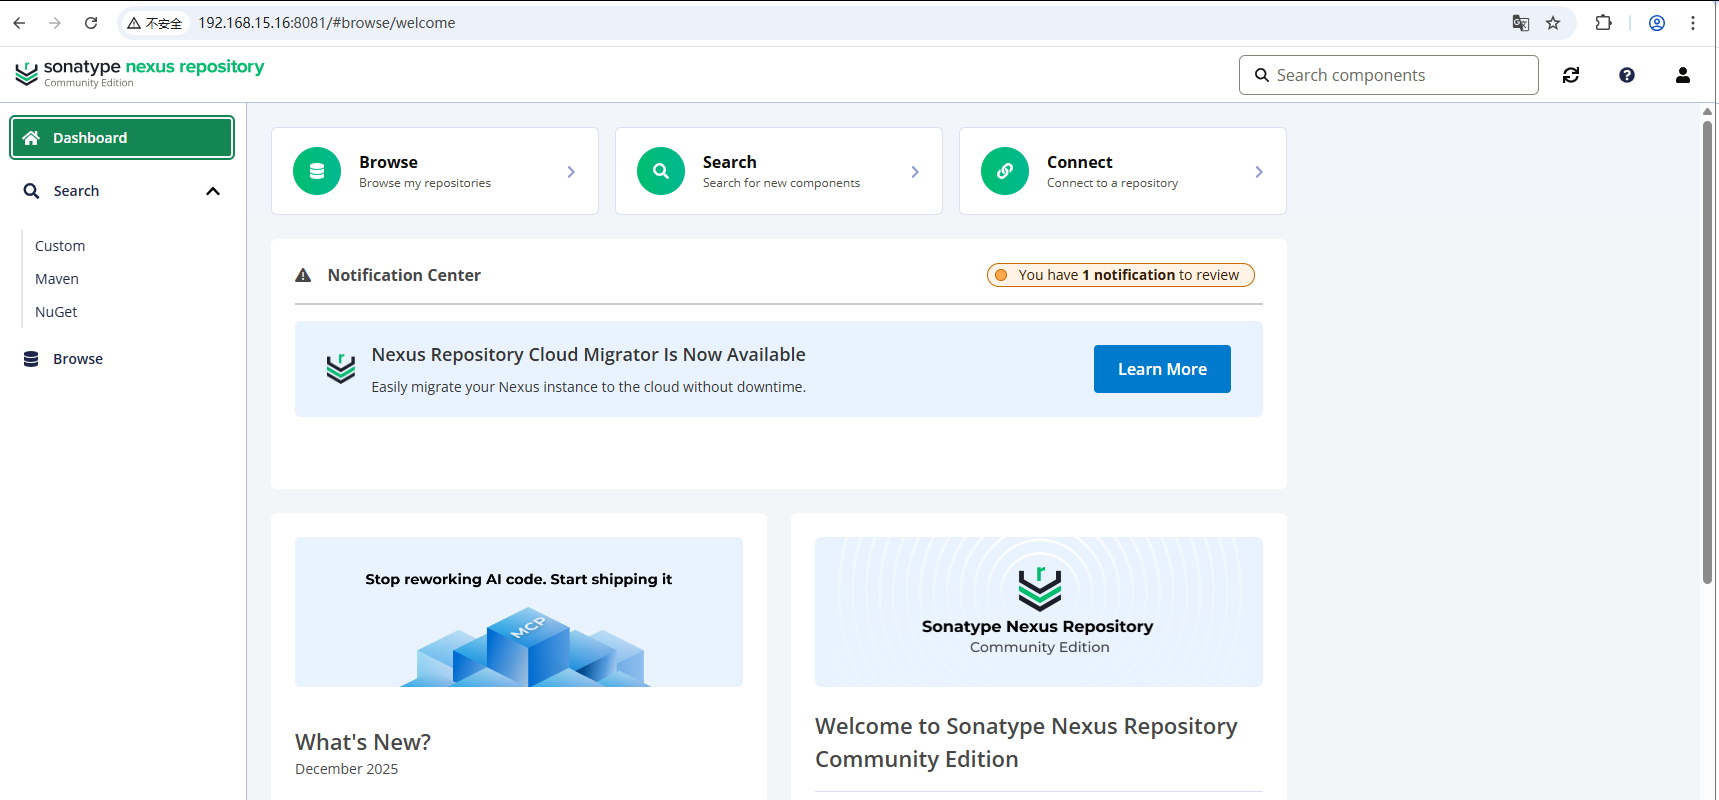
现在使用的Nexus 版本3.63.0,报严重安全问题,因此升级到官方最新版本3.87.1,升级涉及以下两部分:
- Nexus 版本3.63.0 升级至3.87.1
- 数据库 OrientDB 迁移至 H2
2. 参考
3. 环境
- 操作系统 Ubuntu24.04
- 主服务器配置 VM 16C/64G/800G
- Nexus 版本 3.87.1
- Java版本 JDK21
4. 操作系统安装
略
5. Nexus升级
官方文档:Upgrading to Nexus Repository 3.71.0 and Beyond
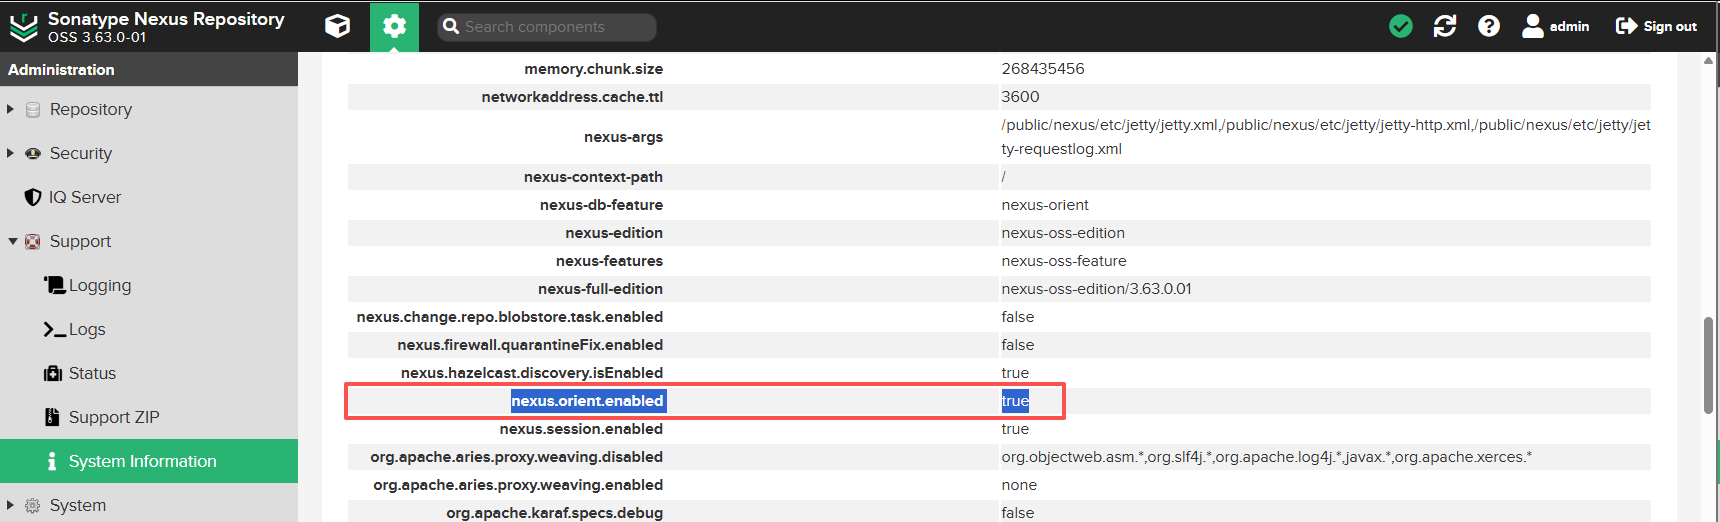
5.1 检查当前数据库
官方文档:Determining Current Database
- Navigate to the System Information under Support → System Information.
- Locate the nexus-properties section.
- Check that nexus.orient.enabled is true.
- 确定当前数据库是 OrientDB
5.2 升级路径
5.2.1 OrientDB 官方迁移路径
可跳过,直接看5.3 迁移操作
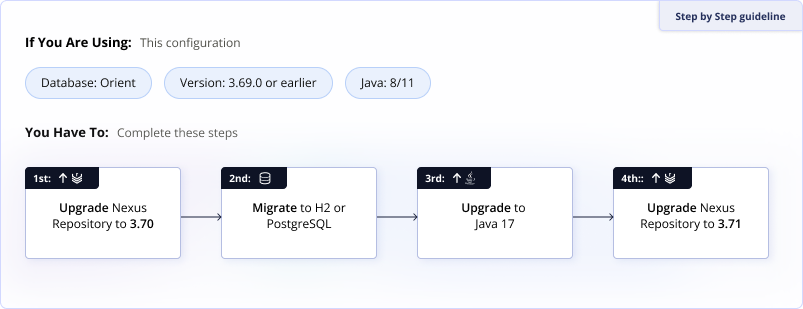
1. Upgrade to the Latest Nexus Repository 3.70.x Release
Upgrade to the latest branch of version 3.70.x using the standard upgrade procedures. Start the instance before proceeding to ensure everything works as expected.
As OrientDB does not support Java 17, continue to use Java 8 or 11 until after the database migration.
See Final Orient Release Download
This includes the migrator version to use for the next step.
2. Use the Database Migrator to switch to the database
Nexus Repository Pro deployments may switch directly to using PostgreSQL. Community Edition users must use the H2 database until upgrading to a Nexus Repository version after the 3.77.0 release. We recommend using Postgres in production deployments.
See Migrating to a New Database
3. Upgrade your Java version before upgrading to 3.71.0 or later.
Upgrade your Nexus Repository instance to the 3.71.0 release or greater. During this upgrade, update your Java version to Java 17 as later versions of Nexus Repository do not support Java 8 or 11.
Download the correct distribution to switch to a different java version. These distributions include configuration aligned to the supported Java version.
See Upgrade Nexus Repository Java Version
5.3 升级操作
注意:本次升级是在全新服务器上进行的,原服务器上的程序和数据目录保留备份。如果是原地升级,每次操作之前务必做好备份!!!
5.3.1 整理当前Nexus工作路径
bash
ll | grep -E "nexus$|sonatype-work"
drwxr-xr-x. 10 root root       268 1月   8 2025 nexus
drwxr-xr-x.  3 root root        28 12月  6 2023 sonatype-work
5.3.2 同步所有文件到新服务器
bash
rsync -avz  nexus  root@192.168.15.16:/public/applicaiton/nexus-3.63.0
rsync -avz  sonatype-work  root@192.168.15.16:/public/applicaiton/sonatype-work--3.63.0
5.3.3 准备Java运行环境
- java8 nexus 3.63.0 运行环境(旧版)
- java11 nexus 3.70.4 数据库迁移工具 运行环境
- java17 nexus 3.86.0 运行环境
- java21 nexus 3.87.1 运行环境
bash
ll /usr/local/jvm/
总计 4
drwxr-xr-x  5 root root   61 12月 30 09:33 ./
drwxr-xr-x 12 root root  139 12月  1 12:45 ../
drwxr-xr-x  8 root root   96 12月 26 11:18 java11/
drwxr-xr-x 10 root root  132  8月 17  2024 java17/
drwxr-xr-x  9 root root 4096  1月  8  2025 java21/
lrwxrwxrwx  1 root root    9 12月 30 09:33 java8 -> /usr/java/
5.3.3 下载多个新版本
官方下载页:Download Archives - Repository Manager 3
bash
mkdir -p /public/software && cd /public/software
bash
wget https://cdn.download.sonatype.com/repository/downloads-prod-group/3/nexus-3.70.4-02-java8-unix.tar.gz
wget https://cdn.download.sonatype.com/repository/downloads-prod-group/3/nexus-3.73.0-12-unix.tar.gz
wget https://cdn.download.sonatype.com/repository/downloads-prod-group/3/nexus-3.77.2-02-unix.tar.gz
wget https://download.sonatype.com/nexus/3/nexus-3.86.2-01-linux-x86_64.tar.gz
wget https://download.sonatype.com/nexus/3/nexus-3.87.1-01-linux-x86_64.tar.gz
5.3.4 下载数据库迁移工具
官方下载页:Nexus Repository 3.70.x Downloads with OrientDB
bash
wget https://cdn.download.sonatype.com/repository/downloads-prod-group/nxrm3-migrator/nexus-db-migrator-3.70.4-02.jar5.3.5 Nexus升级至3.70.4版本
Nexus 3.70.4是支持OrientDB的最后一个版本。需要先升级至3.70.4,然后使用数据库迁移工具完成数据库转换(OrientDB-->H2)
- 选择nexus-3.70.4-02-java8-unix.tar.gz 安装
官方安装文档:Install Self-Hosted Nexus Repository
- 解压nexus-3.70.4-02-java8-unix.tar.gz
bash
cd /public/software
tar xvz --keep-directory-symlink -f nexus-3.70.4-02-java8-unix.tar.gz
bash
mv nexus-3.70.4-02 sonatype-work /public/application/- 拷贝旧数据目录覆盖nexus-3.70.4的数据目录
bash
cd /public/application/
cp -rf sonatype-work-3.63.3/* sonatype-work/- 启动服务升级
- 设置Java环境变量
bash
export JAVA_HOME=/usr/local/jvm/java8
export PATH=$JAVA_HOME/bin:$PATH- 查看启动命令
bash
/public/application/nexus-3.70.4/bin/nexus --help
# 命令输出结果
WARNING: ************************************************************
WARNING: Detected execution as "root" user.  This is NOT recommended!
WARNING: ************************************************************
Usage: /public/application/nexus-3.70.4/bin/nexus {start|stop|run|run-redirect|status|restart|force-reload}- 启动服务
bash
/public/application/nexus-3.70.4/bin/nexus start注意: 程序检查版本升级后,会自动进行升级操作,这期间服务启动会慢,需要多等一会。如果希望查看启动过程或错误,建议使用 nexus run 命令,在前台运行服务,查看升级日志。
- 查看服务监听端口
bash
netstat -nltp | grep java
tcp        0      0 0.0.0.0:8081            0.0.0.0:*               LISTEN      3468/java
tcp 0 0 127.0.0.1:33219 0.0.0.0:* LISTEN 3468/java 5.3.6 Nexus迁移数据库
官方文档:Migrating From OrientDB to H2
官方建议可以直接升级至3.71.0+版本,但是实际操作中不行,升级3.87.1会报数据库索引错误,修复会导致不可控问题,所以稳妥起见,还是先转换数据库,然后小版本逐步升级。
- 创建备份目录,拷贝迁移程序
bash
mkdir -p /public/application/nexus_backup
cp /public/software/nexus-db-migrator-3.70.4-02.jar /public/application/nexus_backup/-
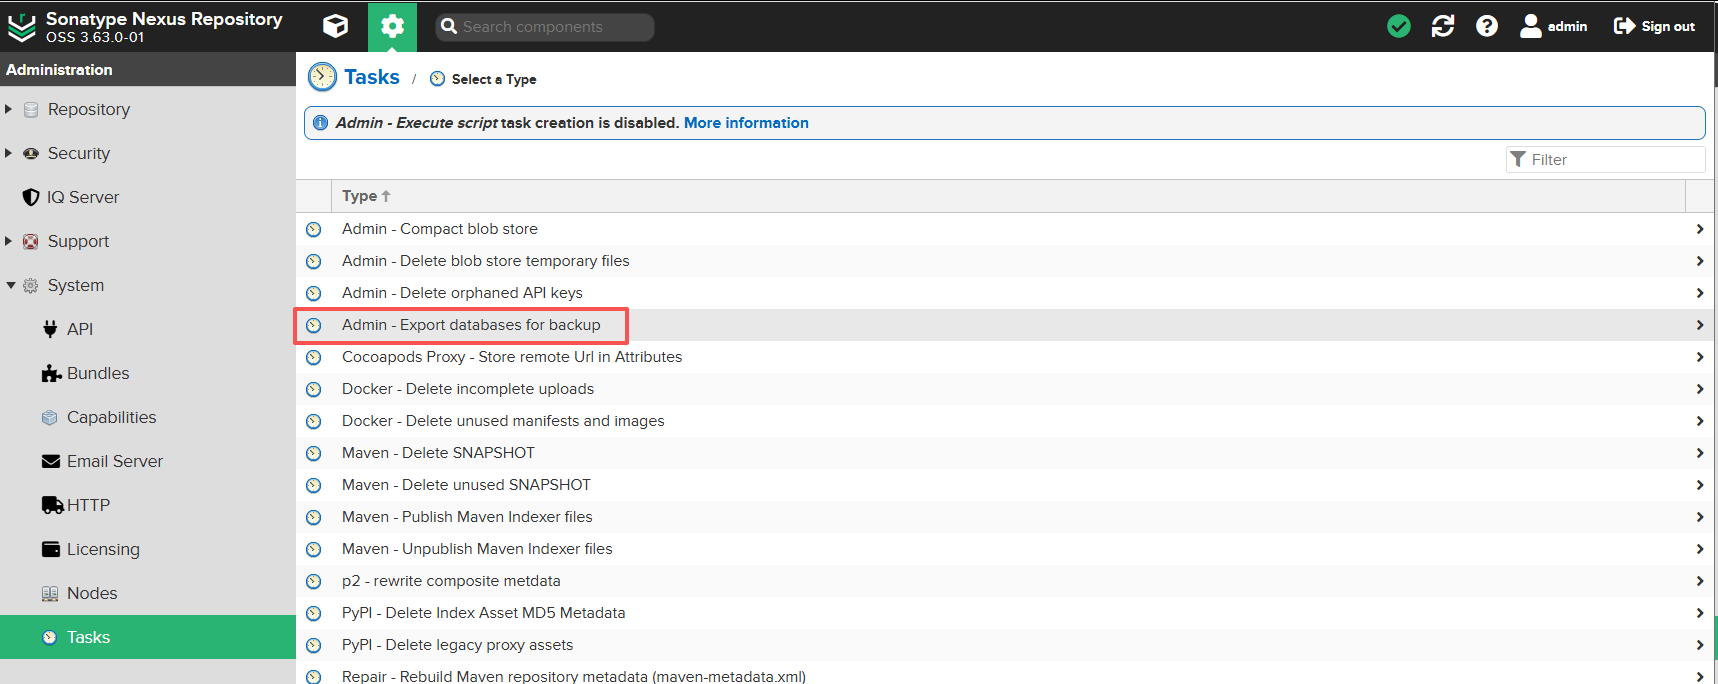
生成数据库备份
Admin - Export Database for backup
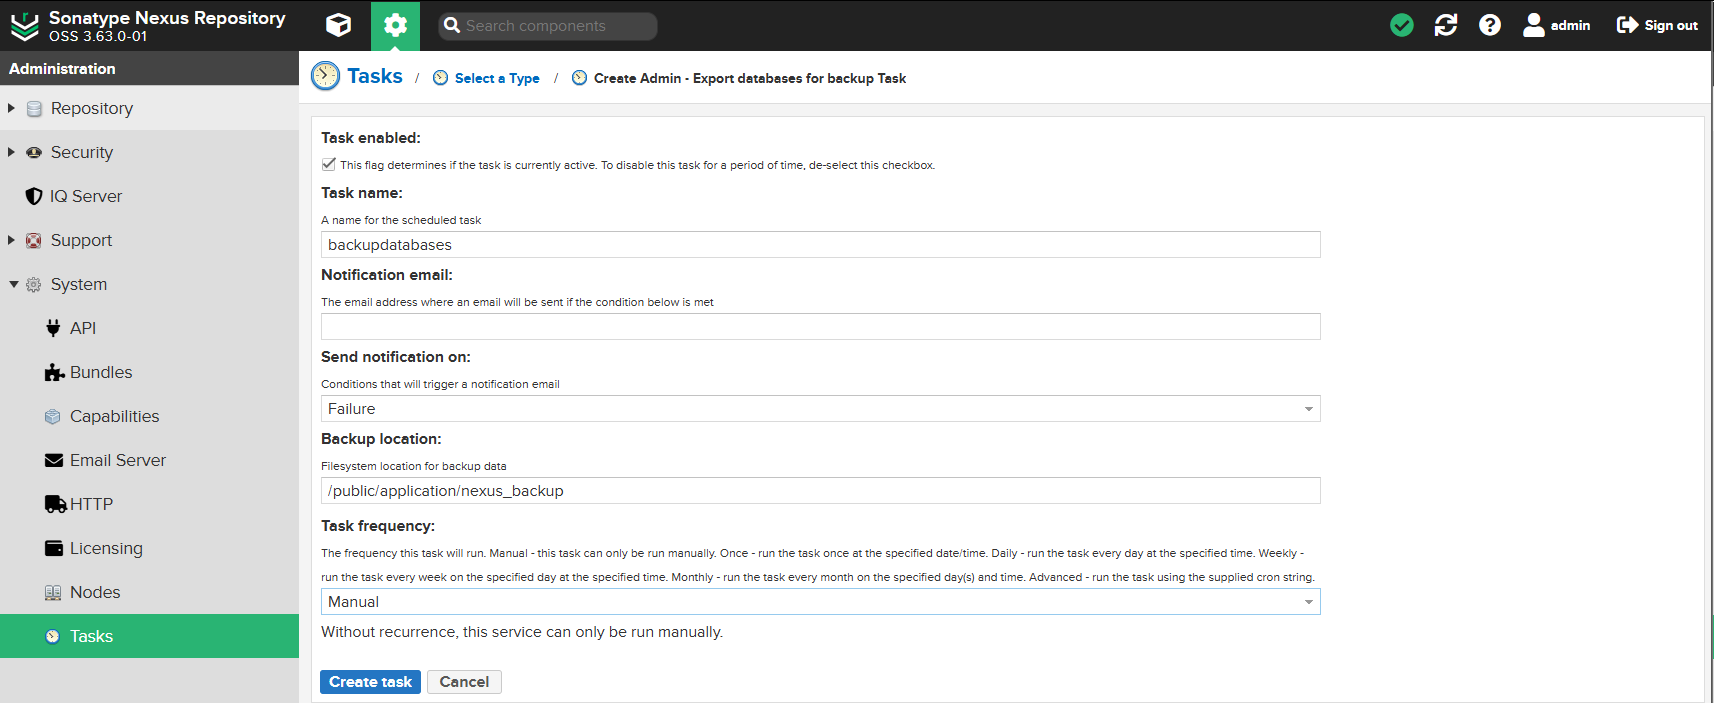
-
执行备份任务

-
查看备份文件
bash
root@ubuntu24-192-168-015-016:/public/application/nexus_backup# ll -rt
总计 154272
-rw-r--r--  1 root   root   56809625  2月 14  2025 nexus-db-migrator-3.70.4-02.jar
-rw-r--r--  1 root   root     398975 12月 26 09:56 security-2025-12-26-01-56-47-3.70.4-02.bak
-rw-r--r--  1 root   root    1064199 12月 26 09:56 config-2025-12-26-01-56-47-3.70.4-02.bak
-rw-r--r--  1 root   root   17451734 12月 26 09:56 component-2025-12-26-01-56-47-3.70.4-02.bak
-rw-r--r-- 1 root root 40092819 12月 26 09:56 analytics-2025-12-26-01-56-47-3.70.4-02.bak- 执行迁移数据库程序
- nexus-db-migrator-3.70.4-02.jar 需要Java11 运行环境
bash
export JAVA_HOME=/usr/local/jvm/java11
export PATH=$JAVA_HOME/bin:$PATH
bash
java -Xmx16G -Xms16G -XX:+UseG1GC -XX:MaxDirectMemorySize=28672M -jar nexus-db-migrator-*.jar --migration_type=h2- 转换后生成nexus.mv.db
bash
 ll -rt | grep nexus.mv.db
-rw-r--r-- 1 root root 41881600 12月 26 11:21 nexus.mv.db- 拷贝数据库到存储目录
bash
cp nexus.mv.db /public/application/sonatype-work/nexus3/db/- 修改nexus.properties配置
- 增加 nexus.datastore.enabled=true
bash
cat /public/application/sonatype-work/nexus3/etc/nexus.properties

# 命令显示结果
# Jetty section
# application-port=8081
# application-host=0.0.0.0
# nexus-args=${jetty.etc}/jetty.xml,${jetty.etc}/jetty-http.xml,${jetty.etc}/jetty-requestlog.xml
# nexus-context-path=/

# Nexus section
# nexus-edition=nexus-pro-edition
# nexus-features=\
# nexus-pro-feature

# nexus.hazelcast.discovery.isEnabled=true

nexus.datastore.enabled=true- 启动服务
bash
/public/application/nexus-3.70.4/bin/nexus start- 查看当前数据库
- 方法同5.1 检查当前数据库
- 显示结果已变更为false
nexus.orient.enabled is false
5.3.7 Nexus升级至3.73.0版本
升级至Nexus 3.73.0,方法与Nexus 3.63.0升级Nexus 3.70.4(5.3.5)类似
- 选择nexus-3.73.0-12-unix.tar.gz 安装
- 停服
bash
/public/application/nexus-3.70.4/bin/nexus stop- 备份nexus-3.70.4的数据目录
bash
cd /public/application
mv sonatype-work sonatype-work-3.70.4- 解压nexus-3.73.0-12-unix.tar.gz
bash
cd /public/software
tar xvz --keep-directory-symlink -f nexus-3.73.0-12-unix.tar.gz
bash
cd /public/software
mv nexus-3.73.0-12 sonatype-work /public/application/- 拷贝旧数据目录覆盖nexus-3.73.0的数据目录
bash
cd /public/application/
cp -rf sonatype-work-3.70.4/* sonatype-work/- 启动服务升级
- 设置Java环境变量:Java17
bash
export JAVA_HOME=/usr/local/jvm/java17
export PATH=$JAVA_HOME/bin:$PATH- 启动服务
bash
/public/application/nexus-3.73.0-12/bin/nexus start注意: 程序检查版本升级后,会自动进行升级操作,这期间服务启动会慢,需要多等一会。如果希望查看启动过程或错误,建议使用 nexus run 命令,在前台运行服务,查看升级日志。
- 查看服务监听端口
bash
netstat -nltp | grep java
tcp        0      0 0.0.0.0:8081            0.0.0.0:*               LISTEN      3468/java
tcp 0 0 127.0.0.1:33219 0.0.0.0:* LISTEN 3468/java 5.3.8 Nexus升级至3.77.2版本
升级至Nexus 3.77.2,方法与Nexus 3.70.4升级Nexus 3.73.0(5.3.7)类似,略
5.3.9 Nexus升级至3.86.2版本
升级至Nexus 3.86.2,方法与Nexus 3.70.4升级Nexus 3.73.0(5.3.7)类似,略
5.3.10 Nexus升级至3.87.1版本
升级至Nexus 3.86.2,方法与Nexus 3.70.4升级Nexus 3.73.0(5.3.7)类似,略
- 启动服务升级
- 设置Java环境变量:Java21
bash
export JAVA_HOME=/usr/local/jvm/java21
export PATH=$JAVA_HOME/bin:$PATH- 启动服务
bash
/public/application/nexus-3.87.1-01/bin/nexus start- 配置Java环境变量
- Java 默认使用Java21
bash
vim /etc/profile
bash
JAVA_HOME=/usr/local/jvm/java21
CLASSPATH=.:$JAVA_HOME
PATH=$JAVA_HOME/bin:$PATH
export JAVA_HOME CLASSPATH PATH
bash
source /etc/profile5.4 配置nexus.vmoptions
- 备份nexus.vmoptions
bash
cd /public/application/nexus-3.87.1-01/bin
cp nexus.vmoptions nexus.vmoptions.orig- vim nexus.vmoptions
bash
# ================= 堆内存配置(核心,适配64G内存) =================
# Java 21+ZGC下,堆内存设为24G(物理内存的3/8,ZGC对大堆优化更好)
-Xms24576m
-Xmx24576m

# ================= ZGC专属配置(Java 21核心优化) =================
# 显式启用ZGC(Java 21 x64/Linux默认启用,显式声明更稳妥)
-XX:+UseZGC
# ZGC使用NUMA感知(适配多核虚拟机,提升内存访问效率)
-XX:+UseNUMA
# ZGC最大停顿时间目标(ZGC天生低停顿,设为10ms进一步优化)
-XX:ZCollectionInterval=10
# 禁用ZGC的未提交内存压缩(提升大堆场景性能)
-XX:-ZUncommit

# ================= 元空间/线程配置(适配Java 21) =================
# Java 21中元空间默认值已优化,此处配置兜底,避免溢出
-XX:MetaspaceSize=512m
-XX:MaxMetaspaceSize=1024m
# 线程栈大小(Java 21下默认1024k,显式声明适配多核并发)
-Xss1024k

-XX:+UnlockDiagnosticVMOptions
-XX:+LogVMOutput
-XX:LogFile=../sonatype-work/nexus3/log/jvm.log
-XX:-OmitStackTraceInFastThrow
-Dkaraf.home=.
-Dkaraf.base=.
-Djava.util.logging.config.file=etc/spring/java.util.logging.properties
-Dkaraf.data=../sonatype-work/nexus3
-Dkaraf.log=../sonatype-work/nexus3/log
-Djava.io.tmpdir=../sonatype-work/nexus3/tmp
-Djdk.tls.ephemeralDHKeySize=2048
-Dfile.encoding=UTF-8
#
# additional vmoptions needed for Java9+
#
--add-reads=java.xml=java.logging
--add-opens
java.base/java.security=ALL-UNNAMED
--add-opens
java.base/java.net=ALL-UNNAMED
--add-opens
java.base/java.lang=ALL-UNNAMED
--add-opens
java.base/java.util=ALL-UNNAMED
--add-opens
java.naming/javax.naming.spi=ALL-UNNAMED
--add-opens
java.rmi/sun.rmi.transport.tcp=ALL-UNNAMED
--add-exports=java.base/sun.net.www.protocol.http=ALL-UNNAMED
--add-exports=java.base/sun.net.www.protocol.https=ALL-UNNAMED
--add-exports=java.base/sun.net.www.protocol.jar=ALL-UNNAMED
--add-exports=jdk.xml.dom/org.w3c.dom.html=ALL-UNNAMED
--add-exports=jdk.naming.rmi/com.sun.jndi.url.rmi=ALL-UNNAMED
--add-exports=java.security.sasl/com.sun.security.sasl=ALL-UNNAMED
--add-exports=java.base/sun.security.x509=ALL-UNNAMED
--add-exports=java.base/sun.security.rsa=ALL-UNNAMED
--add-exports=java.base/sun.security.pkcs=ALL-UNNAMED
5.5 配置systemd管理
- 创建服务目录链接(升级后不用修改nexus.service)
bash
ln -s /public/application/nexus-3.87.1-01 /public/application/nexus- 创建nexus.service
bash
cd /public/application/nexus
vim nexus.service
bash
[Unit]
Description=nexus service
After=network.target

[Service]
Type=forking
LimitNOFILE=65536
ExecStart=/public/application/nexus/bin/nexus start
ExecStop=/public/application/nexus/bin/nexus stop

User=root
Restart=on-abort
TimeoutSec=600

[Install]
WantedBy=multi-user.target- 停止已启动服务
bash
/public/application/nexus/bin/nexus stop- systemd启动服务
bash
systemctl daemon-reload
systemctl enable nexus.service
systemctl start nexus.service- 查看服务状态
bash
systemctl status nexus.service
bash
● nexus.service - nexus service
     Loaded: loaded (/etc/systemd/system/nexus.service; enabled; preset: enabled)
     Active: active (running) since Tue 2025-12-30 14:41:27 CST; 37min ago
    Process: 76208 ExecStart=/public/application/nexus/bin/nexus start (code=exited, status=0/SUCCESS)
   Main PID: 76522 (java)
      Tasks: 113 (limit: 77023)
     Memory: 24.9G (peak: 24.9G)
        CPU: 3min 59.486s
     CGroup: /system.slice/nexus.service
             └─76522 /public/application/nexus-3.87.1-01/jdk/temurin_21.0.9_10_linux_x86_64/jdk-21.0.9+10/bin/java -server -Dnexus.installer.type=linux-x86-64 -Xms24576m -Xmx24576m -XX:+UseZGC -XX:+UseNUMA -XX:ZCollectionInterval=10 -XX:-ZUncommit -XX:MetaspaceSize=512m -XX:MaxMetaspaceSize=1024m -Xss1024k -XX:+UnlockDiagnosticVMOptions -XX:+LogVMOutput -XX:LogFile=../sonatype-work/nexus3/log/jvm.log -XX:-OmitStackTraceInFastThrow -Dkaraf.home=. -Dkaraf.base=. -Djava.util.logging.config.file=etc/spring/java.util.logging.properties -Dkaraf.data=../sonatype-work/nexus3 -Dkaraf.log=../sonatype-work/nexus3/log -Djava.io.tmpdir=../sonatype-work/nexus3/tmp -Djdk.tls.ephemeralDHKeySize=2048 -Dfile.encoding=UTF-8 --add-reads=java.xml=java.logging --add-opens java.base/java.security=ALL-UNNAMED --add-opens java.base/java.net=ALL-UNNAMED --add-opens java.base/java.lang=ALL-UNNAMED --add-opens java.base/java.util=ALL-UNNAMED --add-opens java.naming/javax.naming.spi=ALL-UNNAMED --add-opens java.rmi/sun.rmi.transport.tcp=ALL-UNNAMED --add-exports=java.base/sun.net.www.protocol.http=ALL-UNNAMED --add-exports=java.base/sun.net.www.protocol.https=ALL-UNNAMED --add-exports=java.base/sun.net.www.protocol.jar=ALL-UNNAMED --add-exports=jdk.xml.dom/org.w3c.dom.html=ALL-UNNAMED --add-exports=jdk.naming.rmi/com.sun.jndi.url.rmi=ALL-UNNAMED --add-exports=java.security.sasl/com.sun.security.sasl=ALL-UNNAMED --add-exports=java.base/sun.security.x509=ALL-UNNAMED --add-exports=java.base/sun.security.rsa=ALL-UNNAMED --add-exports=java.base/sun.security.pkcs=ALL-UNNAMED -jar /public/application/nexus-3.87.1-01/bin/sonatype-nexus-repository-3.87.1-01.jar