安装
pip install opencv-python
pip install matplotlib
使用
读取图片
cpp
import os
import cv2 as cv
import  cv2
import  matplotlib.pyplot as plt

print(cv2.__version__)

def test():
    print("test")

if __name__ == '__main__':
    print("hello opencv")
    #读取
    src = cv2.imread(r"D:\\python\\picture\\1.jpg",0) #0灰色
    #显示
    # cv2.imshow("test",src)
    # plt.imshow(src[:,:,::-1]) # 颜色不一致,需要进行翻转 灰度图不需要
    plt.imshow(src,cmap=plt.cm.gray) #运行灰度图片
    plt.show()
    # cv2.waitKey(0)
    #保存
    # cv.imwrite("./first.png",src)
    # cv.destroyAllWindows()
    # print(src)
绘制图像
python
import os
import cv2 as cv
import cv2
import matplotlib.pyplot as plt
import numpy as np
import  matplotlib


def test():
    print(cv2.__version__)


if __name__ == '__main__':
    test()
    src = cv.imread("./first.png")
    print("dtype = ", src.dtype)

    img = np.zeros((512, 512, 3), np.uint8)  # 三维数组512行512列,三个数据,每个都撒unit6  uint8,unsigned char类型的8位数据
    print("img = ",img,"len = ",len(img ))
    cv.line(img,(0,0),(512,512),(255,0,0),3)
    cv.rectangle(img,(10,10),(512,512),(0,255,0),10)
    cv.circle(img,(256,256),56,(0,0,255),-2) # 宽度是负数填充圆形
    cv.putText(img,"My OpeenCV",(100,100),cv.FONT_HERSHEY_SIMPLEX,2,(255,255,255),2,cv.LINE_AA) # Line_AA是抗锯齿

    plt.imshow(img[:,:,::-1])
    plt.show()
图像修改数据
python
import os
import cv2 as cv
import cv2
import matplotlib.pyplot as plt
import numpy as np
import  matplotlib

PATH = r"C:\Users\lxj\Desktop\picture"

def test():
    print(cv2.__version__)


if __name__ == '__main__':
    test()
    src = cv.imread("./first.png")
    print("dtype = ", src.dtype)

    img = np.zeros((512, 512, 3), np.uint8)  # 三维数组512行512列,三个数据,每个都撒unit6  uint8,unsigned char类型的8位数据
    print("img = ",img,"len = ",len(img ))
    print("src = ", img[100,100])
    img[100] = [255,255,255]
    print("update = ",img[100,100])

    cv.imshow("opencv",img)

    cv.moveWindow("opencv",400,200)
    cv.waitKey(0)

    # plt.imshow(img[:,:,::-1])
    # plt.show()

 #通道拆分
    b,g,r = cv.split(img)
    print(f"b = {b} g = {g} r = {r}")
    print("split =  ",len(b)," ",len(b[0]))

    zero = np.zeros(img.shape[:2],dtype="uint8")
    print("img ",img.shape)
    white = np.full((512,512),255,dtype= "uint8")

    cv.imshow("b",b)
    cv.imshow("g",g)
    cv.imshow("r",r)

    #通道合并
    img1 = cv.merge((b,g,r))
色彩空间的改变
BGR彩色图像,GRAY灰度图像,HSV图像(色调(Hue)、饱和度(Saturation)和明度(Value)三个属性)
cv.cvtColor(input_image,flag)
cv.COLOR_BGR2GRAY BGR转GRAY
cv.COLOR_BGR2HSV BGR转HSV
python
import os
import cv2 as cv
import cv2
import matplotlib.pyplot as plt
import numpy as np
import  matplotlib

PATH = r"C:\Users\lxj\Desktop\picture\\"

def test():
    print("===============================================")

    print(cv2.__version__)
    print(np.array([[2,2,3],[1,2,2]])) #
    x = np.array([[2,2,3],[1,2,2]])
    y = np.full((512,512),255)
    print(x)
    print(y)
    print("===============================================")
if __name__ == '__main__':
    test()
    src = cv.imread("./first.png")
    src = cv.imread(PATH+"txt.png")
    cv.imshow("opencv",src)
    cv.moveWindow("opencv",400,200)
    # 拆分
    b,g,r = cv.split(src)

    gray = cv.cvtColor(src,cv.COLOR_BGR2GRAY)
    cv.imshow("gray",gray)
    HSV = cv.cvtColor(src,cv.COLOR_BGR2HSV)
    cv.imshow("HSV",HSV)

    cv.waitKey(0)
    cv.destroyAllWindows()
图像加法
cpp
import os
import cv2 as cv
import cv2
import matplotlib.pyplot as plt
import numpy as np
import  matplotlib

PATH = r"C:\Users\lxj\Desktop\picture\\"

def test():
    print("===============================================")

    print(cv2.__version__)
    print(np.array([[2,2,3],[1,2,2]])) #
    x = np.array([[2,2,3],[1,2,2]])
    y = np.full((512,512),255)
    print(x)
    print(y)
    print("===============================================")
if __name__ == '__main__':
    test()
    # src = cv.imread("./first.png")
    src = cv.imread(PATH+"black.png")
    src1 = cv.imread(PATH+"white.png")
    print("shape = ",src.shape," \ndtype = ",src.dtype)
    x = np.uint8([250])
    y = np.uint8([10])
    # np加法 (250+10)%256
    # print(f"x+y = {x+y}")
    # print(f"np+ = {np.add(x,y)}")
    # cv加法 > 为260 取 255
    # print(f"cv+ = {cv.add(x,y)}")
    # img3 = cv.add(src,src1)
    # img4 = np.add(src, src1)

    x = np.uint8([10])
    y = np.uint8([50])
    # np减法 (10+50) <0  +256
    print(f"x-y = {x-y}")
    print(f"np- = {np.subtract(x,y)}")
    # cv减法 > 为-40 取 0
    print(f"cv- = {cv.subtract(x,y)}")
    img3 = cv.subtract(src,src1)
    img4 = np.subtract(src, src1)


    cv.imshow("cv-",img3)


    cv.imshow("np-",img4)

    cv.imshow("opencv",src)
    cv.waitKey(0)
    cv.destroyAllWindows()
图像混合
python
import os
import cv2 as cv
import cv2
import matplotlib.pyplot as plt
import numpy as np
import  matplotlib

PATH = r"C:\Users\lxj\Desktop\picture\\"

def test():
    print("===============================================")

    print(cv2.__version__)
    print(np.array([[2,2,3],[1,2,2]])) #
    x = np.array([[2,2,3],[1,2,2]])
    y = np.full((512,512),255)
    print(x)
    print(y)
    print("===============================================")
if __name__ == '__main__':
    test()
    # src = cv.imread("./first.png")
    src = cv.imread(PATH+"black.png")
    src1 = cv.imread(PATH+"white.png")
    print("shape = ",src.shape," \ndtype = ",src.dtype)
    x = np.uint8([250])
    y = np.uint8([10])
    img3 = cv.addWeighted(src,0.2,src1,0.8,0) #最后可以加参数


    cv.imshow("weighted ",img3)


    cv.imshow("opencv",src)
    cv.waitKey(0)
    cv.destroyAllWindows()
几何变换
掌握图像的缩放,平移,旋转等。
了解数字图像的仿射变换和透射变换。
图像缩放
python
import os
import cv2 as cv
import cv2
import matplotlib.pyplot as plt
import numpy as np
import  matplotlib

PATH = r"C:\Users\lxj\Desktop\picture\\"

def test():
    print("===============================================")

    print(cv2.__version__)
    print(np.array([[2,2,3],[1,2,2]])) #
    x = np.array([[2,2,3],[1,2,2]])
    y = np.full((512,512),255)
    print(x)
    print(y)
    print("===============================================")
if __name__ == '__main__':
    test()
    # src = cv.imread("./first.png")
    src = cv.imread(PATH+"black.png")
    src1 = cv.imread(PATH+"white.png")
    print("shape = ",src.shape," \ndtype = ",src.dtype)

    rows,cols = src.shape[:2]
    #绝对尺寸 INTER_LINEAR双线性插值  INTER_NEAREEST 最近邻插值  INTER_AREA 像素区域重采样,默认
    res = cv.resize(src,(2*cols,2*rows),interpolation=cv.INTER_LINEAR) #INTER_CUBIC 双三次插值
    # 相对尺寸
    res1 = cv.resize(src,None,fx= 0.5,fy=0.5)

    cv.imshow("res",res)
    cv.imshow("res1",res1)

    cv.imshow("opencv",src)
    cv.waitKey(0)
    cv.destroyAllWindows()
图像平移
python
import os
import cv2 as cv
import cv2
import matplotlib.pyplot as plt
import numpy as np
import  matplotlib

PATH = r"C:\Users\lxj\Desktop\picture\\"

def test():
    print("===============================================")

    print(cv2.__version__)
    print(np.array([[2,2,3],[1,2,2]])) #
    x = np.array([[2,2,3],[1,2,2]])
    y = np.full((512,512),255)
    print(x)
    print(y)
    print("===============================================")
if __name__ == '__main__':
    test()
    # src = cv.imread("./first.png")
    src = cv.imread(PATH+"black.png")
    src1 = cv.imread(PATH+"white.png")
    print("shape = ",src.shape," \ndtype = ",src.dtype)

    rows,cols = src.shape[:2]
    # 图像平移
    M = np.float32([[1,0,100],[0,1,50] ]) #平移矩阵 2维 () x方向移动100 , y方向移动50 x是width,y是height
    dst = cv.warpAffine(src,M,(cols,rows))
    cv.imshow("res1",dst)

    cv.imshow("opencv",src)
    cv.waitKey(0)
    cv.destroyAllWindows()
图像旋转
需要了解旋转矩阵,三角函数(sin cos tan)相关知识
python
import os
import cv2 as cv
import cv2
import matplotlib.pyplot as plt
import numpy as np
import  matplotlib

PATH = r"C:\Users\lxj\Desktop\picture\\"

def test():
    print("===============================================")

    print(cv2.__version__)
    print(np.array([[2,2,3],[1,2,2]])) #
    x = np.array([[2,2,3],[1,2,2]])
    y = np.full((512,512),255)
    print(x)
    print(y)
    print("===============================================")
if __name__ == '__main__':
    test()
    # src = cv.imread("./first.png")
    src = cv.imread(PATH+"black.png")
    src1 = cv.imread(PATH+"white.png")
    print("shape = ",src.shape," \ndtype = ",src.dtype)

    rows,cols = src.shape[:2]
    # 图像旋转
    # 生成旋转矩阵
    M = cv.getRotationMatrix2D((cols/2,rows/2),90,1)
    # 进行旋转变换
    dst = cv.warpAffine(src,M,(cols,rows))

    fig,axes = plt.subplots(nrows=1,ncols =2,figsize=(10,8),dpi = 100)
    axes[0].imshow(src[:,:,::-1])
    axes[0].set_title("src")
    axes[1].imshow(dst[:,:,::-1])
    axes[1].set_title("dst")

    plt.show()
    cv.imshow("res1",dst)

    cv.imshow("opencv",src)
    cv.waitKey(0)
    cv.destroyAllWindows()
仿射变换
python
import os
import cv2 as cv
import cv2
import matplotlib.pyplot as plt
import numpy as np
import  matplotlib

PATH = r"C:\Users\lxj\Desktop\picture\\"

def test():
    print("===============================================")

    print(cv2.__version__)
    print(np.array([[2,2,3],[1,2,2]])) #
    x = np.array([[2,2,3],[1,2,2]])
    y = np.full((512,512),255)
    print(x)
    print(y)
    print("===============================================")
if __name__ == '__main__':
    test()
    # src = cv.imread("./first.png")
    src = cv.imread(PATH+"black.png")
    src1 = cv.imread(PATH+"white.png")
    print("shape = ",src.shape," \ndtype = ",src.dtype)

    rows,cols = src.shape[:2]

    # 仿射变换
    # M = cv.getRotationMatrix2D((cols/2,rows/2),180,0.5)
    pts1 = np.float32([[50,50],[200,50],[50,200]])
    pts2 = np.float32([[100,100],[200,50],[100,250]])
    M = cv.getAffineTransform(pts1,pts2)
    print(M)
    # 扭曲仿射
    dst = cv.warpAffine(src,M,(cols,rows))

    fig,axes = plt.subplots(nrows=1,ncols =2,figsize=(10,8),dpi = 100)
    axes[0].imshow(src[:,:,::-1])
    axes[0].set_title("src")
    axes[1].imshow(dst[:,:,::-1])
    axes[1].set_title("dst")

    plt.show()
    cv.imshow("res1",dst)

    cv.imshow("opencv",src)
    cv.waitKey(0)
    cv.destroyAllWindows()
投射变换
python
import os
import cv2 as cv
import cv2
import matplotlib.pyplot as plt
import numpy as np
import  matplotlib

PATH = r"C:\Users\lxj\Desktop\picture\\"

def test():
    print("===============================================")

    print(cv2.__version__)
    print(np.array([[2,2,3],[1,2,2]])) #
    x = np.array([[2,2,3],[1,2,2]])
    y = np.full((512,512),255)
    print(x)
    print(y)
    print("===============================================")
if __name__ == '__main__':
    test()
    # src = cv.imread("./first.png")
    src = cv.imread(PATH+"black.png")
    src1 = cv.imread(PATH+"white.png")
    print("shape = ",src.shape," \ndtype = ",src.dtype)

    rows,cols = src.shape[:2]

    # 投射变换
    # M = cv.getRotationMatrix2D((cols/2,rows/2),180,0.5)
    pts1 = np.float32([[55,55],[368,52],[28,387],[389,390]])
    pts2 = np.float32([[100,145],[300,100],[80,290],[310,300]])
    print("pts1 shape = ",pts1.shape)

    M = cv.getPerspectiveTransform(pts1,pts2)
    print(M)
    # 投射变化
    dst = cv.warpPerspective(src,M,(cols,rows))

    fig,axes = plt.subplots(nrows=1,ncols =2,figsize=(10,8),dpi = 100)
    axes[0].imshow(src[:,:,::-1])
    axes[0].set_title("src")
    axes[1].imshow(dst[:,:,::-1])
    axes[1].set_title("dst")

    plt.show()
    cv.imshow("res1",dst)

    cv.imshow("opencv",src)
    cv.waitKey(0)
    cv.destroyAllWindows()
图像金字塔
上采样和下采样
python
import os
import cv2 as cv
import cv2
import matplotlib.pyplot as plt
import numpy as np
import  matplotlib

PATH = r"C:\Users\lxj\Desktop\picture\\"

def test():
    print("===============================================")

    print(cv2.__version__)
    print(np.array([[2,2,3],[1,2,2]])) #
    x = np.array([[2,2,3],[1,2,2]])
    y = np.full((512,512),255)
    print(x)
    print(y)
    print("===============================================")
if __name__ == '__main__':
    test()
    # src = cv.imread("./first.png")
    src = cv.imread(PATH+"black.png")
    src1 = cv.imread(PATH+"white.png")
    print("shape = ",src.shape," \ndtype = ",src.dtype)

    rows,cols = src.shape[:2]

    # 图片采样
    up_img = cv.pyrUp(src)
    down_img  = cv.pyrDown(src)


    plt.show()
    cv.imshow("up_img",up_img)
    cv.imshow("down_img",down_img)

    cv.imshow("opencv",src)
    cv.waitKey(0)
    cv.destroyAllWindows()
形态学操作
连通性
分为4联通,M联通,8联通
腐蚀与膨胀
python
import os
import cv2 as cv
import cv2
import matplotlib.pyplot as plt
import numpy as np
import  matplotlib

PATH = r"C:\Users\lxj\Desktop\picture\\"

def test():
    print("===============================================")

    print(cv2.__version__)
    print(np.array([[2,2,3],[1,2,2]])) #
    x = np.array([[2,2,3],[1,2,2]])
    y = np.full((512,512),255)
    print(x)
    print(y)
    print("===============================================")
if __name__ == '__main__':
    test()
    # src = cv.imread("./first.png")
    src = cv.imread(PATH+"black.png")
    src1 = cv.imread(PATH+"white.png")
    print("shape = ",src.shape," \ndtype = ",src.dtype)

    src = cv.cvtColor(src,cv.COLOR_BGR2GRAY) #转灰度

    #创建核结构
    kernel = np.ones((5,5),np.uint8)
    print("kernel = ",kernel)
    #腐蚀
    img2= cv2.erode(src,kernel)

    #膨胀
    img1 = cv2.dilate(src,kernel)

    plt.show()
    cv.imshow("erode",img2)
    cv.imshow("dilate",img1)

    cv.imshow("opencv",src)
    cv.waitKey(0)
    cv.destroyAllWindows()
开闭运算
开运算:去除图片周围噪点。先腐蚀后膨胀。
闭运算:填充图片中间的孔洞。先膨胀后腐蚀。
python
import os
import cv2 as cv
import cv2
import matplotlib.pyplot as plt
import numpy as np
import  matplotlib

PATH = r"C:\Users\lxj\Desktop\picture\\"

def test():
    print("===============================================")

    print(cv2.__version__)
    print(np.array([[2,2,3],[1,2,2]])) #
    x = np.array([[2,2,3],[1,2,2]])
    y = np.full((512,512),255)
    print(x)
    print(y)
    print("===============================================")
if __name__ == '__main__':
    test()
    # src = cv.imread("./first.png")
    src = cv.imread(PATH+"black.png")
    src1 = cv.imread(PATH+"white.png")
    print("shape = ",src.shape," \ndtype = ",src.dtype)

    src = cv.cvtColor(src,cv.COLOR_BGR2GRAY) #转灰度

    #创建核结构
    kernel = np.ones((3,3),np.uint8)
    print("kernel = ",kernel)
    #闭运算
    img2= cv2.morphologyEx(src,cv.MORPH_CLOSE,kernel)

    #开运算
    img1 = cv2.morphologyEx(src,cv.MORPH_OPEN,kernel)

    plt.show()
    cv.imshow("close",img2)
    cv.imshow("open",img1)

    cv.imshow("opencv",src)
    cv.waitKey(0)
    cv.destroyAllWindows()
礼帽和黑帽
礼帽:原图像与开运算的差:显示亮的点
黑帽:闭运算与原图像的差 显示暗的点
python
import os
import cv2 as cv
import cv2
import matplotlib.pyplot as plt
import numpy as np
import  matplotlib

PATH = r"C:\Users\lxj\Desktop\picture\\"

def test():
    print("===============================================")

    print(cv2.__version__)
    print(np.array([[2,2,3],[1,2,2]])) #
    x = np.array([[2,2,3],[1,2,2]])
    y = np.full((512,512),255)
    print(x)
    print(y)
    print("===============================================")
if __name__ == '__main__':
    test()
    # src = cv.imread("./first.png")
    src = cv.imread(PATH+"black.png")
    src1 = cv.imread(PATH+"white.png")
    print("shape = ",src.shape," \ndtype = ",src.dtype)

    src = cv.cvtColor(src,cv.COLOR_BGR2GRAY) #转灰度

    #创建核结构
    kernel = np.ones((5,5),np.uint8)
    print("kernel = ",kernel)
    #礼貌运算
    img2= cv2.morphologyEx(src,cv.MORPH_TOPHAT,kernel)

    #黑帽运算
    img1 = cv2.morphologyEx(src,cv.MORPH_BLACKHAT,kernel)

    plt.show()
    cv.imshow("tophat",img2)
    cv.imshow("blaock",img1)

    cv.imshow("opencv",src)
    cv.waitKey(0)
    cv.destroyAllWindows()
图形平滑
椒盐噪声:白色点,黑色点,极端的值
高斯噪声:噪声的概率密度分布是正态的
处理噪声
均值滤波
给定一个卷积核,对所有图形做卷积操作。
优点:算法简单、计算速度快。
缺点:去噪的同时去掉了很多细节部分,图片变的模糊
python
import os
import cv2 as cv
import cv2
import matplotlib.pyplot as plt
import numpy as np
import  matplotlib

PATH = r"C:\Users\lxj\Desktop\picture\\"

def test():
    print("===============================================")

    print(cv2.__version__)
    print(np.array([[2,2,3],[1,2,2]])) #
    x = np.array([[2,2,3],[1,2,2]])
    y = np.full((512,512),255)
    print(x)
    print(y)
    print("===============================================")
if __name__ == '__main__':
    test()
    # src = cv.imread("./first.png")
    src = cv.imread(PATH+"black.png")
    src1 = cv.imread(PATH+"white.png")
    print("shape = ",src.shape," \ndtype = ",src.dtype)

    src = cv.cvtColor(src,cv.COLOR_BGR2GRAY) #转灰度


    #均值滤波
    img1 = cv.blur(src,(5,5))


    plt.show()
    cv.imshow("avg",img1)

    cv.imshow("opencv",src)
    cv.waitKey(0)
    cv.destroyAllWindows()
高斯滤波
符合高斯分布(正态分布)去除高斯噪声
python
import os
import cv2 as cv
import cv2
import matplotlib.pyplot as plt
import numpy as np
import  matplotlib

PATH = r"C:\Users\lxj\Desktop\picture\\"

def test():
    print("===============================================")

    print(cv2.__version__)
    print(np.array([[2,2,3],[1,2,2]])) #
    x = np.array([[2,2,3],[1,2,2]])
    y = np.full((512,512),255)
    print(x)
    print(y)
    print("===============================================")
if __name__ == '__main__':
    test()
    # src = cv.imread("./first.png")
    src = cv.imread(PATH+"black.png")
    src1 = cv.imread(PATH+"white.png")
    print("shape = ",src.shape," \ndtype = ",src.dtype)

    src = cv.cvtColor(src,cv.COLOR_BGR2GRAY) #转灰度


    #高斯滤波
    img1 = cv.GaussianBlur(src,(5,5),1) # x方向标准差


    plt.show()
    cv.imshow("blur",img1)

    cv.imshow("opencv",src)
    cv.waitKey(0)
    cv.destroyAllWindows()
中值滤波
非线性滤波技术:用像素点邻域灰度值的中值来代替该像素点的灰度值。适用于椒盐噪声。
python
import os
import cv2 as cv
import cv2
import matplotlib.pyplot as plt
import numpy as np
import  matplotlib

PATH = r"C:\Users\lxj\Desktop\picture\\"

def test():
    print("===============================================")

    print(cv2.__version__)
    print(np.array([[2,2,3],[1,2,2]])) #
    x = np.array([[2,2,3],[1,2,2]])
    y = np.full((512,512),255)
    print(x)
    print(y)
    print("===============================================")
if __name__ == '__main__':
    test()
    # src = cv.imread("./first.png")
    src = cv.imread(PATH+"black.png")
    src1 = cv.imread(PATH+"white.png")
    print("shape = ",src.shape," \ndtype = ",src.dtype)

    src = cv.cvtColor(src,cv.COLOR_BGR2GRAY) #转灰度


    #中值滤波
    img1 = cv.medianBlur(src,5) # x方向标准差


    plt.show()
    cv.imshow("blur",img1)

    cv.imshow("opencv",src)
    cv.waitKey(0)
    cv.destroyAllWindows()
直方图
python
import os
import cv2 as cv
import cv2
import matplotlib.pyplot as plt
import numpy as np
import  matplotlib

PATH = r"C:\Users\lxj\Desktop\picture\\"

def test():
    print("===============================================")

    print(cv2.__version__)
    print(np.array([[2,2,3],[1,2,2]])) #
    x = np.array([[2,2,3],[1,2,2]])
    y = np.full((512,512),255)
    print(x)
    print(y)
    print("===============================================")
if __name__ == '__main__':
    test()
    # src = cv.imread("./first.png")
    src = cv.imread(PATH+"black.png")
    # src = cv.imread(PATH+"white.png")
    print("shape = ",src.shape," \ndtype = ",src.dtype)

    src = cv.cvtColor(src,cv.COLOR_BGR2GRAY) #转灰度


    #直方图
    img1=  cv.calcHist([src],[0],None,[256],[0,256])
    print(img1)

    plt.plot(img1) #显示直方图使用折现
    plt.show()
    cv.imshow("hist",img1)

    cv.imshow("opencv",src)
    cv.waitKey(0)
    cv.destroyAllWindows()
掩膜
可以提取感兴趣的区域,或者屏蔽一些区域。在遥感影像处理中使用比较多,提取道路或者房屋时,通过掩膜可以进行过滤,突出显示标志物品。
python
import os
import cv2 as cv
import cv2
import matplotlib.pyplot as plt
import numpy as np
import  matplotlib

PATH = r"C:\Users\lxj\Desktop\picture\\"

def test():
    print("===============================================")

    print(cv2.__version__)
    print(np.array([[2,2,3],[1,2,2]])) #
    x = np.array([[2,2,3],[1,2,2]])
    y = np.full((512,512),255)
    print(x)
    print(y)
    print("===============================================")
if __name__ == '__main__':
    test()
    # src = cv.imread("./first.png")
    src = cv.imread(PATH+"black.png")
    # src = cv.imread(PATH+"white.png")
    print("shape = ",src.shape," \ndtype = ",src.dtype)

    src = cv.cvtColor(src,cv.COLOR_BGR2GRAY) #转灰度

    # 掩膜
    # 创建蒙版
    make = np.zeros(src.shape[:2],np.uint8)
    make[0:100,100:200] = 1
    mask_img = cv.bitwise_and(src,src,mask=make)


    plt.plot(mask_img) #显示直方图使用折现
    plt.show()
    cv.imshow("mask_img",mask_img)

    cv.imshow("opencv",src)
    cv.waitKey(0)
    cv.destroyAllWindows()
直方图均衡化
使用场景:提高图形对比度,曝光度特别亮,特别暗。
黑的更黑,白的更白
python
import os
import cv2 as cv
import cv2
import matplotlib.pyplot as plt
import numpy as np
import  matplotlib

PATH = r"C:\Users\lxj\Desktop\picture\\"

def test():
    print("===============================================")

    print(cv2.__version__)
    print(np.array([[2,2,3],[1,2,2]])) #
    x = np.array([[2,2,3],[1,2,2]])
    y = np.full((512,512),255)
    print(x)
    print(y)
    print("===============================================")
if __name__ == '__main__':
    test()
    # src = cv.imread("./first.png")
    src = cv.imread(PATH+"black.png")
    # src = cv.imread(PATH+"white.png")
    print("shape = ",src.shape," \ndtype = ",src.dtype)

    src = cv.cvtColor(src,cv.COLOR_BGR2GRAY) #转灰度

    # 直方图均衡化
    img1 = cv.equalizeHist(src)

    plt.plot(img1) #显示直方图使用折现
    plt.show()
    cv.imshow("img1",img1)

    cv.imshow("opencv",src)
    cv.waitKey(0)
    cv.destroyAllWindows()
自适应的直方图均衡化
python
import os
import cv2 as cv
import cv2
import matplotlib.pyplot as plt
import numpy as np
import  matplotlib

PATH = r"C:\Users\lxj\Desktop\picture\\"

def test():
    print("===============================================")

    print(cv2.__version__)
    print(np.array([[2,2,3],[1,2,2]])) #
    x = np.array([[2,2,3],[1,2,2]])
    y = np.full((512,512),255)
    print(x)
    print(y)
    print("===============================================")
if __name__ == '__main__':
    test()
    # src = cv.imread("./first.png")
    src = cv.imread(PATH+"black.png")
    # src = cv.imread(PATH+"white.png")
    print("shape = ",src.shape," \ndtype = ",src.dtype)

    src = cv.cvtColor(src,cv.COLOR_BGR2GRAY) #转灰度

    # 自适应直方图均衡化
    clahe = cv.createCLAHE(clipLimit=2,tileGridSize=(8,8))

    img1 =  clahe.apply(src)

    plt.plot(img1) #显示直方图使用折现
    plt.show()
    cv.imshow("img1",img1)

    cv.imshow("opencv",src)
    cv.waitKey(0)
    cv.destroyAllWindows()
边缘检测
sobel检测算子
比较简单,实际应用中效率比canny边缘检测效率要高,不如canny准确率高。实际中sobel边缘是首选,他是高斯平滑和微分操作的结合体,具有抗噪能力强,用途多。
cpp
import os
import cv2 as cv
import cv2
import matplotlib.pyplot as plt
import numpy as np
import  matplotlib

PATH = r"C:\Users\lxj\Desktop\picture\\"

def test():
    print("===============================================")

    print(cv2.__version__)
    print(np.array([[2,2,3],[1,2,2]])) #
    x = np.array([[2,2,3],[1,2,2]])
    y = np.full((512,512),255)
    print(x)
    print(y)
    print("===============================================")
if __name__ == '__main__':
    test()
    # src = cv.imread("./first.png")
    src = cv.imread(PATH+"black.png")
    # src = cv.imread(PATH+"white.png")
    print("shape = ",src.shape," \ndtype = ",src.dtype)

    src = cv.cvtColor(src,cv.COLOR_BGR2GRAY) #转灰度
    # sobel 算子
    x  =cv.Sobel(src,cv.CV_16S,1,0)
    y = cv.Sobel(src,cv.CV_16S,0,1)
    absx = cv.convertScaleAbs(x)
    absy = cv.convertScaleAbs(y)
    # 边缘检测
    img1 = cv.addWeighted(absx,0.5,absy,0.5,0)


    plt.show()
    cv.imshow("img1",img1)

    # schaar 算子
    x  =cv.Sobel(src,cv.CV_16S,1,0,ksize=-1)
    y = cv.Sobel(src,cv.CV_16S,0,1,ksize= -1)
    absx = cv.convertScaleAbs(x)
    absy = cv.convertScaleAbs(y)
    # 边缘检测
    img2 = cv.addWeighted(absx,0.5,absy,0.5,0)
    cv.imshow("img2",img2)


    cv.imshow("opencv",src)
    cv.waitKey(0)
    cv.destroyAllWindows()
laplacian算子
拉不拉思算子,laplacian算子利用二阶导数来检测边缘。因为图像是二维,需要在两个方向求导。
cpp
import os
import cv2 as cv
import cv2
import matplotlib.pyplot as plt
import numpy as np
import  matplotlib

PATH = r"C:\Users\lxj\Desktop\picture\\"

def test():
    print("===============================================")

    print(cv2.__version__)
    print(np.array([[2,2,3],[1,2,2]])) #
    x = np.array([[2,2,3],[1,2,2]])
    y = np.full((512,512),255)
    print(x)
    print(y)
    print("===============================================")
if __name__ == '__main__':
    test()
    # src = cv.imread("./first.png")
    src = cv.imread(PATH+"black.png")
    # src = cv.imread(PATH+"white.png")
    print("shape = ",src.shape," \ndtype = ",src.dtype)

    src = cv.cvtColor(src,cv.COLOR_BGR2GRAY)
    plt.show()


    # laplacia
    res = cv.Laplacian(src,cv.CV_16S)
    print(res)
    img1 = cv.convertScaleAbs(res)

    cv.imshow("img1",img1)

    cv.imshow("opencv",src)
    cv.waitKey(0)
    cv.destroyAllWindows()
canny边缘检测
最优的边缘检测算法。
第一步:噪声去除
使用高斯滤波器
第二步:计算图像梯度
使用sobel算子计算一阶导数,获取梯度和方向。
第三步:非极大值抑制
去除非边界上的点,保留最大点。
第四步:滞后阈值
确定真正的边界。
cpp
import os
import cv2 as cv
import cv2
import matplotlib.pyplot as plt
import numpy as np
import  matplotlib

PATH = r"C:\Users\lxj\Desktop\picture\\"

def test():
    print("===============================================")

    print(cv2.__version__)
    print(np.array([[2,2,3],[1,2,2]])) #
    x = np.array([[2,2,3],[1,2,2]])
    y = np.full((512,512),255)
    print(x)
    print(y)
    print("===============================================")
if __name__ == '__main__':
    test()
    # src = cv.imread("./first.png")
    src = cv.imread(PATH+"black.png")
    # src = cv.imread(PATH+"white.png")
    print("shape = ",src.shape," \ndtype = ",src.dtype)
    src = cv.cvtColor(src,cv.COLOR_BGR2GRAY)
    plt.show()


    # canny边缘检测
    lowThreshold = 0
    max_lowThreshold = 100
    canny = cv.Canny(src,lowThreshold,max_lowThreshold)

    print(canny)

    cv.imshow("canny",canny)

    cv.imshow("opencv",src)
    cv.waitKey(0)
    cv.destroyAllWindows()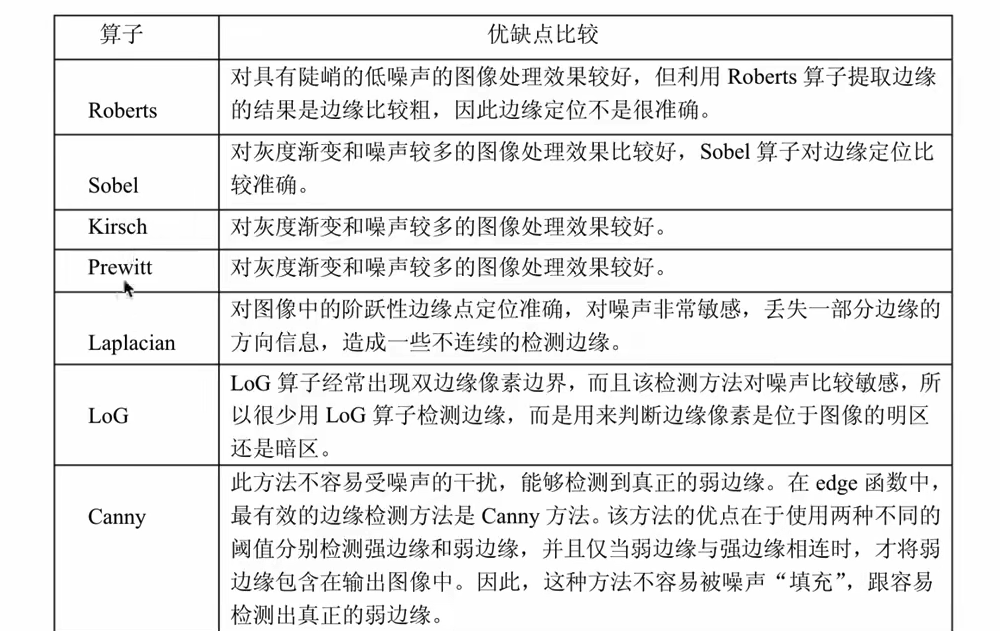
模板匹配
匹配位置
cpp
import os
import cv2 as cv
import cv2
import matplotlib.pyplot as plt
import numpy as np
import matplotlib

PATH = r"C:\Users\lxj\Desktop\picture\\"


def test():
    print("===============================================")

    print(cv2.__version__)
    print(np.array([[2, 2, 3], [1, 2, 2]]))  #
    x = np.array([[2, 2, 3], [1, 2, 2]])
    y = np.full((512, 512), 255)
    print(x)
    print(y)
    print("===============================================")


if __name__ == '__main__':
    test()
    # src = cv.imread("./first.png")
    src = cv.imread(PATH + "black.png")
    src1 = cv.imread(PATH + "template.png")
    print("shape = ", src.shape, " \ndtype = ", src.dtype)

    h,w,l = src1.shape

    # src = cv.cvtColor(src, cv.COLOR_BGR2GRAY)
    plt.show()
    cv.imshow("src", src)

    res = cv.matchTemplate(src, src1, cv.TM_CCORR)
    print(res)
    # 返回图像中最匹配的位置,确定左上角坐标,将匹配位置绘制在图像上。
    min_val,max_val,min_loc,max_loc = cv.minMaxLoc(res)

    top_left = max_loc
    bottom_right = (top_left[0]+w,top_left[1]+h )
    cv.rectangle(src,top_left,bottom_right,(0,255,0),2)


    cv.imshow("src1", src1)

    cv.imshow("opencv", src)

    cv.waitKey(0)
    cv.destroyAllWindows()
shift和surf匹配
霍夫变换
霍夫线检测
提取图像中的直线和圆等几何形状。
cpp
import os
import cv2 as cv
import cv2
import matplotlib.pyplot as plt
import numpy as np
import matplotlib

PATH = r"C:\Users\lxj\Desktop\picture\\"


def test():
    print("===============================================")

    print(cv2.__version__)
    print(np.array([[2, 2, 3], [1, 2, 2]]))  #
    x = np.array([[2, 2, 3], [1, 2, 2]])
    y = np.full((512, 512), 255)
    print(x)
    print(y)
    print("===============================================")


if __name__ == '__main__':
    test()
    # src = cv.imread("./first.png")
    src = cv.imread(PATH + "black.png")
    src1 = cv.imread(PATH + "template.png")
    print("shape = ", src.shape, " \ndtype = ", src.dtype)

    h,w,l = src1.shape
    src = cv.cvtColor(src, cv.COLOR_BGR2GRAY)

    #边缘检测
    edge = cv.Canny(src,50,150)

    cv.imshow("edge",edge)
    # 霍夫检测直线
    lines = cv.HoughLines(edge,0.8,np.pi/180,150)
    print(lines)
    if  lines is None:
        pass
        exit(0)

    for line in lines:
        rho,theta = line[0]
        a = np.cos(theta)
        b = np.sin(theta)
        x0 = rho*a
        y0 = rho*b

        x1 =int(x0+1000*(-b))
        y1 =int(y0+1000*(a))
        x2 = int(x0-1000*(-b))
        y2 = int(y0-1000*a)
        cv.line(src,(x1,y1),(x2,y2),(0,255,0))


    cv.imshow("opencv", src)

    cv.waitKey(0)
    cv.destroyAllWindows()
霍夫圆检测
cpp
import os
import cv2 as cv
import cv2
import matplotlib.pyplot as plt
import numpy as np
import matplotlib

PATH = r"C:\Users\lxj\Desktop\picture\\"


def test():
    print("===============================================")

    print(cv2.__version__)
    print(np.array([[2, 2, 3], [1, 2, 2]]))  #
    x = np.array([[2, 2, 3], [1, 2, 2]])
    y = np.full((512, 512), 255)
    print(x)
    print(y)
    print("===============================================")


if __name__ == '__main__':
    test()
    # src = cv.imread("./first.png")
    src = cv.imread(PATH + "black.png")
    src1 = cv.imread(PATH + "template.png")
    print("shape = ", src.shape, " \ndtype = ", src.dtype)

    h,w,l = src1.shape
    src = cv.cvtColor(src, cv.COLOR_BGR2GRAY)

    #进行中值模糊 去噪点
    edge = cv.medianBlur(src,7)

    cv.imshow("edge",edge)

    # 霍夫检测圆
    circles = cv.HoughCircles(edge,cv.HOUGH_GRADIENT,1,200,param1=100,param2=30,minRadius=0,maxRadius=100)


    print(circles)
    if  circles is None:
        pass
        exit(0)

    for circle in circles[0,:]:
        print("circle = ",circle)

        circle = circle.astype(int)
        cv.circle(src,(circle[0],circle[1]),circle[2],(0,255,0),2)
        cv.circle(src,(circle[0],circle[1]),2,(0,255,0),-1)


    cv.imshow("opencv", src)

    cv.waitKey(0)
    cv.destroyAllWindows()
角点特征
Harris和shi-Tomas算法
Harris检测
cpp
import os
import cv2 as cv
import cv2
import matplotlib.pyplot as plt
import numpy as np
import matplotlib

PATH = r"C:\Users\lxj\Desktop\picture\\"


def test():
    print("===============================================")

    print(cv2.__version__)
    print(np.array([[2, 2, 3], [1, 2, 2]]))  #
    x = np.array([[2, 2, 3], [1, 2, 2]])
    y = np.full((512, 512), 255)
    print(x)
    print(y)
    print("===============================================")


if __name__ == '__main__':
    test()
    # src = cv.imread("./first.png")
    src_d = cv.imread(PATH + "black.png")
    src1 = cv.imread(PATH + "template.png")
    print("shape = ", src_d.shape, " \ndtype = ", src_d.dtype)

    h,w,l = src1.shape
    src = cv.cvtColor(src_d, cv.COLOR_BGR2GRAY)

    #角点检测,输入图像必须是float32
    gray = np.float32(src)
    print("src = ",src)
    print("dst = ",gray)

    #最后一个参数为0.04到0.05之间
    dst =cv.cornerHarris(gray,2,3,0.04)
    print("dst = ",dst)

    src_d[dst > 0.001 * dst.max()] =  [0,0,255]

    print( src)


    cv.imshow("dst",dst)

    cv.imshow("opencv", src_d)

    cv.waitKey(0)
    cv.destroyAllWindows()
shi-tomas角点检测
cpp
import os
import cv2 as cv
import cv2
import matplotlib.pyplot as plt
import numpy as np
import matplotlib

PATH = r"C:\Users\lxj\Desktop\picture\\"


def test():
    print("===============================================")

    print(cv2.__version__)
    print(np.array([[2, 2, 3], [1, 2, 2]]))  #
    x = np.array([[2, 2, 3], [1, 2, 2]])
    y = np.full((512, 512), 255)
    print(x)
    print(y)
    print("===============================================")


if __name__ == '__main__':
    test()
    # src = cv.imread("./first.png")
    src_d = cv.imread(PATH + "black.png")
    src1 = cv.imread(PATH + "template.png")
    print("shape = ", src_d.shape, " \ndtype = ", src_d.dtype)

    h,w,l = src1.shape
    src = cv.cvtColor(src_d, cv.COLOR_BGR2GRAY)

    #角点检测,输入图像必须是float32
    gray = np.float32(src)
    print("src = ",src)
    print("dst = ",gray)

    #最后一个参数为0.04到0.05之间
    corners =cv.goodFeaturesToTrack(src,1000,0.01,10)
    print("corners = ",corners)

    for i in corners:
        i = i.astype(int)
        x,y = i.ravel()
        # x = int(x)
        # y = int(y) #圆心需要转换成为int
        cv.circle(src_d,(x,y),2,(0,0,255),-1)


    cv.imshow("opencv", src_d)

    cv.waitKey(0)
    cv.destroyAllWindows()
SIFT算法
尺度不变特征转换,实时性不高,边缘光滑的目标不能提取关键点。
cpp
import os
import cv2 as cv
import cv2
import matplotlib.pyplot as plt
import numpy as np
import matplotlib

PATH = r"C:\Users\lxj\Desktop\picture\\"


def test():
    print("===============================================")

    print(cv2.__version__)
    print(np.array([[2, 2, 3], [1, 2, 2]]))  #
    x = np.array([[2, 2, 3], [1, 2, 2]])
    y = np.full((512, 512), 255)
    print(x)
    print(y)
    print("===============================================")


if __name__ == '__main__':
    test()
    # src = cv.imread("./first.png")
    src_d = cv.imread(PATH + "black.png")
    src1 = cv.imread(PATH + "template.png")
    print("shape = ", src_d.shape, " \ndtype = ", src_d.dtype)

    h,w,l = src1.shape
    src = cv.cvtColor(src_d, cv.COLOR_BGR2GRAY)
    # sift关键点检测
    # cv.xfeatures2d.SIFT_create()
    sift = cv.SIFT_create()
    # kp 关键点信息包括:方向、尺度、位置信息,des是关键点的描述符
    kp,des = sift.detectAndCompute(src,None)

    cv.drawKeypoints(src_d,kp,src_d,flags=cv.DRAW_MATCHES_FLAGS_DRAW_RICH_KEYPOINTS)

    cv.imshow("sift", src)

    cv.imshow("opencv", src_d)

    cv.waitKey(0)
    cv.destroyAllWindows()
SURF算法
速度更快,计算小,提取特征跟SIFT相同。(不开源)
FAST算法
角点检测,比前两个效率高.
原理:若一个图像周围有一定数量的像素与该点像素值不同,则认为是角点。开源免费。
cpp
import os
import cv2 as cv
import cv2
import matplotlib.pyplot as plt
import numpy as np
import matplotlib

PATH = r"C:\Users\lxj\Desktop\picture\\"


def test():
    print("===============================================")

    print(cv2.__version__)
    print(np.array([[2, 2, 3], [1, 2, 2]]))  #
    x = np.array([[2, 2, 3], [1, 2, 2]])
    y = np.full((512, 512), 255)
    print(x)
    print(y)
    print("===============================================")


if __name__ == '__main__':
    test()
    # src = cv.imread("./first.png")
    src_d = cv.imread(PATH + "black.png")
    src1 = cv.imread(PATH + "template.png")
    print("shape = ", src_d.shape, " \ndtype = ", src_d.dtype)

    h,w,l = src1.shape
    src = cv.cvtColor(src_d, cv.COLOR_BGR2GRAY)
    #fast关键点检测,传入阈值,这个可以处理彩色图像
    fast = cv.FastFeatureDetector_create(threshold = 30 )

    # 检测关键点
    kp = fast.detect(src,None)
    cv.drawKeypoints(src_d,kp,None,color=(0,0,255))

    #非及大点抑制
    fast.setNonmaxSuppression(0)
    kp = fast.detect(src,None)
    img2 = cv.drawKeypoints(src,kp,None,color=(0,0,255))
    cv.imshow("img2",img2)

    cv.imshow("fast", src)
    cv.imshow("opencv", src_d)
    print("thread =  ",fast.getThreshold() )
    print("len(kp) =  ",len(kp) )

    cv.waitKey(0)
    cv.destroyAllWindows()
ORB算法
特征点检测,免费的算法。是FAST和BRIEF算法的结合。
SIFT和SURF是收费的。
cpp
import os
import cv2 as cv
import cv2
import matplotlib.pyplot as plt
import numpy as np
import matplotlib

PATH = r"C:\Users\lxj\Desktop\picture\\"


def test():
    print("===============================================")

    print(cv2.__version__)
    print(np.array([[2, 2, 3], [1, 2, 2]]))  #
    x = np.array([[2, 2, 3], [1, 2, 2]])
    y = np.full((512, 512), 255)
    print(x)
    print(y)
    print("===============================================")


if __name__ == '__main__':
    test()
    # src = cv.imread("./first.png")
    src_d = cv.imread(PATH + "black.png")
    src1 = cv.imread(PATH + "template.png")
    print("shape = ", src_d.shape, " \ndtype = ", src_d.dtype)

    h,w,l = src1.shape
    src = cv.cvtColor(src_d, cv.COLOR_BGR2GRAY)

    #ORB角点检测

    orb = cv.ORB.create(nfeatures=500)
    # orb = cv.xfeatures2d.orb_create(nfeatures=500)
    kp,des = orb.detectAndCompute(src,None)
    print(des.shape)
    #绘制关键点
    img = cv.drawKeypoints(src,kp,None,color=(0,0,255),flags=0)

    cv.imshow("img", img)

    cv.imshow("opencv", src_d)

    cv.waitKey(0)
    cv.destroyAllWindows()
视频操作
视频读取与显示
cpp
import os
import cv2 as cv
import cv2
import matplotlib.pyplot as plt
import numpy as np
import matplotlib

PATH = r"C:\Users\lxj\Desktop\picture\\"


def test():
    print("===============================================")

    print(cv2.__version__)
    print(np.array([[2, 2, 3], [1, 2, 2]]))  #
    x = np.array([[2, 2, 3], [1, 2, 2]])
    y = np.full((512, 512), 255)
    print(x)
    print(y)
    print("===============================================")


if __name__ == '__main__':
    test()
    # src = cv.imread("./first.png")
    # filename 0就是摄像头
    cap = cv.VideoCapture(r"C:\Users\lxj\Videos\Captures\test.mp4")
    while (cap.isOpened()):
        # 获取每一帧图片
        ret, frame = cap.read()
        if ret == True:
            cv.imshow("frame", frame)
        # 每一帧图像的间隔
        k = cv.waitKey(25)
        print("k = ", k)
        if k & 0xFF == ord('q'):
            break

    cap.release()

    # cv.waitKey(0)
    cv.destroyAllWindows()
视频读取是没有声音的,只有视频。
视频文件保存
cpp
import os
import cv2 as cv
import cv2
import matplotlib.pyplot as plt
import numpy as np
import matplotlib

PATH = r"C:\Users\lxj\Desktop\picture\\"


def test():
    print("===============================================")

    print(cv2.__version__)
    print(np.array([[2, 2, 3], [1, 2, 2]]))  #
    x = np.array([[2, 2, 3], [1, 2, 2]])
    y = np.full((512, 512), 255)
    print(x)
    print(y)
    print("===============================================")


if __name__ == '__main__':
    test()
    # src = cv.imread("./first.png")
    # filename 0就是摄像头
    # cap = cv.VideoCapture(r"C:\Users\lxj\Videos\Captures\test.mp4")
    cap = cv.VideoCapture(r"C:\Users\lxj\Videos\Captures\1.mp4")

    frame_width = cap.get(3)
    frame_height = cap.get(4)
    print(frame_width,frame_height)
    #
    # out = cv.VideoWriter("out.avi", cv.VideoWriter.fourcc("M", "J", "P", "G"), 10,(int(frame_width), int(frame_height)))
    # 定义视频文件的编解码器
    fourcc = cv2.VideoWriter.fourcc(*'XVID')
    # 创建视频文件
    out = cv2.VideoWriter('output.avi', fourcc, 20.0, (int(frame_width), int(frame_height)))

    while (cap.isOpened()):
        # 获取每一帧图片
        ret, frame = cap.read()

        if ret == True:
            cv.imshow("frame", frame)
            # 保存图片视频
            out.write(frame)

        # 每一帧图像的间隔
        k = cv.waitKey(25)
        print("k = ", k)
        if k & 0xFF == ord('q'):
            break

    cap.release()
    out.release()


    # cv.waitKey(0)
    cv.destroyAllWindows()
视频追踪
mean shift原理
cpp
import os
import cv2 as cv
import cv2
import matplotlib.pyplot as plt
import numpy as np
import matplotlib

PATH = r"C:\Users\lxj\Desktop\picture\\"


def test():
    print("===============================================")

    print(cv2.__version__)
    print(np.array([[2, 2, 3], [1, 2, 2]]))  #
    x = np.array([[2, 2, 3], [1, 2, 2]])
    y = np.full((512, 512), 255)
    print(x)
    print(y)
    print("===============================================")


if __name__ == '__main__':
    test()
    # src = cv.imread("./first.png")
    # filename 0就是摄像头
    # cap = cv.VideoCapture(r"C:\Users\lxj\Videos\Captures\test.mp4")
    cap = cv.VideoCapture(r"C:\Users\lxj\Videos\Captures\1.mp4")

    frame_width = cap.get(3)
    frame_height = cap.get(4)
    print(frame_width,frame_height)
    ret,frame = cap.read()
    r,h,c,w = 197,141,0,207
    track_window = (c,r,w,h)
    #指定感兴趣区域
    roi = frame[r:r+h,c:c+w]

    #计算直方图
    #转换色彩空间
    hsv_roi = cv.cvtColor(roi,cv.COLOR_BGR2HSV)
    #去除亮度的值
    # mask = cv.inRange(hsv_roi,[0],np.array((0.,60.,32.)),np.array((180.,255.,255,)))
    #计算直方图
    roi_hist = cv.calcHist([hsv_roi],[0],None,[180],[0,180])
    #归一化
    cv.normalize(roi_hist,roi_hist,0,255,cv.NORM_MINMAX)
    #目标追踪
    term_crit = (cv.TERM_CRITERIA_EPS |cv.TERM_CRITERIA_COUNT,10,1)
    while True:
        #获取图片
        ret,frame = cap.read()
        if ret ==True:
            hsv = cv.cvtColor(frame,cv.COLOR_BGR2HSV)
            dst = cv.calcBackProject([hsv],[0],roi_hist,[0,180],1)
            #进行追踪
            ret,track_window = cv.meanShift(dst,track_window,term_crit)
            x,y,w,h = track_window
            print(track_window)
            img2  = cv.rectangle(frame,(x,y),(x+w,y+h),255,2)
            cv.imshow("frame",img2)

            if cv.waitKey(60) == 27:
                break

    # cv.waitKey(0)
    cv.destroyAllWindows()
camshift
连续自适应的mean shift算法。
cpp
import os
import cv2 as cv
import cv2
import matplotlib.pyplot as plt
import numpy as np
import matplotlib

PATH = r"C:\Users\lxj\Desktop\picture\\"


def test():
    print("===============================================")

    print(cv2.__version__)
    print(np.array([[2, 2, 3], [1, 2, 2]]))  #
    x = np.array([[2, 2, 3], [1, 2, 2]])
    y = np.full((512, 512), 255)
    print(x)
    print(y)
    print("===============================================")


if __name__ == '__main__':
    test()
    # src = cv.imread("./first.png")
    # filename 0就是摄像头
    # cap = cv.VideoCapture(r"C:\Users\lxj\Videos\Captures\test.mp4")
    cap = cv.VideoCapture(r"C:\Users\lxj\Videos\Captures\1.mp4")

    frame_width = cap.get(3)
    frame_height = cap.get(4)
    print(frame_width,frame_height)
    ret,frame = cap.read()
    r,h,c,w = 197,141,0,207
    track_window = (c,r,w,h)
    #指定感兴趣区域
    roi = frame[r:r+h,c:c+w]

    #计算直方图
    #转换色彩空间
    hsv_roi = cv.cvtColor(roi,cv.COLOR_BGR2HSV)
    #去除亮度的值
    # mask = cv.inRange(hsv_roi,[0],np.array((0.,60.,32.)),np.array((180.,255.,255,)))
    #计算直方图
    roi_hist = cv.calcHist([hsv_roi],[0],None,[180],[0,180])
    #归一化
    cv.normalize(roi_hist,roi_hist,0,255,cv.NORM_MINMAX)
    #目标追踪
    term_crit = (cv.TERM_CRITERIA_EPS |cv.TERM_CRITERIA_COUNT,10,1)
    while True:
        #获取图片
        ret,frame = cap.read()
        if ret ==True:
            hsv = cv.cvtColor(frame,cv.COLOR_BGR2HSV)
            dst = cv.calcBackProject([hsv],[0],roi_hist,[0,180],1)
            #进行追踪
            # ret,track_window = cv.meanShift(dst,track_window,term_crit)
            ret,track_window = cv.CamShift(dst,track_window,term_crit)
            pts = cv.boxPoints(ret)
            pts=np.int32(pts)
            print("pts = ",pts,"\n", [pts])

            # img2 = cv.polylines(frame,[pts],True,255,2)
            img2 = cv.polylines(frame,[pts],True,(0,0,255),2)

            # x,y,w,h = track_window
            # print(track_window)
            # img2  = cv.rectangle(frame,(x,y),(x+w,y+h),255,2)
            cv.imshow("frame",img2)

            if cv.waitKey(60) == 27:
                break

    # cv.waitKey(0)
    cv.destroyAllWindows()
人脸检测
使用机器学习完成人脸检测。
自带的训练好的文件:C:\Users\lxj\AppData\Roaming\Python\Python313\site-packages\cv2\data
使用cv.file 输出文件位置。
图像人脸检测
cpp
import os
import cv2 as cv
import cv2
import matplotlib.pyplot as plt
import numpy as np
import matplotlib

PATH = r"C:\Users\lxj\Desktop\picture\\"


def test():
    print("===============================================")

    print(cv2.__version__)
    print(np.array([[2, 2, 3], [1, 2, 2]]))  #
    x = np.array([[2, 2, 3], [1, 2, 2]])
    y = np.full((512, 512), 255)
    print(x)
    print(y)
    print("===============================================")


if __name__ == '__main__':


    print(cv.__file__)
    # "haarcascade_frontalface_default.xml"
    src = cv.imread(r"C:\Users\lxj\Desktop\picture\face.png")
    gray = cv.cvtColor(src,cv.COLOR_BGR2GRAY)

    face_cas = cv.CascadeClassifier("haarcascade_frontalface_default.xml")
    face_cas.load("haarcascade_frontalface_default.xml")

    eyes_cas = cv.CascadeClassifier("haarcascade_eye.xml")
    eyes_cas.load("haarcascade_eye.xml")

    print("gray = ",gray)

    #调用识别人脸
    faceRects = face_cas.detectMultiScale(gray,scaleFactor=1.2,minNeighbors=3,minSize=(32,32))
    for faceRect in faceRects:
        x,y,w,h = faceRect
        #框出人脸
        cv.rectangle(src,(x,y),(x+h,y+w),(0,255,0),3)
        # 识别出的人脸进行眼睛检测
        roi_color = src[y:y+h,x:x+w]
        roi_gray = gray[y:y+h,x:x+w]
        eyes = eyes_cas.detectMultiScale(roi_gray)
        for(ex,ey,ew,eh) in eyes:
            cv.rectangle(roi_color,(ex,ey),(ex+ew,ey+eh),(0,255,0),2)
    #绘制结果
    cv.imshow("src",src)
    cv.imshow("gray",gray)

    cv.waitKey(0)
    cv.destroyAllWindows()
视频人脸检测
cpp
import os
import cv2 as cv
import cv2
import matplotlib.pyplot as plt
import numpy as np
import matplotlib

PATH = r"C:\Users\lxj\Desktop\picture\\"


def test():
    print("===============================================")

    print(cv2.__version__)
    print(np.array([[2, 2, 3], [1, 2, 2]]))  #
    x = np.array([[2, 2, 3], [1, 2, 2]])
    y = np.full((512, 512), 255)
    print(x)
    print(y)
    print("===============================================")


if __name__ == '__main__':


    print(cv.__file__)
    # "haarcascade_frontalface_default.xml"
    cap = cv.VideoCapture(r"C:\Users\lxj\Desktop\picture\test.mp4")
    #每一帧进行检测
    while(cap.isOpened()):
        ret,frame = cap.read()
        if ret == True:
            gray = cv.cvtColor(frame,cv.COLOR_BGR2GRAY)
            face_cas = cv.CascadeClassifier("haarcascade_frontalface_default.xml")
            face_cas.load("haarcascade_frontalface_default.xml")

            eyes_cas = cv.CascadeClassifier("haarcascade_eye.xml")
            eyes_cas.load("haarcascade_eye.xml")
            #调用识别人脸
            faceRects = face_cas.detectMultiScale(gray,scaleFactor=1.2,minNeighbors=3,minSize=(32,32))
            for faceRect in faceRects:
                x,y,w,h = faceRect
                #框出人脸
                cv.rectangle(frame,(x,y),(x+h,y+w),(0,255,0),3)
                # 识别出的人脸进行眼睛检测
                roi_color = frame[y:y+h,x:x+w]
                roi_gray = gray[y:y+h,x:x+w]
                eyes = eyes_cas.detectMultiScale(roi_gray)
                for(ex,ey,ew,eh) in eyes:
                    cv.rectangle(roi_color,(ex,ey),(ex+ew,ey+eh),(0,255,0),2)
            #绘制结果
            # cv.imshow("src",src)
            # cv.imshow("gray",gray)
            cv.imshow("frame",frame)
            k = cv.waitKey(100)
            print("k = ",k)
            if k == 27:
                break
    # cv.waitKey(0)
    cv.destroyAllWindows()