文章目录
-
- Agent
- Workflow
- LangGraph本地服务
-
- 创建一个LangGraph项目
-
- 1、创建python虚拟环境
- [2、安装LangGraph CLI](#2、安装LangGraph CLI)
- 3、创建LangGraph应用
- 4、启动LangGraph服务器
- 调用Agent发布的API接口
- 企业开发思路&流程
- Tool工具定义
LangGraph是一个用于复杂代理系统的编排框架,比Langchain代理更底层,更可控。
LangGraph不会给你增加代码上的开销,是专门为流式工作流设计的。
Agent
智能体=Agent
模型具备:
- 外部工具访问权限
- 自主规划与任务执行任务的推理能力
这种结合推理能力与外部信息访问的系统,就叫智能体Agent。
智能体的认知架构中有三个基本组件:
- 模型model
- 工具tools
- 提示词
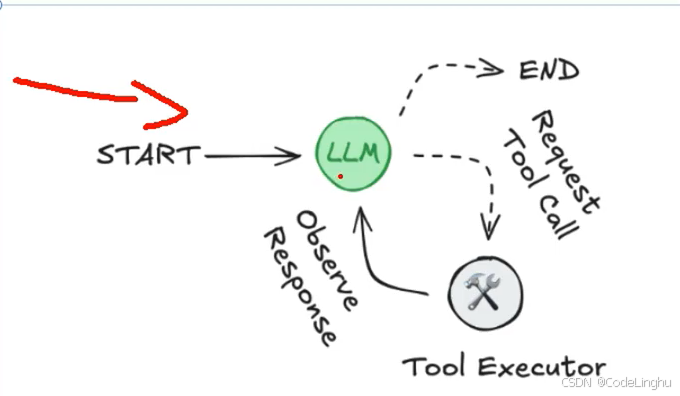
LLM在一个循环中运行,在每次迭代中,他会选择一个要调用的工具,提供输入,接收结果(一个观察),并利用该观察来指导下一个动作,循环一直持续,直到满足停止条件------通常是Agent已经收集到足够的信息来响应用户的时候。
Workflow
workflow又叫做图。
Agent系统分为两类:
- 第一类是workflow,遵循定义的工作流,编排LLM和工具,固定代码路径
- 第二类就是Agent:就是一个完全自主的系统,自身推理、规划,自主控制,完成任务。
Agent智能体搞不定的时候,可以用编排流程做工作流。在智能体的世界中,一切都是图。当Agent智能体出现大模型幻觉的时候,我们就可以使用workflow工作流。
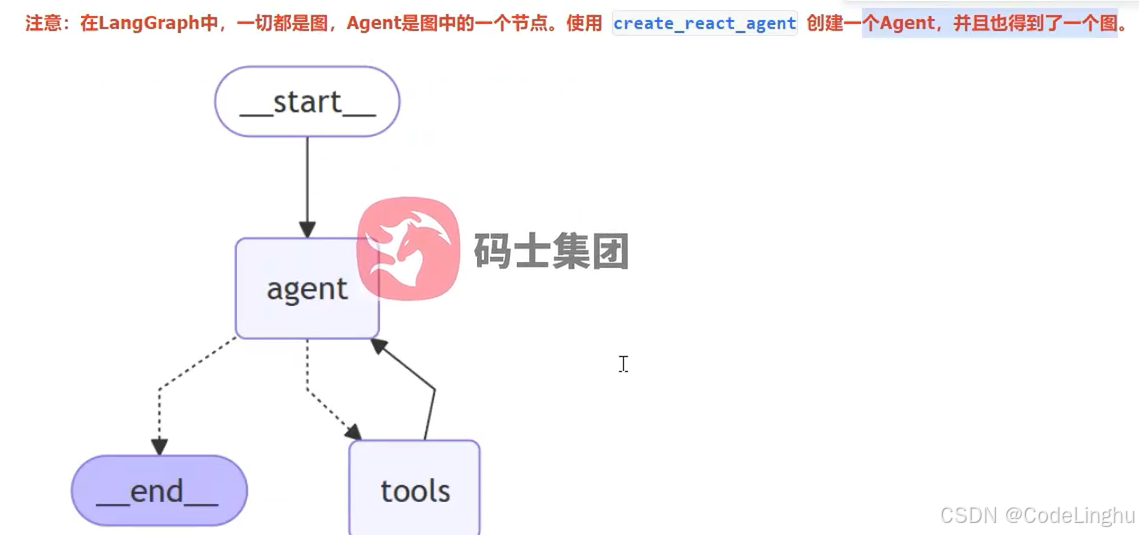
宏观来看:整个工作流workflow其实就是一个智能体。
LangGraph本地服务
LangGraph就是一个多平台命令行工具,用户在本地构建和运行LangGraph API服务,生成的服务器包含您的图所有的运行、线程等API端点。
创建一个LangGraph项目
1、创建python虚拟环境
cmd输入:
pip install virtualenv
创建虚拟环境:
D:\Environment\python\env_py>D:\Environment\python\Python3.11\Scripts\virtualenv.exe new_langgraph_env
D:\Environment\python\env_py>D:\Environment\python\Python3.11\Scripts\virtualenv.exe new_langgraph_env
created virtual environment CPython3.11.0.beta.1-64 in 20997ms
creator CPython3Windows(dest=D:\Environment\python\env_py\new_langgraph_env, clear=False, no_vcs_ignore=False, global=False)
seeder FromAppData(download=False, pip=bundle, setuptools=bundle, via=copy, app_data_dir=C:\Users\linghu\AppData\Local\pypa\virtualenv)
added seed packages: pip25.3, setuptools80.9.0
activators BashActivator,BatchActivator,FishActivator,NushellActivator,PowerShellActivator,PythonActivator
D:\Environment\python\env_py>
然后去激活自己创建的虚拟环境:
D:\Environment\python\env_py\new_langgraph_env 的目录
2025/12/28 13:55
.
2025/12/28 13:55 ...
2025/12/28 13:55 42 .gitignore
2025/12/28 13:55 197 CACHEDIR.TAG
2025/12/28 13:55 Lib
2025/12/28 13:55 321 pyvenv.cfg
2025/12/28 13:55 Scripts
3 个文件 560 字节
4 个目录 150,790,975,488 可用字节D:\Environment\python\env_py\new_langgraph_env>cd Scripts
D:\Environment\python\env_py\new_langgraph_env\Scripts>activate
(new_langgraph_env) D:\Environment\python\env_py\new_langgraph_env\Scripts>...
2、安装LangGraph CLI
pip install --upgrade "langgraph-cliinmem"
3、创建LangGraph应用
langgraph new langgraph_demo
(new_langgraph_env) D:\Environment\python\env_py\new_langgraph_env\Scripts>cd d:\PersonWork\Projects\AIProjects
(new_langgraph_env) d:\PersonWork\Projects\AIProjects>langgraph new langgraph_demo
🌟 Please select a template:
- New LangGraph Project - A simple, minimal chatbot with memory.
- ReAct Agent - A simple agent that can be flexibly extended to many tools.
- Memory Agent - A ReAct-style agent with an additional tool to store memories for use across conversational threads.
- Retrieval Agent - An agent that includes a retrieval-based question-answering system.
- Data-enrichment Agent - An agent that performs web searches and organizes its findings into a structured format.
Enter the number of your template choice (default is 1):You selected: New LangGraph Project - A simple, minimal chatbot with memory.
Choose language (1 for Python 🐍, 2 for JS/TS 🌐):
Choose language (1 for Python 🐍, 2 for JS/TS 🌐):
Choose language (1 for Python 🐍, 2 for JS/TS 🌐): 1
📥 Attempting to download repository as a ZIP archive...
URL: https://github.com/langchain-ai/new-langgraph-project/archive/refs/heads/main.zip
✅ Downloaded and extracted repository to d:\PersonWork\Projects\AIProjects\langgraph_demo
🎉 New project created at d:\PersonWork\Projects\AIProjects\langgraph_demo
(new_langgraph_env) d:\PersonWork\Projects\AIProjects>
打包应用:
pip install -e .
4、启动LangGraph服务器
langgraph dev
python
"""LangGraph single-node graph template.

Returns a predefined response. Replace logic and configuration as needed.
"""

from __future__ import annotations

from dataclasses import dataclass
from typing import Any, Dict

from langchain_core.tools import tool
from langchain_openai import ChatOpenAI
from langgraph.graph import StateGraph
from langgraph.prebuilt import create_react_agent
from langgraph.runtime import Runtime
from typing_extensions import TypedDict

from src.env_utils import DASHSCOPE_API_KEY, DASHSCOPE_BASE_URL


class Context(TypedDict):
    """Context parameters for the agent.

    Set these when creating assistants OR when invoking the graph.
    See: https://langchain-ai.github.io/langgraph/cloud/how-tos/configuration_cloud/
    """

    my_configurable_param: str


@dataclass
class State:
    """Input state for the agent.

    Defines the initial structure of incoming data.
    See: https://langchain-ai.github.io/langgraph/concepts/low_level/#state
    """

    changeme: str = "example"


async def call_model(state: State, runtime: Runtime[Context]) -> Dict[str, Any]:
    """Process input and returns output.

    Can use runtime context to alter behavior.
    """
    return {
        "changeme": "output from call_model. "
        f"Configured with {(runtime.context or {}).get('my_configurable_param')}"
    }


llm = ChatOpenAI(
    model="qwen3-max",
    temperature=0.8,
    openai_api_key=DASHSCOPE_API_KEY,
    openai_api_base=DASHSCOPE_BASE_URL,
)
@tool(description="Get weather information for a given city.")
def get_weather(city: str)->str:
    return f"It's sunny in {city}"

# Define the graph
graph = create_react_agent(
    llm,
    tools=[get_weather],
    prompt="你是智能助手"
)
(new_langgraph_env) PS D:\PersonWork\Projects\AIProjects\langgraph_demo> langgraph dev
INFO:langgraph_api.cli:
Welcome to╦ ┌─┐┌┐┌┌─┐╔═╗┬─┐┌─┐┌─┐┬ ┬
║ ├─┤││││ ┬║ ╦├┬┘├─┤├─┘├─┤
╩═╝┴ ┴┘└┘└─┘╚═╝┴└─┴ ┴┴ ┴ ┴
- 🚀 API: http://127.0.0.1:2024
- 🎨 Studio UI: https://smith.langchain.com/studio/?baseUrl=http://127.0.0.1:2024
- 📚 API Docs: http://127.0.0.1:2024/docs
This in-memory server is designed for development and testing.
For production use, please use LangSmith Deployment.
调用Agent发布的API接口
pythonSDK安装:
pip install langgraph-sdk
写一个单元测试,在项目的test文件夹下:
异步调用
python
import asyncio

from langgraph_sdk import get_client
#调用智能体发布的API接口
client=get_client(url="http://localhost:2024")

async def main():
    async for chunk in client.runs.stream(
        None,
        "agent",
        input={
            "message":[
                {
                    "role": "human",
                    "content": "今天,北京的天气怎么样?"
                }
            ],
        },
    ):
        print(f"Receving new event of type:{chunk.event}...")
        print(chunk.data)
        print("\n\n")

if __name__ == '__main__':
    asyncio.run(main())
同步调用
python
import asyncio

from langgraph_sdk import get_client
#调用智能体发布的API接口
client=get_client(url="http://localhost:2024")

def main():
    for chunk in client.runs.stream(
        None,
        "agent",
        input={
            "message":[
                {
                    "role": "human",
                    "content": "今天,北京的天气怎么样?"
                }
            ],
        },
        stream_mode="messages"
    ):
        print(f"Receving new event of type:{chunk.event}...")
        print(chunk.data)
        print("\n\n")

if __name__ == '__main__':
    run(main())
企业开发思路&流程
- 首先使用LangGraph CLI创建项目模板
- 安装依赖,用pycharm打开项目
- LangGraph dev启动项目进行测试
- 还可以测试API接口。
- 把程序发布成docker容器,放在服务器上跑起来。
- 未来可以通过Java、python调用我们的智能体的API接口
Tool工具定义
智能体的四种消息类型:
- humanmessage
- aimessage
- toolmessage
- aimessage