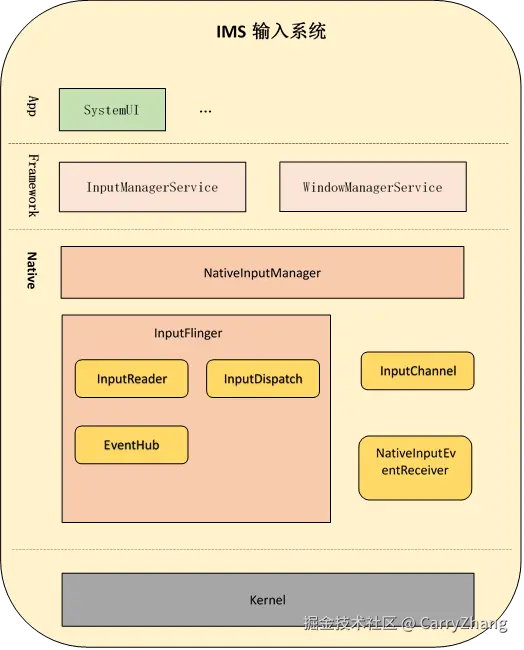
1.前言
Android的输入系统是贯穿各个系统的事件管线。
在最低层,物理输入设备会生成描述状态更改(例如按键按压和轻触接触点)的信号。设备固件以某种方式编码和传输这些信号,例如向系统发送 USB HID 报告或在 I2C 总线上产生中断。
输入设备驱动程序负责通过 Linux 输入协议将设备特定信号转换为标准输入事件格式。Linux 输入协议在 linux/input.h 内核头文件中定义了一组标准事件类型和代码。
接下来,Android EventHub 组件通过打开与每个输入设备关联的 evdev 驱动程序从内核读取输入事件。然后,Android InputReader 组件根据设备类别解码输入事件,并生成 Android 输入事件流。在此过程中,Linux 输入协议事件代码将根据输入设备配置、键盘布局文件和各种映射表,转化为 Android 事件代码。
最后,InputReader 将输入事件发送到 InputDispatcher,由其通过socket对将这些事件转发到相应的窗口client,各窗口收到事件找到最匹配的InputState处理事件,处理完事件最终又通过socket对将事件处理结束标记回传到server端的InputDispatcher,这样一个事件的分发处理流程才算结束。然后InputDispatcher又可以开始分发下一个事件了。
整体的 架构图如下:
2.IMS系统初始化
在Android系统启动时启动了很多服务,包括引导服务、核心服务、其他服务等,我们的IMS就是在其他服务里启动的。
本文的源码是基于cs.android.com/ maint分支 最新代码分析的。
scss
frameworks/base/services/java/com/android/server/SystemServer.java
private void startOtherServices(@NonNull TimingsTraceAndSlog t) {
    ...
    InputManagerService inputManager = new InputManagerService(context);
    //关联WMS和IMS
    WindowManagerService wm = WindowManagerService.main(context, inputManager, !mFirstBoot,
                new PhoneWindowManager(), mActivityManagerService.mActivityTaskManager);
    inputManager.setWindowManagerCallbacks(wm.getInputManagerCallback());
    //启动ims
    inputManager.start();
    ...
}

frameworks/base/services/core/java/com/android/server/input/InputManagerService.java
public void start() {
    Slog.i(TAG, "Starting input manager");
    mNative.start();

    // Add ourselves to the Watchdog monitors.
    Watchdog.getInstance().addMonitor(this);
}

frameworks/base/services/core/jni/com_android_server_input_InputManagerService.cpp
int register_android_server_InputManager(JNIEnv* env) {
    //注册jni方法
    int res = jniRegisterNativeMethods(env,
                                       "com/android/server/input/"
                                       "NativeInputManagerService$NativeImpl",
                                       gInputManagerMethods, NELEM(gInputManagerMethods));
    (void)res; // Faked use when LOG_NDEBUG.
    LOG_FATAL_IF(res < 0, "Unable to register native methods.");

    FIND_CLASS(gNativeInputManagerServiceImpl.clazz,
               "com/android/server/input/"
               "NativeInputManagerService$NativeImpl");
   //注册java引用
    gNativeInputManagerServiceImpl.clazz =
            jclass(env->NewGlobalRef(gNativeInputManagerServiceImpl.clazz));
    gNativeInputManagerServiceImpl.mPtr =
            env->GetFieldID(gNativeInputManagerServiceImpl.clazz, "mPtr", "J");
}

static void nativeStart(JNIEnv* env, jobject nativeImplObj) {
    NativeInputManager* im = getNativeInputManager(env, nativeImplObj);

    status_t result = im->getInputManager()->start();
    if (result) {
        jniThrowRuntimeException(env, "Input manager could not be started.");
    }
}

frameworks/native/services/inputflinger/InputManager.cpp
InputManager::InputManager(const sp<InputReaderPolicyInterface>& readerPolicy,
                       InputDispatcherPolicyInterface& dispatcherPolicy,
                       PointerChoreographerPolicyInterface& choreographerPolicy,
                       InputFilterPolicyInterface& inputFilterPolicy) {
    mInputFlingerRust = createInputFlingerRust();
    //初始化InputDispatcher
    mDispatcher = createInputDispatcher(dispatcherPolicy);
    mTracingStages.emplace_back(
        std::make_unique<TracedInputListener>("InputDispatcher", *mDispatcher));
    ...
    //初始化InputDispatcher
    mReader = createInputReader(readerPolicy, *mTracingStages.back());
}

status_t InputManager::start() {
    //开始轮询分发事件
    status_t result = mDispatcher->start();
    if (result) {
        ALOGE("Could not start InputDispatcher thread due to error %d.", result);
        return result;
    }
    //开始轮询读取事件
    result = mReader->start();
    if (result) {
        ALOGE("Could not start InputReader due to error %d.", result);

        mDispatcher->stop();
        return result;
    }

    return OK;
}
IMS启动时主要是初始化事件分发器InputDispatcher和事件读取器InputReader,并分别开始轮询。接下来将分别对事件读取流程和分发流程进行分析。
3.InputReader事件读取、组装和预分发
InputReader中的InputThread一直循环从EventHub中读取设备输入的事件和对事件进行封装,同时将事件传递到InputDispatcher的队列中,以便后续的分发。
先从初始化开始入手,InputDispatcher初始化时同时初始化了EventHub,同时还关联了mTracingStages,而mTracingStages里面又关联了事件分发的InputDispatcher。
c
frameworks/native/services/inputflinger/reader/InputReaderFactory.cpp
std::unique_ptr<InputReaderInterface> createInputReader(
    const sp<InputReaderPolicyInterface>& policy, InputListenerInterface& listener) {
    return std::make_unique<InputReader>(std::make_unique<EventHub>(), policy, listener);
}
InputReader::start()里初始化了InputThread,InputThread是C++ Thread的子类,这里相当于开启了轮询,循环调用 loopOnce,线程的执行流程可以参阅相关介绍。
arduino
frameworks/native/services/inputflinger/reader/InputReader.cpp
std::shared_ptr<EventHubInterface> mEventHub;
sp<InputReaderPolicyInterface> mPolicy;
std::list<NotifyArgs> mPendingArgs GUARDED_BY(mLock);

status_t InputReader::start() {
    if (mThread) {
        return ALREADY_EXISTS;
    }
    mThread = std::make_unique<InputThread>(
            "InputReader", [this]() { loopOnce(); }, [this]() { mEventHub->wake(); });
    return OK;
}


frameworks/native/services/inputflinger/reader/InputReader.cpp
void InputReader::loopOnce() {

    std::vector<InputDeviceInfo> inputDevices;
    std::list<NotifyArgs> notifyArgs;
    {
        //计算epoll_wait等待时间,大部分为-1,即一直阻塞,直到读取到事件
        timeoutMillis = -1;
        ...
    }
    std::vector<RawEvent> events = mEventHub->getEvents(timeoutMillis);//注释1

    { // acquire lock

        if (!events.empty()) {

            //组装事件,事件分三种:1.添加输入设备,2.移除输入设备,3.设备产品的事件
            mPendingArgs += processEventsLocked(events.data(), events.size());//注释2
        }
        ...
        std::swap(notifyArgs, mPendingArgs);
        ...
    } // release lock


    // Flush queued events out to the listener.
    //通知InputDispatcher有新事件需要处理
    for (const NotifyArgs& args : notifyArgs) {
        mNextListener.notify(args);//注释3
    }

    // Notify the policy that input devices have changed.
    if (inputDevicesChanged) {
        mPolicy->notifyInputDevicesChanged(inputDevices);
    }
    ...
}
loopOnce这里主要分析标注注释的三个方法,
- 注释1 读取事件:从EventHub获取时间,等待时间为timeoutMillis,这个一般都是-1,即epoll_wait一直阻塞等待事件
- 注释2 封装事件:事件分三类:新增输入设备(例如外接键盘/插入耳机等),删除输入设备,设备正常的输入事件。针对不同类型的新增设备(触控屏/键等)InputDeviceClass添加不同类型InputMapper用来处理该设备后续传入的事件,收到某种设备的原始事件后,就获取对应的InputMapper来进行数据封装
- 注释3 分发事件:通知InputDispatcher处理封装好的事件
3.1 EventHub读取事件
读取事件主要是 通过 EventHub 进行的,这里我们进一步跟进 EventHub的源码,先看一下EventHub 的初始化逻辑
scss
frameworks/native/services/inputflinger/reader/EventHub.cpp
//输入事件的文件操作目录
static const char* DEVICE_INPUT_PATH = "/dev/input";
// v4l2 devices go directly into /dev
static const char* DEVICE_PATH = "/dev";

EventHub::EventHub(void)
  : mBuiltInKeyboardId(NO_BUILT_IN_KEYBOARD),
    mNextDeviceId(1),
    mControllerNumbers(),
    mNeedToReopenDevices(false),
    mNeedToScanDevices(true),
    mPendingEventCount(0),
    mPendingEventIndex(0),
    mPendingINotify(false) {
    //初始化mEpollFd
    mEpollFd = epoll_create1(EPOLL_CLOEXEC);
    //初始化 mINotifyFd
    mINotifyFd = inotify_init1(IN_CLOEXEC);
    //对dev/input 目录下文件的增删进行监控
    if (std::filesystem::exists(DEVICE_INPUT_PATH, errorCode)) {
        addDeviceInputInotify();//注释4
    } else {
        addDeviceInotify();
    }
    ...
    struct epoll_event eventItem = {};
    eventItem.events = EPOLLIN | EPOLLWAKEUP;
    eventItem.data.fd = mINotifyFd;
    //FD 监听
    int result = epoll_ctl(mEpollFd, EPOLL_CTL_ADD, mINotifyFd, &eventItem);//注释5
}
void EventHub::addDeviceInputInotify() {
    mDeviceInputWd = inotify_add_watch(mINotifyFd, DEVICE_INPUT_PATH, IN_DELETE | IN_CREATE);
}
void EventHub::addDeviceInotify() {
    mDeviceWd = inotify_add_watch(mINotifyFd, DEVICE_PATH, IN_DELETE | IN_CREATE);
}- 注释4 这里主要是监听 dev/input 目录下文件的增删,也就是监听新增和移除输入设备,有新的输入设备时这里就会新建一个文件,删除设备时这里就会移除一个对应的文件。通过指令
adb shell --su --getevent -p可以获取设备dev/input/目录下的输入设备及信息,通过adb shell -- su -- getevent -lt /dev/input/event1可以监听对应输入设备的所有事件,当监听的为触摸屏时,按压滑动屏幕时就会看到触摸原始数据。mEpollFd也会监听这个原始数据,这个下面会讲到。 - 注释5 这里则是epoll监听,mEpollFd添加对mINotifyFd的监听,监听的事件则是EPOLLIN | EPOLLWAKEUP 也就是当有新的输入设备加入时,驱动会在dev/input下面新建一个文件(用来存储事件数据),新建文件时,就会通知到mINotifyFd通知到mEpollFd,mEpollFd的epoll_wait就会收到事件被唤醒。android系统源码基本到处可以看到对epoll的使,对epoll机制不熟悉的可以参考Android系统下Looper深度解析及无处不在的epoll.
接下来我们重点分析 EventHub::getEvents 方法
scss
frameworks/native/services/inputflinger/reader/EventHub.cpp
std::vector<RawEvent> EventHub::getEvents(int timeoutMillis) {
    std::scoped_lock _l(mLock);

    std::array<input_event, EVENT_BUFFER_SIZE> readBuffer;

    std::vector<RawEvent> events;
    bool awoken = false;
    for (;;) { //循环1
        ...
        // Report any devices that had last been added/removed.
        for (auto it = mClosingDevices.begin(); it != mClosingDevices.end();) {
            std::unique_ptr<Device> device = std::move(*it);
            ALOGV("Reporting device closed: id=%d, name=%s\n", device->id, device->path.c_str());
            const int32_t deviceId = (device->id == mBuiltInKeyboardId)
                    ? ReservedInputDeviceId::BUILT_IN_KEYBOARD_ID
                    : device->id;
            //添加设备移除事件
            events.push_back({
                    .when = now,
                    .deviceId = deviceId,
                    .type = DEVICE_REMOVED,
            });//注释6
            it = mClosingDevices.erase(it);
            if (events.size() == EVENT_BUFFER_SIZE) {
                break;
            }
        }

        if (mNeedToScanDevices) { //构造初始化的时候mNeedToScanDevices就是true
            mNeedToScanDevices = false;
            //第一次进来比走到这里,监听已有的设备
            scanDevicesLocked();//注释7
        }
        ...
        while (!mOpeningDevices.empty()) {
            std::unique_ptr<Device> device = std::move(*mOpeningDevices.rbegin());
            mOpeningDevices.pop_back();
            ALOGV("Reporting device opened: id=%d, name=%s\n", device->id, device->path.c_str());
            const int32_t deviceId = device->id == mBuiltInKeyboardId ? 0 : device->id;
            //添加新增设备事件
            events.push_back({
                    .when = now,
                    .deviceId = deviceId,
                    .type = DEVICE_ADDED,
            });//注释8
            ...

            auto [dev_it, inserted] = mDevices.insert_or_assign(device->id, std::move(device));
            ...
            if (events.size() == EVENT_BUFFER_SIZE) {
                break;
            }
        }

        // Grab the next input event.
        bool deviceChanged = false;
        while (mPendingEventIndex < mPendingEventCount) { //循环2
            const struct epoll_event& eventItem = mPendingEventItems[mPendingEventIndex++];
            if (eventItem.data.fd == mINotifyFd) {
                if (eventItem.events & EPOLLIN) {
                    //有增删输入设备时
                    mPendingINotify = true;//注释9
                } else {
                    ALOGW("Received unexpected epoll event 0x%08x for INotify.", eventItem.events);
                }
                continue;
            }

            ...

            Device* device = getDeviceByFdLocked(eventItem.data.fd);

            ...
            // This must be an input event
            // 这里的都是事件数据了
            if (eventItem.events & EPOLLIN) {
                int32_t readSize =
                        read(device->fd, readBuffer.data(),
                             sizeof(decltype(readBuffer)::value_type) * readBuffer.size());
                ...
                const int32_t deviceId = device->id == mBuiltInKeyboardId ? 0 : device->id;

                const size_t count = size_t(readSize) / sizeof(struct input_event);
                for (size_t i = 0; i < count; i++) {
                    struct input_event& iev = readBuffer[i];
                    device->trackInputEvent(iev);
                    //添加事件原始数据
                    events.push_back({
                            .when = processEventTimestamp(iev),
                            .readTime = systemTime(SYSTEM_TIME_MONOTONIC),
                            .deviceId = deviceId,
                            .type = iev.type,
                            .code = iev.code,
                            .value = iev.value,
                    });//注释10
                }
                ...
            }
        }
        ...
        // 有增删输入设备
        if (mPendingINotify && mPendingEventIndex >= mPendingEventCount) {
            mPendingINotify = false;
            const auto res = readNotifyLocked();//注释11
            deviceChanged = true;
        }
        if (deviceChanged) {
            continue;
        }
        if (!events.empty() || awoken) {
            break;
        }

        ...

        mPendingEventIndex = 0;
        mLock.unlock(); // release lock before poll
        //监听输入事件(新增设备,删除设备,设备输入事件)
        int pollResult = epoll_wait(mEpollFd, mPendingEventItems, EPOLL_MAX_EVENTS, timeoutMillis);//注释12
        mLock.lock(); // reacquire lock after poll

         ...
        // Some events occurred.
        mPendingEventCount = size_t(pollResult);
    }

    // All done, return the number of events we read.
    return events;
}
这里的代码比较长,重点分析一下有注释的地方
- 注释7 扫描dev/input/目录下目前已有的设备文件,添加对设备输入事件文件fd 的监听,创建设备Device,并根据配置信息设置Device支持的classes,系统所有的classes都定义在 InputDeviceClass 枚举中 (
frameworks/native/services/inputflinger/reader/include/EventHub.h 里的 enum class InputDeviceClass),再添加设备信息Device到 mOpeningDevices 队列中,主要调用逻辑如下
rust
frameworks/native/services/inputflinger/reader/EventHub.cpp
void EventHub::scanDevicesLocked() {
    ...
    //判断 dev/input目录是否存在
    if (std::filesystem::exists(DEVICE_INPUT_PATH, errorCode)) {
        result = scanDirLocked(DEVICE_INPUT_PATH);
    }
    ...
}

status_t EventHub::scanDirLocked(const std::string& dirname) {
    //遍历目录对已存在设备文件
    for (const auto& entry : std::filesystem::directory_iterator(dirname)) {
        openDeviceLocked(entry.path());
    }
    return 0;
}

void EventHub::openDeviceLocked(const std::string& devicePath) {
    ...
    int fd = open(devicePath.c_str(), O_RDWR | O_CLOEXEC | O_NONBLOCK);//获取设备文件的fd
    ...
     std::unique_ptr<Device> device =
    std::make_unique<Device>(fd, deviceId, devicePath, identifier,
                             obtainAssociatedDeviceLocked(devicePath));
     ...
     //添加键盘事件的设备支持
   //See if this is a device with keys
    if (haveKeyboardKeys || haveGamepadButtons || haveStylusButtons) {
        device->classes |= InputDeviceClass::KEYBOARD;
    }
    //添加触摸事件的支持
    // See if this is a touch pad.
    // Is this a new modern multi-touch driver?
    if (device->absBitmask.test(ABS_MT_POSITION_X) && device->absBitmask.test(ABS_MT_POSITION_Y)) {
        // Some joysticks such as the PS3 controller report axes that conflict
        // with the ABS_MT range.  Try to confirm that the device really is
        // a touch screen.
        if (device->keyBitmask.test(BTN_TOUCH) || !haveGamepadButtons) {
            device->classes |= (InputDeviceClass::TOUCH | InputDeviceClass::TOUCH_MT);
            if (device->propBitmask.test(INPUT_PROP_POINTER) &&
                !device->keyBitmask.any(BTN_TOOL_PEN, BTN_TOOL_FINGER) && !haveStylusButtons) {
                device->classes |= InputDeviceClass::TOUCHPAD;
            }
        }
        // Is this an old style single-touch driver?
    } else if (device->keyBitmask.test(BTN_TOUCH) && device->absBitmask.test(ABS_X) &&
               device->absBitmask.test(ABS_Y)) {
        device->classes |= InputDeviceClass::TOUCH;
        // Is this a stylus that reports contact/pressure independently of touch coordinates?
    } else if ((device->absBitmask.test(ABS_PRESSURE) || device->keyBitmask.test(BTN_TOUCH)) &&
               !device->absBitmask.test(ABS_X) && !device->absBitmask.test(ABS_Y)) {
        device->classes |= InputDeviceClass::EXTERNAL_STYLUS;
    }
    ...
    //mEpollFd添加对设备文件fd的监听,监听设备事件的输入
    if (registerDeviceForEpollLocked(*device) != OK) {
        return;
    }
    ...
    //添加设备到 mOpeningDevices
    addDeviceLocked(std::move(device));
}


status_t EventHub::registerDeviceForEpollLocked(Device& device) {
    status_t result = registerFdForEpoll(device.fd);
    ...
    return result;
}

status_t EventHub::registerFdForEpoll(int fd) {
    // TODO(b/121395353) - consider adding EPOLLRDHUP
    struct epoll_event eventItem = {};
    eventItem.events = EPOLLIN | EPOLLWAKEUP;
    eventItem.data.fd = fd;
    //添加对 设备输入文件描述符Fd的监控,当该设备有新事件输入时,就会唤醒epoll_wait(mEpollFd...)
    if (epoll_ctl(mEpollFd, EPOLL_CTL_ADD, fd, &eventItem)) {
        return -errno;
    }
    return OK;
}
这样当当前设备如果有输入事件时,就会唤醒 注释12处的epoll_wait.
- 注释12 添加对mEpollFd的监听,监听mEpollFd的唤醒事件,而通过上面
注释7和注释5添加到mEpollFd的fd都会被监控到,也就是 dev/input下有增删文件(增删输入设备)和文件输入(设备输入事件)都会被监控到。到这里,我们就捋清了整个输入事件的监听. epoll_wait会一直阻塞在这里,有输入设备增删和事件输入时都会唤醒注释12这里的逻辑,接下来就分别对设备增删事件和输入事件的流程进行分析。
3.1.1增删设备事件的读取
设备增删主要涉及到 注释6、注释8、注释9、注释11,当有增删设备时,首先唤醒了注释12,然后进入到下一个for循环(循环1),此时不会先走到注释6、注释8,因为此时的mClosingDevices和mOpeningDevices都是空的,会先执行到while循环(循环2),因为是增删设备,所以会 满足 eventItem.data.fd == mINotifyFd 和 eventItem.events & EPOLLIN,这样就会执行到注释9,然后挑出while循环(循环2),此时就会执行到注释11.
- 注释11 处理设备增删逻辑,当有设备新增时处理流程和
注释7类似,添加对设备输入事件文件fd 的监听,同时添加设备信息到 mOpeningDevices 队列中。移除设备时,移除对设备输入事件文件fd的监听,同事添加设备信息到 mClosingDevices 队列中。具体调用逻辑如下
c
frameworks/native/services/inputflinger/reader/EventHub.cpp
base::Result<void> EventHub::readNotifyLocked() {
    ...
    do {
        sizeRead = read(mINotifyFd, eventBuffer, sizeof(eventBuffer));
    } while (sizeRead < 0 && errno == EINTR);
    ...
    for (ssize_t eventPos = 0; sizeRead >= EVENT_SIZE;) {
        ...
        handleNotifyEventLocked(*event);
        ...
    }
    return {};
}

void EventHub::handleNotifyEventLocked(const inotify_event& event) {
    if (event.wd == mDeviceInputWd) {
        std::string filename = std::string(DEVICE_INPUT_PATH) + "/" + event.name;
        if (event.mask & IN_CREATE) {
            openDeviceLocked(filename);//添加设备
        } else {
            closeDeviceByPathLocked(filename);//移除设备
        }
    }
    ...
}
到这里增删事件读取完毕后,就会添加到 mOpeningDevices 或 mClosingDevices中了,此时就会立马到下一个for循环(循环1),然后执行到注释6或注释8
- 注释6 添加设备移除事件到events列表中
- 注释8 添加设备新增事件到events列表中
3.1.2设备输入事件的读取
接着注释12分析,上一小节主要分析了设备新增和删除时时间的读取,如果是设备新增时,还会对新增设备文件fd进行监听,当该设备有输入事件时也会唤醒注释12的epoll_wait,唤醒之后,也是进入到下一个for循环(循环1),并直接进入到while循环(循环2),跳过一些逻辑执行到注释10
- 注释10 添加设备输入事件到events列表中
这样设备输入事件(增、删、输入)就读取完并添加到events中,事件读取完全在EventHub::getEvents()中进行,该方法是阻塞,没有输入事件时会一直阻塞在epoll_wait处(注释12), 执行在InputReader的InputThread中,当读取完一组事件和处理后,又会进入到下一个读取流程中,这样只要有新事件产生就会唤醒EventHub将事件传递给InputReader进行后续处理。接下来我们分析下InputReader读取事件的后续流程。
3.2 InputReader 组装事件数据
前一章节我们已经通过EventHub-->getEvents()获取到输入事件的原始数据,这里的事件数据主要分为三大类,新增输入设备,删除输入设备,输入设备输入事件。组装事件主要由InputReader::processEventsLocked()开始进行的。
rust
frameworks/native/services/inputflinger/reader/InputReader.cpp
std::list<NotifyArgs> InputReader::processEventsLocked(const RawEvent* rawEvents, size_t count) {
    std::list<NotifyArgs> out;
    for (const RawEvent* rawEvent = rawEvents; count;) {
        int32_t type = rawEvent->type;
        ...
        if (type < EventHubInterface::FIRST_SYNTHETIC_EVENT) {
            ...
            //封装输入设备的输入事件
            out += processEventsForDeviceLocked(deviceId, rawEvent, batchSize);//注释13
        } else {
            switch (rawEvent->type) {
                case EventHubInterface::DEVICE_ADDED:
                    //新增输入设备
                    addDeviceLocked(rawEvent->when, rawEvent->deviceId);//注释14
                    break;
                case EventHubInterface::DEVICE_REMOVED:
                    //删除输入设备
                    removeDeviceLocked(rawEvent->when, rawEvent->deviceId);//注释15
                    break;
                default:
                    ALOG_ASSERT(false); // can't happen
                    break;
            }
        }
        ...
    }
    return out;
}
接下来我们就输入设备新增删除事件和输入设备输入事件数据封装流程进行分析
3.2.1 InputReader 增删输入设备
- 注释14 新增输入设备时,后续核心逻辑如下
c
frameworks/native/services/inputflinger/reader/InputReader.cpp
void InputReader::addDeviceLocked(nsecs_t when, int32_t eventHubId) {
    ...
    InputDeviceIdentifier identifier = mEventHub->getDeviceIdentifier(eventHubId);
    //根据新增设备的信息创造 InputDevice
    std::shared_ptr<InputDevice> device = createDeviceLocked(when, eventHubId, identifier);

    mPendingArgs += device->configure(when, mConfig, /*changes=*/{});
    mPendingArgs += device->reset(when);
    ...
    //添加到 键值对集合 mDevices 中
    mDevices.emplace(eventHubId, device);
    ...
}

std::shared_ptr<InputDevice> InputReader::createDeviceLocked(
        nsecs_t when, int32_t eventHubId, const InputDeviceIdentifier& identifier) {
    auto deviceIt = std::find_if(mDevices.begin(), mDevices.end(), [identifier](auto& devicePair) {
        const InputDeviceIdentifier identifier2 =
                devicePair.second->getDeviceInfo().getIdentifier();
        return isSubDevice(identifier, identifier2);
    });

    std::shared_ptr<InputDevice> device;
    if (deviceIt != mDevices.end()) {
        device = deviceIt->second;
    } else {
        int32_t deviceId = (eventHubId < END_RESERVED_ID) ? eventHubId : nextInputDeviceIdLocked();
        //构造InputDevice
        device = std::make_shared<InputDevice>(&mContext, deviceId, bumpGenerationLocked(),
                                               identifier);
    }
    //将新增设备的事件数据进行封装,并添加到 集合 mPendingArgs 中
    mPendingArgs += device->addEventHubDevice(when, eventHubId, mConfig);//
    return device;
}

frameworks/native/services/inputflinger/reader/InputDevice.cpp
[[nodiscard]] std::list<NotifyArgs> InputDevice::addEventHubDevice(
        nsecs_t when, int32_t eventHubId, const InputReaderConfiguration& readerConfig) {

    std::list<NotifyArgs> out = configureInternal(when, readerConfig, {}, /*forceEnable=*/true);

    DevicePair& devicePair = mDevices[eventHubId];
    //根据Device的支持的classes创建对应的InputMapper
    devicePair.second = createMappers(*devicePair.first, readerConfig);

    // Must change generation to flag this device as changed
    bumpGeneration();
    return out;
}

//根据classes创建对应InputMapper
std::vector<std::unique_ptr<InputMapper>> InputDevice::createMappers(
        InputDeviceContext& contextPtr, const InputReaderConfiguration& readerConfig) {
    ftl::Flags<InputDeviceClass> classes = contextPtr.getDeviceClasses();
    std::vector<std::unique_ptr<InputMapper>> mappers;
    ...
    // Keyboard-like devices.
    uint32_t keyboardSource = 0;
    if (classes.test(InputDeviceClass::KEYBOARD)) {
        keyboardSource |= AINPUT_SOURCE_KEYBOARD;
    }
    ...
    // Touchscreens and touchpad devices.
    if (classes.test(InputDeviceClass::TOUCHPAD) && classes.test(InputDeviceClass::TOUCH_MT)) {
        mappers.push_back(createInputMapper<TouchpadInputMapper>(contextPtr, readerConfig));
    } else if (classes.test(InputDeviceClass::TOUCH_MT)) {
        mappers.push_back(createInputMapper<MultiTouchInputMapper>(contextPtr, readerConfig));
    } else if (classes.test(InputDeviceClass::TOUCH)) {
        mappers.push_back(createInputMapper<SingleTouchInputMapper>(contextPtr, readerConfig));
    }
    ...
    return mappers;
}
这里主要是根据原始数据的deviceId获取EventHub中创建的Device,再根据Device的数据创建InputDevice,再根据Device的classes(enum InputDeviceClass)创建当前设备InputDevice关联的数据封装InputMapper类(这里的InputDeviceClass和InputMapper是多对一的关系,常见的InputMapper的有KeyBoardInputMapper, TouchpadInputMapper,TouchInputMapper等),并将InputDevice和InputMapper 添加到mDevice中,供后续数据封装时使用。最后将添加设备数据封装成NotifyArgs 供后续使用。
- 注释15 删除输入设备时,后续核心逻辑如下
ini
frameworks/native/services/inputflinger/reader/InputReader.cpp
void InputReader::removeDeviceLocked(nsecs_t when, int32_t eventHubId) {
    auto deviceIt = mDevices.find(eventHubId);
    if (deviceIt == mDevices.end()) {
        ALOGW("Ignoring spurious device removed event for eventHubId %d.", eventHubId);
        return;
    }

    std::shared_ptr<InputDevice> device = std::move(deviceIt->second);
    mDevices.erase(deviceIt);
    // Erase device from device to EventHub ids map.
    auto mapIt = mDeviceToEventHubIdsMap.find(device);
    if (mapIt != mDeviceToEventHubIdsMap.end()) {
        std::vector<int32_t>& eventHubIds = mapIt->second;
        std::erase_if(eventHubIds, [eventHubId](int32_t eId) { return eId == eventHubId; });
        if (eventHubIds.size() == 0) {
            mDeviceToEventHubIdsMap.erase(mapIt);
        }
    }
    device->removeEventHubDevice(eventHubId);

    if (device->getClasses().test(InputDeviceClass::EXTERNAL_STYLUS)) {
        notifyExternalStylusPresenceChangedLocked();
    }

    if (device->hasEventHubDevices()) {
        mPendingArgs += device->configure(when, mConfig, /*changes=*/{});
    }
    mPendingArgs += device->reset(when);
}
删除设备时主要是从 键值对集合mDevices中移除 device,从mDeviceToEventHubIdsMap 中移除mapper,同时将删除设备事件封装成数据NotifyArgs 供后续使用。
3.2.2 InputReader 封装输入设备输入事件
新增完设备后,当设备有事件输入时,逻辑就会走到注释13这里,
- 注释13 输入事件原始数据封装的核心逻辑代码如下:
rust
frameworks/native/services/inputflinger/reader/InputReader.cpp
std::list<NotifyArgs> InputReader::processEventsForDeviceLocked(int32_t eventHubId,
                                                                const RawEvent* rawEvents,
                                                                size_t count) {
    auto deviceIt = mDevices.find(eventHubId);
    ...
    std::shared_ptr<InputDevice>& device = deviceIt->second;
    ...
    return device->process(rawEvents, count);
}

frameworks/native/services/inputflinger/reader/InputDevice.cpp
std::list<NotifyArgs> InputDevice::process(const RawEvent* rawEvents, size_t count) {
    // Process all of the events in order for each mapper.
    // We cannot simply ask each mapper to process them in bulk because mappers may
    // have side-effects that must be interleaved.  For example, joystick movement events and
    // gamepad button presses are handled by different mappers but they should be dispatched
    // in the order received.
    std::list<NotifyArgs> out;
    for (const RawEvent* rawEvent = rawEvents; count != 0; rawEvent++) {
        if (mDropUntilNextSync) {
            if (rawEvent->type == EV_SYN && rawEvent->code == SYN_REPORT) {
                out += reset(rawEvent->when);
                mDropUntilNextSync = false;
                ALOGD_IF(debugRawEvents(), "Recovered from input event buffer overrun.");
            } else {
                ALOGD_IF(debugRawEvents(),
                         "Dropped input event while waiting for next input sync.");
            }
        } else if (rawEvent->type == EV_SYN && rawEvent->code == SYN_DROPPED) {
            ALOGI("Detected input event buffer overrun for device %s.", getName().c_str());
            mDropUntilNextSync = true;
        } else {
            //遍历InputDevice所有的mapper,串行对原始事件进行封装处理
            for_each_mapper_in_subdevice(rawEvent->deviceId, [&](InputMapper& mapper) {
                out += mapper.process(*rawEvent);//注释16
            });
        }
        --count;
    }
    //更新事件的 policy flags
    postProcess(out);
    return out;
}这里首先是在之前添加设备(注释14)时更新的mDevices中找到当前输入事件对应的设备InputDevice,再遍历当前InputDevice的所有InputMapper,串行的对数据进行process处理
- 注释16根据不同的硬件输入设备有不同的数据格式,这里利用各种输入设备对应的InputMapper对原始的数据格式封装,封装成便于后续分发处理的NotifyArgs
到这里InputReader就完成了对原始输入事件的组装,统一组装成NotifyArgs,里面包含各种输入设备后续分发需要的数据。接下来看一下InputReader对NotifyArgs数据的预分发。
3.3 InputReader的预分发数据
前面两个章节已经分析了InputReader::loopOnce中的原始事件的读取和封装,接下来看一下对事件的预分发,预分发流程开始于注释3,这里遍历所有事件然后调用 mNextListener.notify(args) 去分发事件。而这里的 mNextListener 正是 InputReader中的构造函数中传递过来的,而InputReader是在InputManager中初始化,我们再回到InputManager的初始化代码
ini
frameworks/native/services/inputflinger/InputManager.cpp
InputManager::InputManager(const sp<InputReaderPolicyInterface>& readerPolicy,
                           InputDispatcherPolicyInterface& dispatcherPolicy,
                           PointerChoreographerPolicyInterface& choreographerPolicy,
                           InputFilterPolicyInterface& inputFilterPolicy) {
    mInputFlingerRust = createInputFlingerRust();

    mDispatcher = createInputDispatcher(dispatcherPolicy);
    //往mTracingStages列表中添加 InputDispatcher 的listener
    mTracingStages.emplace_back(
            std::make_unique<TracedInputListener>("InputDispatcher", *mDispatcher));

    if (ENABLE_INPUT_FILTER_RUST) {
        mInputFilter = std::make_unique<InputFilter>(*mTracingStages.back(), *mInputFlingerRust,
                                                     inputFilterPolicy);
        mTracingStages.emplace_back(
                std::make_unique<TracedInputListener>("InputFilter", *mInputFilter));
    }

    if (ENABLE_INPUT_DEVICE_USAGE_METRICS) {
        mCollector = std::make_unique<InputDeviceMetricsCollector>(*mTracingStages.back());
        mTracingStages.emplace_back(
                std::make_unique<TracedInputListener>("MetricsCollector", *mCollector));
    }

    mProcessor = std::make_unique<InputProcessor>(*mTracingStages.back());
    mTracingStages.emplace_back(
            std::make_unique<TracedInputListener>("InputProcessor", *mProcessor));

    mChoreographer =
            std::make_unique<PointerChoreographer>(*mTracingStages.back(), choreographerPolicy);
    mTracingStages.emplace_back(
            std::make_unique<TracedInputListener>("PointerChoreographer", *mChoreographer));

    mBlocker = std::make_unique<UnwantedInteractionBlocker>(*mTracingStages.back());
    mTracingStages.emplace_back(
            std::make_unique<TracedInputListener>("UnwantedInteractionBlocker", *mBlocker));

    //构造时传入了最后一个 TracedInputListener 的实现类UnwantedInteractionBlocker 对象
    mReader = createInputReader(readerPolicy, *mTracingStages.back());//注释17
}
阅读源码不难发现这里构造了好几个 TracedInputListener 对象,InputDispatcher 则作为第一个listener压入到列表mTracingStages最前面了,而每一个listener都持有列表mTracingStages中前一个listener的引用。
- 注释17 构造 InputReader时传入的则是列表mTracingStages的最后一个listener(UnwantedInteractionBlocker),这样第一个拿到事件的类便是 UnwantedInteractionBlocker类。
下面都以事件 NotifyMotionArgs 来分析。mNextListener.notify(args)下一步便会去执行 UnwantedInteractionBlocker::notifyMotion(args);流程了。其实这里的 每个TracedInputListener 处理完事件后都会传递到前一个 TracedInputListener, 最终都会传递到InputDispatcher中,触摸事件就会传递到 InputDispatcher::notifyMotion(args),InputDispatcher前面的 TracedInputListener有的会对数据进行预加工,有的则负责数据统计,这里不展开分析,感兴趣的同学可以自行阅读源码。
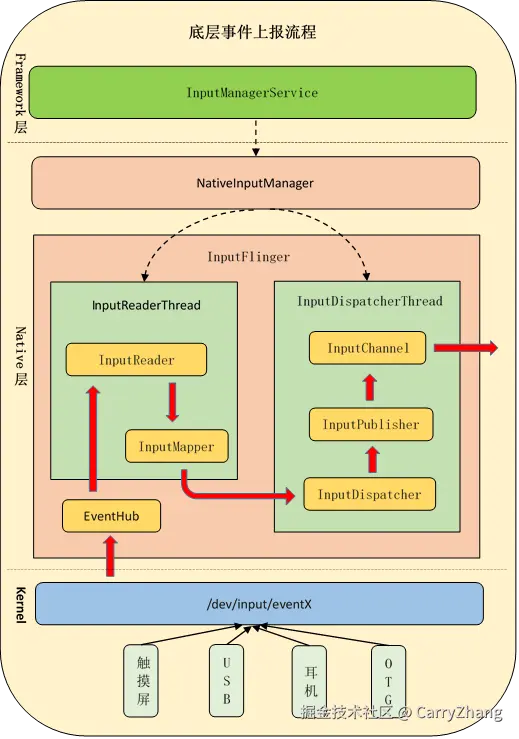
底层事件读取和上报到InputDispatcher流程如下:
此时InputReader数据的预分发任务基本完成了,接下来重点分析InputDispatcher::notifyMotion(args)
4.InputDispatcher事件分发
InputDispatcher接受到InputReader的输入事件后,会首先判断时间是否需要拦截,然后将事件存储到 mInboundQueue 中,再通过 mLooper->wake() 唤醒阻塞的 loopOnce 获取 mInboundQueue 中的事件进行分发。
4.1 InputDispatcher 事件接受、拦截及入列
arduino
frameworks/native/services/inputflinger/dispatcher/InputDispatcher.cpp
status_t InputDispatcher::start() {
    if (mThread) {
        return ALREADY_EXISTS;
    }
    //开始loopOnce的死循环
    mThread = std::make_unique<InputThread>(
            "InputDispatcher", [this]() { dispatchOnce(); }, [this]() { mLooper->wake(); });//注释18
    return OK;
}

void InputDispatcher::dispatchOnce() {
    nsecs_t nextWakeupTime = LLONG_MAX;
    { // acquire lock
         ...
        // Run a dispatch loop if there are no pending commands.
        // The dispatch loop might enqueue commands to run afterwards.
        //判断是否有没处理完的指令
        if (!haveCommandsLocked()) { //注释19
            //分发事件到应用
            dispatchOnceInnerLocked(/*byref*/ nextWakeupTime); //注释 20
        }
        ...
        //判断是否anr了
        const nsecs_t nextAnrCheck = processAnrsLocked(); // 注释21
        ...
    } // release lock
    ...
    int timeoutMillis = toMillisecondTimeoutDelay(currentTime, nextWakeupTime);
    //会一直阻塞,直到监听有数据更新或者调用mLooper->wake
    mLooper->pollOnce(timeoutMillis);//注释22
}

void InputDispatcher::notifyMotion(const NotifyMotionArgs& args) {
    ...

    uint32_t policyFlags = args.policyFlags;
    policyFlags |= POLICY_FLAG_TRUSTED;
    // 设置 policyFlags 标记,同时判断是否需要拦截事件
    mPolicy.interceptMotionBeforeQueueing(args.displayId, args.source, args.action, args.eventTime,
                                          policyFlags);//注释23


    bool needWake = false;
    { // acquire lock
        mLock.lock();


        // Just enqueue a new motion event.
        //数据初始化
        std::unique_ptr<MotionEntry> newEntry =
                std::make_unique<MotionEntry>(args.id, /*injectionState=*/nullptr, args.eventTime,
                                              args.deviceId, args.source, args.displayId,
                                              policyFlags, args.action, args.actionButton,
                                              args.flags, args.metaState, args.buttonState,
                                              args.classification, args.edgeFlags, args.xPrecision,
                                              args.yPrecision, args.xCursorPosition,
                                              args.yCursorPosition, args.downTime,
                                              args.pointerProperties, args.pointerCoords);

        //添加数据到 mInboundQueue 中
        needWake = enqueueInboundEventLocked(std::move(newEntry)); //注释24
        mLock.unlock();
    } // release lock

    if (needWake) {
        //唤醒mLooper::pollOnce
        mLooper->wake();//注释25
    }
}

bool InputDispatcher::enqueueInboundEventLocked(std::unique_ptr<EventEntry> newEntry) {
    bool needWake = mInboundQueue.empty();
    mInboundQueue.push_back(std::move(newEntry));//注释26
    ...
    return needWake;
}在IMS初始化的时候是先调用InputDispatcher::start(),再调用InputReader::start(),InputReader::start()流程前面已经分析了,这里从 InputDispatcher::start() 开始分析
- 注释18 这里也是新起了一个InputThread,并且开始了dispatchOnce的死循环,dispatchOnce每次执行完都会阻塞在
注释22等待被唤醒从而进行下一个 dispatchOnce
根据第3章节的分析,当InputReader读取到事件后,就会调用到InputDispatcher::notifyXXX 来分发事件,下面还是以 NotifyMotionArgs 为例,此时会调用 InputDispatcher::notifyMotion,这个方法 主要是初始化事件,设置事件标记,将事件添加到 InputDispatcher::mInboundQueue中,同时唤醒mLooper::loopOnce
- 注释23 给事件的 policyFlags 设置标记和拦截事件,这里重点关注的标记时 POLICY_FLAG_PASS_TO_USER 和 ~POLICY_FLAG_PASS_TO_USER,这两个表示是否需要传递给用户,这个后续会用到,事件拦截主要是通过IMS的 interceptXXXBeforeQueueing到
PhoneWindowManager.interceptXXXBeforeQueueing,比如我们的开机键/关机键/音量键等按键事件大部分是会被系统拦截掉的,还有在某些情况下有些事件也会被直接拦截掉,这个大家可以自行阅读PhoneWindowManager.interceptXXXBeforeQueueing方法。 - 注释24 注释26 将事件MotionEntry添加添加到
InputDispatcher::mInboundQueue中 - 注释25 根据Looper的原理,此处会唤醒
注释22的阻塞,使 dispatchOnce 继续执行下去
4.2 InputDispatcher 事件出列分发
此时我们再回到 dispatchOnce 执行下一个分发,这里主要是
- 注释19 检查 mCommandQueue 队列是否为空,为空时,才会向下分发数据,不为空时,会跳过这次dispatchOnce的分发
- 注释20 分发数据到应用
c
frameworks/native/services/inputflinger/dispatcher/InputDispatcher.cpp
void InputDispatcher::dispatchOnceInnerLocked(nsecs_t& nextWakeupTime) {
    nsecs_t currentTime = now();


    // Ready to start a new event.
    // If we don't already have a pending event, go grab one.
    if (!mPendingEvent) {
        if (mInboundQueue.empty()) {

        } else {
            // Inbound queue has at least one entry.
            // 从 mInboundQueue 前面移除
            mPendingEvent = mInboundQueue.front();
            mInboundQueue.pop_front();//注释27
            traceInboundQueueLengthLocked();
        }

        // Poke user activity for this event.
        if (mPendingEvent->policyFlags & POLICY_FLAG_PASS_TO_USER) {
            //通知PowerManagerService不要熄屏
            pokeUserActivityLocked(*mPendingEvent);//注释28
        }
    }

    // Now we have an event to dispatch.
    // All events are eventually dequeued and processed this way, even if we intend to drop them.
    ALOG_ASSERT(mPendingEvent != nullptr);
    bool done = false;
    //定义了丢弃原因,如果没有传递给应用,就是丢弃了,系统对不同事件有不同的丢弃规则,决定是否传递给应用
    DropReason dropReason = DropReason::NOT_DROPPED;


    switch (mPendingEvent->type) {
       ...
       //触摸事件
        case EventEntry::Type::MOTION: {
            std::shared_ptr<const MotionEntry> motionEntry =
                    std::static_pointer_cast<const MotionEntry>(mPendingEvent);
            ...
            done = dispatchMotionLocked(currentTime, motionEntry, &dropReason, nextWakeupTime);//注释29
            break;
        }
       ...
    }

    if (done) {
        //分发成功
        ...
    }
}- 注释27 从 mInboundQueue(InputReader传递过来时会存储到这里) 队列中移除数据
- 注释28 通过IMS通知PowerManagerService处理相关逻辑(不要熄屏等)
- 注释29 分发触摸事件,首先找到事件关联的窗口,然后再进行事件分发
ini
frameworks/native/services/inputflinger/dispatcher/InputDispatcher.cpp
bool InputDispatcher::dispatchMotionLocked(nsecs_t currentTime,
                                           std::shared_ptr<const MotionEntry> entry,
                                           DropReason* dropReason, nsecs_t& nextWakeupTime) {
    ...
    const bool isPointerEvent = isFromSource(entry->source, AINPUT_SOURCE_CLASS_POINTER);
    ...
    // Identify targets.
    std::vector<InputTarget> inputTargets;
    ...
    if (isPointerEvent) {
        // Pointer event.  (eg. touchscreen)
        //获取关联窗口
        Result<std::vector<InputTarget>, InputEventInjectionResult> result =
                findTouchedWindowTargetsLocked(currentTime, *entry);//注释30
        ...
        if (result.ok()) {
            inputTargets = std::move(*result);
        }
        ...
    } else {
        // Non touch event.  (eg. trackball)
       ...
    }
    ...
    // Dispatch the motion.
    //分发事件
    dispatchEventLocked(currentTime, entry, inputTargets);
    return true;
}

void InputDispatcher::dispatchEventLocked(nsecs_t currentTime,
                                          std::shared_ptr<const EventEntry> eventEntry,
                                          const std::vector<InputTarget>& inputTargets) {

    //debug信息和数据统计
    processInteractionsLocked(*eventEntry, inputTargets);
    //再次停止PowerManagerService不要熄屏
    pokeUserActivityLocked(*eventEntry);

    for (const InputTarget& inputTarget : inputTargets) {
        std::shared_ptr<Connection> connection = inputTarget.connection;
        //处理事件
        prepareDispatchCycleLocked(currentTime, connection, eventEntry, inputTarget);
    }
}

void InputDispatcher::prepareDispatchCycleLocked(nsecs_t currentTime,
                                                 const std::shared_ptr<Connection>& connection,
                                                 std::shared_ptr<const EventEntry> eventEntry,
                                                 const InputTarget& inputTarget) {
    ...
    enqueueDispatchEntryAndStartDispatchCycleLocked(currentTime, connection, eventEntry,
                                                    inputTarget);
}

void InputDispatcher::enqueueDispatchEntryAndStartDispatchCycleLocked(
        nsecs_t currentTime, const std::shared_ptr<Connection>& connection,
        std::shared_ptr<const EventEntry> eventEntry, const InputTarget& inputTarget) {

    //connect的待处理事件是否都处理完了
    const bool wasEmpty = connection->outboundQueue.empty();
    //往 connection->outboundQueue 队列塞事件
    enqueueDispatchEntryLocked(connection, eventEntry, inputTarget);//注释31

    // If the outbound queue was previously empty, start the dispatch cycle going.
    if (wasEmpty && !connection->outboundQueue.empty()) {
        //之前的事件都处理完了,且这次有新事件,开始处理事件
        startDispatchCycleLocked(currentTime, connection); //注释32
    }
}

void InputDispatcher::enqueueDispatchEntryLocked(const std::shared_ptr<Connection>& connection,
                                                 std::shared_ptr<const EventEntry> eventEntry,
                                                 const InputTarget& inputTarget) {
    ...
    connection->outboundQueue.emplace_back(std::move(dispatchEntry));
}

void InputDispatcher::startDispatchCycleLocked(nsecs_t currentTime,
                                               const std::shared_ptr<Connection>& connection) {

    ...
    //遍历所有待处理事件
    while (connection->status == Connection::Status::NORMAL && !connection->outboundQueue.empty()) {
        std::unique_ptr<DispatchEntry>& dispatchEntry = connection->outboundQueue.front();
        dispatchEntry->deliveryTime = currentTime;
        const std::chrono::nanoseconds timeout = getDispatchingTimeoutLocked(connection);
        dispatchEntry->timeoutTime = currentTime + timeout.count();

        // Publish the event.
        status_t status;
        const EventEntry& eventEntry = *(dispatchEntry->eventEntry);
        switch (eventEntry.type) {
            ...
            //触摸事件
            case EventEntry::Type::MOTION: {
                if (DEBUG_OUTBOUND_EVENT_DETAILS) {
                    LOG(INFO) << "Publishing " << *dispatchEntry << " to "
                              << connection->getInputChannelName();
                }
                const MotionEntry& motionEntry = static_cast<const MotionEntry&>(eventEntry);
                //发送事件
                status = publishMotionEvent(*connection, *dispatchEntry);//注释33

                break;
            }
            ...
        }

        // Check the result.
        if (status) {
            if (status == WOULD_BLOCK) {
            //事件发送异常处理
            return;
        }

        ...
        //将事件从 outboundQueue 中移除添加到 waitQueue
        connection->waitQueue.emplace_back(std::move(dispatchEntry));
        connection->outboundQueue.erase(connection->outboundQueue.begin());
        //获取事件的处理超时ANR时间,添加超时的ANR时间到 mAnrTracker,是往后添加
       const nsecs_t timeoutTime = dispatchEntry->timeoutTime;
         if (connection->responsive) {
            mAnrTracker.insert(timeoutTime, connection->getToken());
        }
        ...
    }
}

status_t InputDispatcher::publishMotionEvent(Connection& connection,
                                             DispatchEntry& dispatchEntry) const {

    // Publish the motion event.
    //发送事件
    return connection.inputPublisher
            .publishMotionEvent(dispatchEntry.seq, motionEntry.id, motionEntry.deviceId,
                                motionEntry.source, motionEntry.displayId, std::move(hmac),
                                motionEntry.action, motionEntry.actionButton,
                                dispatchEntry.resolvedFlags, motionEntry.edgeFlags,
                                motionEntry.metaState, motionEntry.buttonState,
                                motionEntry.classification, dispatchEntry.transform,
                                motionEntry.xPrecision, motionEntry.yPrecision,
                                motionEntry.xCursorPosition, motionEntry.yCursorPosition,
                                dispatchEntry.rawTransform, motionEntry.downTime,
                                motionEntry.eventTime, motionEntry.getPointerCount(),
                                motionEntry.pointerProperties.data(), usingCoords);
}

frameworks/native/libs/input/InputTransport.cpp
status_t InputPublisher::publishMotionEvent(
        uint32_t seq, int32_t eventId, int32_t deviceId, int32_t source,
        ui::LogicalDisplayId displayId, std::array<uint8_t, 32> hmac, int32_t action,
        int32_t actionButton, int32_t flags, int32_t edgeFlags, int32_t metaState,
        int32_t buttonState, MotionClassification classification, const ui::Transform& transform,
        float xPrecision, float yPrecision, float xCursorPosition, float yCursorPosition,
        const ui::Transform& rawTransform, nsecs_t downTime, nsecs_t eventTime,
        uint32_t pointerCount, const PointerProperties* pointerProperties,
        const PointerCoords* pointerCoords) {
    ...

    // 构造 InputMessage  并赋值
    InputMessage msg;
    msg.header.type = InputMessage::Type::MOTION;
    msg.header.seq = seq;
    msg.body.motion.eventId = eventId;
    msg.body.motion.deviceId = deviceId;
    msg.body.motion.source = source;
    msg.body.motion.displayId = displayId.val();
    msg.body.motion.hmac = std::move(hmac);
    msg.body.motion.action = action;
    msg.body.motion.actionButton = actionButton;
    msg.body.motion.flags = flags;
    msg.body.motion.edgeFlags = edgeFlags;
    msg.body.motion.metaState = metaState;
    msg.body.motion.buttonState = buttonState;
    msg.body.motion.classification = classification;
    msg.body.motion.dsdx = transform.dsdx();
    msg.body.motion.dtdx = transform.dtdx();
    msg.body.motion.dtdy = transform.dtdy();
    msg.body.motion.dsdy = transform.dsdy();
    msg.body.motion.tx = transform.tx();
    msg.body.motion.ty = transform.ty();
    msg.body.motion.xPrecision = xPrecision;
    msg.body.motion.yPrecision = yPrecision;
    msg.body.motion.xCursorPosition = xCursorPosition;
    msg.body.motion.yCursorPosition = yCursorPosition;
    msg.body.motion.dsdxRaw = rawTransform.dsdx();
    msg.body.motion.dtdxRaw = rawTransform.dtdx();
    msg.body.motion.dtdyRaw = rawTransform.dtdy();
    msg.body.motion.dsdyRaw = rawTransform.dsdy();
    msg.body.motion.txRaw = rawTransform.tx();
    msg.body.motion.tyRaw = rawTransform.ty();
    msg.body.motion.downTime = downTime;
    msg.body.motion.eventTime = eventTime;
    msg.body.motion.pointerCount = pointerCount;
    for (uint32_t i = 0; i < pointerCount; i++) {
        msg.body.motion.pointers[i].properties = pointerProperties[i];
        msg.body.motion.pointers[i].coords = pointerCoords[i];
    }
    //通过发送数据
    return mChannel->sendMessage(&msg);
}- 注释30 寻找事件关联且有焦点的窗口,在View初始化窗口创建时会关联token,窗口上有InputChannel信息, InputChannel里面是有一个socket对的,用来cleint-server通信的。若是没找到有焦点的窗口,这里会记录无焦点anr时间
mNoFocusedWindowTimeoutTime,这标记后面再第7章节分析ANR的流程时会用到。 - 注释31 往
connection->outboundQueue队列添加待处理事件 - 注释32 如果之前的
connection->outboundQueue中的事件都处理完了,且这次有新事件,开始处理事件 - 注释33 调用socket发送事件
根据上面的 InputDispatcher 的事件分发最终调用的是socket发送消息,但是消息接收方还不知道是哪里。我们知道触摸事件最终是要分发到应用App的窗口(View/Activity)去处理,这里 InputDispatcher 的事件分发我们先暂缓一下,我们可以看下App窗口是怎么获取到事件的,只要App窗口那边能找事件接受的cleintSocket,且和这里的事件发送的serverSocket是成对的话,那上面 InputDispatcher通过serverSocket发送的事件应用窗口那边就能收到。