input
在Android中,我们一般使用EditText来获取用户的输入。
Flutter 提供了两种文本字段:TextField 和 TextFormField。
TextField
TextField 是最常用的文本输入组件。
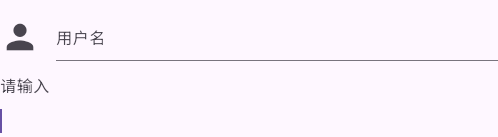
默认情况下,TextField 会带有下划线装饰。你可以通过为 TextField 的 decoration 属性提供 InputDecoration 来添加标签、图标、行内提示文本和错误文本。要完全移除装饰(包括下划线和为标签预留的空间),请将 decoration 设置为 null。
下面是常见的使用案例:
kotlin
 children: [
            TextField(
              decoration: InputDecoration(
                hintText: '请输入',
                label: Text('用户名'),
                icon: Icon(Icons.person, size: 40),
              ),
            ),

            TextField(
              decoration: InputDecoration(
                hintText: '请输入',
                border: InputBorder.none, // 去掉下划线
              ),
            ),
            TextField(decoration: null),
            ]
TextFormField
TextFormField 包装了一个 TextField 并将其与周围的 Form 集成。这提供了额外的功能,例如验证以及与其他 FormField 小部件的集成。
与TextField相比较,TextFormField的核心是与form联动、输入校验。
下面是一个登录案例:
kotlin
import 'package:flutter/material.dart';
import 'package:fluttertoast/fluttertoast.dart';

class LoginForm extends StatefulWidget {
  @override
  _LoginFormState createState() => _LoginFormState();
}

class _LoginFormState extends State<LoginForm> {
  final _formKey = GlobalKey<FormState>();
  String _email = '';
  String _password = '';

  @override
  Widget build(BuildContext context) {
    return Scaffold(
      body: Padding(
        padding: EdgeInsets.all(20),
        child: Form(
          key: _formKey,
          child: Column(
            children: [
              // 邮箱输入
              TextFormField(
                decoration: InputDecoration(
                  labelText: '邮箱',
                  hintText: 'example@email.com',
                  prefixIcon: Icon(Icons.email),
                  border: OutlineInputBorder(),
                ),
                validator: (value) {
                  if (value == null || value.isEmpty) {
                    return '请输入邮箱';
                  }
                  // 更严谨的邮箱正则
                  final emailRegex = RegExp(
                    r'^[a-zA-Z0-9._%+-]+@[a-zA-Z0-9.-]+\.[a-zA-Z]{2,}$',
                  );
                  if (!emailRegex.hasMatch(value)) {
                    return '请输入有效的邮箱地址';
                  }
                  return null;
                },
                onSaved: (value) {
                  _email = value ?? '';
                },
              ),

              SizedBox(height: 20),

              // 密码输入
              TextFormField(
                decoration: InputDecoration(
                  labelText: '密码',
                  prefixIcon: Icon(Icons.lock),
                  border: OutlineInputBorder(),
                ),
                obscureText: true,
                validator: (value) {
                  if (value == null || value.isEmpty) {
                    return '请输入密码';
                  }
                  if (value.length < 6) {
                    return '密码至少6位字符';
                  }
                  if (!value.contains(RegExp(r'[A-Z]'))) {
                    return '密码必须包含大写字母';
                  }
                  if (!value.contains(RegExp(r'[0-9]'))) {
                    return '密码必须包含数字';
                  }
                  return null;
                },
                onSaved: (value) {
                  _password = value ?? '';
                },
              ),

              SizedBox(height: 30),

              // 提交按钮
              ElevatedButton(
                onPressed: _submitForm,
                style: ElevatedButton.styleFrom(
                  minimumSize: Size(double.infinity, 50),
                ),
                child: Text('登录', style: TextStyle(fontSize: 18)),
              ),
            ],
          ),
        ),
      ),
    );
  }

  void _submitForm() {
    // 1. 触发所有验证
    if (_formKey.currentState!.validate()) {
      print('✅ 所有验证通过');

      // 2. 保存表单数据
      _formKey.currentState!.save();

      // 3. 处理数据
      print('邮箱: $_email');
      print('密码: $_password');

      // 4. 执行登录逻辑
      _performLogin(_email, _password);
    } else {
      Fluttertoast.showToast(msg: '❌ 表单验证失败');
    }
  }

  void _performLogin(String email, String password) {
    // 实际登录逻辑
    Fluttertoast.showToast(msg: '登录成功');
  }
}
获取TextField的值
1. Create a TextEditingController
要获取用户在文本字段中输入的文本,需创建一个 TextEditingController 并将其提供给 TextField 或 TextFormField。
重要:使用完 TextEditingController 后,请调用其 dispose 方法。这能确保释放该对象所使用的所有资源。
kotlin
// Define a custom Form widget.
class MyCustomForm extends StatefulWidget {
  const MyCustomForm({super.key});

  @override
  State<MyCustomForm> createState() => _MyCustomFormState();
}

// Define a corresponding State class.
// This class holds the data related to the Form.
class _MyCustomFormState extends State<MyCustomForm> {
  // Create a text controller and use it to retrieve the current value
  // of the TextField.
  final myController = TextEditingController();

  @override
  void dispose() {
    // Clean up the controller when the widget is disposed.
    myController.dispose();
    super.dispose();
  }

  @override
  Widget build(BuildContext context) {
    // Fill this out in the next step.
  }
}
2. Supply the TextEditingController to a TextField
既然你已经有了一个 TextEditingController,那就通过 controller 属性将它与文本字段连接起来:
kotlin
return TextField(controller: myController);3. Display the current value of the text field
向文本字段提供 TextEditingController 后,就可以开始读取值了。使用 TextEditingController 提供的 text 属性来获取用户在文本字段中输入的字符串。
以下代码会在用户点击悬浮操作按钮时,显示一个包含文本字段当前值的警告对话框。
kotlin
FloatingActionButton(
  // When the user presses the button, show an alert dialog containing
  // the text that the user has entered into the text field.
  onPressed: () {
    showDialog(
      context: context,
      builder: (context) {
        return AlertDialog(
          // Retrieve the text that the user has entered by using the
          // TextEditingController.
          content: Text(myController.text),
        );
      },
    );
  },
  tooltip: 'Show me the value!',
  child: const Icon(Icons.text_fields),
),
实时处理文本的变更
在某些情况下,每当文本字段中的文本发生变化时运行一个回调函数是很有用的。例如,你可能想要构建一个带有自动完成功能的搜索界面,在用户输入时更新结果。
每次文本发生变化时,如何运行回调函数?使用 Flutter,你有两个选择:
1、为 TextField 或 TextFormField 提供一个 onChanged () 回调函数。
2、使用TextEditingController.
向 TextField 或 TextFormField 提供一个 onChanged () 回调函数
最简单的方法是向 TextField 或 TextFormField 提供一个 onChanged () 回调函数。每当文本发生变化时,就会调用该回调函数。
在这个示例中,每当文本发生变化时,就将文本字段的当前值及其长度打印到控制台。
处理用户输入时,使用字符很重要,因为文本可能包含复杂字符。这样可以确保每个字符都能按照用户看到的样子被正确计数。
kotlin
TextField(
  onChanged: (text) {
    print('First text field: $text (${text.characters.length})');
  },
),
使用TextEditingController
一种更强大但也更复杂的方法是,提供一个 TextEditingController 作为 TextField 或 TextFormField 的 controller 属性。
若要在文本更改时收到通知,请按照以下步骤使用 addListener () 方法监听控制器:
1.创建一个 TextEditingController。
kotlin
// Define a custom Form widget.
class MyCustomForm extends StatefulWidget {
  const MyCustomForm({super.key});

  @override
  State<MyCustomForm> createState() => _MyCustomFormState();
}

// Define a corresponding State class.
// This class holds data related to the Form.
class _MyCustomFormState extends State<MyCustomForm> {
  // Create a text controller. Later, use it to retrieve the
  // current value of the TextField.
  final myController = TextEditingController();

  @override
  void dispose() {
    // Clean up the controller when the widget is removed from the
    // widget tree.
    myController.dispose();
    super.dispose();
  }

  @override
  Widget build(BuildContext context) {
    // Fill this out in the next step.
  }
}
请记住,当 TextEditingController 不再需要时,要对其进行销毁。这能确保释放该对象所使用的所有资源。
2.将 TextEditingController 连接到文本字段。
将 TextEditingController 提供给 TextField 或 TextFormField。一旦将这两个类连接起来,您就可以开始监听文本字段的变化了。
kotlin
TextField(controller: myController),3.创建一个函数来打印最新值。
你需要一个在文本每次变化时运行的函数。在_MyCustomFormState 类中创建一个方法,用于打印出文本字段的当前值。
kotlin
void _printLatestValue() {
  final text = myController.text;
  print('Second text field: $text (${text.characters.length})');
}
4.监听控制器的变化。
最后,监听 TextEditingController,并在文本发生变化时调用_printLatestValue () 方法。为此,请使用 addListener () 方法。
在_MyCustomFormState 类初始化时开始监听变化,在_MyCustomFormState 被销毁时停止监听。
kotlin
@override
void initState() {
  super.initState();

  // Start listening to changes.
  myController.addListener(_printLatestValue);
}
kotlin
@override
void dispose() {
  // Clean up the controller when the widget is removed from the widget tree.
  // This also removes the _printLatestValue listener.
  myController.dispose();
  super.dispose();
}
Focus
当一个文本框被选中并接受输入时,就说它处于 "焦点" 状态。通常,用户通过点击将焦点切换到文本框,而开发者则通过使用本教程中描述的工具,以编程方式将焦点切换到文本框。
管理焦点是创建具有直观流程的表单的基本工具。例如,假设你有一个带有文本字段的搜索屏幕。当用户导航到搜索屏幕时,你可以将焦点设置到用于输入搜索词的文本字段上。这样,用户在屏幕一显示时就能开始输入,无需手动点击该文本字段。
接下来,了解如何在文本字段一显示时就使其获得焦点,以及如何在点击按钮时让文本字段获得焦点。
可见就立即聚焦
要在文本字段一显示就使其获得焦点,请使用 autofocus 属性。
kotlin
TextField(
  autofocus: true,
);
点击按钮时聚焦文本字段
你可能需要在稍后的某个时间点将焦点赋予文本字段。在实际情况中,你可能还需要响应 API 调用或验证错误,将焦点赋予特定的文本字段。在本示例中,按照以下步骤在用户按下按钮后将焦点赋予文本字段:
- Create a FocusNode
首先,创建一个 FocusNode。使用 FocusNode 在 Flutter 的 "焦点树" 中标识特定的 TextField。这使你能够在后续步骤中为该 TextField 设置焦点。
由于焦点节点是长期存在的对象,因此请使用 State 对象来管理其生命周期。按照以下说明,在 State 类的 initState () 方法中创建 FocusNode 实例,并在 dispose () 方法中对其进行清理:
kotlin
// Define a custom Form widget.
class MyCustomForm extends StatefulWidget {
  const MyCustomForm({super.key});

  @override
  State<MyCustomForm> createState() => _MyCustomFormState();
}

// Define a corresponding State class.
// This class holds data related to the form.
class _MyCustomFormState extends State<MyCustomForm> {
  // Define the focus node. To manage the lifecycle, create the FocusNode in
  // the initState method, and clean it up in the dispose method.
  late FocusNode myFocusNode;

  @override
  void initState() {
    super.initState();

    myFocusNode = FocusNode();
  }

  @override
  void dispose() {
    // Clean up the focus node when the Form is disposed.
    myFocusNode.dispose();

    super.dispose();
  }

  @override
  Widget build(BuildContext context) {
    // Fill this out in the next step.
  }
}- Pass the FocusNode to a TextField
既然你已经有了一个 FocusNode,就在 build () 方法中将它传递给特定的 TextField 吧。
kotlin
@override
Widget build(BuildContext context) {
  return TextField(focusNode: myFocusNode);
}- Give focus to the TextField when a button is tapped
最后,当用户点击悬浮操作按钮时,让文本字段获得焦点。使用 requestFocus () 方法来完成这项任务。
kotlin
FloatingActionButton(
  // When the button is pressed,
  // give focus to the text field using myFocusNode.
  onPressed: () => myFocusNode.requestFocus(),
),
最后附上本期全部的测试代码
kotlin
import 'package:flutter/material.dart';

class InputPage extends StatefulWidget {
  const InputPage({super.key});

  @override
  State<InputPage> createState() => _InputPageState();
}

class _InputPageState extends State<InputPage> {
  final textController = TextEditingController();
  var inputText = '';
  late FocusNode myFocusNode;
  late bool hasFocus = false;
  @override
  void initState() {
    super.initState();
    myFocusNode = FocusNode();
    myFocusNode.addListener(() {
      setState(() {
        hasFocus = myFocusNode.hasFocus;
      });
    });
    textController.addListener(() {
      setState(() {
        inputText = (textController.text);
      });
    });
  }

  @override
  dispose() {
    textController.dispose();
    myFocusNode.dispose();
    super.dispose();
  }

  @override
  Widget build(BuildContext context) {
    return Scaffold(
      appBar: AppBar(title: Text('input test')),
      body: Center(
        child: Column(
          mainAxisAlignment: MainAxisAlignment.center,
          children: [
            TextField(
              autofocus: true, //可见就立刻聚焦
              decoration: InputDecoration(
                hintText: '请输入',
                label: Text('用户名'),
                icon: Icon(Icons.person, size: 40),
              ),
            ),
            Row(
              children: [
                Expanded(
                  child: TextField(
                    focusNode: myFocusNode,
                    decoration: InputDecoration(
                      hintText: '请输入',
                      border: InputBorder.none, // 去掉下划线
                    ),
                  ),
                ),
                GestureDetector(
                  onTap: () {
                    if (hasFocus) {
                      myFocusNode.unfocus();
                      //这一部分实测,Android可用,web取消后立马会自动获得
                    } else {
                      myFocusNode.requestFocus();
                    }
                  },
                  child: Text(hasFocus ? '取消' : '聚焦'),
                ),
              ],
            ),

            TextField(decoration: null),
            TextFormField(
              decoration: InputDecoration(
                labelText: '邮箱',
                prefixIcon: Icon(Icons.email),
              ),
              keyboardType: TextInputType.emailAddress,
              validator: (value) {
                if (value == null || value.isEmpty) {
                  return '请输入邮箱';
                }
                if (!RegExp(
                  r'^[\w-\.]+@([\w-]+\.)+[\w-]{2,4}$',
                ).hasMatch(value)) {
                  return '邮箱格式不正确';
                }
                return null;
              },
            ),
            TextField(
              controller: textController,
              decoration: InputDecoration(hintText: '请输入'),
            ),
            Text(inputText, style: TextStyle(fontSize: 20, color: Colors.red)),
          ],
        ),
      ),
    );
  }
}
kotlin
import 'package:flutter/material.dart';
import 'package:fluttertoast/fluttertoast.dart';

class LoginForm extends StatefulWidget {
  @override
  _LoginFormState createState() => _LoginFormState();
}

class _LoginFormState extends State<LoginForm> {
  final _formKey = GlobalKey<FormState>();
  String _email = '';
  String _password = '';

  @override
  Widget build(BuildContext context) {
    return Scaffold(
      body: Padding(
        padding: EdgeInsets.all(20),
        child: Form(
          key: _formKey,
          child: Column(
            children: [
              // 邮箱输入
              TextFormField(
                decoration: InputDecoration(
                  labelText: '邮箱',
                  hintText: 'example@email.com',
                  prefixIcon: Icon(Icons.email),
                  border: OutlineInputBorder(),
                ),
                validator: (value) {
                  if (value == null || value.isEmpty) {
                    return '请输入邮箱';
                  }
                  // 更严谨的邮箱正则
                  final emailRegex = RegExp(
                    r'^[a-zA-Z0-9._%+-]+@[a-zA-Z0-9.-]+\.[a-zA-Z]{2,}$',
                  );
                  if (!emailRegex.hasMatch(value)) {
                    return '请输入有效的邮箱地址';
                  }
                  return null;
                },
                onSaved: (value) {
                  _email = value ?? '';
                },
              ),

              SizedBox(height: 20),

              // 密码输入
              TextFormField(
                decoration: InputDecoration(
                  labelText: '密码',
                  prefixIcon: Icon(Icons.lock),
                  border: OutlineInputBorder(),
                ),
                obscureText: true,
                validator: (value) {
                  if (value == null || value.isEmpty) {
                    return '请输入密码';
                  }
                  if (value.length < 6) {
                    return '密码至少6位字符';
                  }
                  if (!value.contains(RegExp(r'[A-Z]'))) {
                    return '密码必须包含大写字母';
                  }
                  if (!value.contains(RegExp(r'[0-9]'))) {
                    return '密码必须包含数字';
                  }
                  return null;
                },
                onSaved: (value) {
                  _password = value ?? '';
                },
              ),

              SizedBox(height: 30),

              // 提交按钮
              ElevatedButton(
                onPressed: _submitForm,
                style: ElevatedButton.styleFrom(
                  minimumSize: Size(double.infinity, 50),
                ),
                child: Text('登录', style: TextStyle(fontSize: 18)),
              ),
            ],
          ),
        ),
      ),
    );
  }

  void _submitForm() {
    // 1. 触发所有验证
    if (_formKey.currentState!.validate()) {
      print('✅ 所有验证通过');

      // 2. 保存表单数据
      _formKey.currentState!.save();

      // 3. 处理数据
      print('邮箱: $_email');
      print('密码: $_password');

      // 4. 执行登录逻辑
      _performLogin(_email, _password);
    } else {
      Fluttertoast.showToast(msg: '❌ 表单验证失败');
    }
  }

  void _performLogin(String email, String password) {
    // 实际登录逻辑
    Fluttertoast.showToast(msg: '登录成功');
  }
}