若该文为原创文章,转载请注明原文出处
本文章博客地址:https://hpzwl.blog.csdn.net/article/details/156614838
长沙红胖子Qt(长沙创微智科)博文大全:开发技术集合(包含Qt实用技术、树莓派、三维、OpenCV、OpenGL、ffmpeg、OSG、单片机、软硬结合等等)持续更新中...
Qt开发专栏:三方库开发技术
上一篇:《QXlsx开发笔记(二):QXlsx基本数据结构解说以及单元格Cell边框操作》
下一篇:敬请期待...
前言
QXlsx的单元格边框的操作,涉及宽度、高度、合并,结合边框样式,就能做出需要的表格框架了。
Demo
表格单元格的操作
注意1:单元格都是从1,1开始,不是程序员理解的0,0开始。
注意2:高度和宽度默认单位都是磅,不是程序员理解的像素。
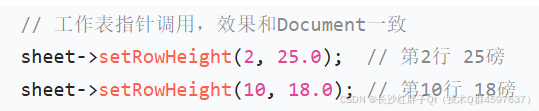
行高的设置
QXlsx中行高设置唯一核心接口:setRowHeight(int row, double height),适配2种调用方式,覆盖所有行高需求。
直接操作表格:
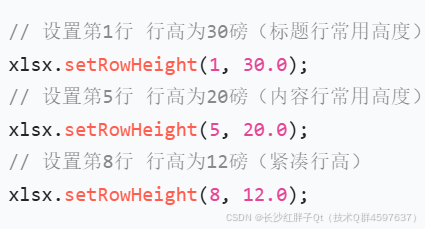
操作worksheet(建议都操作worksheet)
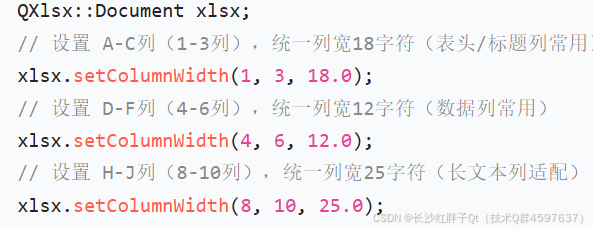
列宽的设置
接口格式:setColumnWidth(int col, double width)。
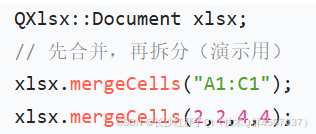
单元格的合并
接口格式:mergeCells(CellRange range)。
其中可以通过CellRange使用字符串"A1:C3"excel内部的格式。
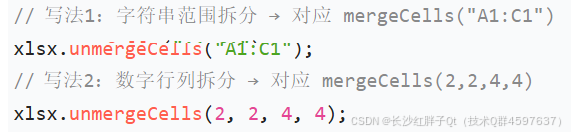
单元格的拆分
拆分使用unmergeCells(CellRange range)。
表格创建Demo
步骤一:新建xlsx(QXlsx框架)
新建xlsx进行保存是QXlsx的基础框架:

步骤二:获取单元格表
步骤三:每行的表格组成细节

步骤四:保存

Demo源码
cpp
void XlsxManager::testDemo2()
{
// 步骤一:创建表格
Document document;
// document.save();
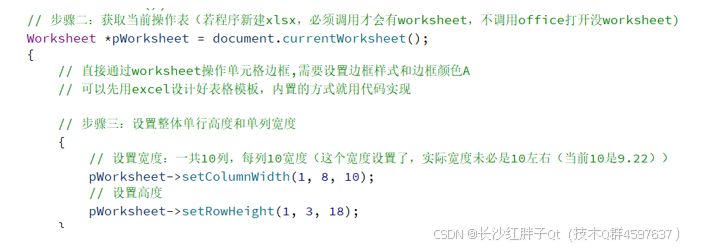
// 步骤二:获取当前操作表(若程序新建xlsx,必须调用才会有worksheet,不调用office打开没worksheet)
Worksheet *pWorksheet = document.currentWorksheet();
{
// 直接通过worksheet操作单元格边框,需要设置边框样式和边框颜色A
// 可以先用excel设计好表格模板,内置的方式就用代码实现
// 步骤三:设置整体单行高度和单列宽度
{
// 设置宽度:一共10列,每列10宽度(这个宽度设置了,实际宽度未必是10左右(当前10是9.22))
pWorksheet->setColumnWidth(1, 8, 10);
// 设置高度
pWorksheet->setRowHeight(1, 3, 18);
}
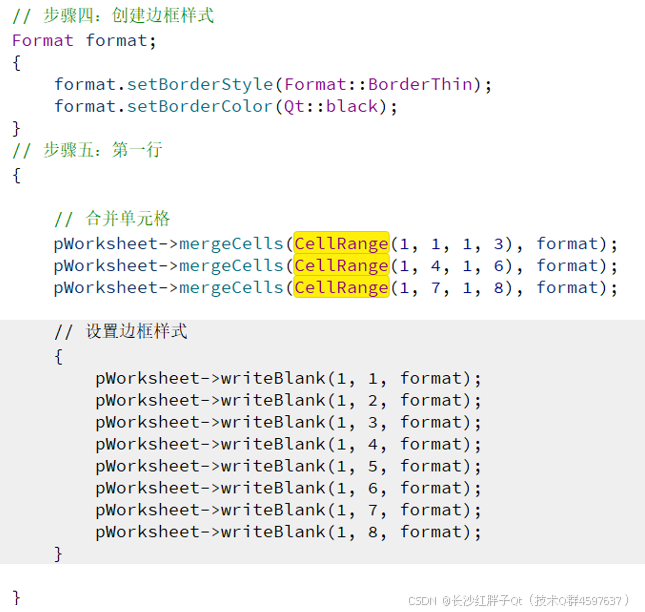
// 步骤四:创建边框样式
Format format;
{
format.setBorderStyle(Format::BorderThin);
format.setBorderColor(Qt::black);
}
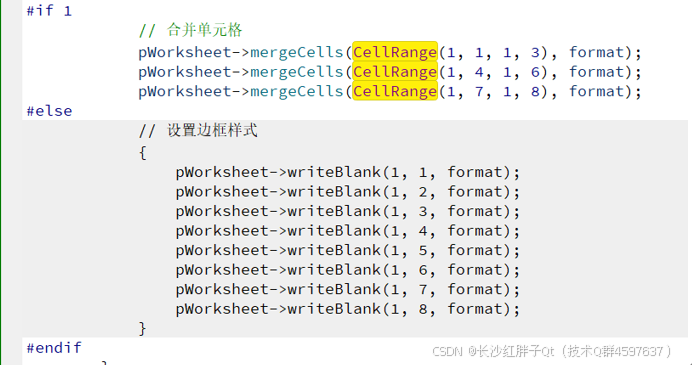
// 步骤五:第一行
{
#if 1
// 合并单元格
pWorksheet->mergeCells(CellRange(1, 1, 1, 3), format);
pWorksheet->mergeCells(CellRange(1, 4, 1, 6), format);
pWorksheet->mergeCells(CellRange(1, 7, 1, 8), format);
#else
// 设置边框样式
{
pWorksheet->writeBlank(1, 1, format);
pWorksheet->writeBlank(1, 2, format);
pWorksheet->writeBlank(1, 3, format);
pWorksheet->writeBlank(1, 4, format);
pWorksheet->writeBlank(1, 5, format);
pWorksheet->writeBlank(1, 6, format);
pWorksheet->writeBlank(1, 7, format);
pWorksheet->writeBlank(1, 8, format);
}
#endif
}
// 步骤六:第二行
{
#if 0
// 设置范围内的列格式(设置毫无变化)
pWorksheet->setColumnFormat(CellRange(2, 1, 2, 10), format);
#endif
for(int col = 1; col <= 8; col++)
{
pWorksheet->writeBlank(2, col, format);
}
}
// 步骤七:第三行
{
Format format1;
{
format1.setLeftBorderStyle(Format::BorderThin);
format1.setLeftBorderColor(Qt::black);
}
pWorksheet->writeBlank(3, 1, format1);
Format format2;
{
format2.setRightBorderStyle(Format::BorderThin);
format2.setRightBorderColor(Qt::black);
}
pWorksheet->writeBlank(3, 8, format2);
}
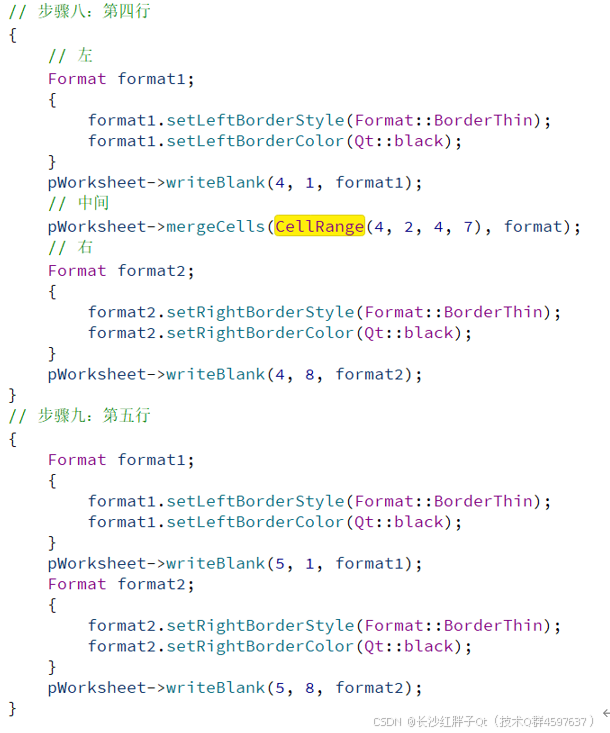
// 步骤八:第四行
{
// 左
Format format1;
{
format1.setLeftBorderStyle(Format::BorderThin);
format1.setLeftBorderColor(Qt::black);
}
pWorksheet->writeBlank(4, 1, format1);
// 中间
pWorksheet->mergeCells(CellRange(4, 2, 4, 7), format);
// 右
Format format2;
{
format2.setRightBorderStyle(Format::BorderThin);
format2.setRightBorderColor(Qt::black);
}
pWorksheet->writeBlank(4, 8, format2);
}
// 步骤九:第五行
{
Format format1;
{
format1.setLeftBorderStyle(Format::BorderThin);
format1.setLeftBorderColor(Qt::black);
}
pWorksheet->writeBlank(5, 1, format1);
Format format2;
{
format2.setRightBorderStyle(Format::BorderThin);
format2.setRightBorderColor(Qt::black);
}
pWorksheet->writeBlank(5, 8, format2);
}
// 步骤十:第六行
{
// 合并单元格
pWorksheet->mergeCells(CellRange(6, 1, 6, 3), format);
pWorksheet->mergeCells(CellRange(6, 4, 6, 6), format);
pWorksheet->mergeCells(CellRange(6, 7, 6, 8), format);
}
}
// 步骤十一: 存表
document.saveAs(QString("%1.xlsx").arg(QDateTime::currentDateTime().toString("yyyy-MM-dd hh_mm_ss")));
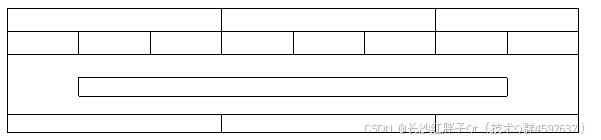
}工程模板v1.2.0

入坑
入坑一:设置合并单元格边框有问题
问题
设置一个格子,其他合并的格子没默认,按照我们操作xlsx,选择合并的单元格只能操作全部边框,不能在选择合并的单元格去做一行的边框。


预期:

原因
库的原因,还用问
解决
在合并单元格的时候,就设置format,或者就得全部每个单元格要设置。

上一篇:《QXlsx开发笔记(二):QXlsx基本数据结构解说以及单元格Cell边框操作》
下一篇:敬请期待...
本文章博客地址:https://hpzwl.blog.csdn.net/article/details/156614838