文章目录
-
- 1,POI操作Excel高低版本区别
- 2,创建一个新的工作薄
- 3,实现用户数据的导入
- 4,实现用户数据的导出
-
- 4.1、需求
- 4.2、基本思路
- 4.3、代码实现
- [4.4、后端Cannot delete报错的解决](#4.4、后端Cannot delete报错的解决)
- 4.5、导出时样式的设置
在企业级应用开发中,Excel报表是一种最常见的报表需求。Excel报表开发一般分为两种形式:
- 为了方便操作,基于Excel的报表批量上传数据,也就是把Excel中的数据导入到系统中。
- 通过java代码生成Excel报表。也就是把系统中的数据导出到Excel中,方便查阅。
1,POI操作Excel高低版本区别
1.1、Excel的两种版本
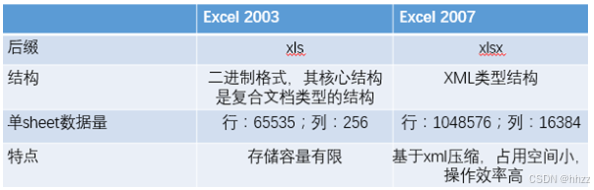
目前世面上的Excel分为两个大的版本Excel2003和Excel2007及以上两个版本;
两者之间的区别如下:
-
Excel2003 是一个特有的二进制格式,其核心结构是复合文档类型的结构,存储数据量较小;
-
Excel2007 的核心结构是 XML 类型的结构,采用的是基于 XML 的压缩方式,使其占用的空间更小,操作效率更高
1.2、POI介绍
-
POI是apache的项目,可对微软的Word,Excel,PPT进行操作,包括office2003和2007,Excle2003和2007。
-
poi现在一直有更新。所以现在主流使用POI。
-
Apache POI是Apache软件基金会的开源项目,由Java编写的免费开源的跨平台的 Java API,Apache
-
POI提供API给Java语言操作Microsoft Office的功能。
API对象介绍:
-
工作簿 : WorkBook (HSSFWordBook : 2003版本,XSSFWorkBook : 2007级以上)
-
工作表 : Sheet (HSSFSheet : 2003版本,XSSFSheet : 2007级以上)
-
行 : Row (HSSFRow : 2003版本,XSSFRow : 2007级以上)
-
单元格 : Cell (HSSFCell : 2003版本,XSSFCell : 2007级以上)
1.3、POI操作Excel高低版本区别
在POI包中有如下几个主要对象和excel的几个对象对应:
| 对应excel名称 | 低版本中的类名 | 高版本中的类名 |
|---|---|---|
| 工作簿 | HSSFWorkbook | XSSFWorkbook |
| 工作表 | HSSFSheet | XSSFSheet |
| 行 | HSSFRow | XSSFRow |
| 单元格 | HSSFCell | XSSFCell |
| 单元格样式 | HSSFCellStyle | XSSFCellStyle |
2,创建一个新的工作薄
2.1、所需依赖
poi最原始的依赖(总共三个):
xml
<dependency>
    <groupId>org.apache.poi</groupId>
    <artifactId>poi</artifactId>
    <version>4.0.1</version>
</dependency>

<dependency>
    <groupId>org.apache.poi</groupId>
    <artifactId>poi-ooxml</artifactId>
    <version>4.0.1</version>
</dependency>

<dependency>
    <groupId>org.apache.poi</groupId>
    <artifactId>poi-ooxml-schemas</artifactId>
    <version>4.0.1</version>
</dependency>
本文中我直接使用easypoi,它应该是包含上述poi原始的所有依赖:
xml
		<dependency>
			<groupId>cn.afterturn</groupId>
			<artifactId>easypoi-spring-boot-starter</artifactId>
			<version>4.4.0</version>
		</dependency>
2.2、分别创建高低版本的excel文件
入门案例代码:创建一个新的工作薄,里面随便写一句话
操作低版本:
java
package com.tigerhhzz;

import org.apache.poi.hssf.usermodel.HSSFWorkbook;
import org.apache.poi.ss.usermodel.Cell;
import org.apache.poi.ss.usermodel.Row;
import org.apache.poi.ss.usermodel.Sheet;
import org.apache.poi.ss.usermodel.Workbook;
import org.junit.jupiter.api.Test;
import org.springframework.boot.test.context.SpringBootTest;

import java.io.FileOutputStream;

//创建一个低版本的excel,并且向其中的一个单元格中随便写一句话
@SpringBootTest
public class POIDemo1 {

    @Test
    public void main() throws Exception {
//创建了一个全新(里面什么都没有)的工作薄
        Workbook workbook = new HSSFWorkbook();
//创建了一个全新(里面什么都没有)的工作表
        Sheet sheet = workbook.createSheet("POI操作Excel");
//创建了第一行(空的)
        Row row = sheet.createRow(0);
//创建的是第一行的第一个单元格
        Cell cell = row.createCell(0);
//        在单元格中写入内容
        cell.setCellValue("这是我第一次玩POI11111111");
        //把工作薄输出到本地磁盘
        workbook.write(new FileOutputStream("d:/test01.xls"));
    }
}
操作低版本:
java
package com.tigerhhzz;


import org.apache.poi.ss.usermodel.Cell;
import org.apache.poi.ss.usermodel.Row;
import org.apache.poi.ss.usermodel.Sheet;
import org.apache.poi.ss.usermodel.Workbook;
import org.apache.poi.xssf.usermodel.XSSFWorkbook;

import java.io.FileOutputStream;


//创建一个高版本的excel,并且向其中的一个单元格中随便写一句话
public class POIDemo2 {

    public static void main(String[] args) throws Exception {
//        创建一个全新工作薄
        Workbook workbook = new XSSFWorkbook();
//        在工作薄中创建新的工作表
        Sheet sheet = workbook.createSheet("POI操作Excel");
//        在工作表中创建行
        Row row = sheet.createRow(0);
//        在行中创建单元格
        Cell cell = row.createCell(0);
//        在单元格中写入内容
        cell.setCellValue("这是我第一次玩POI-------");
//        把工作薄输出到本地磁盘
        workbook.write(new FileOutputStream("d:/test02.xlsx"));
    }
}
比较上面两个代码会发现,在开发中只是类的名称不一样,方法是一样的。
3,实现用户数据的导入
3.1、需求
把《用户导入测试数据.xlsx》文档中的数据导入到系统中,
内容如下:
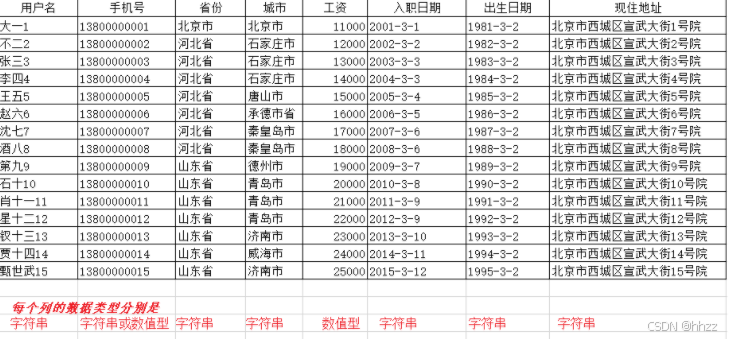
数据的导入就是读取excel中的内容,转成对象插入到数据库中
3.2、基本思路
一般来说,即将导入的文件,每个列代表什么意思基本上都是固定的,比如第1列就是用户姓名,最后一列就是用户的现住址,并且在做excel时对每个列的类型都是有要求的,这样就可以给我们开发带来很大的简便。
最终的目标就是读取每一行数据,把数据转成用户的对象,保存到表中
实现的步骤:
- 根据上传的文件创建Workbook
- 获取到第一个sheet工作表
- 从第二行开始读取数据
- 读取每一个单元格,把内容放入到用户对象的相关的属性中
3.3、代码实现
第一步:在Controller接收文件,具体的实现交给service
java
    @PostMapping(value = "/uploadExcel", name = "上传用户数据")
    public void uploadExcel(MultipartFile file)  throws Exception{
        userService.uploadExcel(file);
    }
第二步:在UserService中添加uploadExcel
java
package com.tigerhhzz.service;


import com.baomidou.mybatisplus.extension.service.IService;
import com.tigerhhzz.pojo.User;
import org.springframework.web.multipart.MultipartFile;

import javax.servlet.http.HttpServletResponse;

/**
 * @Author tigerhhzz
 * @Date 2025 07 07 18 19
 **/
public interface IUserService extends IService<User> {

    void uploadExcel(MultipartFile file) throws Exception;


//    void downLoadXlsx(HttpServletResponse response);
}
第三步:实现UserServiceImpl 类,添加上传用户的方法
java
package com.tigerhhzz.service.impl;
import com.baomidou.mybatisplus.extension.service.impl.ServiceImpl;
import com.tigerhhzz.mapper.UserMapper;
import com.tigerhhzz.pojo.User;
import com.tigerhhzz.service.IUserService;
import org.apache.poi.ss.usermodel.Cell;
import org.apache.poi.ss.usermodel.Row;
import org.apache.poi.ss.usermodel.Sheet;
import org.apache.poi.ss.usermodel.Workbook;
import org.apache.poi.xssf.usermodel.XSSFWorkbook;
import org.springframework.beans.factory.annotation.Autowired;
import org.springframework.stereotype.Service;
import org.springframework.web.multipart.MultipartFile;
import java.text.SimpleDateFormat;
import java.util.Date;
/**
* @Author tigerhhzz
* @Date 2025 07 07 18 19
**/
@Service
public class UserServiceImpl extends ServiceImpl<UserMapper, User> implements IUserService {
@Autowired
private UserMapper userMapper;
@Override
public void uploadExcel(MultipartFile file) throws Exception {
Workbook workbook = new XSSFWorkbook(file.getInputStream()); //根据上传的输入流创建workbook
Sheet sheet = workbook.getSheetAt(0); //获取工作薄中的第一个工作表
int lastRowIndex = sheet.getLastRowNum(); //获取这个sheet中最后一行数据,为了循环遍历
// 以下三个为了节省栈内存,所以提到循环的外面
User user = null;
Row row = null;
Cell cell = null;
//开始循环每行,获取每行的单元格中的值,放入到user属性中
for (int i = 1; i <= lastRowIndex; i++) {
row = sheet.getRow(i);
user = new User();
// 因为第一个列单元格中是字符串,可以直接使用getStringCellValue方法
String userName = row.getCell(0).getStringCellValue(); //用户名
user.setUserName(userName);
String phone = null; //手机号
try {
phone = row.getCell(1).getStringCellValue();
} catch (IllegalStateException e) {
phone = row.getCell(1).getNumericCellValue()+"";
}
user.setPhone(phone);
String province = row.getCell(2).getStringCellValue(); //省份
user.setProvince(province);
String city = row.getCell(3).getStringCellValue(); //城市
user.setCity(city);
// 因为在填写excel中的数据时就可以约定这个列只能填写数值,所以可以直接用getNumericCellValue方法
Integer salary = ((Double)row.getCell(4).getNumericCellValue()).intValue(); //工资
user.setSalary(salary);
String hireDateStr = row.getCell(5).getStringCellValue(); //入职日期
SimpleDateFormat sdf = new SimpleDateFormat("yyyy-MM-dd");
Date hireDate = sdf.parse(hireDateStr);
user.setHireDate(hireDate);
String birthdayStr = row.getCell(6).getStringCellValue(); //出生日期
Date birthday = sdf.parse(birthdayStr);
user.setBirthday(birthday);
String address = row.getCell(7).getStringCellValue(); //现住地址
user.setAddress(address);
userMapper.insert( user);
}
}
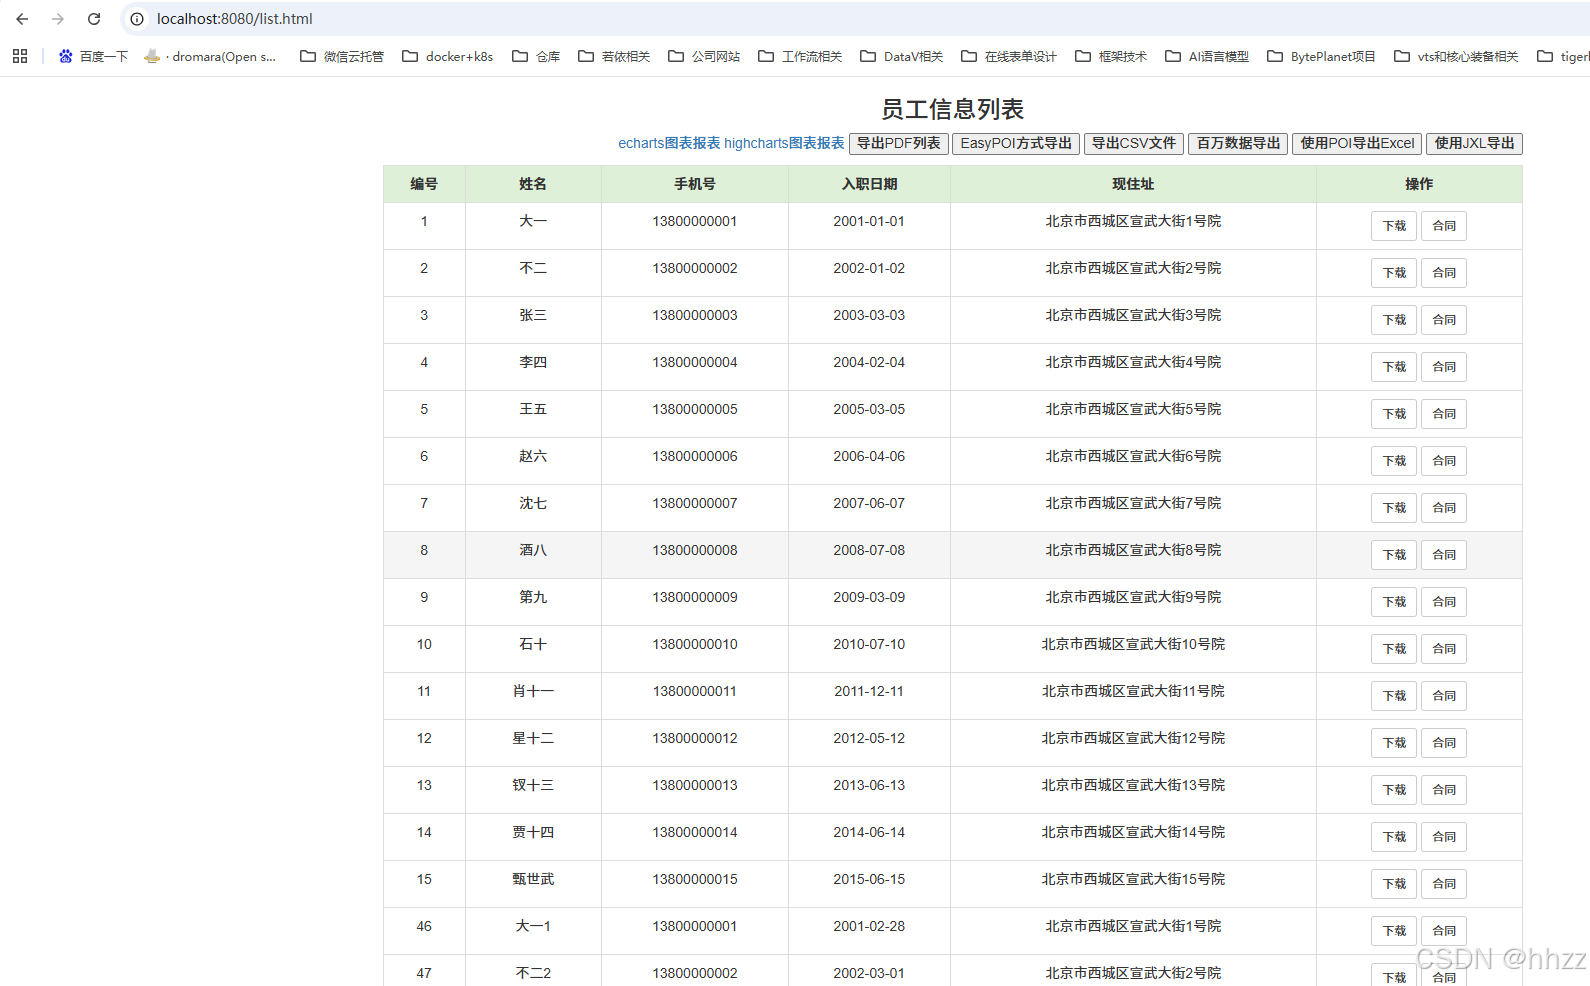
}上传成功后直接查询数据库中的数据:
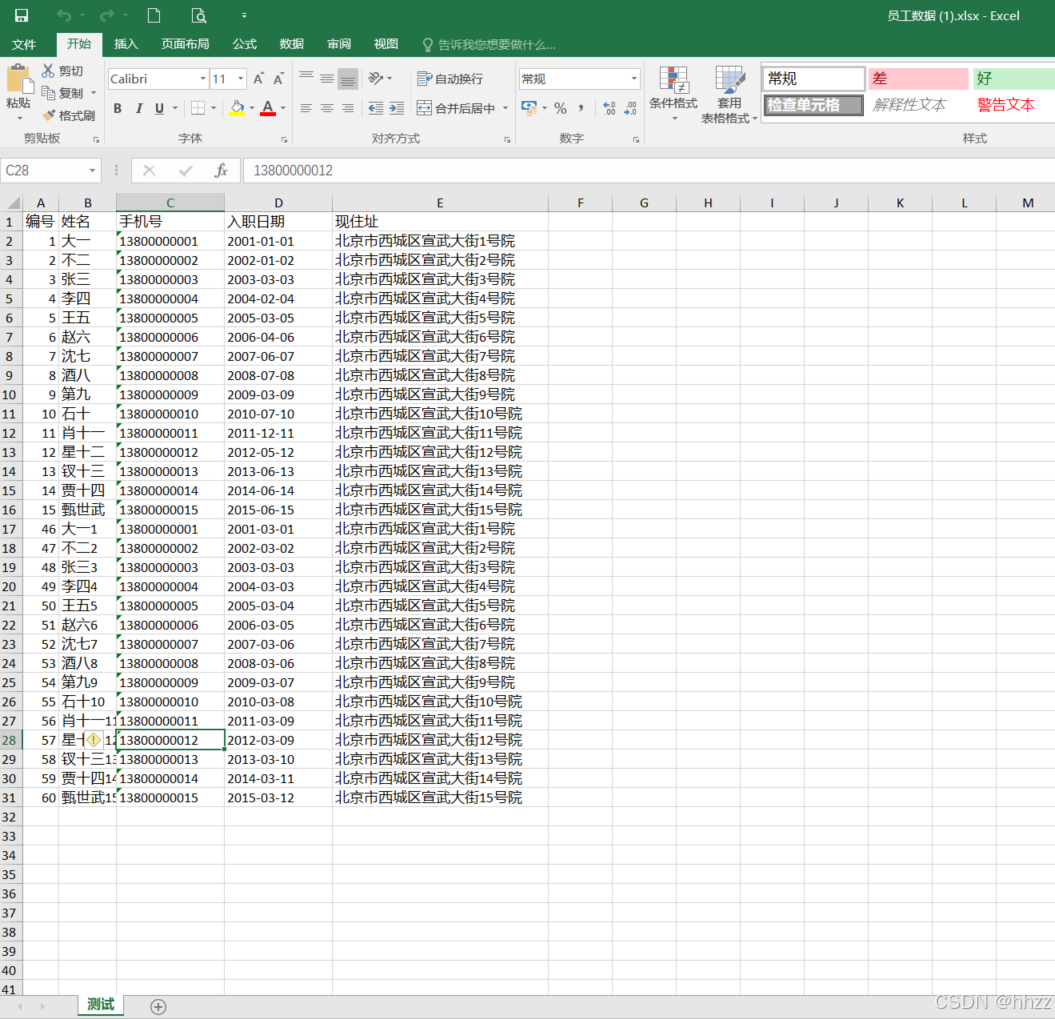
4,实现用户数据的导出
4.1、需求
我们先来一个简单的excel的导出,不要求有什么样式。
4.2、基本思路
- 创建一个全新的工作薄
- 在新的工作薄中创建一个新的工作表
- 在工作表创建第一行作为标题行,标题固定
- 从第二行循环遍历创建,有多少条用户数据就应该创建多少行
- 把每一个user对象的属性放入到相应的单元格中
4.3、代码实现
第一步:在Controller添加方法,具体的实现交给service
java
    @GetMapping(value = "/downLoadXlsxByPoi",name = "使用POI下载高版本")
    public void downLoadXlsx(HttpServletResponse response) throws Exception{
        userService.downLoadXlsx(response);
    }
第二步:在UserService中添加downLoadXlsx
java
package com.tigerhhzz.service;


import com.baomidou.mybatisplus.extension.service.IService;
import com.tigerhhzz.pojo.User;
import org.springframework.web.multipart.MultipartFile;

import javax.servlet.http.HttpServletResponse;

/**
 * @Author tigerhhzz
 * @Date 2025 07 07 18 19
 **/
public interface IUserService extends IService<User> {

    void uploadExcel(MultipartFile file) throws Exception;

    void downLoadXlsx(HttpServletResponse response) throws Exception;;
}
第三步:实现UserServiceImpl 类,添加下载用户的方法
java
 @Override
    public void downLoadXlsx(HttpServletResponse response) throws Exception  {
        //        创建一个空的工作薄
        Workbook workbook = new XSSFWorkbook();
        //        在工作薄中创建一个工作表
        Sheet sheet = workbook.createSheet("测试");
        //        设置列宽
        sheet.setColumnWidth(0,5*256);
        sheet.setColumnWidth(1,8*256);
        sheet.setColumnWidth(2,15*256);
        sheet.setColumnWidth(3,15*256);
        sheet.setColumnWidth(4,30*256);
        //            处理标题
        String[] titles = new String[]{"编号","姓名","手机号","入职日期","现住址"};

        //        创建标题行
        Row titleRow = sheet.createRow(0);
        Cell cell = null;
        for (int i = 0; i < titles.length; i++) {
            cell = titleRow.createCell(i);
            cell.setCellValue(titles[i]);
        }
        //        处理内容
        List<User> userList = userMapper.selectList(null);
        int rowIndex = 1;
        Row row = null;
        SimpleDateFormat sdf = new SimpleDateFormat("yyyy-MM-dd");
        for (User user : userList) {
            row = sheet.createRow(rowIndex);
            cell = row.createCell(0);
            cell.setCellValue(user.getId());

            cell = row.createCell(1);
            cell.setCellValue(user.getUserName());

            cell = row.createCell(2);
            cell.setCellValue(user.getPhone());

            cell = row.createCell(3);
            cell.setCellValue(sdf.format(user.getHireDate()));

            cell = row.createCell(4);
            cell.setCellValue(user.getAddress());

            rowIndex++;
        }
        //            导出的文件名称
        String filename="员工数据.xlsx";
        //            设置文件的打开方式和mime类型
        ServletOutputStream outputStream = response.getOutputStream();
        response.setHeader( "Content-Disposition", "attachment;filename="  + new String(filename.getBytes(),"ISO8859-1"));
        response.setContentType("application/vnd.openxmlformats-officedocument.spreadsheetml.sheet");
        workbook.write(outputStream);
4.4、后端Cannot delete报错的解决
报错信息如下:
bash
Cannot delete C:\Users\Administrator\AppData\Local\Temp\tomcat.8080.17684240添加自定义配置类DoNotCleanupMultipartResolver来避免自动删除临时文件,仅在必要时清理部分信息。
java
package com.tigerhhzz.config;
import org.springframework.context.annotation.Bean;
import org.springframework.context.annotation.Configuration;
import org.springframework.web.multipart.MultipartHttpServletRequest;
import org.springframework.web.multipart.support.StandardMultipartHttpServletRequest;
import org.springframework.web.multipart.support.StandardServletMultipartResolver;
import org.springframework.web.servlet.DispatcherServlet;
//SpringBoot在做文件上传的时候,会把文件先上传到操作系统的临时目录中,
// 上传完成以后会把临时目录下的文件再删除掉,这个错误就是因为权限或者别的什么原因无法删除临时文件导致的,
// 最简单的解决办法就是先不删除临时文件,只需在项目中添加如下配置类即可
@Configuration
public class MultipartConfig {
@Bean(name = DispatcherServlet.MULTIPART_RESOLVER_BEAN_NAME)
public StandardServletMultipartResolver multipartResolver() {
StandardServletMultipartResolver multipartResolver = new DoNotCleanupMultipartResolver();
multipartResolver.setResolveLazily(false);
return multipartResolver;
}
public static class DoNotCleanupMultipartResolver extends StandardServletMultipartResolver{
@Override
public void cleanupMultipart(MultipartHttpServletRequest request) {
try{
if(request instanceof StandardMultipartHttpServletRequest){
((StandardMultipartHttpServletRequest) request).getRequest().getParts().clear();
}
}catch(Exception e){
e.printStackTrace();
}
}
}
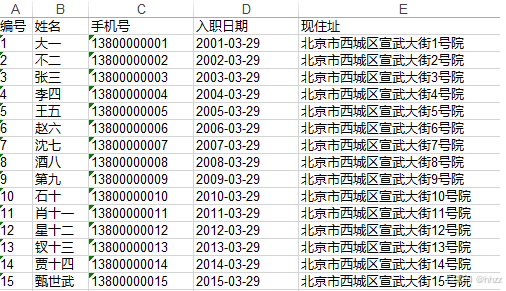
}文件导出如下:
4.5、导出时样式的设置
如果要求导出的excel如下内容:
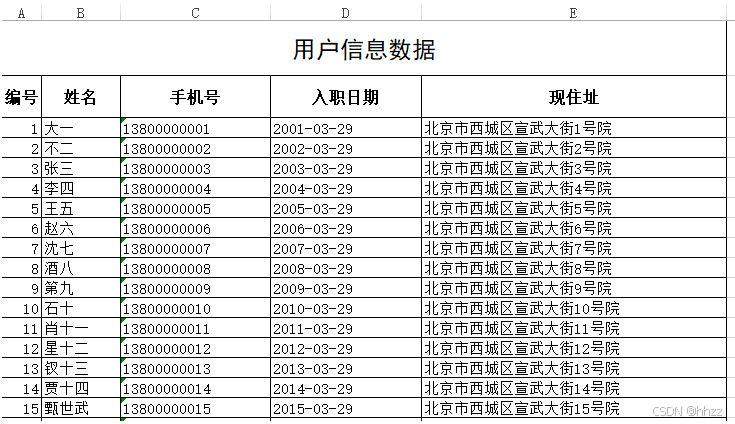
通过上图可以看出有些样式需要我们来设置,来看一下都有哪些知识点:
- 画框线
java
/**
 * 设置框线
 */
HSSFCellStyle contentStyle = book.createCellStyle();
contentStyle.setBorderBottom(HSSFCellStyle.BORDER_THIN);//底线
contentStyle.setBorderTop(HSSFCellStyle.BORDER_THIN);//顶部线
contentStyle.setBorderLeft(HSSFCellStyle.BORDER_THIN);//左侧线
contentStyle.setBorderRight(HSSFCellStyle.BORDER_THIN);//右侧线- 合并单元格
java
//合并单元格 起始行, 结束行, 起始列, 结束列
sheet.addMergedRegion(new CellRangeAddress(0,0,0,4));- 设置行高
java
/**
设置行高
*/
sheet.getRow(1).setHeight((short)500);- 设置表格的对齐方式和字体
java
//*设置对齐方式和字体***/
//内容部分的样式
style_content.setAlignment(HSSFCellStyle.ALIGN_CENTER);//设置水平居中
style_content.setVerticalAlignment(HSSFCellStyle.VERTICAL_CENTER);//设置垂直居中

HSSFFont font = book.createFont();//创建字体
font.setFontName("宋体");//设置字体名称
font.setFontHeightInPoints((short)11);//设置字体大小
style_content.setFont(font);//对样式设置字体

//标题样式
HSSFCellStyle style_title = book.createCellStyle();//创建标题样式
style_title.setAlignment(HSSFCellStyle.ALIGN_CENTER);//设置水平居中
style_title.setVerticalAlignment(HSSFCellStyle.VERTICAL_CENTER);//设置垂直居中
HSSFFont titleFont = book.createFont();//设置标题字体
titleFont.setFontName("黑体");
titleFont.setBold(true);//加粗
titleFont.setFontHeightInPoints((short)18);//字体大小
style_title.setFont(titleFont);//将标题字体设置到标题样式
sheet.getRow(0).getCell(0).setCellStyle(style_title);//单元格设置标题样式
导出结果如下:
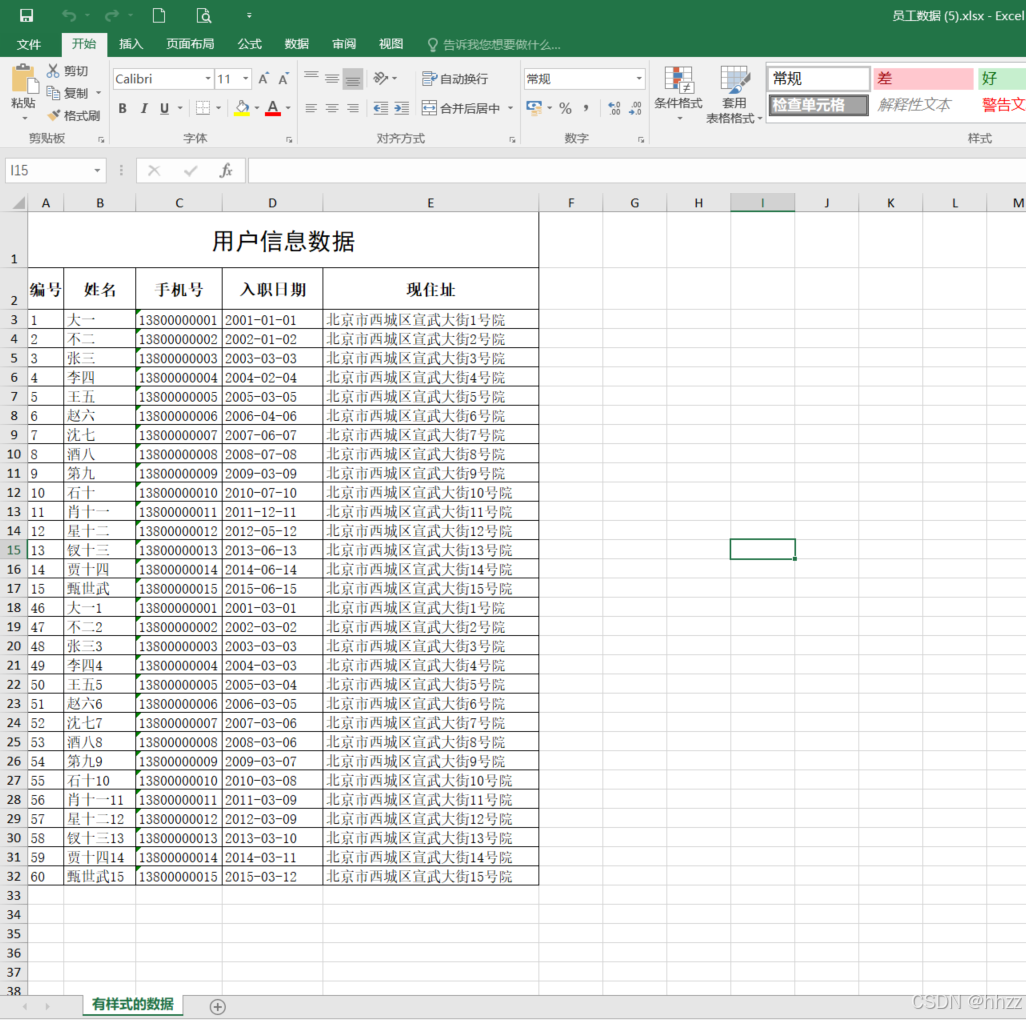
完整实现类代码:
java
//    使用POI导出用户列表数据--带样式
    @Override
    public void downLoadXlsxByPoiWithCellStyle(HttpServletResponse response) throws Exception {
        Workbook workbook = new XSSFWorkbook();
        Sheet sheet = workbook.createSheet("有样式的数据");

        sheet.setColumnWidth(0, 5 * 256);
        sheet.setColumnWidth(1, 10 * 256);
        sheet.setColumnWidth(2, 12 * 256);
        sheet.setColumnWidth(3, 14 * 256);
        sheet.setColumnWidth(4, 30 * 256);

//        需求:1、边框线:全边框  2、行高:42   3、合并单元格:第1行的第1个单元格到第5个单元格 4、对齐方式:水平垂直都要居中 5、字体:黑体18号字
        CellStyle bigTitleRowCellStyle = workbook.createCellStyle();
        bigTitleRowCellStyle.setBorderBottom(BorderStyle.THIN); //下边框  BorderStyle.THIN 细线
        bigTitleRowCellStyle.setBorderLeft(BorderStyle.THIN);  //左边框
        bigTitleRowCellStyle.setBorderRight(BorderStyle.THIN);  //右边框
        bigTitleRowCellStyle.setBorderTop(BorderStyle.THIN);  //上边框
//        对齐方式: 水平对齐  垂直对齐
        bigTitleRowCellStyle.setAlignment(HorizontalAlignment.CENTER); //水平居中对齐
        bigTitleRowCellStyle.setVerticalAlignment(VerticalAlignment.CENTER); // 垂直居中对齐
//        创建字体
        Font font = workbook.createFont();
        font.setFontName("黑体");
        font.setFontHeightInPoints((short) 18);
//        把字体放入到样式中
        bigTitleRowCellStyle.setFont(font);

        Row bigTitleRow = sheet.createRow(0);
        bigTitleRow.setHeightInPoints(42); //设置行高
        for (int i = 0; i < 5; i++) {
            Cell cell = bigTitleRow.createCell(i);
            cell.setCellStyle(bigTitleRowCellStyle);
        }
        //合并单元格 起始行, 结束行, 起始列, 结束列
        sheet.addMergedRegion(new CellRangeAddress(0, 0, 0, 4)); //int firstRow 起始行, int lastRow 结束行, int firstCol 开始列, int lastCol 结束列
//        向单元格中放入一句话
        sheet.getRow(0).getCell(0).setCellValue("用户信息数据");
//        小标题的样式
        CellStyle littleTitleRowCellStyle = workbook.createCellStyle();
//        样式的克隆
        littleTitleRowCellStyle.cloneStyleFrom(bigTitleRowCellStyle);
//        创建字体  宋体12号字加粗
        Font littleFont = workbook.createFont();
        littleFont.setFontName("宋体");
        littleFont.setFontHeightInPoints((short) 12);
        littleFont.setBold(true);
//        把字体放入到样式中
        littleTitleRowCellStyle.setFont(littleFont);
//        内容的样式
        CellStyle contentRowCellStyle = workbook.createCellStyle();
//        样式的克隆
        contentRowCellStyle.cloneStyleFrom(littleTitleRowCellStyle);
        contentRowCellStyle.setAlignment(HorizontalAlignment.LEFT);
//        创建字体  宋体12号字加粗
        Font contentFont = workbook.createFont();
        contentFont.setFontName("宋体");
        contentFont.setFontHeightInPoints((short) 11);
        contentFont.setBold(false);
//        把字体放入到样式中
        contentRowCellStyle.setFont(contentFont);

//        编号	姓名	手机号	入职日期	现住址

        Row titleRow = sheet.createRow(1);
        titleRow.setHeightInPoints(31.5F);
        String[] titles = new String[]{"编号", "姓名", "手机号", "入职日期", "现住址"};
        for (int i = 0; i < 5; i++) {
            Cell cell = titleRow.createCell(i);
            cell.setCellValue(titles[i]);
            cell.setCellStyle(littleTitleRowCellStyle);
        }

        List<User> userList = userMapper.selectList( null);
        int rowIndex = 2;
        Row row = null;
        Cell cell = null;
        SimpleDateFormat sdf = new SimpleDateFormat("yyyy-MM-dd");
        for (User user : userList) {
            row = sheet.createRow(rowIndex);
            cell = row.createCell(0);
            cell.setCellStyle(contentRowCellStyle);
            cell.setCellValue(user.getId());

            cell = row.createCell(1);
            cell.setCellStyle(contentRowCellStyle);
            cell.setCellValue(user.getUserName());

            cell = row.createCell(2);
            cell.setCellStyle(contentRowCellStyle);
            cell.setCellValue(user.getPhone());

            cell = row.createCell(3);
            cell.setCellStyle(contentRowCellStyle);
            cell.setCellValue(sdf.format(user.getHireDate()));

            cell = row.createCell(4);
            cell.setCellStyle(contentRowCellStyle);
            cell.setCellValue(user.getAddress());

            rowIndex++;
        }

        String filename = "员工数据.xlsx";
        response.setHeader("content-disposition", "attachment;filename=" + new String(filename.getBytes(), "ISO8859-1"));
        response.setContentType("application/vnd.openxmlformats-officedocument.spreadsheetml.sheet");
        workbook.write(response.getOutputStream());

    }
其实真正要用代码实现我们最终想要的效果的话,难道不大,但是代码写起来非常麻烦,下一篇给大家介绍一种非常简单的方式,并且还带有样式(使用模板导出)。

"人的一生会经历很多痛苦,但回头想想,都是传奇"。