背景
让我们按照 From Nand to Tetris 里 Project 5 的要求,来完成下列的设计。
MemoryCPUComputer
本文只涉及 Memory 的实现
说明
我是阅读了《计算机系统要素 (第2版)》 第 5 章的内容后才去完成 Project 5 的。读者朋友在完成 Project 5 时,如果遇到不明白的地方,可以参考这本书中的描述。
正文
前往 Nand to Tetris Online IDE,选择 Project 5 里的 Memory ⬇️

我们的目标是实现 Memory (数据存储器),注释中的相关描述如下 ⬇️
text
/**
 * The complete address space of the Hack computer's memory,
 * including RAM and memory-mapped I/O.
 * The chip facilitates read and write operations, as follows:
 *     Read:  out(t) = Memory[address(t)](t)
 *     Write: if load(t-1) then Memory[address(t-1)](t) = in(t-1)
 * In words: the chip always outputs the value stored at the memory
 * location specified by address. If load=1, the in value is loaded
 * into the memory location specified by address. This value becomes
 * available through the out output from the next time step onward.
 * Address space rules:
 * Only the upper 16K+8K+1 words of the Memory chip are used.
 * Access to address>0x6000 is invalid and reads 0. Access to any address
 * in the range 0x4000-0x5FFF results in accessing the screen memory
 * map. Access to address 0x6000 results in accessing the keyboard
 * memory map. The behavior in these addresses is described in the Screen
 * and Keyboard chip specifications given in the lectures and the book.
*/-
输入是
- in16
- load
- address15
-
输出是
- out16
| address 的范围 | 应该访问哪里 | 说明 |
|---|---|---|
| 0≤address<16384 | RAM | 16384=214=0x4000 |
| 16384≤address<24576 | Screen | 16384=214=0x4000 24576=214+213=0x6000 |
| address=24576 | Keyboard | 24576=214+213=0x6000 |
| address>24576 | (此时的 address 无效) | 24576=214+213=0x6000 |
1 如果 address 在 RAM 的范围内
当且仅当 0≤address<16384 时, address 在 RAM 的范围内。由于 address 是 15 位的,这就等价于 address14=0。 address0..13 这些位可以是任意值。当 address 在 RAM 的范围内时, address 的模式可以表示如下 ⬇️ (下图中用 ? 表示这一位可以是任意值)
可以用一个 非门 来判断 address 是否在 RAM 的范围内。
Not(in=address14,out=inRamRange)
这个 非门 的输出是 inRamRange
- inRamRange 为 true 时: address 在 RAM 的范围内
- inRamRange 为 false 时: address 不在 RAM 的范围内
我们可以用一个 Mux 来结合 inRamRange 和 load,这个 Mux 的输出记为 loadRAM ⬇️
Mux(a=false,b=load,sel=inRamRange,out=loadRAM)
现在可以将 in,loadRAM,address 连接到 RAM 上了(我们只需要 address 的低 14 位,即 address0..13) ⬇️
RAM16K(in=in,load=loadRAM,address=address0..13,out=ramOut)
将 RAM 的输出记为 ramOut,我们需要根据 inRamRange 的值来判断是否使用 ramOut ⬇️
- inRamRange 为 true 时: 使用 ramOut
- inRamRange 为 false 时: 忽略 ramOut
我们可以用 Mux16 来选择是否使用 ramOut,这个 Mux16 的输出记为 outCandidate1 ⬇️
Mux16(a=false,b=ramOut,sel=inRamRange,out=outCandidate1)
这些代码合起来是这样的 ⬇️
hdl
// When and only when address[14] == 0, RAM is loaded
Not(in= address[14], out= inRamRange);
Mux(a= false, b= load, sel= inRamRange, out= loadRAM);
RAM16K(in= in, load= loadRAM, address= address[0..13], out= ramOut);
Mux16(a= false, b= ramOut, sel= inRamRange, out= outCandidate1);
2. 如果 address 在 Screen 的范围内
当且仅当 16384≤address<24576 时, address 在 Screen 的范围内。由于 address 是 15 位的,这就等价于以下两个条件都成立 ⬇️
- address14=1
- address13=0
address0..12 这些位可以是任意值,下图中用 ? 来表示任意值 ⬇️
可以用一个 非门 来判断 address13=0 是否成立(这个非门的输出记为 notA13) ⬇️
Not(in=address13,out=notA13)
在此基础上,可以用一个 与门 来判断以下两者是否都成立
- address14=1
- address13=0
这个与门的输出记为 inScreenRange ⬇️
And(a=address14,b=notA13,out=inScreenRange)
我们可以用一个 Mux 来结合 inScreenRange 和 load。将 Screen 的输出记为 screenOut,我们再用一个 Mux 来选择是否使用 screenOut
- inScreenRange 为 true 时: outCandidate2=screenOut
- inScreenRange 为 false 时: outCandidate2=16 个 0 00⋯0
相关代码如下 ⬇️
hdl
// When and only when (address[14] == 1) and (address[13] == 0), Screen is loaded
Not(in= address[13], out= notA13);
And(a= address[14], b= notA13, out= inScreenRange);
Mux(a= false, b= load, sel= inScreenRange, out= loadScreen);
Screen(in= in, load= loadScreen, address= address[0..12], out= screenOut);
Mux16(a= false, b= screenOut, sel= inScreenRange, out= outCandidate2);
3 如果 address 在 Keyboard 的范围内
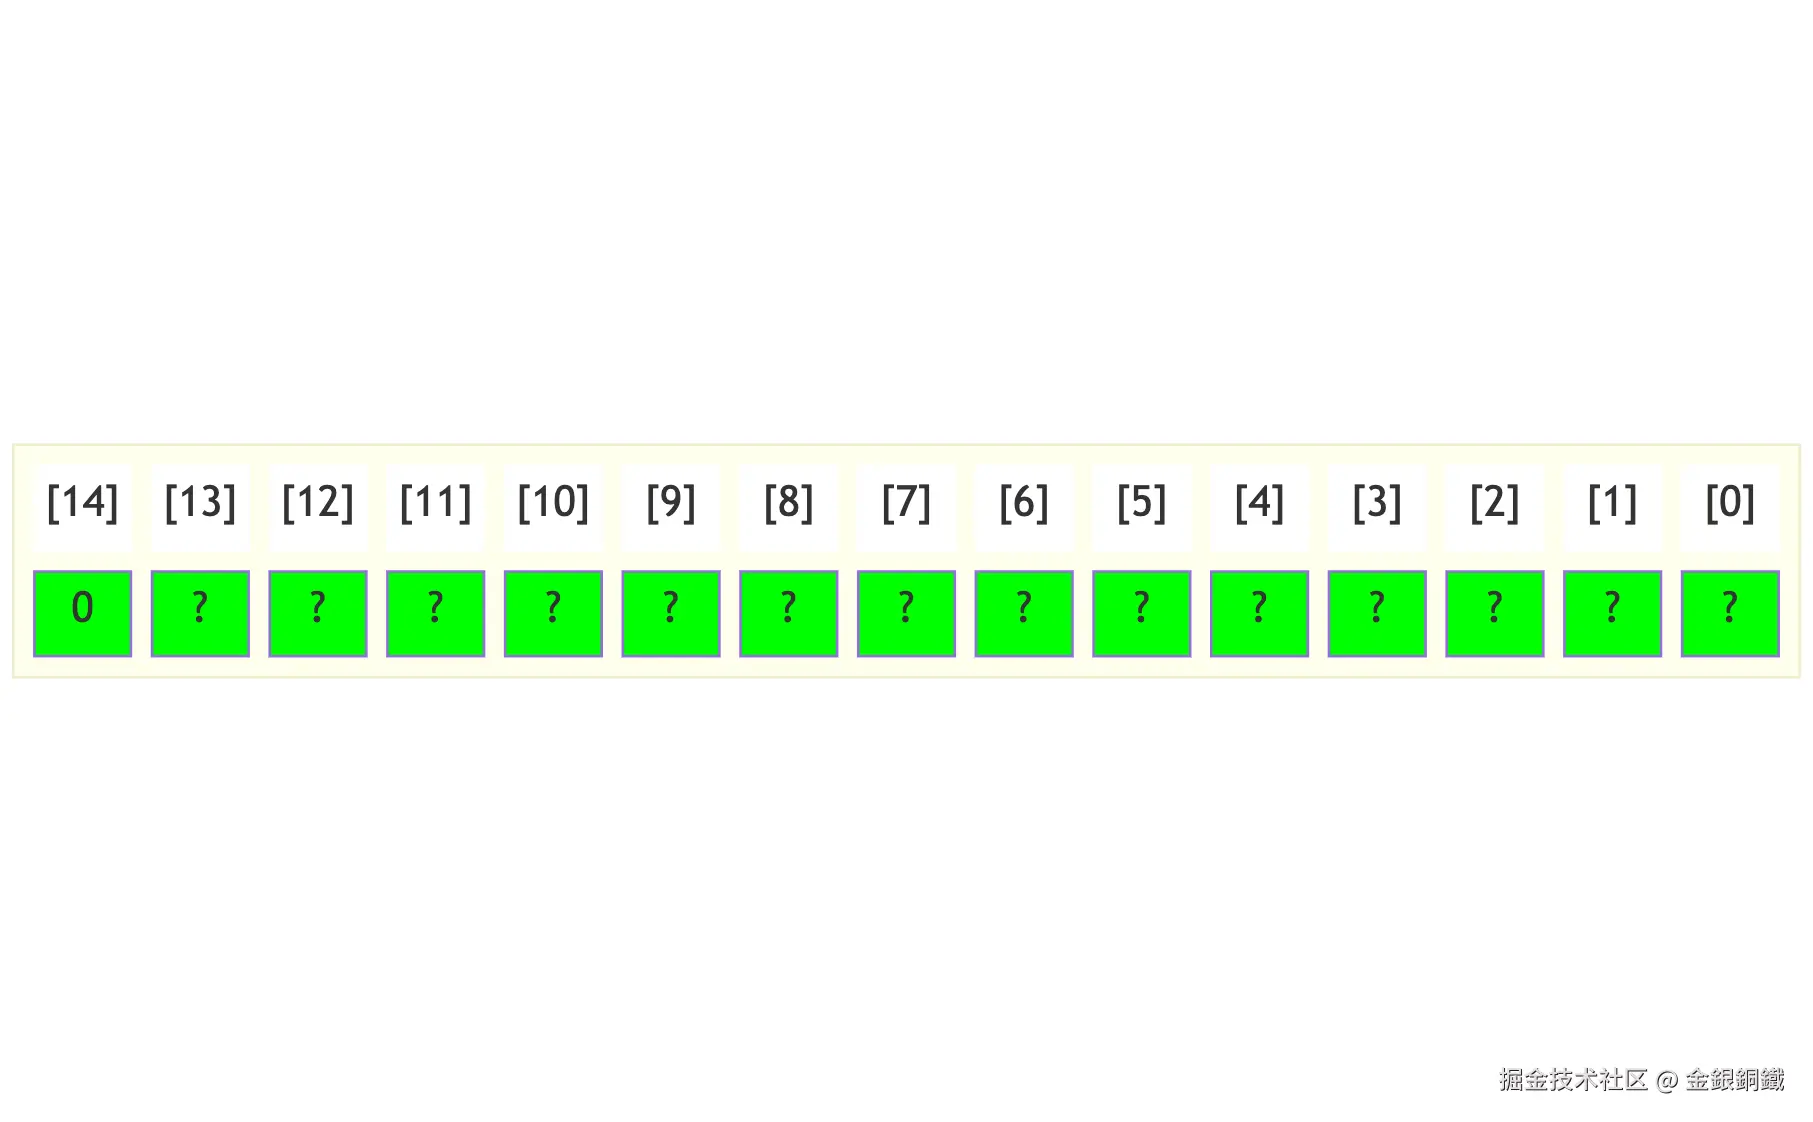
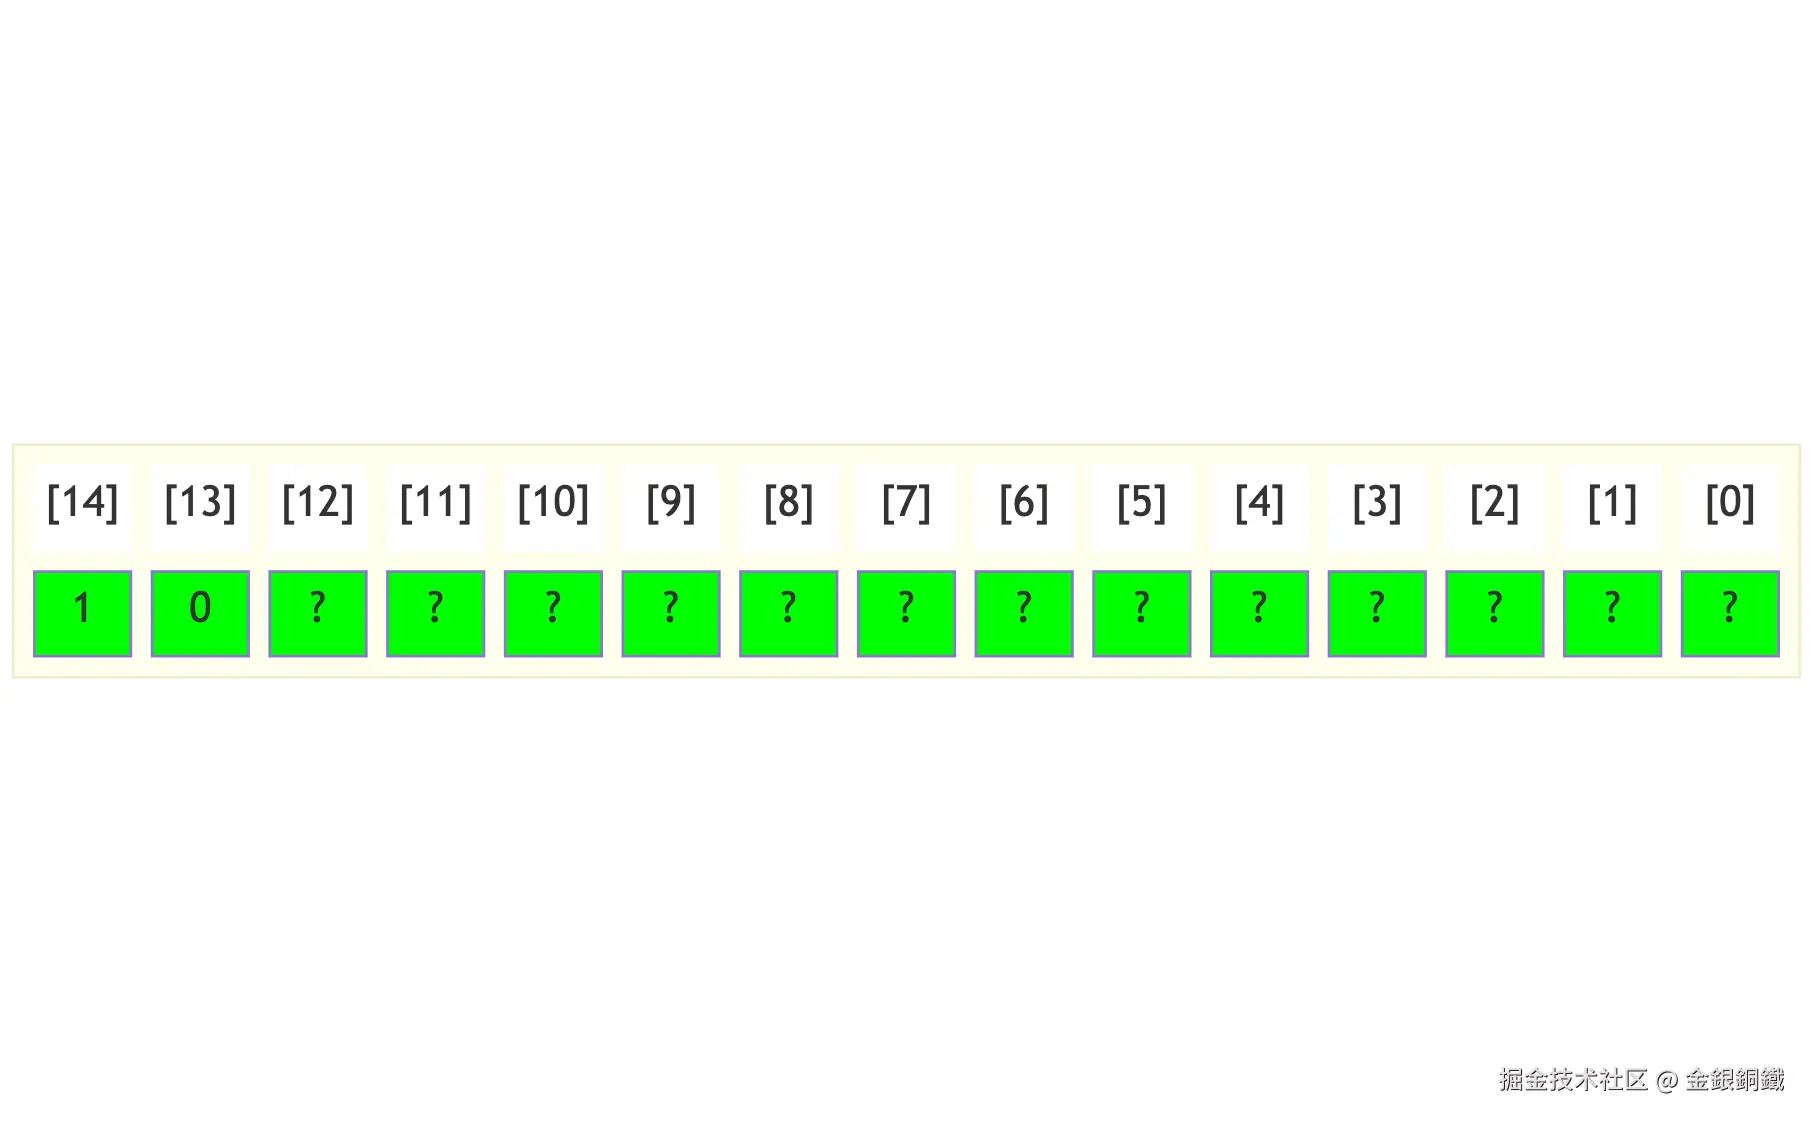
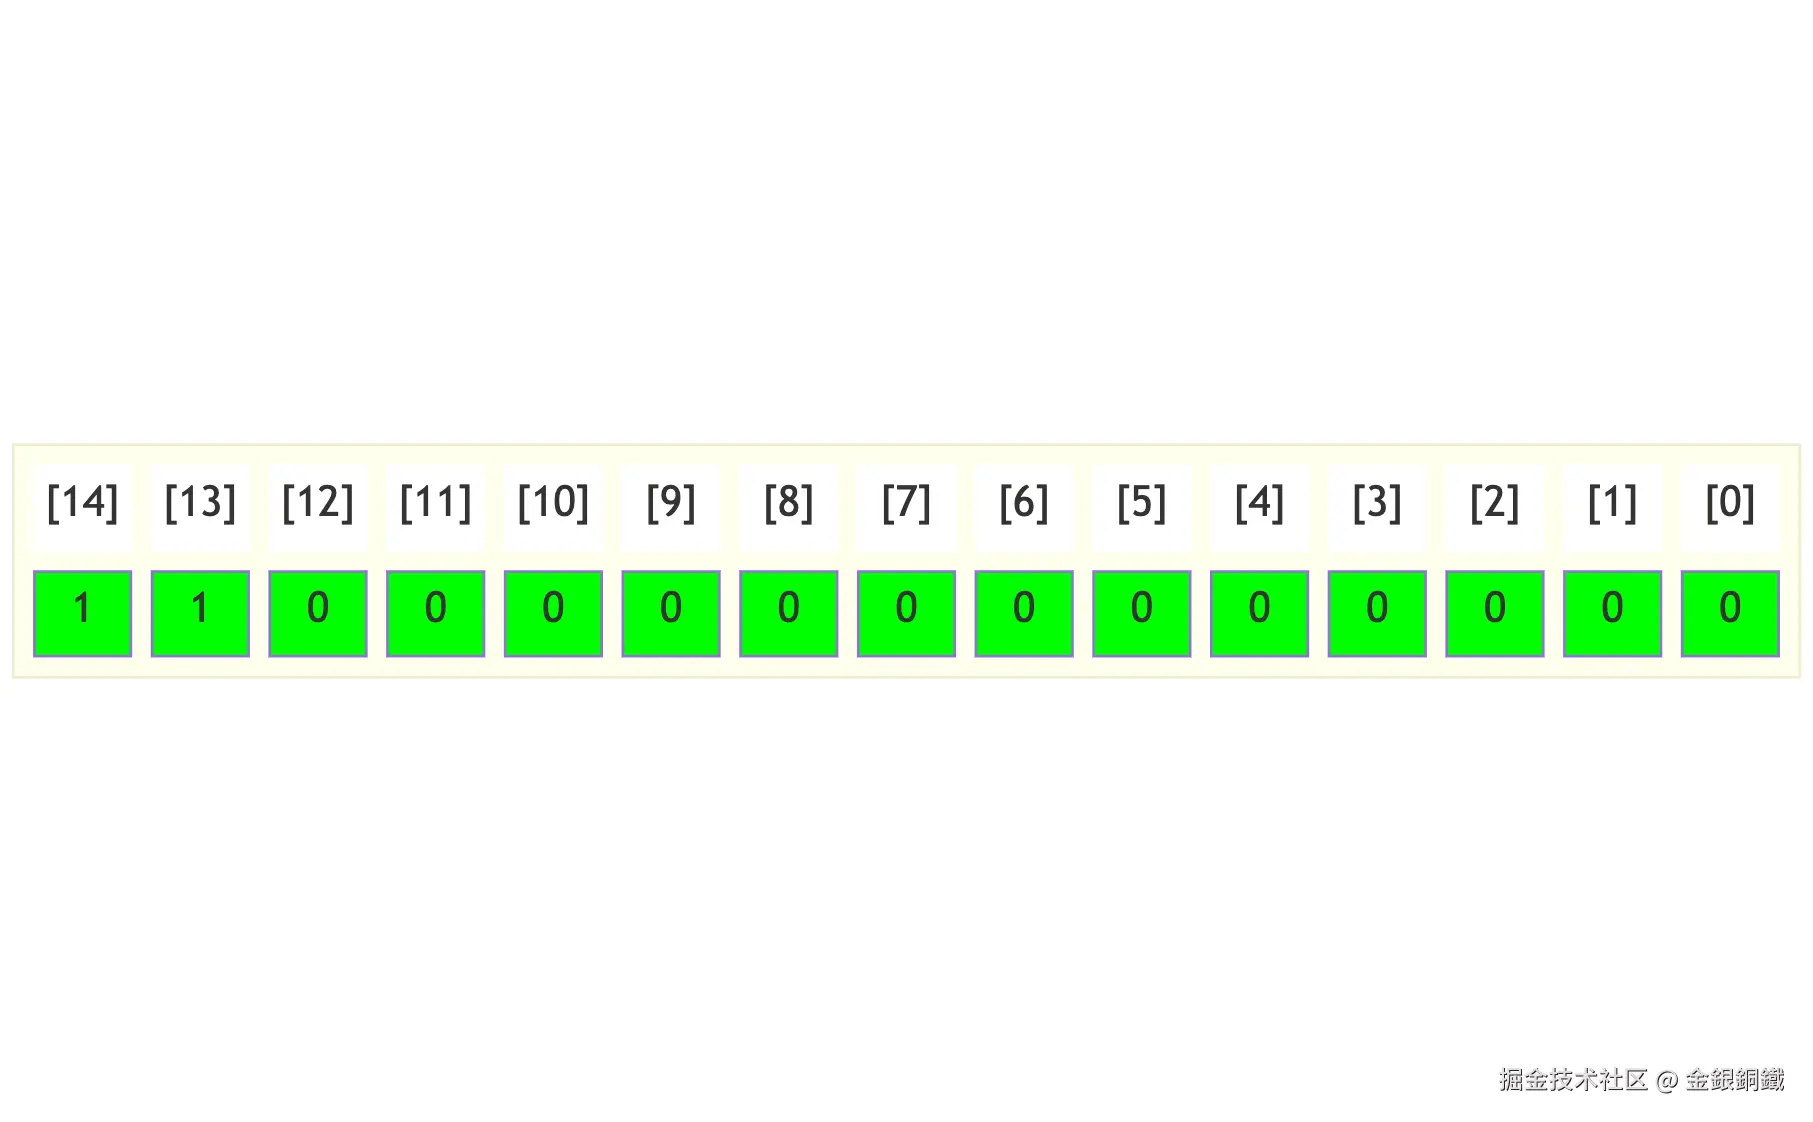
当且仅当 address=24576 时, address 在 Keyboard 的范围内。 address 的每一位的值如下 ⬇️
我们需要判断以下两个条件是否都成立
- address13=0
- address14=0
可以用一个 与门 来进行判断 ⬇️
And(a=address13,b=address14,out=high2BitAnd)
在此基础上,还需要判断 address0..12 是否都为 0。如果逐位去判断,看起来比较繁琐。可以这样考虑,如果 address0..12 都为 0 的话,记
sum=address0..14+13 个 1 11⋯1
=1113 个 0 00⋯0+13 个 1 11⋯1
=15 个 1 11⋯1
=015 个 1 11⋯1
那么 sum15=0。在此基础上,可以用一个 与门 来判断以下两者是否都成立
- high2BitAnd=true
- sum15=0
将这个 与门 的输出记为 inKbRange,对应的实现如下 ⬇️
Add16(a0..14=address,b0..12=true,out15=msbIsOne)
Not(in=msbIsOne,out=msbIsZero)
And(a=high2BitAnd,b=msbIsZero,out=inKbRange)
将 Keyboard 的输出记为 kbOut,我们可以用一个 Mux 来选择是否使用 kbOut
- inKbRange 为 true 时: outCandidate3=kbOut
- inKbRange 为 false 时: outCandidate3=16 个 0 00⋯0
Mux16(a=false,b=kbOut,sel=inKbRange,out=outCandidate3)
和 Keyboard 的处理相关的代码如下 ⬇️
hdl
Keyboard(out= kbOut);
// When and only when address is 110000000000000 (there are two '1' and thirteen '0'),
// keyboard is loaded
And(a= address[13], b= address[14], out= high2BitAnd);
Add16(a[0..14]= address, b[0..12]= true, out[15]= msbIsOne);
Not(in= msbIsOne, out= msbIsZero);
And(a= high2BitAnd, b= msbIsZero, out= inKbRange);
Mux16(a= false, b= kbOut, sel= inKbRange, out= outCandidate3);
4 将 RAM/Screen/Keyboard 的输出整合在一起
- 和 RAM 有关的候选输出在 outCandidate1 中
- 和 Screen 有关的候选输出在 outCandidate2 中
- 和 Keyboard 有关的候选输出在 outCandidate3 中
我们可以用两个 Or16 对 outCandidate1,outCandidate2,outCandidate3 进行或运算 ⬇️
Or16(a=outCandidate1,b=outCandidate2,out=outTemp)
Or16(a=outTemp,b=outCandidate3,out=out)
将上面的代码都整合到一起,得到完整的 hdl 代码如下 ⬇️
hdl
CHIP Memory {
    IN in[16], load, address[15];
    OUT out[16];

    PARTS:
    // When and only when address[14] == 0, RAM is loaded
    Not(in= address[14], out= inRamRange);
    Mux(a= false, b= load, sel= inRamRange, out= loadRAM);
    RAM16K(in= in, load= loadRAM, address= address[0..13], out= ramOut);
    Mux16(a= false, b= ramOut, sel= inRamRange, out= outCandidate1);

    // When and only when (address[14] == 1) and (address[13] == 0), Screen is loaded
    Not(in= address[13], out= notA13);
    And(a= address[14], b= notA13, out= inScreenRange);
    Mux(a= false, b= load, sel= inScreenRange, out= loadScreen);
    Screen(in= in, load= loadScreen, address= address[0..12], out= screenOut);
    Mux16(a= false, b= screenOut, sel= inScreenRange, out= outCandidate2);

    Keyboard(out= kbOut);
    // When and only when address is 110000000000000 (there are two '1' and thirteen '0'),
    // keyboard is loaded
    And(a= address[13], b= address[14], out= high2BitAnd);
    Add16(a[0..14]= address, b[0..12]= true, out[15]= msbIsOne);
    Not(in= msbIsOne, out= msbIsZero);
    And(a= high2BitAnd, b= msbIsZero, out= inKbRange);
    Mux16(a= false, b= kbOut, sel= inKbRange, out= outCandidate3);

    Or16(a= outCandidate1, b= outCandidate2, out= outTemp);
    Or16(a= outTemp, b= outCandidate3, out= out);
}
这样的代码可以通过仿真测试,具体测试步骤如下。先点击 Run 按钮,开始测试
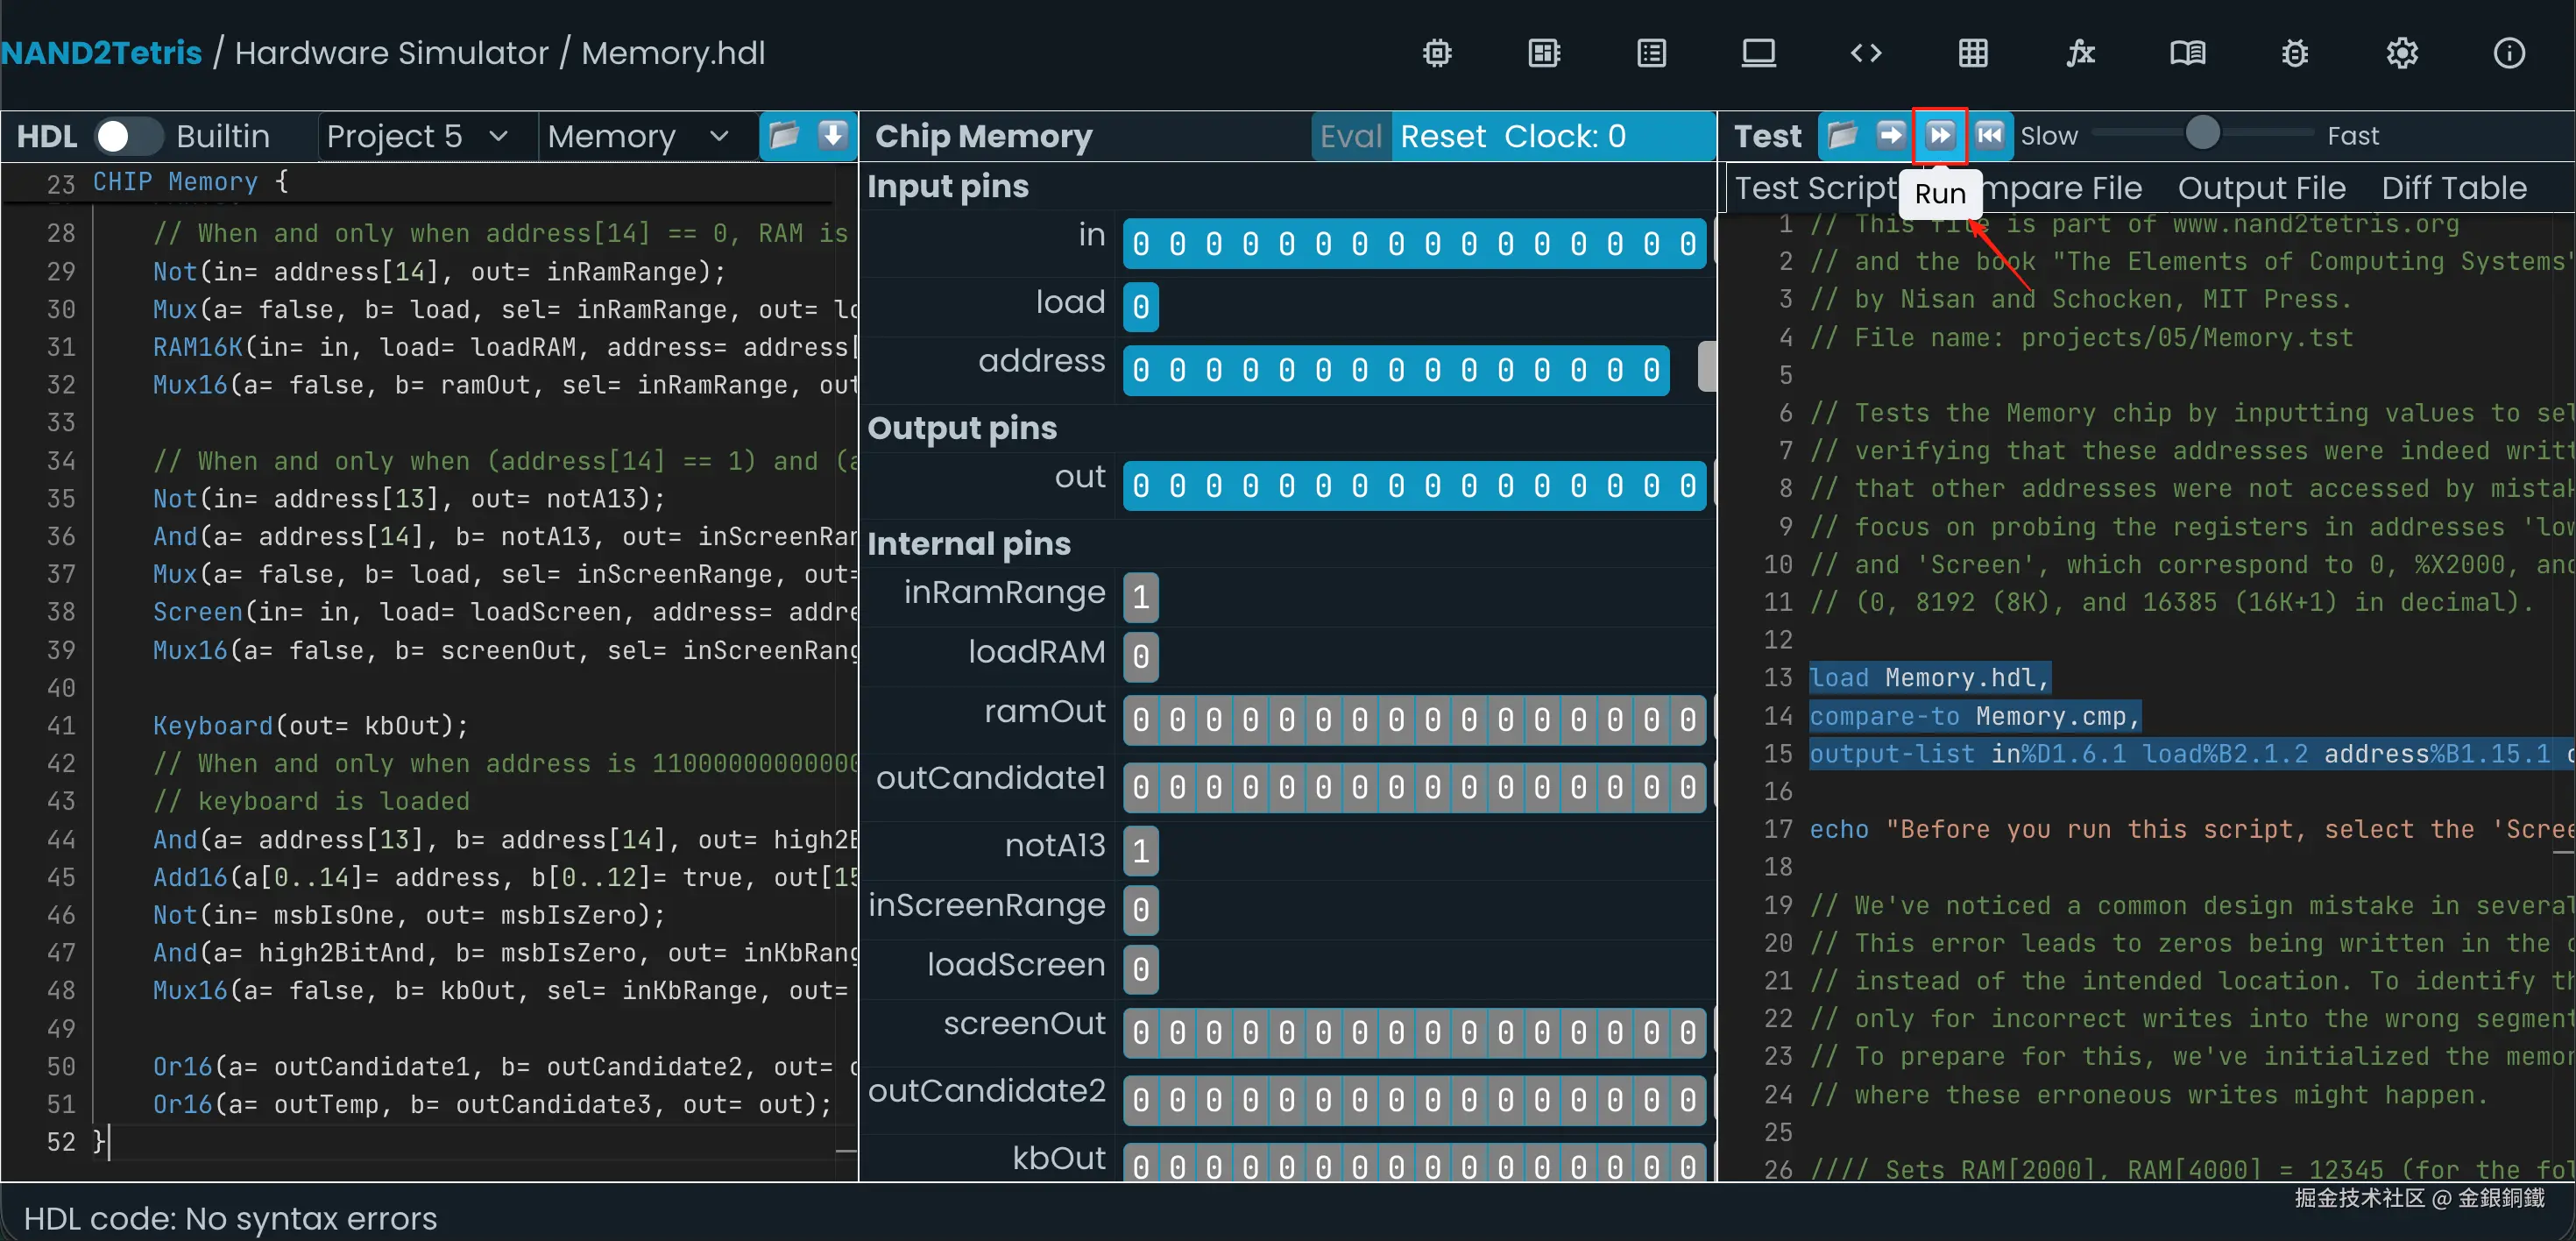
测试过程中,会看到以下提示
Click the Keyboard icon and hold down the 'K' key (uppercase) until you see the next message...
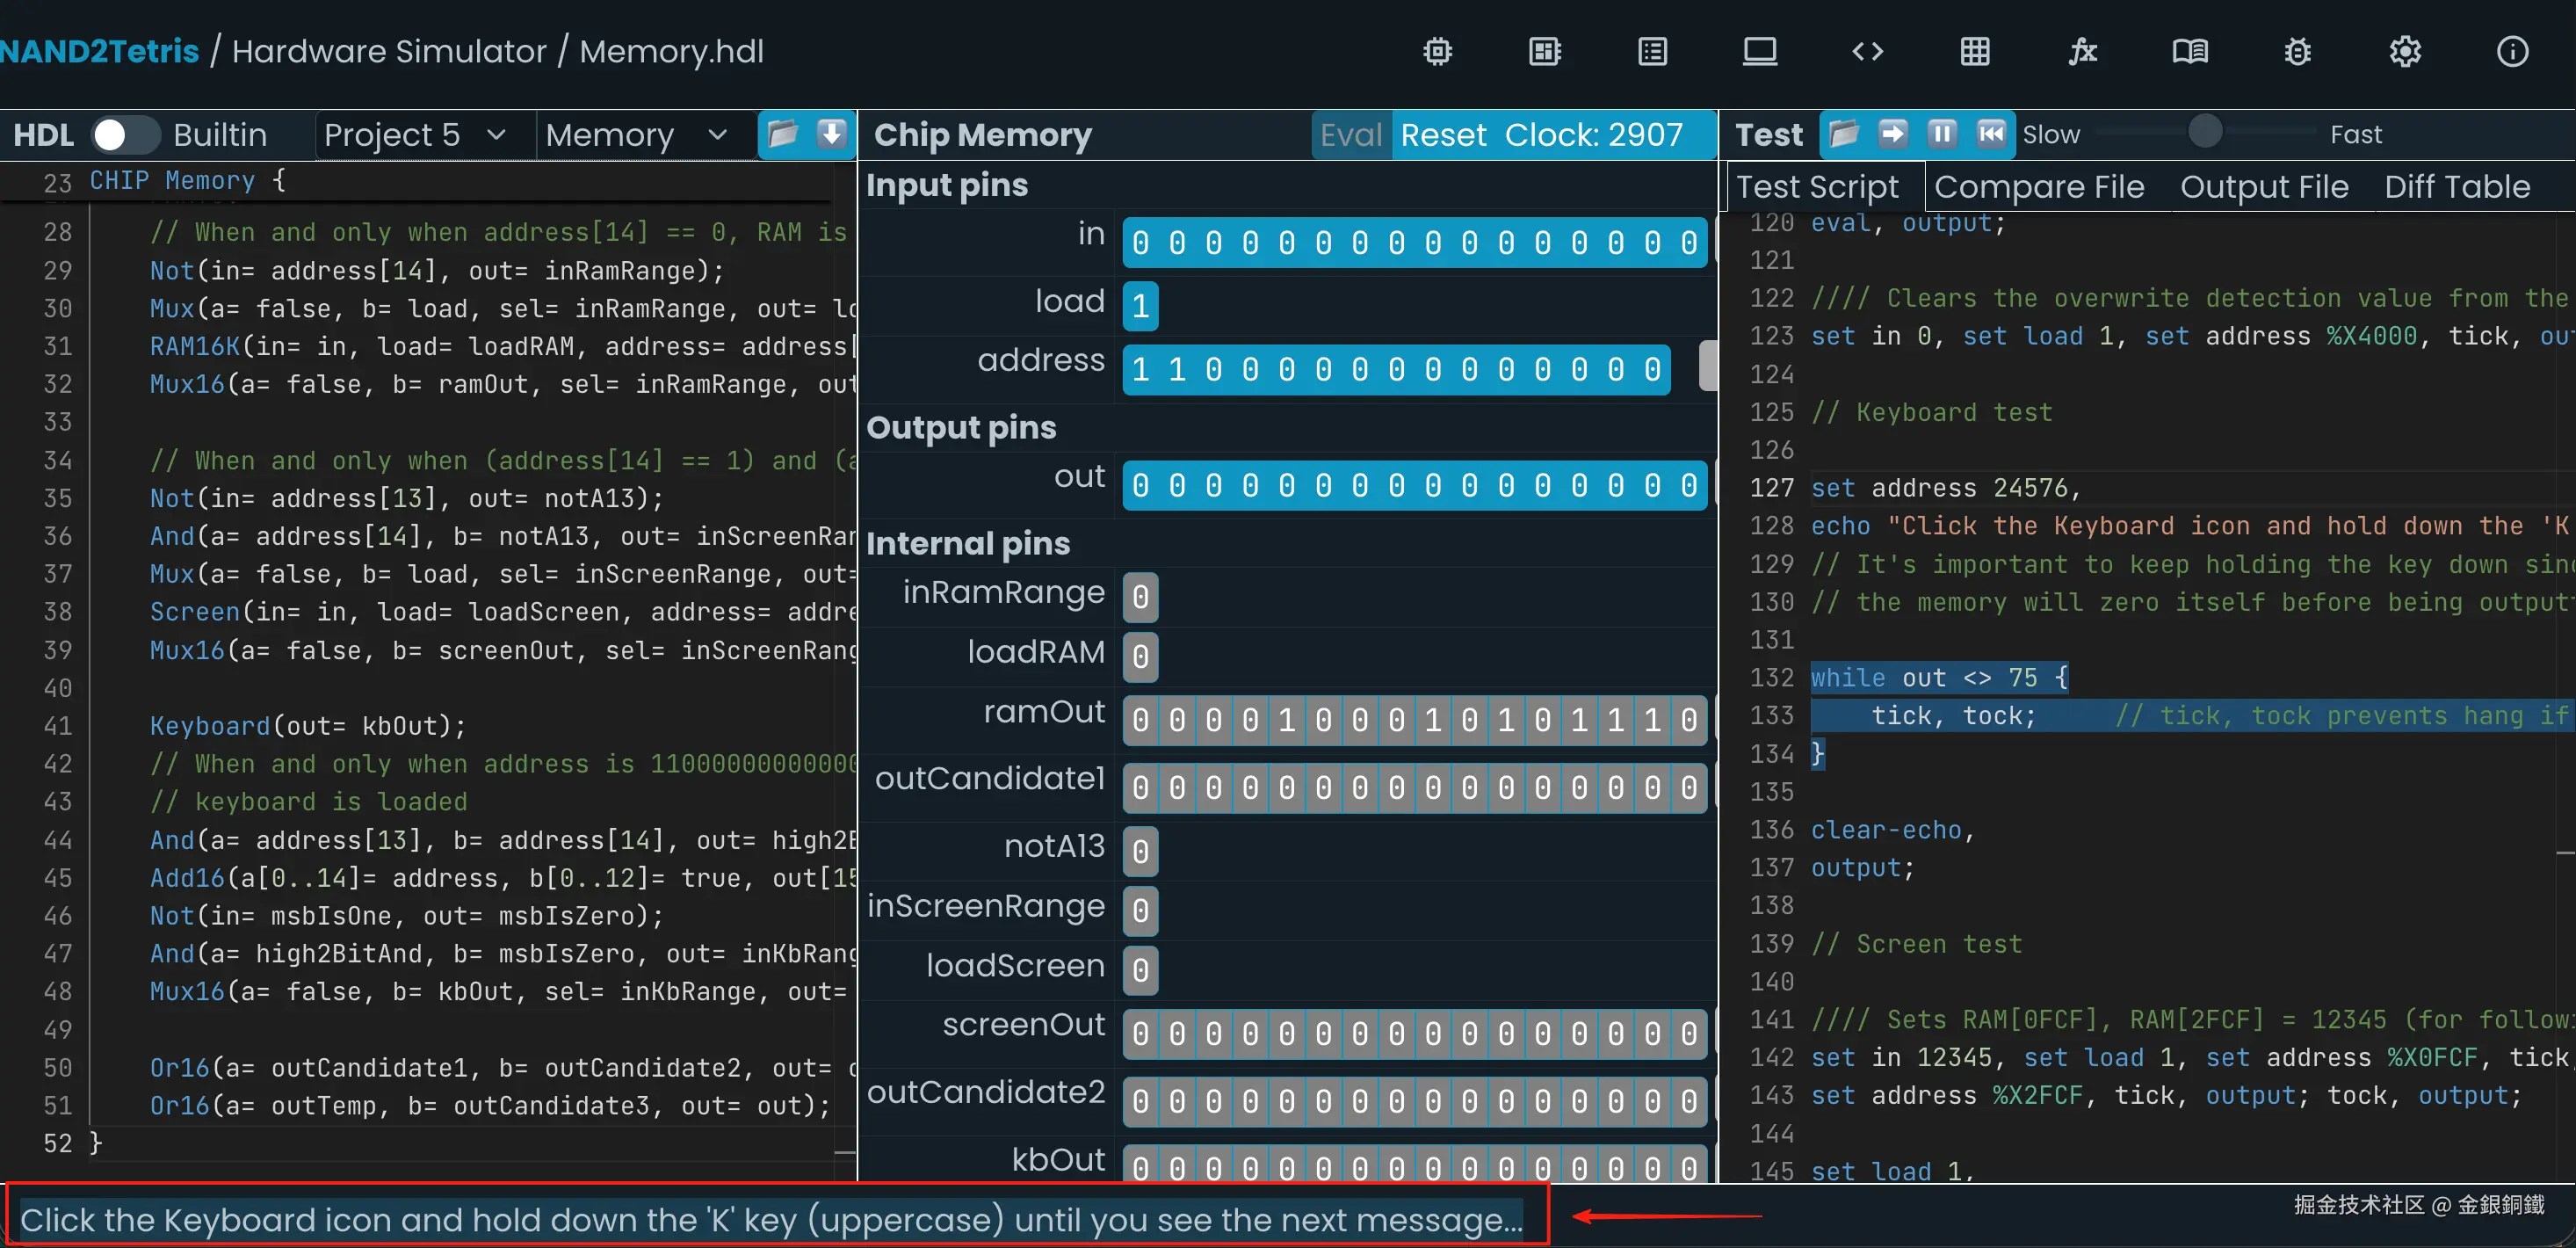
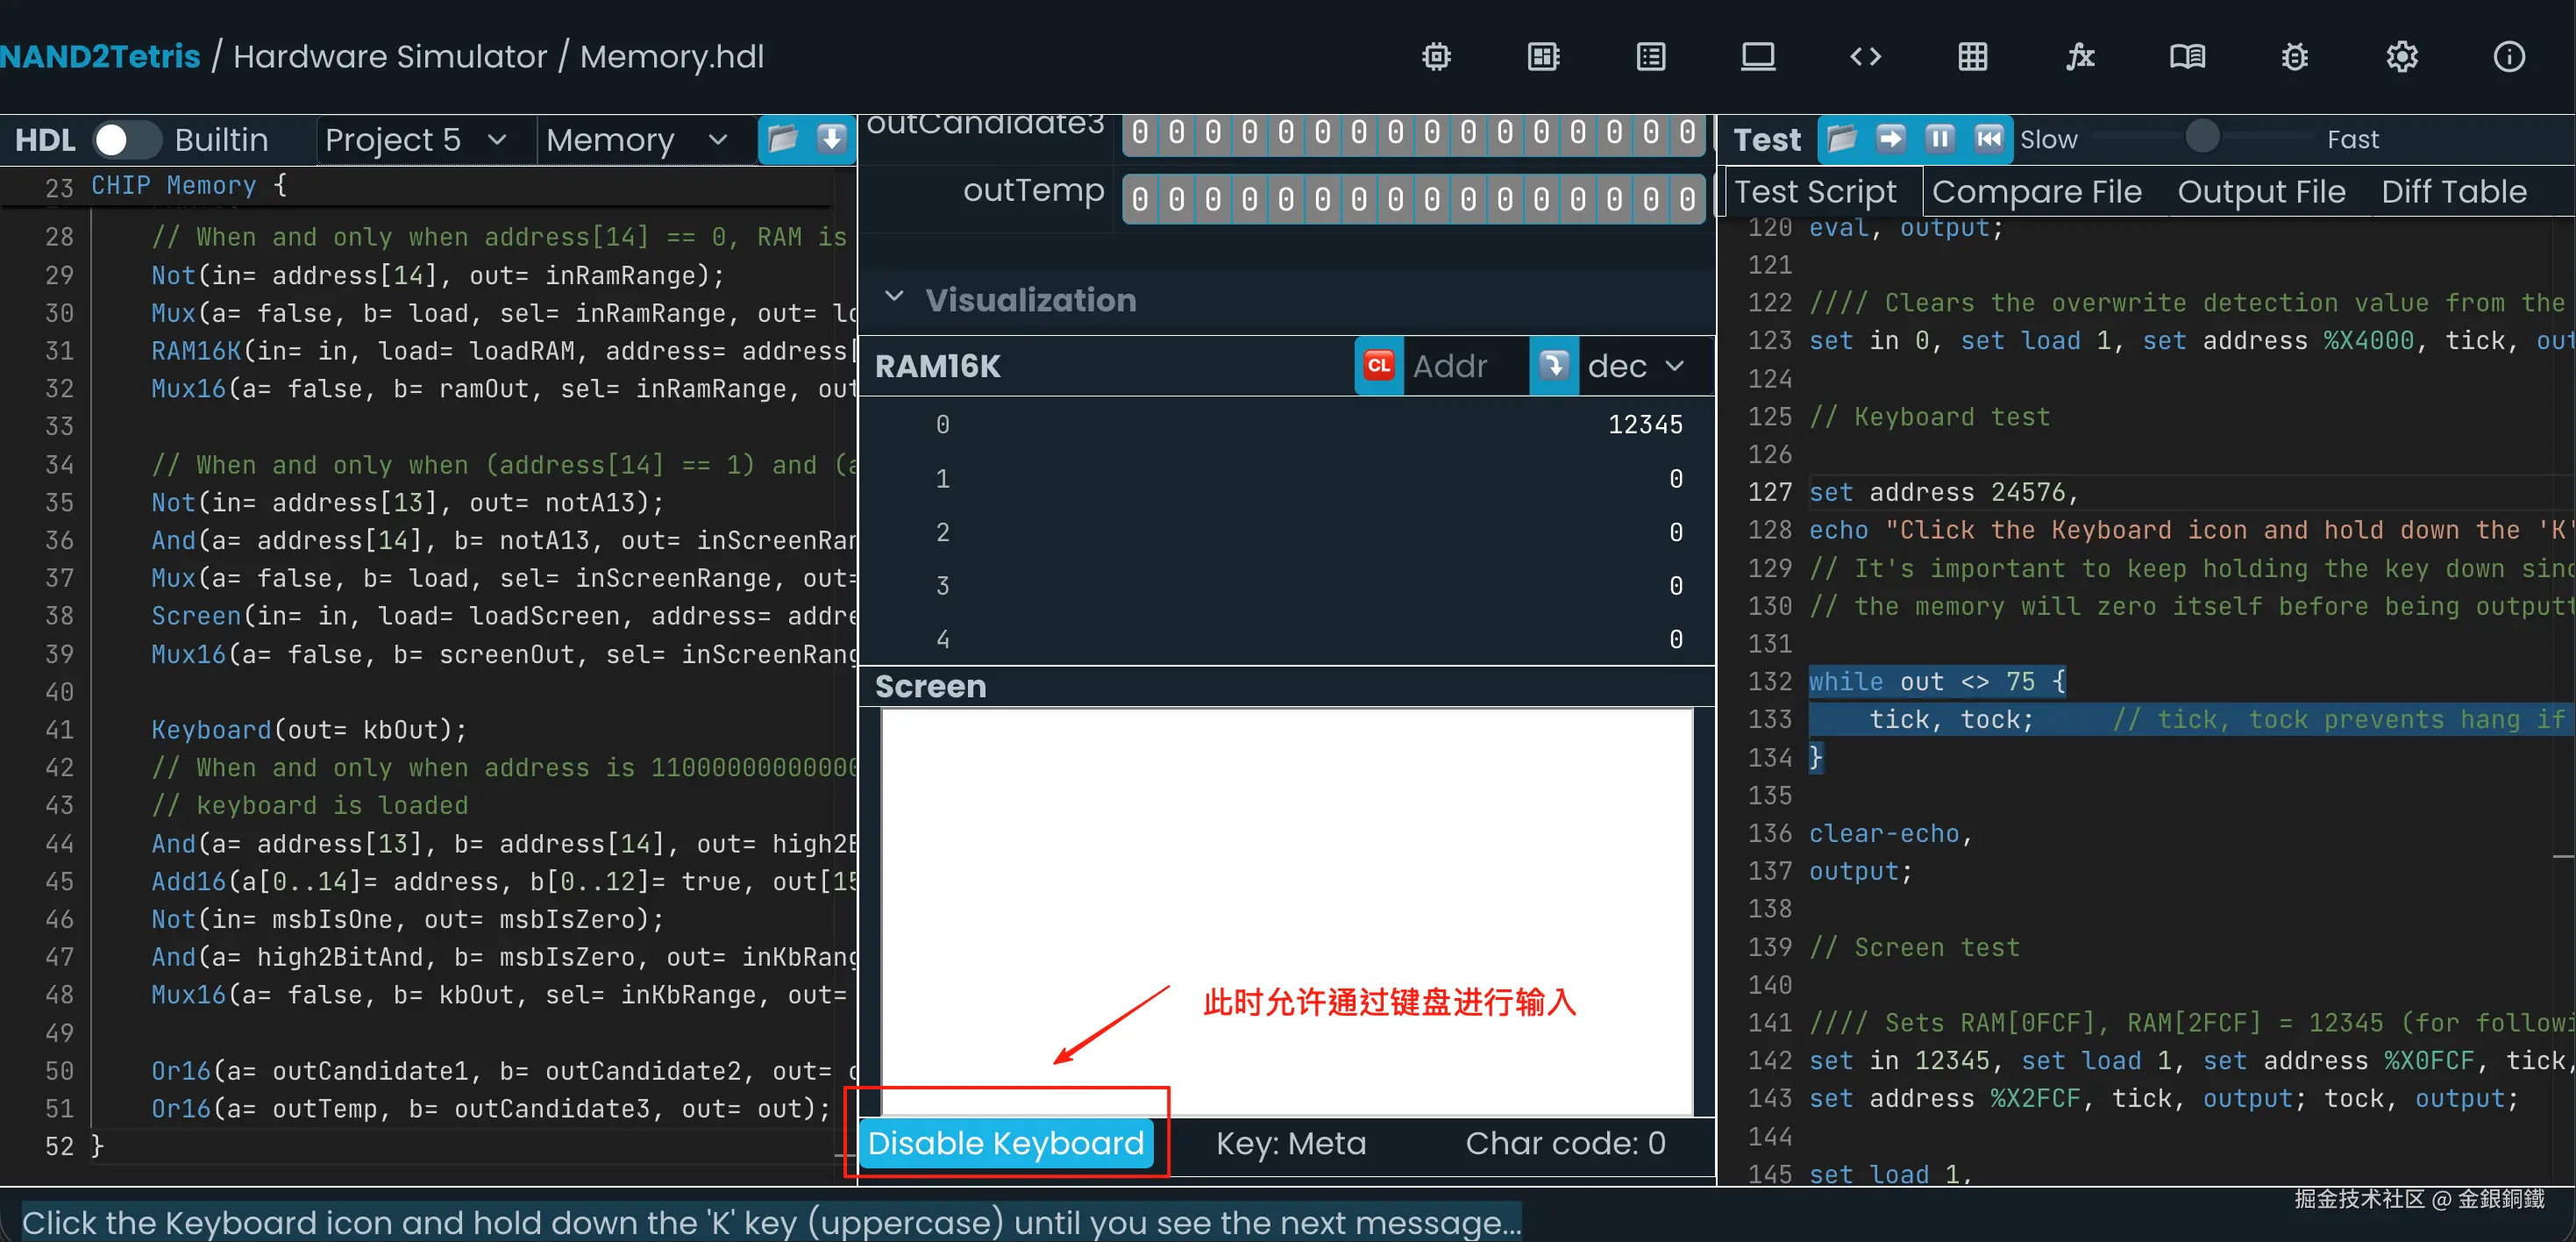
我们把 Chip Memory 这个面板滑动到最底部,确保键盘的输入是被允许的(当你能看到 "Disable Keyboard" 时,就处于正确的状态) ⬇️ 此时通过键盘输入 K,就可以继续进行测试了
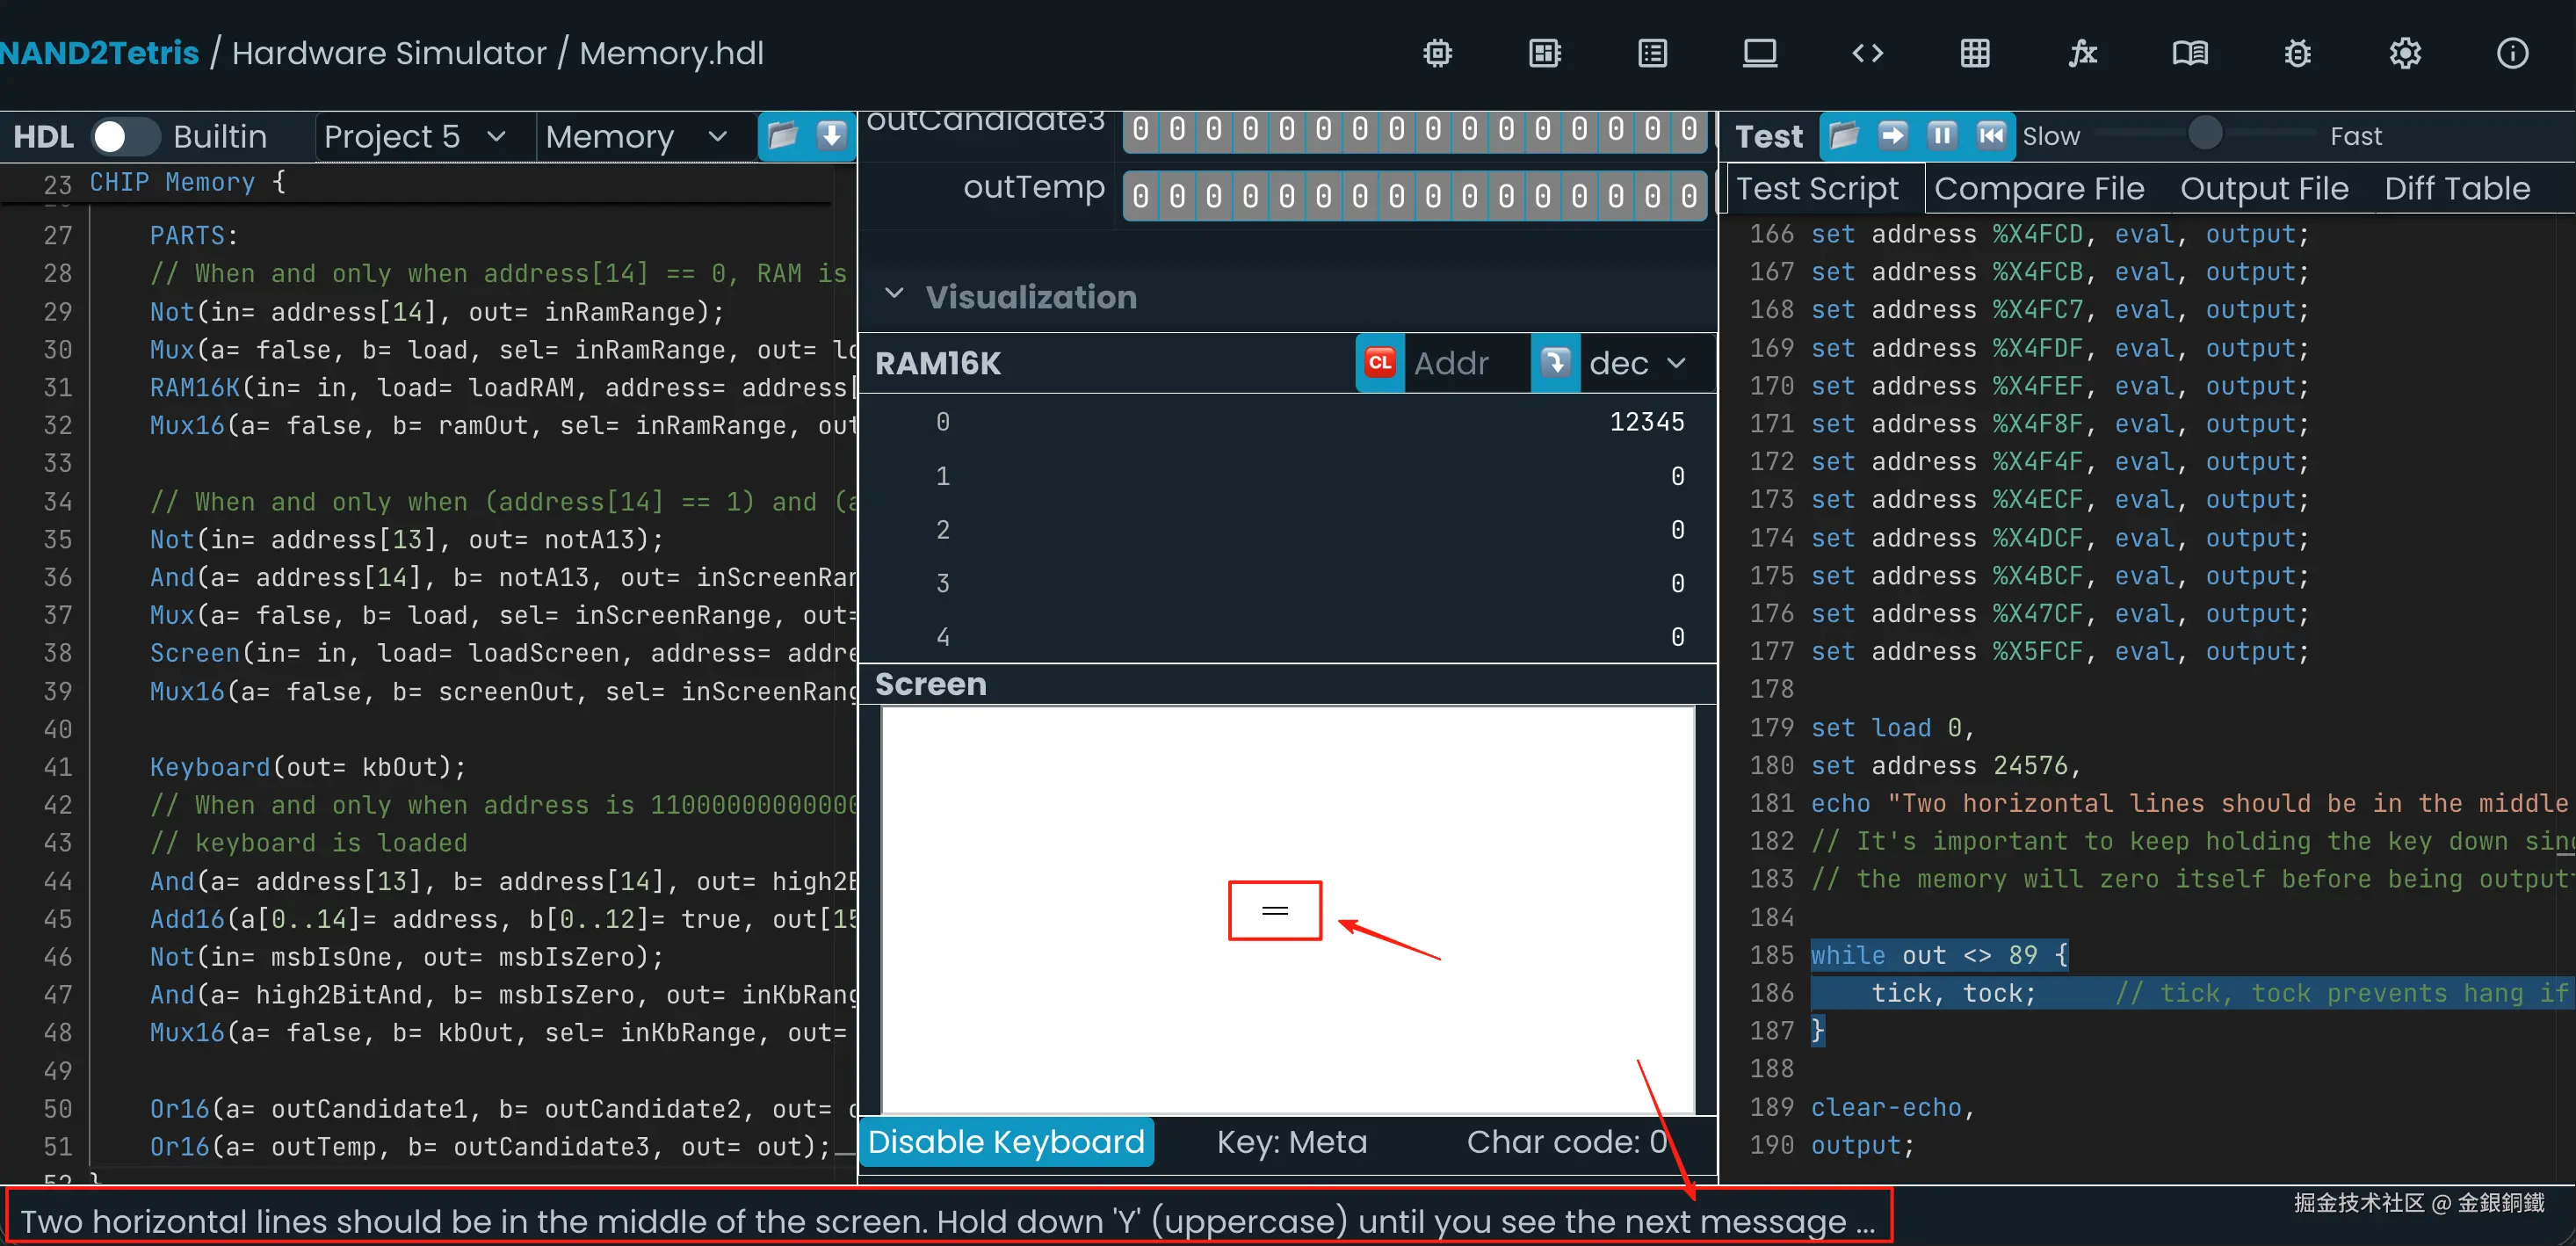
之后会看到 Screen 中出现两个短的横线,在屏幕最下方会有如下的提示
Two horizontal lines should be in the middle of the screen. Hold down 'Y' (uppercase) until you see the next message ...
此时用键盘输入 Y,就可以继续进行测试。之后会看到如下的提示
Simulation successful: The output file is identical to the compare file
这就说明测试通过了 ⬇️ 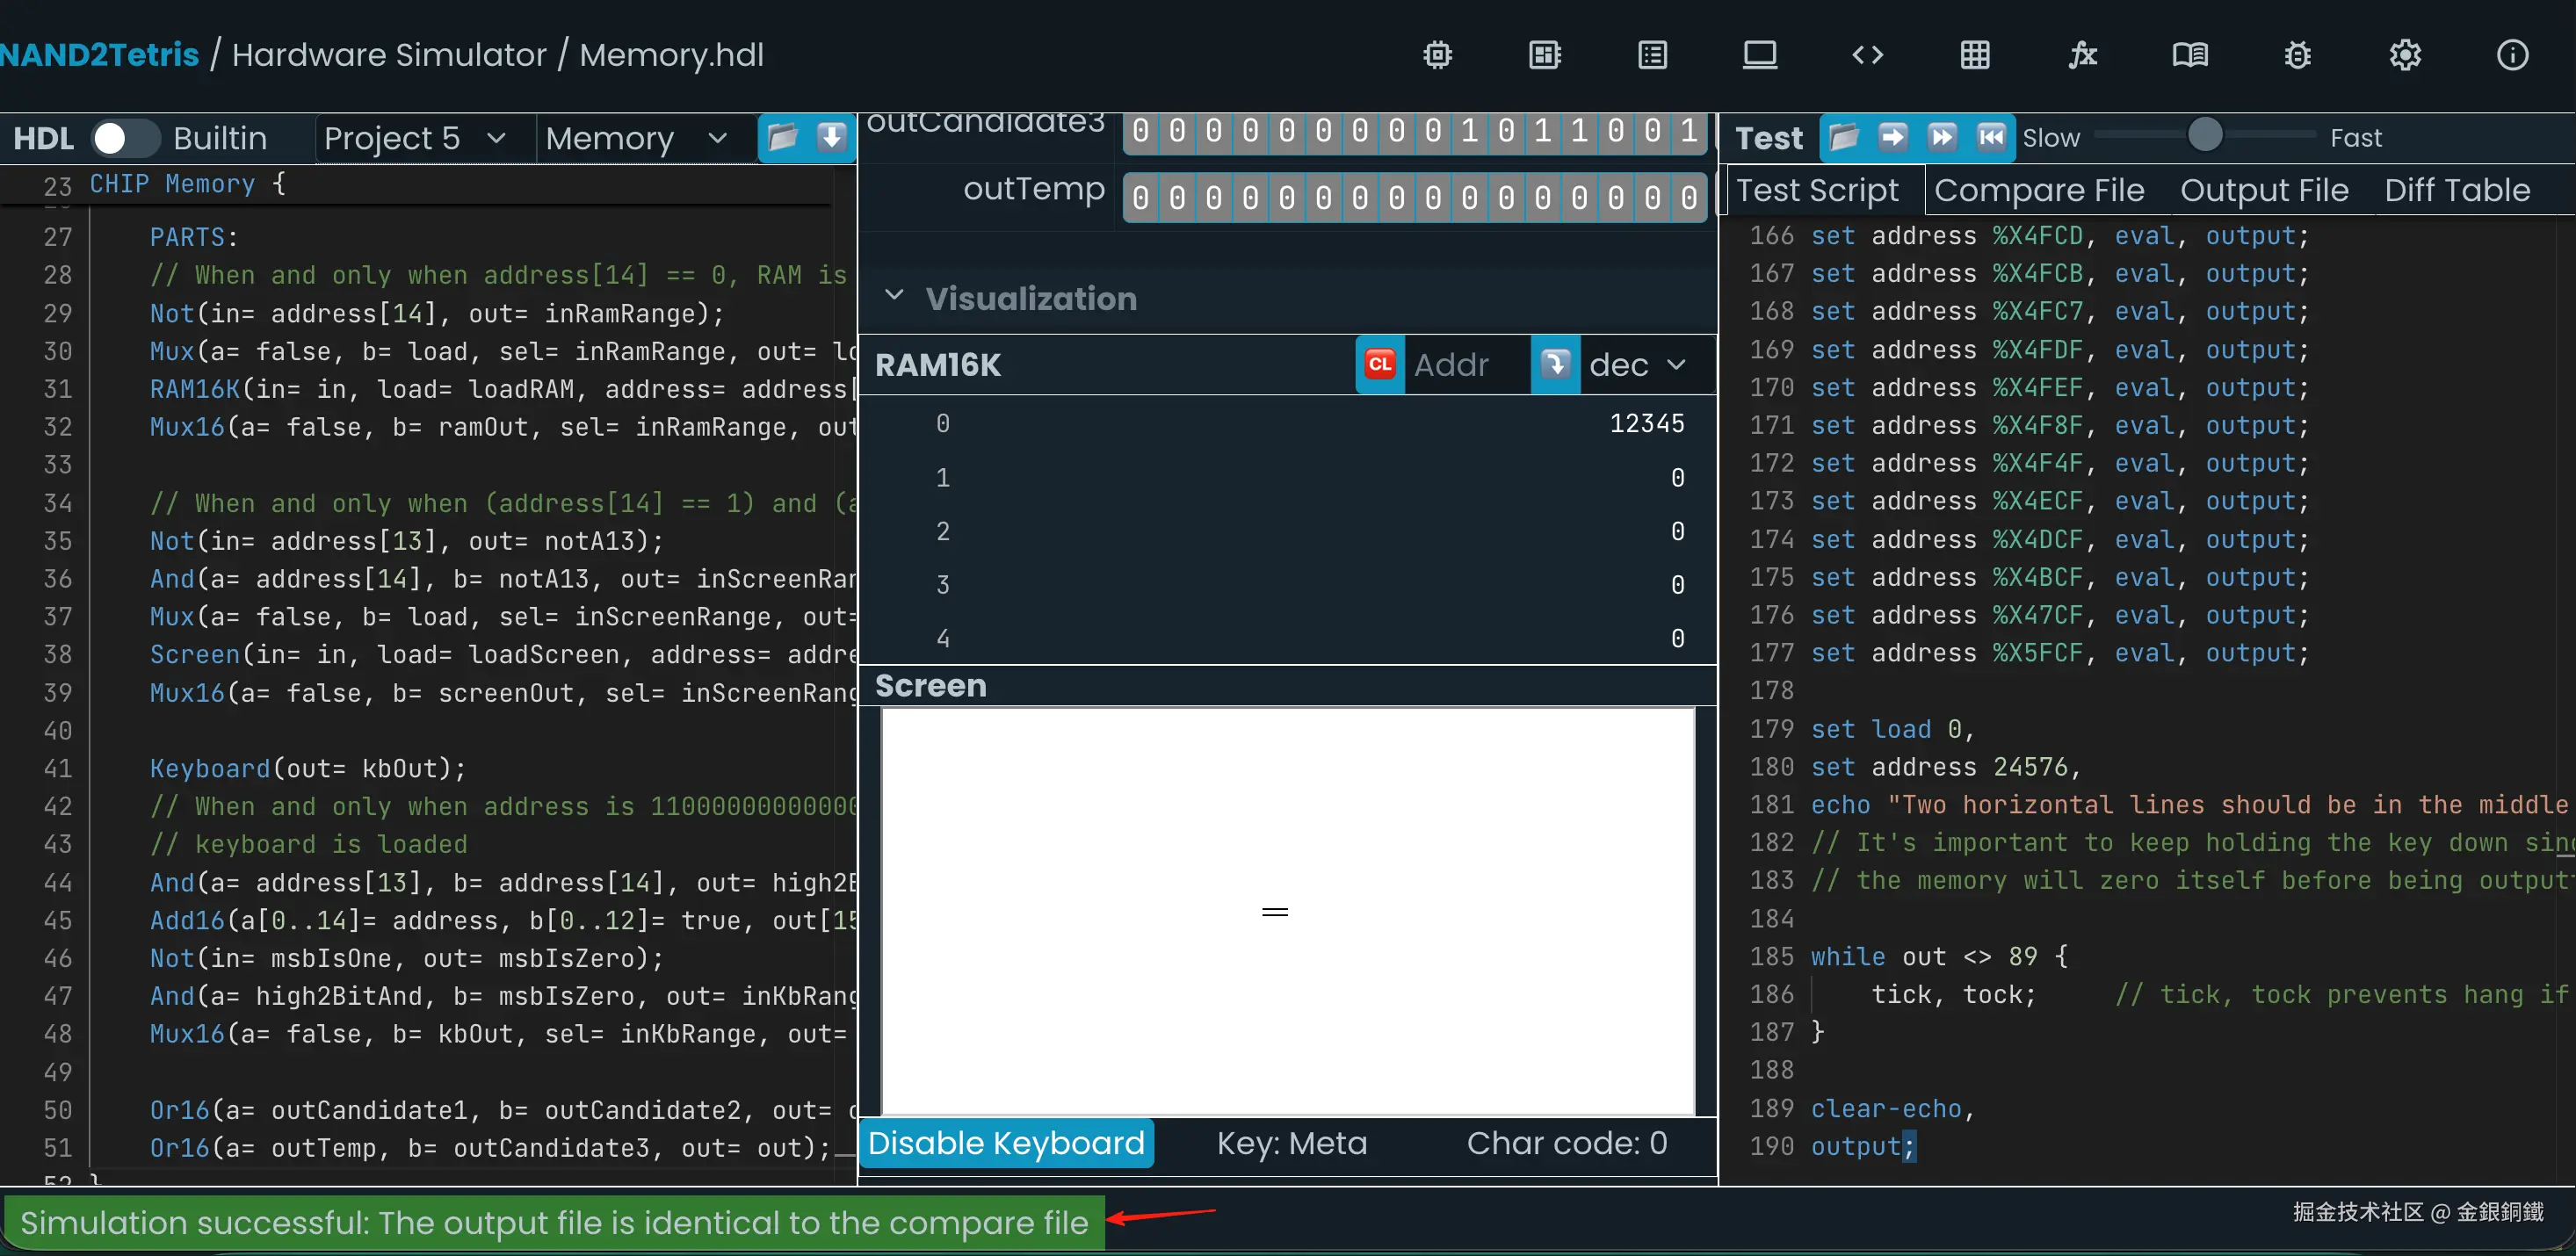
其他
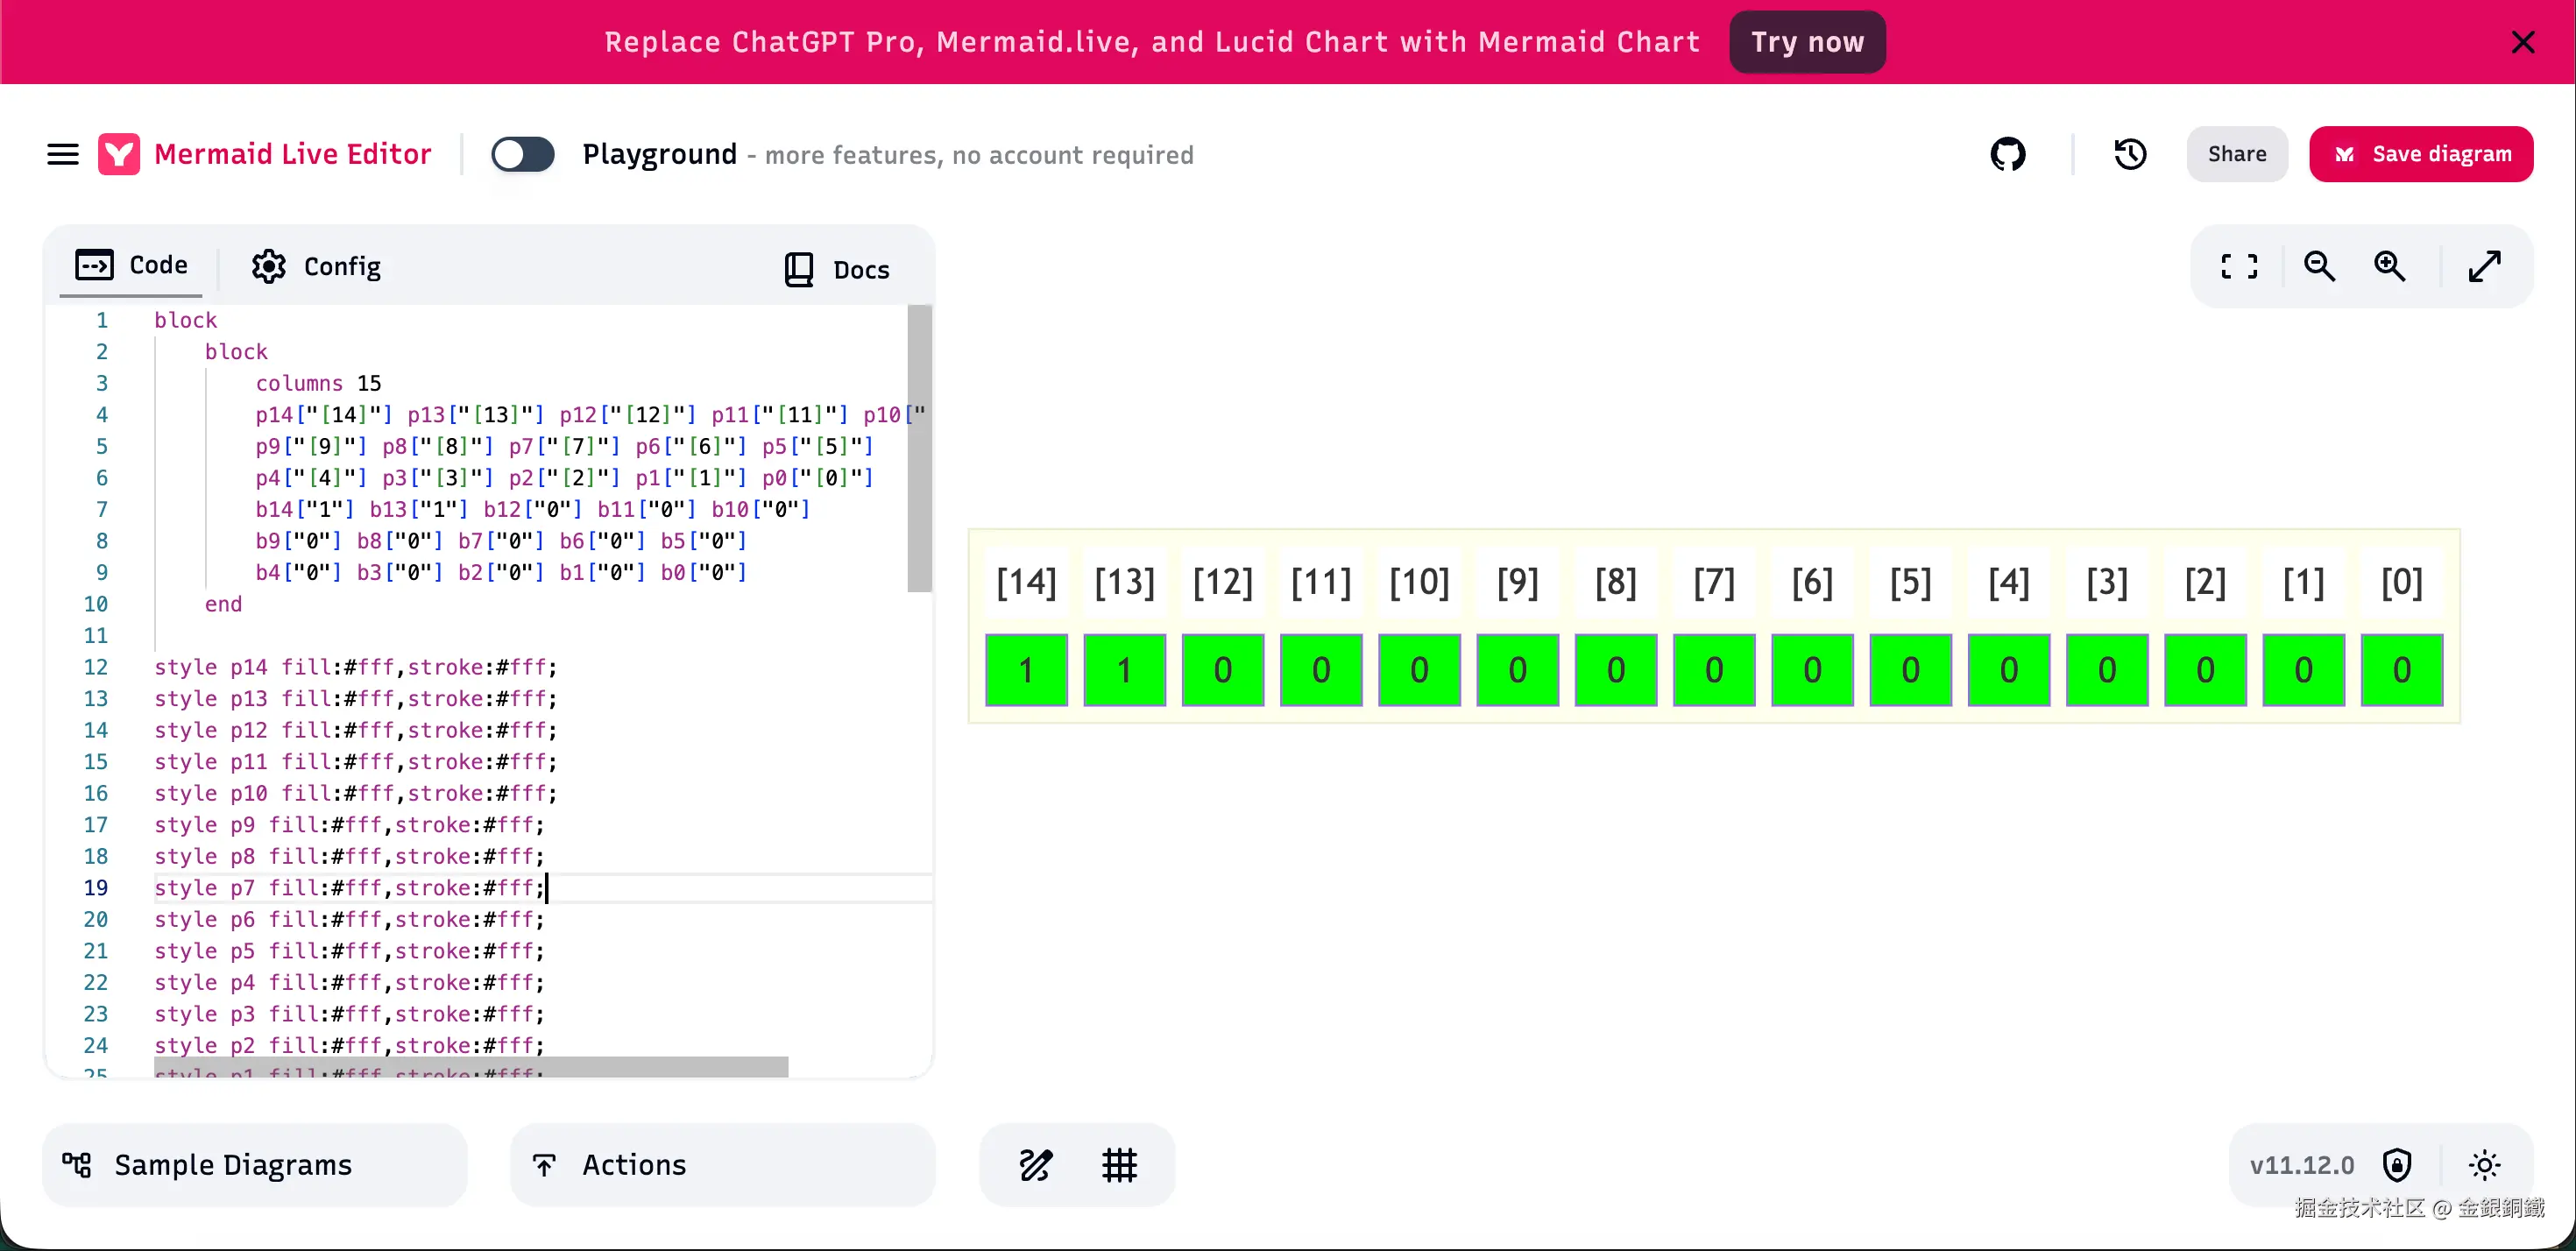
文中展示 RAM/Screen/Keyboard 地址范围的那些图是如何画出来的?我以 Keyboard 为例,来进行说明。
在 mermaid.live 页面可以绘制 block 图。具体的语法可以参考 Block Diagrams Documentation 一文。用以下代码可以画出对应的图 ⬇️
text
block
    block
        columns 15
        p14["[14]"] p13["[13]"] p12["[12]"] p11["[11]"] p10["[10]"]
        p9["[9]"] p8["[8]"] p7["[7]"] p6["[6]"] p5["[5]"]
        p4["[4]"] p3["[3]"] p2["[2]"] p1["[1]"] p0["[0]"]
        b14["1"] b13["1"] b12["0"] b11["0"] b10["0"]
        b9["0"] b8["0"] b7["0"] b6["0"] b5["0"]
        b4["0"] b3["0"] b2["0"] b1["0"] b0["0"]
    end

style p14 fill:#fff,stroke:#fff;
style p13 fill:#fff,stroke:#fff;
style p12 fill:#fff,stroke:#fff;
style p11 fill:#fff,stroke:#fff;
style p10 fill:#fff,stroke:#fff;
style p9 fill:#fff,stroke:#fff;
style p8 fill:#fff,stroke:#fff;
style p7 fill:#fff,stroke:#fff;
style p6 fill:#fff,stroke:#fff;
style p5 fill:#fff,stroke:#fff;
style p4 fill:#fff,stroke:#fff;
style p3 fill:#fff,stroke:#fff;
style p2 fill:#fff,stroke:#fff;
style p1 fill:#fff,stroke:#fff;
style p0 fill:#fff,stroke:#fff;

style b14 fill:#0f0;
style b13 fill:#0f0;
style b12 fill:#0f0;
style b11 fill:#0f0;
style b10 fill:#0f0;
style b9 fill:#0f0;
style b8 fill:#0f0;
style b7 fill:#0f0;
style b6 fill:#0f0;
style b5 fill:#0f0;
style b4 fill:#0f0;
style b3 fill:#0f0;
style b2 fill:#0f0;
style b1 fill:#0f0;
style b0 fill:#0f0;