Gitlab和Gerrit部署后的工作
本文是对上一小节Gitlab 和 Gerrit安装部署之后(点击跳转)的工作,包括:
- Gitlab 企业版激活
- Gitlab 集成LDAP
- 使用Nginx反向代理 Gitlab 、 Gerrit
- 关于Gerrit常见的一些问题
1.Gitlab 企业版激活
1.1生成许可证
激活之前需要先生成激活的许可证文件才可以,如下是生成许可证文件的具体步骤
激活会生成三个文件:
GitlabBV.gitlab-license
license_key
license_key.pub
shell
# 1. 安装Ruby
# 安装ruby
sudo apt install ruby -f
# 查看安装版本
ruby -v
# 查看gem安装版本
gem -v

#2.安装gitlab-license
sudo gem install gitlab-license
# gem下载慢
sudo gem sources l # 查看当前镜像
#删除这个镜像
sudo gem sources --remove https://rubygems.org/
#添加阿里巴巴镜像
sudo gem sources -a https://mirrors.aliyun.com/rubygems/
再去下载就变快了

#3.生成许可证
sudo mkdir -p /opt/gitlab/license
sudo cd /opt/gitlab/license

sudo vim license.rb
#4.复制如下内容,里面都有注释,可以自己看着修改
    require "openssl"
    require "gitlab/license"
    key_pair = OpenSSL::PKey::RSA.generate(2048)
    File.open("license_key", "w") { |f| f.write(key_pair.to_pem) }
    public_key = key_pair.public_key
    File.open("license_key.pub", "w") { |f| f.write(public_key.to_pem) }
    private_key = OpenSSL::PKey::RSA.new File.read("license_key")
    Gitlab::License.encryption_key = private_key
    license = Gitlab::License.new
    license.licensee = {
    "Name" => "IT",   # 许可证颁发的用户名称
    "Company" => "ztf",  # 组织名称
    "Email" => "it@ztf.com",  # email
    }
    license.starts_at = Date.new(2025, 8, 8) # 许可证颁发的开始时间
    license.expires_at = Date.new(2099, 12, 20) # 许可证到期的结束时间
    license.notify_admins_at = Date.new(2099, 11, 20) # 提前多久通知管理员即将过期
    license.notify_users_at = Date.new(2099, 11, 20)  # 提前多久通知普通用户即将到期
    license.block_changes_at = Date.new(2099, 12, 21) # 过期后多久禁止提交等变更操作
    license.restrictions = {
    active_user_count: 30000,  # 许可证激活的人数数量
    }
    puts "License:"
    puts license
    data = license.export
    puts "Exported license:"
    puts data
    File.open("GitLabBV.gitlab-license", "w") { |f| f.write(data) }
    public_key = OpenSSL::PKey::RSA.new File.read("license_key.pub")
    Gitlab::License.encryption_key = public_key
    data = File.read("GitLabBV.gitlab-license")
    $license = Gitlab::License.import(data)
    puts "Imported license:"
    puts $license
    unless $license
    raise "The license is invalid."
    end
    if $license.restricted?(:active_user_count)
    active_user_count = 30000  # 许可证激活的人数数量
    if active_user_count > $license.restrictions[:active_user_count]
        raise "The active user count exceeds the allowed amount!"
    end
    end
    if $license.notify_admins?
    puts "The license is due to expire on #{$license.expires_at}."
    end
    if $license.notify_users?
    puts "The license is due to expire on #{$license.expires_at}."
    end
    module Gitlab
    class GitAccess
        def check(cmd, changes = nil)
        if $license.block_changes?
            return build_status_object(false, "License expired")
        end
        end
    end
    end
    puts "This instance of GitLab Enterprise Edition is licensed to:"
    $license.licensee.each do |key, value|
    puts "#{key}: #{value}"
    end
    if $license.expired?
    puts "The license expired on #{$license.expires_at}"
    elsif $license.will_expire?
    puts "The license will expire on #{$license.expires_at}"
    else
    puts "The license will never expire."
    end
#5.执行rb文件
cd /opt/gitlab/license
ruby license.rb
#生成 GitLabBV.gitlab-license license_key license_key.pub 这三个文件。
注意:如果机器断电/重启,许可证可能会丢失,立即按照下面的方式进行重新注册许可!
shell
cd /opt/license/gitlab-license
sudo rm -rf GitLabBV.gitlab-license license_key license_key.pub  # 删除原有生成的三个文件
ruby license.rb  # 重新注册许可,还是会生成三个文件
sudo cp GitLabBV.gitlab-license license_key license_key.pub /data/docker-compose/gitlab/gitlab-config/gitlab-license/   # 直接复制到配置文件目录,会覆盖原有的三个文件。
docker exec -it gitlab /bin/bash
cp /opt/gitlab/embedded/service/gitlab-rails/.license_encryption_key.pub /opt/gitlab/embedded/service/gitlab-rails/.license_encryption_key.pub_bak
cp /etc/gitlab/gitlab-license/license_key.pub /opt/gitlab/embedded/service/gitlab-rails/.license_encryption_key.pub

# 修改证书等级为 ULTIMATE_PLAN
vi /opt/gitlab/embedded/service/gitlab-rails/ee/app/models/license.rb
# 将
# restricted_attr(:plan).presence || STARTER_PLAN
# 替换成
# restricted_attr(:plan).presence || ULTIMATE_PLAN
保存退出。

# 重新加载配置
gitlab-ctl reconfigure
sudo gitlab-ctl restart

######################################################################################################
然后浏览器打开Gitlab登录上去。
刚刚生成的三个文件其中 GitLabBV.gitlab-license 即是许可证
cat GitLabBV.gitlab-license  这个文件
点击左上角的 [菜单/Menu] -》[管理员/Admin] -》 [设置/Settings] -》 [通用/General] -》 翻到最下面,[添加许可证/Add a license] 来进行注册。
当看到这段话, 表示成功。[The license was successfully uploaded and is now active. You can see the details below]
#######################################################################################################
1.2 使用激活的许可证
shell
#1.将上面三个文件上传到服务器上,新建一个gitlab-licese文件夹,三个文件全放在里面,然后我移动到外部持久化的gitlab的config目录下。
sudo mv gitlab-license /data/docker-compose/gitlab/gitlab-config/  # gitlab-config文件夹对应容器里的/etc/gitlab目录

# 2.进gitlab容器
docker exec -it gitlab /bin/bash

#3.备份原有的 /opt/gitlab/embedded/service/gitlab-rails/.license_encryption_key.pub
cp /opt/gitlab/embedded/service/gitlab-rails/.license_encryption_key.pub /opt/gitlab/embedded/service/gitlab-rails/.license_encryption_key.pub_bak

#4.用 license_key.pub 文件替换 /opt/gitlab/embedded/service/gitlab-rails/.license_encryption_key.pub
cp /etc/gitlab/gitlab-license/license_key.pub /opt/gitlab/embedded/service/gitlab-rails/.license_encryption_key.pub

# 5.修改证书等级为 ULTIMATE_PLAN
vi /opt/gitlab/embedded/service/gitlab-rails/ee/app/models/license.rb
# 将
# restricted_attr(:plan).presence || STARTER_PLAN
# 替换成
# restricted_attr(:plan).presence || ULTIMATE_PLAN

#6.重新加载配置,重启gitlab
gitlab-ctl reconfigure
sudo gitlab-ctl restart

######################################################################################################
然后浏览器打开Gitlab登录上去。
刚刚生成的三个文件其中 GitLabBV.gitlab-license 即是许可证

点击左上角的 [菜单/Menu] -》[管理员/Admin] -》 [设置/Settings] -》 [通用/General] -》 翻到最下面,[添加许可证/Add a license] 来进行注册
当看到这段话, 表示成功。[The license was successfully uploaded and is now active. You can see the details below]
#######################################################################################################
2.Gitlab 集成LDAP
shell
# 1.进入容器
docker exec -it gitlab /bin/bash

#2.先关闭服务
gitlab-ctl stop

#3.修改配置文件
vi /etc/gitlab/gitlab.rb  # 然后按Shift + g 跳转至最后一行进行添加如下内容

gitlab_rails['time_zone'] = 'Beijing'
gitlab_rails['smtp_enable'] = true
gitlab_rails['smtp_address'] = "172.20.50.88"
gitlab_rails['smtp_port'] = 25
gitlab_rails['smtp_user_name'] = "readonly@ztf.com"
gitlab_rails['smtp_password'] = "Ztf@123456!"
gitlab_rails['smtp_domain'] = "ztf.com"
gitlab_rails['smtp_authentication'] = "login"
gitlab_rails['smtp_enable_starttls_auto'] = false
gitlab_rails['smtp_tls'] = false
gitlab_rails['smtp_pool'] = false
gitlab_rails['smtp_openssl_verify_mode'] = 'none'
gitlab_rails['gitlab_email_enabled'] = true
gitlab_rails['gitlab_email_from'] = 'readonly@ztf.com'
gitlab_rails['gitlab_email_display_name'] = 'GitLab'
gitlab_rails['gitlab_email_reply_to'] = 'noreply@ztf.com'
gitlab_rails['gitlab_email_subject_suffix'] = ''
gitlab_rails['ldap_enabled'] = true
gitlab_rails['ldap_servers'] = YAML.load <<-'EOS'
  main: # 'main' is the GitLab 'provider ID' of this LDAP server
    label: 'LDAP'
    host: '172.20.50.253'
    port: 389
    uid: 'sAMAccountName'
    bind_dn: 'admin1'
    password: '******'
    encryption: 'plain' # "start_tls" or "simple_tls" or "plain"
    verify_certificates: false
    smartcard_auth: false
    active_directory: true
    allow_username_or_email_login: false
    lowercase_usernames: false
    block_auto_created_users: false
    base: 'dc=ztf,dc=com'
    user_filter: '(&(objectCategory=person)(objectCategory=user))'
    sync_ssh_keys: false
EOS
gitlab_rails['manage_backup_path'] = false
gitlab_rails['backup_path'] = "/var/opt/gitlab/backups"
gitlab_rails['backup_archive_permissions'] = 0644
gitlab_rails['backup_keep_time'] = 97200
gitlab_rails['env'] = {
    "SKIP" => "artifacts"
}
gitlab_rails['ldap_sync_worker_cron'] = "*/30 * * * *"

#保存退出

#4.开启服务
gitlab-ctl reconfigure
gitlab-ctl restart
gitlab-rake gitlab:ldap:check
如果成功,将显示可访问的AD用户列表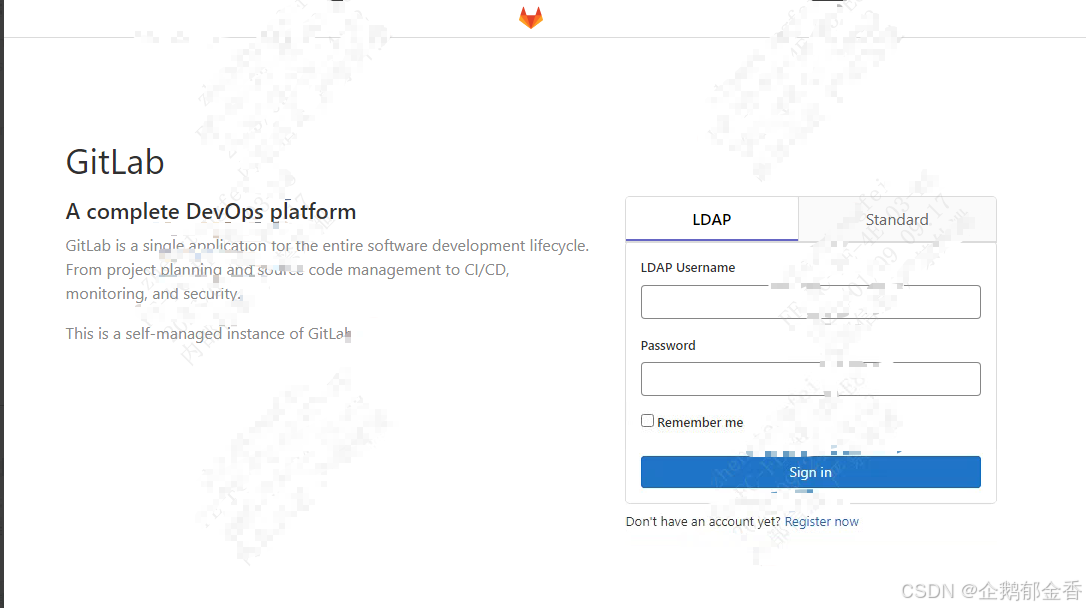
3.使用Nginx反向代理 Gitlab 和 Gerrit
这里的Gerrit和Gitlab我是部署在同一台机器上了,我们使用Nginx代理这两个服务,实现用不同域名访问不同服务。
我们这里使用Nginx,只实现HTTP协议的代理,非HTTPS协议(有兴趣的自己可以找资料,很简单)
假设两个服务的域名是:
| 服务 | 源地址 | 域名 | 协议 |
|---|---|---|---|
| Gerrit | http://172.253.200.36:8080 | http://gerrit.ztf.com | HTTP |
| Gitlab | http://172.253.200.36:8081 | http://gitlab.ztf.com | HTTP |
注意:这里的域名有可能的话,最好要注册到DNS服务器里,如果本地测试的话,可以写在hosts文件里验证即可
3.1 安装Nginx并初始化服务配置文件
shell
sudo apt update
sudo apt install -y nginx

# 创建Gerrit配置文件
sudo vim /etc/nginx/sites-available/gerrit
#内容如下:
server {
    listen 80;
    server_name gerrit.ztf.com;

    location / {
        proxy_pass http://172.253.200.36:8080;  # 根据自己的IP地址填写
        proxy_set_header Host $host;
        proxy_set_header X-Real-IP $remote_addr;
        proxy_set_header X-Forwarded-For $proxy_add_x_forwarded_for;
        proxy_set_header X-Forwarded-Proto $scheme;

        client_max_body_size 100M;
        proxy_connect_timeout 300;
        proxy_send_timeout 300;
        proxy_read_timeout 300;

        proxy_http_version 1.1;
        proxy_set_header Upgrade $http_upgrade;
        proxy_set_header Connection "upgrade";
    }
}

# 创建Gitlab配置文件
sudo vim /etc/nginx/sites-available/gitlab
# 内容如下:
server {
    listen 80;
    server_name gitlab.ztf.com;

    location / {
        proxy_pass http://172.253.200.36:8081;  # 根据自己的IP地址填写
        proxy_set_header Host $host;
        proxy_set_header X-Real-IP $remote_addr;
        proxy_set_header X-Forwarded-For $proxy_add_x_forwarded_for;
        proxy_set_header X-Forwarded-Proto $scheme;

        client_max_body_size 200M;
        proxy_connect_timeout 300;
        proxy_send_timeout 300;
        proxy_read_timeout 300;

        proxy_http_version 1.1;
        proxy_set_header Upgrade $http_upgrade;
        proxy_set_header Connection "upgrade";
    }
}

sudo ln -s /etc/nginx/sites-available/gerrit /etc/nginx/sites-enabled/
sudo ln -s /etc/nginx/sites-available/gitlab /etc/nginx/sites-enabled/sudo rm /etc/nginx/sites-enabled/default  # 删除默认站点(避免冲突)


sudo nginx -t  # 测试并重启 Nginx
sudo systemctl restart nginx
sudo systemctl enable nginx  # 开机自启
3.2 修改Gerrit和Gitlab配置
shell
# 进入宿主机的 Gerrit 的配置目录
===========================================================================================================
# 1. vim /data/docker-compose/gerrit/etc/gerrit.config  # 修改以下配置
[gerrit]
    canonicalWebUrl = http://gerrit.chw.com/

[httpd]
    listenUrl = proxy-http://*:8080

#保存退出
# 2. vim /data/docker-compose/gerrit/docker-compose-gerrit.yaml # 修改以下参数
 -CANONICAL_WEB_URL=http://gerrit.chw.com/    # 将原有的IP:端口形式也改为域名,和上面的gerrit.config文件里的域名格式相同

# 3.然后重启容器即可
docker compose -f /data/docker-compose/gerrit/docker-compose-gerrit.yaml restart


# 进去宿主机的 Gitlab 的配置目录
=============================================================================================================
# 1. vim /data/docker-compose/gitlab/gitlab-config/gitlab.rb   #修改如下配置项
external_url 'http://gitlab.chw.com'
#保存退出

# 2.重新加载配置文件并重启容器即可
docker exec -it gitlab gitlab-ctl reconfigure
docker compose -f /data/docker-compose/gitlab/docker-compose-gitlab.yaml restart
然后可以先使用原来的IP+端口访问,看看服务正常是否可以访问,如果可以访问的话,那就可以用域名去访问了。
也可以先在本地hosts文件里写入域名访问是否可以。
4.关于Gerrit常见的一些问题
4.1 当需要修改Gerrit域名,所带来的问题以及解决办法
修改新的域名,一般直接在gerrit.config文件和compose文件里都修改一下就可以,但是
修改后,重启容器,会发现Gerrit.config文件里的域名又被自动改回来了,没完成修改,导致访问页面登录失效。
解决办法:
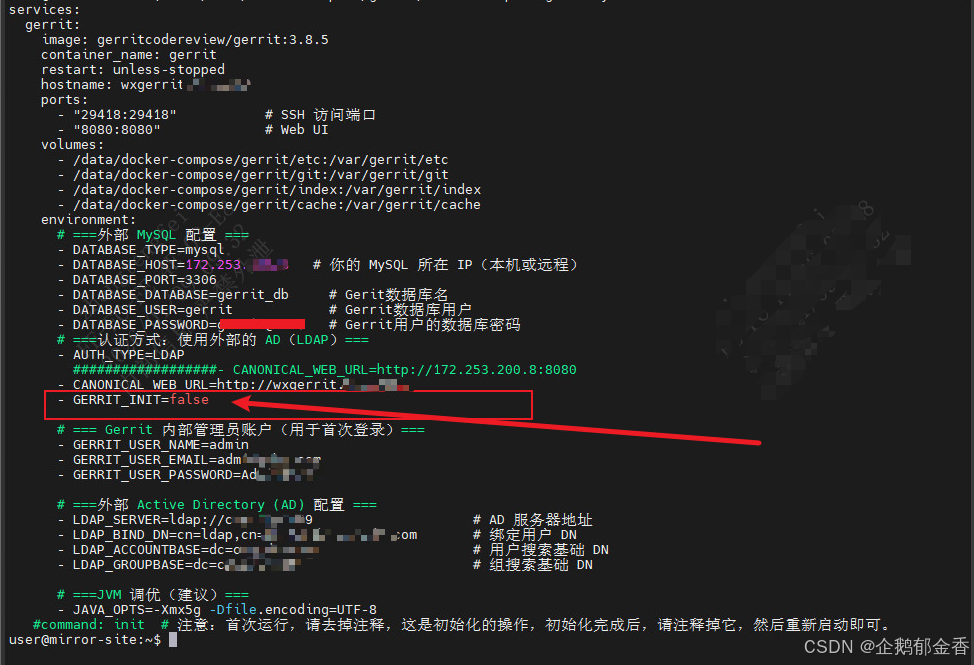
1.停止服务运行
2.正常修改gerrit.config文件里的域名和compose文件里的域名
3.在compose文件里加上一个环境变量参数,如下图,这样再次运行容器,就不会被原有配置覆盖。