前言
在接下来的内容中,我们将首先介绍 Spring 的事务管理基础知识,包括事务的概念和 Spring 如何提供支持。然后,我们将分别展示如何使用 XML 和注解两种方式进行声明式事务控制,并讨论它们各自的优缺点。最后,我们还会探讨如何将 Spring 的事务管理功能有效集成到 Web 应用程序中,以实现更高效的数据处理和用户体验。
XML方式声明事务通知
结合上面我们学习的AOP的技术,很容易就可以想到,可以使用AOP对Service的方法进行事务的增强。
- 目标类:自定义的AccountServicelmpl,内部的方法是切点
- 通知类:Spring提供的,通知方法已经定义好,只需要配置即可
我们分析:
- 通知类是Spring提供的,需要导入Spring事务的相关的坐标;
- 配置目标类AccountServicelmpl;
- 使用advisor标签配置切面。
xml
<?xml version="1.0" encoding="UTF-8"?>
<beans xmlns="http://www.springframework.org/schema/beans"
       xmlns:xsi="http://www.w3.org/2001/XMLSchema-instance"
       xmlns:context="http://www.springframework.org/schema/context"
       xmlns:aop="http://www.springframework.org/schema/aop"
       xmlns:tx="http://www.springframework.org/schema/tx"
       xsi:schemaLocation="
       http://www.springframework.org/schema/beans
       http://www.springframework.org/schema/beans/spring-beans.xsd
       http://www.springframework.org/schema/context
       http://www.springframework.org/schema/context/spring-context.xsd
       http://www.springframework.org/schema/aop
       http://www.springframework.org/schema/aop/spring-aop.xsd
       http://www.springframework.org/schema/tx
       http://www.springframework.org/schema/tx/spring-tx.xsd

       ">
    <!--组件扫描-->
    <context:component-scan base-package="com.itheima"/>

    <!--加载properties文件-->
    <context:property-placeholder location="classpath:jdbc.properties"/>

    <!--配置数据源信息-->
    <bean id="dataSource" class="com.alibaba.druid.pool.DruidDataSource">
        <property name="driverClassName" value="${jdbc.driver}"></property>
        <property name="url" value="${jdbc.url}"></property>
        <property name="username" value="${jdbc.username}"></property>
        <property name="password" value="${jdbc.password}"></property>
    </bean>
    <!--配置SqlSessionFactoryBean,作用将SqlSessionFactory存储到spring容器-->
    <bean class="org.mybatis.spring.SqlSessionFactoryBean">
        <property name="dataSource" ref="dataSource"></property>
    </bean>

    <!--MapperScannerConfigurer,作用扫描指定的包,产生Mapper对象存储到Spring容器-->
    <bean class="org.mybatis.spring.mapper.MapperScannerConfigurer">
        <property name="basePackage" value="com.itheima.mapper"></property>
    </bean>
    <!--配置平台事务管理器-->
    <bean id="transactionManager" class="org.springframework.jdbc.datasource.DataSourceTransactionManager">
        <property name="dataSource" ref="dataSource"></property>

    </bean>

    <!--配置Spring提供好的Advice-->
    <tx:advice id="txAdvice" transaction-manager="transactionManager">
        <tx:attributes>
            <tx:method name="*"/>
        </tx:attributes>
    </tx:advice>

    <!--事务增强的AOP-->
    <aop:config>
        <!--配置切点表达式-->
        <aop:pointcut id="txPointcut" expression="execution(* com.itheima.service.impl.*.*(..))"/>
        <!--配置织入 通知advice-ref引入Spring提供好的-->
        <aop:advisor advice-ref="txAdvice" pointcut-ref="txPointcut"></aop:advisor>
    </aop:config>

</beans>
事务管理器配置
- 定义了一个事务管理器,类型为DataSourceTransactionManager,它是Spring提供的用于管理JDBC事务的实现。
- dataSource属性引用了一个名为dataSource的Bean,这个Bean通常用于配置数据库连接。
事务通知配置
- 定义了一个事务通知(Advice),其ID为txAdvice,并将其与之前定义的transactionManager关联。
- tx:attributes中定义了一个通配符*,表示对所有方法调用应用事务管理。这意味着任何匹配切点的服务方法都会自动开启事务。
AOP配置
- aop:config标签用于配置AOP相关的内容。
- aop:pointcut定义了一个切点,ID为txPointcut,表达式execution(* com.itheima.service.impl..(...))表示匹配com.itheima.service.impl包下所有类的所有方法。
- aop:advisor将txAdvice与txPointcut关联起来,表示当某个方法执行时,会执行与之关联的事务管理逻辑。
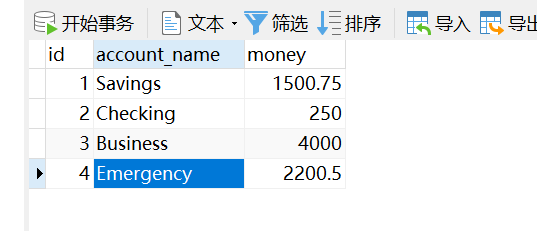
初始数据

java
	@Override
    public void transforMoney(String outAccount, String inAccount, double money) {
        accountMapper.decrMoney(outAccount,money);
        int i = 1 / 0;
        accountMapper.incrMoney(inAccount,money);
    }
在转账操作中加入错误,运行后看数据是否会发生修改
测试代码:
java
	public static void main(String[] args) {
        ApplicationContext applicationContext = new ClassPathXmlApplicationContext("applicationContext.xml");
        AccountService accountService =(AccountService) applicationContext.getBean("accountService");
        accountService.transforMoney("Business","Emergency",500);

    }
如若不进行事务管理,会产生错误操作即Business的money减少,而Emergency的money不变。
运行后数据为:
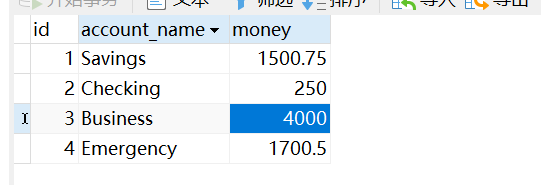
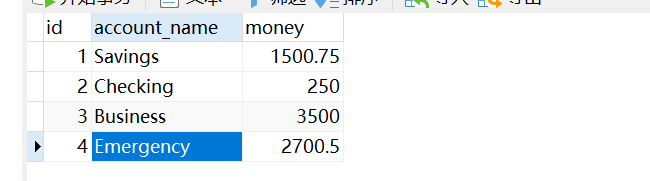
加入事务管理后运行后数据为

此时数据均未发生修改,说明此时事务控制成功。
如若不进行事务管理,会产生错误操作即Business的money增加,而Emergency的money不变。
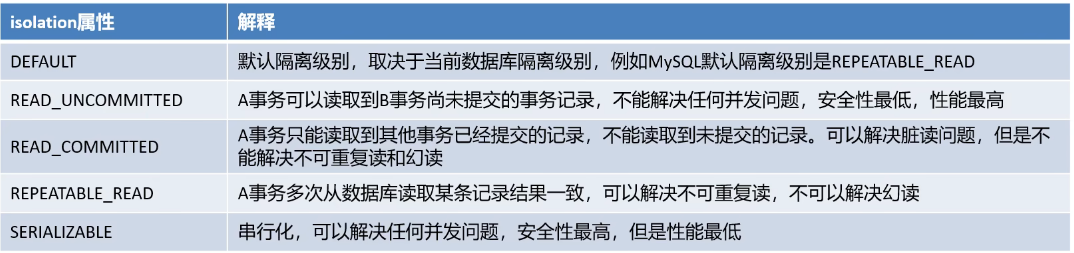
isolation属性:指定事务的隔离级别,事务并发存在三大问题:脏读、不可重复读、幻读/虚读。可以通过设置事务的隔离级别来保证并发问题的出现,常用的是READCOMMITTED和 REPEATABLE READ
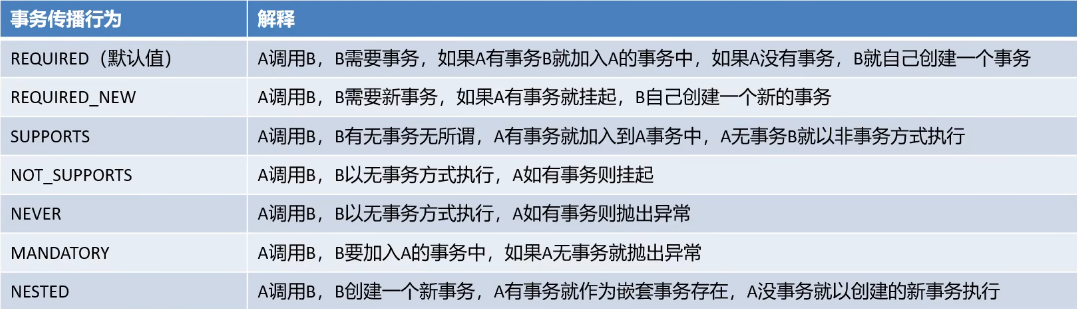
propagation属性:设置事务的传播行为,主要解决是A方法调用B方法时,事务的传播方式问题的,例如:使用单方的事务,还是A和B都使用自己的事务等。事务的传播行为有如下七种属性值可配置
xml
	<!--配置Spring提供好的Advice-->
    <tx:advice id="txAdvice" transaction-manager="transactionManager">
        <tx:attributes>

            <!--配置不同的方法的事务属性
            name:方法名 *代表通配符 添加操作addUser、addAccount、addOrders=>add*
            isolation:事务的隔离级别,解决事务并发问题
            timeout:超时时间 默认-1 单位是s
            read-only:是否只读,查询操作才设置为只读状态
            propagation:事务的传播行为,解决业务方法调用业务方法(事务嵌套问题)
            -->
            <tx:method name="*" isolation="READ_COMMITTED" timeout="3" propagation="REQUIRED"  read-only="false"/>
        </tx:attributes>
    </tx:advice>
基于注解的声明式事务控制
注解就是对xml的替代
java
@Service("accountService")
public class AccoutServiceImpl implements AccountService {
	@Autowired
	private AccountMapper accountMapper;
	//<tx:method name-"*" isolation-"REPEATABLE READ" propagation-"REQUIRED "/>
	@Transactional(isolation = Isolation.REPEATABLE_READ,propagation =Propagation.REQUIRED, readOnly = false,timeout = 5)
	public void transferMoney(String decrAccountName, String incrAccountName, int money) {
		accountMapper.decrMoney (decrAccountName,money);
		//转出钱inti=1/0;
		//模拟某些逻辑产生的异常
  		accountMapper.incrMoney(incrAccountName,money);
  		//转入钱
   }
}
同样,使用的事务的注解,平台事务管理器仍然需要配置,还需要进行事务注解开关的开启
xml
<bean id="transactionManager"class="org.springframework.jdbc.datasource.DataSourcerransactionManager">
	<property name="dataSource" ref="dataSource"/>
</bean>
<!--配置事务的注解驱动-->
<tx:annotation-driven transaction-manager=" transactionManager"/>
把xml文件全用注解代替后的配置类SpringConfig.java
java
package com.itheima.config;

import com.alibaba.druid.pool.DruidDataSource;
import org.mybatis.spring.SqlSessionFactoryBean;
import org.mybatis.spring.annotation.MapperScan;
import org.springframework.beans.factory.annotation.Value;
import org.springframework.context.annotation.Bean;
import org.springframework.context.annotation.ComponentScan;
import org.springframework.context.annotation.Configuration;
import org.springframework.context.annotation.PropertySource;
import org.springframework.jdbc.datasource.DataSourceTransactionManager;
import org.springframework.transaction.annotation.EnableTransactionManagement;

import javax.sql.DataSource;

@Configuration
@ComponentScan("com.itheima")
@PropertySource("jdbc.properties")
@MapperScan("com.itheima.mapper")
@EnableTransactionManagement //事务的自动代理
public class SpringConfig {

    @Bean
    public DataSource dataSource(@Value("${jdbc.driver}") String driver,
                                 @Value("${jdbc.url}") String url, @Value("${jdbc.username}") String username,@Value("${jdbc.password}") String password) {
        DruidDataSource  dataSource = new DruidDataSource();
        dataSource.setDriverClassName(driver);
        dataSource.setUrl(url);
        dataSource.setUsername(username);
        dataSource.setPassword(password);
        return dataSource;
    }

    @Bean
    public SqlSessionFactoryBean sqlSessionFactoryBean(DataSource dataSource) throws Exception {
        SqlSessionFactoryBean sqlSessionFactoryBean = new SqlSessionFactoryBean();
        sqlSessionFactoryBean.setDataSource(dataSource);
        return sqlSessionFactoryBean;
    }
    @Bean
    public DataSourceTransactionManager transactionManager(DataSource dataSource) {
        DataSourceTransactionManager dataSourceTransactionManager = new DataSourceTransactionManager();
        dataSourceTransactionManager.setDataSource(dataSource);
        return dataSourceTransactionManager;
    }

}
其中,name属性名称指定哪个方法要进行哪些事务的属性配置,此处需要区分的是切点表达式指定的方法与此处指定的方法的区别?切点表达式,是过滤哪些方法可以进行事务增强;事务属性信息的name,是指定哪个方法要进行哪些事务属性的配置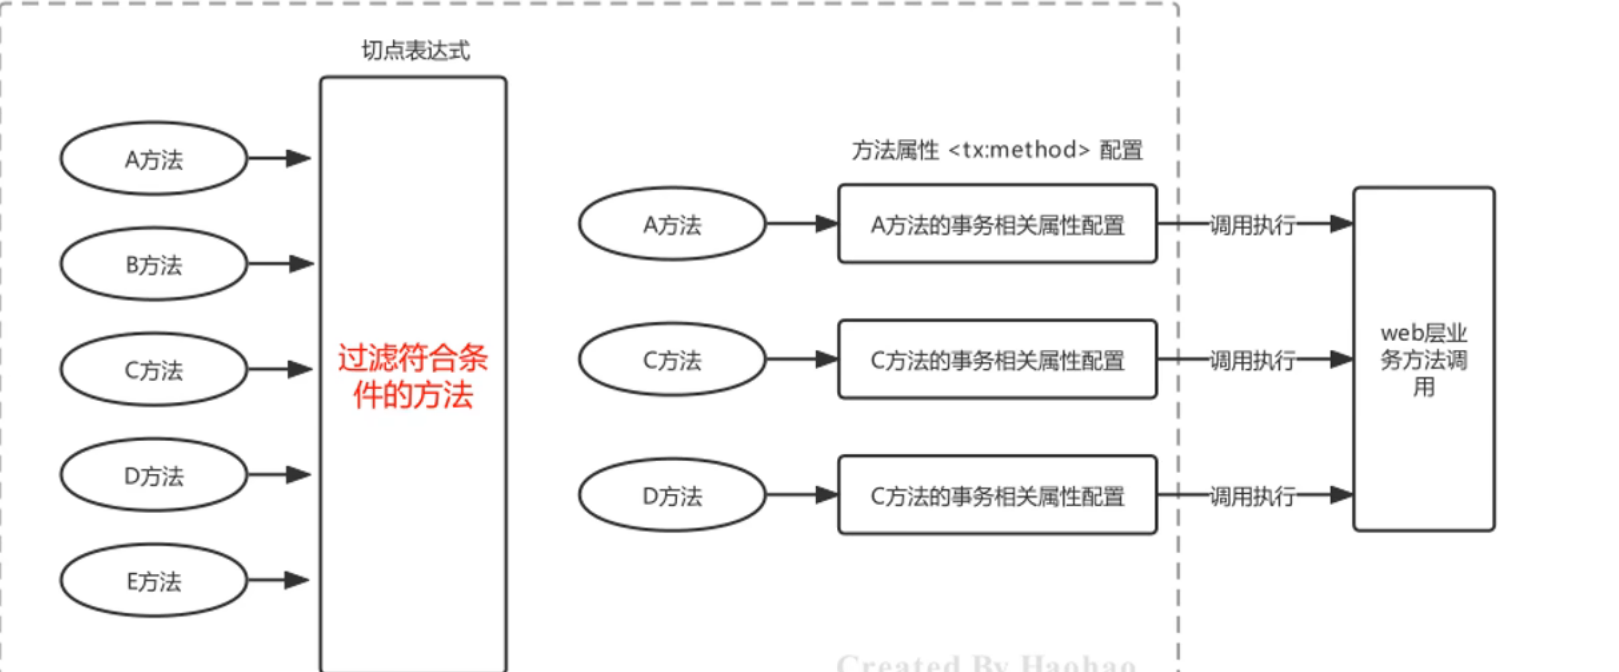
Spring整合Web环境
Javaweb三大组件及环境特点
在Java语言范畴内,web层框架都是基于Javaweb基础组件完成的,所以有必要复习一下Javaweb组件的特点

Spring整合web环境的思路及实现
在进行Java开发时要遵循三层架构+MVC,Spring操作最核心的就是Spring容器,web层需要注入Service,service层需要注入Dao(Mapper),web层使用Servlet技术充当的话,需要在Servlet中获得Spring容器
java
AnnotationConfigApplicationContext applicationContext = new AnnotationConfigApplicationcontext(Applicationcontextconfig.class);
AccountService accountService = (AccountService)applicationContext.getBean("accountservice");
accountService.transferMoney("tom","lucy",100);
web层代码如果都去编写创建AnnotationConfigApplicationContext的代码,那么配置类重复被加载了,Spring容器也重复被创建了,不能每次想从容器中获得一个Bean都得先创建一次容器,这样肯定是不允许。所以,我们现在的诉求很简单,如下:
- ApplicationContext创建一次,配置类加载一次;
- 最好web服务器启动时,就执行第1步操作,后续直接从容器中获取Bean使用即可;
- ApplicationContext的引用需要在web层任何位置都可以获取到。
java
package com.itheima.web;


import com.itheima.service.AccountService;

import org.springframework.context.support.ClassPathXmlApplicationContext;

import javax.servlet.ServletException;
import javax.servlet.annotation.WebServlet;
import javax.servlet.http.HttpServlet;
import javax.servlet.http.HttpServletRequest;
import javax.servlet.http.HttpServletResponse;
import java.io.IOException;

@WebServlet(urlPatterns = "/accountServlet")
public class AccountServlet extends HttpServlet {

    protected void doGet(HttpServletRequest request, HttpServletResponse response) throws ServletException, IOException {
        //web层调用service层,获得AccountService,accountService存在applicationContext中
        ClassPathXmlApplicationContext applicationContext = new ClassPathXmlApplicationContext("applicationContext2.xml");
        AccountService bean = applicationContext.getBean(AccountService.class);
        bean.transforMoney("Business","Emergency",500);
    }
}
@WebServlet(urlPatterns = "/accountServlet") 表示这个 Servlet 的 URL 映射为 /accountServlet。当用户在浏览器中访问 http://< server>:< port>/spring_trans_war/accountServlet 时,Servlet 容器会调用 AccountServlet 类中的 doGet方法
此前数据库数据为:
访问http://< server>:< port>/spring_trans_war/accountServlet 后数据库的数据为:
针对以上诉求我们给出解决思路,如下:
- 在ServletContextListener的contextlnitialized方法中执行ApplicationContext的创建。或在Servlet的init方法中执行ApplicationContext的创建,并给Servlet的load-on-startup属性一个数字值,确保服务器启动Servlet就创建;
- 将创建好的ApplicationContext存储到ServletContext域中,这样整个web层任何位置就都可以获取到了
总结
希望通过本文的分享,能够帮助开发者更好地理解和使用 Spring 的事务管理功能,从而在实际项目中实现更高效、更可靠的业务处理。