目录
文章目录
- 目录
- [LLM 微调](#LLM 微调)
- 微调技术原理
- LLaMA-Factory
- [LLaMA-Factory + Qwen3-7B + LoRA](#LLaMA-Factory + Qwen3-7B + LoRA)
-
- 安装部署
- 准备数据集
- 执行微调
- 批量推理和训练效果评估
- [LoRA 模型合并导出](#LoRA 模型合并导出)
- 部署运行微调后的大模型
LLM 微调
微调是指在已经训练好的大型预训练模型的基础上,进一步训练该模型以适应特定任务或特定领域的数据。可以在特定任务上取得更好的性能,因为模型在微调过程中会重点学习与任务相关的特性。还可以在多种领域(如情感分析、问答系统等)上进行微调,从而快速适应不同应用场景。另外,相比从零开始训练一个模型,微调所需的数据和计算资源显著减少了。
在实际大模型应用场景中,高效微调主要用于以下四个方面:
- 改变对话风格:根据特定需求调整模型的对话风格。比如客服、虚拟助理等场景,通过微调少量的参数(例如对话生成的策略、情感表达等),可以使模型适应不同的语气、礼貌程度或回答方式。
- 注入私域知识:将外部知识或领域特定的信息快速集成到预训练模型中。比如法律、医疗、IT 等专业领域,通过少量的标注数据对预训练模型进行微调,帮助模型理解特定行业的术语、规则和知识,进而提升专业领域的问答能力。
- 提升推理能力:在处理复杂推理任务时,微调使模型能够更高效地理解长文本、推理隐含信息,或者从数据中提取逻辑关系,进而在多轮推理任务中提供更准确的答案。这种微调方式可以帮助模型在解答复杂问题时,提高推理准确性并减少错误。
- 支撑 Agent 需求:通过 Agent 使得模型能够有效地与其他系统进行交互、调用外部 API 执行特定任务。通过针对性微调,模型可以学会更精准的 Function Calling 策略、参数解析和操作指令,从而支撑 Agent 的能力。
现在绝大多数开源模型,在开源的时候都会公布两个版本的模型。一个是 Base 模型,该模型只经过了预训练,没有经过指令微调。其二则是微调模型,是在 Base 模型的基础上进一步进行全量指令微调之后的对话模型。
微调技术原理
从广义上讲,微调可以分为 2 种主要方式:全量微调和高效微调。选择哪种微调方法,取决于开发者希望对原始模型进行多大程度的调整。
参数高效微调(Efficient Fine-Tuning,LoRA 或 QLoRA):
- 工作原理:仅更新模型的一小部分,以更快、更低成本完成训练。这是一种在不大幅改变模型的情况下提升能力的高效方式。
- 适用场景:几乎适用于所有传统需要完整微调的场景,包括引入领域知识、提升代码准确性、使模型适配法律或科学任务、改进推理能力,或对语气和行为进行对齐。
- 要求:小到中等规模的数据集(100~1000 组示例提示词对)。
完整微调(Full Fine-Tuning):
- 工作原理:更新模型的所有参数,适用于训练模型遵循特定格式或风格。
- 适用场景:高级应用场景,例如构建 AI 智能体和聊天机器人,这些系统需要围绕特定主题提供帮助、遵循既定的约束规则,并以特定方式进行响应。
- 要求:大规模数据集(1000+ 组示例提示词对)。
LLM 微调是一种对 GPU 显存和计算要求极高的工作负载,在每个训练步骤中都需要进行以数十亿次量级的矩阵乘法来更新模型权重。即使是像 Mistral 7B 这样的小型 LLM 进行全面微调,也可能需要高达 100GB 的内存。所以,在进行微调前,需要考虑的因素是各种微调方法的 GPU 显存需求。
并且显然的,相较于 LoRA 和 QLoRA 高效微调,完整微调对内存和吞吐量要求更高。尽管完全微调可以对模型的能力进行深度改造,但要带入模型全部参数进行训练,需要消耗大量的算力,且有一定的技术门槛。相比之下,在绝大多数场景中,如果我们只想提升模型某个具体领域的能力,那高效微调会更加合适。
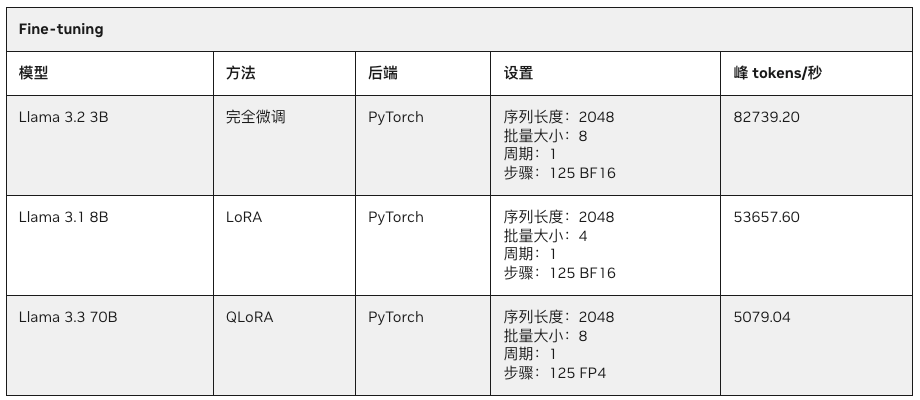
由于微调需要消耗大量的显存,因此参数规模超过 30B 的大模型往往无法在 32GB 消费级 GPU 上运行,但却可以轻松在拥有 128GB UMA 的 PGX 上随时进行。下表展示了在 PGX/DGX 上对 Llama 系列模型进行微调的性能表现。
- Llama3.2 3B 完全微调:每秒 82739.2 tokens 的处理速度。
- Llama3.1 8B LoRA 微调:每秒 53657.6 tokens 的处理速度。
- Llama3.3 70B QLoRA 微调:每秒 5079.4 tokens 的处理速度。
LoRA
LoRA(Low-Rank Adaptation,低秩适应)旨在通过引入低秩矩阵来减少微调时需要调整的参数数量,从而显著降低显存和计算资源的消耗。具体来说,LoRA 微调并不直接调整原始模型的所有参数,而是通过在某些层中插入低秩的适配器(Adapter)层来对低秩矩阵进行训练。
LoRA 的原理:
- 在完全微调中,会修改模型的所有权重,而在 LoRA 中,只有某些低秩矩阵(适配器)会被训练和调整。这意味着原始模型的参数保持不变,只是通过少量的新参数来调整模型的输出。
- 低秩矩阵的引入可以在显存和计算能力有限的情况下,依然有效地对大型预训练模型进行微调,从而让 LoRA 成为显存较小的设备上的理想选择。
LoRA 的优势:
- 显存优化: 只需要调整少量的参数(适配器),显著减少了显存需求,适合显存有限的 GPU。
- 计算效率: 微调过程中的计算负担也更轻,因为减少了需要调整的参数量。
- 灵活性: 可以与现有的预训练模型轻松结合使用,适用于多种任务,如文本生成、分类、问答等。
QLoRA
QLoRA(Quantized Low-Rank Adaptation)是 LoRA 的一个扩展版本,它结合了 LoRA 的低秩适配器技术和量化技术。在 LoRA 的基础上再进一步优化了计算效率和显存需求,特别是在极端显存受限的环境下。
QLoRA 的原理:
- 与 LoRA 不同的是,QLoRA 会将插入的低秩适配器层的部分权重进行量化,通常是量化为 FP4、INT4 或 INT8 等低精度格式,在保持性能的同时显著降低模型的存储和计算需求。
- 可见,QLoRA 涉及量化(quantization)技术,将模型的一部分权重参数存储在较低精度的数值格式中,以此减少内存使用和计算量,同时结合 LoRA 的低秩调整,让适应过程更加高效。
QLoRA 的优势:
- 在显存非常有限的情况下仍能进行微调。
- 可以处理更大规模的模型。
- 适合用于边缘设备和需要低延迟推理的场景。
LLaMA-Factory
Llama-Factory 是基于 transformers 库开发的训练、微调、推理一体化平台,支持预训练、指令监督微调、奖励模型训练、PPO 训练、DPO 训练、KTO 训练、ORPO 训练等多种训练范式。支持使用 Accelerate 或 DeepSpeed 作为训练加速后端。
使用 Llama-Factory 进行微调非常简单,因为其最大的优势在于强大的数据处理与训练配置能力。只要按照官方的文档配置好环境,直接运行对应的脚本即可。
LLaMA-Factory + Qwen3-7B + LoRA
安装部署
- 容器安装
bash
git clone https://github.com/hiyouga/LlamaFactory.git
cd LlamaFactory
cd docker/docker-cuda/

# Build the image
docker build -f ./docker/docker-cuda/Dockerfile \
    --build-arg PIP_INDEX=https://pypi.org/simple \
    --build-arg EXTRAS=metrics \
    -t llamafactory:latest .

# Run the container
docker run -dit --ipc=host --gpus=all \
    -p 7860:7860 \
    -p 8000:8000 \
    --name llamafactory \
    llamafactory:latest

# Enter the container
docker exec -it llamafactory bash- 编译安装
bash
$ cd workspace
$ git clone https://github.com/hiyouga/LlamaFactory.git

$ docker run -d --network=host --restart=always --name=llamafactory-dev \
    --gpus=all --ipc=host --ulimit memlock=-1 --ulimit stack=67108864 \
    -v "$PWD":/workspace -w /workspace \
    nvcr.io/nvidia/pytorch:25.08-py3 \
    tail -f /dev/null

$ docker exec -it -u root llamafactory-dev bash

# 创建配置目录
$ mkdir -p ~/.pip

# 创建配置文件
$ cat > ~/.pip/pip.conf << EOF
[global]
index-url = https://pypi.tuna.tsinghua.edu.cn/simple
trusted-host = pypi.tuna.tsinghua.edu.cn
EOF


$ pip uninstall -y torch torchvision torchaudio nvidia-cublas nvidia-cudnn-cu12
$ pip install torch torchvision torchaudio -i https://pypi.tuna.tsinghua.edu.cn/simple --index-url https://download.pytorch.org/whl/cu130
$ pip install --upgrade nvidia-cublas nvidia-cudnn-cu13


$ cd LlamaFactory
$ pip install -e '.[torch,metrics]'- 测试
bash
# 确认安装正常
$ llamafactory-cli train -h

# 确认 GPU 和 CUDA 环境正常
$ python
import torch
torch.cuda.current_device()
torch.cuda.get_device_name(0)
torch.__version__- 测试推理
bash
$ pip install modelscope
$ modelscope download --model LLM-Research/Meta-Llama-3-8B-Instruct --local_dir /workspace/Meta-Llama-3-8B-Instruct
$ pip install -U bitsandbytes -i https://pypi.tuna.tsinghua.edu.cn/simple
$ vim test-inf.py
import torch
import warnings
from transformers import AutoTokenizer, AutoModelForCausalLM, BitsAndBytesConfig
# ===================== 核心修复:屏蔽警告 + 强制锁定GPU =====================
warnings.filterwarnings('ignore', category=UserWarning, module='torch.cuda')
torch.cuda.set_device(0)
device = "cuda:0" if torch.cuda.is_available() else "cpu"
# ===============================================================================
# ===================== 4bit量化配置(补装库后正常生效) =====================
bnb_config = BitsAndBytesConfig(
load_in_4bit=True,
bnb_4bit_compute_dtype=torch.bfloat16,
bnb_4bit_use_double_quant=True,
bnb_4bit_quant_type="nf4"
)
# ===============================================================================
# ===================== 加载模型和Tokenizer =====================
model_id = "/workspace/Meta-Llama-3-8B-Instruct"
tokenizer = AutoTokenizer.from_pretrained(model_id)
tokenizer.pad_token = tokenizer.eos_token
# ===============================================================================
# ===================== 加载量化模型 =====================
model = AutoModelForCausalLM.from_pretrained(
model_id,
quantization_config=bnb_config,
torch_dtype=torch.bfloat16,
device_map=device,
trust_remote_code=True,
low_cpu_mem_usage=True
)
# ===============================================================================
# 验证GPU加载
assert next(model.parameters()).device == torch.device(device), "模型加载失败!未使用GPU!"
print(f"✅ 模型已100%加载到 GPU → {torch.cuda.get_device_name(0)}")
print(f"✅ PyTorch版本: {torch.__version__} | CUDA版本: {torch.version.cuda}")
print(f"✅ 运行模式: 4bit无损量化 | 显存占用≈8.5GB (减半)")
# 原有对话逻辑
messages = [
{"role": "system", "content": "You are a pirate chatbot who always responds in pirate speak!"},
{"role": "user", "content": "Who are you?"},
]
prompt = tokenizer.apply_chat_template(messages, tokenize=False, add_generation_prompt=True)
inputs = tokenizer(prompt, return_tensors="pt").to(device)
terminators = [tokenizer.eos_token_id, tokenizer.convert_tokens_to_ids("<|eot_id|>")]
outputs = model.generate(
**inputs,
max_new_tokens=256,
eos_token_id=terminators,
do_sample=True,
temperature=0.6,
top_p=0.9,
pad_token_id=tokenizer.eos_token_id
)
response = tokenizer.decode(outputs[0][len(inputs["input_ids"][0]):], skip_special_tokens=True)
print("\n===== 🏴☠️ 海盗机器人回答 🏴☠️ =====")
print(response)
$ python test-inf.py
`torch_dtype` is deprecated! Use `dtype` instead!
Loading checkpoint shards: 100%|████████████████████████████████████████████████████████████████████████████████████████████████████████████████████| 4/4 [01:27<00:00, 21.92s/it]
✅ 模型已100%加载到 GPU → NVIDIA GB10
✅ PyTorch版本: 2.9.1+cu130 | CUDA版本: 13.0
✅ 运行模式: 4bit无损量化 | 显存占用≈8.5GB (减半)
===== 🏴☠️ 海盗机器人回答 🏴☠️ =====
Arrrr, me hearty! Me name be Captain Chatbot, the scourge o' the seven seas... o' text-based conversations, that is! I be a swashbucklin' bot, here to chart a course through the choppy waters o' language, helpin' ye navigate the treacherous tides o' syntax and grammar. So hoist the colors, me hearty, and let's set sail fer a chat that'll make ye walk the plank fer more!
- 测试 WebUI
bash
$ CUDA_VISIBLE_DEVICES=0 llamafactory-cli webchat \
    --model_name_or_path /workspace/Meta-Llama-3-8B-Instruct \
    --template llama3

* Running on local URL:  http://0.0.0.0:7860

$ telnet localhost 7860- model_name_or_path:huggingface 或 modelscope 的模型名称,如 meta-llama/Meta-Llama-3-8B-Instruct;或者是本地下载的绝对路径。
- template :模型问答时所使用的 prompt 模板,不同模型使用各自的模版,否则会出现回答结果重复生成等奇怪现象。比如 Meta-Llama-3-8B 的 template 就是 llama3
准备数据集
打开 WebUI:
bash
cd LlamaFactory/

export USE_MODELSCOPE_HUB=1
llamafactory-cli webui

* Running on local URL:  http://0.0.0.0:7860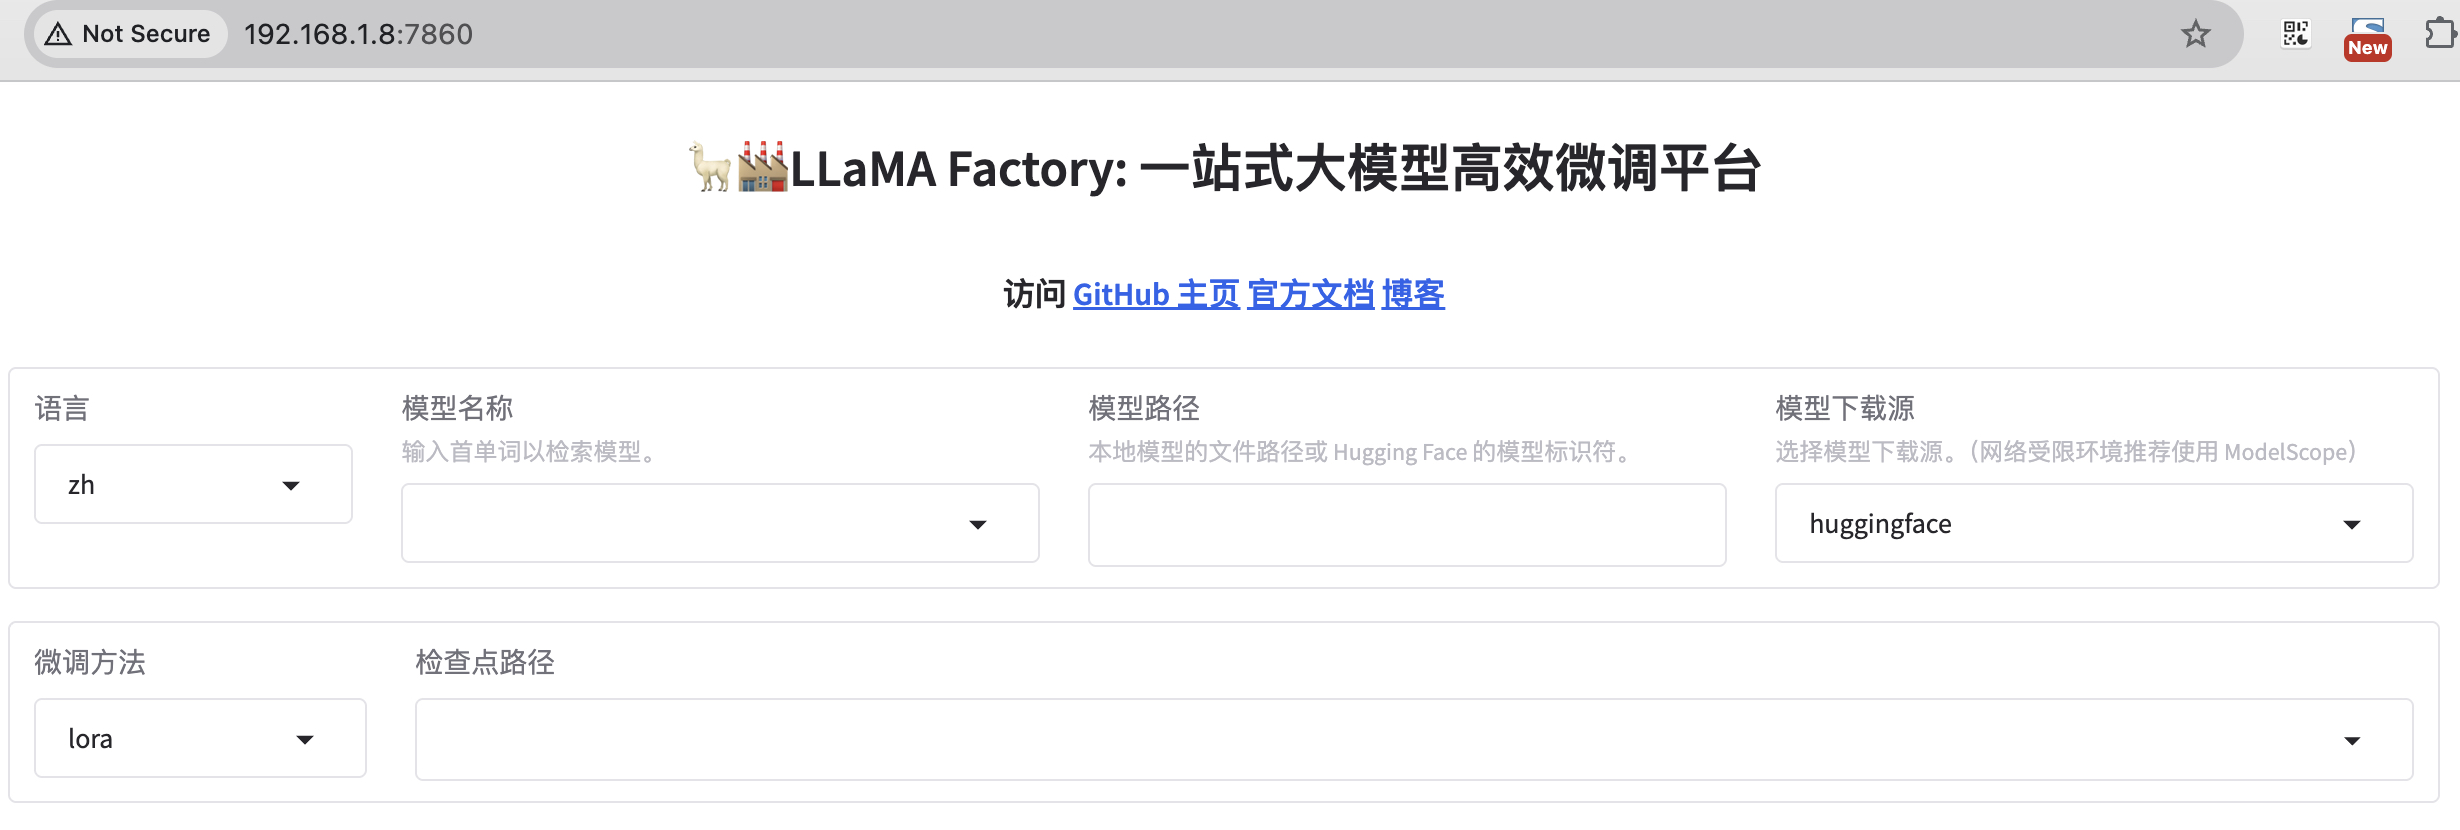
魔搭社区集成了相当丰富的中文数据集,有很多分类可以选。
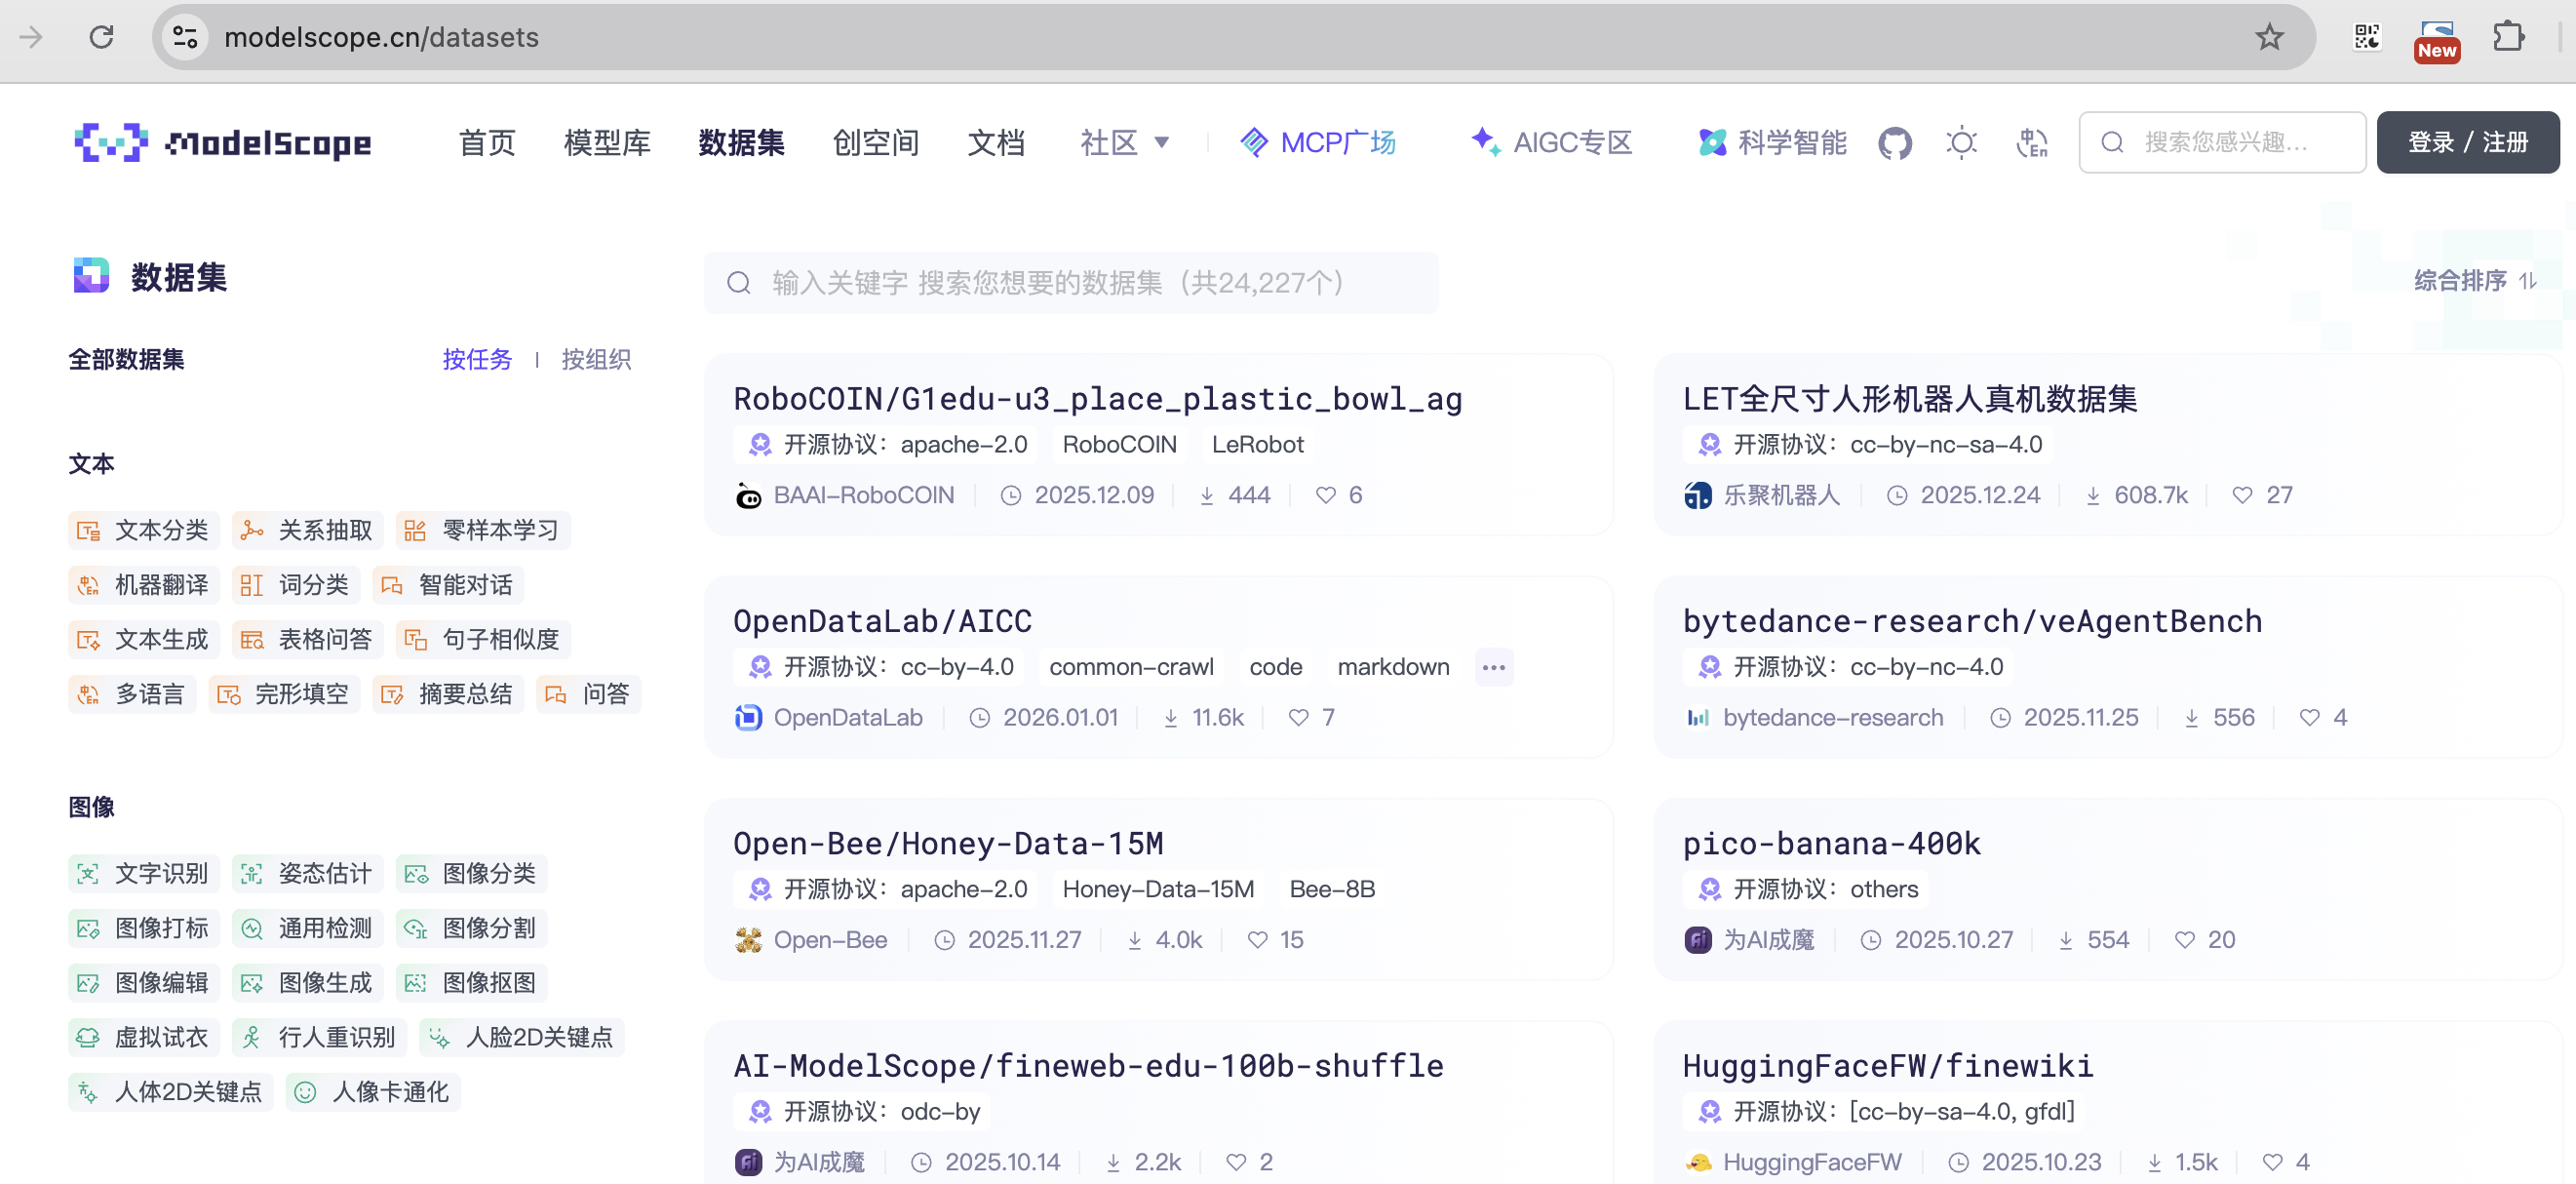
找一个角色扮演的数据集来微调(方便查看效果)。
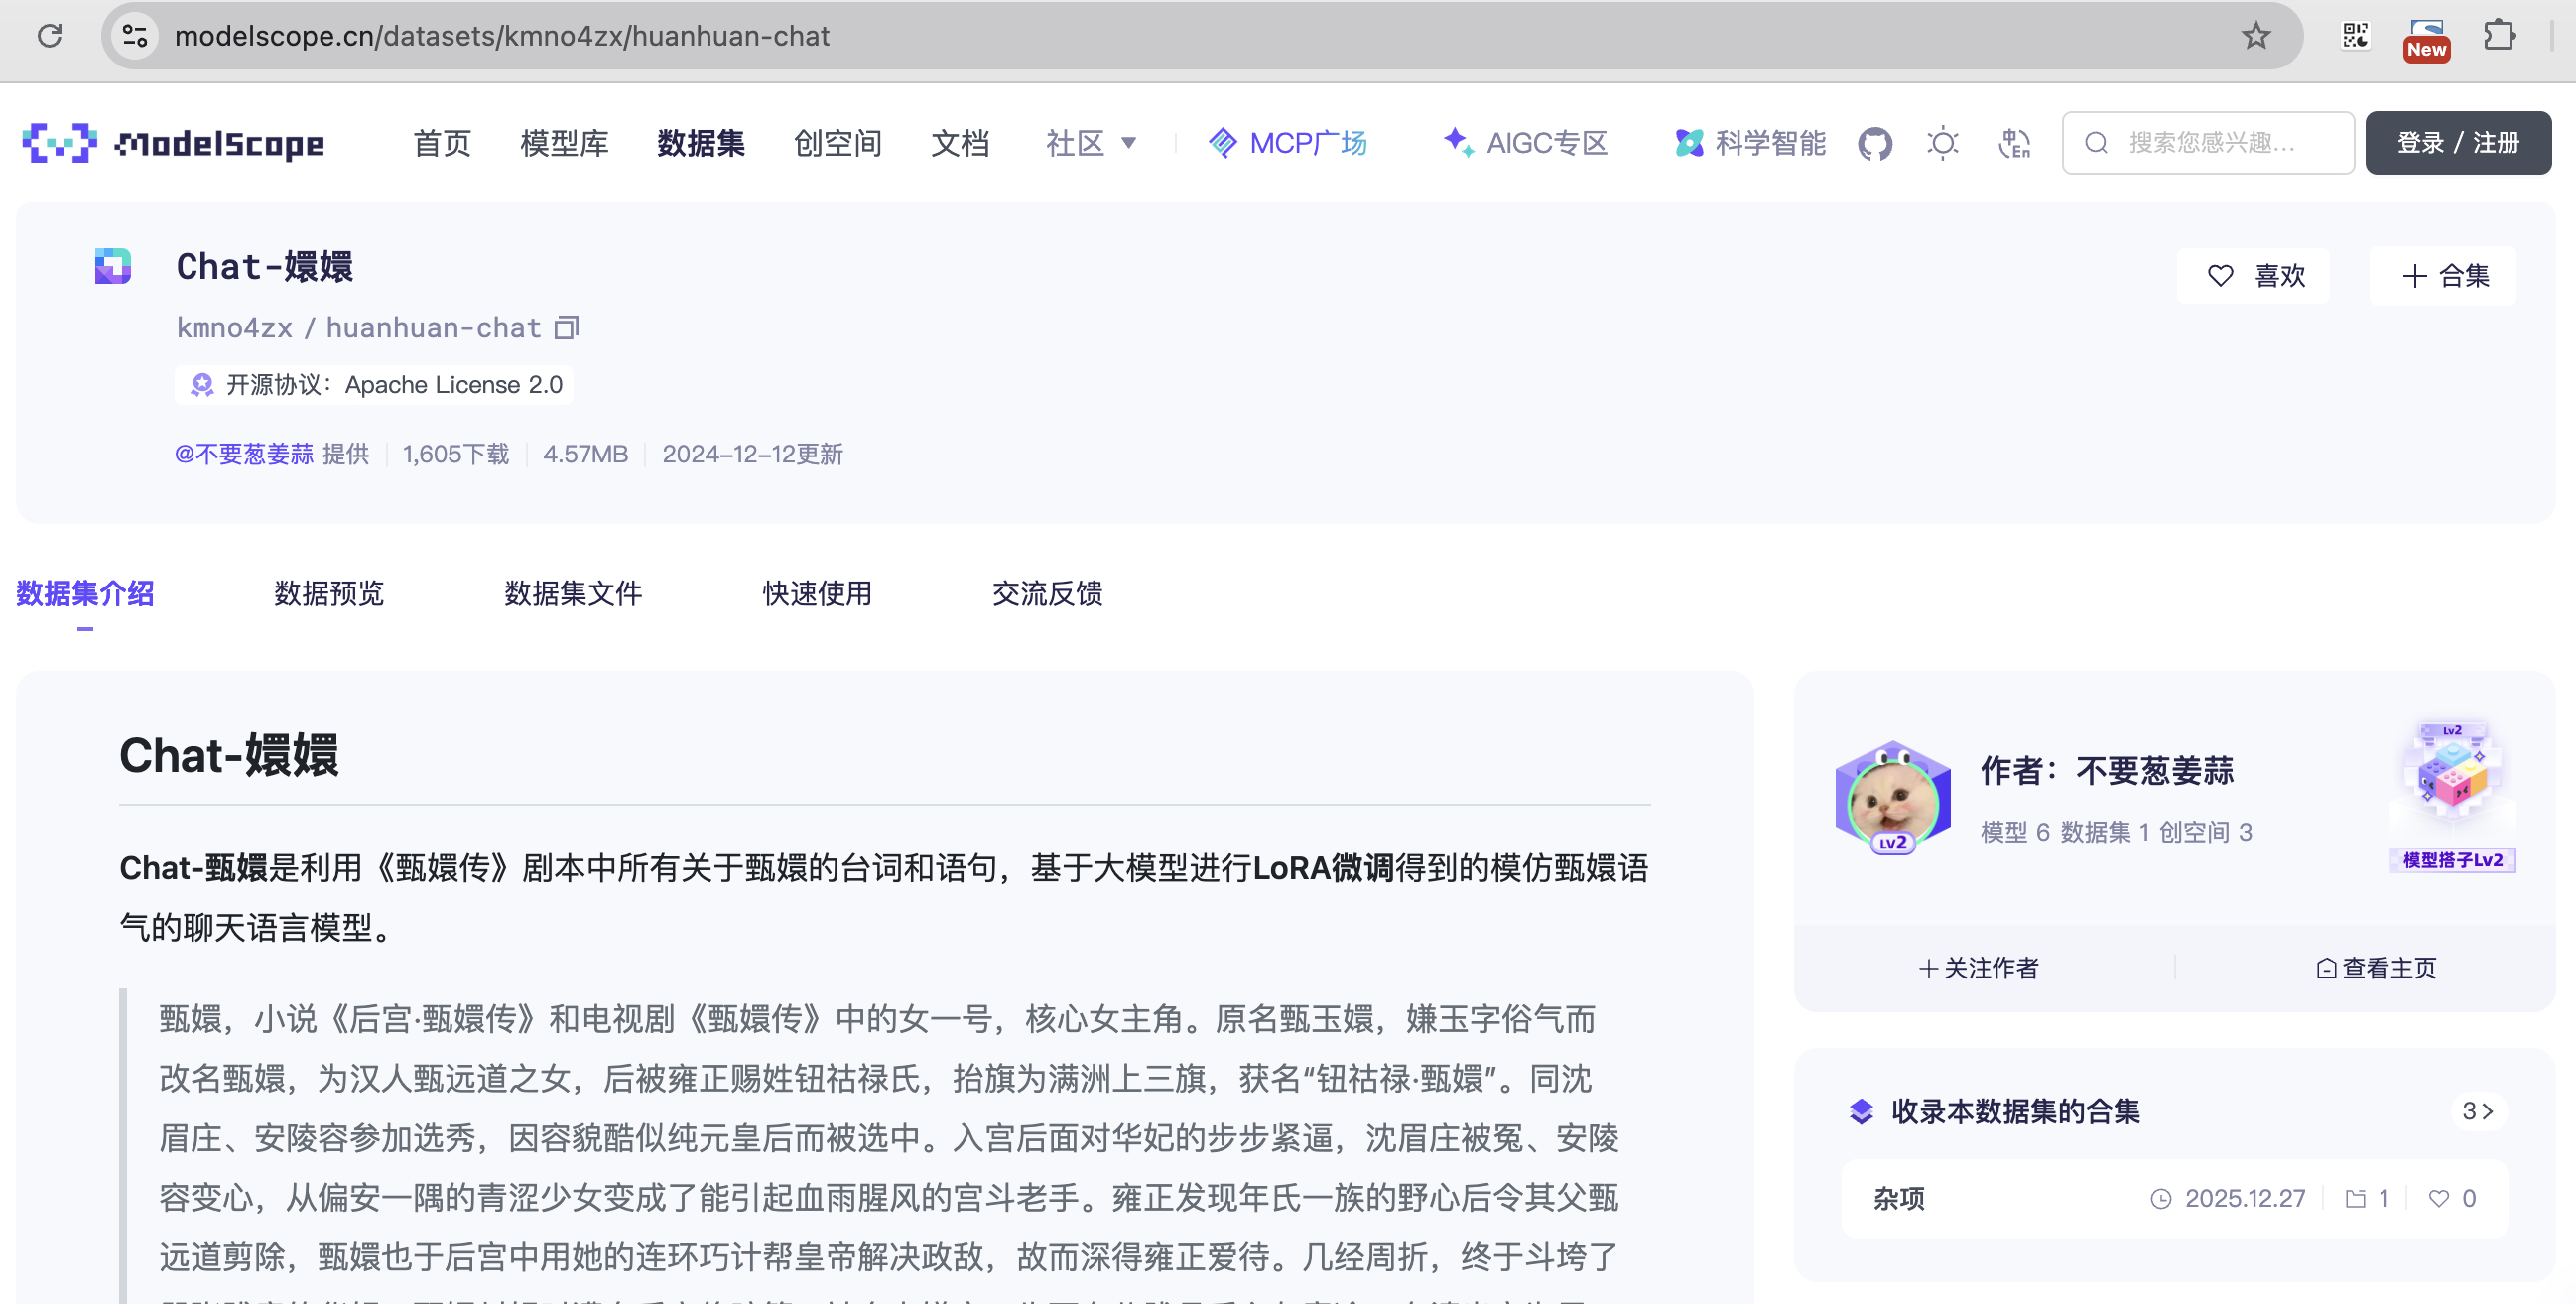
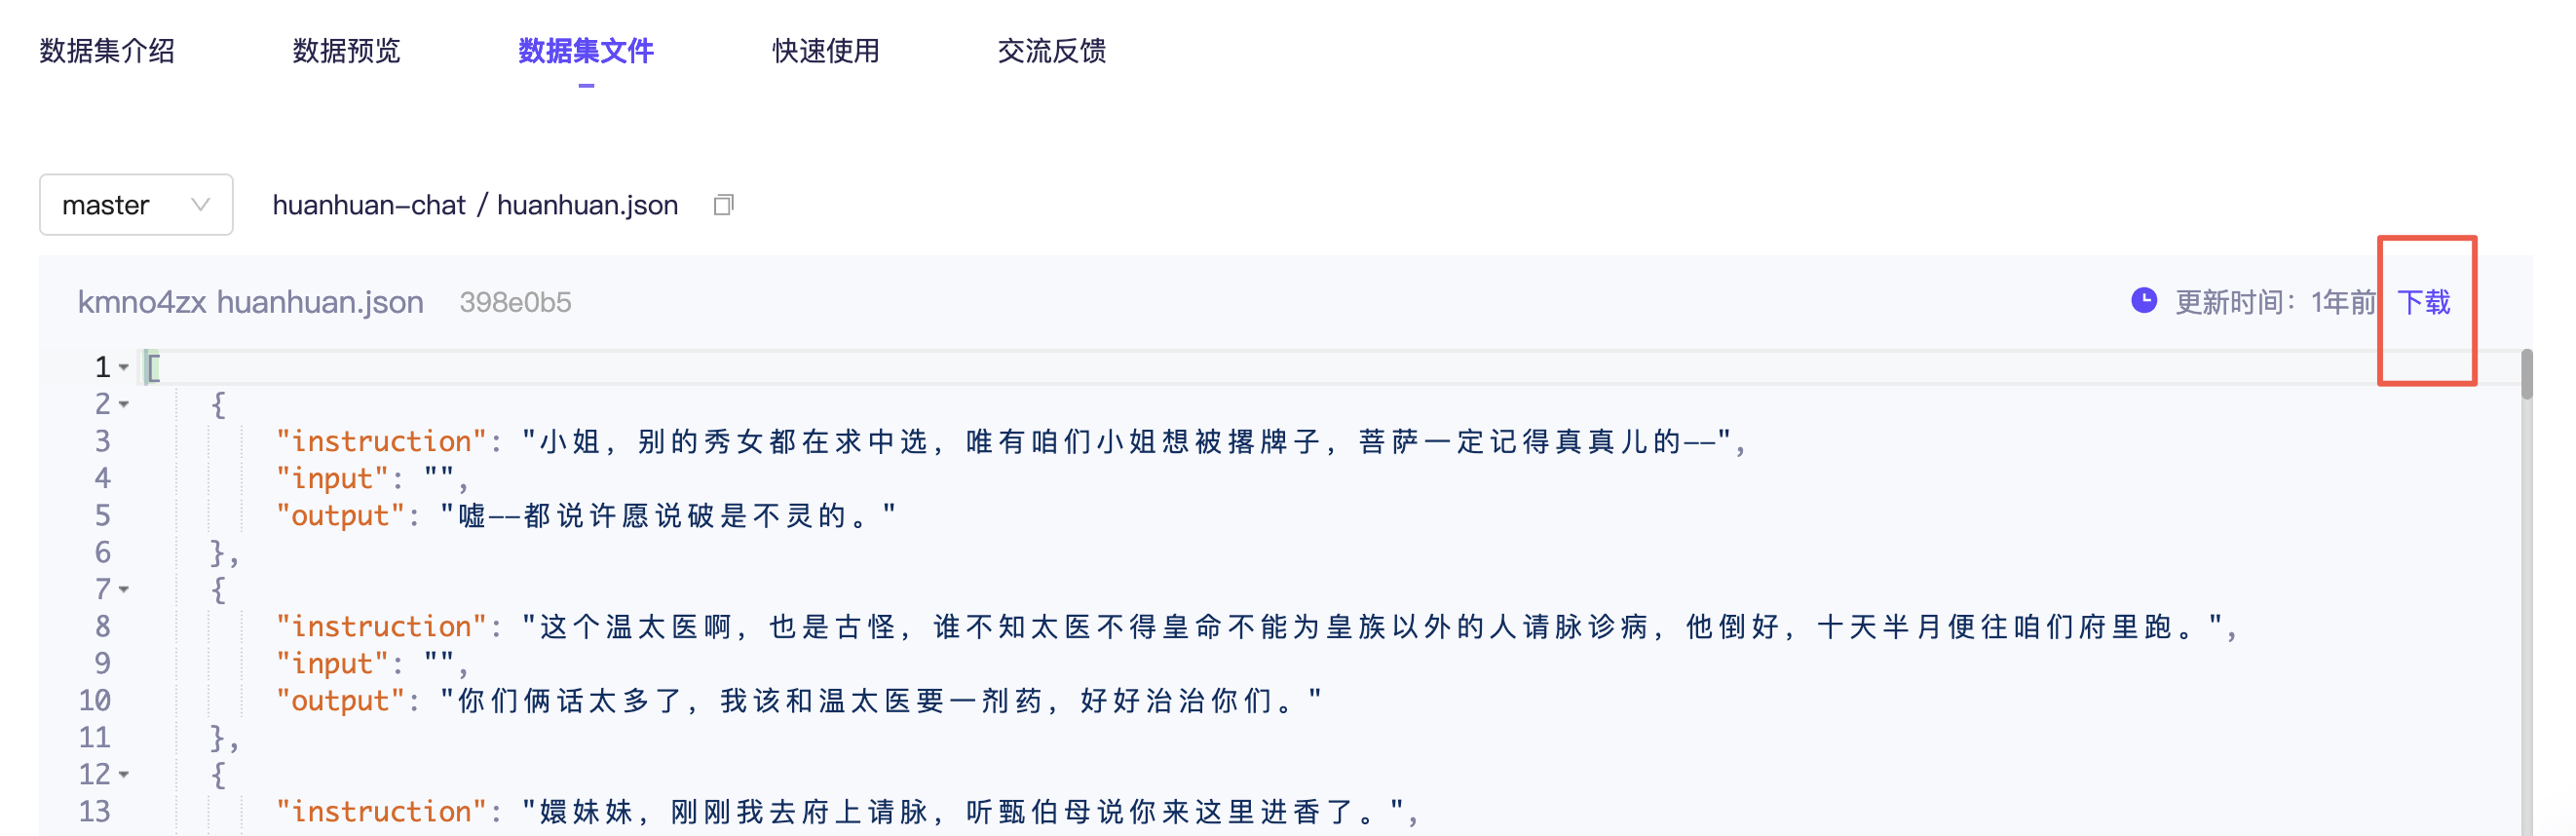
在数据预览这里查看详细数据。
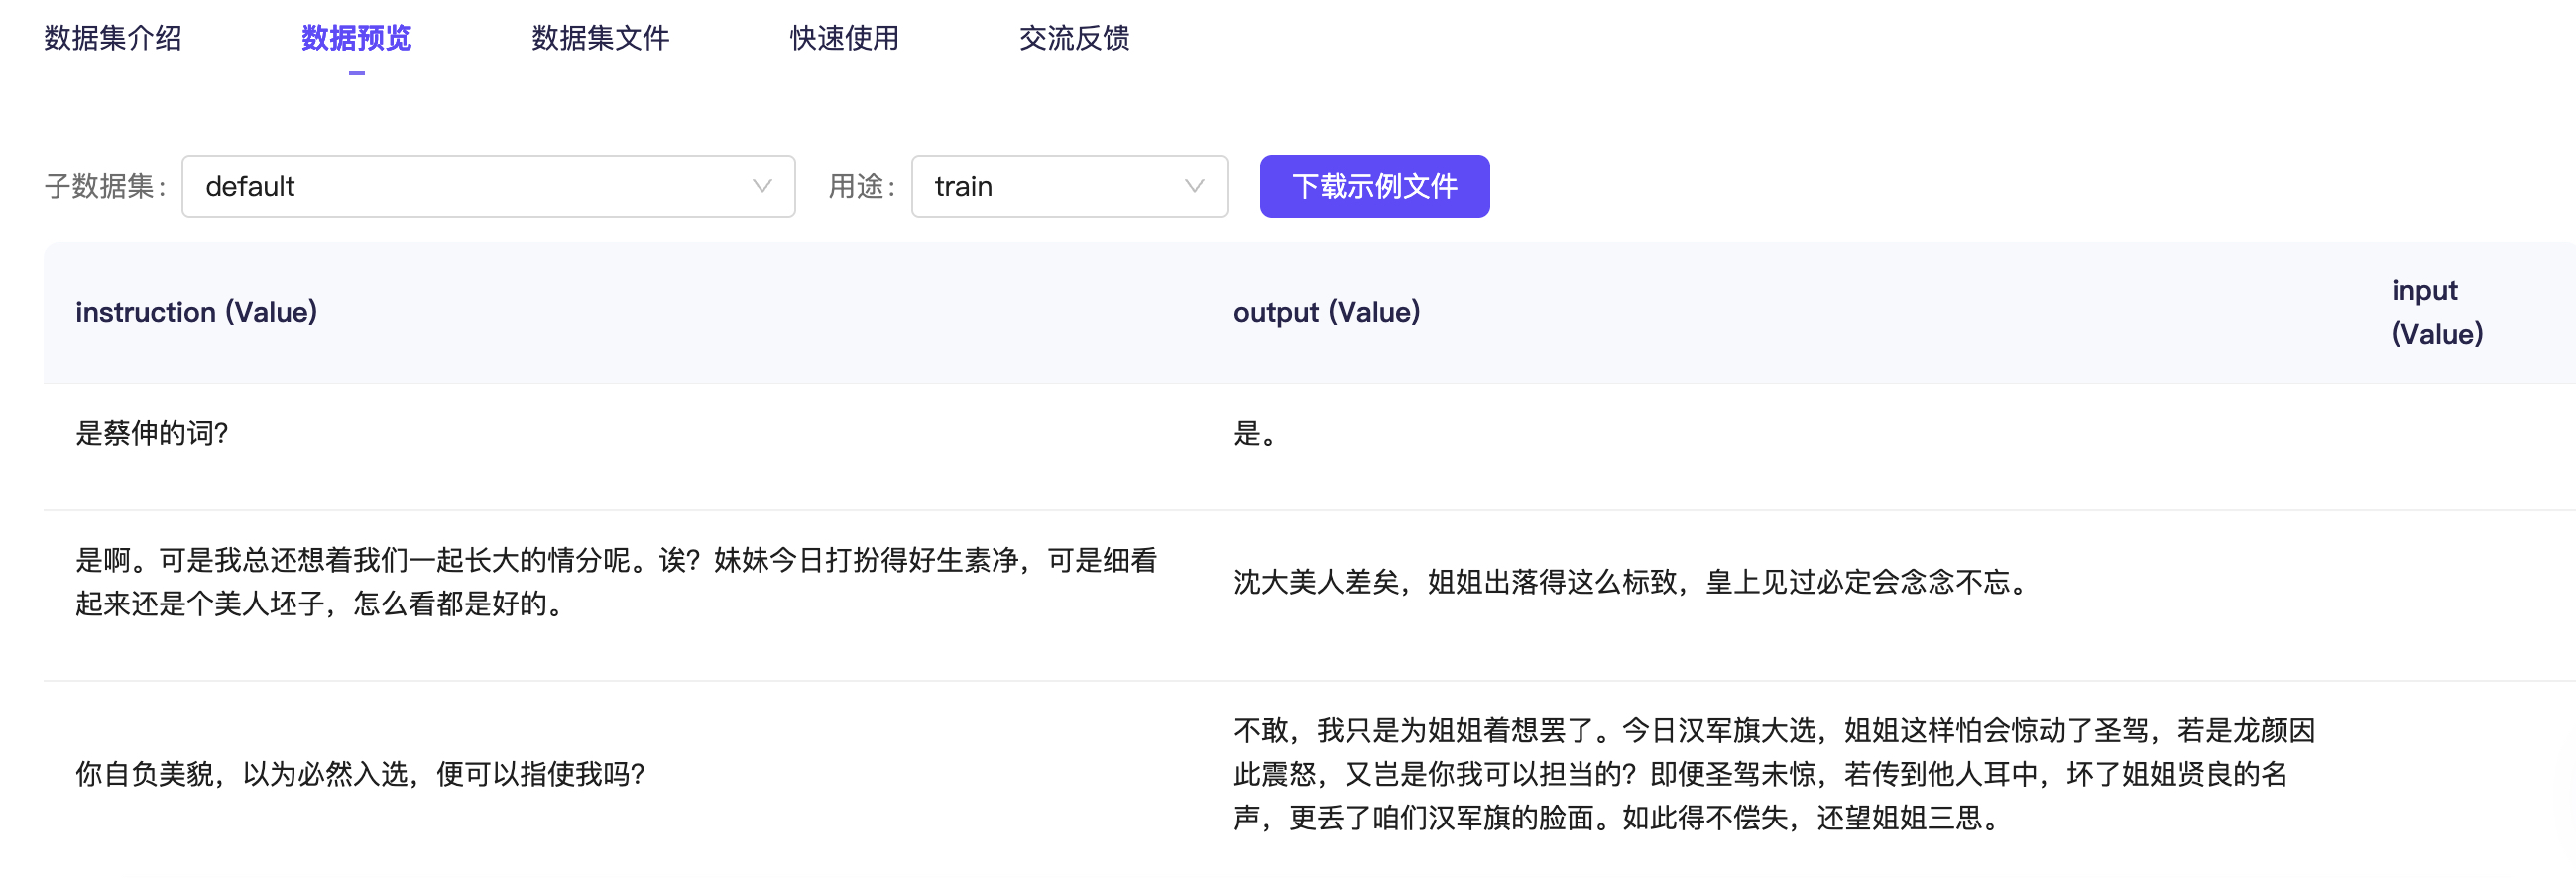
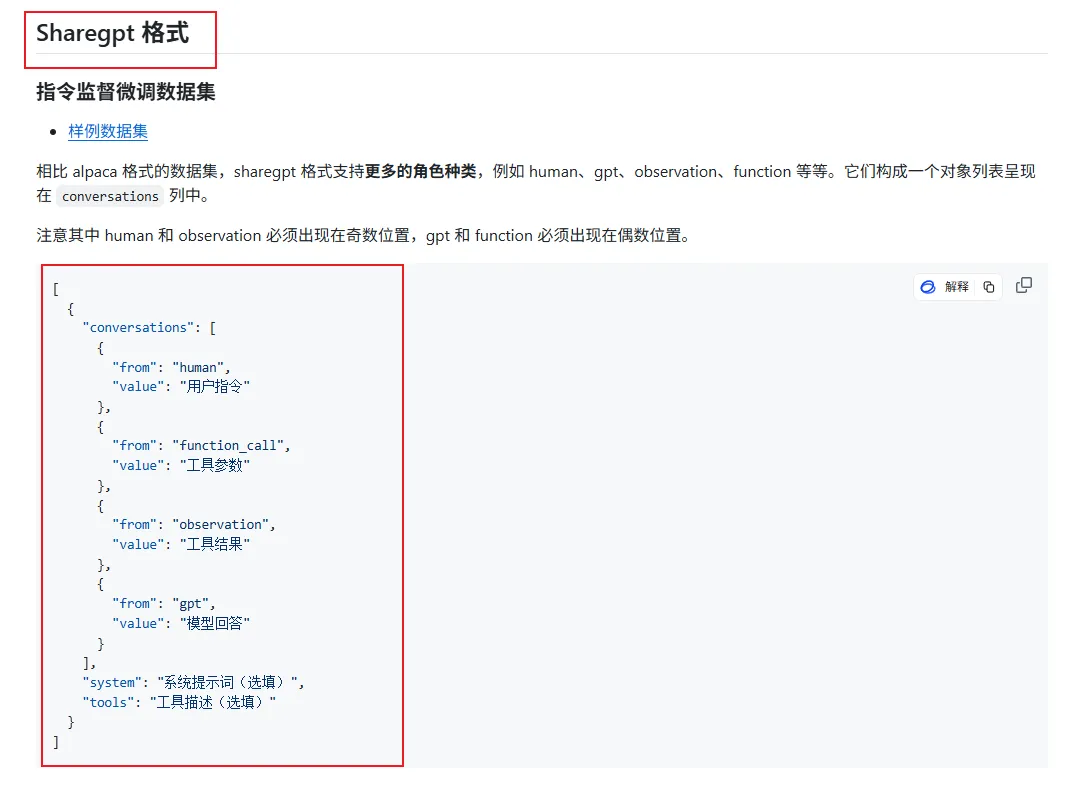
注意,llama-factory 目前只支持两种格式的数据集:Alpaca 和 Sharegpt 格式。
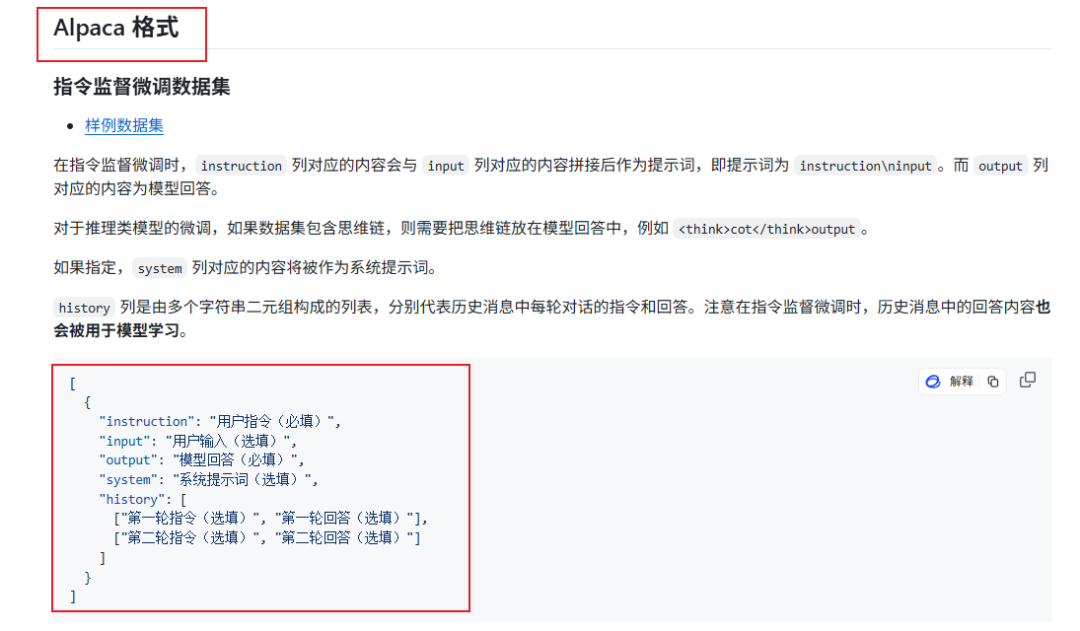
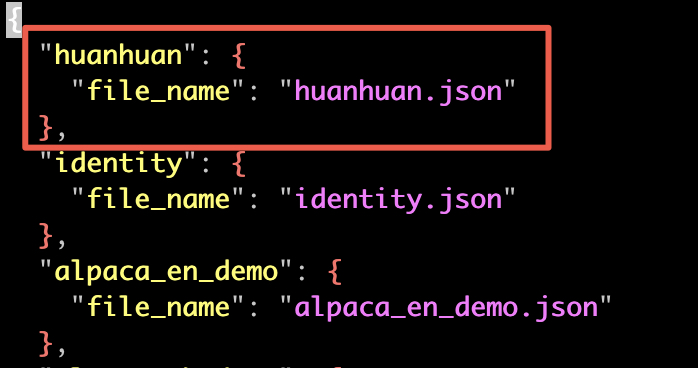
切换到数据集文件这边,打开 huanhuan.json 文件,看到它其实就是 Alpaca 格式的数据集,仅下载这一个文件即可。
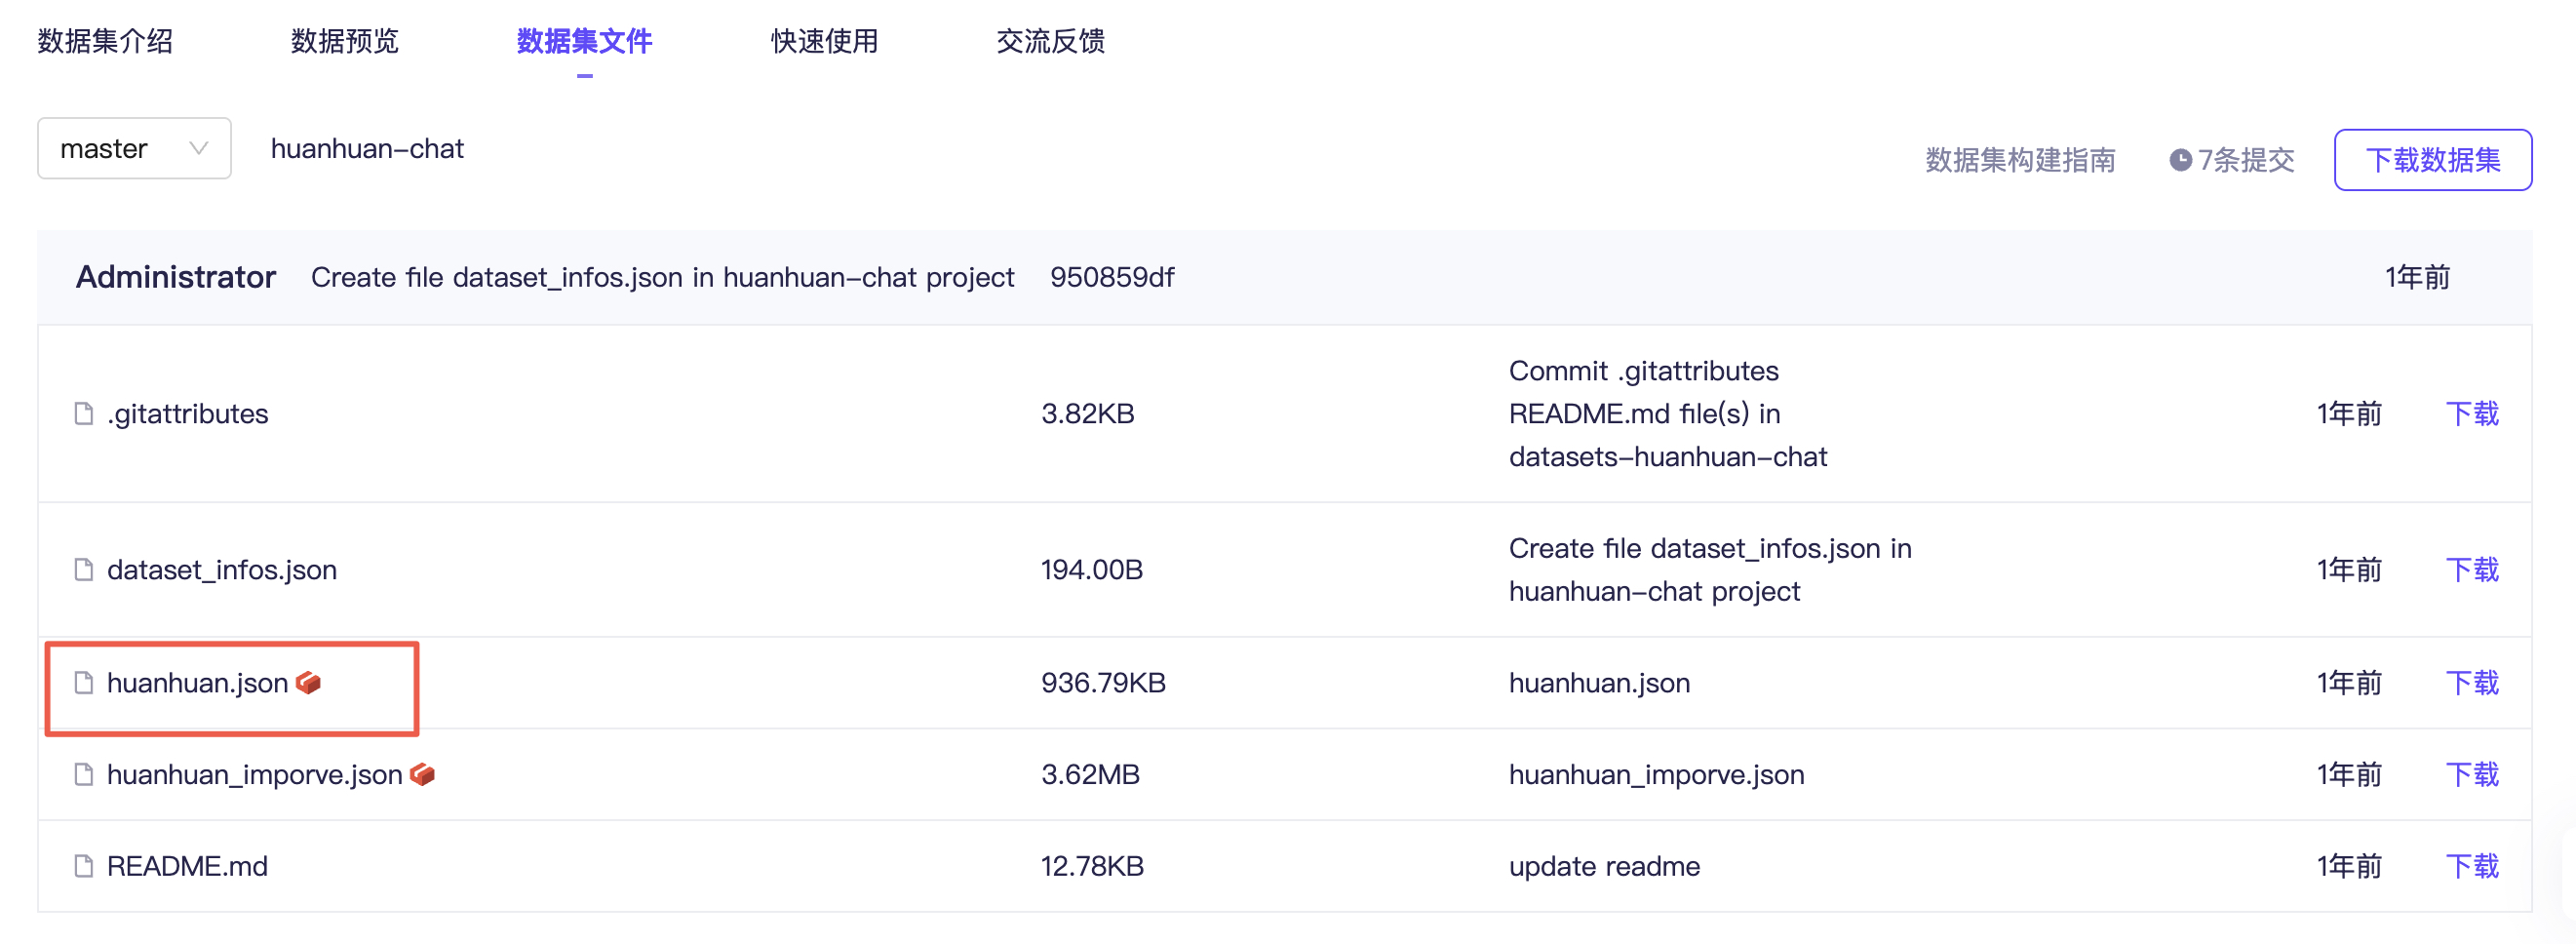
在 llama-factory 添加数据集,不仅要把数据文件放到 data 目录下,还需要在配置文件 dataset_info.json 里面添加一条该数据集的记录。这样,新添加的数据集才能被 llama-factory 识别到。
这里保存之后,webui 那边会实时更新,不需要重启。
执行微调
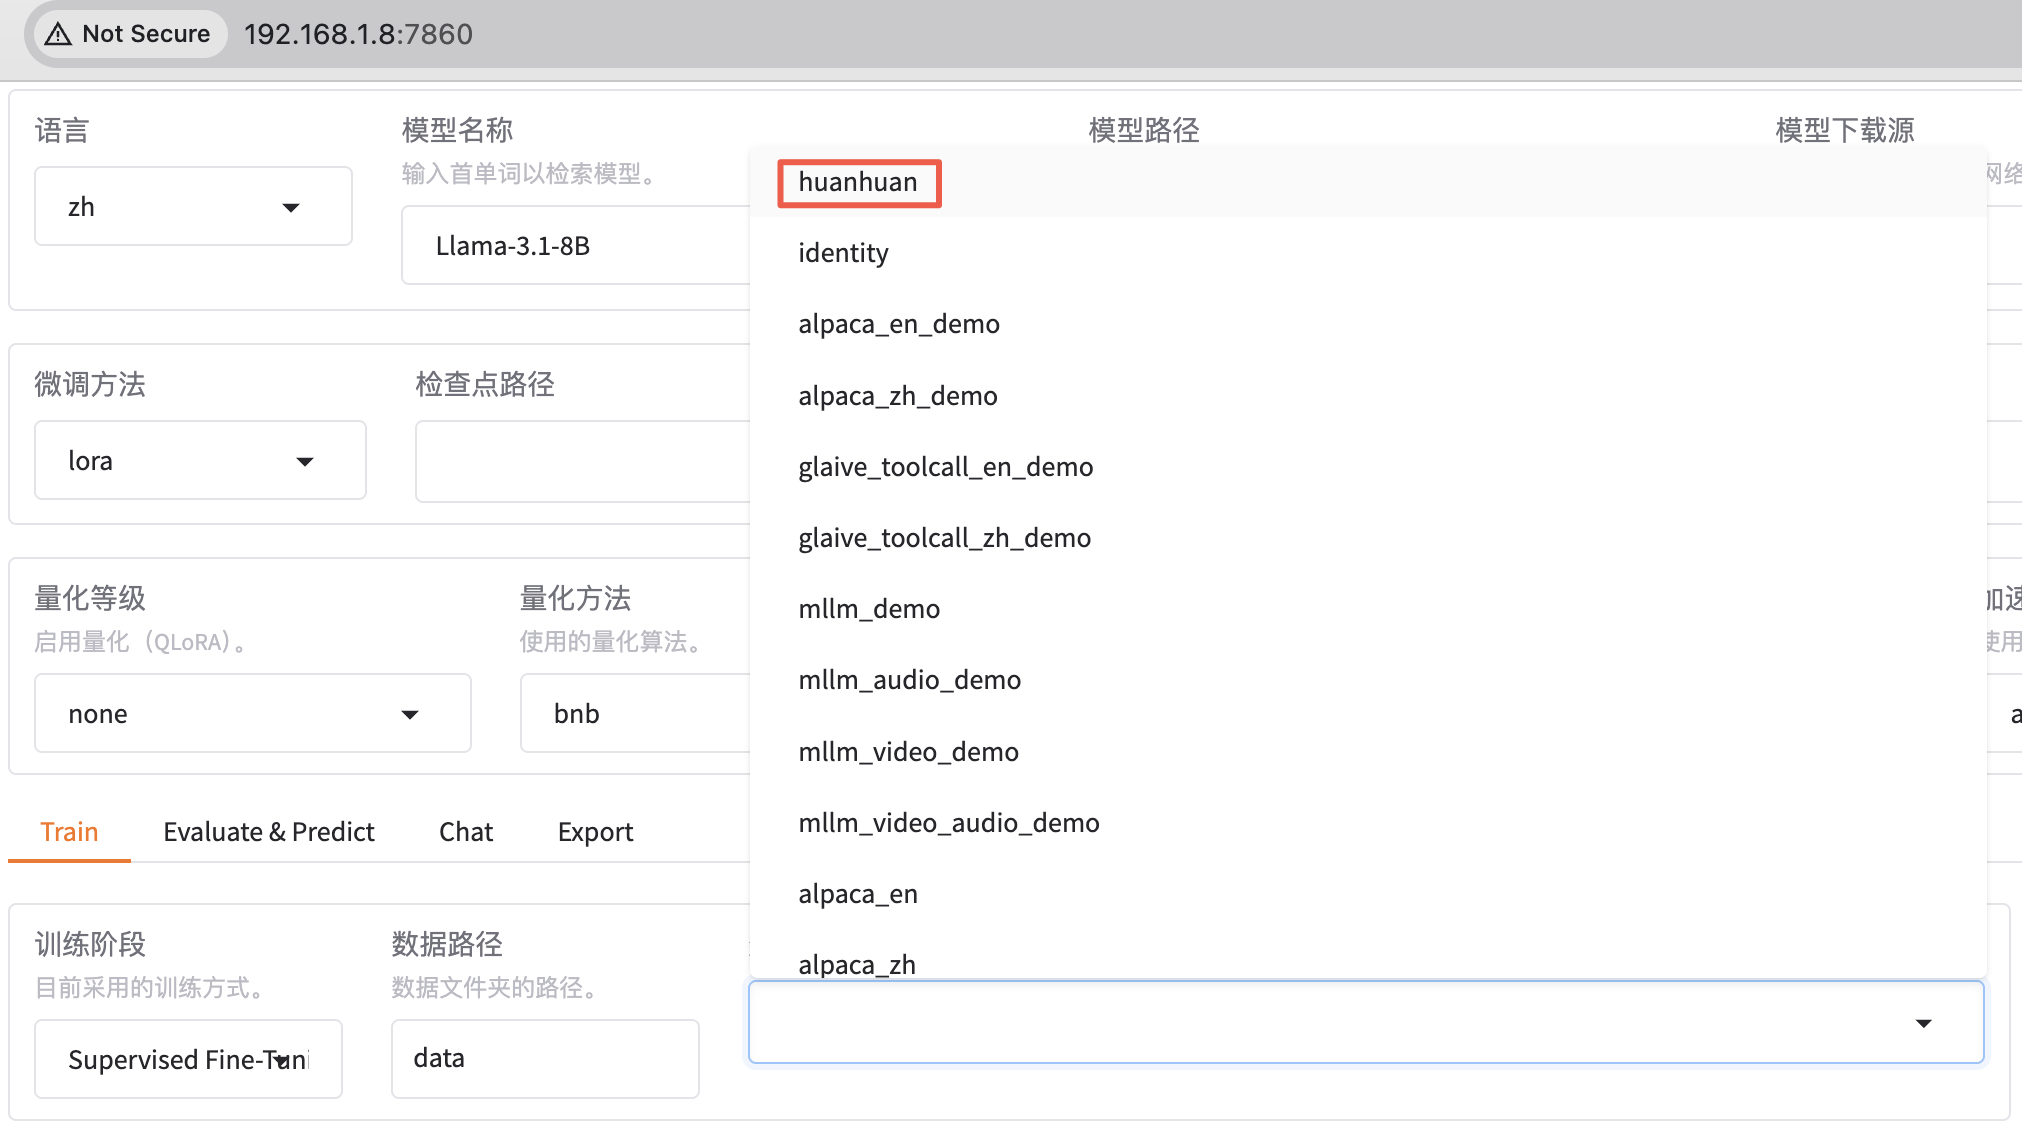
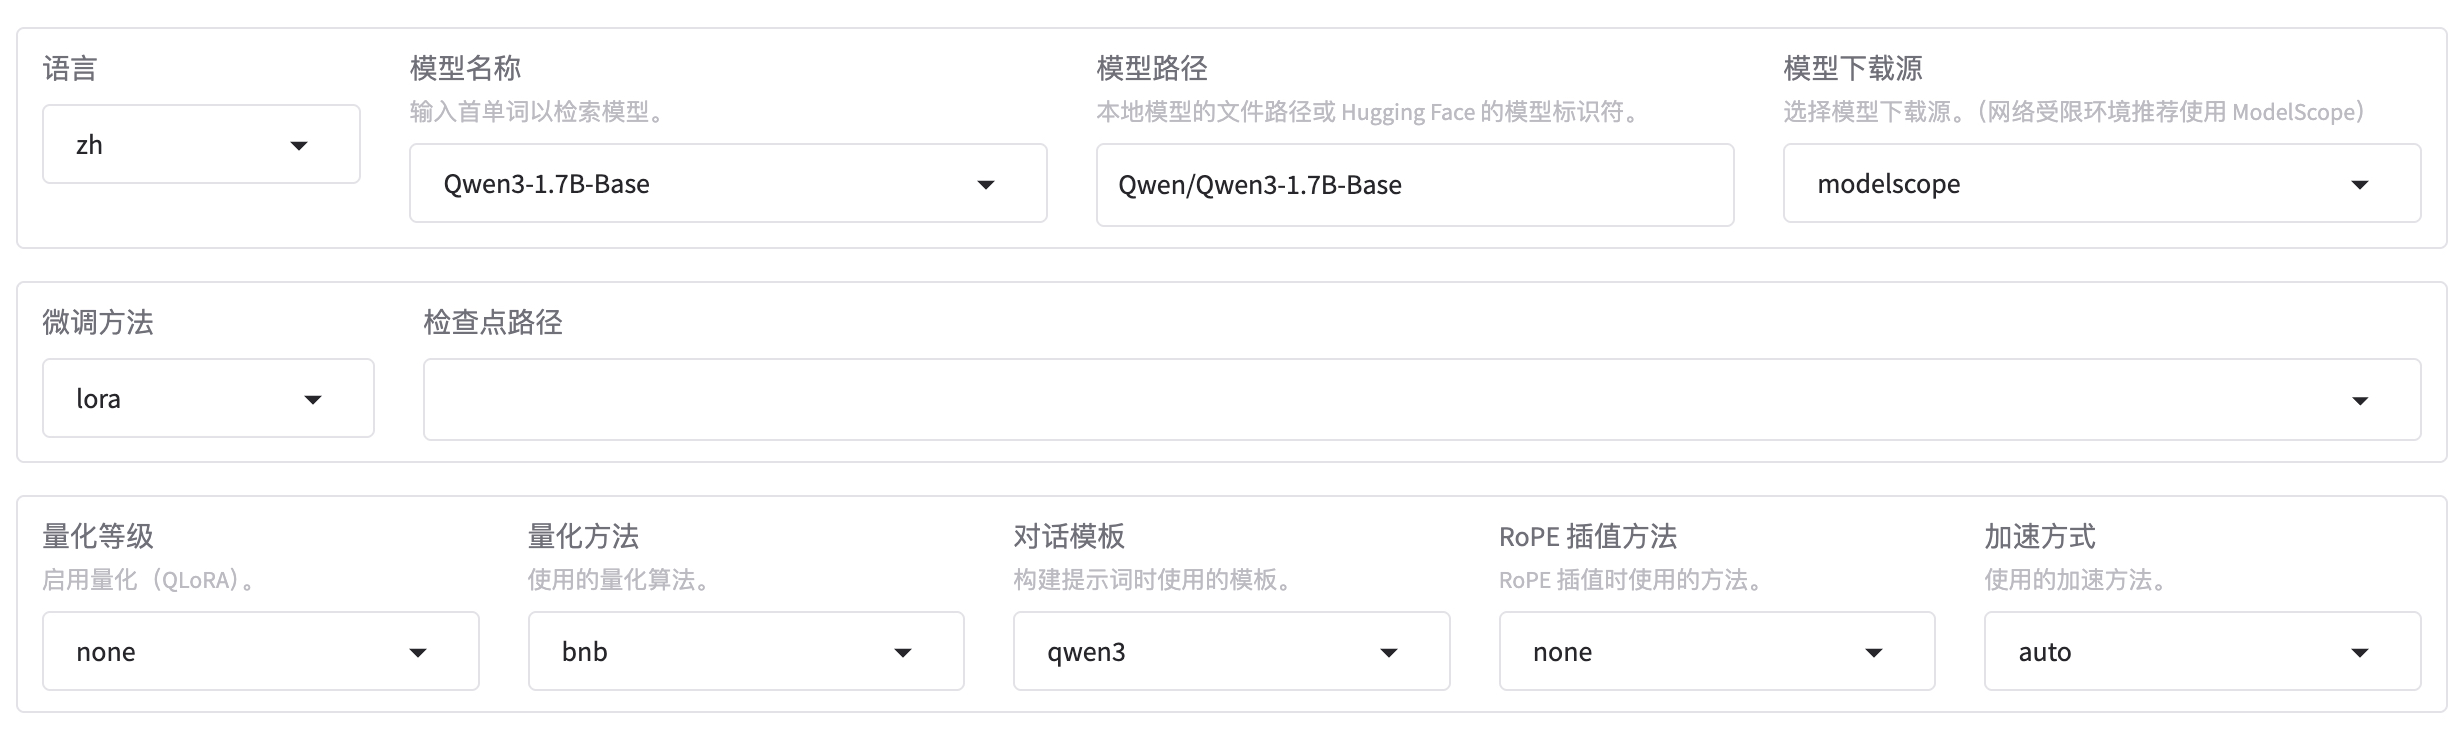
微调 Qwen3-1.7B-Base 基础大模型,方法选用 LoRA。
- Base 基础预训练模型。
- 没有经过指令微调。
- 适合继续预训练或指令微调。
- Base 通常情况下输出质量不如 Instruct 版本。
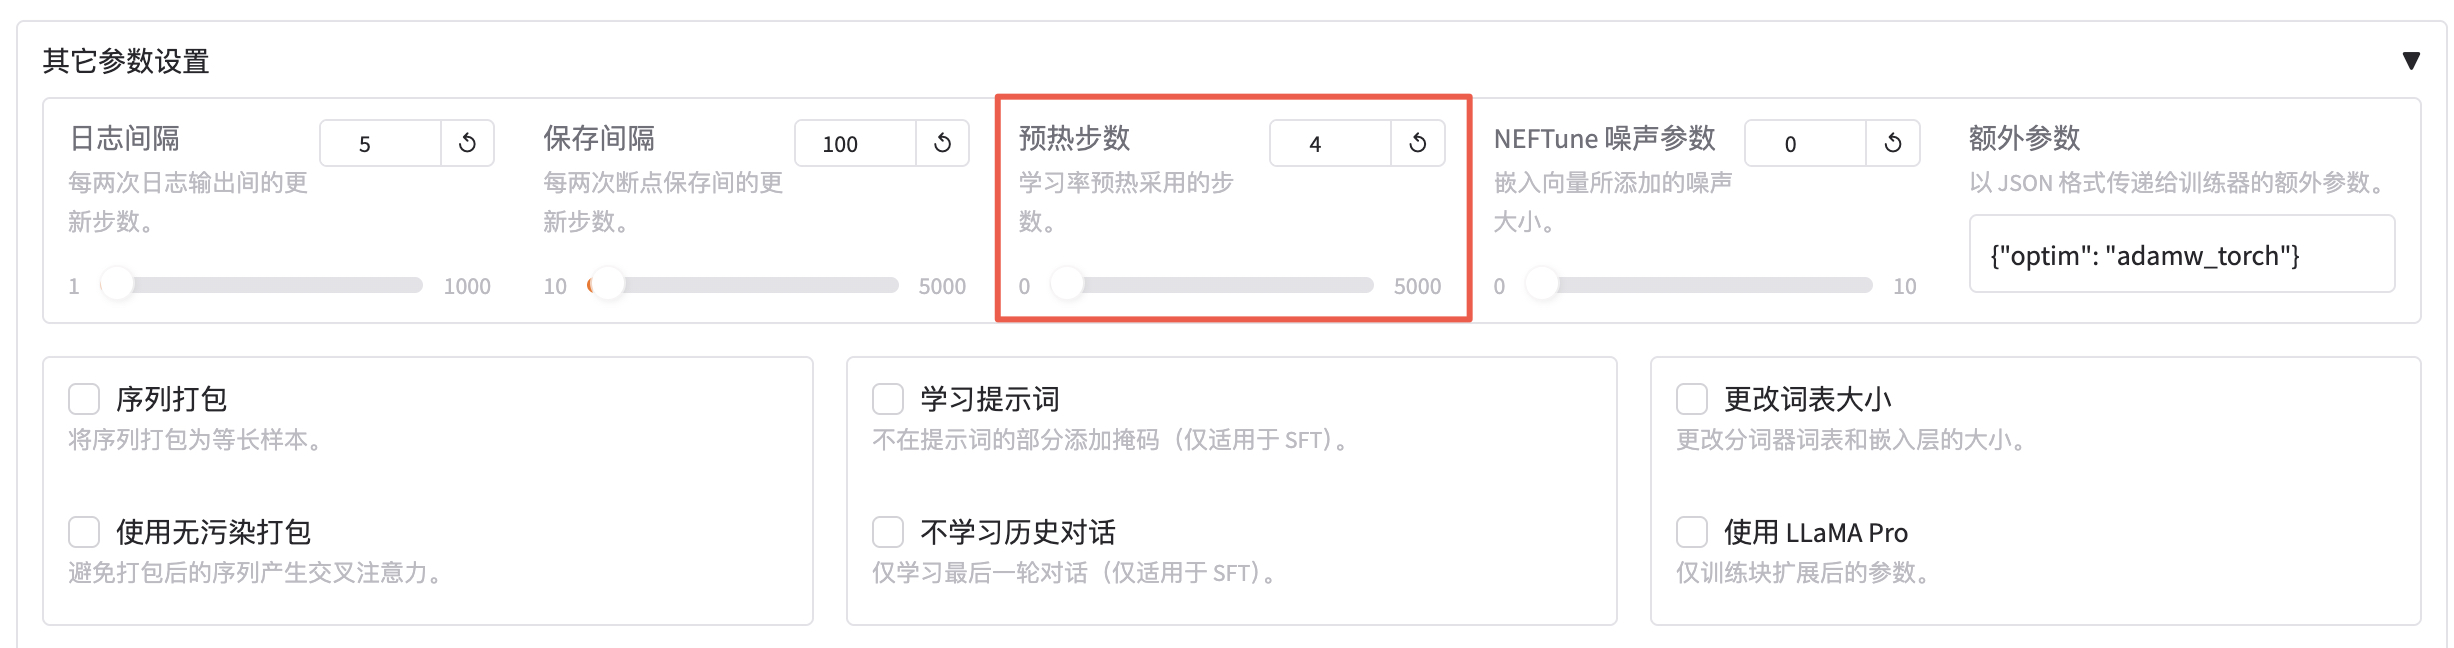
使用 huanhuan 数据集,先训练 1 轮看看效果,如果效果不理想再多训练几轮。由于数据集都是一些短问答,可以把截断长度设置小一点,为 1024(默认是 2048)。梯度累计设置为 4。注意,计算类型选择 BF16,暂不支持 FP4。
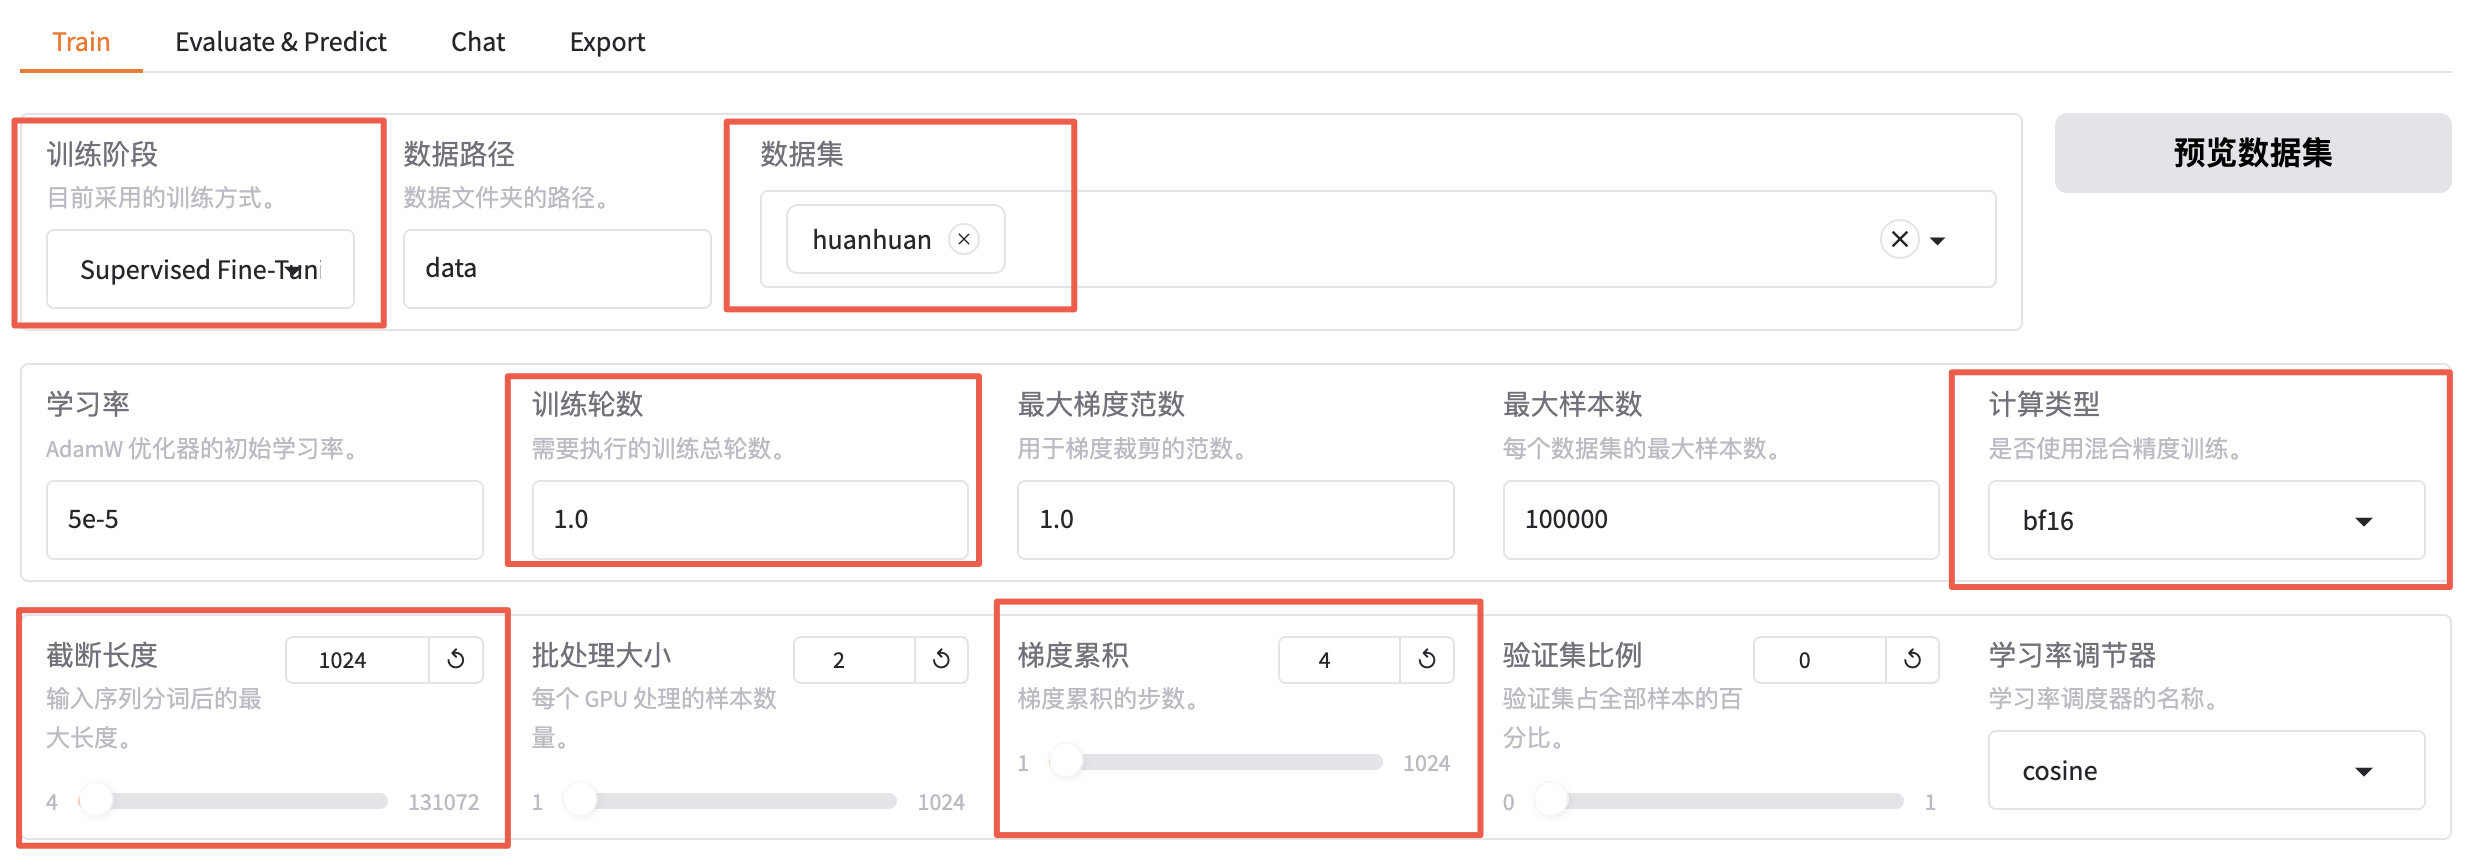
预热步数是学习率预热采用的步数,通常设置范围在2-8之间,这里配置为 4。
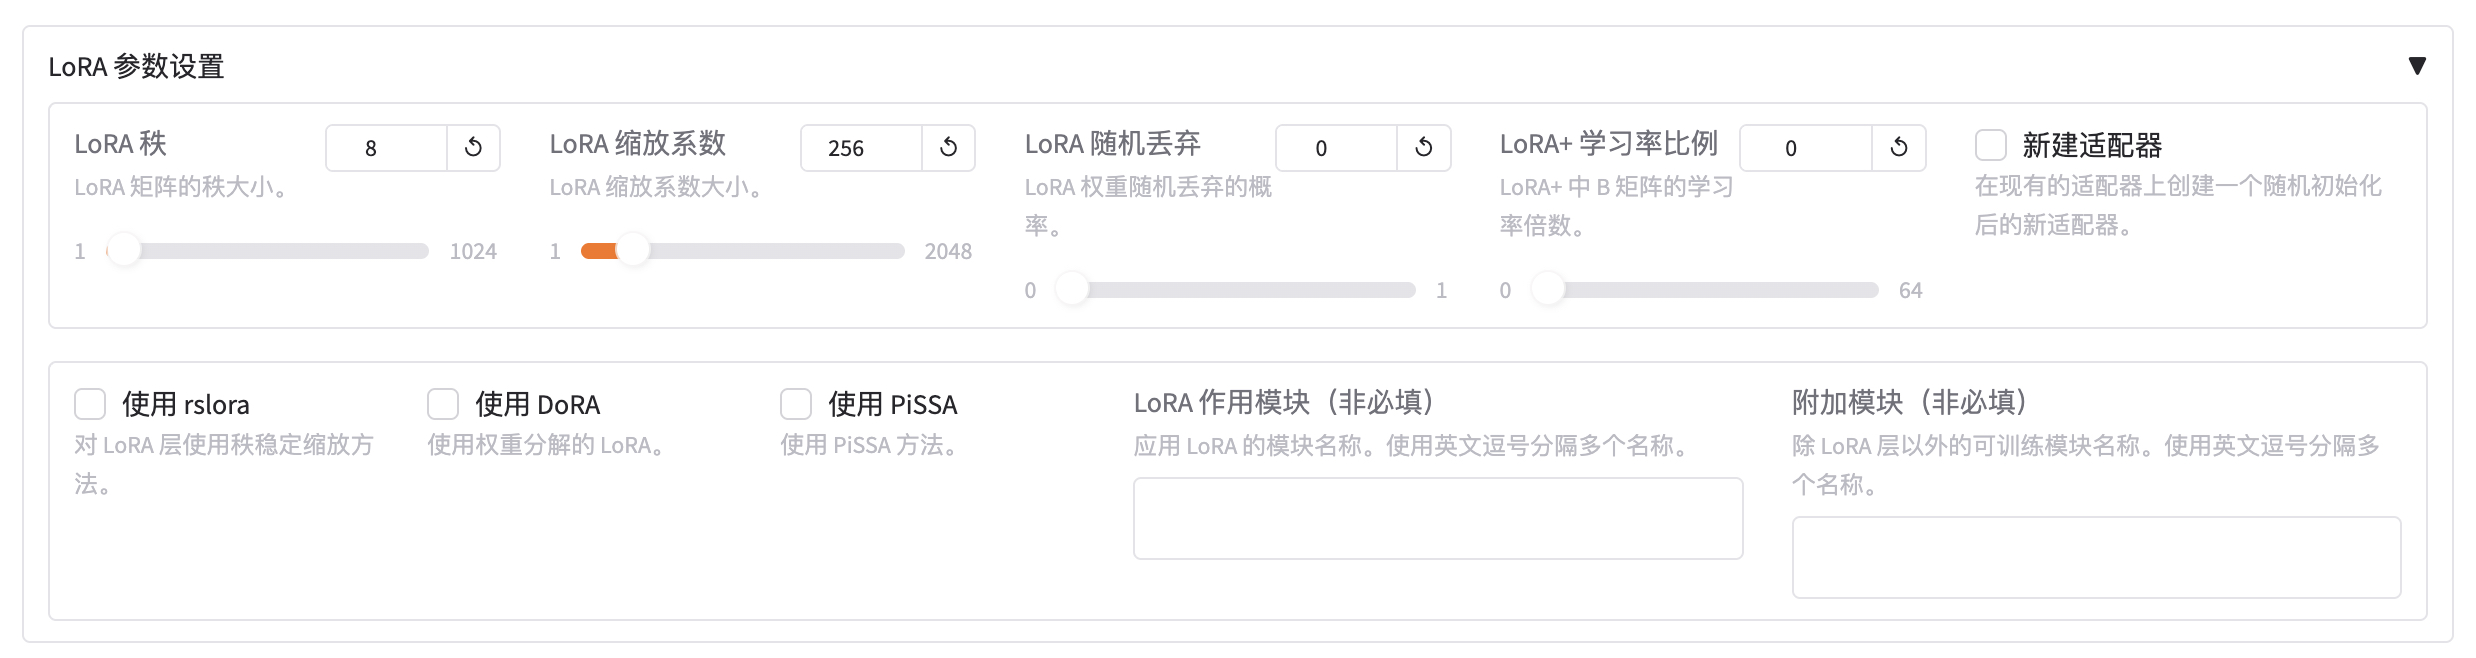
继续设置 LoRA 微调参数:
- LoRA 秩:可以看作学习的广度,越大学习的东西越多,微调之后的效果可能会越好,但是也不是越大越好。太大的话容易造成过拟合(书呆子,照本宣科,不知变通),这里设置为 8。
- LoRA 缩放系数:可以看作学习强度,越大效果可能会越好,对于一些用于复杂场景的数据集可以设置更大一些,简单场景的数据集可以稍微小一点。这里设置 256。
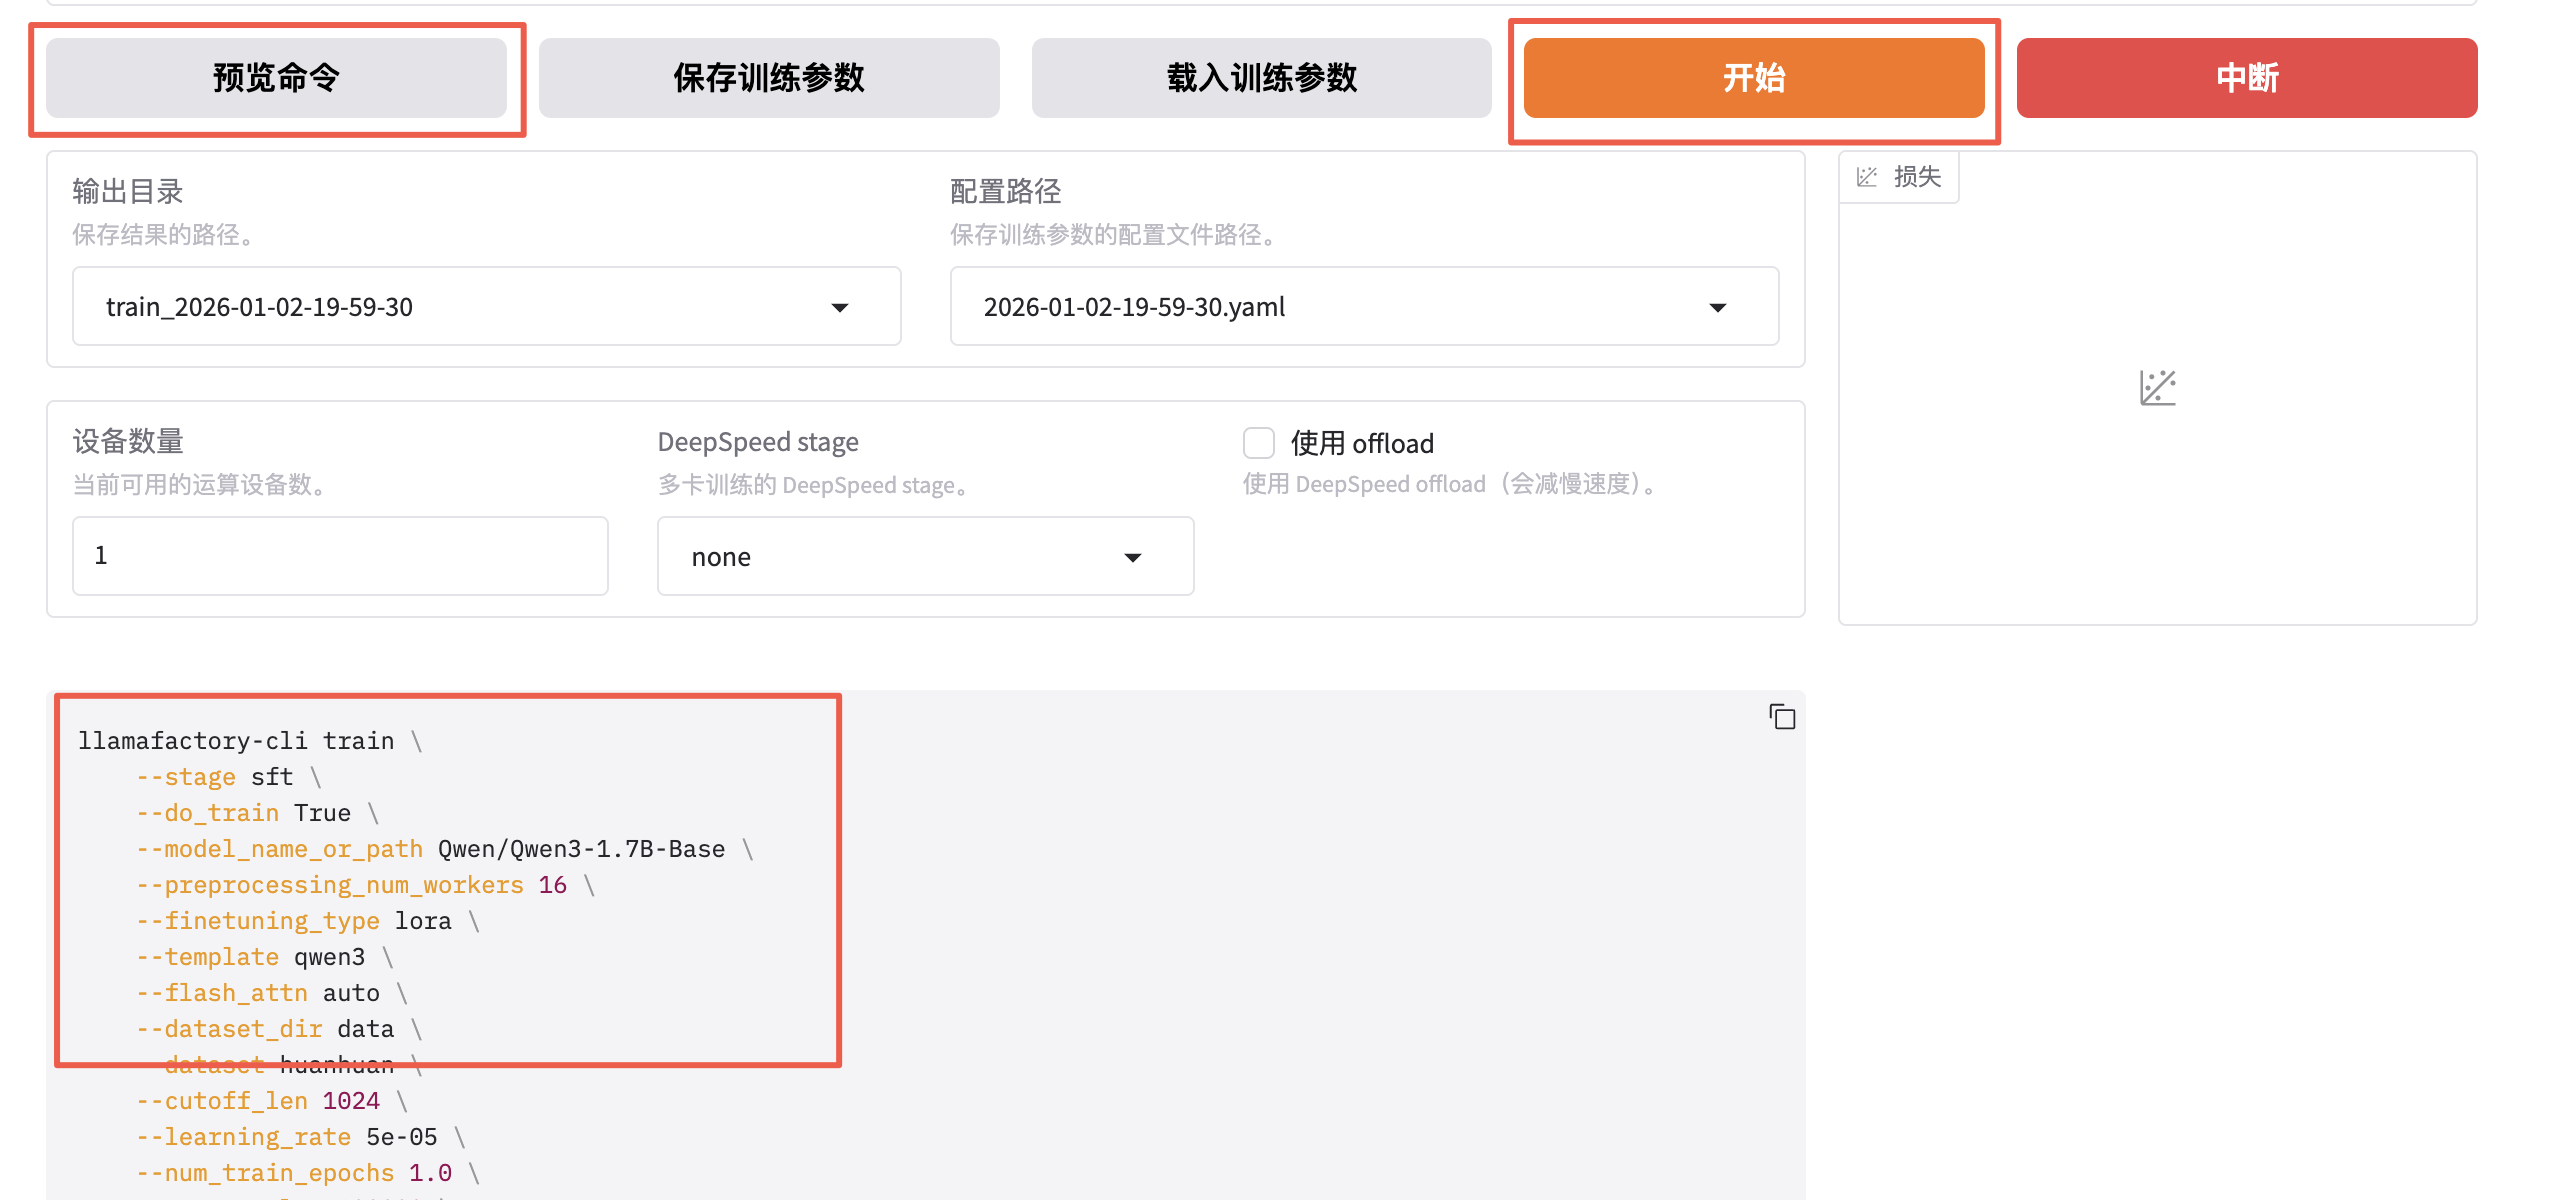
预览训练指令并开始训练。
bash
llamafactory-cli train \
    --stage sft \
    --do_train True \
    --model_name_or_path Qwen/Qwen3-1.7B-Base \
    --preprocessing_num_workers 16 \
    --finetuning_type lora \
    --template qwen3 \
    --flash_attn auto \
    --dataset_dir data \
    --dataset huanhuan \
    --cutoff_len 1024 \
    --learning_rate 5e-05 \
    --num_train_epochs 4.0 \
    --max_samples 100000 \
    --per_device_train_batch_size 2 \
    --gradient_accumulation_steps 4 \
    --lr_scheduler_type cosine \
    --max_grad_norm 1.0 \
    --logging_steps 5 \
    --save_steps 100 \
    --warmup_steps 4 \
    --packing False \
    --enable_thinking True \
    --report_to none \
    --output_dir saves/Qwen3-1.7B-Base/lora/train_2026-01-02-06-40-31 \
    --bf16 True \
    --plot_loss True \
    --trust_remote_code True \
    --ddp_timeout 180000000 \
    --include_num_input_tokens_seen True \
    --optim adamw_torch \
    --adapter_name_or_path saves/Qwen3-1.7B-Base/lora/train_2026-01-02-06-01-20 \
    --lora_rank 8 \
    --lora_alpha 256 \
    --lora_dropout 0 \
--lora_target all- stage:指示当前训练的阶段,枚举值 sft、pt、rm、ppo 等,这里我们是有监督指令微调,所以是 sft。
- do_train:是否是训练模式。
- dataset:使用的数据集。
- dataset_dir:数据集所在目录,这里是 data。
- finetuning_type:微调训练的类型,枚举值 lora、full、freeze 等,这里使用 lora。
- output_dir:训练 Checkpoint 保存的位置。
- cutoff_len:训练数据集的长度截断。
- per_device_train_batch_size:每个设备上的 batch size,最小是 1,如果 GPU 显存够大,可以适当增加。
- bf16:训练数据精度格式。
- max_samples:每个数据集采样多少数据。
- val_size:随机从数据集中抽取多少比例的数据作为验证集。
- logging_steps:定时输出训练日志,包含当前 loss,训练进度等。
- adapter_name_or_path:LoRA 适配器路径。
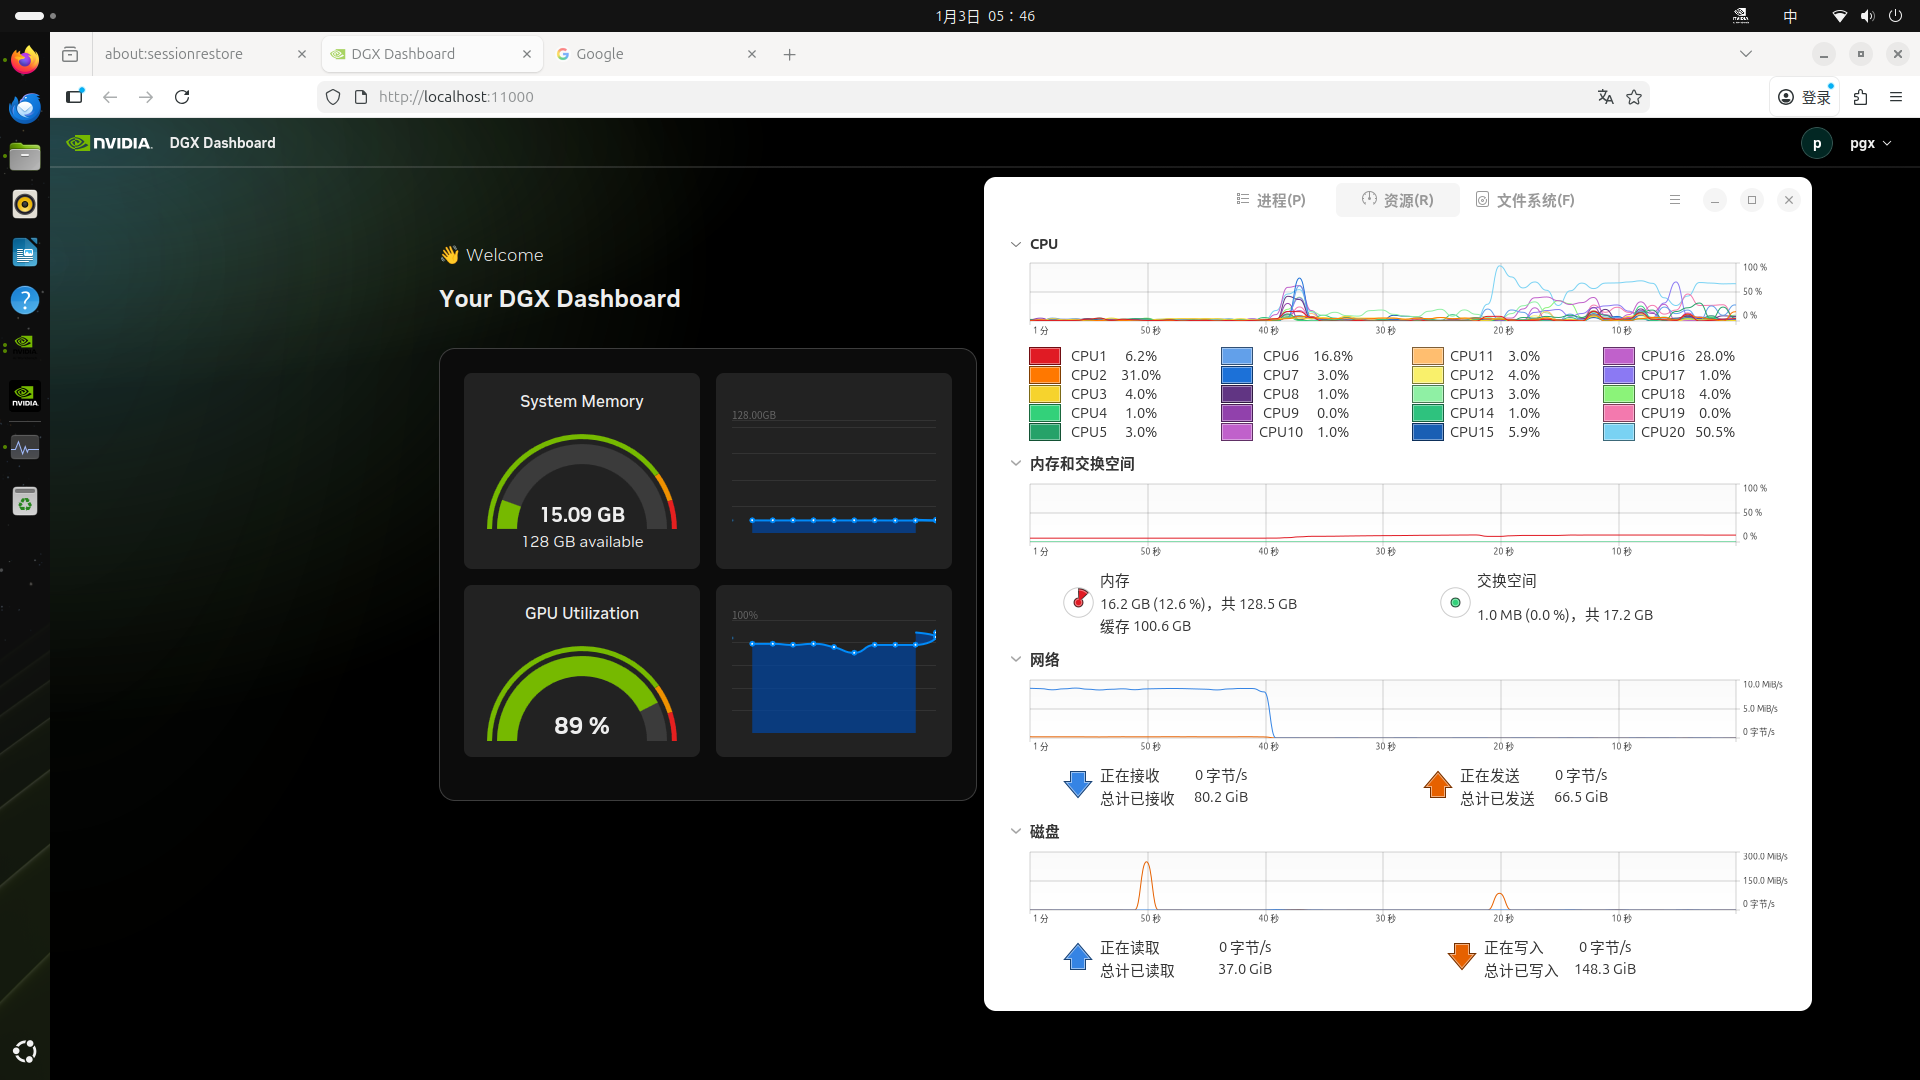
开始之后,会启动一个新的训练进程。
bash
$ ps -ef
UID          PID    PPID  C STIME TTY          TIME CMD
root         437     212  0 19:59 pts/1    00:00:56 /usr/bin/python /usr/local/bin/llamafactory-cli webui
root         502     437  5 21:38 pts/1    00:00:23 /usr/bin/python /usr/local/bin/llamafactory-cli train saves/Qwen3-1.7B-Base/lora/train_2026-01-02-19-59-30/training_args.yam
如果本地没有找到模型,会先自动下载模型:
bash
[INFO|2026-01-02 21:38:43] llamafactory.hparams.parser:465 >> Process rank: 0, world size: 1, device: cuda:0, distributed training: False, compute dtype: torch.bfloat16
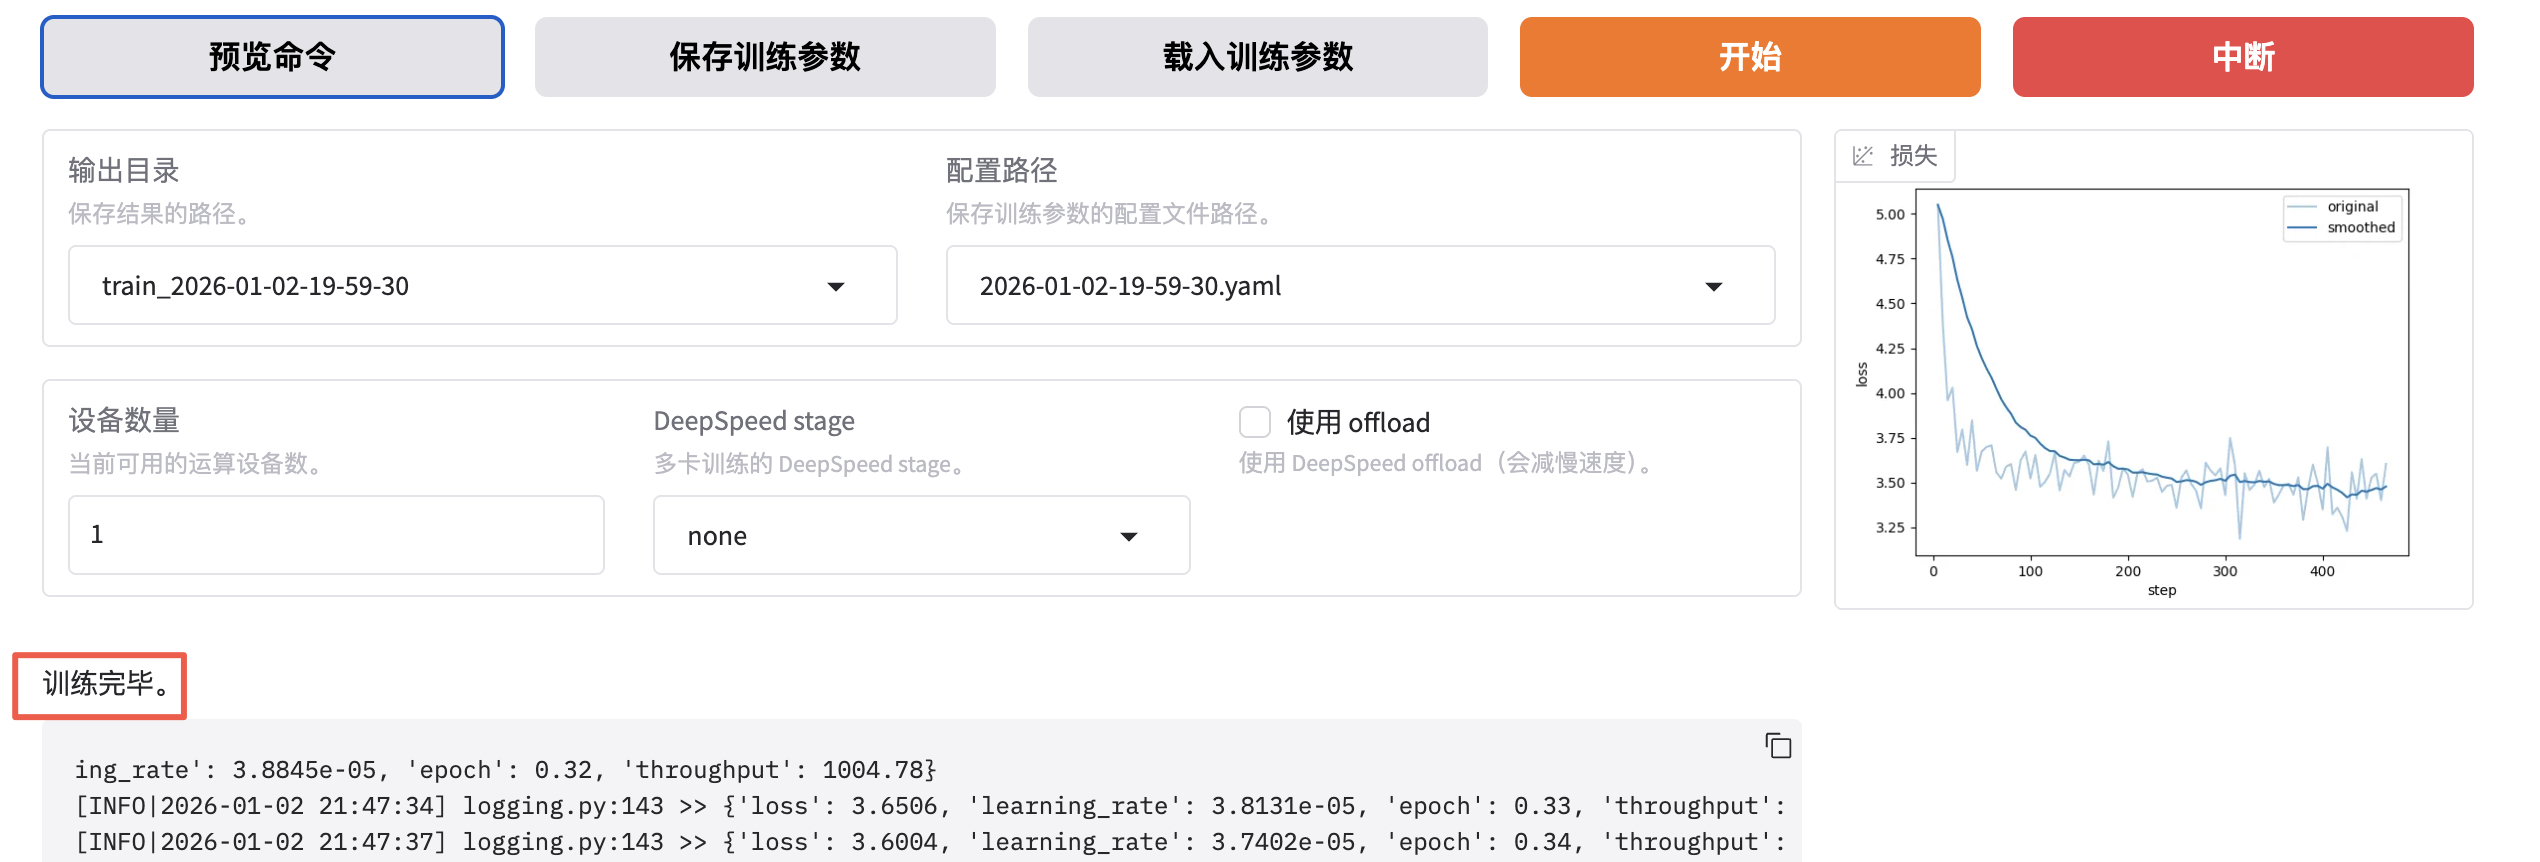
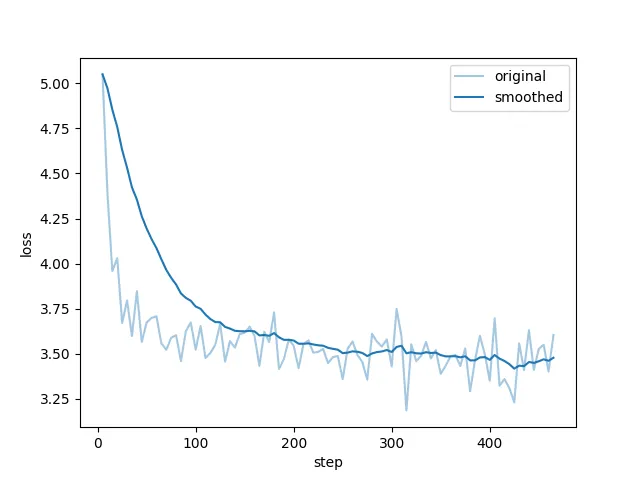
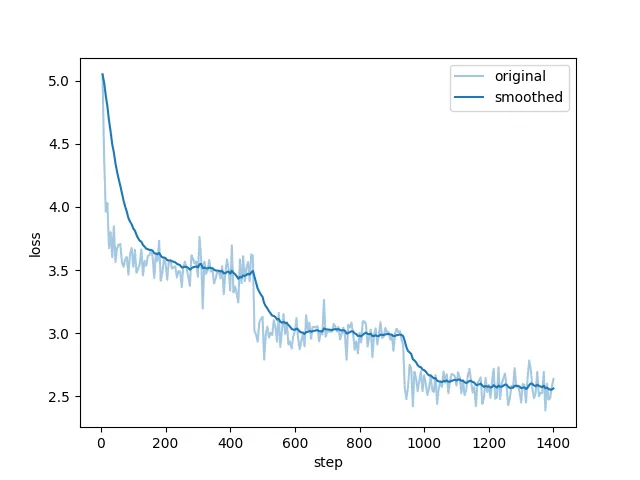
Downloading Model from https://www.modelscope.cn to directory: /root/.cache/modelscope/hub/models/Qwen/Qwen3-1.7B-Base开始训练后可以查看进度条和损失值曲线。
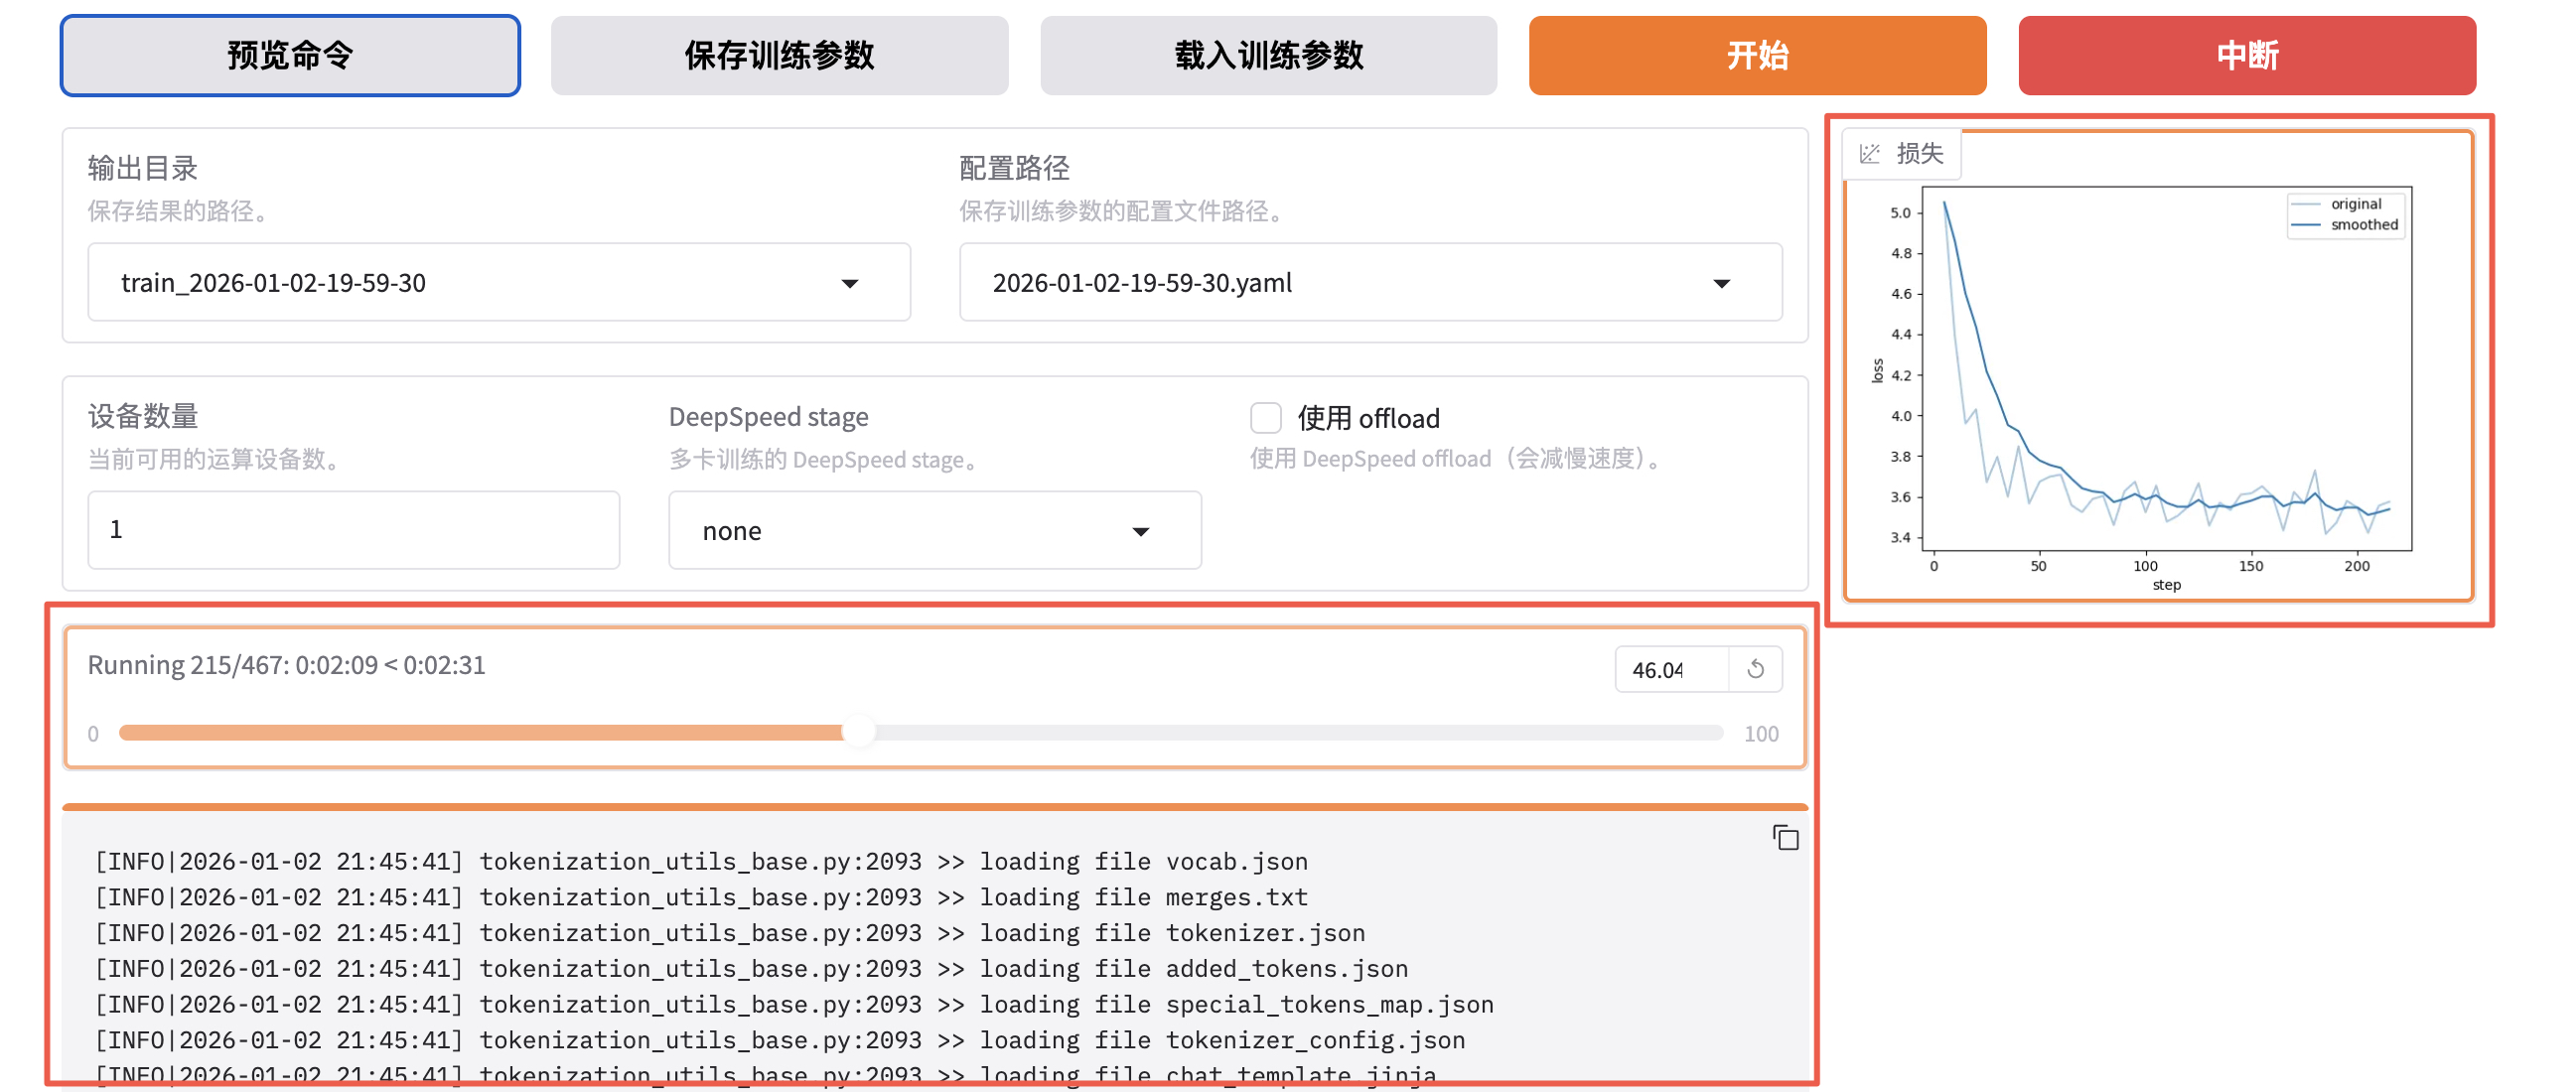
看到类似下面 "训练完毕" 就代表微调成功。
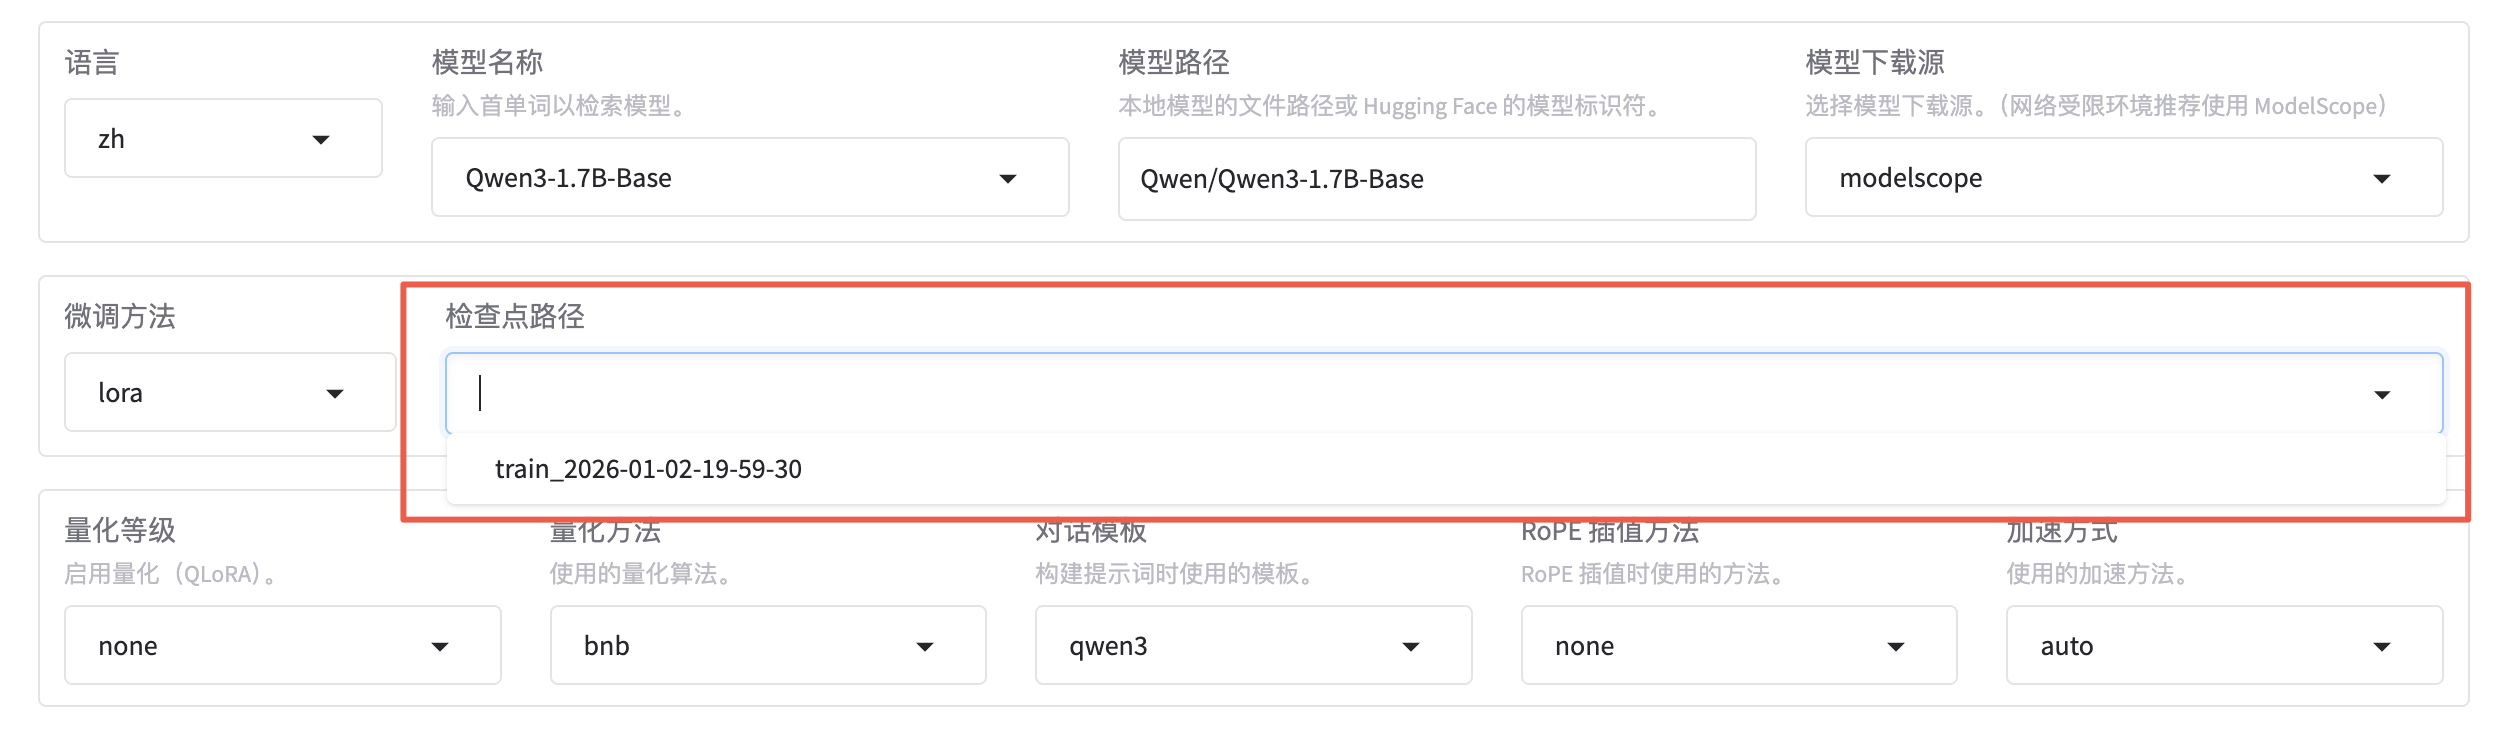
微调成功后,我们得到了一个 Checkpoint 记录,下拉可以选择刚刚微调好的模型。
Checkpoing 在后台的存储位置是 saves/Qwen3-1.7B-Base/lora/:
- adapter 开头的是 LoRA 适配器结果,后续用于模型推理融合。
- training_loss 和 trainer_log 等记录了训练过程中的指标。
- 其他是训练时各种参数的备份。
bash
$ ll saves/Qwen3-1.7B-Base/lora/train_2026-01-02-06-01-20/
total 50012
drwxr-xr-x 17 root root 4096 Jan 2 22:16 ./
drwxr-xr-x 5 root root 4096 Jan 2 22:40 ../
-rw-r--r-- 1 root root 1518 Jan 2 22:16 README.md
-rw-r--r-- 1 root root 966 Jan 2 22:16 adapter_config.json
-rw-r--r-- 1 root root 34916720 Jan 2 22:16 adapter_model.safetensors
-rw-r--r-- 1 root root 707 Jan 2 22:16 added_tokens.json
-rw-r--r-- 1 root root 240 Jan 2 22:16 all_results.json
-rw-r--r-- 1 root root 4116 Jan 2 22:16 chat_template.jinja
drwxr-xr-x 2 root root 4096 Jan 2 22:03 checkpoint-100/
drwxr-xr-x 2 root root 4096 Jan 2 22:12 checkpoint-1000/
drwxr-xr-x 2 root root 4096 Jan 2 22:13 checkpoint-1100/
drwxr-xr-x 2 root root 4096 Jan 2 22:14 checkpoint-1200/
drwxr-xr-x 2 root root 4096 Jan 2 22:15 checkpoint-1300/
drwxr-xr-x 2 root root 4096 Jan 2 22:16 checkpoint-1400/
drwxr-xr-x 2 root root 4096 Jan 2 22:16 checkpoint-1401/
drwxr-xr-x 2 root root 4096 Jan 2 22:04 checkpoint-200/
drwxr-xr-x 2 root root 4096 Jan 2 22:05 checkpoint-300/
drwxr-xr-x 2 root root 4096 Jan 2 22:06 checkpoint-400/
drwxr-xr-x 2 root root 4096 Jan 2 22:07 checkpoint-500/
drwxr-xr-x 2 root root 4096 Jan 2 22:08 checkpoint-600/
drwxr-xr-x 2 root root 4096 Jan 2 22:09 checkpoint-700/
drwxr-xr-x 2 root root 4096 Jan 2 22:10 checkpoint-800/
drwxr-xr-x 2 root root 4096 Jan 2 22:11 checkpoint-900/
-rw-r--r-- 1 root root 2258 Jan 2 22:02 llamaboard_config.yaml
-rw-r--r-- 1 root root 1671853 Jan 2 22:16 merges.txt
-rw-r--r-- 1 root root 81222 Jan 2 22:16 running_log.txt
-rw-r--r-- 1 root root 613 Jan 2 22:16 special_tokens_map.json
-rw-r--r-- 1 root root 11422654 Jan 2 22:16 tokenizer.json
-rw-r--r-- 1 root root 5431 Jan 2 22:16 tokenizer_config.json
-rw-r--r-- 1 root root 240 Jan 2 22:16 train_results.json
-rw-r--r-- 1 root root 67870 Jan 2 22:16 trainer_log.jsonl
-rw-r--r-- 1 root root 81507 Jan 2 22:16 trainer_state.json
-rw-r--r-- 1 root root 6289 Jan 2 22:16 training_args.bin
-rw-r--r-- 1 root root 735 Jan 2 22:02 training_args.yaml
-rw-r--r-- 1 root root 48990 Jan 2 22:16 training_loss.png
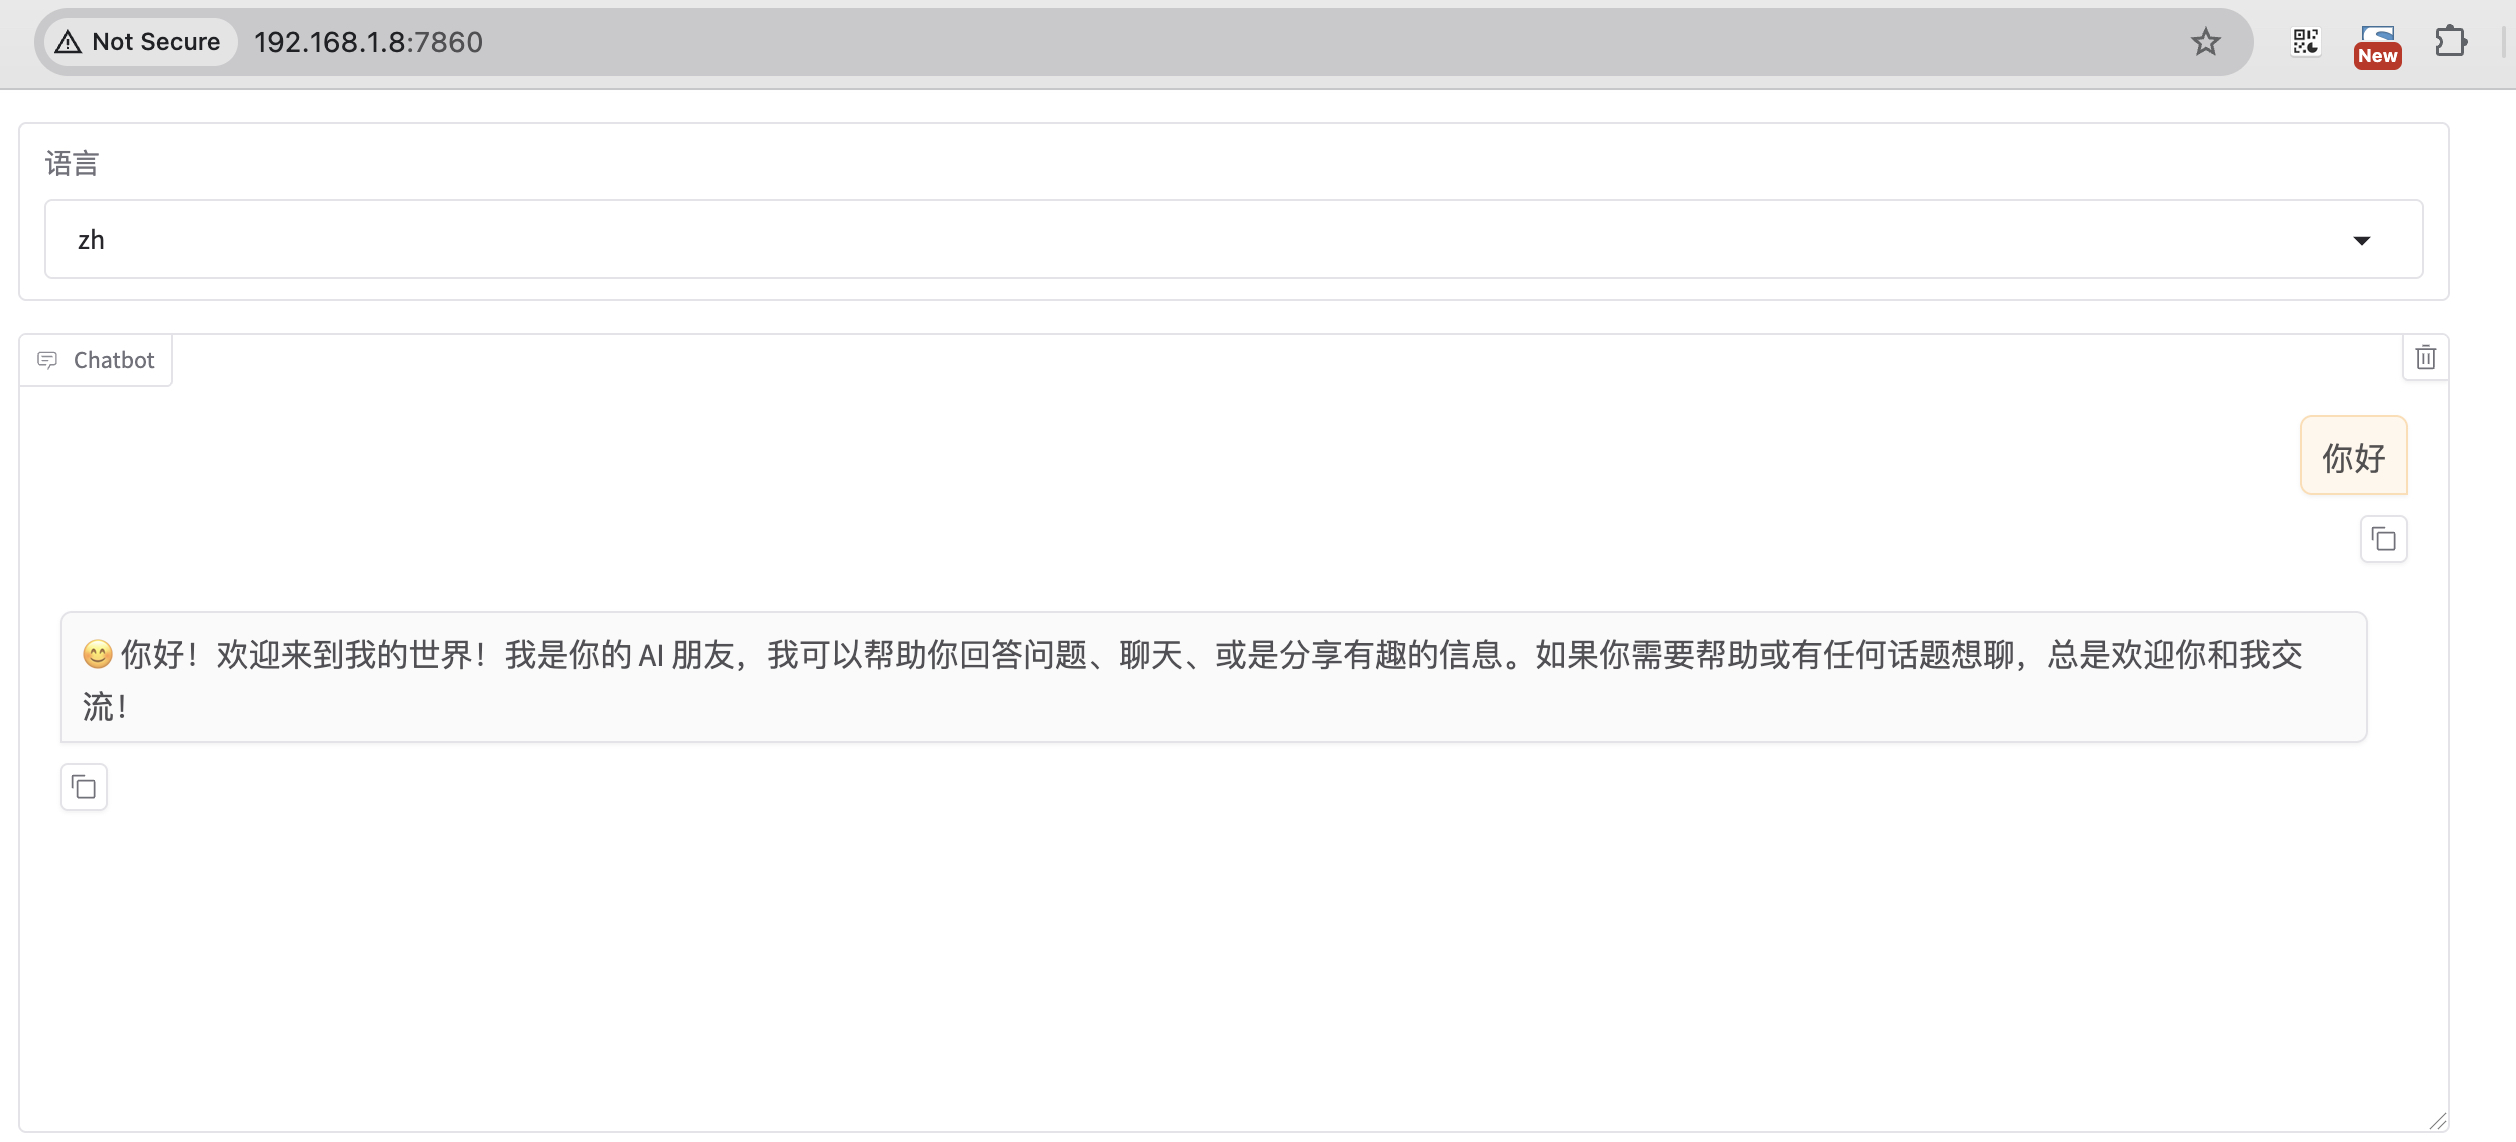
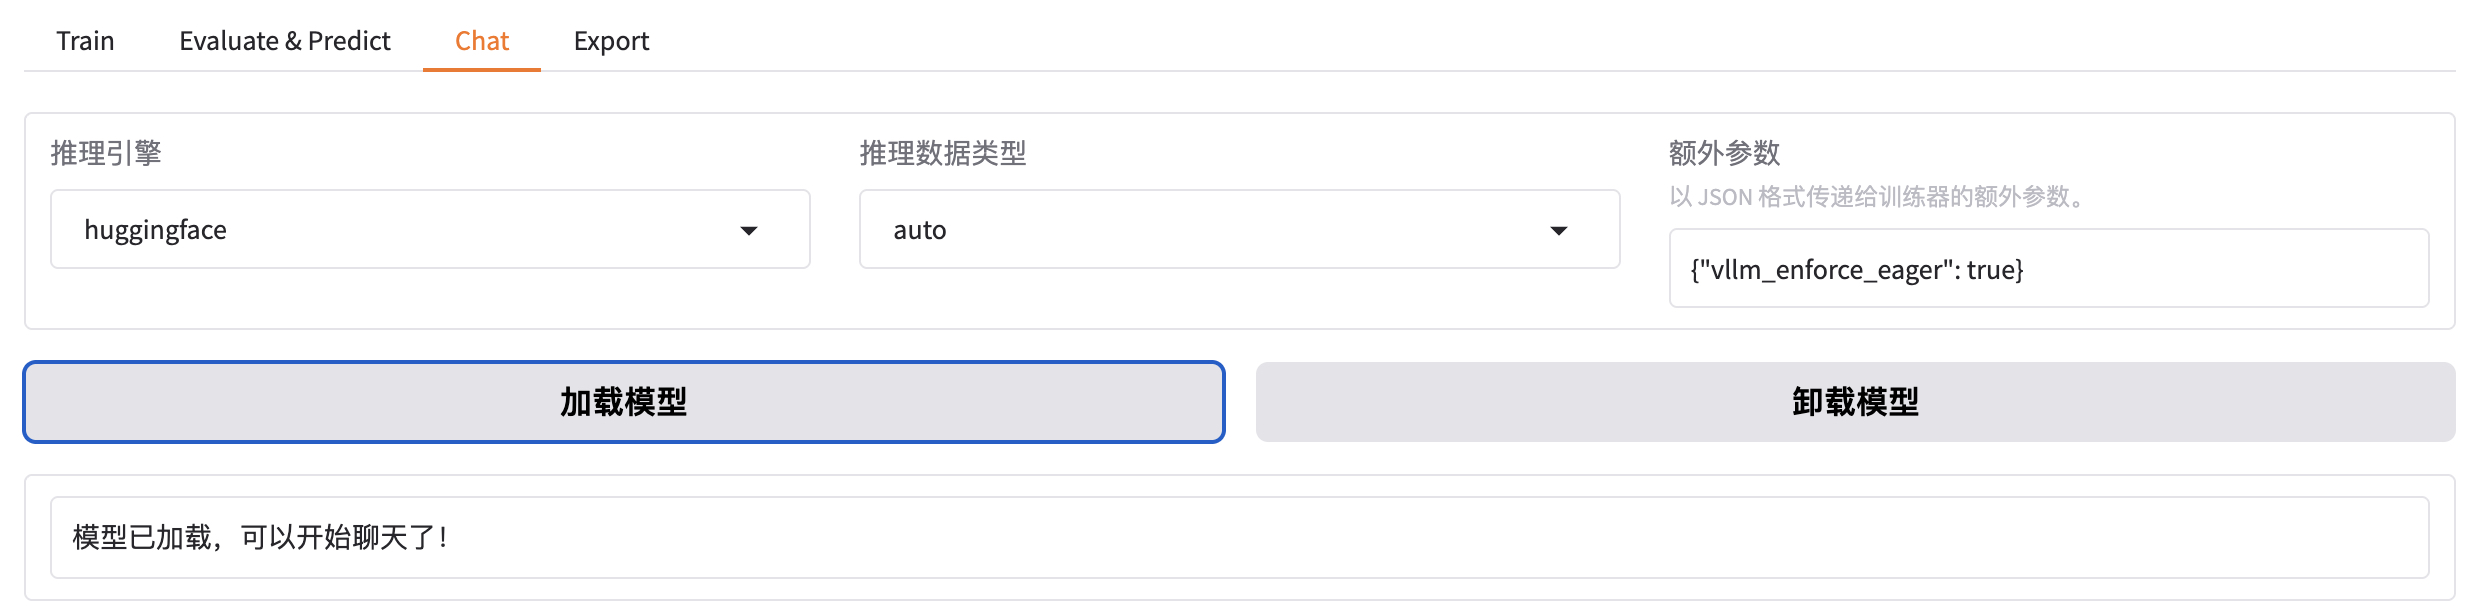
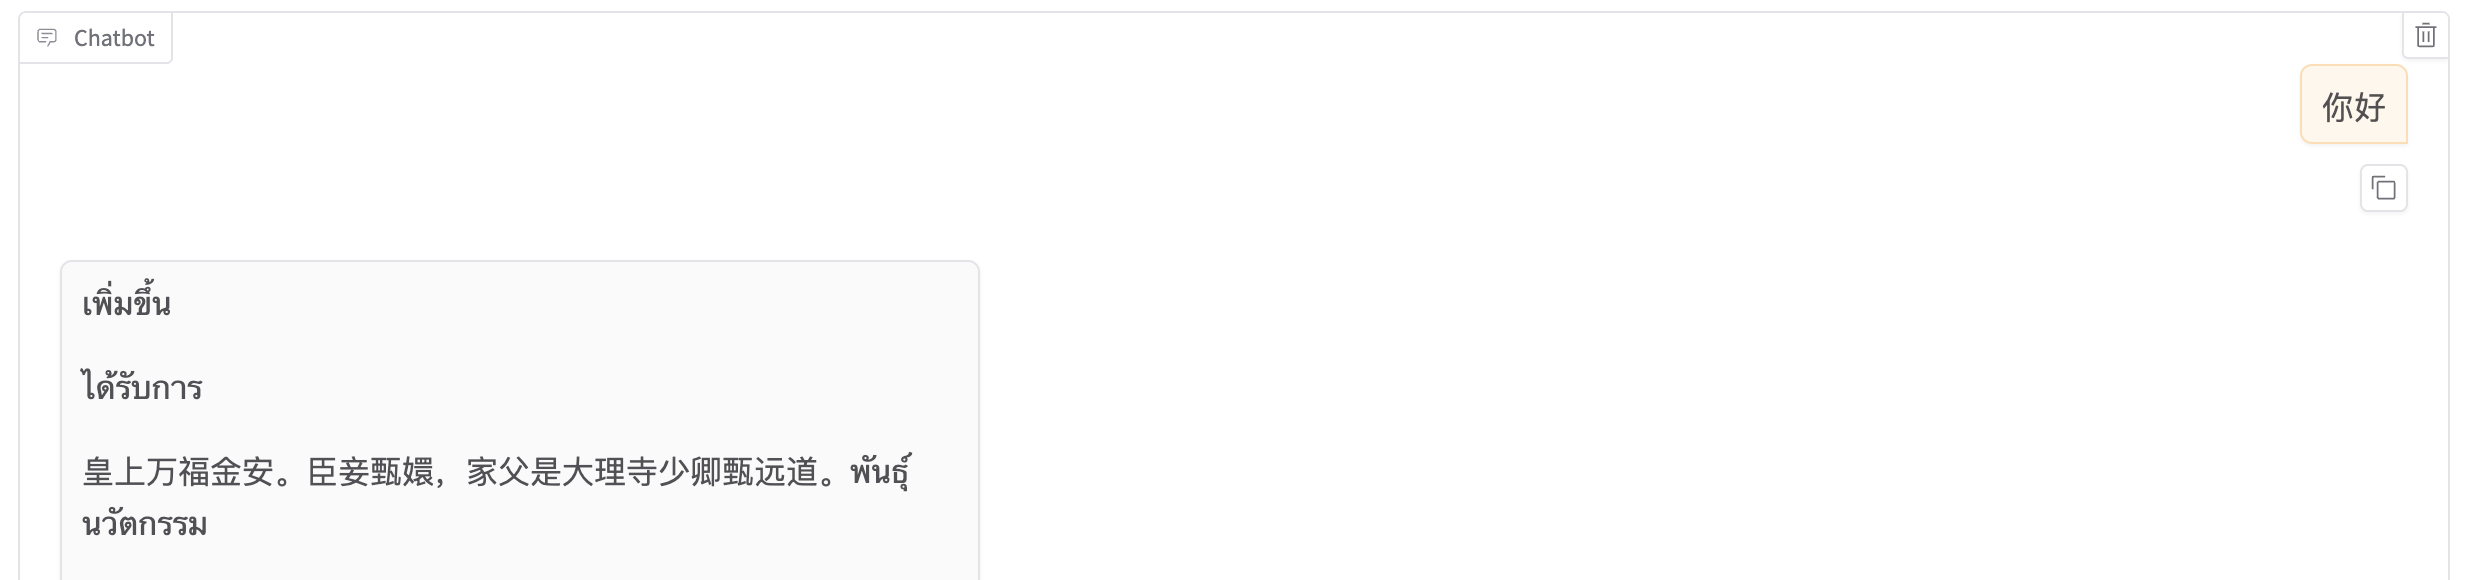
-rw-r--r-- 1 root root 2776833 Jan 2 22:16 vocab.json把窗口切换到 chat,可以点击加载模型。
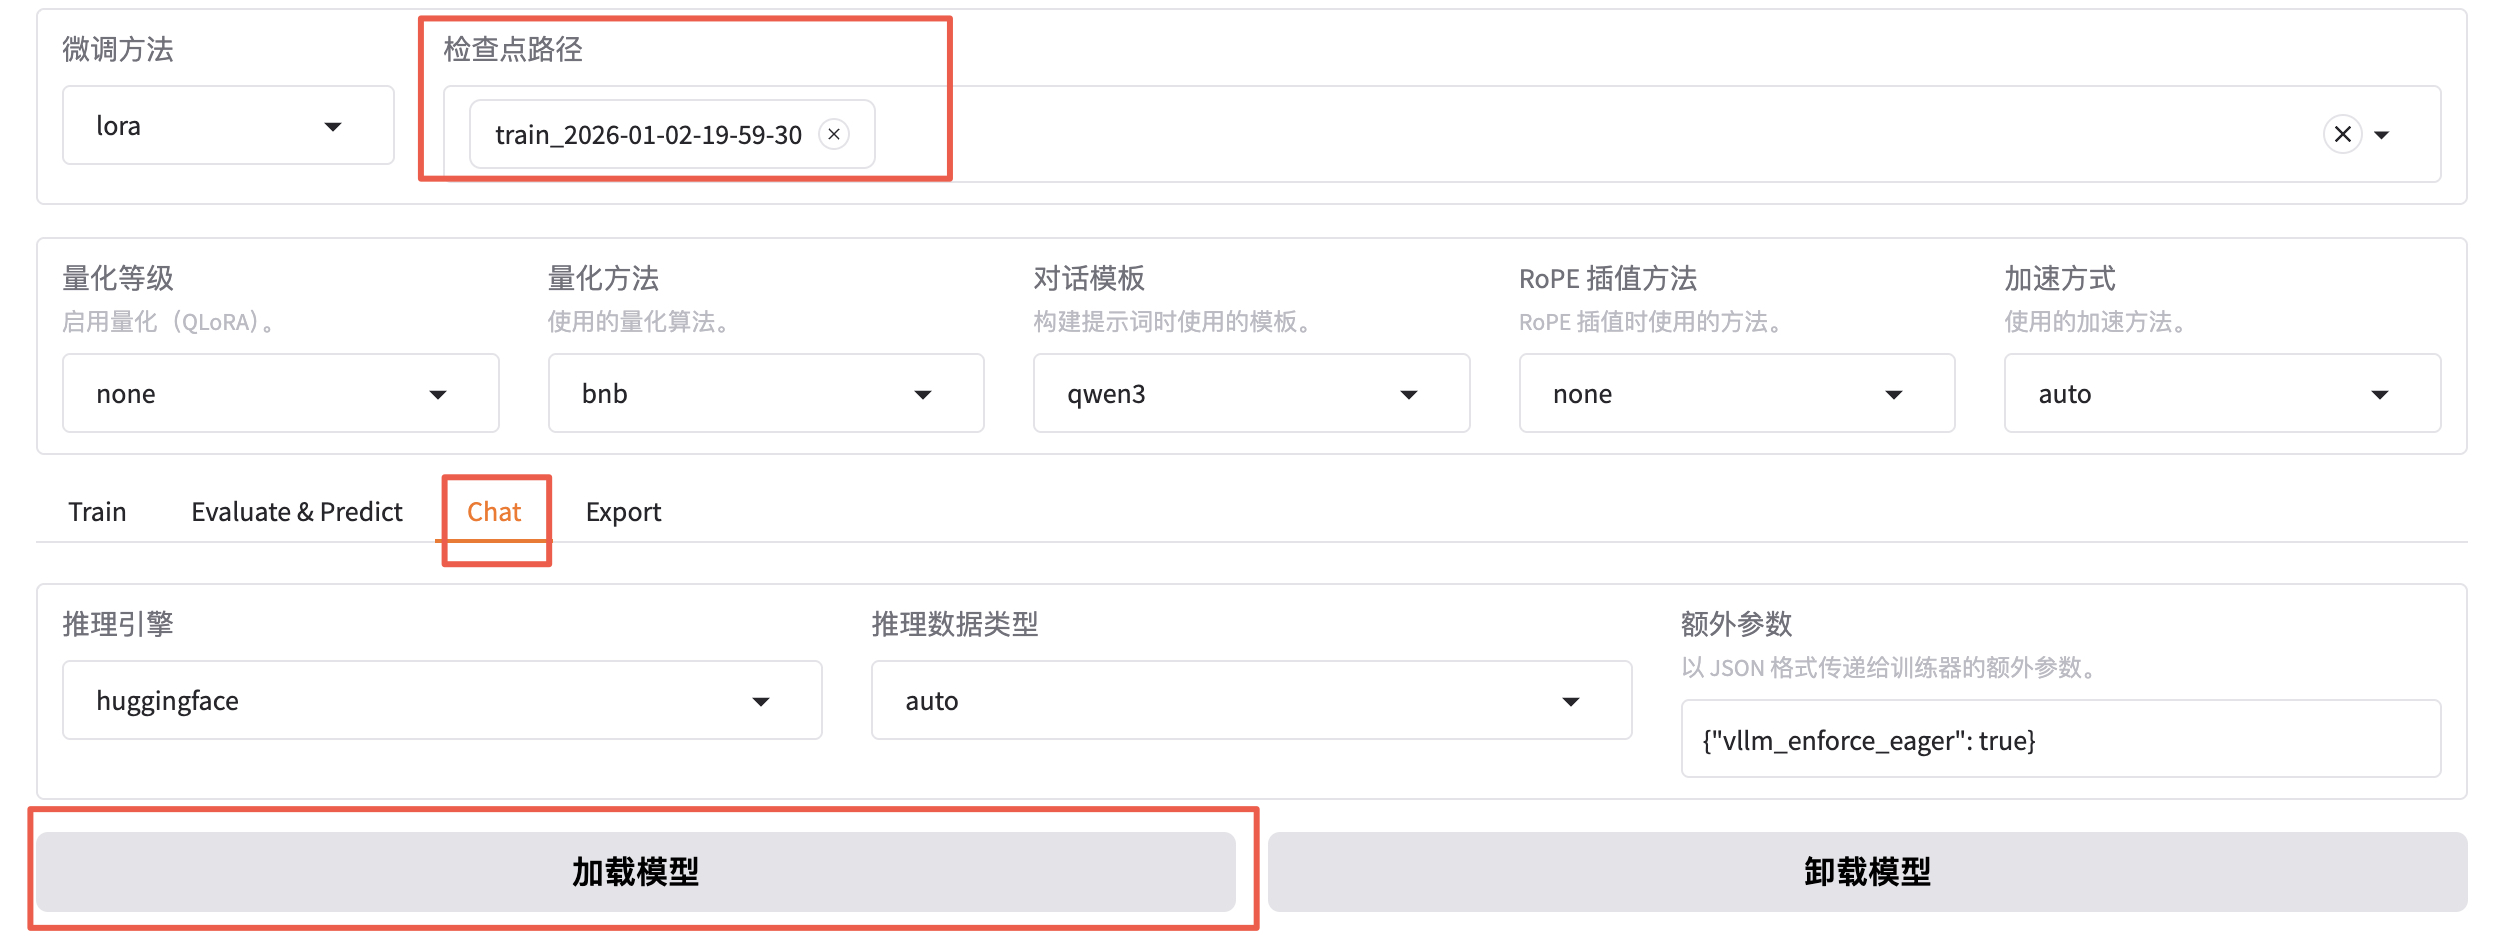
加载好之后就可以在输入框发送问题,测试微调模型的效果。
bash
[INFO|modeling_utils.py:1169] 2026-01-02 21:53:37,228 >> loading weights file /root/.cache/modelscope/hub/models/Qwen/Qwen3-1___7B-Base/model.safetensors对 LoRA 微调模型进行推理,需要应用动态合并 LoRA 适配器的推理技术。需要通过 finetuning_type 参数告诉使用了 LoRA 训练,然后将 LoRA 的模型位置通过 adapter_name_or_path 参数即可。
bash
--finetuning_type lora \
--adapter_name_or_path saves/Qwen3-1.7B-Base/lora/train_2026-01-02-06-01-20 \
但是渲染只训练了一次的效果很差。
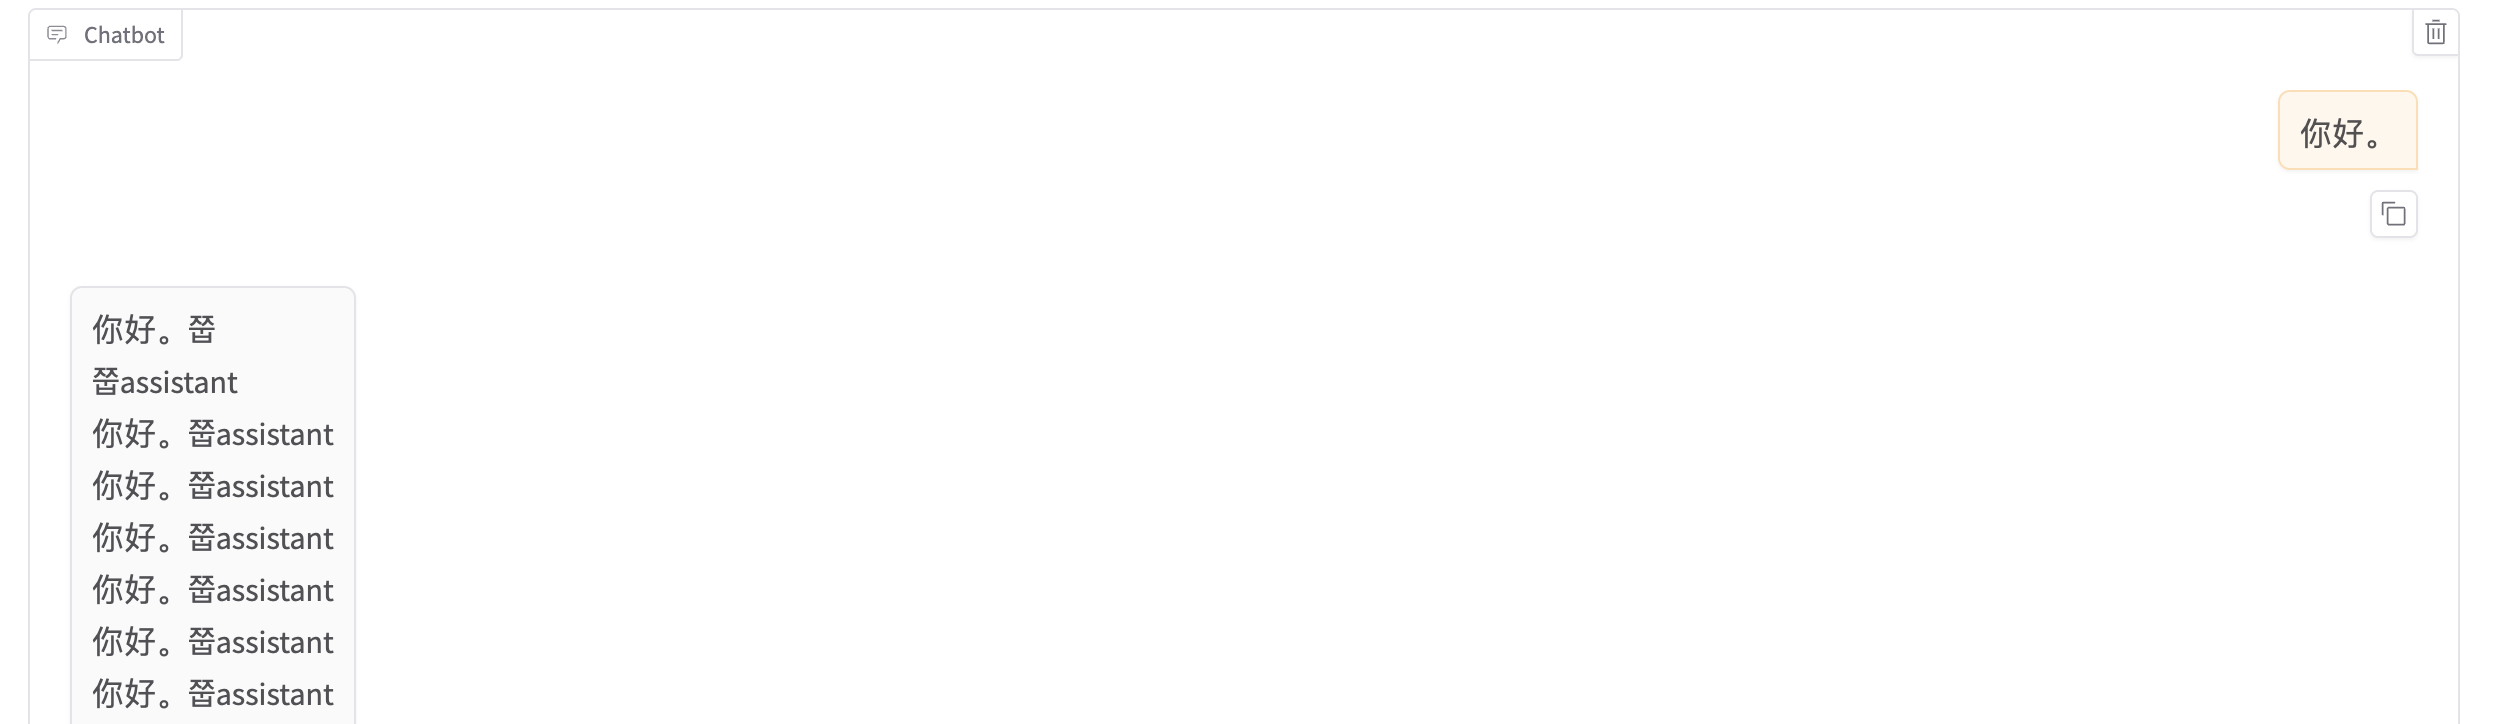
如果想切换回微调之前的模型,只需先卸载模型,选择想要的 Checkpoint,然后再加载模型即可。
如果想重新微调,需要修改红框中的两个值。
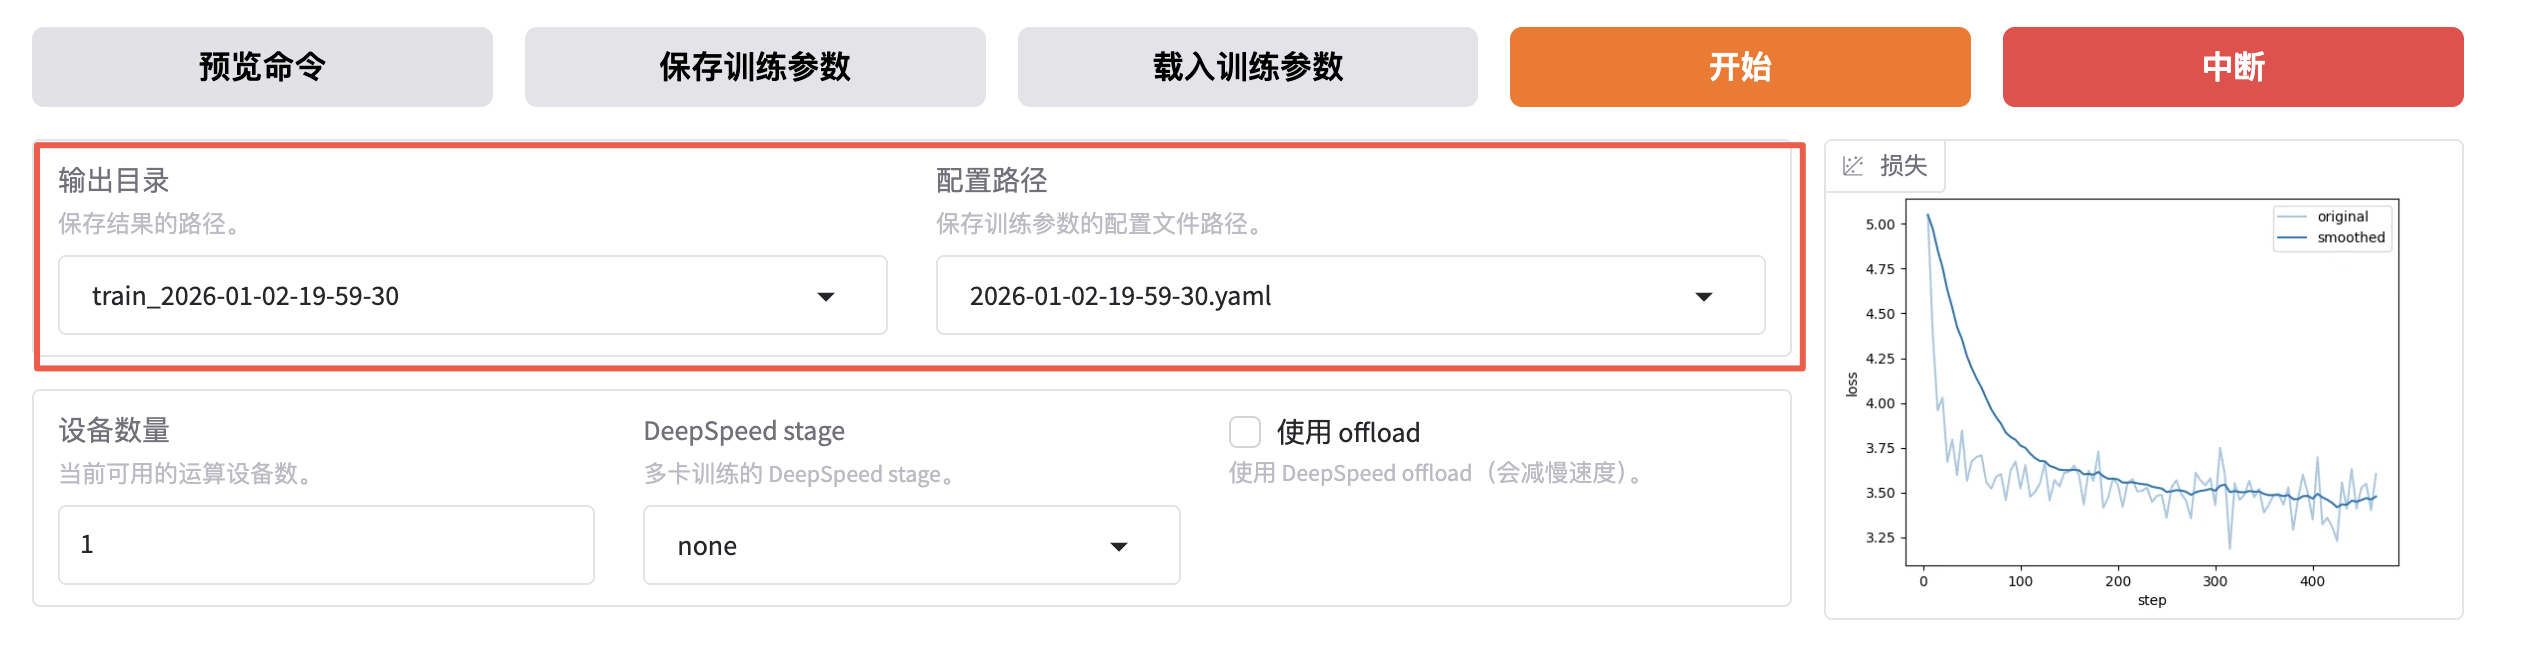
在经过 3 个 Epoch 的训练之后,效果也越好越好了。
批量推理和训练效果评估
上文中的人工交互测试实际上并不严谨,通常我们需要进行自动化的批量测试。例如:使用自动化的 bleu 和 rouge 等常用的文本生成指标来做评估。
bash
pip install jieba
pip install rouge-chinese
pip install nltk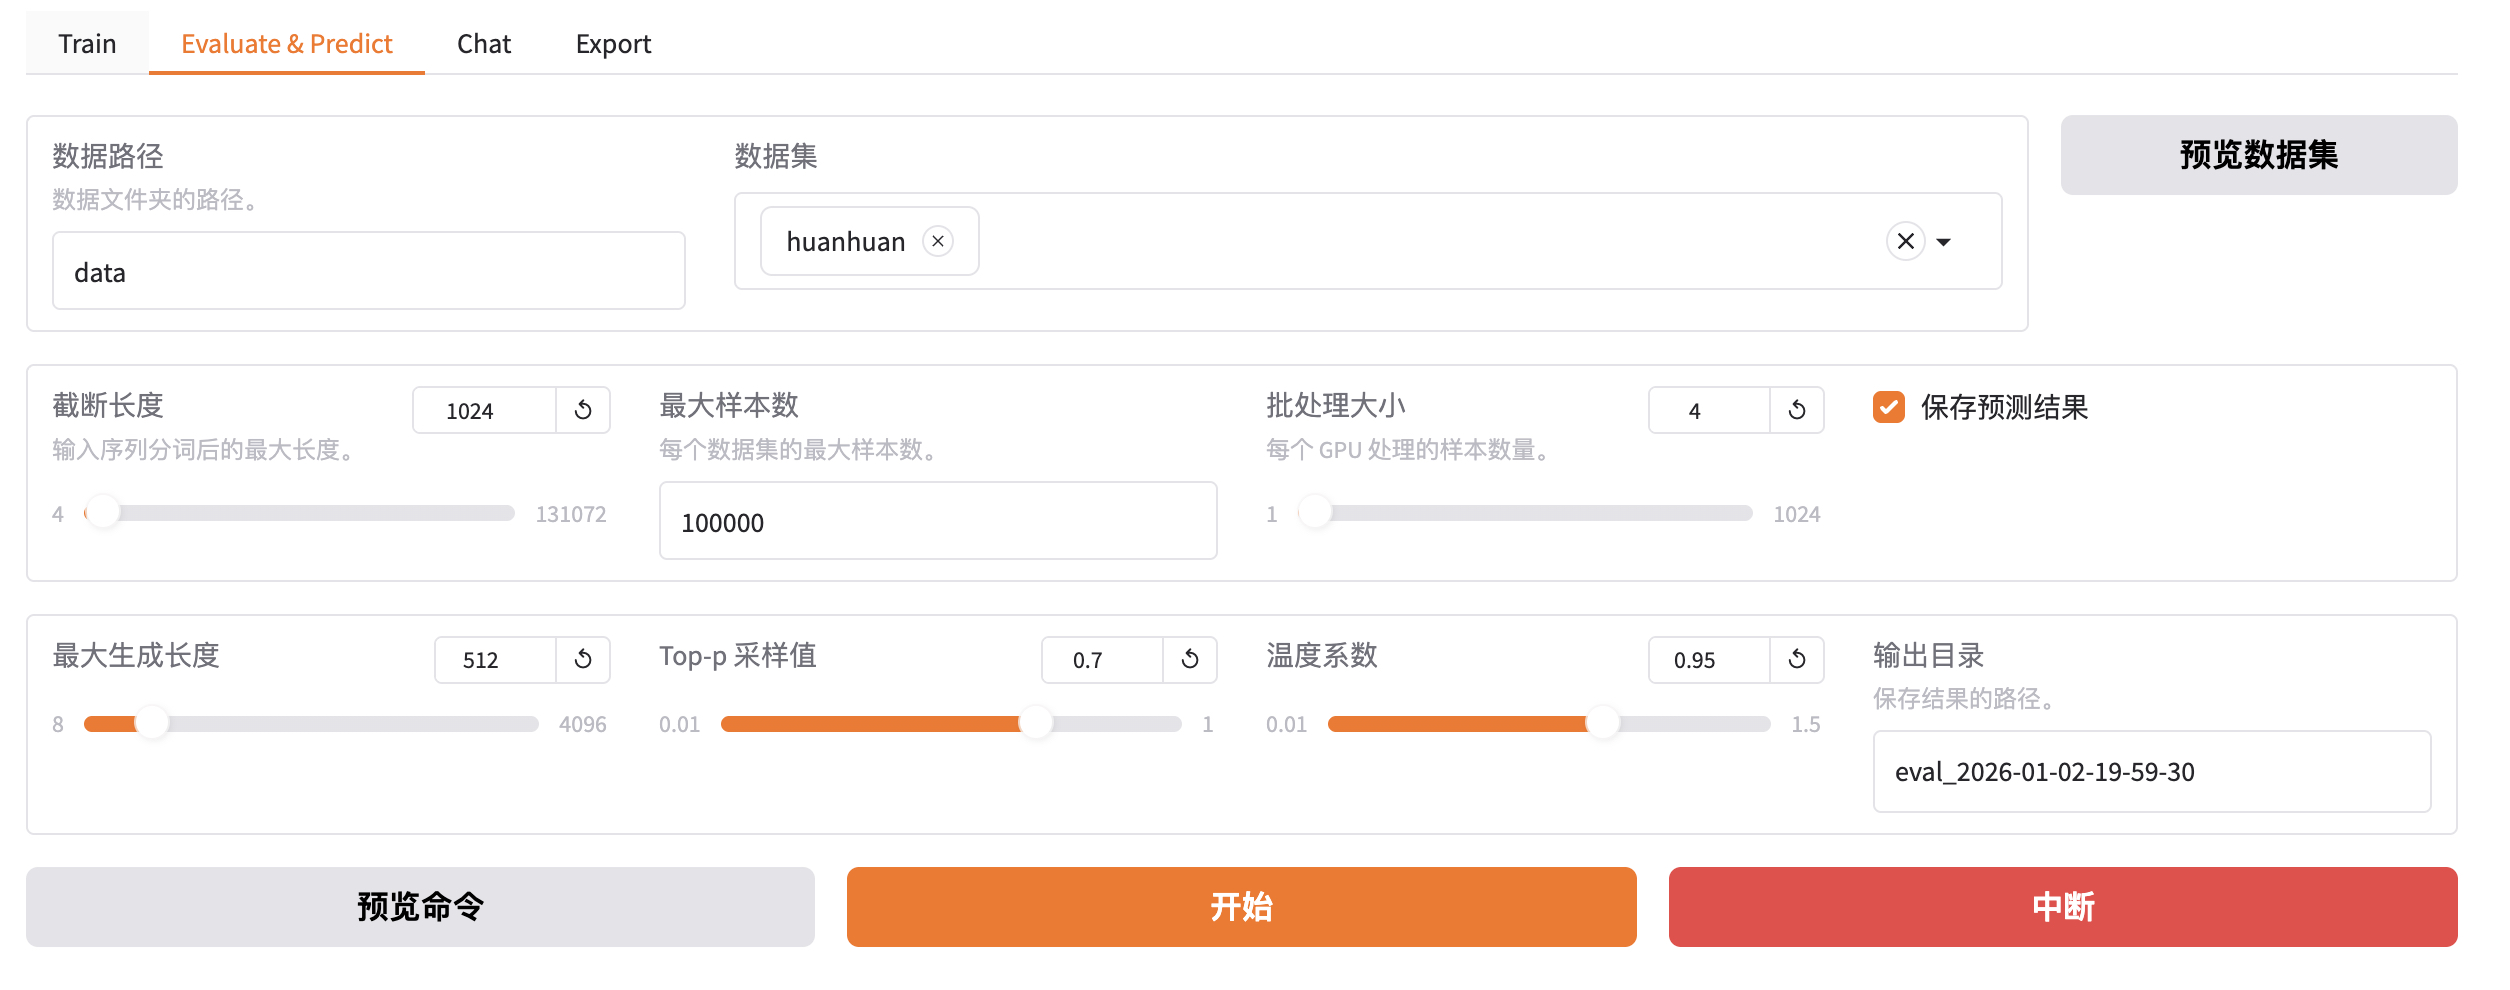
与训练脚本主要的参数区别如下 3 个:
- do_predict:现在是预测模式。
- predict_with_generate:现在用于生成文本。
- max_samples:每个数据集采样多少用于预测对比。
bash
llamafactory-cli train \
    --stage sft \
    --model_name_or_path Qwen/Qwen3-1.7B-Base \
    --preprocessing_num_workers 16 \
    --finetuning_type lora \
    --quantization_method bnb \
    --template qwen3 \
    --flash_attn auto \
    --dataset_dir data \
    --eval_dataset huanhuan \
    --cutoff_len 1024 \
    --max_samples 100000 \
    --per_device_eval_batch_size 4 \
    --predict_with_generate True \
    --report_to none \
    --max_new_tokens 512 \
    --top_p 0.7 \
    --temperature 0.95 \
    --output_dir saves/Qwen3-1.7B-Base/lora/eval_2026-01-02-19-59-30 \
    --trust_remote_code True \
    --ddp_timeout 180000000 \
    --do_predict True \
    --adapter_name_or_path saves/Qwen3-1.7B-Base/lora/train_2026-01-02-06-40-31
完成后查看微调质量评估结果,下面是训练效果评估指标。
质量类指标:BLEU-4 + ROUGE-1/2/L,衡量模型生成文本的好坏、和标准答案的匹配度、内容质量优劣。
- BLEU-4(Bilingual Evaluation Understudy):是一种常用的用于评估机器翻译质量的指标。BLEU-4 表示四元语法 BLEU 分数,它衡量模型生成文本与参考文本之间的 n-gram 匹配程度,其中 n=4。值越高表示生成的文本与参考文本越相似,最大值为 100%。如下,BLEU-4=0.8539 属于高分,说明模型生成的文本,和标准答案的语义贴合度极高、核心信息无遗漏、表达逻辑一致,对于 8B 量级的开源大模型,这个分数是优秀水平。
- predict_rouge-1(Recall-Oriented Understudy for Gisting Evaluation):是一种用于评估自动摘要和文本生成模型性能的指标。ROUGE-1 表示一元 ROUGE 分数,衡量模型生成文本与参考文本之间的单个词序列的匹配程度,即:词汇层面的匹配度,看生成文本有没有用到标准答案里的核心词。值越高表示生成的文本与参考文本越相似,最大值为 100。如下,rouge-1=10.37 属于高分,模型能精准捕捉到标准答案里的核心关键词,生成内容不会偏离主题,这是优质模型的核心特征。
- predict_rouge-2:ROUGE-2 表示二元 ROUGE 分数,衡量模型生成文本与参考文本之间的双词序列的匹配程度,即:短语 / 短句层面的匹配度。同上,最大值为 100。如下,rouge-2=1.67 分数偏低,但这是正常现象,ROUGE-2 要求连续两个词和标准答案完全一致,而大模型的优势是语义一致但表达多样化的泛化能力。大模型使用不同的短语表达相同的意思,这是生成能力的体现,不是缺陷。如果 rouge-2 分数很高,反而说明模型在的泛化能力极差。
- predict_rouge-l:ROUGE-L 表示最长公共子序列匹配率,衡量模型生成文本与参考文本之间最长公共子序列(Longest Common Subsequence)的匹配程度,即:整句的语义连贯性和语序一致性。同上,最大值为 100。如下,rouge-L=4.10 中等分数,表示模型生成的文本语义完整、逻辑通顺,虽然句式和标准答案不同,但核心信息完整、语序合理,能准确回答问题。
如果是文本摘要任务,那么 rouge-1 一般 20-40,rouge-2 5-15,rouge-L 10-25;如果是开放问答 / 对话 / 指令遵循任务,那么 rouge-1 8-15,rouge-2 1-3,rouge-L 3-6。下列数值完全落在这个区间内,是标准水平。
性能类指标:耗时 / 吞吐量 / 加载时间,衡量模型推理速度、效率、硬件利用率。
- predict_model_preparation_time:表示模型加载和预热(显存初始化)的耗时。如下,0.002s 是优秀的数值。
- predict_runtime:本次批量推理的总耗时,单位为秒。如下,15356秒 ≈ 4 小时 16 分钟。
- predict_samples_per_second:每秒推理生成的样本数量,推理吞吐量核心指标的核心指标,表示模型每秒钟能够生成的样本数量。用于评估模型的推理速度。如下,0.243 样本/秒,表示模型平均每 4.1 秒处理 1 条推理样本。
- predict_steps_per_second:每秒执行的 step 数量,模型每秒钟能够执行的 step 数量。模型每生成一个 token 就是一个 step。如下,0.061 step/s 表示每秒生成约 0.061 个 token。
通过对比 1 Epoch 和 3 Epoch 微调的结果可以看出,多轮训练后的效果会更好一些。
-
1 Epoch

-
3 Epoch

训练后也会在 output_dir 下看到如下新文件:
- generated_predictions.jsonl:输出了要预测的数据集的原始 label 和模型 predict 的结果。
- predict_results.json:给出了原始 label 和模型 predict 的结果,用自动计算的指标数据。
bash
$ ll saves/Qwen3-1.7B-Base/lora/eval_2026-01-02-19-59-30
-rw-r--r-- 1 root root     331 Jan  3 03:36 all_results.json
-rw-r--r-- 1 root root 8123325 Jan  3 03:36 generated_predictions.jsonl
-rw-r--r-- 1 root root     465 Jan  2 23:19 llamaboard_config.yaml
-rw-r--r-- 1 root root     331 Jan  3 03:36 predict_results.json
-rw-r--r-- 1 root root    7492 Jan  3 03:36 running_log.txt
-rw-r--r-- 1 root root   22264 Jan  3 03:35 trainer_log.jsonl
-rw-r--r-- 1 root root     566 Jan  2 23:19 training_args.yaml
LoRA 模型合并导出
通过不断 "炼丹" 直到效果满意后就可以导出模型了。即:把训练的 LoRA 模型和原始 Base 模型进行融合,输出一个完整的模型文件。
检查点路径选择我们刚刚微调好的模型,切换到 export,填写导出目录 output/qwen3-1.7b-huanhuan。
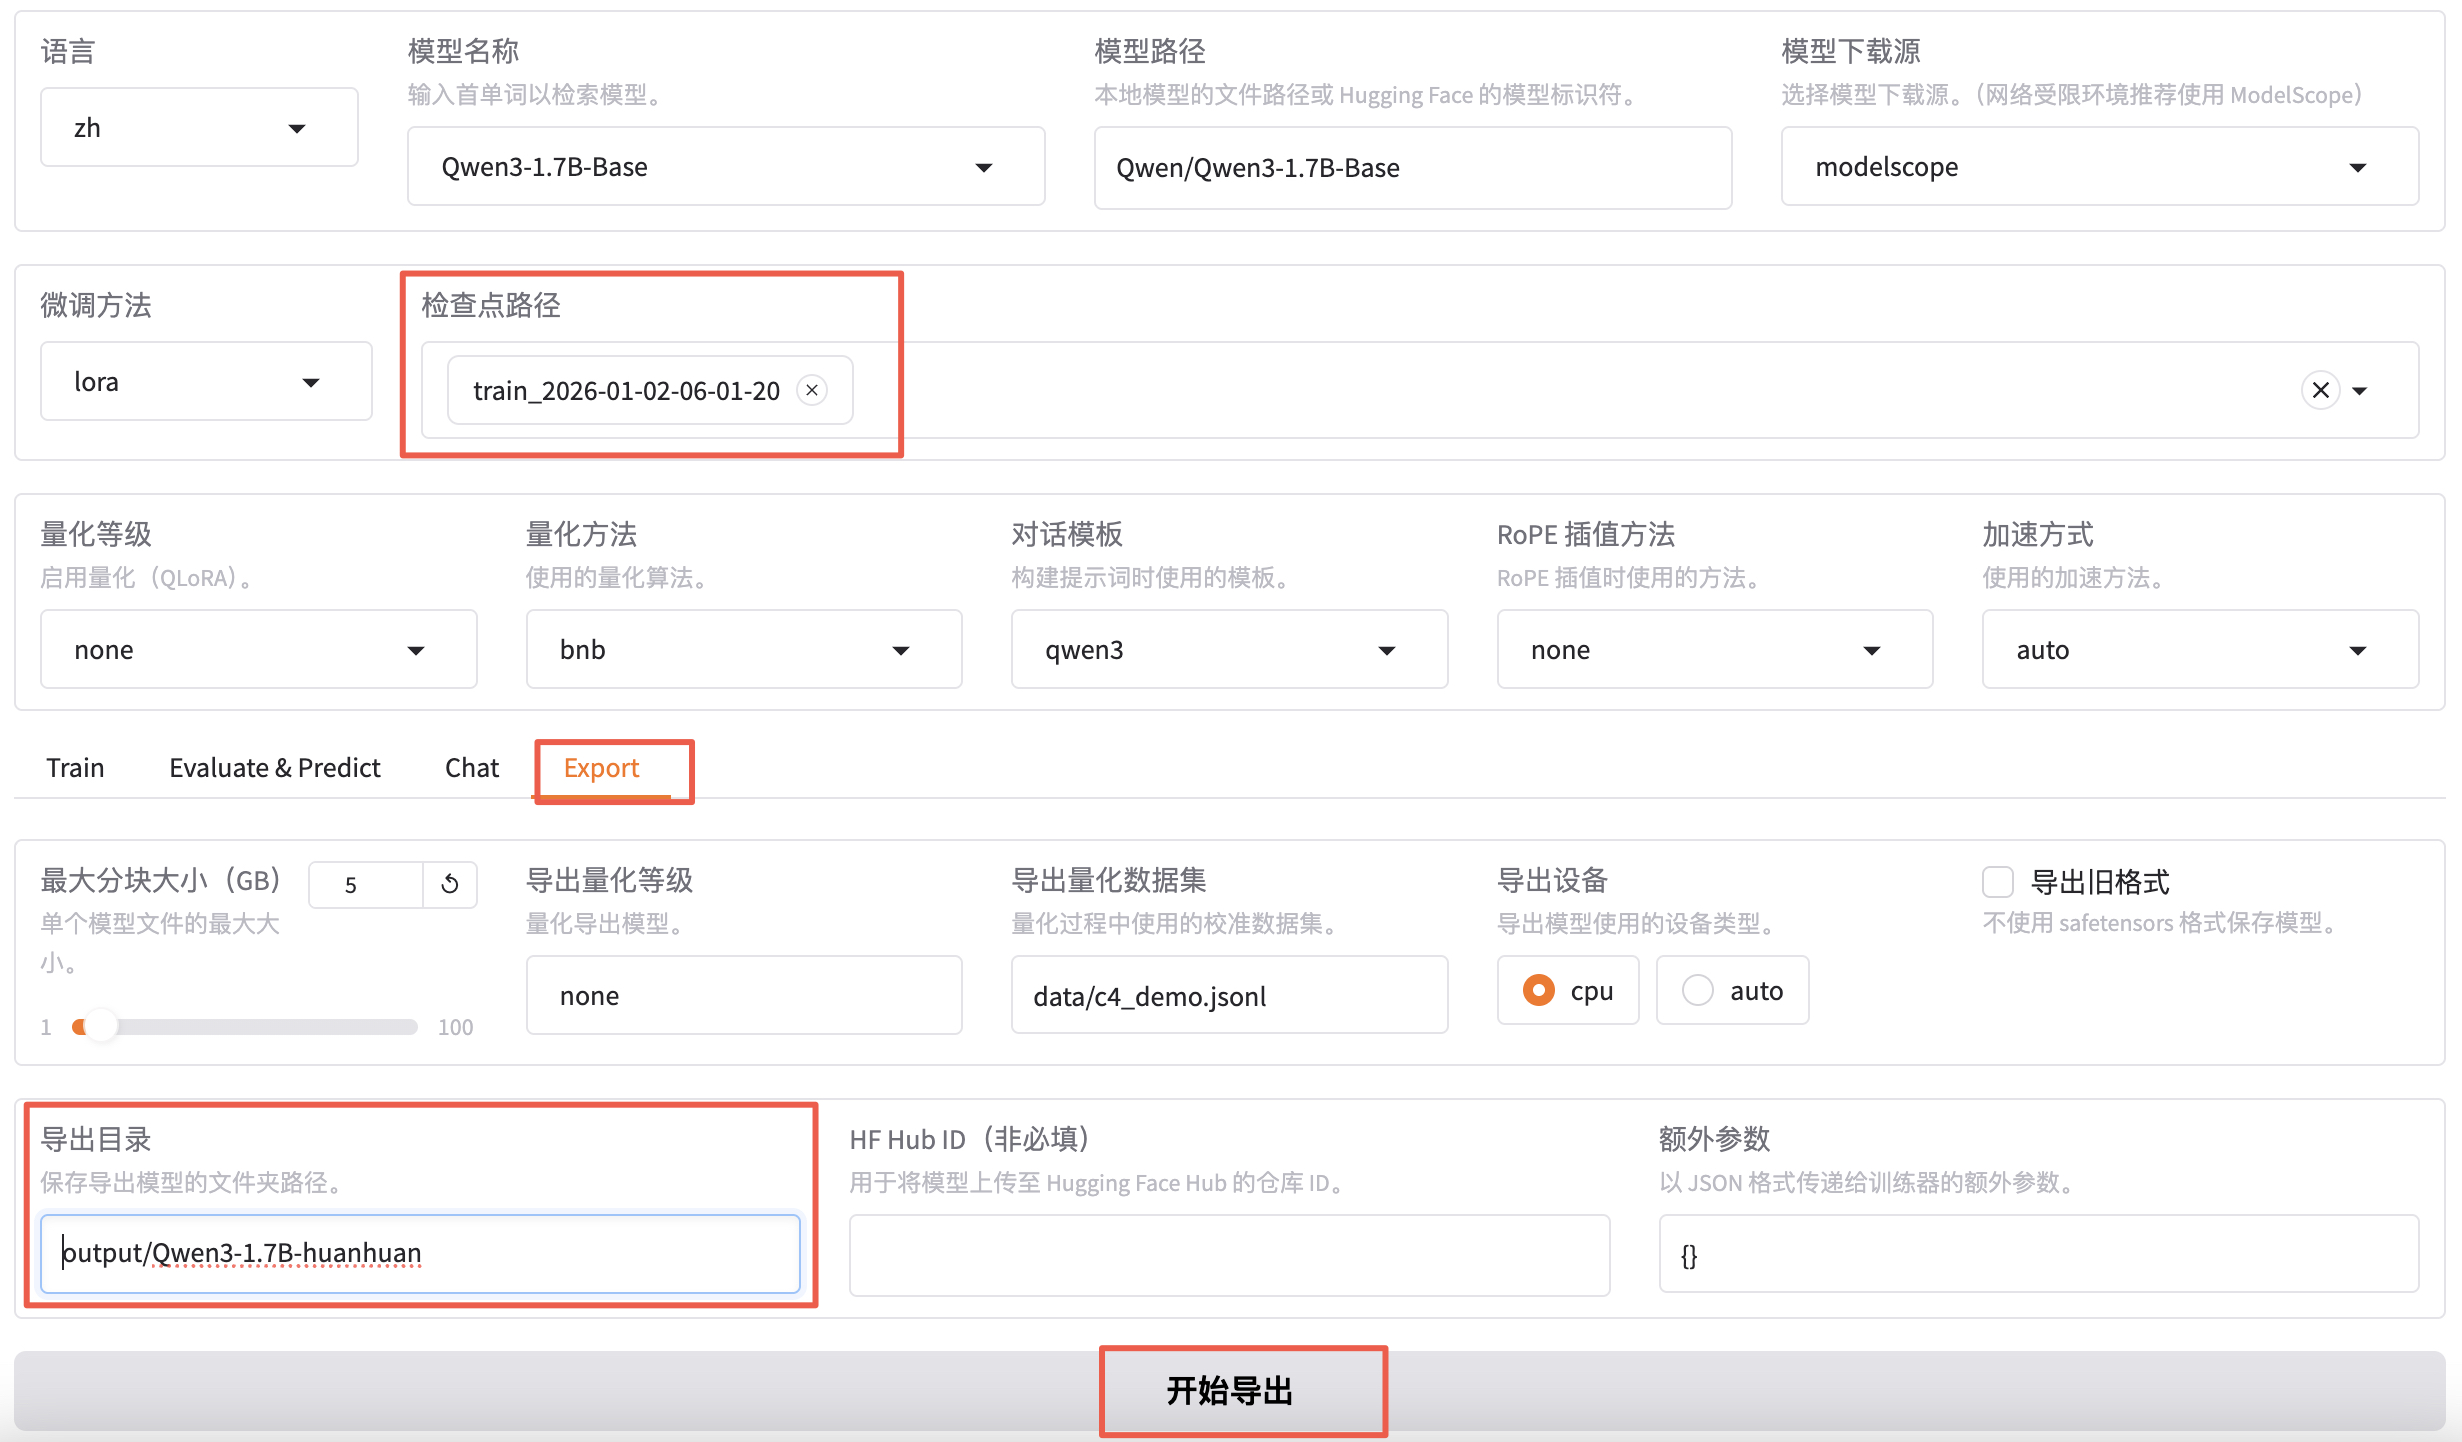
导出完成之后就可以在 output 目录下看到 qwen3-1.7b-huanhuan 目录了。
bash
$ cd LlamaFactory
$ ll -h output/Qwen3-1.7B-huanhuan/
total 3.3G
drwxr-xr-x 2 root root 4.0K Jan  2 22:27 ./
drwxr-xr-x 3 root root 4.0K Jan  2 22:27 ../
-rw-r--r-- 1 root root  381 Jan  2 22:27 Modelfile
-rw-r--r-- 1 root root  707 Jan  2 22:27 added_tokens.json
-rw-r--r-- 1 root root 4.1K Jan  2 22:27 chat_template.jinja
-rw-r--r-- 1 root root 1.4K Jan  2 22:27 config.json
-rw-r--r-- 1 root root  117 Jan  2 22:27 generation_config.json
-rw-r--r-- 1 root root 1.6M Jan  2 22:27 merges.txt
-rw-r--r-- 1 root root 3.3G Jan  2 22:27 model.safetensors
-rw-r--r-- 1 root root  613 Jan  2 22:27 special_tokens_map.json
-rw-r--r-- 1 root root  11M Jan  2 22:27 tokenizer.json
-rw-r--r-- 1 root root 5.4K Jan  2 22:27 tokenizer_config.json
-rw-r--r-- 1 root root 2.7M Jan  2 22:27 vocab.json
部署运行微调后的大模型
这里用 Ollama + GGUF 进行部署。
其中,GGUF 是大模型的存储格式,可以对模型进行高效的压缩,减少模型的大小与内存占用,从而提升模型的推理速度和效率。如下,安装 GGUF 并将微调后大模型的格式进行转换。
bash
$ git clone https://github.com/ggerganov/llama.cpp.git
$ cd llama.cpp/gguf-py
$ pip install --editable .

$ cd llama.cpp
$ python convert_hf_to_gguf.py /workspace/LlamaFactory/output/Qwen3-1.7B-huanhuan/

# 生成 xxx.gguf 格式文件。
$ ll /workspace/LlamaFactory/output/Qwen3-1.7B-huanhuan/
-rw-r--r-- 1 root root        381 Jan  2 22:27 Modelfile
-rw-r--r-- 1 root root 3447348896 Jan  3 05:13 Qwen3-1.7B-huanhuan-BF16.gguf
另外,Ollama 是大模型推理框架,适用于个人环境使用,简单而高效。
bash
$ curl -fsSL https://ollama.com/install.sh | sh
$ ollama serve

$ ollama create qwen3-huanhuan -f /workspace/LlamaFactory/output/Qwen3-1.7B-huanhuan/Modelfile
$ ollama run qwen3-huanhuan