ansible集群批量管理与维护
一、集群批量管理-SSHD服务
1.openssh服务
-
实现加密的远程连接/传输数据
-
openssh-server(sshd,/etc/ssh/sshd------config)
-
openssh-clients(命令,scp,ssh)
2.telnet vs openssh
| 共同点 | 区别 | 应用场景 | |
|---|---|---|---|
| openssh服务 | 远程连接 | 数据加密 | 默认使用 |
| telnet 服务 | 远程连接 | 数据不加密 | 升级openssh服务使用 |
2.1 telnet服务
bash
#安装
yum -y install telnet-server.x86_64

#启动
systemctl disable telnet.socket
systemctl start telnet.socket

#xsell连接
telnet 10.0.0.61 23
2.2 openssh-server配置文件
bash
#查看软件包是否安装,默认已经安装
rpm -qa |grep openssh

#查看openssh-server有哪些配置文件
rpm -ql openssh-server- 核心配置文件 :/etc/ssh/sshd_config
| openssh服务端配置详解 | |
|---|---|
| ==连接加速== | |
| UseDNS no | 是否开启反向解析:ip-->域名或主机名 |
| GSSAPIAuthentication no | GSS认证功能关闭 |
| ==安全优化项目== | |
| Port | 默认 22 端口范围1-65535 推荐1w以上的端口 |
| PermitRootLogin | 禁用root远程登录权限。默认是yes(可以上root远程登录) |
| ListenAddress | 监听的地址(后面需要指定本地网卡的地址)可以控制用户只能通过内网访问 |
2.3 openssh-clients配置文件
01 scp 远程传输工具
bash
scp  文件/目录  用户名@ip:路径
-r  递归传输
-p	保持属性信息不变
-P	指定端口


scp -rp -P /etc/hostname  root@10.0.0.41:/tmp/
02 ssh 远程连接
bash
#使用root用户远程连接到10.0.0.41的22端口
ssh -p 22 root@10.0.0.41

#使用root用户远程连接到10.0.0.41的22端口并执行whoami和pwd命令
ssh -P 22 root@10.0.0.41 "whoami pwd"
03 sftp 远程传输文件(一般开发通过图形化界面使用ftp工具)(了解)
-
ftp工具的一种
上传大文件,建议使用ftp
二、集群批量管理-密钥认证
1.概述
- 两个节点,通过密钥形式进行访问,不需要输入密码。
- 服务要求:一些服务在使用前要求我们做密钥认证。
- 名字:密钥认证,免密码登录,双击互信
温馨提示:密钥认证是单向的。
2.实战创建分发密钥
| 角色 | |
|---|---|
| 管理机 | m01 |
| 被管理节点 | backup、nfs01、web01 |
2.1 创建密钥对
bash
#创建时也可以不加-t rsa 默认就是rsa
ssh-keygen -t rsa
2.2 分发密钥
bash
#给backup服务器分发密钥 存放在远程主机/root/.ssh/authorized_keys
ssh-copy-id -i /root/.ssh/id_rsa.pub  root@10.0.0.41
2.3 连接测试
bash
ssh root@10.0.0.41 hostname -I

[root@m01 ~]# ssh root@10.0.0.41 hostname -I
10.0.0.41 172.16.1.41
3.自动化分发与创建密钥对
3.1 自动化创建密钥
bash
#-f指定路径  -P 密码短语,设置为空
ssh-keygen -f ~/.ssh/id_rsa -P ''
3.2 自动化分发公钥
- 阻碍1 :密码 -p 指定密码
sh
#安装密码提供工具
yum -y install sshpass
#使用-p 指定密码
sshpass -p12366 ssh 10.0.0.41 hostname -I

#sshpass与ssh-copy-id分发公钥
sshpass -p12366 ssh-copy-id 10.0.0.41- 阻碍2:第一次连接的时候提示的yes和no,主机密钥信息检查,输入yes后存放到~/.ssh/known_hosts
温馨提示:sshpass与ssh-copy-id分发公钥 第一次连接,提示yes/no,sshpass就失效了。
解决思路:临时取消即可,连接的时候不检查主机信息。 -o StrictHostKeyCheckin=no 临时不检查主机信息.
-p22 指定主机端口为22
sh
sshpass -p12366 ssh-copy-id -i ~/.ssh/id_rsa.pub -oStrictHostKeyChecking=no 10.0.0.313.3自动化创建与分发 脚本
- 编辑 vim /server/scripts/fenfa.sh
bash
#!/bin/bash
#author:liux
#desc:自动话创建密钥与分发密钥

#0.变量
ips="7 31 41"
#1.创建密钥对(未来可以加入判断)
echo "创建密钥对"
ssh-keygen -f /root/.ssh/id_rsa -P ''
#2.分发公钥
echo "分发公钥"
for ip in $ips
do
   sshpass -p12366 ssh-copy-id -i /root/.ssh/id_rsa.pub  -oStrictHostKeyChecking=no 10.0.0.$ip
done

#3.检查
echo "检查密钥认证"
for ip in $ips
do
   ssh 10.0.0.$ip hostname -I
done
三、集群批量管理-Ansible
sh
ansible-doc -s	模块名  #命令查看帮助文档
#官网查看帮助文档
https://docs.ansible.com/ansible/latest/collections/ansible/builtin/index.html#plugins-in-ansible-builtin
1.Ansible概述
Ansible是一个自动化统一配置管理工具,自动化主要体现在Ansible集成了丰富模块以及功能组件,可以通过一个命令完成一系列的操作,进而能减少重复性的工作和维护成本,可以提高工作效率
- 自动化运维:批量管理,批量分发,批量执行,维护......
- python写的
- ansible 轻量级,大规模环境下只通过ssh会很慢,串行的
| 批量管理工具 | |
|---|---|
| ==Ansible== | 无客户端,基于ssh进行管理与维护 |
| saltstack | 需要安装客户端,基于ssh进行管理 |
| terraform | 批量管理基础设施(批量创建100台公有云) |
2.Ansible管理架构
- Inventory 主机清单:被管理主机的ip列表,分类。
- ad-hoc模式 命令行批量管理(使用ans模块),临时任务。
- playbook 剧本模式:类似于把操作写成脚本,可以重复运行该脚本。
3.Ansible安装及修改配置
bash
#1.安装epel源
[root@m01 ~]# wget -O /etc/yum.repos.d/epel.repo http://mirrors.aliyun.com/repo/epel-7.repo

#2.安装Ansible
yum -y install ansible

ansible --version

[root@m01 ~]# vim /etc/ansible/ansible.cfg
[root@m01 ~]# egrep -vn '^$|#' /etc/ansible/ansible.cfg
10:[defaults]
71:host_key_checking = False
111:log_path = /var/log/ansible.log
327:[inventory]
340:[privilege_escalation]
346:[paramiko_connection]
370:[ssh_connection]
431:[persistent_connection]
445:[accelerate]
460:[selinux]
469:[colors]
485:[diff]
4.Ansible-Inventory 主机清单
-
分组进行管理
-
子组进行管理
-
默认在/etc/ansible/hosts
-
在指定目录创建hosts,需要在运行ansible命令的时候,通过-i选项指定hosts文件
4.1 主机清单必会格式
bash
#编辑hosts文件,添加需要管理的服务器,并给服务器分组
[root@m01 ~]# vim /etc/ansible/hosts
[web]
172.16.1.7
[backup]
172.16.1.41
[nfs]
172.16.1.31

#invertory主机清单定义方式
#方法一: 单台主机定义
[root@ansible ~]# cat /etc/ansible/hosts
10.0.0.7 ansible_ssh_port=22 ansible_ssh_user=root ansible_ssh_pass='1'

#方式二、IP+端口+用户+密码
[webs]
10.0.0.7 ansible_ssh_port=22 ansible_ssh_user=root ansible_ssh_pass='1'
10.0.0.8 ansible_ssh_port=22 ansible_ssh_user=root ansible_ssh_pass='1'

#方式三 配置别名方
[root@ansible ~]# cat /etc/ansible/hosts
[webs]
web01 ansible_ssh_host=10.0.0.7 ansible_ssh_port=22 ansible_ssh_user=root ansible_ssh_pass='1'

web02 ansible_ssh_host=10.0.0.8 ansible_ssh_port=22 ansible_ssh_user=root ansible_ssh_pass='1'

#方式四 变量使用
[root@ansible ~]# cat /etc/ansible/hosts
[webs]
web01 ansible_ssh_host=10.0.0.7
web02 ansible_ssh_host=10.0.0.8
[webs:vars]
ansible_ssh_port=22
ansible_ssh_user=root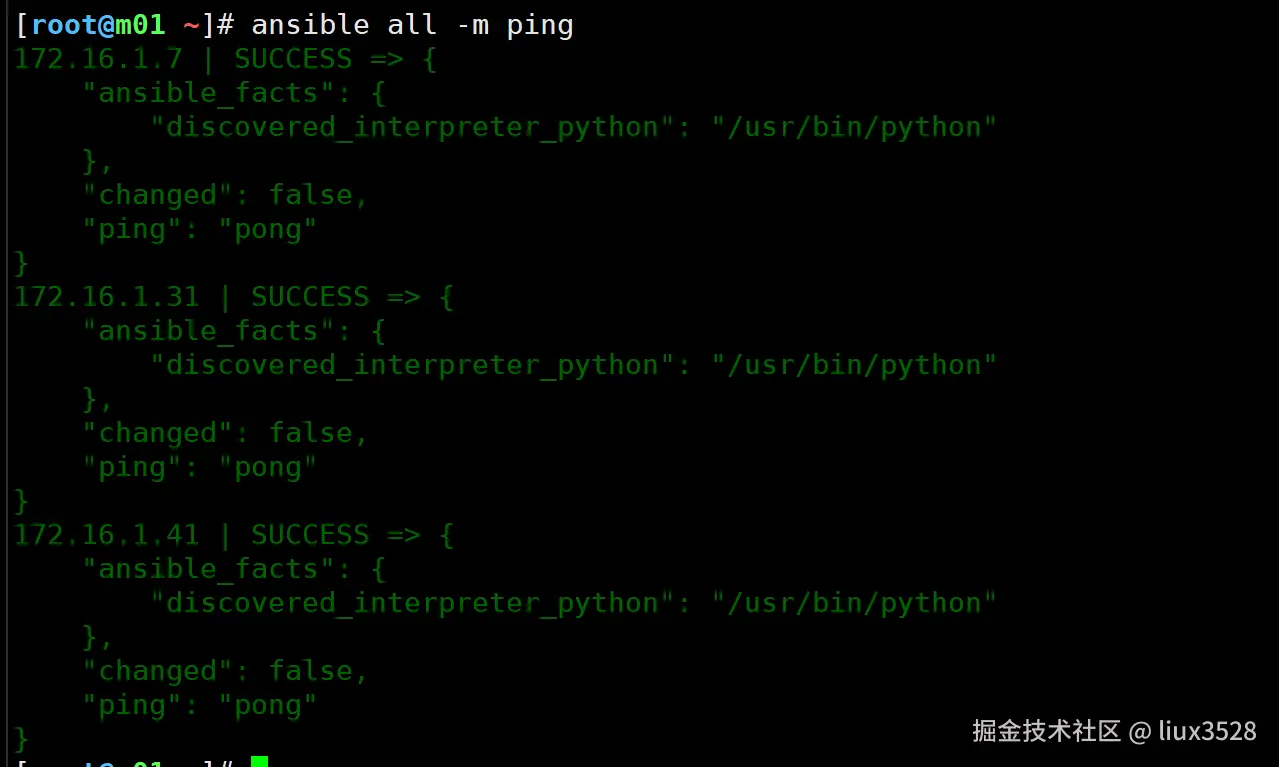
ansible_ssh_pass='1'- ansible测试三台服务器是否可以ping通
bash
ansible all -m ping

[root@m01 ~]# ansible all -m ping
172.16.1.7 | SUCCESS => {
    "ansible_facts": {
        "discovered_interpreter_python": "/usr/bin/python"
    },
    "changed": false,
    "ping": "pong"
}
172.16.1.31 | SUCCESS => {
    "ansible_facts": {
        "discovered_interpreter_python": "/usr/bin/python"
    },
    "changed": false,
    "ping": "pong"
}
172.16.1.41 | SUCCESS => {
    "ansible_facts": {
        "discovered_interpreter_python": "/usr/bin/python"
    },
    "changed": false,
    "ping": "pong"
}
主机清单分组详解:
需要我们进行分组:按照层次进行分组,按照功能/业务进行分组
4.2 子组(给组再分组)
csharp
[data:children]
backup
nfs
4.3小结
- 帮助文档
5.Ansible必知必会模块-ad-hoc
- ansible模块 modules
- ansible通过各种模块实现批量管理
- 一般来说这些模块对应着Linux里面的基本操作或服务管理
- 找出Linux场景操作对应的模块即可。
| 模块分类 | |
|---|---|
| 命令和脚本模块 | command模块 默认的模块,执行简单命令,不支持特殊符号 |
| shell模块 执行命令,支持特殊符号 | |
| script模块 分发脚本并执行 | |
| 文件 | file 创建目录,文件,软链接 |
| copy 远程分发文件,修改权限,所有者,备份 | |
| 服务 | systemd服务管理 |
| service 服务管理(了解) | |
| 软件包 | yum源 yum_repository |
| yum 命令 | |
| get_url下载软件 | |
| 系统管理 | mount 挂载 |
| cron 定时任务 | |
| 用户管理 | user 管理用户 |
| group 管理用户组 | |
| 调式模块 | ping 模块检查 ansible与其他节点连通性 |
| debug 用于检查/显示 变量 |
| ansible | |||
|---|---|---|---|
| ansible | 主机清单(all/web/172.16.1.7) | -m 模块 | -a 模块中的选项 |
| -m 指定模块 | |||
| -a 指定模块中的选项 |
5.1命令与脚本类模块
a)command模块
-
ans 默认的模块,适用于执行简单的命令,不支持特殊符号( -m command 可以不加)
-
批量获取所有主机的主机名
bash
 ansible all -m command -a 'hostname'
 ansible all  -a 'ip a s eth0'
b)shell模块
- 与command模块相似,但支持特殊符号
- 批量获取ip地址
sh
ansible all -m shell -a "ip a s eth0 |awk -F '[ /]+' 'NR==3{print \$3}'"温馨提示:
shell模块不推荐较为复杂的指令,如果需要执行可放在脚本中执行。
c)script模块
-
分发脚本(传输脚本)
-
运行脚本
-
批量执行脚本获取主机信息
sh
[root@m01 ~]# vim /server/scripts/ansible.sh
#!/bin/bash
#author :liux
#desc:系统巡检脚本

hostname
hostname -I
uptime
whoami
date +%F


ansible all -m script -a '/server/scripts/ansible.sh'
5.2 文件相关模块
a)file模块
- 管理文件,管理目录,创建软链接
- 查看帮助文档ansible-doc -s file
| file模块 | |
|---|---|
| ==path== | 路径(目录、文件),必须要写 |
| src | 源文件一般用于link(创建软链接模式) 用于指定源文件 |
| ==state== | 状态(模式) state=directory 创建目录 state=file(默认) 更新文件,如果文件不存在也不创建 state=link 创建软链接 state=touch 创建文件 state=absent 删除(:warning:注意:如果是目录,将递归删除目录) |
| mode | mode=755 创建并修改权限 |
| owner | owner=root |
| group | group=root |
- 创建文件
sh
#创建
ansible all -m file -a 'path=/opt/liux.txt state=touch'
#查看
ansible all -a 'ls -l /opt/liux.txt'- 创建目录
sh
ansible all -m file -a 'path=/app/ state=directory'- 创建软链接 /etc/hosts创建软链接到/opt下
sh
ln -s /etc/hosts  /opt/hosts
ansible all -m file -a 'src=/etc/hosts path=/opt/hosts state=link'- 创建/ans-backup 目录 所有者是liux
sh
ansible all -m file -a 'path=/app/ owner=liux group=liux mode=700 state=directory'- 删除
sh
ansible all -m file -a 'path=/app/ state=absent'b)copy模块
- 批量分发:scp
| copy模块 | |
|---|---|
| ==src== | source 源文件 |
| ==dest== | destination 目标文件 |
| backup | backup=yes 则会在覆盖前备份 |
| mode | mode=755 创建并修改权限 |
| owner | owner=root |
| group | group=root |
sh
ansible all -m copy -a 'src=/etc/hosts dest=/etc/hosts backup=yes'c)lineinfile
- 修改文件内容
sh
#查看帮助文档
ansible-doc -s lineinfile
5.3服务管理-sysmtemd
- 相当于是sysmtemctl命令:
- 开启/关闭/重启服务
- 开机自启动
| systemd模块 | |
|---|---|
| name | 用于指定服务名称 |
| enabled | yes开启自启动 |
| state | 表示服务开、关、重启 state=started 开启 state=stopped 关闭 state=reloaded 重读配置文件(服务支持) state=restarted 重启(关闭再开启) |
| daemon-reload | yes 是否重新加载对应的服务管理配置文件(用于书写systemctl配置文件) |
sh
#启动服务
ansible all -m systemd -a 'name=crond enabled=yes state=started'

#关闭服务
ansible all -m systemd -a 'name=firewalld enabled=no state=stopped'

#重启ssh服务
ansible all -m systemd -a 'name=sshd state=reloaded '
5.3 软件管理
- yum模块
- get_url模块
- yum_repository模块 yum源配置模块
a)yum模块
| yum命令 | |
|---|---|
| name | 指定软件包名字 |
| state | installed 安装(present)默认 removed 删除 (absent) lastest 安装或更新 |
| update_cache | 可以设置为no加加速 |
sh
ansible all -m yum -a 'tree,htop update_cache=no'b)get_url模块
- wget命令 所有主机能访问网络才行
- 推荐在管理节点下载好,使用copy分发即可。
| get_url模块 | |
|---|---|
| url | 指定下载的地址 |
| dest | 下载到哪个目录 |
sh
https: ˌ tengine.taobao.org/download/tengine-2.3.3.tar.gz下载到/app/tools目录下面
ansible all -m file -a 'path=/app/tools/ state=directory'
ansible all -m get_url -a'url="https: ˌ tengine.taobao.org/download/tengine-2.3.3.tar.gz" dest=/app/tools/'
c)yum_repository模块
- 书写好yum配置文件,copy分发过去即可。
| yum****源模块 yum_repository | |
|---|---|
| name | yum源中名字 epel |
| description | yum源的注释说明 对应的 是name的内容 |
| baseurl | yum源中 baseurl 下载地址 |
| enabled | 是否启动这个源 yes/no |
| gpgcheck | 是否启动gpgcheck功能 no |
| file | 指定yum源的文件 自动添加.repo 默认与模块名字 |
sh
root@m01 ~]# cat /etc/yum.repos.d/epel.repo
[epel]
name=Extra Packages for Enterprise Linux 7 - $basearch
baseurl=http: ˌ mirrors.aliyun.com/epel/7/$basearch
failovermethod=priority
enabled=1
gpgcheck=0
gpgkey=file: ˎ etc/pki/rpm-gpg/RPM-GPG-KEY-EPEL-7
sh
-m yum_repository
-a 'name=epel
description="Extra Packages for Enterprise Linux 7 -$basearch"
baseurl="http: ˌ mirrors.aliyun.com/epel/7/$basearch"
enabled=yes
gpgcheck=no
5.4用户管理
- user 用户管理
- group 用户组管理
| user模块 | |
|---|---|
| name | 用户名 |
| uid | 指定uid |
| group | 指定用户组 |
| shell | 指定命令解释器 |
| create_home | 是否创建家目录(yes/no) |
| state | present 添加 absent 删除 |
- 创建用户
sh
#创建www_ans用户 uid=2000的虚拟用户,先检查有没有该用户
ansible all -a 'id www_ans'
ansible all -m user -a 'name=www_ans uid=2000 shell=/sbin/nologin create_home=no state=present'- 批量更新密码
sh
#官网文档,生成密码
https://docs.ansible.com/ansible/latest/reference_appendices/faq.html#how-do-i-generate-encrypted-passwords-for-the-user-module

#官方ansible生成密码
ansible all -i localhost, -m debug -a "msg={{ '12366' | password_hash('sha512', 'mysecretsalt') }}"

ansible all -m user -a 'name=liux_ans password="$6$mysecretsalt$47o4R/btNUBdeUe.eAV/RbdNcZM7vXgMW
GhLsStZuSbzojBIhSKbrVC0UIFr4CLfLmusW6qmtgQ4SMhAFbcEl/" state=present'

#远程设置密码
ansible all -m shell -a 'echo 12366 |passwd --stdin liux_ans'
5.5 ansible ad-hoc
- ad-hoc简而言之就是"临时命令",执行完即结束,并不会保存
sh
1.yum模块
yum:
  name: 指定软件的名称
  state: 状态
      present: 安装软件
      absent:  卸载软件
[root@ansible ~]#ansible backup -m yum -a 'name=rsync state=present'

2.copy模块
copy:
     src: 源文件
     dest: 目标位置
     owner: 属主
     group: 属组
     mode: 权限
     content: 将content后面的字符串写入到dest目标文件中
     backup: yes  复制前先将dest目标的文件进行备份
[root@ansible ~]# ansible backup -m copy -a "src=1.txt dest=/root/ owner=ntp group=ntp mode=777 backup=yes"
将密码文件写入到目标位置一定要和配置文件相同: /etc/rsync.passwd
[root@ansible ~]# ansible backup -m copy -a 'content=rsync_backup:123456 dest=/etc/rsync.passwd mode=0600'

3.group user模块
group:
	 name: 组的名称
	 gid:  组id
	 state: present 和 absent
user:
     name: 用户名称
     uid: 666 指定uid号码
     group: www 不指定数字 指定组名称
     shell: /sbin/nologin  或者 /bin/bash
     create_home: false  # 默认为true 创建 false不创建
     state: present 创建
     state: absent  删除

创建组:
[root@ansible ~]# ansible backup -m group -a 'name=www gid=666 state=present'
创建用户:
[root@ansible ~]# ansible backup -m user -a 'name=www uid=666 group=www shell=/sbin/nologin create_home=false state=present'

4.file模块
file:
	path: 文件或目录的路径
    state: touch     创建文件
           directory 创建目录
    	   link      创建软链接
		   absent    删除
    owner:
 	group:
 	mode:

创建目录并修改权限
[root@ansible ~]# ansible backup -m file -a 'path=/root/oldboy state=directory owner=www group=www recurse=yes'

5.systemd模块
systemd:
       name: 服务名称
       state:
       	     started:     启动
       	     stopped:     停止
       	     restarted:   重启
       	     reloaded:    重新加载
       	     enabled: yes 开机自动启动
       	     enabled: no  开机禁止启动
[root@ansible ~]# ansible backup -m systemd -a 'name=rsyncd state=started enabled=yes'

6.mount挂载模块
mount:
	 src: 源设备
	 path: 挂载到本地的路径
	 fstype: nfs
	 state:
            absent	   # 卸载并且删除/etc/fstab配置
            mounted      # 挂载并且写入到/etc/fstab

 [root@ansible ~]# ansible web01 -m mount -a 'src=172.16.1.31:/code/blog path=/mnt fstype=nfs state=mounted'

 7.cron定时任务模块
cron:
	 minute: 分钟 */5
	 job: 定时任务命令
	 state: present 添加(不写默认就是创建或者添加)
	 	    absent  删除

[root@ansible ~]# ansible web01 -m cron -a 'name=ntpdate minute=*/5 job="ntpdate ntp1.aliyun.com &>/dev/null"'

8.其他模块
01)模块:commnd
[root@ansible ~]# ansible web01 -m  command -a 'ifconfig eth0'
02)script模块:
ansible web01 -m script -a  '/root/1.sh'  # 1.sh在ansible主机上
03)get_url模块: 下载软件
get_url:
	   url: 链接
	   dest: 下载到本地的位置
[root@ansible ~]# ansible web01 -m get_url -a 'url=https://img10.360buyimg.com/n1/g12/M00/08/03/rBEQYVGZ8F0IAAAAAAIapXb0bREAABlfAPtsn0AAhq9958.jpg dest=/root/'

04)firewalld 停止防火墙
[root@ansible ~]# ansible web01 -m systemd -a 'name=firewalld state=stopped enabled=no'

05)selinux 关闭selinux
[root@ansible ~]# ansible web01 -m selinux -a 'policy=targeted state=disabled'

06)yum_repository: 配置YUM仓库模块
[root@ansible ~]# ansible nfs -m yum_repository -a 'name=nginx description="Nginx YUM repo" baseurl=http://nginx.org/packages/centos/$releasever/$basearch/ enabled=yes gpgcheck=no gpgkey=https://nginx.org/keys/nginx_signing.key'

07)shell模块
[root@ansible ~]# ansible web01 -m shell -a 'ps axu|grep nginx'
5.6 ad-hoc部署rsync
sh
----------------------------------------------
写出rsync手动部署的步骤
1)安装rsync服务
yum -y install rsync
2)配置rsync服务 提前将配置文件收集到ansible管理主机
[root@ansible ~]# scp 10.0.0.41:/etc/rsyncd.conf .
3)根据配置创建必要数据
创建www用户
创建密码文件/etc/rsync.passwd
密码权限600

创建目录
/backup
修改目录权限属主属组www

4)启动rsync服务
systemctl start rsyncd
systemctl enable rsyncd
-----------------------------------------------
1.配置免密码登录
[root@ansible ~]# ssh-copy-id -i .ssh/id_rsa.pub 10.0.0.41
2.配置主机清单
root@ansible ~]# cat /etc/ansible/hosts
[nfs]
10.0.0.31
[webs]
web01 ansible_ssh_host=10.0.0.7
web02 ansible_ssh_host=10.0.0.8
[backups]
backup ansible_ssh_host=10.0.0.41

3.通过ansible单条命令实现远程部署rsync服务
01)安装rsync
[root@ansible ~]# ansible backup -m yum -a 'name=rsync state=present'
02)配置rsync
将rsync配置文件拷贝到目标位置/etc/rsyncd.conf
[root@ansible ~]# ansible backup -m copy -a 'src=rsyncd.conf dest=/etc/rsyncd.conf'
03)根据配置文件创建必要数据
  a.创建组
[root@ansible ~]# ansible backup -m group -a 'name=www gid=666 state=present'
  b.创建用户
[root@ansible ~]# ansible backup -m user -a 'name=www uid=666 group=www shell=/sbin/nologin create_home=false state=present'
  c.将密码文件写入到目标位置一定要和配置文件相同: /etc/rsync.passwd
[root@ansible ~]# ansible backup -m copy -a 'content=rsync_backup:12366 dest=/etc/rsync.passwd mode=0600'
  d.创建/backup并修改属主属组
[root@ansible ~]# ansible backup -m file -a 'path=/backup state=directory owner=www group=www'

4)启动服务
[root@ansible ~]# ansible backup -m systemd -a 'name=rsyncd state=started enabled=yes'
5.7 ad-hoc部署nfs
sh
------------------------------------------------
1.安装nfs
yum -y install nfs-utils
2.配置nfs
vim /etc/exports
/code/blog  172.16.1.0/24(rw,sync,all_squash,anonuid=666,anongid=666)
3.根据配置文件创建必要数据
mkdir -p /code/blog
创建www组和用户
授权/code/blog
4.启动nfs
------------------------------------------------
ansible部署NFS
1.密钥下发
ssh-copy-id -i /root/.ssh/id_rsa.pub 10.0.0.31
2.写入主机清单
[root@ansible ~]# cat /etc/ansible/hosts
[nfs]
10.0.0.31
3.安装nfs
ansible nfs -m yum -a 'name=nfs-utils state=present'
4.拷贝配置文件到/etc/exports
需提前拷贝一份写好的文件  scp 10.0.0.31:/etc/exports .
ansible nfs -m copy -a 'src=exports dest=/etc/exports
5.根据配置创建数据
ansible nfs -m group -a 'name=www gid=666'
ansible nfs -m user -a 'name=www group=www uid=666 shell=/sbin/nologin create_home=false'
ansible nfs -m file -a 'path=/code/blog/ state=directory owner=www group=www'

6.启动nfs
ansible nfs -m systemd -a 'name=nfs state=started enabled=yes'

7.挂载nfs
[root@m01 ~]# ansible web01 -m mount -a 'src=172.16.1.31:/code/blog path=/mnt fstype=nfs state=mounted'
5.8 setup模块
sh
1.查看主机所有详细信息
ansible web01 -m setup
2.获取ip地址
ansible web01 -m setup -a 'filter=ansible_default_ipv4'
3.获取主机名
ansible web01 -m setup -a 'filter=ansible_fqdn'
4.获取内存信息
ansible web01 -m setup -a 'filter=ansible_memory_mb'
5.获取磁盘信息
ansible web01 -m setup -a 'filter=ansible_devices'


6.其他参数信息
ansible_all_ipv4_addresses:仅显示ipv4的信息。
ansible_devices:仅显示磁盘设备信息。
ansible_distribution:显示是什么系统,例:centos,suse等。
ansible_distribution_major_version:显示是系统主版本。
ansible_distribution_version:仅显示系统版本。
ansible_machine:显示系统类型,例:32位,还是64位。
ansible_eth0:仅显示eth0的信息。
ansible_hostname:仅显示主机名。
ansible_kernel:仅显示内核版本。
ansible_lvm:显示lvm相关信息。
ansible_memtotal_mb:显示系统总内存。
ansible_memfree_mb:显示可用系统内存。
ansible_memory_mb:详细显示内存情况。
ansible_swaptotal_mb:显示总的swap内存。
ansible_swapfree_mb:显示swap内存的可用内存。
ansible_mounts:显示系统磁盘挂载情况。
ansible_processor:显示cpu个数(具体显示每个cpu的型号)。
ansible_processor_vcpus:显示cpu个数(只显示总的个数)
6.Ansible-剧本与变量(PlayBook)
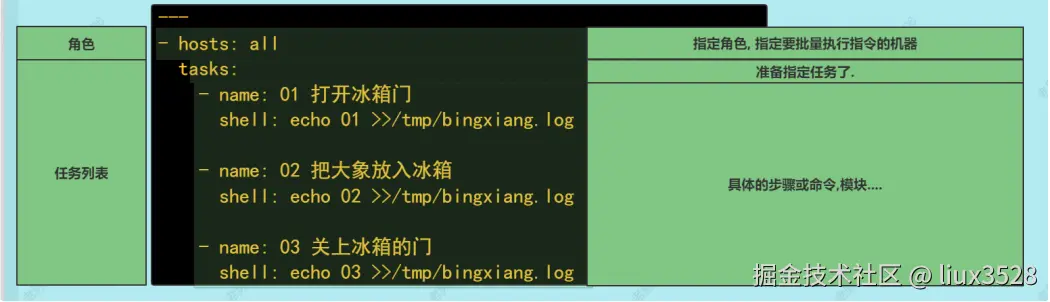
PlayBook即"剧本","兵书"之意,PlayBook是由以下部分组成的
play: 定义的是主机的角色。(主角还是配角,找哪个明星)task: 定义的是具体执行的任务。(角色的台词和动作)playbook: 由一个或多个play(角色)组成,一个play(角色)可以包含多个task(台词,动作,大腕每集拍什么)
6.1模块
01 mount模块
- 实现mount命令进行挂载,可以修改/etc/fstab实现永久挂载
| mount模块 | |
|---|---|
| fstype | 指定文件系统:xfs、ext4,iso9660,nfs |
| src | 源地址(nfs地址 172.16.1.31/data) |
| path | 挂载点 |
| ==state== | ==absent== 卸载并修改fstab文件 ==mounted== 挂载并修改fstab 文件 umounted 卸载不修改fstab文件 present 仅修改/etc/fstab 不挂载 remounted 重新挂载 |
sh
#通过ansible管理,在web01上挂载nfs:/data挂载到web01的/ans-upload/
#1.nfs    服务端配置,目录
[root@nfs01 ~]# showmount -e 172.16.1.31
Export list for 172.16.1.31:
/nfsdata 172.16.1.0/24
/data    172.16.1.0/24

#2.web01  是否安装nfs
[root@web01 ~]# rpm -qa |grep nfs
libnfsidmap-0.25-19.el7.x86_64
nfs-utils-1.3.0-0.68.el7.2.x86_64

#3.web01  挂载
ansible 172.16.1.7 -m mount -a 'src=172.16.1.31:/data/ path=/ans-upload/ state=mounted fstype=nfs'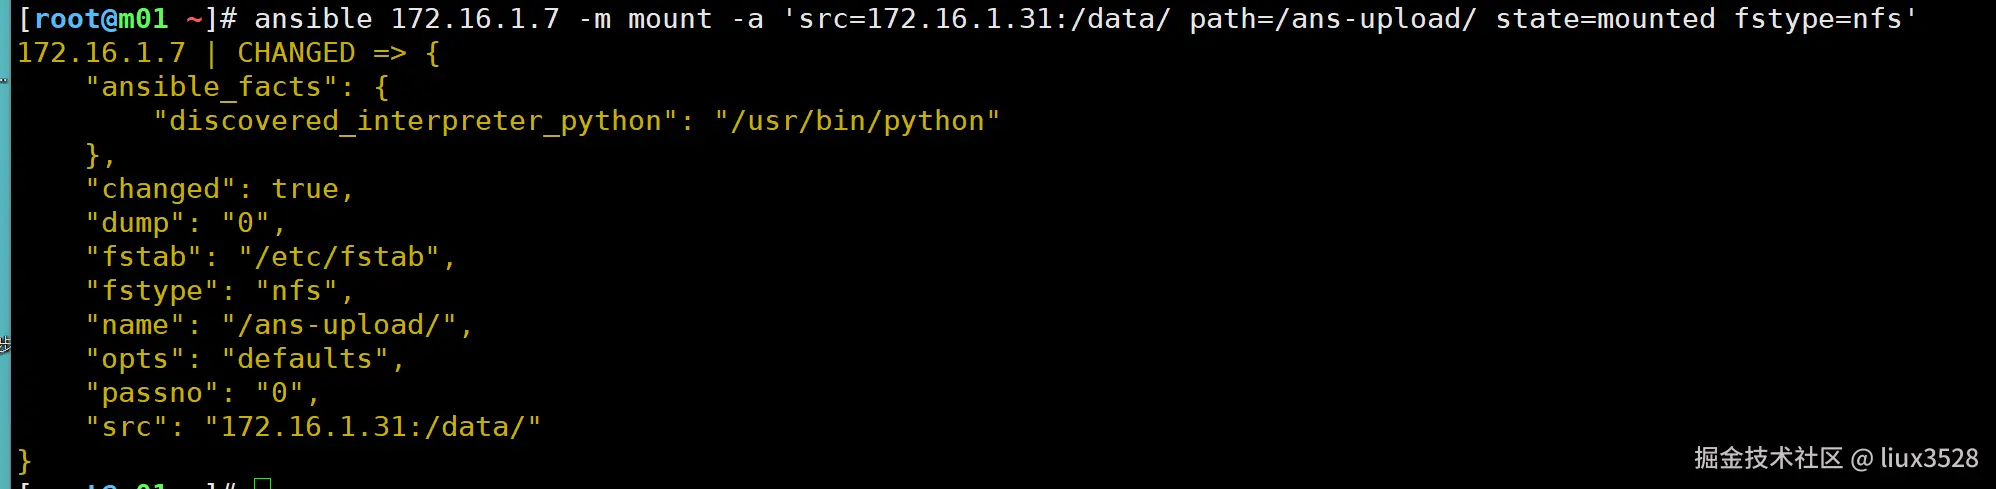

02 cron 模块
- 用于管理系统的定时任务
| cron 模块 定时任务 | |
|---|---|
| name | 定时任务名称,对应下面注释的内容 |
| minute | 分钟 |
| hour | 小时 |
| day | 天 |
| month | 月 |
| week | 周 |
| job | 指定命令或脚本(定向到空)job="/sbin/nptdate nt1aliyun.com &>/dev/null" |
| state | present 添加定时任务(默认) absent删除 |
sh
#2. sync time liux
2 * * * * /sbin/ntpdate ntp1.aliyun.com &>/dev/null
sh
#批量创建定时任务
ansible all -m cron -a 'name="2. sync time liux" minute="*/5" job="/sbin/ntpdate ntp1.aliyun.com &>/devnull" state=present '

#查看
ansible all -a 'crontab -l'

#批量删除定时任务,通过name删除
ansible all -m cron -a 'name="2. sync time liux" state=absent'
6.2 剧本
- 剧本:playbook 用于长久保存并且实现批量管理,维护,部署的文件
- 剧本yaml格式,yaml格式的文件.空格,冒号
| ans剧本 | ans ad-hoc | |
|---|---|---|
| 共同点 | 批量管理,使用模块 | 批量管理,使用模块 |
| 不同点 | 重复调用 | 不是很方便,不容易重复 |
| 应用建议(应用场景 ) | 部署服务,多个步骤的服务 | 测试模块,临时性任务 |
- 剧本书写格式
sh
#1. 书写剧本 注意以.yml或.yaml结尾

#2. 执行剧本
ansible-playbook 01.show.yml
执行的时候有奶牛: 可以删除软件或修改ansible.cfg配置进行关闭 #nocows = 1去掉注释即可
具体书写注意事项: 同一个层级的内容对齐的. 不同层级的通过2个空格对齐 不能使用tab键
6.3剧本案例
01 创建目录并分发文件
1.创建目录/server/files
2.将/etc/hosts文件分发过去 /server/files
sh
#1.创建
-m file  -a 'path=/server/files state=directory'
#2.分发
-m copy -a 'src=/etc/hosts dest=/server/files'- 编辑剧本 vim /server/scripts/playbook/02.dist_file.yml
yaml
- hosts: all
  tasks:
    - name: 01 创建目录
      file:
        path: /server/files
        state: directory

    - name: 02 分发文件
      copy:
        src: /etc/hosts
dest: /server/files/- 测试并分发
sh
ansible-playbook -C  02.dist_file.yml

# -C 测试剧本是否有报错,不会真的创建于分发

ansible-playbook  02.dist_file.yml
02 分发软件包,安装软件包,启动服务
- zabbix-agent软件包,分发软件包
- 安装软件包
- 启动开机自启动
03 nfs服务
-
nfs服务端:在backup上部署nfs服务,共享/backup-nfs目录,all_squash,nfsnobody
-
nfs客户端:web挂载 /ans-upload目录挂载 nfs服务端共享的/backup-nfs(永久挂载)
-
服务端流程:
- 部署nfs-utils
- 修改配置文件
- 创建共享目录,改所有者
- 启动rpcbind,nfs
-
客户端:
- 安装nfs-utils
- 挂载与永久挂载
-
编写剧本 vim 04.deploy_nfs.yml
yaml
- hosts: backup
  tasks:
    - name: 01. 部署nfs-utils
      yum:
        name: nfs-utils,rpcbind
        state: installed
    - name: 02. 修改配置文件
      #copy发送过去
      lineinfile:
        path: /etc/exports
        line: "/backup-nfs/ 172.16.1.0/24(rw,all_squash) "
    - name: 03. 共享目录
      file:
        path: /backup-nfs/
        owner: nfsnobody
        group: nfsnobody
        state: directory
    - name: 04. 启动服务rpc
      systemd:
        name: rpcbind
        enabled: yes
        state: started
    - name: 04. 启动服务nfs
      systemd:
        name: nfs
        enabled: yes
        state: started

- hosts: web
  tasks:
    - name: 01. 部署服务
      yum:
        name: nfs-utils,rpcbind
        state: installed

    - name: 02. 挂载
      mount:
        src: 172.16.1.41:/backup-nfs/
        path: /ans-upload/
        state: mounted
fstype: nfs- 测试
sh
ansible-playbook 04.deploy_nfs.yml 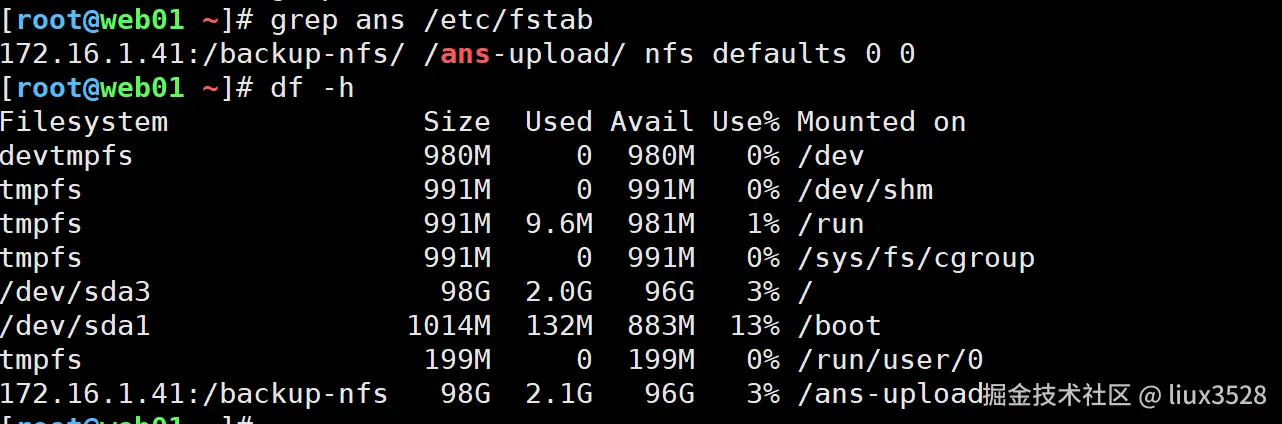
6.4 ansible中的变量(vars)
- 变量无处不在
| 可以定义变量的地方 | |
|---|---|
| invertory主机清单中定义变量 | 可以用于批量修改主机 |
| 命令行中 | 几乎不用 |
| ==在剧本文件中定义== | 比较常用 |
| 变量文件,==根据主机清单的分组进行定义变量== | 如果多个剧本,使用相同的变量 |
| facts变量 | 一般用户获取主机基本信息:ip,主机名,系统(centos/ubuntu) 如果不需要可以关闭,用于加速剧本的执行 |
| ==register 变量(注册变量)== | ip=hostname -I 调用命令结果 |
01 在剧本(playbook)中定义变量:arrow_up_small:
- 批量创建/liux/test/upload
yaml
[root@m01 playbook]# cat 05.vars.yml
- hosts: all
  vars:
    dir: /liux/test/upload
  tasks:
    - name: mkdir
      file:
        path: "{{ dir }}"
        state: directory
温馨提示:如果变量是某个选项的开头,则变量引用的时候需要加上双引号。
path: "{{ dir }}"
path: /app/{{ dir }} 这种可以不加
02 共用变量-变量文件:star::star::star:
sh
[root@m01 /server/scripts/playbook]# cat 05.vars.yml
- hosts: all
vars_files: ./vars.yml
tasks:
- name: file
file:
path: "{{ dir }}/{{ user }}-{{ file }}"
state: touch

[root@m01 /server/scripts/playbook]# cat vars.yml
dir: /tmp/
file: lidao.txt
user: lidao996kkk
03 主机组创建变量文件 (官方推荐)
- group_vars
sh
group_vars/
lb/vars.yml #存放lb组的变量
web/vars.yml #存放web组的变量
data/vars.yml #存放xxx组的变量
all/vars.yml #所有主机共用的变量- 创建属于liux用户的文件
sh
[root@m01 /server/scripts/playbook]# cat 05.vars.yml
- hosts: all
  tasks:
    - name: file
      file:
        path: "{{ dir }}/{{ user }}-{{ file }}"
        owner: "{{ user }}"
        group: "{{ user }}"
        state: touch


[root@m01 /server/scripts/playbook]# tree -F
├── 05.vars.yml
└── group_vars/
      └── all/
        └── vars.yml


[root@m01 /server/scripts/playbook]# cat  group_vars/all/vars.yml
dir: /opt/
file: liux.txt
user: liux
⚠温馨提示: group_vars应用提示
一般使用group_vars中的all分组即可
04 facts变量
Ansible facts是在被管理追击上通过Ansible自动采集发现的变量。
facts包含每台特定的主机信息。比如:被控端的主机名、IP地址、系统版本、CPU数量、内存状态、磁盘状态等等
-
运行剧本的时候ans会收集每个主机的基本信息,这些信息形成的变量叫做facts变量.
-
facts变量setup模块获取
sh
常用fact变量
 ansible_hostname #主机名
 ansible_memtotal_mb #内存大小(总计) 单位mb
 ansible_processor_vcpus #cpu数量

 ansible_default_ipv4.address #默认的网卡ip eth0
 ansible_distribution #系统发行版本名字 CentOS Ubuntu

 ansible_processor_vcpus
 ansible_processor_core
11 ansible_date_time.date- 批量修改系统/etc/motd文件,登录的时候输出系统的基本信息.
输出主机名
输出内存总大小
输出ip地址
发行版本
cpu数
核心数
yaml
#1. 创建包含变量的模板文件
#2. 发送模板文件替代/etc/motd 即可
[root@m01 /server/scripts/playbook]# cat 07.change_motd.yml
- hosts: all
  tasks:
    - name: 分发motd文件
      templdate:
        src: templates/motd.j2
        dest: /etc/motd
        backup: yes
    - name: 分发motd文件
      cp:
        src: templates/motd.j2
        dest: /tmp/motd
        backup: yes


[root@m01 /server/scripts/playbook]# cat templates/motd.j2
#######################################
welcome to oldboy elastic linux system
操作需谨慎,删根弹指间.
主机名: {{ ansible_hostname }}
ip地址: {{ ansible_default_ipv4.address }}
内存大小: {{ ansible_memtotal_mb }}
CPU数量: {{ ansible_processor_vcpus }}
核心总数: {{ ansible_processor_cores }}
发行版本: {{ ansible_distribution }}
温馨提示: template vs copy模块
copy仅仅传输数据,复制文件.
template 传输数据,复制文件的时候,文件中的变量会被解析和运行.
关于facts变量实际应用案例:
通过facts变量获取系统的基本信息
通过facts变量获取信息并进行判断
如果不需要可以进行关闭,加速剧本的运行( gather_facts: no)
- 关闭facts
sh
[root@m01 ~]# vim facts.yml
- hosts: web_group
  gather_facts: no #关闭信息采集
  tasks:
05 register变量
-
本质上就是用来实现脚本中的
反引号功能. ip=\hostname -I -
用户通过命令获取的内容都存放到Register变量中.
sh
[root@m01 /server/scripts/playbook]# cat 08.reg-vars.yml
- hosts: all
  gather_facts: no
  tasks:
    - name: get date
      shell: date +%F
      register: result

    - name: print result 变量内容
      debug:
        msg: |
              "register变量的全部内容是:{{ result.stderr }}"
               "register变量的精确的内容是:{{ result.stdout}}"
register注册变量: 变量.stdout 获取输出即可
符号说明: msg:中的|表示下面的内容是多行. |也可以用于其他模块中.
- 某个Register变量的信息
sh
{
 'stderr_lines': [],
 u'changed': True,
 u'end': u'2022-08-24 16:38:27.887829',
 'failed': False,
 u'stdout': u'2022-08-24',
 u'cmd': u'date +%F',
 u'rc': 0,
 u'start': u'2022-08-24 16:38:27.860574',
 u'stderr': u'',
 u'delta': u'0:00:00.027255',
 'stdout_lines': [u'2022-08-24'],
 'ansible_facts': {u'discovered_interpreter_python':u'/usr/bin/python'}
6.5 playbook重构rsync
sh
手动部署rsync服务:
1.安装rsync
2.配置rsync(配置文件提前收集)
3.创建必要数据
  创建用户
  创建密码文件 权限
  创建目录 修改权限
4.启动

[root@m01 /server/scripts/playbook]# cat rsync.yml
- hosts: backup
  tasks:
    - name: Install Rsync Server
      yum:
        name: rsync
        state: present
    - name: configure rsync server
      copy:
        src: rsyncd.conf
        dest: /etc/rsyncd.conf
    - name: create group www
      group:
        name: www
        gid: 666
    - name: create user www
      user:
        name: www
        uid: 666
        group: www
        shell: /sbin/nologin
        create_home: false
    - name: create passwd file
      copy:
        content: rsync_backup:12366
        dest: /etc/rsync.passwd
        mode: 0600
    - name: create backup dir
      file:
        path: /backup
        state: directory
        owner: www
        group: www
    - name: start rsync server
      systemd:
        name: rsyncd
        state: started
        enabled: yes

#语法检查
[root@m01 /server/scripts/playbook]# ansible-playbook --syntax-check rsync.yml
#模拟运行
[root@m01 /server/scripts/playbook]# ansible-playbook -C  rsync.yml
#运行
[root@m01 /server/scripts/playbook]# ansible-playbook  rsync.yml
6.5 playbook重构nfs
sh
手动配置nfs
1.安装nfs
  yum -y install nfs-utils
2.配置nfs
  exports(提前准备)
3.创建必要数据信息
  创建www用户
  创建共享目录/data/blog 修改属主属组
4.启动nfs

[root@m01 /server/scripts/playbook]# cat nfs.yml
- hosts: nfs
  tasks:
    - name: install nfs-utils server
      yum:
        name: nfs-utils
        state: present
    - name: configure nfs server
      copy:
        src: exports
        dest: /etc/exports
    - name: create group www
      group:
        name: www
        gid: 666
    - name: create user www
      user:
        name: www
        uid: 666
        group: www
        shell: /sbin/nologin
        create_home: false
    - name: create /code/blog dir
      file:
        path: /code/blog
        state: directory
        owner: www
        group: www
    - name: start nfs server
      systemd:
        name: nfs
        state: started
        enabled: yes
7.Ansible-进阶-流程控制
7.1流程控制
- handler
- when
- loop/with_item
01 handler触发器
-
修复服务的配置文件之后,重启服务。
-
有时候配置文件没有变化的时候,则不需要重启服务,仅仅配置文件变化才需要重启服务。
-
没有使用notify和handler触发器
sh
[root@m01 playbook]# cat 09.ans_handler.yml
- hosts: backup
  gather_facts: no
  tasks:
    - name: 分发配置文件
      copy:
        src: files/exports
        dest: /etc/exports
        backup: yes
    - name: 重启服务
      systemd:
        name: nfs
        state: reloaded
如上代码,不管分发的配置文件发生变化与否,都会重启服务
- 使用notify和handler
sh
[root@m01 playbook]# cat 09.ans-user-handler.yml
- hosts: backup
  gather_facts: no
  tasks:
    - name: 分发配置文件
      copy:
        src: files/exports
        dest: /etc/exports
        backup: yes
      notify:
        - 重启服务

  handlers:
    - name: 重启服务
      systemd:
        name: nfs
        state: reloaded
只有当分发的配置文件发生变化,notify会根据 "重启服务" 去handlers查找,然后重启服务
02 when判断
- when进行判断,一般与变量一起使用。
- 一般facts变量或者register变量较多。
sh
[root@m01 playbook]# vim 10.when.yml

- hosts: all
  tasks:
    - name: 只有输出信息
      debug:
        msg: "这是{{ansible_hostname}},正在安装软件......"
      when: ansible_hostname == "backup"
when中使用的符号:
== 等于
is match(web)
ansible_hostname is match("web|backup") ansible_hostname is not match("web|backup")
- 案例: 如果系统是centos则 安装sl,cowsay,如果是ubuntu 则安装cmatrix
sh
[root@m01 /server/scripts/playbook]# cat 11.when-sys.yml
- hosts: all
  tasks:
    - name: yum sl,cowsay
      yum:
        name: sl,cowsay
        state: installed
        when: ansible_distribution == "CentOS"

    - name: apt cmatrix
      apt:
        name: cmatrix
        state: present
        when: ansible_distribution == "Ubuntu"

#and
 when: ( ansible_distribution == "CentOS" and ansible_hostname == "web01" )
 或者
  when:
        - ansible_distribution == "CentOS"	  # 判断版本为centos
- ansible_hostname == "web01" # 判断主机名称为web01- 通过nginx返回结果来判断是否让nginx重启
sh
[root@ansible ansible]# cat when.yml
- hosts: web01
  tasks:
    - name: Configure Nginx file
      copy:
        src: nginx.conf
        dest: /etc/nginx/nginx.conf

    - name: test nginx file
      shell: 'nginx -t'
      ignore_errors: yes
      register: ngx_re

    - name: print ngx_re    # 调试完成后可以取消debug输出
      debug:
        msg: "{{ ngx_re.stderr_lines }}"

    - name: Restart Nginx Server
      systemd:
        name: nginx
        state: restarted
      when: ngx_re.stderr_lines is search "ok"
03 循环
- with_items
- loop
sh
#批量循环启动rpcbind和nfs服务
[root@m01 playbook]# cat 12.loop.yml
- hosts: backup
  gather_facts: false
  tasks:
    - name: 重启服务
      systemd:
        name: "{{ item }}"
        state: restarted
      loop:
        - rpcbind
        - nfs
loop和with_items用法一致
- 循环创建用户
sh
[root@m01 playbook]# vim 12.loop_user.yml
- hosts: web01
  tasks:
    - name: Create www oldboy User
      user:
        name: "{{ item.name }}"
        uid: "{{ item.uid }}"
        group: "{{ item.group }}"
        shell: "{{ item.shell }}"
        create_home: "{{ item.home }}"
        state: present
      loop:
        - { name: 'www',uid: '666' ,group: 'www', shell: '/sbin/nologin',home: 'false' }
- { name: 'oldboy',uid: '667' ,group: 'root', shell: '/bin/bash',home: 'true'}- 创建多个文件
sh
创建多个文件:
file:
	path: "{{ item.path }}"
	owner: "{{ item.owner }}"
	group: "{{ item.gorup }}"
	state: touch
	loop:
	  - { path: 1.txt , owner: www,group: www}
	  - { path: 2.txt , owner: www,group: www}
7.2剧本调试
- 剧本单步执行
- tag标签
- 忽略错误
01 单步执行
- -C 模拟运行 不做出改变
- --syntax-check 只做语法检查,不运行
- --step 单步运行 y执行这个task,n忽略这个task,c自动运行
02 tag标签
- 类似于超市物品的分类,只不过tag标签是给ansible中的task进行分类,加上标记。
- 运行剧本的时候 运行指定的tag标签,或排除某些标签。
sh
 tags:
   - 标签名
运行剧本的时候
	-t 运行的标签,如果多个标签通过","分割
	--skip-tags 排除指定的tags,如果多个标签通过","分割
03 忽略错误
- 运行剧本的时候,因为重复运行导致的错误提示,并发是真的错误.
- 比如:目录已经存在,用户已经存在.
- 在这种情况下,我们可以通过ignore_errors忽略错误,让剧本可以继续运行.
sh
ignore_errors: true
	true/false
	yes/no
7.3 Jinja2模板
- 分发nginx配置文件 ,需要使用template模块中server.conf.j2 进行分发
sh
[root@m01 playbook]# cat 16.jinja2-for.yml
- hosts: web
  gather_facts: false
  tasks:
    - name: 分发nginx配置文件
      template:
        src: templates/server.conf.j2
        dest: /tmp/server.conf
sh
[root@m01 playbook]# cat templates/server.conf.j2
{% for ip in [1,2,3,4,5,6] %}
  10.0.0.{{ ip }}
{%endfor%}
sh
ansible-playbook 16.jinja2-for.yml- 分发之后结果如下

7.4 include文件包含
-
在我们书写剧本的时候,会涉及到多个步骤,还会涉及到服务端和客户端。
-
发现剧本越来越大,不容易进行分析与阅读。
-
把剧本拆分开,分成2个文件(服务端、客户端)。
-
这时候可以通过include_tasks的功能把多个剧本文件合并在一起,让剧本变成多个,方便阅读与维护。
-
案例: 通过include_tasks将部署nfs服务拆分04.deploy_nfs.yml
- 01 deploy_nfs_server.yml
- 02 deploy_nfs_client.yml
- 03 deplay_nfs_all.yml
sh
[root@m01 playbook]# cat deploy_nfs_server.yml
- name: 01. 部署nfs-utils
  yum:
    name: nfs-utils,rpcbind
    state: installed
- name: 02. 修改配置文件
  #copy发送过去
  lineinfile:
    path: /etc/exports
    line: "/backup-nfs/ 172.16.1.0/24(rw,all_squash) "
  notify:
    - restart nfs server
- name: 03. 共享目录
  file:
    path: /backup-nfs/
    owner: nfsnobody
    group: nfsnobody
    state: directory
- name: 04. 启动服务rpc
  systemd:
    name: rpcbind
    enabled: yes
    state: started
- name: 04. 启动服务nfs
  systemd:
    name: nfs
    enabled: yes
    state: started
sh
[root@m01 playbook]# cat deploy_nfs_client.yml
- name: 01. 部署服务
  yum:
    name: nfs-utils,rpcbind
    state: installed

- name: 02. 挂载
  mount:
    src: 172.16.1.41:/backup-nfs/
    path: /ans-upload/
    state: mounted
    fstype: nfs
sh
[root@m01 playbook]# cat deploy_nfs_all.yml
- hosts: nfs
  tasks:
    - include_tasks: deploy_nfs_server.yml
  handlers:
    - name: restart nfs server
      systemd:
        name: nfs
        state: reloaded
- hosts: web
  tasks:
    - include_tasks: deploy_nfs_client.yml
8.Ansible-角色(Roles)
8.1 概述
- 是一套目录结构的要求与标准,让我们书写剧本的时候,把剧本的内容和需要的文件,按照目录要求,分门别类存储.
- 目录规范
- 模块化思想
- 尽量多使用变量
-
ansible-galaxy init rsync


8.2 案例:roles方式部署nfs-server端
bash
ansible-galaxy init nfs
#创建roles标准化目录
[root@m01 roles]# tree -F
.
├── hosts/
├── nfs-server/
│   ├── files/
│   │   └── exports
│   ├── handlers/
│   │   └── main.yml
│   ├── tasks/
│   │   └── main.yml
│   └── templates/
│       └── motd.j2
└── top.yml

6 directories, 5 files

#编写主文件
[root@m01 roles]# vim nfs-server/tasks/main.yml
- name: 01. 部署nfs-utils
  yum:
    name: nfs-utils,rpcbind
    state: installed
  tags:
    - 01-install-nfs
- name: 02. 修改配置文件
  copy:
    src: exports
    dest: /etc/exports
    backup: yes
  tags:
    - 02-conf
  notify:
    - restart nfs server
- name: 03. 共享目录
  file:
    path: /backup-nfs/
    owner: nfsnobody
    group: nfsnobody
    state: directory
  tags:
    - 03-mkdir
- name: 04. 启动服务rpc,nfs
  systemd:
    name: "{{ item }}"
    enabled: yes
    state: started
  loop:
    - rpcbind
    - nfs
  tags:
    - 04-start-service
- name: 05 分发motd
  template:
    src: motd.j2
    dest: /etc/motd
    backup: yes
  tags:
    - 05-motd


#编辑不含变量的配置文件
[root@m01 roles]# cat nfs-server/files/exports
/backup-nfs/ 172.16.1.0/24(rw,all_squash)

#编辑handler触发器部分
[root@m01 roles]# cat nfs-server/handlers/main.yml
- name: restart nfs server
  systemd:
    name: nfs
    state: reloaded

#使用变量模板文件,以.j2结尾
[root@m01 roles]# cat nfs-server/templates/motd.j2
#######################################
 welcome to oldboy elastic linux system
 操作需谨慎,删根弹指间.
 主机名: {{ ansible_hostname }}
 ip地址: {{ ansible_default_ipv4.address }}
 内存大小: {{ ansible_memtotal_mb }}
 CPU数量: {{ ansible_processor_vcpus }}
 核心总数: {{ ansible_processor_cores }}
发行版本: {{ ansible_distribution }}- 书写剧本入口
sh
[root@m01 roles]# cat top.yml
- hosts: backup
  roles:
- role: nfs-server- 运行与调试
sh
#注意运行时候指定hosts文件和当前要与top.yml在同一个目录.
ansible-playbook -i hosts top.yml
8.3 加入变量
- 路径、用户、uid、gid、域名/端口
sh
#新增变量目录与文件group_vars/all/main.yml

#编辑变量文件
[root@m01 roles]# cat group_vars/all/main.yml
nfs_share_dir: /backup-nfs/
nfs_user: nfsnobody
nfs_user_id: 65534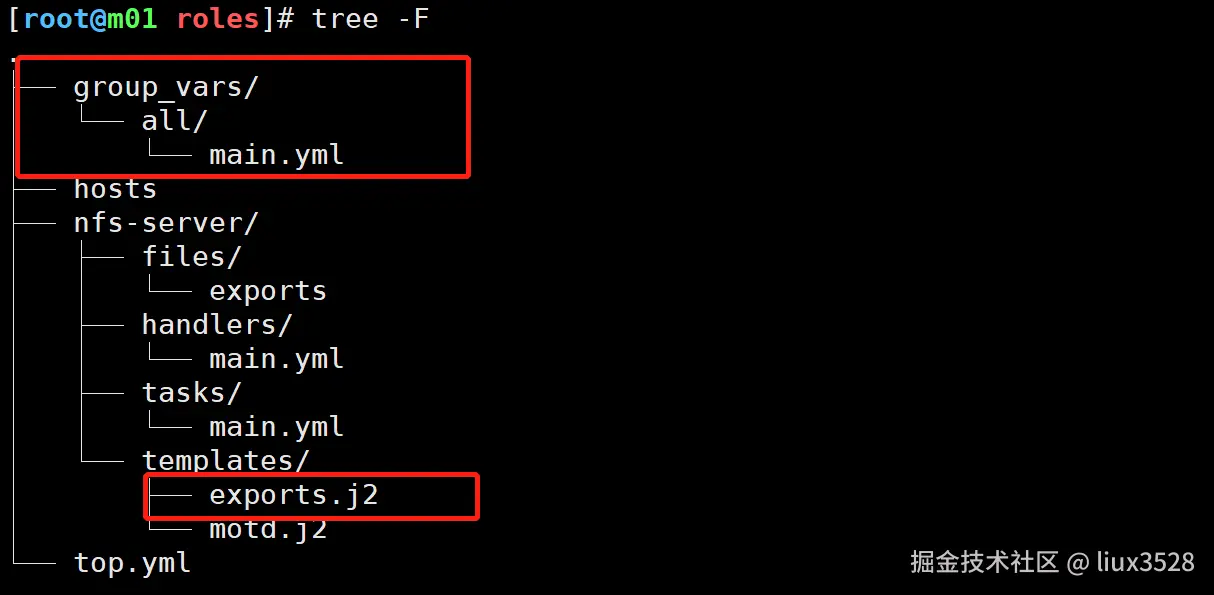
sh
#主剧本中修改变量
- name: 02. 修改配置文件
  template:
    src: exports.j2
    dest: /etc/exports
    backup: yes
  tags:
    - 02-conf
  notify:
    - restart nfs server

- name: 03. 共享目录
  file:
    path: "{{ nfs_share_dir }}"
    owner: "{{ nfs_user }}"
    group: "{{ nfs_user }}"
    state: directory
  tags:
    - 03-mkdir
sh
# 在模板目录中新增exports.j2
[root@m01 roles]# vim nfs-server/templates/exports.j2

{{ nfs_share_dir }} 172.16.1.0/24(rw,all_squash,anonuid={{ nfs_user_id }} ,anongid={{ nfs_user_id }})
9.Ansible-Vault
- ansible-vault用于加密敏感信息
- hosts文件 加密
- 变量文件 加密
sh
#进行加密
ansible-vault encrypt 文件
#进行使用
ansible或ansible-playbook --ask-vault-pass 即可
#彻底解密
ansible-vault decrypt hosts
10.Ansible-Galaxy
- 别人的roles
sh
ansible-galaxy collection install nginxinc.nginx_core11.Ansible-优化
-
性能
- ssh连接速度优化,关闭UseDNS,GSSAPIAuthcation ....
- 不要让ansible运行交互式的命令,非要用使用命令的非交互模式.
- yum安装本地安装.(自建yum源,自己制作的rpm包)
- 调整ansible并发数量( -f 调整并发数量 默认是5 ansible.cfg forks=5,实际调整根据负载情况.)
- 给ansible配置缓存,队列
- 给主机进行分组操作
- 关闭gather_facts,如果不用facts变量可以关闭, 剧本中:gather_facts: false 配置文件:gathering = explicit
- 关闭host,key,check 一般使用密码认证的时候需要关闭,如果不关闭\ansible配置文件 host_key_checking = False
-
安全
- 配置sudo用户 ans ALL=(ALL) NOPASSWD: ALL 密码是1,ssh端口是 22
- 配合vpn,jms一起使用
- 用户 -- >vpn---->jms(跳板机)---->ansible用户的密码,进行加密( hash, ansible-vault)
-
配置sudo
sh
#管理端
[root@m01 /server/scripts/playbook]# egrep -v '^$|#' /etc/ansible/ansible.cfg
[defaults]
sudo_user = ans  #被管理端上具有sudo权限的用户 nopasswd:ALL
remote_user = ans    #被管理端使用的用户,不指定默认是当前用户/root
remote_port = 22      #被管理端ssh端口号
host_key_checking = False
log_path = /var/log/ansible.log
[inventory]
[privilege_escalation]
become=True  ##开启sudo功能
become_method=sudo #使用sudo命令
become_user=root #普通用户切换为root
[paramiko_connection]
[ssh_connection]
[persistent_connection]
[accelerate]
[selinux]
[colors]
[diff]


#被管理端
vim /etc/sudoers

ans ALL=(ALL) NOPASSWD: ALL #密码是1,ssh端口是 22

#禁用root登录
vim /etc/ssh/sshd_config
PermitRootLogin no