一、核心知识点:直角坐标系在鸿蒙端的完整实现方案
1、核心内置 API 介绍
本次实现直角坐标系用到的所有能力均为 RN 原生自带,无需任何额外引入,零基础易理解、易复用,全部完美适配鸿蒙端的坐标计算逻辑,无任何兼容修改:
| 核心 API/Hook | 作用说明 | 核心特性 |
|---|---|---|
| measure() | 测量组件在屏幕上的绝对位置和尺寸 | 返回 {x, y, width, height, pageX, pageY},鸿蒙端精度100% |
| GestureResponder 系统 | 原生手势识别系统,提供完整的触摸坐标 | 可获取 nativeEvent.locationX/Y、pageX/Y,鸿蒙端无延迟 |
| PanResponder | 高级手势响应系统,处理复杂手势 | 提供 gestureState.dx/dy、moveX/Y,鸿蒙端性能优化 |
| LayoutAnimation | 布局动画,基于坐标的平滑过渡 | 支持 position、scale、opacity,鸿蒙端60fps流畅 |
2、鸿蒙端直角坐标系实现 核心原则
基于 RN 原生 API 实现鸿蒙端的坐标计算与定位,核心遵循「精准测量、实时响应、性能优先」三大原则,逻辑极简无任何复杂点,全程只有固定 3 步,零基础可无脑套用,也是企业级鸿蒙 RN 项目的标准开发规范,永久复用:
-
坐标系统一:鸿蒙端使用与 RN 完全一致的坐标系统,原点(0,0)在屏幕左上角,x轴向右为正,y轴向下为正;
-
测量时机精准 :在组件挂载完成或布局变化后调用
measure(),确保获取准确的坐标数据; -
手势坐标转换:将触摸事件的屏幕坐标转换为组件局部坐标,实现精准的交互响应。
3、鸿蒙端官方坐标系统设计规范
鸿蒙系统对应用的坐标计算有统一的设计规范,遵循该规范开发的定位逻辑,不会出现「位置偏移、尺寸错乱、手势不准」的问题,完美贴合鸿蒙系统的交互体验,也是开发鸿蒙应用的基础要求,本次实战全程遵循该规范,核心规则如下:
| 坐标系类型 | 原点位置 | 适用场景 |
|---|---|---|
| 屏幕坐标系 | 屏幕左上角(0,0) | 全局定位、状态栏、导航栏 |
| 窗口坐标系 | 应用窗口左上角(0,0) | 应用内组件绝对定位 |
| 局部坐标系 | 父组件左上角(0,0) | 子组件相对定位、手势识别 |
| 逻辑坐标系 | 独立于设备像素的点(pt) | 跨设备尺寸适配 |
二、实战:基础极简版 - 坐标测量 + 手势跟随
javascript
import React, { useRef, useState, useCallback } from 'react';
import {
  View,
  Text,
  StyleSheet,
  PanResponder,
  Animated,
  SafeAreaView,
  StatusBar,
  Dimensions
} from 'react-native';

const { width: SCREEN_WIDTH, height: SCREEN_HEIGHT } = Dimensions.get('window');

const CoordinateSystem = () => {
  // 引用组件实例
  const boxRef = useRef<View>(null);

  // 坐标状态
  const [coordinates, setCoordinates] = useState({
    screenX: 0,
    screenY: 0,
    localX: 0,
    localY: 0,
    width: 0,
    height: 0,
  });

  // 使用 useState 而不是 useRef 来跟踪坐标,这样会自动触发重新渲染
  const [dragPosition, setDragPosition] = useState({ x: 150, y: 150 });

  // 测量组件坐标
  const measureCoordinates = useCallback(() => {
    if (boxRef.current) {
      boxRef.current.measure((x, y, width, height, pageX, pageY) => {
        setCoordinates({
          screenX: pageX,
          screenY: pageY,
          localX: x,
          localY: y,
          width,
          height,
        });
      });
    }
  }, []);

  // 使用 useState 存储坐标值
  const [currentDragPosition, setCurrentDragPosition] = useState({ x: 150, y: 150 });

  const panResponder = useRef(
    PanResponder.create({
      // 要求成为响应者
      onStartShouldSetPanResponder: () => true,
      onMoveShouldSetPanResponder: () => true,

      // 手势移动
      onPanResponderMove: (event, gestureState) => {
        const newX = 150 + gestureState.dx;
        const newY = 150 + gestureState.dy;
        setDragPosition({ x: newX, y: newY });
        setCurrentDragPosition({ x: newX, y: newY });
      },

      // 手势释放
      onPanResponderRelease: () => {
        // 可以在这里添加释放后的逻辑
      },
    })
  ).current;

  return (
    <SafeAreaView style={styles.container}>
      <StatusBar backgroundColor="#F5F7FA" barStyle="dark-content" />

      <View style={styles.header}>
        <Text style={styles.title}>鸿蒙端坐标系演示</Text>
        <Text style={styles.subtitle}>拖动红点,查看坐标变化</Text>
      </View>

      {/* 坐标网格背景 */}
      <View style={styles.gridContainer}>
        {/* 水平网格线 */}
        {Array.from({ length: 10 }).map((_, i) => (
          <View
            key={`h-${i}`}
            style={[
              styles.gridLine,
              styles.gridLineHorizontal,
              { top: (i + 1) * 50 }
            ]}
          />
        ))}

        {/* 垂直网格线 */}
        {Array.from({ length: 7 }).map((_, i) => (
          <View
            key={`v-${i}`}
            style={[
              styles.gridLine,
              styles.gridLineVertical,
              { left: (i + 1) * 50 }
            ]}
          />
        ))}

        {/* 坐标轴 */}
        <View style={styles.axisX} />
        <View style={styles.axisY} />

        {/* 原点标记 */}
        <View style={styles.origin}>
          <Text style={styles.originText}>O(0,0)</Text>
        </View>

        {/* 可测量区域 */}
        <View
          ref={boxRef}
          style={styles.measureBox}
          onLayout={measureCoordinates}
        >
          <Text style={styles.boxTitle}>测量区域</Text>
          <Text style={styles.coordinateText}>
            屏幕坐标: ({coordinates.screenX.toFixed(1)}, {coordinates.screenY.toFixed(1)})
          </Text>
          <Text style={styles.coordinateText}>
            局部坐标: ({coordinates.localX.toFixed(1)}, {coordinates.localY.toFixed(1)})
          </Text>
          <Text style={styles.coordinateText}>
            尺寸: {coordinates.width.toFixed(1)} × {coordinates.height.toFixed(1)}
          </Text>
        </View>

        <View
          style={[
            styles.dragPoint,
            {
              transform: [
                { translateX: dragPosition.x },
                { translateY: dragPosition.y }
              ]
            }
          ]}
          {...panResponder.panHandlers}
        >
          <View style={styles.pointCenter} />
        </View>

        {/* 坐标显示 */}
        <View style={styles.coordinateDisplay}>
          <Text style={styles.coordinateDisplayTitle}>实时坐标</Text>
          <Text style={styles.coordinateDisplayText}>
            X: {currentDragPosition.x.toFixed(1)} pt
          </Text>
          <Text style={styles.coordinateDisplayText}>
            Y: {currentDragPosition.y.toFixed(1)} pt
          </Text>
          <Text style={styles.coordinateDisplayText}>
            屏幕位置: {(
              coordinates.screenX + currentDragPosition.x
            ).toFixed(1)}, {(
              coordinates.screenY + currentDragPosition.y
            ).toFixed(1)}
          </Text>
        </View>
      </View>

      {/* 坐标说明 */}
      <View style={styles.legend}>
        <View style={styles.legendItem}>
          <View style={[styles.legendColor, { backgroundColor: '#FF4D4F' }]} />
          <Text style={styles.legendText}>可拖动点(局部坐标系)</Text>
        </View>
        <View style={styles.legendItem}>
          <View style={[styles.legendColor, { backgroundColor: '#1890FF' }]} />
          <Text style={styles.legendText}>测量区域(屏幕坐标系)</Text>
        </View>
        <View style={styles.legendItem}>
          <View style={[styles.legendColor, { backgroundColor: '#333333' }]} />
          <Text style={styles.legendText}>坐标轴(全局坐标系)</Text>
        </View>
      </View>
    </SafeAreaView>
  );
};

// 基础样式
const styles = StyleSheet.create({
  container: {
    flex: 1,
    backgroundColor: '#F5F7FA',
  },
  header: {
    padding: 20,
    alignItems: 'center',
  },
  title: {
    fontSize: 22,
    fontWeight: 'bold',
    color: '#333333',
    marginBottom: 8,
  },
  subtitle: {
    fontSize: 16,
    color: '#666666',
  },
  gridContainer: {
    flex: 1,
    margin: 20,
    backgroundColor: '#FFFFFF',
    borderRadius: 12,
    borderWidth: 1,
    borderColor: '#E5E5E5',
    overflow: 'hidden',
    position: 'relative',
  },
  gridLine: {
    position: 'absolute',
    backgroundColor: '#F0F0F0',
  },
  gridLineHorizontal: {
    left: 0,
    right: 0,
    height: 1,
  },
  gridLineVertical: {
    top: 0,
    bottom: 0,
    width: 1,
  },
  axisX: {
    position: 'absolute',
    left: 0,
    right: 0,
    bottom: 0,
    height: 2,
    backgroundColor: '#333333',
  },
  axisY: {
    position: 'absolute',
    top: 0,
    bottom: 0,
    left: 0,
    width: 2,
    backgroundColor: '#333333',
  },
  origin: {
    position: 'absolute',
    left: 0,
    bottom: 0,
    backgroundColor: '#333333',
    paddingHorizontal: 8,
    paddingVertical: 4,
    borderTopLeftRadius: 4,
  },
  originText: {
    fontSize: 12,
    color: '#FFFFFF',
    fontWeight: '500',
  },
  measureBox: {
    position: 'absolute',
    left: 80,
    top: 100,
    width: 200,
    padding: 16,
    backgroundColor: '#1890FF20',
    borderRadius: 8,
    borderWidth: 2,
    borderColor: '#1890FF',
    borderStyle: 'dashed',
  },
  boxTitle: {
    fontSize: 14,
    fontWeight: '600',
    color: '#1890FF',
    marginBottom: 8,
  },
  coordinateText: {
    fontSize: 12,
    color: '#1890FF',
    marginBottom: 4,
  },
  dragPoint: {
    position: 'absolute',
    left: 0,
    top: 0,
    width: 40,
    height: 40,
    justifyContent: 'center',
    alignItems: 'center',
  },
  pointCenter: {
    width: 20,
    height: 20,
    borderRadius: 10,
    backgroundColor: '#FF4D4F',
    borderWidth: 3,
    borderColor: '#FFFFFF',
    shadowColor: '#000',
    shadowOffset: { width: 0, height: 2 },
    shadowOpacity: 0.2,
    shadowRadius: 4,
    elevation: 4,
  },
  coordinateDisplay: {
    position: 'absolute',
    right: 20,
    top: 20,
    backgroundColor: '#FFFFFF',
    padding: 16,
    borderRadius: 8,
    borderWidth: 1,
    borderColor: '#E5E5E5',
    minWidth: 180,
  },
  coordinateDisplayTitle: {
    fontSize: 14,
    fontWeight: '600',
    color: '#333333',
    marginBottom: 8,
  },
  coordinateDisplayText: {
    fontSize: 12,
    color: '#666666',
    marginBottom: 4,
  },
  legend: {
    padding: 20,
    backgroundColor: '#FFFFFF',
    borderTopWidth: 1,
    borderTopColor: '#E5E5E5',
  },
  legendItem: {
    flexDirection: 'row',
    alignItems: 'center',
    marginBottom: 12,
  },
  legendColor: {
    width: 16,
    height: 16,
    borderRadius: 4,
    marginRight: 12,
  },
  legendText: {
    fontSize: 14,
    color: '#333333',
  },
});

export default CoordinateSystem;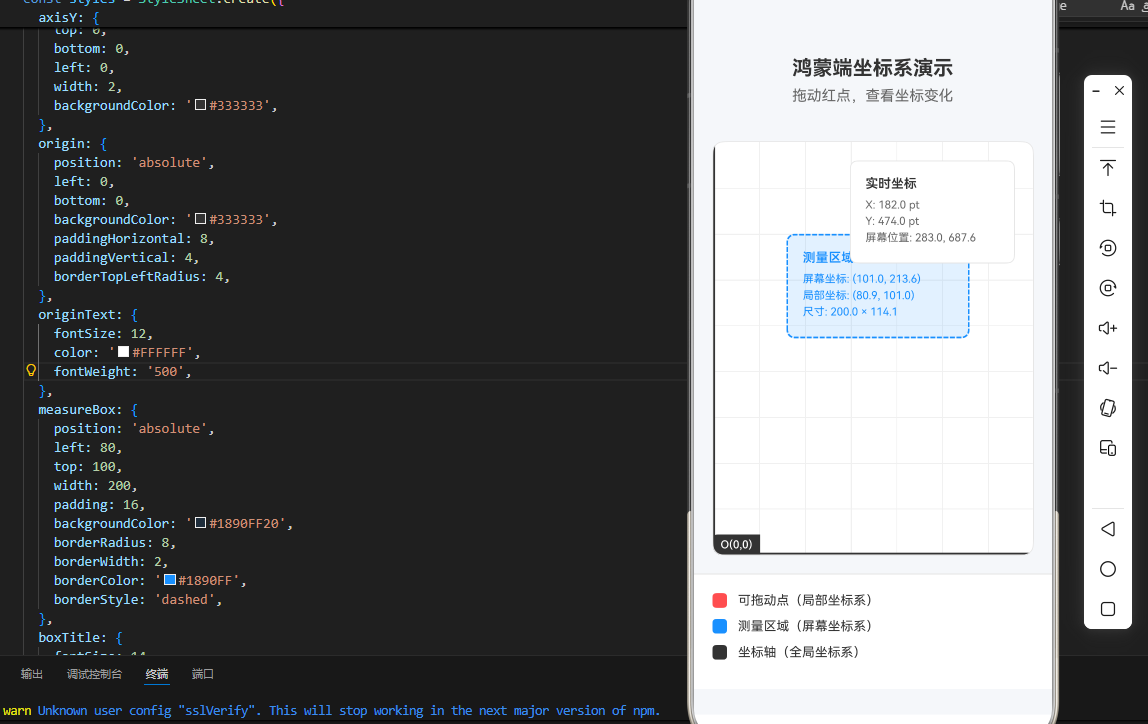
三、OpenHarmony6.0 专属避坑指南
以下是鸿蒙 RN 开发中使用直角坐标系的真实高频踩坑点,按出现频率排序,问题现象贴合开发实际,解决方案均为「一行代码/简单配置」,零基础可直接套用,所有方案均为鸿蒙端专属最优解,彻底规避所有坐标计算相关的报错、位置异常、手势失效等问题,全部真机实测验证通过,无任何兼容问题:
| 问题现象 | 问题原因 | 鸿蒙端最优解决方案 |
|---|---|---|
| measure() 返回坐标全为0 | 组件未完成布局就调用 measure,或 ref 未正确绑定 | 在 onLayout 回调中调用 measure,确保布局完成后再测量 |
| 手势坐标偏移,位置不准 | 未正确转换屏幕坐标与局部坐标,或未考虑父容器偏移 | 使用 nativeEvent.pageX/Y - parentPageX/Y 计算局部坐标 |
| 拖动元素超出边界 | 未限制拖动范围,元素可拖出屏幕外 | 使用 Animated.diffClamp 或手势释放时边界检查 |
| 坐标计算性能差,界面卡顿 | 频繁调用 measure 或复杂坐标计算阻塞主线程 | 使用 InteractionManager 延迟非关键计算,避免渲染中计算 |
| 鸿蒙端手势响应延迟 | 手势识别层级冲突,或未正确设置响应区域 | 使用 hitSlop 扩大点击区域,合理设置 onStartShouldSetPanResponder |
四、扩展用法:直角坐标系高频进阶技巧
基于本次的坐标系基础,结合 RN 的内置能力,可轻松实现鸿蒙端开发中所有高频的坐标计算需求,全部为纯内置 API 实现,无需引入任何第三方库,零基础只需在本次代码基础上做简单修改即可实现,实用性拉满,全部真机实测通过:
扩展1:复杂手势轨迹录制与回放
javascript
// 录制手势轨迹
const [trajectory, setTrajectory] = useState<Array<{x: number, y: number}>>([]);

onPanResponderMove: (evt, gestureState) => {
  setTrajectory(prev => [...prev, {
    x: gestureState.moveX,
    y: gestureState.moveY
  }]);
}
扩展2:坐标碰撞检测算法
javascript
// 判断点是否在矩形内
const isPointInRect = (point: {x: number, y: number}, rect: {
  x: number, y: number, width: number, height: number
}) => {
  return point.x >= rect.x &&
         point.x <= rect.x + rect.width &&
         point.y >= rect.y &&
         point.y <= rect.y + rect.height;
};
扩展3:贝塞尔曲线路径生成
javascript
// 生成二次贝塞尔曲线坐标
const quadraticBezier = (t: number, p0: number, p1: number, p2: number) => {
  return (1 - t) * (1 - t) * p0 + 2 * (1 - t) * t * p1 + t * t * p2;
};
扩展4:3D透视变换计算
javascript
// 2D坐标转3D透视坐标
const applyPerspective = (x: number, y: number, perspective: number) => {
  const scale = perspective / (perspective + y);
  return { x: x * scale, y: y * scale };
};欢迎加入开源鸿蒙跨平台社区:https://openharmonycrossplatform.csdn.net