C11 编写自动化测试
- [11.1 编写和运行测试](#11.1 编写和运行测试)
-
- [11.1.1 测试函数](#11.1.1 测试函数)
- [11.1.2 解剖测试函数](#11.1.2 解剖测试函数)
- [11.1.3 运行测试](#11.1.3 运行测试)
- [11.2 断言(Assert)](#11.2 断言(Assert))
-
- [11.2.1 使用assert! 宏检查测试结果](#11.2.1 使用assert! 宏检查测试结果)
- [11.2.2 使用assert_eq!和assert_ne!测试相等性](#11.2.2 使用assert_eq!和assert_ne!测试相等性)
- [11.3 自定义错误消息](#11.3 自定义错误消息)
-
- [11.3.1 添加自定义错误消息](#11.3.1 添加自定义错误消息)
- [11.4 用should_panic检查恐慌](#11.4 用should_panic检查恐慌)
-
- [11.4.1 验证错误处理的情况 should_panic](#11.4.1 验证错误处理的情况 should_panic)
- [11.4.2 让 should_panic更精确,expected](#11.4.2 让 should_panic更精确,expected)
- [11.5 在测试中使用Result<T,E>](#11.5 在测试中使用Result<T,E>)
- [11.6 控制测试运行](#11.6 控制测试运行)
-
- [11.6.1 控制测试如何运行](#11.6.1 控制测试如何运行)
- [11.6.2 并行/连续运行测试](#11.6.2 并行/连续运行测试)
- [11.6.3 --test-threads参数](#11.6.3 --test-threads参数)
- [11.6.4 显式函数输出](#11.6.4 显式函数输出)
- [11.7 按名称运行测试](#11.7 按名称运行测试)
-
- [11.7.1 按名称运行测试的子集](#11.7.1 按名称运行测试的子集)
- [11.8 忽略测试](#11.8 忽略测试)
- [11.9 集成测试](#11.9 集成测试)
-
- [11.9.1 测试的分类](#11.9.1 测试的分类)
- [11.9.2 单元测试](#11.9.2 单元测试)
- [11.9.3 集成测试](#11.9.3 集成测试)
-
- [11.9.3.1 运行集成测试](#11.9.3.1 运行集成测试)
- [11.9.3.2 运行指定的集成测试](#11.9.3.2 运行指定的集成测试)
11.1 编写和运行测试
11.1.1 测试函数
- 测试函数体通常执行3个操作:
- 准备数据
- 运行被测试的代码
- 断言(Assert)结果
11.1.2 解剖测试函数
- 测试函数需要使用test attribute
- 在函数上加
#[test],将函数变成测试函数
- 在函数上加
11.1.3 运行测试
-
使用
cargo test命令运行所有测试函数 -
当使用cargo创建library项目时,会生成一个test module,里面有一个test函数
-
例子
rust
cargo new adder -- lib运行上述的命令会生成一个adder/src/lib.rs,里面就会包含test
rust
pub fn add(left: u64, right: u64) -> u64 {
    left + right
}

#[cfg(test)]
mod tests {
    use super::*;

    #[test]
    fn it_works() {
        let result = add(2, 2);
        assert_eq!(result, 4);
    }
}- 运行cargo test,测试成功会出现
rust
adder> cargo test
   Compiling adder v0.1.0 (C:\Users\yaxianfan\hello_cargo\adder)
    Finished `test` profile [unoptimized + debuginfo] target(s) in 1.03s
     Running unittests src\lib.rs (target\debug\deps\adder-ca39ee268f455cf0.exe)

running 1 test
test tests::it_works ... ok

test result: ok. 1 passed; 0 failed; 0 ignored; 0 measured; 0 filtered out; finished in 0.00s

   Doc-tests adder

running 0 tests

test result: ok. 0 passed; 0 failed; 0 ignored; 0 measured; 0 filtered out; finished in 0.00s- 测试失败
- 测试函数panic就表示失败
- 每个测试运行在一个新线程
- 当主线程看见某个测试挂掉了,那个测试标记为失败了
11.2 断言(Assert)
11.2.1 使用assert! 宏检查测试结果
- assert! 用于确定某个状态是否为true
- true:测试通过
- false:调用panic!,测试失败
rust
pub struct Rectangle {
    length: i32,
    width: i32,

}

impl Rectangle {
    pub fn can_hold(&self, other: &Rectangle) -> bool {
        self.length > other.length && self.width > other.length
    }
}


#[cfg(test)]
mod tests {
    use super::*;

    #[test]
    fn larger_can_hold_smaller() {
        let larger = Rectangle {
            length: 100,
            width: 50,
        };

        let smaller = Rectangle {
            length: 10,
            width: 5,
        };

        assert!(larger.can_hold(&smaller));
    }
}
运行结果:
rust
running 1 test
test tests::larger_can_hold_smaller ... ok

test result: ok. 1 passed; 0 failed; 0 ignored; 0 measured; 0 filtered out; finished in 0.00s
11.2.2 使用assert_eq!和assert_ne!测试相等性
- assert_eq! 判断两个参数相等
- assert_ne! 判断两个参数不等
- 断言失败:
自动打印出两个参数的值- 有一定要求:使用debug格式打印参数
- 要求参数实现了PartialEq和Debug Trait
- 有一定要求:使用debug格式打印参数
rust
pub fn add_two(i: i32) -> i32 {
    i +2
}


#[cfg(test)]
mod tests {
    use super::*;

    #[test]
    fn is_add_two()
    {
        let a = 2;
        assert_eq!(4, add_two(a));
    }
}- 如果failure的话,打印结果如下,显示left和right分别是什么
rust
failures:

---- tests::is_add_two stdout ----

thread 'tests::is_add_two' (8384) panicked at src\lib.rs:26:9:
assertion `left == right` failed
  left: 4
 right: 5
11.3 自定义错误消息
11.3.1 添加自定义错误消息
- 可以向assert! assert_eq! assert_ne!添加可选的自定义消息
- 这些自定义消息和失败消息都会打印出来
- assert!:第1个参数必填,自定义消息作为第2个参数
- assert_eq! assert_ne!:前两个参数必填,自定义消息作为第3个参数
- 自定义消息参数会被传递给format!宏,可以使用占位符{}
- "the value of result: {}, '{}'", result, result
- 例子
rust
pub fn greeting(name: &str) -> String {
    format!("Hello {}", name)
}

#[cfg(test)]
mod tests {
    use super::*;

    #[test]
    fn greeting_contains_name()
    {
        let name = "xiaoming";
        let result = greeting(name);

        assert!(result.contains("Hello,"), "the value of result: {}, '{}'", result, result);
    }
}
11.4 用should_panic检查恐慌
11.4.1 验证错误处理的情况 should_panic
- 除了验证返回值是否正确,还需要验证代码是否如预期处理了发生错误的情况->(类似是否如期抛出想要的exception)
- 验证代码在特定情况下是否发生了panic
- 使用should_panic attribute
- 函数panic:测试通过
- 函数没有panic:测试失败
rust
pub struct Guess {
    value: u32
}

impl Guess{
    pub fn new(value: u32) -> Guess {
        if value <1 || value >100 {
            panic!("Guess value must be between 1 and 100, got {}", value)
        }
        Guess {value}
    }
}

#[cfg(test)]
mod tests {
    use super::*;

    #[test]
    #[should_panic]
    fn grater_than_100()
    {
        Guess::new(200);

    }
}
成功的结果:
rust
test tests::grater_than_100 - should panic ... ok失败的结果:
rust
running 1 test
test tests::grater_than_100 - should panic ... FAILED

failures:

---- tests::grater_than_100 stdout ----
note: test did not panic as expected at src\lib.rs:20:8
11.4.2 让 should_panic更精确,expected
- 让 should_panic更精确,添加一个可选参数expected
- 检查失败的消息中是否包含所指定的文字
- panic里面内容不同需要做区分
rust
pub struct Guess {
    value: u32
}

impl Guess{
    pub fn new(value: u32) -> Guess {
        if value <1  {
            panic!("Guess value must be >= 1 , got {}", value)
        } else if value >100 {
            panic!("Guess value must be <= 100 , got {}", value)
        }
        Guess {value}
    }
}

#[cfg(test)]
mod tests {
    use super::*;

    #[test]
    #[should_panic(expected = "Guess value must be <= 100")]
    fn grater_than_100()
    {
        Guess::new(1000);

    }

		// 本身的panic应该是Guess value must be >= 1
    #[test]
    #[should_panic(expected = "Guess value must be <= 100")]
    fn grater_than_100_wrong()
    {
        Guess::new(0);

    }
}
输出结果:
rust
running 2 tests
test tests::grater_than_100_wrong - should panic ... FAILED
test tests::grater_than_100 - should panic ... ok

failures:

---- tests::grater_than_100_wrong stdout ----

thread 'tests::grater_than_100_wrong' (5424) panicked at src\lib.rs:8:13:
Guess value must be >= 1 , got 0
note: panic did not contain expected string
      panic message: "Guess value must be >= 1 , got 0"
 expected substring: "Guess value must be <= 100"
11.5 在测试中使用Result<T,E>
- 无需panic,可使用Result<T,E>作为返回类型编写测试:
- 返回Ok:测试通过
- 返回Err:测试失败
- 注意:不要在使用Result<T,E>编写的测试上标注#should_panic
rust
#[cfg(test)]
mod tests {
    use super::*;

    #[test]
    fn it_works() -> Result<(), String> {
        if 2+5 == 4 {
            Ok(())
        } else {
            Err(String::from("two plus two does not equal four"))
        }
    }
}
输出:
rust
test tests::it_works ... FAILED

failures:

---- tests::it_works stdout ----
Error: "two plus two does not equal four"
11.6 控制测试运行
11.6.1 控制测试如何运行
- 改变cargo test的行为:添加命令行参数
- 默认行为
- 并行运行
- 所有测试
- 捕获(不显示)所有输出
- 命令行参数
- 针对cargo test的参数:紧跟cargo test
- 针对 测试可执行程序:放在 -- 之后
- TODO 没看懂这两句话
- cargo test --help
- cargo test -- --help:会显示
cargo test --后面可以添加的全部参数
11.6.2 并行/连续运行测试
- 并行运行测试
- 运行多个测试:默认使用多个线程并行运行
- 需要确保测试之间不会相互依赖,不依赖某个共享状态(环境/工作目录/环境变量等)
11.6.3 --test-threads参数
--test-threads后面跟着线程的数量- 不想以并行方式运行测试
- 例如:
cargo test --test-threads=1表示使用一个线程,单线程
11.6.4 显式函数输出
cargo test --show-output 在成功的测试中看到打印的内容
11.7 按名称运行测试
11.7.1 按名称运行测试的子集
- 选择运行的测试:将测试名称(一个或多个)作为cargo test的参数
- 运行单个测试:指定测试名
cargo test grater_than_100 - 运行多个测试:指定测试名的一部分(模块名也可以)
cargo test grater
- 运行单个测试:指定测试名
11.8 忽略测试
- 忽略某些测试,运行剩余测试
- ignore attribute
- 使用方法:#ignore
rust
#[cfg(test)]
mod tests {
    use super::*;

    #[test]
    #[ignore]
    fn it_works() -> Result<(), String> {
        if 2+5 == 4 {
            Ok(())
        } else {
            Err(String::from("two plus two does not equal four"))
        }
    }
}
输出:
rust
running 1 test
test tests::it_works ... ignored- 如果只想运行ignore的test
cargo test -- --ignored
11.9 集成测试
11.9.1 测试的分类
- 单元测试
- 小,专注
- 一次对一个模块进行隔离测试
- 可测试private接口
- 集成测试
- 在库外部
- 只能使用public接口
- 可以在每个测试中使用到多个模块
11.9.2 单元测试
- #cfg(test)标注
- cfg:configuration(配置)
- tests模块上标注这个
- 只有运行cargo test才编译和运行代码
11.9.3 集成测试
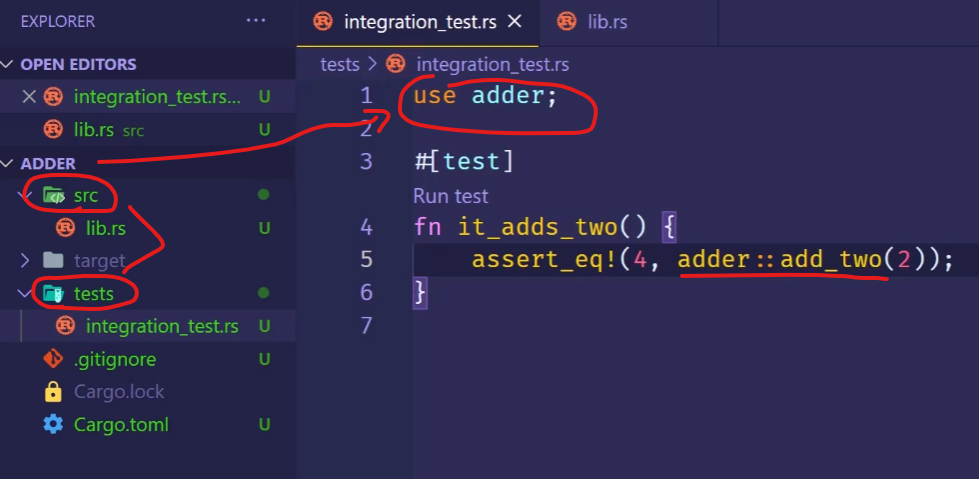
11.9.3.1 运行集成测试
- 集成测试完全位于被测试库的外部
- 目的:验证多个部分是否能正确的一起工作
- tests目录:
- 和src目录并列
- tests目录下的每个测试文件都是单独的一个crate
- 无需标注#cfg(test),直接使用#test
11.9.3.2 运行指定的集成测试
- 运行特定的集成测试:cargo test 函数名
- 运行某个测试文件内的所有测试:cargo test -- test 文件名
- 不会将common视作集成测试文件,不会在运行cargo test时运行
2026/1/14