文章目录
一.事务管理
1)概述
概念: 事务是一组操作的集合,它是一个不可分割的工作单位
事务会把所有的操作作为一个整体一起向系统提交或撤销操作请求,即这些操作 要么同时成功,要么同时失败
默认MySQL的事务是自动提交的,即:当执行一条DML语句,MySQL会立即隐式的提交事务。
2)基本操作
事务控制主要三步操作:开启事务、提交事务/回滚事务
- 需要在这组操作执行之前,先开启事务 (
start transaction; / begin;) - 所有操作如果全部都执行成功,则提交事务 (
commit;) - 如果这组操作中,有任何一个操作执行失败,都应该回滚事务 (
rollback)
eg:
sql
-- 开启事务
start transaction; / begin;

-- 1. 保存员工基本信息
insert into emp values (39, 'Tom', '123456', '汤姆', 1, '13300001111', 1, 4000, '1.jpg', '2023-11-01', 1, now(), now());

-- 2. 保存员工的工作经历信息
insert into emp_expr(emp_id, begin, end, company, job) values (39,'2019-01-01', '2020-01-01', '百度', '开发'),                                                                                                       (39,'2020-01-10', '2022-02-01', '阿里', '架构');

-- 提交事务(全部成功)
commit;

-- 回滚事务(有一个失败)
rollback;
3)Spring事务管理
在spring框架当中封装了事务控制的代码,并不需要我们手动实现
若使用了spring框架,我们只需要通过一个注解@Transactional就能实现事务管理
3.1)Transactional注解
**作用:**在当前这个方法执行开始之前开启事务,方法执行完毕之后提交事务,如果在这个方法执行的过程当中出现了异常,就会进行事务的回滚操作。
**位置:**业务层的方法上、类上、接口上
- 方法上:当前方法交给spring进行事务管理
- 类上:当前类中所有的方法都交由spring进行事务管理
- 接口上:接口下所有的实现类当中所有的方法都交给spring 进行事务管理
搜索控制台信息的一个插件:Grep Console

eg:
java
@Transactional
@Override
public void save(Emp emp) {
    //1.补全基础属性
    emp.setCreateTime(LocalDateTime.now());
    emp.setUpdateTime(LocalDateTime.now());
    //2.保存员工基本信息
    empMapper.insert(emp);

    int i = 1/0;

    //3. 保存员工的工作经历信息 - 批量
    Integer empId = emp.getId();
    List<EmpExpr> exprList = emp.getExprList();
    if(!CollectionUtils.isEmpty(exprList)){
        exprList.forEach(empExpr -> empExpr.setEmpId(empId));
        empExprMapper.insertBatch(exprList);
    }
}
我们一般会在业务层当中来控制事务,因为在业务层当中,一个业务功能可能会包含多个数据访问的操作
在业务层来控制事务,我们就可以将多个数据访问操作控制在一个事务范围内
Transactional不需要手动提交
由 Spring 框架在方法成功执行完毕后,自动调用底层数据源(DataSource)的 commit() 方法来提交事务
3.2)事务进阶
@Transactional注解当中的两个常见的属性:
- 异常回滚的属性:
rollbackFor - 事务传播行为:
propagation
1.rollbackFor
@Transactional默认出现运行异常才回滚,无法处理其他异常
所以想让所有异常都回滚,需要配置@Transactional的rollbackFor属性
eg:
java
@Transactional(rollbackFor = Exception.class)//指定哪种异常需要回滚
@Override
public void save(Emp emp) throws Exception {
    //1.补全基础属性
    emp.setCreateTime(LocalDateTime.now());
    emp.setUpdateTime(LocalDateTime.now());
    //2.保存员工基本信息
    empMapper.insert(emp);

    //int i = 1/0;
    if(true){
        throw new Exception("出异常啦....");
    }

    //3. 保存员工的工作经历信息 - 批量
    Integer empId = emp.getId();
    List<EmpExpr> exprList = emp.getExprList();
    if(!CollectionUtils.isEmpty(exprList)){
        exprList.forEach(empExpr -> empExpr.setEmpId(empId));
        empExprMapper.insertBatch(exprList);
    }
}2.propagation
该属性用于配置事务的传播行为
传播行为:当一个事务被另一个事务调用时,这个事务方法怎么进行事务控制
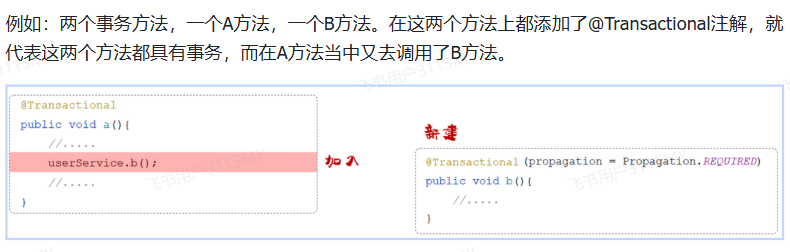
要想控制事务的传播行为,在@Transactional注解的后面指定一个属性propagation,通过 propagation 属性来指定传播行为。接下来我们就来介绍一下常见的事务传播行为。
| 属性值 | 含义 |
|---|---|
| REQUIRED | 【默认值】需要事务,有则加入,无则创建新事务 |
| REQUIRES_NEW | 需要新事务,无论有无,总是创建新事务 |
| SUPPORTS | 支持事务,有则加入,无则在无事务状态中运行 |
| NOT_SUPPORTED | 不支持事务,在无事务状态下运行,如果当前存在已有事务,则挂起当前事务 |
| MANDATORY | 必须有事务,否则抛异常 |
| NEVER | 必须没事务,否则抛异常 |
| ... |
对于这些事务传播行为,我们只需要关注以下两个就可以了:
- REQUIRED(默认值)
- REQUIRES_NEW
【例】日志记录:无论是否执行成功都要记录日志
1). 创建数据库表 emp_log 日志表
sql
-- 创建员工日志表
create table emp_log(
    id int unsigned primary key auto_increment comment 'ID, 主键',
    operate_time datetime comment '操作时间',
    info varchar(2000) comment '日志信息'
) comment '员工日志表';
2). 实体类:EmpLog
java
@Data
@NoArgsConstructor
@AllArgsConstructor
public class EmpLog {
    private Integer id; //ID
    private LocalDateTime operateTime; //操作时间
    private String info; //详细信息
}
3). Mapper接口:EmpLogMapper
java
@Mapper
public interface EmpLogMapper {
        //插入日志
    @Insert("insert into emp_log (operate_time, info) values (#{operateTime}, #{info})")
    public void insert(EmpLog empLog);
}
4). 业务接口:EmpLogService
java
public interface EmpLogService {
        //记录新增员工日志
    public void insertLog(EmpLog empLog);
}
5). 业务实现类:EmpLogServiceImpl
java
@Service
public class EmpLogServiceImpl implements EmpLogService {

    @Autowired
    private EmpLogMapper empLogMapper;

    @Transactional(propagation = Propagation.REQUIRES_NEW)//设置propagation
    @Override
    public void insertLog(EmpLog empLog) {
        empLogMapper.insert(empLog);
    }
}
具体业务实现类:EmpServiceImpl
java
@Autowired
private EmpMapper empMapper;
@Autowired
private EmpExprMapper empExprMapper;
@Autowired
private EmpLogService empLogService;

@Transactional(rollbackFor = {Exception.class})
@Override
public void save(Emp emp) {
    try {
        //1.补全基础属性
        emp.setCreateTime(LocalDateTime.now());
        emp.setUpdateTime(LocalDateTime.now());

        //2.保存员工基本信息
        empMapper.insert(emp);

        int i = 1/0;

        //3. 保存员工的工作经历信息 - 批量
        Integer empId = emp.getId();
        List<EmpExpr> exprList = emp.getExprList();
        if(!CollectionUtils.isEmpty(exprList)){
            exprList.forEach(empExpr -> empExpr.setEmpId(empId));
            empExprMapper.insertBatch(exprList);
        }
    } finally {
        //记录操作日志
        EmpLog empLog = new EmpLog(null, LocalDateTime.now(), emp.toString());
        empLogService.insertLog(empLog);
    }

}
只有当内层事务使用 REQUIRES_NEW 传播行为时,才会"独立提交",不受外层回滚影响
为什么
REQUIRES_NEW能独立?
- Spring 的事务管理器(如
DataSourceTransactionManager)会为REQUIRES_NEW创建新的数据库连接(或重置连接状态)。 - 每个事务对应一个独立的
Connection,commit()/rollback()互不影响
4)事务四大特性
- 原子性(Atomicity):事务是不可分割的最小单元,要么全部成功,要么全部失败
- 一致性(Consistency):事务完成时,必须使所有的数据都保持一致状态
- 隔离性(Isolation):数据库系统提供的隔离机制,保证事务在不受外部并发操作影响的独立环境下运行
- 持久性(Durability):事务一旦提交或回滚,它对数据库中的数据的改变就是永久的
二.文件上传
指将本地图片、视频、音频等文件上传到服务器,供其他用户浏览或下载的过程
1)简介
要实现该功能,前端需要注意method和enctype
上传文件的原始form表单,要求表单必须具备以下三点(上传文件页面三要素):
- 表单必须有file域,用于选择要上传的文件
- 表单提交方式必须为POST:通常上传的文件会比较大,所以需要使用 POST 提交方式
- 表单的编码类型enctype必须要设置为:multipart/form-data:普通默认的编码格式是不适合传输大型的二进制数据的,所以在文件上传时,表单的编码格式必须设置为multipart/form-data
html
<!DOCTYPE html>
<html lang="en">
<head>
    <meta charset="UTF-8">
    <title>上传文件</title>
</head>
<body>

    <form action="/upload" method="post" enctype="multipart/form-data">
        姓名: <input type="text" name="username"><br>
        年龄: <input type="text" name="age"><br>
        头像: <input type="file" name="file"><br>
        <input type="submit" value="提交">
    </form>

</body>
</html>
后端
Spring中提供了一个API:MultipartFile,使用这个API就可以来接收到上传的文件
java
package com.itheima.controller;

import lombok.extern.slf4j.Slf4j;
import org.springframework.web.bind.annotation.PostMapping;
import org.springframework.web.bind.annotation.RestController;
import org.springframework.web.multipart.MultipartFile;

import java.io.File;
import java.io.IOException;

@Slf4j
@RestController
public class UploadController {

    /**
     * 上传文件 - 参数名file
     */
    @PostMapping("/upload")
    public Result upload(String username, Integer age , MultipartFile file) throws Exception {
        log.info("上传文件:{}, {}, {}", username, age, file);
        if(!file.isEmpty()){
            file.transferTo(new File("D:\\images\\" + file.getOriginalFilename()));
        }
        return Result.success();
    }

}
2)本地存储
在服务端接收到上传的文件,并将文件保存在本地服务器的磁盘目录中
代码实现:
java
package com.itheima.controller;

import com.itheima.pojo.Result;
import lombok.extern.slf4j.Slf4j;
import org.springframework.web.bind.annotation.PostMapping;
import org.springframework.web.bind.annotation.RestController;
import org.springframework.web.multipart.MultipartFile;
import java.io.File;
import java.util.UUID;

@Slf4j
@RestController
public class UploadController {

    private static final String UPLOAD_DIR = "D:/images/";
    /**
     * 上传文件 - 参数名file
     */
    @PostMapping("/upload")
    public Result upload(MultipartFile file) throws Exception {
        log.info("上传文件:{}, {}, {}", username, age, file);
        if (!file.isEmpty()) {
            // 生成唯一文件名
            String originalFilename = file.getOriginalFilename();
            String extName = originalFilename.substring(originalFilename.lastIndexOf("."));
            String uniqueFileName = UUID.randomUUID().toString().replace("-", "") + extName;
            // 拼接完整的文件路径
            File targetFile = new File(UPLOAD_DIR + uniqueFileName);

            // 如果目标目录不存在,则创建它
            if (!targetFile.getParentFile().exists()) {
                targetFile.getParentFile().mkdirs();
            }
            // 保存文件
            file.transferTo(targetFile);
        }
        return Result.success();
    }
}
MultipartFile 常见方法:
String getOriginalFilename();//获取原始文件名void transferTo(File dest);``//将接收的文件转存到磁盘文件中long getSize();//获取文件的大小,单位:字节byte[] getBytes();``//获取文件内容的字节数组InputStream getInputStream();//获取接收到的文件内容的输入流
UUID(Universally Unique Identifier,通用唯一标识符)是一种128 位(16 字节)的标识符,设计目标是:在分布式系统中无需中央协调,也能生成全局唯一的 ID
设置上传文件最大大小
默认最大1M
yaml
spring:
  servlet:
    multipart:
      max-file-size: 10MB
      max-request-size: 100MB
缺点
存储在本地
- 不安全:磁盘如果损坏,所有的文件就会丢失
- 容量有限:如果存储大量的图片,磁盘空间有限(磁盘不可能无限制扩容)
- 无法直接访问
解决方法:
- 自己搭建一个服务器
- 使用现成的云服务器
3)阿里云oss云服务器
阿里云对象存储OSS(Object Storage Service),是一款海量、安全、低成本、高可靠的云存储服务
使用OSS,可以通过网络随时存储和调用包括文本、图片、音频和视频等在内的各种文件
使用过程:

Bucket:存储空间是用户用于存储对象(Object,就是文件)的容器,所有的对象都必须隶属于某个存储空间
SDK:sdk中包含了使用第三方云服务时所需要的依赖,以及一些示例代码
注册登录并创建好bucket后
配置AccessKey
以管理员身份打开CMD命令行,执行如下命令,配置系统的环境变量。
sql
set OSS_ACCESS_KEY_ID=xxxxxxxxxxxxxxxxxxxxxxxxxxxxxxxxxxxxxxxxxxxx
set OSS_ACCESS_KEY_SECRET=xxxxxxxxxxxxxxxxxxxxxxxxxxxxxxxxxxxxxxxxxx
注:将上述的ACCESS_KEY_ID 与 ACCESS_KEY_SECRET 的值替换成自己的 。
执行如下命令,让更改生效。
Shell
setx OSS_ACCESS_KEY_ID "%OSS_ACCESS_KEY_ID%"
setx OSS_ACCESS_KEY_SECRET "%OSS_ACCESS_KEY_SECRET%"
执行如下命令,验证环境变量是否生效。
Shell
echo %OSS_ACCESS_KEY_ID%
echo %OSS_ACCESS_KEY_SECRET%
案例
1). 引入阿里云OSS上传文件工具类(由官方的示例代码改造而来)
java
package com.itheima.utils;

import com.aliyun.oss.*;
import com.aliyun.oss.common.auth.CredentialsProviderFactory;
import com.aliyun.oss.common.auth.EnvironmentVariableCredentialsProvider;
import com.aliyun.oss.common.comm.SignVersion;
import org.springframework.stereotype.Component;
import java.io.ByteArrayInputStream;
import java.time.LocalDate;
import java.time.format.DateTimeFormatter;
import java.util.UUID;

@Component
public class AliyunOSSOperator {

    private String endpoint = "https://oss-cn-beijing.aliyuncs.com";
    private String bucketName = "java-ai";
    private String region = "cn-beijing";

    public String upload(byte[] content, String originalFilename) throws Exception {
        // 从环境变量中获取访问凭证。运行本代码示例之前,请确保已设置环境变量OSS_ACCESS_KEY_ID和OSS_ACCESS_KEY_SECRET。
        EnvironmentVariableCredentialsProvider credentialsProvider = CredentialsProviderFactory.newEnvironmentVariableCredentialsProvider();

        // 填写Object完整路径,例如202406/1.png。Object完整路径中不能包含Bucket名称。
        //获取当前系统日期的字符串,格式为 yyyy/MM
        String dir = LocalDate.now().format(DateTimeFormatter.ofPattern("yyyy/MM"));
        //生成一个新的不重复的文件名
        String newFileName = UUID.randomUUID() + originalFilename.substring(originalFilename.lastIndexOf("."));
        String objectName = dir + "/" + newFileName;

        // 创建OSSClient实例。
        ClientBuilderConfiguration clientBuilderConfiguration = new ClientBuilderConfiguration();
        clientBuilderConfiguration.setSignatureVersion(SignVersion.V4);
        OSS ossClient = OSSClientBuilder.create()
                .endpoint(endpoint)
                .credentialsProvider(credentialsProvider)
                .clientConfiguration(clientBuilderConfiguration)
                .region(region)
                .build();

        try {
            ossClient.putObject(bucketName, objectName, new ByteArrayInputStream(content));
        } finally {
            ossClient.shutdown();
        }

        return endpoint.split("//")[0] + "//" + bucketName + "." + endpoint.split("//")[1] + "/" + objectName;
    }

}
2). 修改UploadController代码
java
package com.itheima.controller;

import com.itheima.pojo.Result;
import com.itheima.utils.AliyunOSSOperator;
import lombok.extern.slf4j.Slf4j;
import org.springframework.beans.factory.annotation.Autowired;
import org.springframework.web.bind.annotation.PostMapping;
import org.springframework.web.bind.annotation.RestController;
import org.springframework.web.multipart.MultipartFile;
import java.io.File;
import java.util.UUID;

@Slf4j
@RestController
public class UploadController {

    @Autowired
    private AliyunOSSOperator aliyunOSSOperator;

    @PostMapping("/upload")
    public Result upload(MultipartFile file) throws Exception {
        log.info("上传文件:{}", file);
        if (!file.isEmpty()) {
            // 生成唯一文件名
            String originalFilename = file.getOriginalFilename();
            String extName = originalFilename.substring(originalFilename.lastIndexOf("."));
            String uniqueFileName = UUID.randomUUID().toString().replace("-", "") + extName;
            // 上传文件
            String url = aliyunOSSOperator.upload(file.getBytes(), uniqueFileName);
            return Result.success(url);
        }
        return Result.error("上传失败");
    }

}
优化
上述案例中将 endpoint、bucketName参数直接在java文件中写死了,不方便维护和管理
1.@Value
对于这些容易变动的参数,可以将其配置在配置文件中,然后通过 @Value 注解来注解外部配置的属性
1). application.yml
yaml
#阿里云OSS
aliyun:
  oss:
    endpoint: https://oss-cn-beijing.aliyuncs.com
    bucketName: java-ai
    region: cn-beijing
2). AliyunOSSOperator
java
package com.itheima.utils;

import com.aliyun.oss.*;
import com.aliyun.oss.common.auth.CredentialsProviderFactory;
import com.aliyun.oss.common.auth.EnvironmentVariableCredentialsProvider;
import com.aliyun.oss.common.comm.SignVersion;
import org.springframework.beans.factory.annotation.Autowired;
import org.springframework.beans.factory.annotation.Value;
import org.springframework.stereotype.Component;
import java.io.ByteArrayInputStream;
import java.time.LocalDate;
import java.time.format.DateTimeFormatter;
import java.util.UUID;

@Component
public class AliyunOSSOperator {

    //方式一: 通过@Value注解一个属性一个属性的注入
    @Value("${aliyun.oss.endpoint}")
    private String endpoint;

    @Value("${aliyun.oss.bucketName}")
    private String bucketName;

    @Value("${aliyun.oss.region}")
    private String region;

    public String upload(byte[] content, String originalFilename) throws Exception {
        // 从环境变量中获取访问凭证。运行本代码示例之前,请确保已设置环境变量OSS_ACCESS_KEY_ID和OSS_ACCESS_KEY_SECRET。
        EnvironmentVariableCredentialsProvider credentialsProvider = CredentialsProviderFactory.newEnvironmentVariableCredentialsProvider();

        // 填写Object完整路径,例如2024/06/1.png。Object完整路径中不能包含Bucket名称。
        //获取当前系统日期的字符串,格式为 yyyy/MM
        String dir = LocalDate.now().format(DateTimeFormatter.ofPattern("yyyy/MM"));
        //生成一个新的不重复的文件名
        String newFileName = UUID.randomUUID() + originalFilename.substring(originalFilename.lastIndexOf("."));
        String objectName = dir + "/" + newFileName;

        // 创建OSSClient实例。
        ClientBuilderConfiguration clientBuilderConfiguration = new ClientBuilderConfiguration();
        clientBuilderConfiguration.setSignatureVersion(SignVersion.V4);
        OSS ossClient = OSSClientBuilder.create()
                .endpoint(endpoint)
                .credentialsProvider(credentialsProvider)
                .clientConfiguration(clientBuilderConfiguration)
                .region(region)
                .build();

        try {
            ossClient.putObject(bucketName, objectName, new ByteArrayInputStream(content));
        } finally {
            ossClient.shutdown();
        }

        return endpoint.split("//")[0] + "//" + bucketName + "." + endpoint.split("//")[1] + "/" + objectName;
    }

}
2.实现类
@Value注解注入配置文件的配置项,如果配置项多,注入繁琐,也不便于维护管理和复用
具体过程:
Spring提供的简化方式套路:
- 需要创建一个实现类,且实体类中的属性名和配置文件当中key的名字必须要一致
- 需要将实体类交给Spring的IOC容器管理,成为IOC容器当中的bean对象
- 在实体类上添加
@ConfigurationProperties注解,并通过perfect属性来指定配置参数项的前缀
1). 定义实体类AliyunOSSProperties ,并交给IOC容器管理
java
package com.itheima.utils;

import lombok.Data;
import org.springframework.boot.context.properties.ConfigurationProperties;
import org.springframework.stereotype.Component;

@Data
@Component
@ConfigurationProperties(prefix = "aliyun.oss")
public class AliyunOSSProperties {
    private String endpoint;
    private String bucketName;
    private String region;
}
2). 修改AliyunOSSOperator
java
package com.itheima.utils;

import com.aliyun.oss.*;
import com.aliyun.oss.common.auth.CredentialsProviderFactory;
import com.aliyun.oss.common.auth.EnvironmentVariableCredentialsProvider;
import com.aliyun.oss.common.comm.SignVersion;
import org.springframework.beans.factory.annotation.Autowired;
import org.springframework.beans.factory.annotation.Value;
import org.springframework.stereotype.Component;
import java.io.ByteArrayInputStream;
import java.time.LocalDate;
import java.time.format.DateTimeFormatter;
import java.util.UUID;

@Component
public class AliyunOSSOperator {


    @Autowired
    private AliyunOSSProperties aliyunOSSProperties;

    public String upload(byte[] content, String originalFilename) throws Exception {
        String endpoint = aliyunOSSProperties.getEndpoint();
        String bucketName = aliyunOSSProperties.getBucketName();
        String region = aliyunOSSProperties.getRegion();

        // 从环境变量中获取访问凭证。运行本代码示例之前,请确保已设置环境变量OSS_ACCESS_KEY_ID和OSS_ACCESS_KEY_SECRET。
        EnvironmentVariableCredentialsProvider credentialsProvider = CredentialsProviderFactory.newEnvironmentVariableCredentialsProvider();

        // 填写Object完整路径,例如2024/06/1.png。Object完整路径中不能包含Bucket名称。
        //获取当前系统日期的字符串,格式为 yyyy/MM
        String dir = LocalDate.now().format(DateTimeFormatter.ofPattern("yyyy/MM"));
        //生成一个新的不重复的文件名
        String newFileName = UUID.randomUUID() + originalFilename.substring(originalFilename.lastIndexOf("."));
        String objectName = dir + "/" + newFileName;

        // 创建OSSClient实例。
        ClientBuilderConfiguration clientBuilderConfiguration = new ClientBuilderConfiguration();
        clientBuilderConfiguration.setSignatureVersion(SignVersion.V4);
        OSS ossClient = OSSClientBuilder.create()
                .endpoint(endpoint)
                .credentialsProvider(credentialsProvider)
                .clientConfiguration(clientBuilderConfiguration)
                .region(region)
                .build();

        try {
            ossClient.putObject(bucketName, objectName, new ByteArrayInputStream(content));
        } finally {
            ossClient.shutdown();
        }

        return endpoint.split("//")[0] + "//" + bucketName + "." + endpoint.split("//")[1] + "/" + objectName;
    }

}