基于零炻 的提供的 文件系统(buildroot.tar.gz),定制文件系统
1 准备环境
进入buildroot目录
sudo tar -zvxf buildroot.tar.gz
cd buildroot
cp ./config_systemd .config
make ARCH=loongarch64 menuconfig
2 配置交叉编译工具链
make ARCH=loongarch64 menuconfig
Toolchain path:修改为/opt/loongson-gnu-toolchain-13.2
Toolchain prefix:修改为$(ARCH)-unknown-linux-gnu
External toolchain gcc version:修改为13.x
External toolchain kernel headers series:修改为6.5.x
Toolchain has RPC support:输入n
然后选择save保存,并选择exit退出配置界面
3 修改hostname主机名和欢迎语
System configuration --->System hostname
--->System banner
--->Run agetty(login prompt)after boot。
4 添加常用工具
在menuconfig 中添加配置项
Target packages --->Networking applications ---> net-tools、openssh
--->Filesystem and flash utilities --> exFAT(FUSE) 、 exfat-utils、f2fs-tools、 genext2fs、 genpart
--->System tools --->htop、tar
--->Shell and utilities --->bash、sudo
--->Compressors and decompressors --->zip、unzip
--->Text editors and viewers --->nano
--->Interpreter languages and scripting --->External python modules --->python-pip
--->Interpreter languages and scripting --->python3 module format to install --->.py sources and .pyc compiled
下载连接配置为国内镜像
Build_options --->Mirrorsand Download locations
Backup download site  :http://sources.buildroot.net
Kernel.org mirror     :https://mirror.bjtu.edu.cn/kernel/
GNU Software mirror   :http://mirrors.nju.edu.cn/gnu/
LuaRocks mirror       :https://luarocks.cn
CPAN mirror (Perl packages) :http://mirrors.nju.edu.cn/CPAN/
5 编译文件系统
sudo make FORCE_UNSAFE_CONFIGURE=1
执行完后会在output/images文件夹下生成rootfs.cpio rootfs.tar rootfs.tar.gz三个文件
下载的源码包在buildroot根目录的dl目录下
编译出来的各种文件会放在buildroot目录下面的output目录
需要烧写的最终的映像文件 rootfs.tar 在output/images目录下
进入文件系统启动后,在系统中操作以下内容(这是基于久久派):
(1)添加新用户 (可不用)
adduser loongson
输入两遍密码
如果不小心输错了,就用passwd loongson修改密码
vi sudo
输入i开始编辑
在root ALL=(ALL:ALL) ALL下面,添加以下这条
loongson ALL=(ALL:ALL) ALL
按下ESC,然后输入:wq
然后重启,以loongson登录
(2)开启网口(因为是双网口,按需修改end0)
sudo ifconfig end0 192.168.xx.xx netmask 255.255.255.0 broadcast 192.168.xx.xx
添加开机自动配置
sudo nano /etc/systemd/network/end0.network
然后添加以下内容
Match
Name=end0
Network
Address=192.168.xx.xx/24
Gateway=192.168.xx.xx
DNS=8.8.8.8
保存并退出,然后重启服务
sudo systemctl restart systemd-networkd
(3)开启ssh(root用户)
1)开启 Linux 系统中 root 用户的 SSH 登录权限
vi /etc/ssh/sshd_config 修改以下:
PermitRootLogin yes
PermitEmptyPasswords yes
- 重启一下ssh服务
systemctl restart sshd
- 开机启动
systemctl start sshd
systemctl enable sshd
(4)配置提示符
默认状态下,登录后只有一个$非常难看,需要手动配置
echo "PS1='\\u@\\h:\w$: '" >> /etc/profile && source /etc/profile
执行
source /etc/profile临时生效(5)开机免登录
sudo systemctl enable getty@ttyS0.service
sudo mkdir -p /etc/systemd/system/getty@ttyS0.service.d
sudo nano /etc/systemd/system/getty@ttyS0.service.d/override.conf
添加以下内容
Service
ExecStart=
ExecStart=-/sbin/agetty --autologin loongson --noclear %I $TERM
loongson需要替换成需要自动登录的账号,保存并退出,然后启动服务
sudo systemctl daemon-reload
sudo systemctl restart getty@ttyS0.service
如果有动态链接库,则添加动态链接库的位置 到 /etc/profile
export LD_LIBRARY_PATH=/opt/opencv/lib:$LD_LIBRARY_PATH
export LD_LIBRARY_PATH=/opt/jsoncpp/lib:$LD_LIBRARY_PATH
export LD_LIBRARY_PATH=/opt/libserial/lib:$LD_LIBRARY_PATH
查看一个可执行文件所需要的动态链接库的命令为:
$ loongarch64-unknown-linux-gnu-objdump -x main | grep -i need
  NEEDED               libopencv_core.so.410
  NEEDED               libopencv_imgcodecs.so.410
  NEEDED               libopencv_imgproc.so.410
  NEEDED               libopencv_videoio.so.410
  NEEDED               libjsoncpp.so.27
  NEEDED               libserial.so.1
  NEEDED               libgomp.so.1
  NEEDED               libstdc++.so.6
  NEEDED               libm.so.6
  NEEDED               libgcc_s.so.1
  NEEDED               libc.so.6
  VERNEED              0x0000000000001d50
  VERNEEDNUM           0x0000000000000003
6 配置开机启动 和 无线网络
1 配置无线网络 /etc/wpa_supplicant.conf
改 /etc/wpa_supplicant.conf 文件如下 :
# vi /etc/wpa_supplicant.conf2 开机启动 修改 /etc/rc.local
方法一:
/etc/rc.local 这个文件用于启动时添加启动命令。
/etc/profile 文件是 一个完整的、单一的系统级 shell 脚本文件 ,是 Linux 系统的核心全局配置主文件,有固定的文件格式要求。
方法二:
/etc/profile.d/目录下 存放着一系列 启动时运行的脚本文件,按照字母排列顺序依次运行。是一个系统预留的专用目录 ,目录里可以存放任意多个独立的 .sh 后缀的脚本文件 (还有部分系统支持 .csh 后缀,适配 csh/tcsh),目录本身不是脚本,是「脚本的容器」。
配置启动时 ,来获取IP地址和其他网络配置信息 unmask.sh
sleep 3
ifconfig eth0 192.168.3.99
echo "hello world"
注意:
/etc/profile.d/ 目录下的所有脚本,都是被 /etc/profile 这个主文件主动调用执行的 ,二者是「主脚本 调用 子脚本」的强依赖关系。
export PATH="/bin:/sbin:/usr/bin:/usr/sbin"

if [ "$PS1" ]; then
	if [ "`id -u`" -eq 0 ]; then
		export PS1='# '
	else
		export PS1='$ '
	fi
fi

export EDITOR='/bin/vi'

# Source configuration files from /etc/profile.d #  轮询运行 目录下的所有脚本
for i in /etc/profile.d/*.sh ; do
	if [ -r "$i" ]; then
		. $i
	fi
done
unset i
export PS1='[\u@\h $PWD]\$'  #  提示符格式: [ 用户名 @ 主机名 当前目录 ]$
export LD_LIBRARY_PATH=/opt/opencv/lib:$LD_LIBRARY_PATH
export LD_LIBRARY_PATH=/opt/jsoncpp/lib:$LD_LIBRARY_PATH
export LD_LIBRARY_PATH=/opt/libserial/lib:$LD_LIBRARY_PATH
7 用文件系统启动后
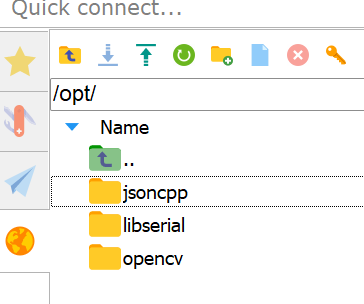
将编译好的动态链接库复制到 /opt 下:
/opt/opencv
/opt/libserial
/opt/jsoncpp