HarmonyOS实战(源码教学篇)--- 深入浅出鸿蒙特性【跨端迁移-应用接续】
- 深入浅出鸿蒙特性【跨端迁移-应用接续】
深入浅出鸿蒙特性【跨端迁移-应用接续】
前言
大家好!今天我要给大家分享一个非常酷的HarmonyOS特性------应用接续与跨设备互通。想象一下,你正在手机上编辑一篇图文并茂的游记,突然想在平板上继续编辑,或者想把内容分享给朋友的设备查看。传统做法可能是:保存、发送、打开、重新编辑......但在HarmonyOS的世界里,这一切都可以无缝衔接!
🎯 应用接续的使用场景有哪些?
比如在用户使用过程中,使用情景发生了变化,之前使用的设备不再适合继续当前任务,或者周围有更合适的设备,此时用户可以选择使用新的设备来继续当前的任务。接续完成后,之前设备的应用可退出或保留,用户可以将注意力集中在被拉起的设备上,继续执行任务。
简单说,就是让你的应用能在不同设备间"跳来跳去",就像接力赛一样。比如:
-
手机上写到一半的文档,点击一下就能在平板上继续写
-
设备A上的图片,拖拽一下就能传到设备B上使用
-
多台设备上的应用状态实时同步,始终保持最新
-
案例概述
接下来我将用一篇系列文章,为大家演示一个基于 HarmonyOS 的内容发布应用如何实现,如何自己动手开发应用接续 、分布式数据对象 、分布式文件系统 和跨设备互通 等核心功能,实现文本和图片数据在多设备间的无缝交互。Demo源码地址
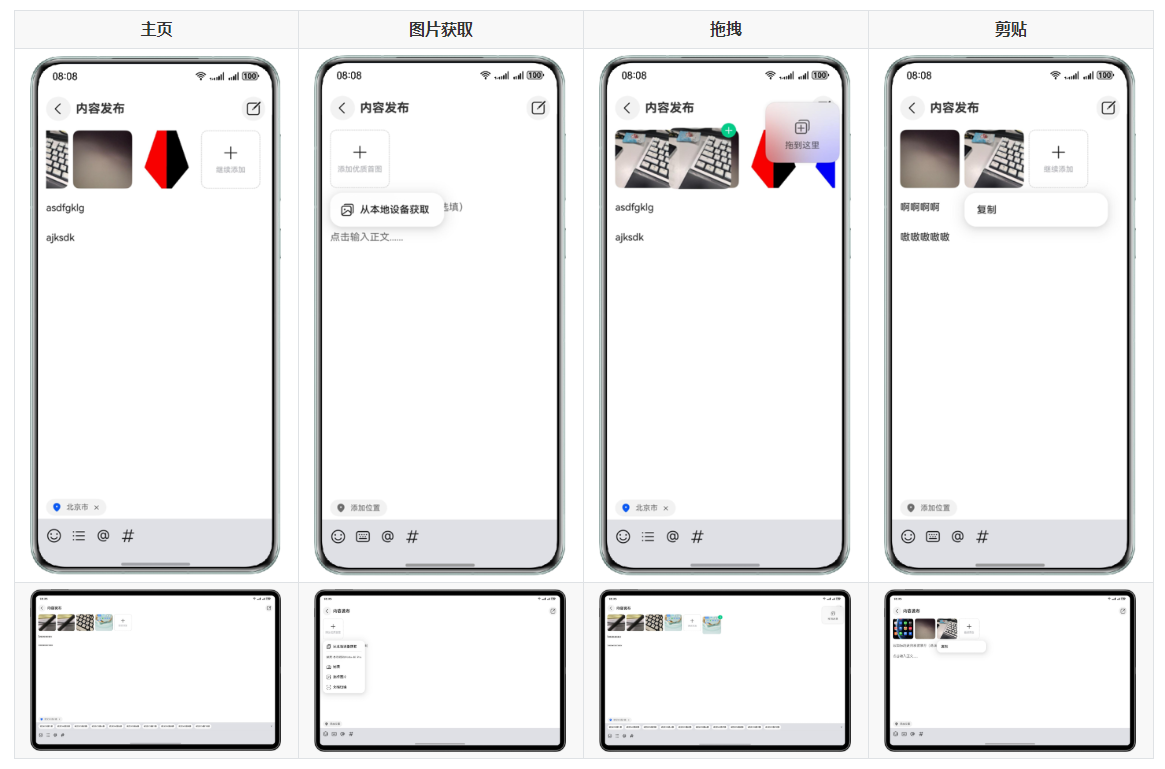
核心功能
- 📱 应用接续:在不同设备间无缝切换应用
- 🖼️ 跨设备图片传输:支持拖拽、复制粘贴图片
- 📝 跨设备文本编辑:支持拖拽、复制粘贴文本
- 📍 位置信息共享:获取并共享地理位置信息
- 🔄 分布式数据同步:实时同步应用状态
目录结构
entry/src/main/ets/
├── constants/              # 常量定义
│   ├── BreakpointConstants.ets    # 断点常量(响应式布局)
│   └── CommonConstants.ets        # 公共常量
├── entryability/          # 应用入口
│   └── EntryAbility.ets           # 应用生命周期管理
├── model/                 # 数据模型
│   └── ContentInfo.ets            # 内容信息模型
├── pages/                 # 页面
│   └── Home.ets                   # 主页面
├── utils/                 # 工具类
│   ├── BreakpointSystem.ets       # 响应式断点系统
│   ├── FileUtil.ets               # 文件选择工具
│   └── LocationUtil.ets           # 位置服务工具
└── view/                  # 视图组件
    ├── AddPic.ets                 # 图片添加组件
    ├── BottomToolbar.ets          # 底部工具栏
    ├── EditorComponent.ets        # 文本编辑组件
    └── TopArea.ets                # 顶部区域组件
核心功能实现
1. 应用接续(Application Continuation)原理介绍
应用接续允许应用在不同设备间无缝迁移,用户可以在一台设备上开始任务,然后在另一台设备上继续。
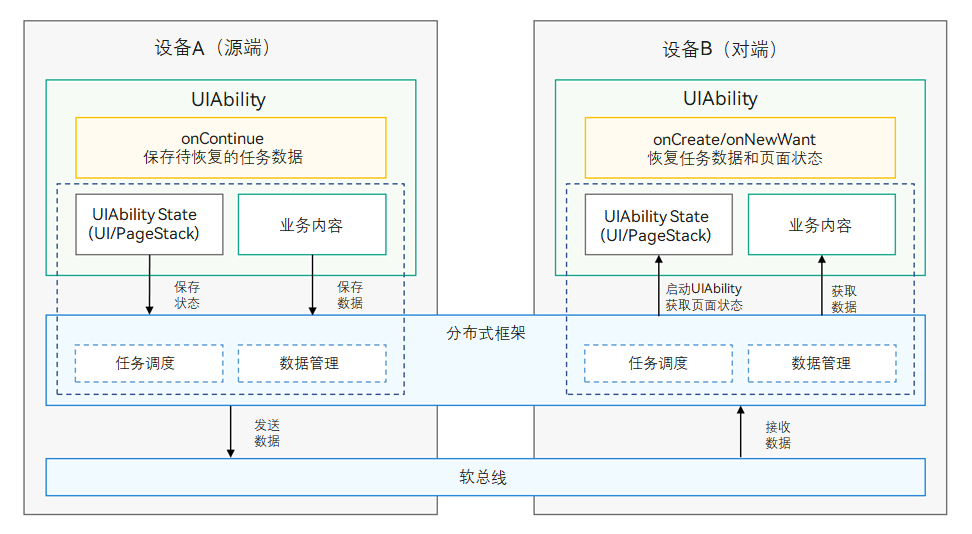
在源端,通过UIAbility的onContinue()回调,开发者可以保存待接续的业务数据。
例如,浏览器应用完成应用接续,在源端浏览一个页面,到对端继续浏览。系统将自动保存页面状态,如当前页面的浏览进度;开发者需要通过onContinue接口保存页面url等业务内容。
分布式框架提供跨设备应用界面、页面栈以及业务数据的保存和恢复机制,负责将数据从源端发送到对端。
在对端,同一UIAbility通过onCreate/onNewWant接口恢复业务数据。
1.1 启用应用接续能力&数据模型定义
启用应用接续能力。
在module.json5文件的abilities中,将continuable标签配置为"true",表示该UIAbility可被迁移。配置为false的UIAbility将被系统识别为无法迁移且该配置默认值为false。
{
  "module": {
    ...
    "abilities": [
      {
        ...
        "continuable": true,
      }
    ]
  }
}
根据需要配置应用启动模式类型,配置详情请参照UIAbility组件启动模式。
数据模型定义
typescript
// entry/src/main/ets/model/ContentInfo.ets
import { commonType } from '@kit.ArkData';

/**
 * 内容信息数据模型
 * 用于在设备间传输应用状态
 */
export class ContentInfo {
  mainTitle: string | undefined;              // 标题
  textContent: string | undefined;            // 正文内容
  imageUriArray: Array<ImageInfo> | undefined; // 图片数组
  isShowLocalInfo: boolean | undefined;       // 是否显示位置信息
  isAddLocalInfo: boolean | undefined;        // 是否添加位置信息
  selectLocalInfo: string | undefined;        // 选中的位置信息
  attachments: commonType.Assets | undefined; // 附件(分布式文件)

  constructor(
    mainTitle: string | undefined,
    textContent: string | undefined,
    imageUriArray: Array<ImageInfo> | undefined,
    isShowLocalInfo: boolean | undefined,
    isAddLocalInfo: boolean | undefined,
    selectLocalInfo: string | undefined,
    attachments: commonType.Assets | undefined
  ) {
    this.mainTitle = mainTitle;
    this.textContent = textContent;
    this.imageUriArray = imageUriArray;
    this.isShowLocalInfo = isShowLocalInfo;
    this.isAddLocalInfo = isAddLocalInfo;
    this.selectLocalInfo = selectLocalInfo;
    this.attachments = attachments;
  }

  /**
   * 将附件数组展平为对象属性
   * 用于分布式数据对象的序列化
   */
  flatAssets(): object {
    let obj: object = this;
    if (!this.attachments) {
      return obj;
    }
    // 将数组元素转换为对象属性:attachments0, attachments1, ...
    for (let i = 0; i < this.attachments.length; i++) {
      obj[`attachments${i}`] = this.attachments[i];
    }
    return obj;
  }
}

/**
 * 图片信息接口
 */
export interface ImageInfo {
  imagePixelMap: PixelMap;  // 图片的像素映射
  imageName: string;         // 图片名称
}
1.2 应用接续发起端实现
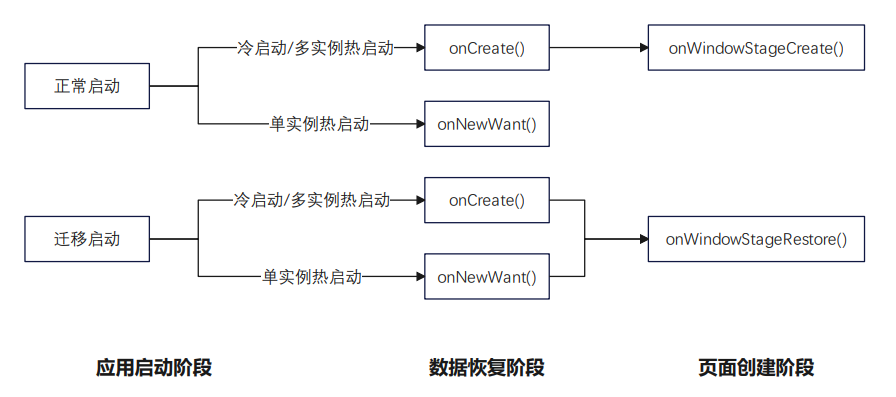
在应用迁移启动时,无论是冷启动还是热启动,都会在执行完onCreate()/onNewWant()后,触发onWindowStageRestore()生命周期函数,不执行onWindowStageCreate()生命周期函数。
在开发阶段,如果在onWindowStageCreate()中进行了一些应用启动时必要的初始化,那么迁移后需要在onWindowStageRestore()中执行同样的初始化操作,避免应用异常。
官方的介绍是在源端UIAbility中实现onContinue()接口。
当应用触发迁移时,onContinue()接口在源端被调用,开发者可以在该接口中保存迁移数据,实现应用兼容性检测,决定是否支持此次迁移。
保存迁移数据:开发者可以将要迁移的数据通过键值对的方式保存在wantParam中。
(可选)检测应用兼容性:开发者可以在触发迁移时从onContinue()入参wantParam.version获取到迁移对端应用的版本号,与迁移源端应用版本号做兼容校验。应用在校验版本兼容性失败后,需要提示用户迁移失败的原因。
如果迁移过程中的兼容性问题对于应用迁移体验影响较小或无影响,可以跳过该步骤。
返回迁移结果:开发者可以通过onContinue()回调的返回值决定是否支持此次迁移,接口返回值详见AbilityConstant.OnContinueResult
onContinue()接口传入的wantParam参数中,有部分字段由系统预置,开发者可以使用这些字段用于业务处理。同时,应用在保存自己的wantParam参数时,也应注意不要使用同样的key值,避免被系统覆盖导致数据获取异常。详见下表:
| 字段 | 含义 |
|---|---|
| version | 对端应用的版本号 |
| targetDevice | 对端设备的networkId |
下面给出我们的完整实现,细节在注释内补充。
设备A(发起端)                    设备B(接收端)
    |                                  |
    | 1. 用户编辑内容                  |
    |    (标题、正文、图片)            |
    |                                  |
    | 2. 点击 Dock 栏应用图标          |
    |    触发 onContinue()             |
    |                                  |
    | 3. 创建分布式数据对象            |
    |    生成 sessionId                |
    |                                  |
    | 4. 保存数据到对端                |
    |    save(targetDevice)            |
    |                                  |
    |--------------------------------->| 5. 接收到接续请求
    |                                  |    触发 onCreate/onNewWant
    |                                  |
    |                                  | 6. 恢复分布式数据对象
    |                                  |    setSessionId(sessionId)
    |                                  |
    |                                  | 7. 监听 'restored' 状态
    |                                  |
    |                                  | 8. 恢复应用状态
    |                                  |    - 标题、正文
    |                                  |    - 图片数组
    |                                  |    - 位置信息
    |                                  |
    |                                  | 9. 复制分布式文件到本地
    |                                  |
    |                                  | 10. 显示完整内容
typescript
// entry/src/main/ets/entryability/EntryAbility.ets

/**
 * onContinue 生命周期回调
 * 当用户在对端设备点击应用接续图标时触发
 * @param wantParam 传递给对端设备的参数
 * @returns 接续结果(AGREE 表示同意接续)
 */
async onContinue(wantParam: Record<string, Object | undefined>): Promise<AbilityConstant.OnContinueResult> {
  // 1. 生成分布式数据对象的会话ID
  let sessionId: string = distributedDataObject.genSessionId();
  wantParam.distributedSessionId = sessionId;

  // 2. 准备要传输的图片附件
  let imageUriArray = AppStorage.get<Array<ImageInfo>>('imageUriArray');
  let assets: commonType.Assets = [];
  if (imageUriArray) {
    for (let i = 0; i < imageUriArray.length; i++) {
      let append = imageUriArray[i];
      // 获取分布式文件的资产信息
      let attachment: commonType.Asset = this.getAssetInfo(append);
      assets.push(attachment);
    }
  }

  // 3. 创建内容信息对象,包含所有应用状态
  let contentInfo: ContentInfo = new ContentInfo(
    AppStorage.get('mainTitle'),        // 标题
    AppStorage.get('textContent'),      // 正文
    AppStorage.get('imageUriArray'),    // 图片数组
    AppStorage.get('isShowLocalInfo'),  // 位置信息显示状态
    AppStorage.get('isAddLocalInfo'),   // 位置信息添加状态
    AppStorage.get('selectLocalInfo'),  // 选中的位置
    assets                               // 图片附件
  );

  // 4. 创建分布式数据对象
  let source = contentInfo.flatAssets();
  this.distributedObject = distributedDataObject.create(this.context, source);

  // 5. 设置会话ID,建立与对端设备的连接
  this.distributedObject.setSessionId(sessionId);

  // 6. 保存数据到对端设备
  await this.distributedObject.save(wantParam.targetDevice as string);

  // 7. 返回同意接续
  return AbilityConstant.OnContinueResult.AGREE;
}

/**
 * 获取分布式文件的资产信息
 * @param append 图片信息
 * @returns 资产对象
 */
private getAssetInfo(append: ImageInfo): commonType.Asset {
  // 分布式文件路径
  let filePath = this.context.distributedFilesDir + '/' + append.imageName;
  let attachment: commonType.Asset;

  try {
    // 获取文件统计信息
    let stat = fs.statSync(filePath);
    let uri: string = fileUri.getUriFromPath(filePath);

    // 构建资产对象
    attachment = {
      name: append.imageName,
      uri: uri,
      path: filePath,
      createTime: stat.ctime.toString(),
      modifyTime: stat.ctime.toString(),
      size: stat.size.toString()
    };
  } catch (err) {
    hilog.error(DOMAIN, TAG, FORMAT, `StatSync failed: ${err.message}`);
  }

  return attachment!;
}
1.3 应用接续接收端实现
在目的端设UIAbility中实现onCreate()与onNewWant()接口,恢复迁移数据。
目的端设备上,在onCreate中根据launchReason判断该次启动是否为迁移LaunchReason.CONTINUATION。下面贴出我们的完整实例。
typescript
// entry/src/main/ets/entryability/EntryAbility.ets

/**
 * onCreate 生命周期回调
 * 应用启动时调用,检查是否为接续启动
 */
onCreate(want: Want, launchParam: AbilityConstant.LaunchParam): void {
  hilog.info(DOMAIN, TAG, FORMAT, 'Ability onCreate');
  // 恢复分布式数据对象
  this.restoreDistributedObject(want, launchParam);
}

/**
 * onNewWant 生命周期回调
 * 应用已启动时再次被拉起时调用
 */
onNewWant(want: Want, launchParam: AbilityConstant.LaunchParam): void {
  hilog.info(DOMAIN, TAG, FORMAT, 'Ability onNewWant');
  // 恢复分布式数据对象
  this.restoreDistributedObject(want, launchParam);
}

/**
 * 恢复分布式数据对象
 * 对端设备接收数据的核心逻辑
 */
async restoreDistributedObject(want: Want, launchParam: AbilityConstant.LaunchParam): Promise<void> {
  // 1. 检查启动原因是否为应用接续
  if (launchParam.launchReason !== AbilityConstant.LaunchReason.CONTINUATION) {
    return;
  }

  // 2. 创建空的内容信息对象
  let mailInfo: ContentInfo = new ContentInfo(
    undefined, undefined, [], undefined, undefined, undefined, undefined
  );
  this.distributedObject = distributedDataObject.create(this.context, mailInfo);

  // 3. 监听数据恢复状态
  try {
    this.distributedObject.on('status',
      (sessionId: string, networkId: string, status: 'online' | 'offline' | 'restored') => {
        hilog.info(DOMAIN, TAG, FORMAT, `Status changed: ${status}`);

        // 当状态为 'restored' 时,表示数据已恢复
        if (status === 'restored') {
          if (!this.distributedObject) {
            return;
          }

          // 4. 将恢复的数据存储到 AppStorage
          AppStorage.setOrCreate('mainTitle', this.distributedObject['mainTitle']);
          AppStorage.setOrCreate('textContent', this.distributedObject['textContent']);
          AppStorage.setOrCreate('isShowLocalInfo', this.distributedObject['isShowLocalInfo']);
          AppStorage.setOrCreate('isAddLocalInfo', this.distributedObject['isAddLocalInfo']);
          AppStorage.setOrCreate('selectLocalInfo', this.distributedObject['selectLocalInfo']);
          AppStorage.setOrCreate('attachments', this.distributedObject['attachments']);

          // 5. 处理图片附件
          let attachments = this.distributedObject['attachments'] as commonType.Assets;
          for (const attachment of attachments) {
            // 复制分布式文件到本地
            this.fileCopy(attachment);
          }

          // 6. 更新图片数组
          AppStorage.setOrCreate<Array<ImageInfo>>('imageUriArray', this.imageUriArray);
        }
      });
  } catch (err) {
    hilog.error(DOMAIN, TAG, FORMAT, `On status failed: ${err.message}`);
  }

  // 7. 设置会话ID,连接到发起端的分布式数据对象
  let sessionId: string = want.parameters?.distributedSessionId as string;
  this.distributedObject.setSessionId(sessionId);

  // 8. 恢复窗口状态
  try {
    this.context.restoreWindowStage(new LocalStorage());
  } catch (err) {
    hilog.error(DOMAIN, TAG, FORMAT, `RestoreWindowStage failed: ${err.message}`);
  }
}

/**
 * 复制分布式文件到本地
 * @param attachment 附件信息
 */
private fileCopy(attachment: commonType.Asset): void {
  // 1. 分布式文件路径
  let filePath: string = this.context.distributedFilesDir + '/' + attachment.name;
  // 2. 本地保存路径
  let savePath: string = this.context.filesDir + '/' + attachment.name;

  try {
    // 3. 检查分布式文件是否存在
    if (fs.accessSync(filePath)) {
      // 4. 打开文件
      let saveFile = fs.openSync(savePath, fs.OpenMode.READ_WRITE | fs.OpenMode.CREATE);
      let file = fs.openSync(filePath, fs.OpenMode.READ_WRITE);

      // 5. 读取文件内容
      let buf: ArrayBuffer = new ArrayBuffer(Number(attachment.size));
      let readSize = 0;
      let readLen = fs.readSync(file.fd, buf, { offset: readSize });

      // 6. 创建图片源
      let sourceOptions: image.SourceOptions = { sourceDensity: 120 };
      let imageSourceApi: image.ImageSource = image.createImageSource(buf, sourceOptions);

      // 7. 添加到图片数组
      this.imageUriArray.push({
        imagePixelMap: imageSourceApi.createPixelMapSync(),
        imageName: attachment.name
      });

      // 8. 写入本地文件
      while (readLen > 0) {
        readSize += readLen;
        fs.writeSync(saveFile.fd, buf);
        readLen = fs.readSync(file.fd, buf, { offset: readSize });
      }

      // 9. 关闭文件
      fs.closeSync(file);
      fs.closeSync(saveFile);

      hilog.info(DOMAIN, TAG, FORMAT, attachment.name + ' synchronized successfully.');
    }
  } catch (error) {
    hilog.error(DOMAIN, TAG, FORMAT, `File copy failed: ${error.message}`);
  }
}
动态配置迁移能力
从API version 10起,提供了支持动态配置迁移能力的功能。即应用可以根据实际使用场景,在需要迁移功能时,设置开启应用迁移能力;在业务不需要迁移时,则可以关闭迁移能力。开发者可以通过调用setMissionContinueState接口对迁移能力进行设置。
章节学习整理
💡 实际应用场景
这个技术可以用在很多地方:
写作应用:手机写提纲 → 平板详细写 → 电脑排版
购物应用:手机选商品 → 平板看详情 → 电脑下单
游戏应用:手机开始玩 → 平板大屏玩 → 电视全家玩
协作应用:多设备实时同步编辑文档
🚀 快速入门建议
如果你也想在自己的应用中实现这个功能:
1.先理解基础:
分布式数据对象:设备间同步数据的桥梁
应用生命周期:onContinue、onCreate、onNewWant是关键
文件系统:分布式文件与本地文件的区别
2.分步实现:
第一步:先实现简单的文本同步
第二步:加入图片等文件传输
第三步:优化用户体验(加载提示、错误处理等)
3.调试技巧:
使用hilog打印详细日志
先用模拟器测试单设备场景,再使用真机验证多设备场景
注意权限配置(文件访问、位置服务等)
📝 代码要点总结
| 关键点 | 作用 | 注意事项 |
|---|---|---|
| distributedDataObject | 设备间数据同步 | 需要设置SessionID |
| onContinue | 发起接续 | 返回AGREE表示同意 |
| flatAssets() | 序列化附件 | 数组需要展平 |
| restoreWindowStage | 恢复窗口状态 | 确保UI正确显示 |
🌟 写在最后
HarmonyOS的跨设备能力真的非常强大,它不仅仅是技术上的创新,更是用户体验的巨大提升。想象一下未来,我们的应用可以真正做到"无处不在、无缝流转",用户不再被设备束缚,这是多么美妙的场景!
如果你对这部分内容感兴趣,我建议:
下载我们的Demo项目亲手试试,评论区可以留言交流。
阅读HarmonyOS官方文档的分布式章节。
加入开发者社区,和大家一起交流。
技术不是冰冷的代码,而是连接人与设备、设备与设备的温暖桥梁。 让我们一起,用代码创造更智能、更便捷的数字生活!下一章节,我将继续为大家介绍并动手实践分布式数据对象实践。