一、功能概述
在合同审查系统中,左侧文档结构树负责将后端返回的 Markdown 格式合同文档解析为可交互的目录树,并支持点击定位到对应的文档位置。该功能主要包含四个核心部分:
- 数据源 :来自后端的
resultData(Markdown 格式) - 解析器:将 Markdown 转换为树形数据结构
- 渲染器:使用 Ant Design Tree 组件展示
- 交互层:处理点击事件和页面定位
二、Markdown 解析为树形结构
数据获取与预处理
首先从后端获取 Markdown 数据,数据可能是一个字符串或按页面分组的对象。代码会统一将其转换为字符串格式:
useEffect(() => {
    if (!resultData || Object.keys(resultData).length === 0) return;

    let markdownText = '';
    if (typeof resultData === 'string') {
        markdownText = resultData;
    } else if (typeof resultData === 'object') {
        // 如果是对象,按页面顺序拼接
        Object.keys(resultData).sort().forEach(pageKey => {
            markdownText += resultData[pageKey] + '\n';
        });
    }
    // 继续解析...
}, [resultData]);
核心解析算法
解析使用栈(Stack)数据结构来构建层级关系。这种方式能够优雅地处理任意层级的嵌套标题:
const lines = markdownText.trim().split('\n');
const structure = [];
const stack = []; // 用于跟踪各级父节点

lines.forEach((line, index) => {
    // 匹配 Markdown 标题:# ## ### 等
    const match = line.match(/^(#+)\s(.+)/);
    if (match) {
        const level = match[1].length;  // #=1, ##=2, ###=3
        const title = match[2];          // 标题文本
        const key = `node-${index}`;     // 唯一标识

        const node = {
            title,
            key,
            level,
            children: []
        };

        if (level === 1) {
            // 一级标题:作为根节点
            structure.push(node);
            stack[0] = node;
            stack.splice(1);
        } else {
            // 多级标题:找到父节点并添加
            const parentLevel = level - 2;
            const parent = stack[parentLevel];
            if (parent) {
                parent.children.push(node);
            }
            stack[level - 1] = node;
            stack.splice(level);
        }
    }
});栈的工作原理:当遇到一级标题时,将其放入 stack0,清除更深层级;当遇到二级标题时,将其作为 stack0 的子节点,并存入 stack1,以此类推。这样就能准确维护每个标题的父子关系。
数据清理与优化
解析完成后,需要进行数据清理:
// 清理没有子节点的节点(移除空的 children 数组)
const cleanEmptyChildren = (nodes) => {
    return nodes.map(node => {
        if (node.children?.length === 0) {
            const { children, ...nodeWithoutChildren } = node;
            return nodeWithoutChildren;
        }
        if (node.children?.length > 0) {
            return {
                ...node,
                children: cleanEmptyChildren(node.children)
            };
        }
        return node;
    });
};

// 获取所有节点的 key,用于默认展开
const getAllKeys = (nodes) => {
    return nodes.flatMap(node => {
        const keys = [node.key];
        if (node.children) {
            keys.push(...getAllKeys(node.children));
        }
        return keys;
    });
};

const cleanedStructure = cleanEmptyChildren(structure);
const allKeys = getAllKeys(cleanedStructure);

setTreeData(cleanedStructure);
setExpandedKeys(allKeys); // 默认展开所有节点
三、树形组件渲染
节点渲染器
为每个节点添加图标(使用 Ant Design 的 FileTextOutlined),并递归处理子节点:
const renderTreeNodes = (data) => {
    return data.map((node) => {
        const iconNode = <FileTextOutlined />;

        if (node.children && node.children.length > 0) {
            return {
                ...node,
                icon: iconNode,
                children: renderTreeNodes(node.children),
            };
        }
        return {
            ...node,
            icon: iconNode,
        };
    });
};
Tree 组件配置
<Tree
    showIcon={true}
    expandedKeys={expandedKeys}
    onExpand={onExpand}
    onSelect={onSelect}
    selectedKeys={[selectedTreeKey]}
    treeData={renderTreeNodes(treeData)}
    switcherIcon={<DownOutlined style={{ fontSize: 12 }} />}
    className={styles.customTree}
/>关键属性说明:
expandedKeys: 控制哪些节点展开selectedKeys: 控制哪些节点被选中onExpand: 展开/折叠时的回调onSelect: 点击节点时的回调(核心定位逻辑)
四、目录定位功能实现
节点点击处理
当用户点击树节点时,触发 onSelect 事件:
const onSelect = (selectedKeys, info) => {
    if (selectedKeys.length > 0) {
        const key = selectedKeys[0];
        setSelectedTreeKey(key); // 记录选中状态

        // 获取点击的节点标题
        const title = info.node.title;

        // 延迟执行,确保 DOM 已更新
        setTimeout(() => {
            highlightHeading(title);
        }, 100);
    }
};
标题定位与高亮
这是整个功能的核心,实现精确的标题定位和高亮显示:
const highlightHeading = (title) => {
    // 1. 移除之前的高亮
    document.querySelectorAll('.heading-highlight').forEach(el => {
        el.classList.remove('heading-highlight');
    });

    // 2. 查找所有标题元素(h1-h6)
    const allHeadings = document.querySelectorAll('h1, h2, h3, h4, h5, h6');

    // 3. 遍历匹配标题
    allHeadings.forEach((heading) => {
        const headingText = heading.textContent?.trim();

        // 精确匹配或包含匹配
        if (headingText === title || headingText?.includes(title)) {
            // 添加高亮类
            heading.classList.add('heading-highlight');

            // 获取滚动容器(自定义滚动区域)
            const scrollContainer = document.querySelector('.centerContent');

            if (scrollContainer && heading) {
                // 计算相对位置
                const containerRect = scrollContainer.getBoundingClientRect();
                const headingRect = heading.getBoundingClientRect();
                const relativeTop = headingRect.top - containerRect.top + scrollContainer.scrollTop;

                // 预留额外空间(padding + margin)
                const extraSpace = 20;

                // 平滑滚动到目标位置
                scrollContainer.scrollTo({
                    top: relativeTop - extraSpace,
                    behavior: 'smooth'
                });
            } else {
                // 降级方案:使用原生 scrollIntoView
                heading.scrollIntoView({ behavior: 'smooth', block: 'center' });
            }
        }
    });
};
定位算法原理 :通过 getBoundingClientRect() 获取标题和滚动容器的位置信息,计算标题相对于容器的位置,然后使用 scrollTo() 方法进行精确的平滑滚动。如果找不到自定义滚动容器,则降级使用原生的 scrollIntoView() 方法。
样式实现
// 高亮样式
.heading-highlight {
    background-color: #fff3cd;
    border-left: 4px solid #ffc107;
    padding-left: 12px;
    transition: all 0.3s ease;
    box-shadow: 0 2px 8px rgba(255, 193, 7, 0.3);
}

// 自定义树样式
.customTree {
    background: transparent;
    .ant-tree-node-content-wrapper {
        &:hover {
            background-color: rgba(24, 144, 255, 0.05);
        }
        &.ant-tree-node-selected {
            background-color: rgba(24, 144, 255, 0.1);
        }
    }
}
五、完整工作流程
整个功能的执行流程如下:
- 数据加载 :从后端获取
resultData(Markdown 格式) - 数据解析:拼接字符串 → 分行处理 → 正则匹配标题 → 栈构建层级 → 清理数据
- 树形生成:将解析结果转换为树形数据结构
- 组件渲染:Tree 组件展示可交互的目录树
- 用户交互 :点击节点触发
onSelect事件 - 定位高亮:查找对应标题 → 计算位置 → 平滑滚动 → 添加高亮样式
六、关键优化点
性能优化
- 延迟执行 :使用
setTimeout确保 DOM 完全渲染后再定位 - 唯一 key :使用
node-${index}避免重复渲染 - 记忆化 :可以利用
useMemo缓存树形数据(如需要)
用户体验优化
- 平滑滚动 :
behavior: 'smooth'提供流畅动画 - 视觉反馈:高亮样式 + 选中状态
- 容错机制:支持精确匹配和包含匹配
- 降级方案 :找不到容器时使用
scrollIntoView
可维护性优化
- 职责分离:解析、渲染、定位各自独立
- 代码复用 :
cleanEmptyChildren、getAllKeys等工具函数 - 类型安全:可以添加 TypeScript 类型定义
七、扩展功能建议
添加搜索功能
在树节点中高亮显示搜索关键词:
const highlightMatch = (title) => {
    const index = title.toLowerCase().indexOf(searchValue.toLowerCase());
    return index > -1 ? (
        <span>
            {title.substr(0, index)}
            <span className="highlight-text">
                {title.substr(index, searchValue.length)}
            </span>
            {title.substr(index + searchValue.length)}
        </span>
    ) : (
        <span>{title}</span>
    );
};
添加同步滚动
监听主内容区滚动,自动更新树节点选中状态:
useEffect(() => {
    const scrollContainer = document.querySelector('.centerContent');

    const handleScroll = () => {
        const headings = document.querySelectorAll('h1, h2, h3, h4, h5, h6');
        headings.forEach((heading) => {
            const rect = heading.getBoundingClientRect();
            if (rect.top >= 0 && rect.top < 200) {
                // 找到对应的树节点并选中
                const title = heading.textContent?.trim();
                // 更新选中状态...
            }
        });
    };

    scrollContainer?.addEventListener('scroll', handleScroll);
    return () => scrollContainer?.removeEventListener('scroll', handleScroll);
}, [treeData]);八、(可选)硬编码只将一级标题(#)作为根节点,导致文档中只有二级标题(##)时无法生成目录树。
解决方案:
- 第一步 :先扫描所有标题,找到最小级别(例如文档中只有
##和###,那么最小级别就是 2) - 第二步 :计算相对级别(
relativeLevel = level - minLevel),这样:##(级别2) → 相对级别 0(作为根节点)###(级别3) → 相对级别 1(作为根节点的子节点)
- 容错处理:如果某个标题找不到父节点(比如标题级别跳跃),会自动将其添加到根节点的子节点中,避免数据丢失
适用场景:
-
✅ 只有一级标题(
#) -
✅ 只有二级标题(
##) -
✅ 只有三级标题(
###) -
✅ 混合标题(
##和###) -
✅ 标题级别不连续(比如
##直接跳到####)// 解析 Markdown 为树状结构
useEffect(() => {
if (!resultData || Object.keys(resultData).length === 0) return;// 将 resultData 转换为 markdown 字符串 let markdownText = ''; if (typeof resultData === 'string') { markdownText = resultData; } else if (typeof resultData === 'object') { // 如果是对象,按页面顺序拼接 Object.keys(resultData).sort().forEach(pageKey => { markdownText += resultData[pageKey] + '\n'; }); } if (!markdownText.trim()) return; const lines = markdownText.trim().split('\n'); const structure = []; const stack = []; // 用于跟踪各级父节点 // 第一步:扫描所有标题,找到最小级别(作为根节点级别) let minLevel = Infinity; const headers = []; lines.forEach((line, index) => { const match = line.match(/^(#+)\s(.+)/); if (match) { const level = match[1].length; const title = match[2]; if (level < minLevel) { minLevel = level; } headers.push({ index, level, title, line }); } }); // 第二步:根据最小级别重新组织树结构 headers.forEach(({ index, level, title }) => { const key = `node-${index}`; const node = { title, key, level, children: [] }; // 计算相对级别(相对于最小级别) const relativeLevel = level - minLevel; if (relativeLevel === 0) { // 这是最顶级标题,直接添加到 structure structure.push(node); stack[0] = node; // 清除更深层级的 stack stack.splice(1); } else { // 找到对应的父节点 const parentLevel = relativeLevel - 1; // stack 的索引 const parent = stack[parentLevel]; if (parent) { parent.children.push(node); } else { // 如果找不到父节点,将其作为根节点的子节点 if (stack[0]) { stack[0].children.push(node); } } // 更新当前层级的 stack stack[relativeLevel] = node; // 清除更深层级的 stack stack.splice(relativeLevel + 1); } }); // 清理没有子节点的节点 const cleanEmptyChildren = (nodes) => { return nodes.map(node => { if (node.children && node.children.length === 0) { const { children, ...nodeWithoutChildren } = node; return nodeWithoutChildren; } if (node.children && node.children.length > 0) { return { ...node, children: cleanEmptyChildren(node.children) }; } return node; }); }; const cleanedStructure = cleanEmptyChildren(structure); // 默认展开所有节点 const getAllKeys = (nodes) => { return nodes.flatMap(node => { const keys = [node.key]; if (node.children) { keys.push(...getAllKeys(node.children)); } return keys; }); }; const allKeys = getAllKeys(cleanedStructure); setTreeData(cleanedStructure); setExpandedKeys(allKeys); }, [resultData]);
九、实现效果

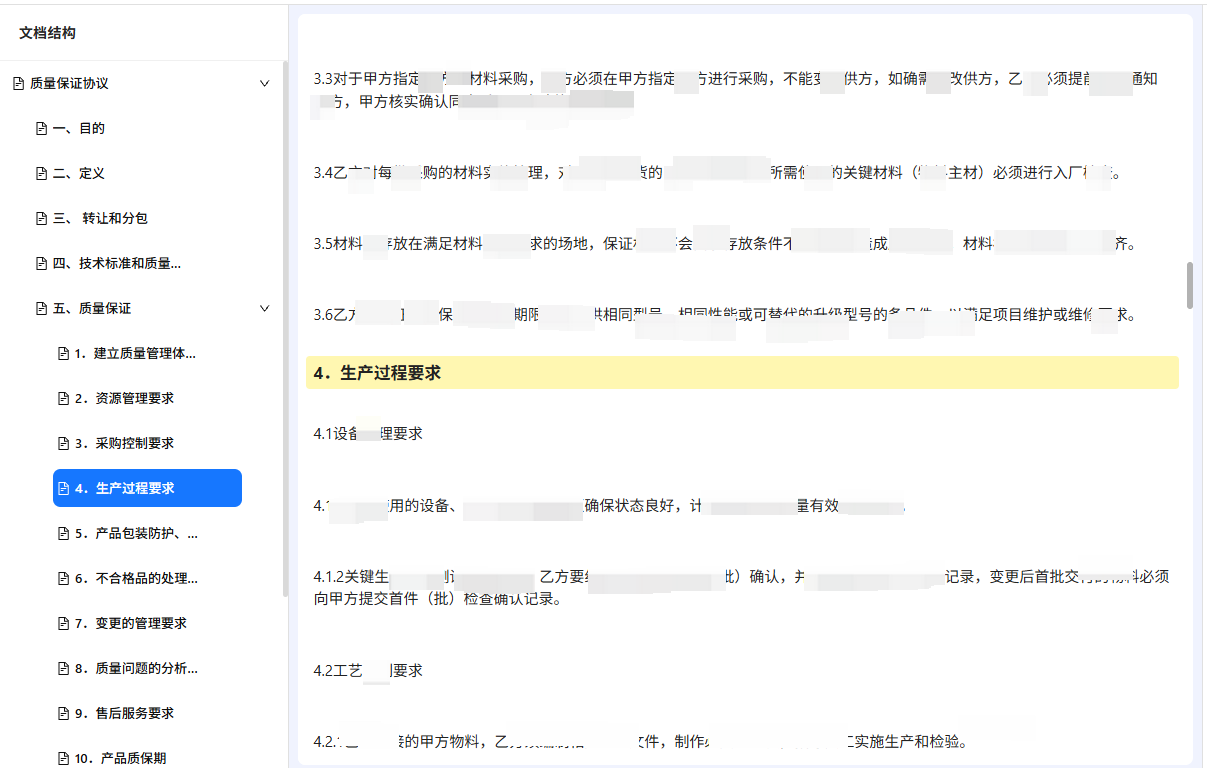
点击目录会自动平滑的滚动定位到相应的标题并高亮显示
十、总结
文档结构树的实现充分利用了 React 的状态管理和 Ant Design 的组件能力,通过栈数据结构优雅地处理了 Markdown 标题的层级关系,并实现了精确的目录定位功能。核心思想是将数据解析、UI 渲染和交互逻辑分离,从而构建出灵活且高性能的组件。这种实现方式具有良好的可扩展性,可以根据实际需求添加搜索、同步滚动等更多功能。
注意⚠:完整的逻辑及样式可自行调整,本文仅供参考!!!