HAPORXY 实验环境设定
本文档整理了 Haproxy 在实验环境(双网卡调度器 + 两台后端 Web 服务器)下的安装、配置、网络与验证步骤,包含示例配置与常见排查要点。
原始图片已保留并嵌入文档中。
目录
- 简介与拓扑
- 环境准备
- Haproxy 安装
- Haproxy 配置示例(frontend/backend 与 listen)
- 主机网络配置(haproxy 与 webserver)
- Web 服务准备(webserver1 / webserver2)
- 验证方法
- 参数说明与常见故障排查
- 附:完整示例配置与常用命令
简介与拓扑
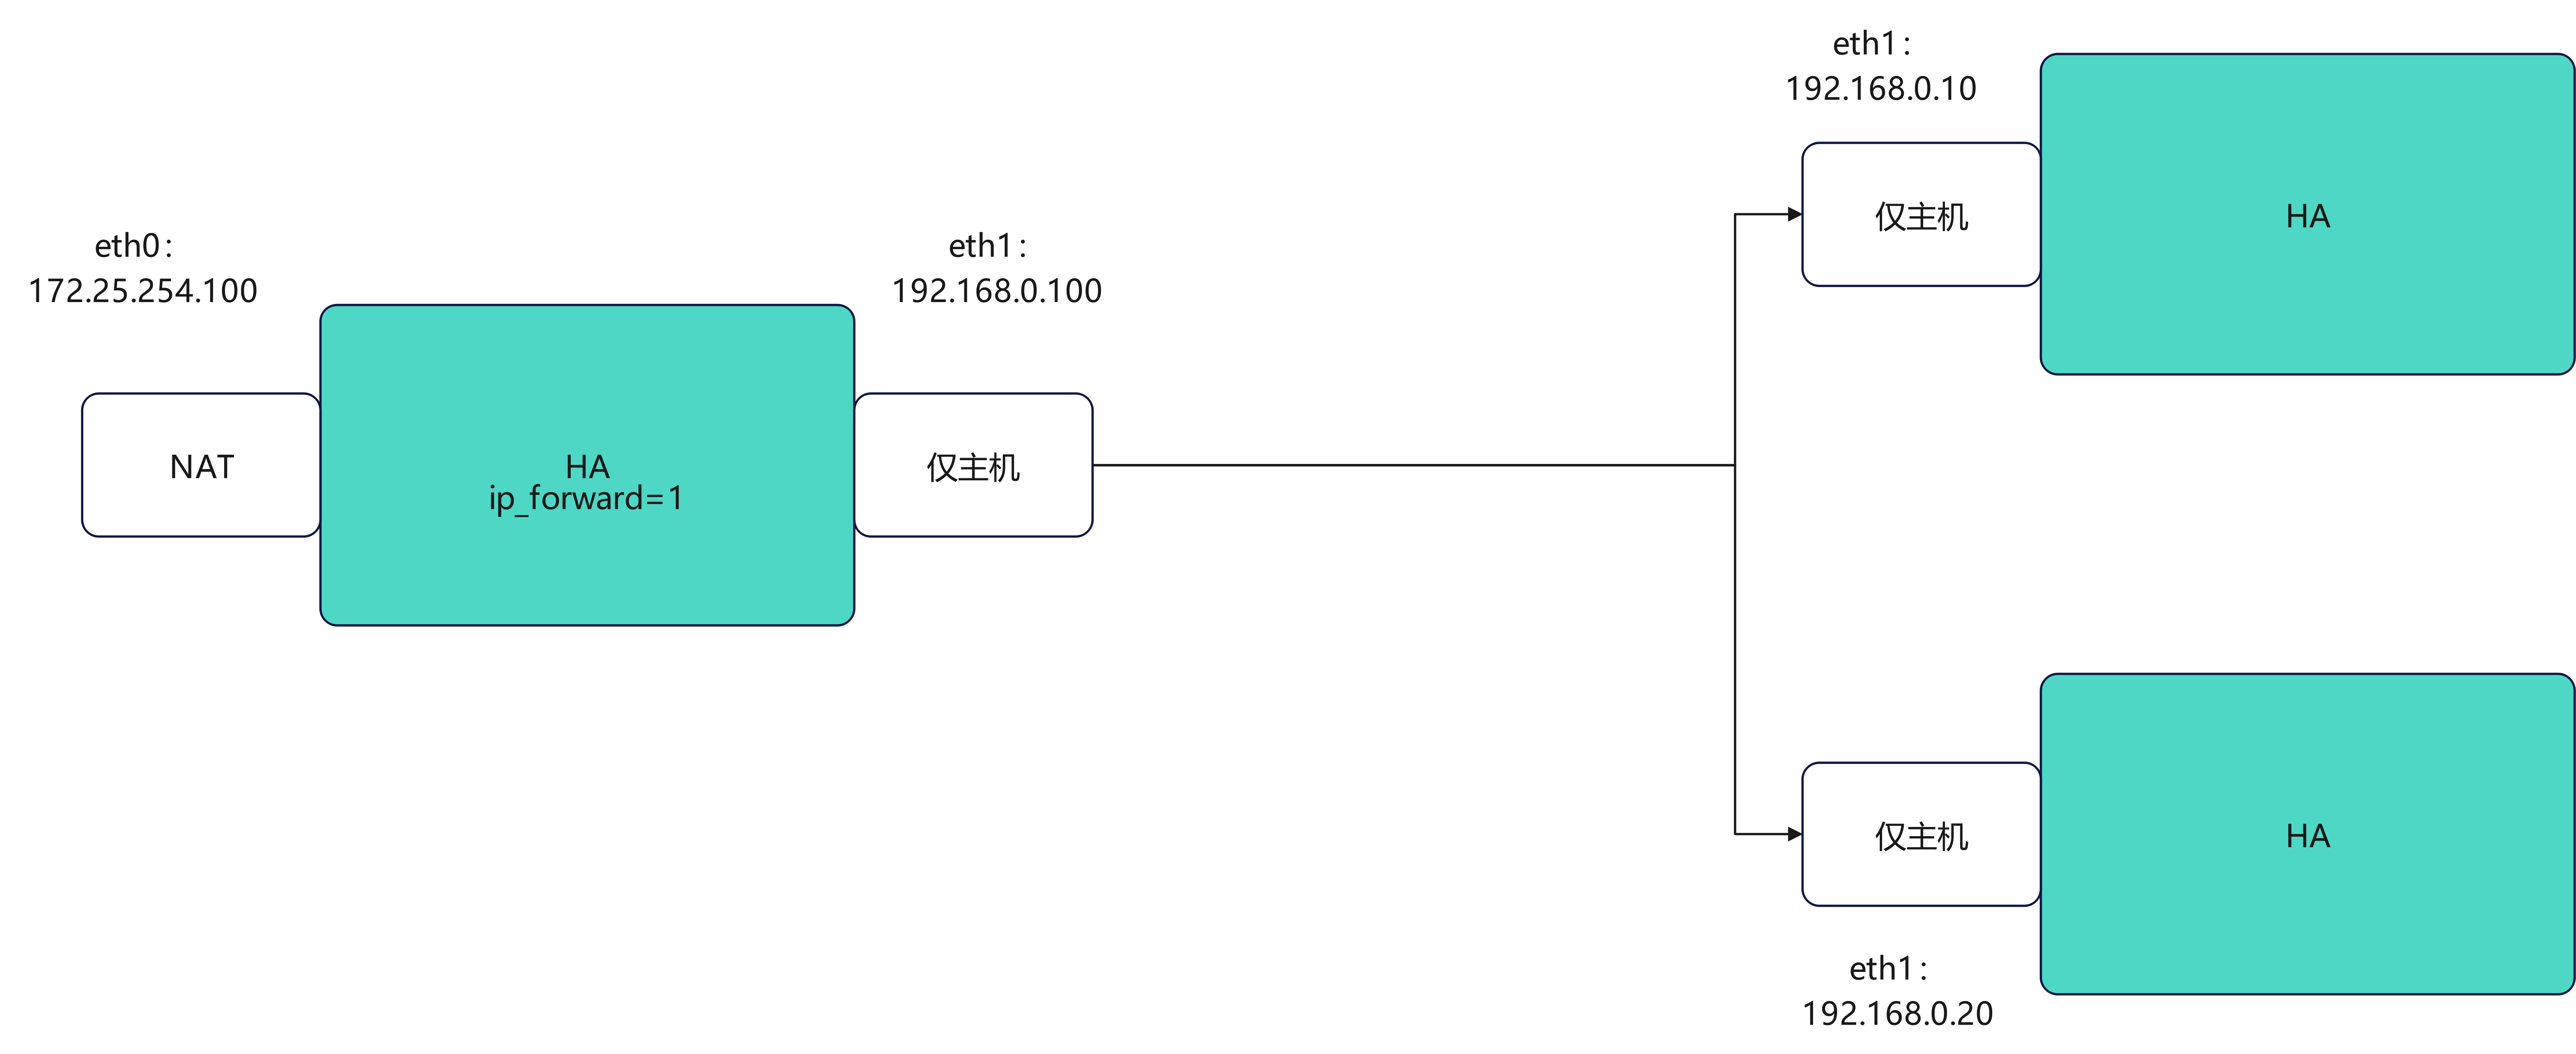
- 拓扑:一台 haproxy(具有两块网卡:外网 eth0:172.25.254.100,内网 eth1:192.168.0.100)作为负载均衡器,后端两台 webserver(192.168.0.10、192.168.0.20)提供 HTTP 服务。
- haproxy 监听外网 IP(例如 172.25.254.100:80),将请求转发到内网的两个后端服务器。
环境准备
-
假设三台主机:
- haproxy:eth0 (外网) 172.25.254.100/24,eth1 (内网) 192.168.0.100/24
- webserver1:eth0 192.168.0.10/24
- webserver2:eth0 192.168.0.20/24
-
确保实验网络连通(内网互通或 haproxy 可访问后端 IP)。
1. Haproxy 安装
在 haproxy 主机上执行:
bash
# 在调度器(双网卡主机中)
[root@haproxy ~]# dnf install haproxy.x86_64 -y
[root@haproxy ~]# systemctl enable --now haproxy
Created symlink /etc/systemd/system/multi-user.target.wants/haproxy.service → /usr/lib/systemd/system/haproxy.service.
2. Haproxy 基础配置示例
推荐把前端(frontend)和后端(backend)分开写,或使用 listen 模式。
示例 A --- frontend / backend 写法:
haproxy
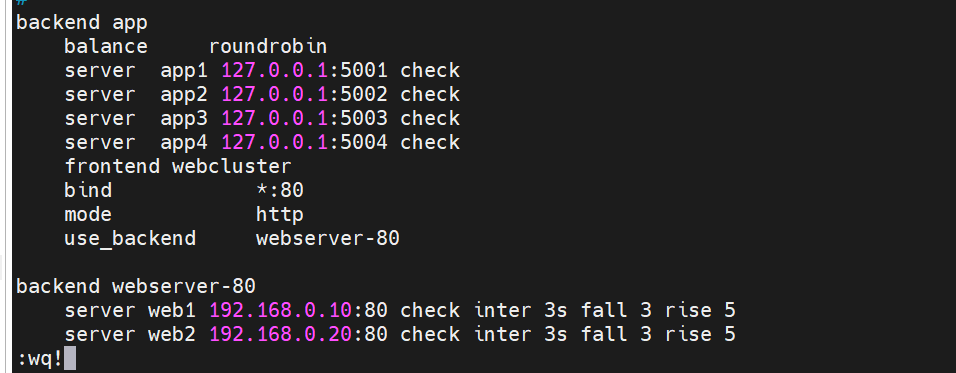
frontend webcluster
    bind            *:80
    mode            http
    default_backend webserver-80

backend webserver-80
    mode http
    balance roundrobin
    server web1 192.168.0.10:80 check inter 3s fall 3 rise 5
    server web2 192.168.0.20:80 check inter 3s fall 3 rise 5
示例 B --- listen 写法(功能相同):
haproxy
listen webcluster
    bind        *:80
    mode        http
    balance     roundrobin
    server haha 192.168.0.10:80 check inter 3s fall 3 rise 5
    server hehe 192.168.0.20:80 check inter 3s fall 3 rise 5
编辑完成后重启 haproxy:
bash
[root@haproxy ~]# systemctl restart haproxy.service测试(从能访问 haproxy 的主机上):
bash
[root@haproxy ~]# curl 172.25.254.100
# 可能返回
webserver2 - 192.168.0.20

[root@haproxy ~]# curl 172.25.254.100
# 轮询到另一台
webserver1 - 192.168.0.10
3. 主机网络配置(示例命令)
在你的实验中使用了 vmset.sh 辅助脚本来配置网卡。示例:
haproxy(外网 eth0):
bash
[root@haproxy ~]# vmset.sh eth0 172.25.254.100 haproxy
连接已成功激活(D-Bus 活动路径:/org/freedesktop/NetworkManager/ActiveConnection/7)
2: eth0: <BROADCAST,MULTICAST,UP,LOWER_UP> mtu 1500 qdisc mq state UP group default qlen 1000
    link/ether 00:0c:29:0c:6f:ee brd ff:ff:ff:ff:ff:ff
    altname enp3s0
    altname ens160
    inet 172.25.254.100/24 brd 172.25.254.255 scope global noprefixroute eth0
       valid_lft forever preferred_lft forever
    inet6 fe80::20c:29ff:fe0c:6fee/64 scope link tentative noprefixroute
       valid_lft forever preferred_lft forever
haproxy
haproxy(内网 eth1):
bash
[root@haproxy ~]# vmset.sh eth1 192.168.0.100 haproxy norouter
连接已成功激活(D-Bus 活动路径:/org/freedesktop/NetworkManager/ActiveConnection/8)
3: eth1: <BROADCAST,MULTICAST,UP,LOWER_UP> mtu 1500 qdisc mq state UP group default qlen 1000
    link/ether 00:0c:29:0c:6f:f8 brd ff:ff:ff:ff:ff:ff
    altname enp19s0
    altname ens224
    inet 192.168.0.100/24 brd 192.168.0.255 scope global noprefixroute eth1
       valid_lft forever preferred_lft forever
    inet6 fe80::4ca7:8cde:1244:8df/64 scope link tentative noprefixroute
       valid_lft forever preferred_lft forever
haproxy
启用内核转发(若 haproxy 作为路由/转发节点需要):
bash
[root@haproxy ~]# echo net.ipv4.ip_forward=1 > /etc/sysctl.conf
[root@haproxy ~]# sysctl -p
net.ipv4.ip_forward = 1
webserver1:
bash
[root@webserver1 ~]# vmset.sh eth0 192.168.0.10 webserver1 noroute
连接已成功激活(D-Bus 活动路径:/org/freedesktop/NetworkManager/ActiveConnection/4)
2: eth0: <BROADCAST,MULTICAST,UP,LOWER_UP> mtu 1500 qdisc mq state UP group default qlen 1000
    link/ether 00:0c:29:8c:96:72 brd ff:ff:ff:ff:ff:ff
    altname enp3s0
    altname ens160
    inet 192.168.0.10/24 brd 192.168.0.255 scope global noprefixroute eth0
       valid_lft forever preferred_lft forever
    inet6 fe80::20c:29ff:fe8c:9672/64 scope link tentative noprefixroute
       valid_lft forever preferred_lft forever
webserver1
webserver2(示例输出也类似):
bash
[root@webserver2 ~]# vmset.sh eth0 192.168.0.20 webserver2 noroute
连接已成功激活(D-Bus 活动路径:/org/freedesktop/NetworkManager/ActiveConnection/4)
2: eth0: <BROADCAST,MULTICAST,UP,LOWER_UP> mtu 1500 qdisc mq state UP group default qlen 1000
    link/ether 00:0c:29:8c:96:72 brd ff:ff:ff:ff:ff:ff
    altname enp3s0
    altname ens160
    inet 192.168.0.20/24 brd 192.168.0.255 scope global noprefixroute eth0
       valid_lft forever preferred_lft forever
    inet6 fe80::20c:29ff:fe8c:9672/64 scope link tentative noprefixroute
       valid_lft forever preferred_lft forever
webserver2
4. Web 服务准备(两台后端)
在每台 webserver 上安装并启动 httpd(Apache),并写一个简单的 index.html:
webserver1:
bash
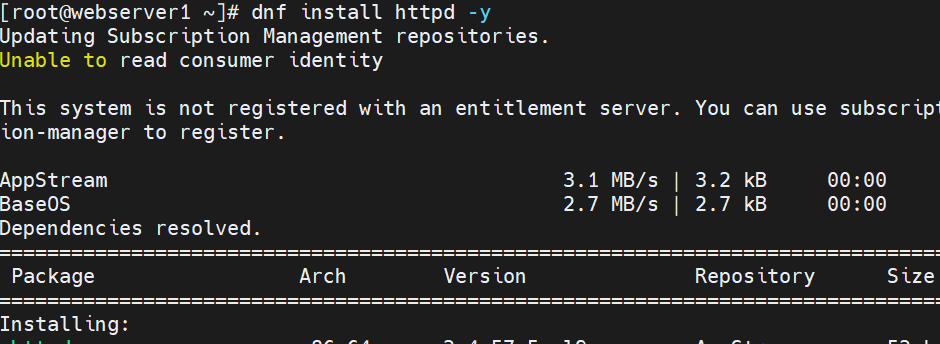
[root@webserver1 ~]# dnf install httpd -y
[root@webserver1 ~]# echo "webserver1 - 192.168.0.10" > /var/www/html/index.html
[root@webserver1 ~]# systemctl enable --now httpd
Created symlink /etc/systemd/system/multi-user.target.wants/httpd.service → /usr/lib/systemd/system/httpd.service.
(原笔记中的图片)
webserver2:
bash
[root@webserver2 ~]# dnf install httpd -y
[root@webserver2 ~]# echo "webserver2 - 192.168.0.20" > /var/www/html/index.html
[root@webserver2 ~]# systemctl enable --now httpd
Created symlink /etc/systemd/system/multi-user.target.wants/httpd.service → /usr/lib/systemd/system/httpd.service.
(原笔记中的图片)

5. 验证环境
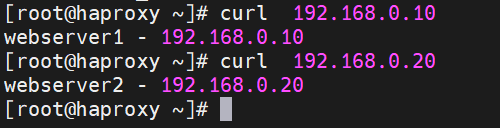
在 haproxy 中访问后端直接验证 web 服务:
bash
# 在 haproxy 中访问
[root@haproxy ~]# curl 192.168.0.10
webserver1 - 192.168.0.10
[root@haproxy ~]# curl 192.168.0.20
webserver2 - 192.168.0.20
通过 haproxy 访问验证负载均衡:
bash
[root@haproxy ~]# curl 172.25.254.100
webserver2 - 192.168.0.20
[root@haproxy ~]# curl 172.25.254.100
webserver1 - 192.168.0.10
(原笔记中的验证截图)
6. 参数说明(简要)
- check:启用健康检查
- inter 3s:每 3 秒进行一次检查
- fall 3:连续 3 次失败则认为后端 DOWN
- rise 5:连续 5 次成功才认为后端 UP
- balance roundrobin(或其它算法):轮询、最少连接等
7. 常见故障排查
- haproxy 未启动:
systemctl status haproxy/journalctl -u haproxy -e - 后端不可达:在 haproxy 主机上使用
curl 192.168.0.10:80、telnet 192.168.0.10 80测试连通性 - 防火墙/SELinux:
- 查看防火墙:
firewall-cmd --list-all;必要时开放端口firewall-cmd --add-service=http --permanent; firewall-cmd --reload - SELinux 可能阻止 httpd / 端口访问:
sestatus或临时 permissive 测试
- 查看防火墙:
- IP 转发:如果网络需要通过 haproxy 转发,请确认
net.ipv4.ip_forward=1 - haproxy 配置语法错误:
haproxy -c -f /etc/haproxy/haproxy.cfg校验配置 - health check 配置过于严格/宽松会导致后端频繁上下线,调整
inter/fall/rise参数以稳定检测
8. 完整示例 haproxy.cfg(可直接替换或参考)
haproxy
global
    log /dev/log    local0
    maxconn 4096
    daemon

defaults
    log     global
    mode    http
    option  httplog
    option  dontlognull
    timeout connect 5s
    timeout client  50s
    timeout server  50s

frontend webcluster
    bind *:80
    default_backend webserver-80

backend webserver-80
    balance roundrobin
    server web1 192.168.0.10:80 check inter 3s fall 3 rise 5
    server web2 192.168.0.20:80 check inter 3s fall 3 rise 5
常用命令速查
- 重启 haproxy:
systemctl restart haproxy - 校验 haproxy 配置:
haproxy -c -f /etc/haproxy/haproxy.cfg - 查看 haproxy 状态:
systemctl status haproxy - 查看日志:
journalctl -u haproxy -f - 查看某台后端是否可达:
curl -I http://192.168.0.10/或telnet 192.168.0.10 80
fall 3 rise 5
---

## 常用命令速查
- 重启 haproxy:`systemctl restart haproxy`
- 校验 haproxy 配置:`haproxy -c -f /etc/haproxy/haproxy.cfg`
- 查看 haproxy 状态:`systemctl status haproxy`
- 查看日志:`journalctl -u haproxy -f`
- 查看某台后端是否可达:`curl -I http://192.168.0.10/` 或 `telnet 192.168.0.10 80`