搭建方式以及搭建流程
搭建方式:独立模式、伪分布式、完全分布式
实际上,需要完全分布式配置才能完全测试HBase并在实际场景中使用它。在分布式配置中,群集包含多个节点,每个节点运行一个或多个HBase守护程序。其中包括主要和备用Master,多个Zookeeper节点和多个RegionServer节点。
规划如下:
|------------------|----------------|-------------------|----------------------|
| NodeName | Master | Zookeeper | RegionServer |
| node1 | yes | no | no |
| node2 | backup | yes | yes |
| node3 | no | yes | yes |
| node4 | no | yes | yes |
下载网址:https://archive.apache.org/dist/hbase/
具体操作 :
前置条件:Hadoop 集群高可用搭建:Yarn资源调度器-CSDN博客
1、配置四台主机,实现彼此之间的免密钥登录。(免密登录参考HDFS完全分布式搭建-CSDN博客)
2、将安装包解压到本地后,将其中的hbase-2.0.5- bin.tar.gz 上传到node1的/opt/apps下,然后解压到的/opt。
bash
[root@node1 apps]# ls
hbase-2.0.5-bin.tar.gz
[root@node1 apps]# tar -zxvf hbase-2.0.5-bin.tar.gz -C /opt/
3、 四个节点:在/etc/profile中配置HBASE_HOME,并将HBase的bin目录添加到PATH中
bash
# 配置HBase的环境变量
[root@node1 conf]# vim /etc/profile
export HBASE_HOME=/opt/hbase-2.0.5
export PATH=$PATH:$HBASE_HOME/bin
[root@node1 conf]# source /etc/prifile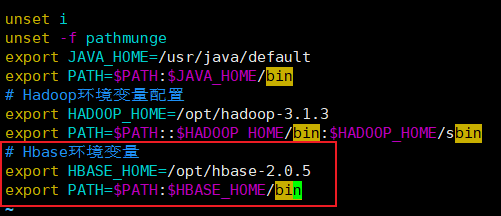
4、 cd /opt/hbase-2.0.5/conf,编辑regionservers,删掉原本内容,补充以下内容
bash
node2
node3
node4
5、 配置node2为backup master
在conf中添加一个文件backup-masters,并配置如下
bash
[root@node1 conf]# echo "node2" >> backup-masters
[root@node1 conf]# chown root:root backup-masters
6、 在conf/hbase-env.sh中设置JAVA_HOME和pid目录
bash
# The java implementation to use.  Java 1.8+ required.
export JAVA_HOME=/usr/java/default
# The directory where pid files are stored. /tmp by default.
export HBASE_PID_DIR=/opt/hbase-2.0.5/pids
7、 配置zookeeper
a) 首先继续在刚刚的conf/hbase-env.sh中设置使用外部的zookeeper设置(默认使用内部的)
bash
# Tell HBase whether it should manage it's own instance of ZooKeeper or not.
export HBASE_MANAGES_ZK=false
b) 在hbase- site.xml中配置zookeeper的信息。 在hbase-site.xml中配置如下:
XML
<configuration>
<!-- 指定hbase在HDFS文件系统上的根路径 -->
<property>
<name>hbase.rootdir</name>
<value>hdfs://mycluster/hbase_ha</value> </property>
<!-- 使用hbase集群分布式 -->
<property>
<name>hbase.cluster.distributed</name> <value>true</value>
</property>
<!-- 指定hbase使用到的zk集群 -->
<property>
<name>hbase.zookeeper.quorum</name> <value>node2,node3,node4</value>
</property>
 </configuration>
8、 拷贝hdfs-site.xml到HBASE_HOME/conf,当然,最好是做一个符号链接。
XML
[root@node1 conf]# ln /opt/hadoop-3.1.3/etc/hadoop/hdfs-site.xml hdfs-site.xml9、 将/opt/hbase-2.0.5拷贝到node2, node3和node4。
XML
[root@node1 opt]# scp -r hbase-2.0.5/ root@node2:/opt/
[root@node1 opt]# scp -r hbase-2.0.5/ root@node3:/opt/
[root@node1 opt]# scp -r hbase-2.0.5/ root@node4:/opt/
10、 启动hadoop集群(包含Zookeeper集群)
XML
[root@node1 opt]# startha.sh集群启动与测试
1、修改node1上hbase-2.0.5文件夹以及子内容的所有者和所属用户组
XML
[root@node1 opt]# chown -R root:root /opt/hbase-2.0.5/2、 启动hbase集群
XML
[root@node1 opt]# start-hbase.sh如果某角色进程没有启动,则在对应的节点上执行:
XML
[root@nodeX ~]# hbase-daemon.sh start master/regionserver启动后发现node1的master没有启动起来,这里没有HMaster
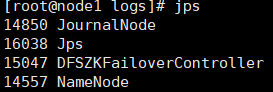
查看日志: /opt/hbase-2.0.5/logs/hbase-root-master-node1.log
XML
ERROR [Thread-14] master.HMaster: Failed to become active master
java.lang.IllegalStateException: The procedure WAL relies on the ability to hsync for proper operation during component failures, but the underlying filesystem does not support doing so. Please check the config value of 'hbase.procedure.store.wal.use.hsync' to set the desired level of robustness and ensure the config value of 'hbase.wal.dir' points to a FileSystem mount that can provide it
3、 bug解决:
解决方案,修改四个节点的hbase-site.xml(/opt/hbase-2.0.5/conf/hbase-site.xml)文件添加如下配置:
XML
<property>
<name>hbase.unsafe.stream.capability.enforce</name>
<value>false</value>
</property>
4、关闭相关节点后再次启动hbase集群即可
关闭命令:
XML
hbase-daemon.sh stop master
hbase-daemon.sh stop regionserver5、 查看各个节点运行的进程
XML
[root@node1 conf]# allJps.sh
-----------node1 jps--------------
19236 NameNode
19527 JournalNode
19755 DFSZKFailoverController
17533 HMaster
19822 Jps
-----------node2 jps--------------
19121 NodeManager
19250 Jps
18788 DataNode
19032 DFSZKFailoverController
18889 JournalNode
17291 HRegionServer
18606 QuorumPeerMain
18702 NameNode
17439 HMaster
-----------node3 jps--------------
19296 Jps
18305 DataNode
18406 JournalNode
18935 NodeManager
18200 QuorumPeerMain
16732 HRegionServer
18781 ResourceManager
-----------node4 jps--------------
14357 HRegionServer
15848 Jps
15612 ResourceManager
15709 NodeManager
15390 QuorumPeerMain
15487 DataNode
6、Zookeeper客户端上查看添加的节点:
XML
#node2-node4都可以:
[root@node4 ~]# zkCli.sh
[zk: localhost:2181(CONNECTED) 6] ls -R /hbase
7、 浏览HBase的Web UI:

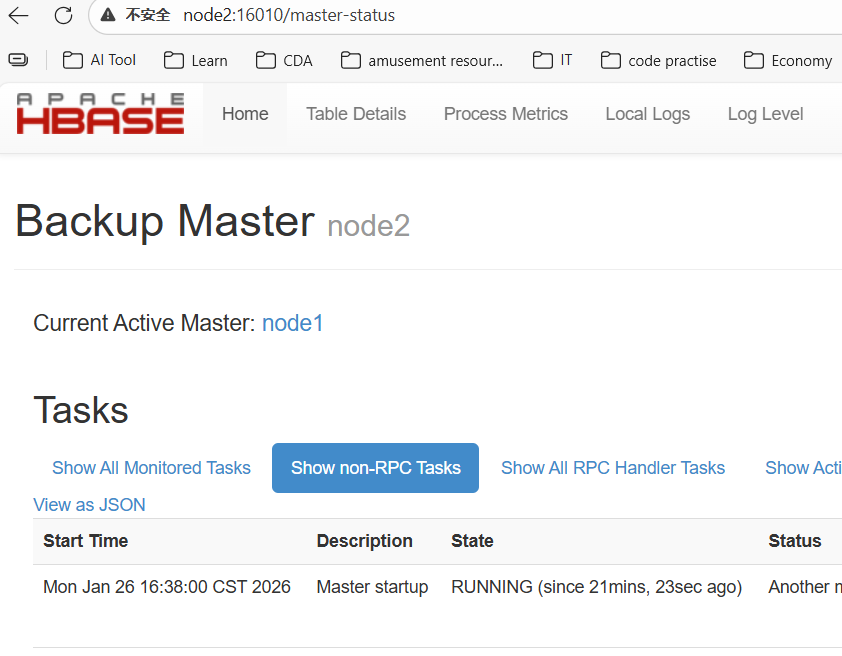
8、 测试一下如果节点或服务消失会发生什么
如果只配置了四个节点, HBase还不是太有弹性。不过依然可以测试如果主HMaster或者HRegionServer消失会发生什么。比如可以kill掉进程,查看log日志等。
a) 杀死node1上的HMaster观察web ui
XML
[root@node1 opt]# hbase-daemon.sh stop master http://node1:16010/ 提示无法访问。
http://node2:16010/ 显示为Active Master,Backup Master没有了
b) 在node1启动HMaster: hbase-daemon.sh start master
访问node1的web ui界面:
XML
[root@node1 opt]# hbase-daemon.sh start master http://node1:16010/ 变为的Backup Master。
http://node2:16010/ 显示为Active Master,Backup Master显示为node1.
c) 在node2上kill掉HRegionServer,查看web ui:
XML
[root@node2 ~]# hbase-daemon.sh stop regionserverregionserver列表中减少了一个node2的regionserver
d) 在node2上启动HRegionServer: hbase-daemon.sh start regionserver,查看web ui:
XML
[root@node2 ~]# hbase-daemon.sh start regionserverregionserver列表中增加了一个node2的regionserver
HBase Shell 操作
打开hbase命令行客户端:hbase shell
XML
[root@node1 ~]# hbase shell
#查看都有什么命令
hbase(main):001:0> help
 Group name: general
  Commands: processlist, status, table_help, version, whoami
 Group name: ddl # 表、region的ddl
  Commands: alter, alter_async, alter_status, create, describe,
disable, disable_all, drop, drop_all, enable, enable_all, exists,
get_table, is_disabled, is_enabled, list, list_regions, locate_region,
show_filters
 Group name: namespace #命名空间的相关操作
  Commands: alter_namespace, create_namespace, describe_namespace,
drop_namespace, list_namespace, list_namespace_tables
Group name: dml #数据操作
  Commands: append, count, delete, deleteall, get, get_counter,
 get_splits, incr, put, scan, truncate, truncate_preserve
查询有哪些namespace
XML
hbase(main):002:0> list_namespace
NAMESPACE
default
hbase
创建命名空间:
XML
hbase(main):001:0> create_namespace "mydb"
hbase(main):002:0> list_namespace
NAMESPACE
default
hbase
mydb
3 row(s)
命名空间属性相关操作:查询、添加、修改、删除属性
XML
hbase(main):003:0> create_namespace "mydb1",{"author"=>"wusen","create_time"=>"2026-1-26"}
#查看属性
describe_namespace "mydb1"
DESCRIPTION
{NAME => 'mydb1', author => 'wusen', create_time => '2026-1-26'}
添加或者修改属性 :
alter_namespace 'ns1', {METHOD => 'set', 'PROPERTY_NAME' => 'PROPERTY_VALUE'}
删除属性 :
alter_namespace 'ns1', {METHOD => 'unset', NAME => ' PROPERTY_NAME '}
例子
XML
alter_namespace "mydb1", {METHOD => 'set','author' => 'hbase'}
alter_namespace "mydb1", {METHOD =>'unset', NAME => 'create_time'}
删除namespace
XML
drop_namespace "mydb1"注意 : 要删除的 namespace 必须是空的,其下没有表。
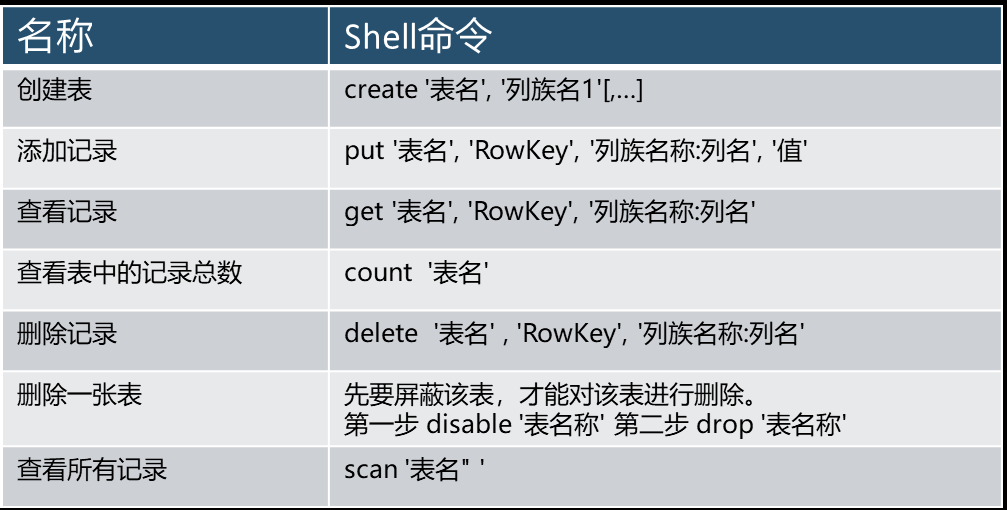
创建表
使用create命令创建表,必须指定表名和列族的名称
XML
hbase(main):006:0> create 'test','hbase'
Created table test
Took 5.2806 seconds
=> Hbase::Table - test
列出表的信息
使用 list 命令列出信息。
XML
hbase(main):007:0> list
TABLE
test
1 row(s)
Took 0.0899 seconds
=> ["test"]
向table插入数据:使用put命令。
XML
hbase(main):008:0> put 'test','row1','hbase:a','value1'
Took 0.3116 seconds
hbase(main):009:0> put 'test','row2','hbase:b','value2'
Took 0.0081 seconds
hbase(main):010:0> put 'test','row3','hbase:c','value3'
Took 0.0104 seconds
以上,插入了三个值,每次一个。第一次在 row1 的位置,cf:a列插入值 value1 。 hbase 中的列由列族前缀hbase 跟一个冒号,再跟一个列标识符后缀比如a 。
一次性扫描表中的所有数据
要查询表中的数据,可以使用 scan 命令。可以在该命令中使用限定条件,下面获取了表中的所有数据:
XML
hbase(main):011:0> scan 'test'
ROW                                                   COLUMN+CELL
 row1                                                 column=hbase:a, timestamp=1769428960630, value=value1
 row2                                                 column=hbase:b, timestamp=1769428977074, value=value2
 row3                                                 column=hbase:c, timestamp=1769428987993, value=value3
查询一行记录:使用get命令一次获取一行记录
XML
hbase(main):012:0> get 'test','row1'
COLUMN                                                CELL
 hbase:a                                              timestamp=1769428960630, value=value1
1 row(s)
禁用一张表
如果要删除表或更改表的设置,需要先使用 disable 命令禁用该表,之后也可以使用enable 命令重新使用该表。
XML
hbase(main):013:0> drop 'test'

ERROR: Table test is enabled. Disable it first.

Drop the named table. Table must first be disabled:
  hbase> drop 't1'
  hbase> drop 'ns1:t1'

Took 0.0284 seconds
hbase(main):014:0> disable 'test'
Took 1.5641 seconds
hbase(main):015:0> enable 'test'
Took 0.8112 seconds
删除表
在表已经禁用的情况下,使用drop命令删除表
XML
hbase(main):017:0> drop 'test'
Took 1.3327 seconds
退出HBase的shell
退出 shell 断开到集群的连接,可以使用 quit 命令。但是 hbase服务进程仍然在后台运行。
XML
hbase(main):019:0> quit